SEARCH FINESCALE.COM

Enter keywords or a search phrase below:

British Army Group Build 2020

60332 views
1206 replies
1 rating 2 rating 3 rating 4 rating 5 rating
  • Member since
    December 2002
  • From: Bury St Edmunds, Suffolk, England
Posted by Bish on Tuesday, January 21, 2020 3:03 PM

Those are deffinete improvments Ziggy.

I am a Norfolk man and i glory in being so


On the bench: Airfix 1/72nd Harrier GR.3/Fujimi 1/72nd Ju 87D-3

  • Member since
    December 2002
  • From: Northern California
Posted by jeaton01 on Wednesday, January 22, 2020 12:50 AM

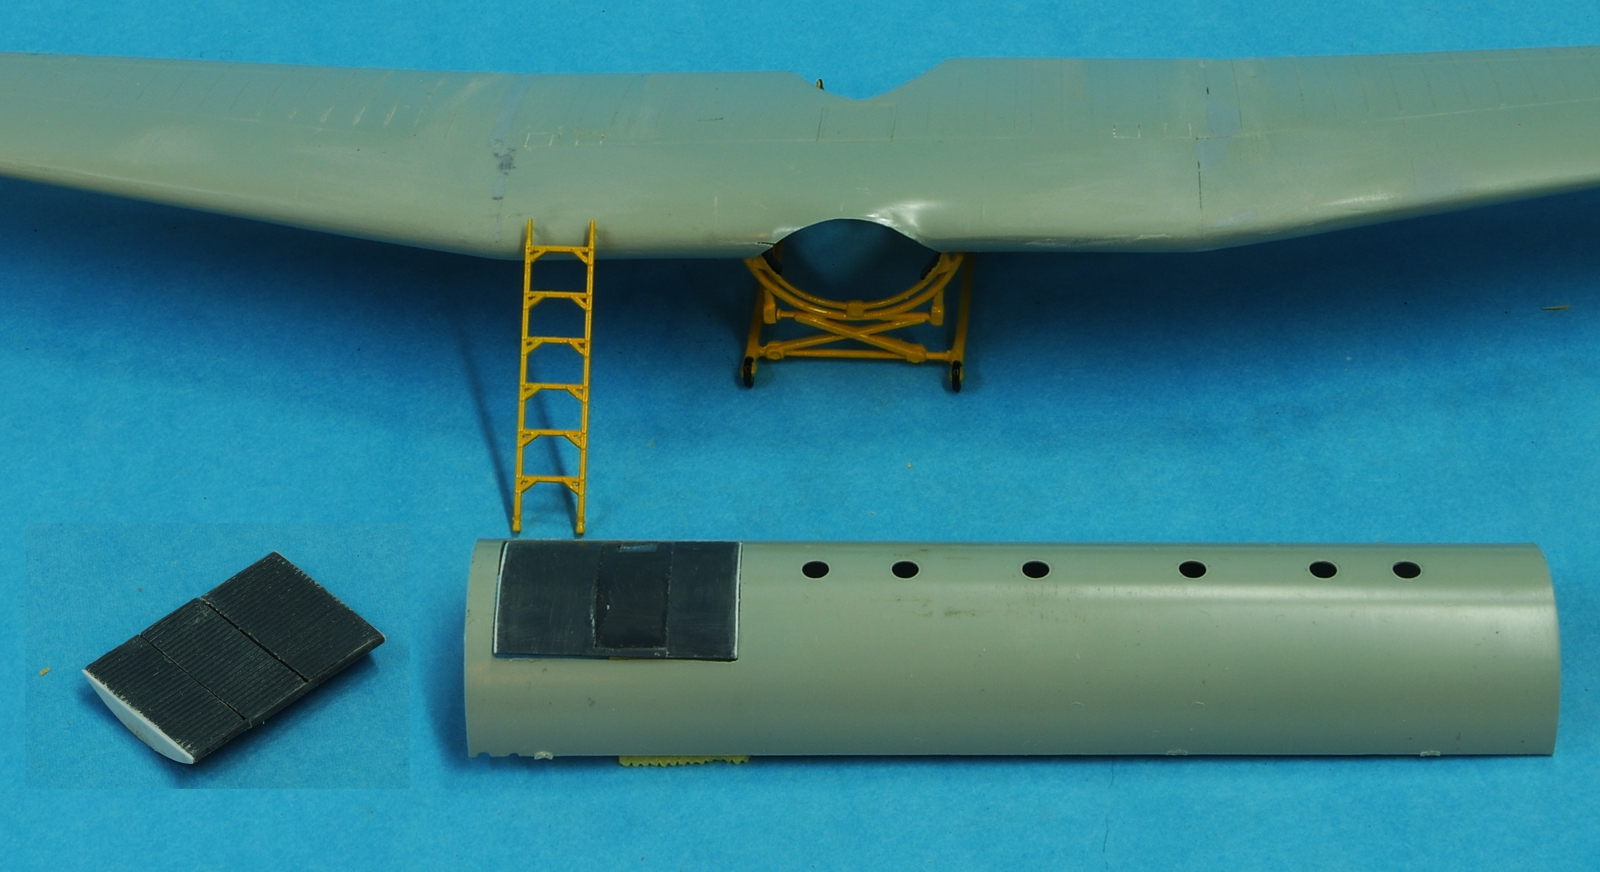
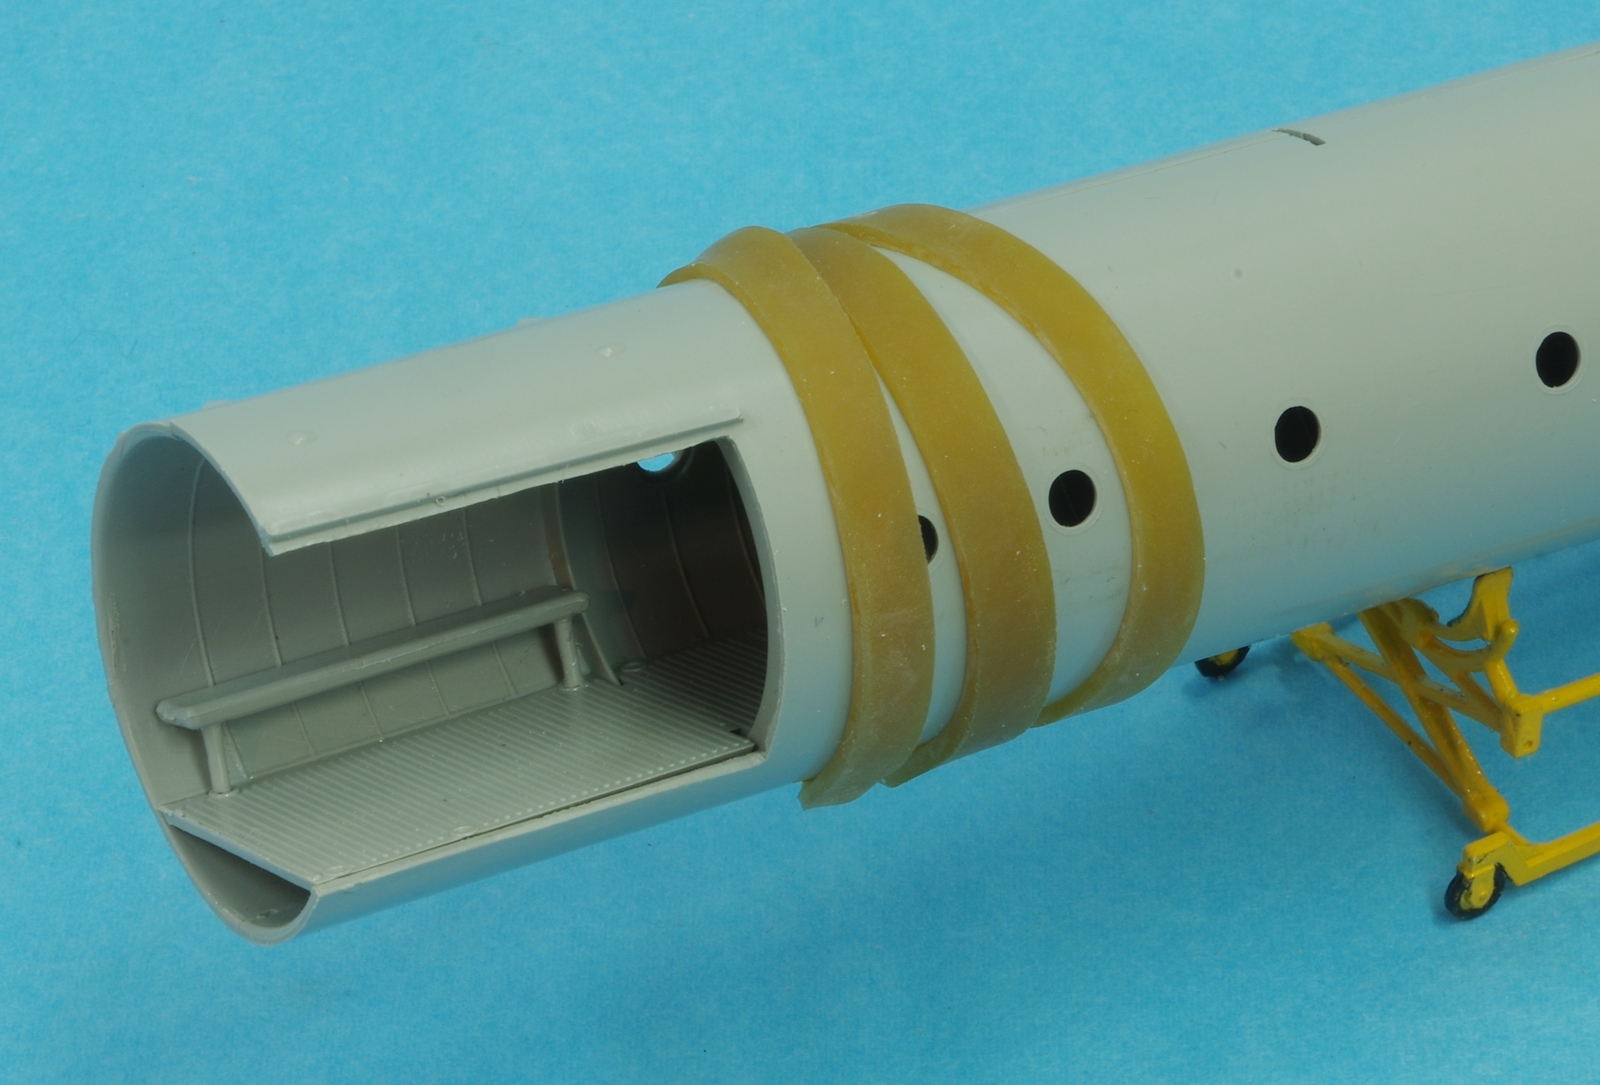
A little work has been done on the Italeri 1/72 Horsa.  I have a spare kit that I picked up somewhere that someone had started.  The wings were poorly joined and they may have given up at that point.  In any event, the carpet monster, if not doomed, at least has suffered a major setback.  It also allowed me to take a different approach on the cargo door.  Italeri's plan was to cut out the door, and they supplied separate parts to make up the door.  The parts didn't look like what the door looks like in pictures, and I didn't see how you could load wheeled vehicles through the side door when there was a big gap in the ramp where the door was.  Also, I believe the door was inset, and slid sideways to open.  The steps Italeri supplied did not appear in any photos, not even in the rear door.  All the photos show ladders being used when the door was open, and the doors are never visible when they are open.  To make something that looked plausible, I made up a removable section of ramp surface that fits over the door opening to be used when cargo is being loaded or unloaded.  There may well be steps on the back of the door in the ramp, but it will not be visible on my model.  I used parts from the started kit to make the cargo door and the needed ramp parts, you can tell what they are by the dark plastic.  I capped the ends of the new cargo door with plastic card.  As I saw in some photos, the man door in the cargo ramp is not flush with the outside surface, but inset a little, so it can slide. I sure hope I interpreted all those photos correctly.  I actually did, after several hours, find a photo of the ramp with the door section covered by a section of ramp.

Before I worked on the cargo door I assembled the wings, which was a lot like working with vacuform parts.  I matched up the upper surfaces as well as possible, then tacked them in spots with CA on the inside surface.  When the alignment looked good I applied a heavy pass of CA over the entire inside joint.  Next the lower wing parts were attached.  Because of the angle of the join, there was still some filling to do so the upper join areas were taped off and a thick layer of Mr. Surfacer 1200 was sprayed on.  That was left to cure for a day and then sanded smooth.

I next went to the fuselage parts and cleaned up a few sink marks with CA, then joined the left tail to the left main fuselage and the same for the right side.  This gave me the opportunity avoid misalignments at the join.  I cut off the alignment pins so I could lay the sides on a glass plate to insure good alignment.

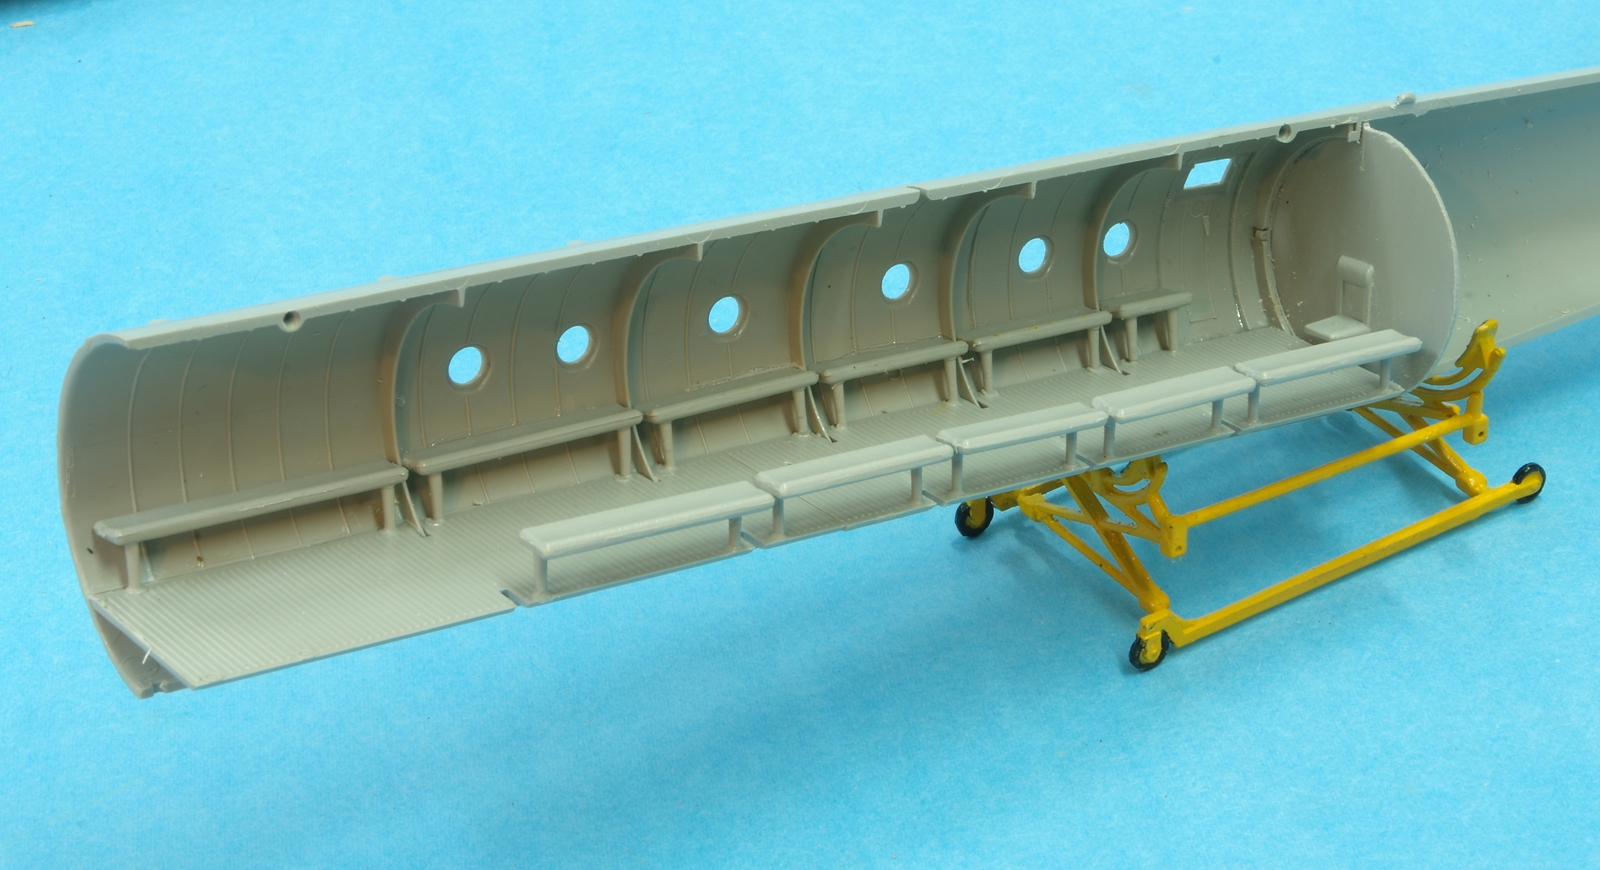
With the fuselage halves together the two floor sections which were previously joined were set in, and then tack glued to the right fuselage half where I could reach it in front.  That insured the floor was level, as there were just some faint lines in the plastic where it might attach.  The right front seat was installed, then the halves were separated and the floor was glued down the right side.  The rear bulkhead was next installed in the right fuselage and the fit was checked.  In order to get the fuselage to come together in that area a generous amount was removed from the right edge of the bulkhead, there is no penalty there because there is a ring bulkhead in the fuselage that covers any gap and you will need your borescope to see it anyway.   You do have one, don't you, a borescope?  As you can see, the seats were then installed.

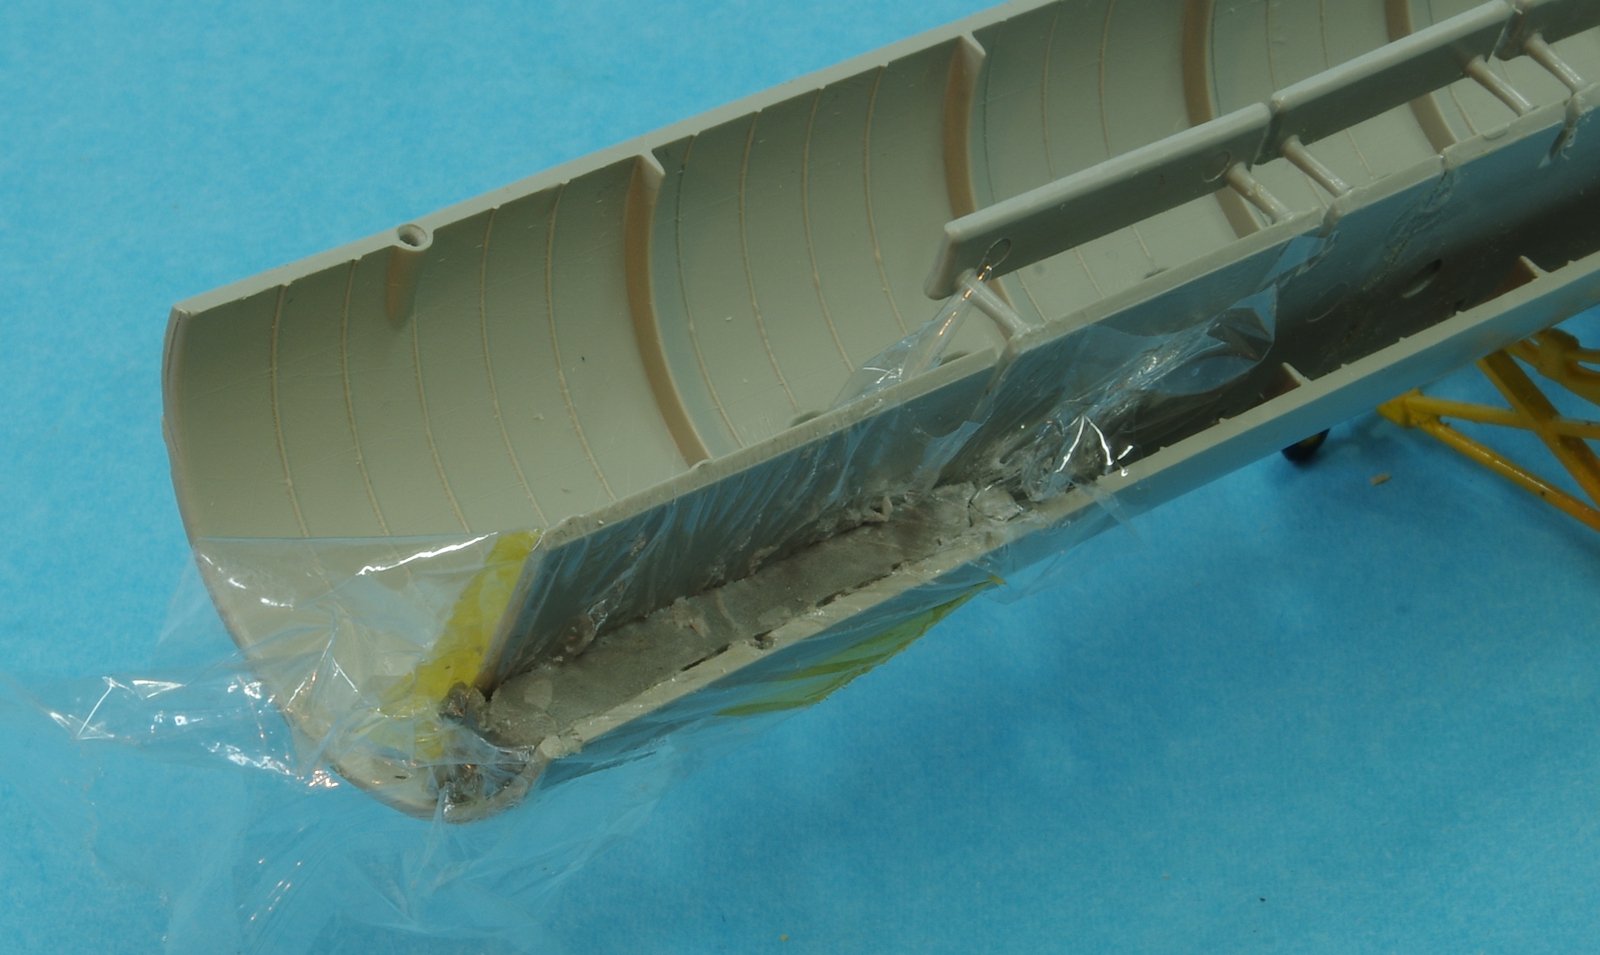
The last photo shows the beginnings of making some weights to fit under the forward section of the floor.  Plastic wrap is pressed in to cover the plastic and Epoxy Sculpt has been formed into the cavity.  Once it cures the resulting shape will have silicone mold material poured over it and in that mold lead will be melted. 


http://goldeneramodel.com/mymodels/gliders/horsa/1horsa/0051horsa.jpg


http://goldeneramodel.com/mymodels/gliders/horsa/1horsa/0071horsa.jpg


http://goldeneramodel.com/mymodels/gliders/horsa/1horsa/0081horsa.jpg


John

To see build logs for my models:  http://goldeneramodel.com/mymodels/mymodels.html


  • Member since
    December 2002
  • From: Northern California
Posted by jeaton01 on Thursday, January 23, 2020 12:09 AM

Guess I put everyone to sleep with the last post!

Model Master Wood overcoated with Tamiya Clear Yellow, then MM RAF Interior Green.

I found some moldable lead clay type stuff in my weight bin after I had made the silicone mold so I used that, pressed in under the cargo floor and the cockpit floor.  About an ounce went in, more than the .7 ounces the instructions called for.  I used Peewit masks on the canopy, and they fit very well and are made of Tamiya type tape material.  I made substitutes for the 4 panels in front, making them into the 8 panes shown in most pictures.


http://goldeneramodel.com/mymodels/gliders/horsa/1horsa/0091horsa.jpg


http://goldeneramodel.com/mymodels/gliders/horsa/1horsa/0101horsa.jpg


John

To see build logs for my models:  http://goldeneramodel.com/mymodels/mymodels.html


  • Member since
    April 2010
Posted by Theuns on Thursday, January 23, 2020 6:13 AM

Bish, will a 1/48 RFC WW1 Sopwith Camel count?


Theuns

  • Member since
    November 2009
  • From: SW Virginia
Posted by Gamera on Thursday, January 23, 2020 11:30 AM

Sorry John/Jeaton, looks like I missed your post yesterday. Really like how she's coming. Weird the company messed up the door so badly but the replacement work is coming along really well.  

"I dream in fire but work in clay." -Arthur Machen


  • Member since
    March 2019
  • From: Post Falls, Idaho
Posted by Sigep Ziggy on Thursday, January 23, 2020 1:42 PM

Adding some interior details to the nonexistant interior. I had to remove 'REVELL 1981' and the molded part numbers first.  I will base my interior on photos of a 1/32 scale D.H. 2.

your shipmate,

Ziggy


  • Member since
    December 2002
  • From: Bury St Edmunds, Suffolk, England
Posted by Bish on Thursday, January 23, 2020 2:08 PM

Thats some lovely work there Johyn and a great write up and what you have done. I do like that cradle your sitting it on.

Sorry i didn't post, i have only been able to view the site from work lately and not long in. Thats when i used to do most of my posting so i could save the evenings for building.

I am a Norfolk man and i glory in being so


On the bench: Airfix 1/72nd Harrier GR.3/Fujimi 1/72nd Ju 87D-3

  • Member since
    December 2002
  • From: Bury St Edmunds, Suffolk, England
Posted by Bish on Thursday, January 23, 2020 2:09 PM

Theuns, yes, it certainly does count. Whats the brand?

I am a Norfolk man and i glory in being so


On the bench: Airfix 1/72nd Harrier GR.3/Fujimi 1/72nd Ju 87D-3

  • Member since
    December 2002
  • From: Bury St Edmunds, Suffolk, England
Posted by Bish on Thursday, January 23, 2020 2:10 PM

Looking forward to seeing how that comes put Ziggy. Thats a nice bit of referance you have to go on.

I am a Norfolk man and i glory in being so


On the bench: Airfix 1/72nd Harrier GR.3/Fujimi 1/72nd Ju 87D-3

  • Member since
    March 2019
  • From: Post Falls, Idaho
Posted by Sigep Ziggy on Thursday, January 23, 2020 2:51 PM

Thanks Bish, I do most of my viewing when I'm at work, so I can't login and comment. 

I would like to say everyone is doing a great job on their builds and I will try to acknowledge your work in the future.

your shipmate,

Ziggy


  • Member since
    April 2015
Posted by Mopar Madness on Thursday, January 23, 2020 5:01 PM

John, I really do think I'm going to have to add one of those gliders to the stash one day!

Chad

God, Family, Models...

At the plate: 1/48 Airfix Bf109 & 1/35 Tamiya Famo

On deck: Who knows!

  • Member since
    April 2015
Posted by Mopar Madness on Thursday, January 23, 2020 5:03 PM

Wow Ziggy, awesome details! 

Chad

God, Family, Models...

At the plate: 1/48 Airfix Bf109 & 1/35 Tamiya Famo

On deck: Who knows!

  • Member since
    December 2002
  • From: Northern California
Posted by jeaton01 on Thursday, January 23, 2020 6:26 PM

Thanks, everyone.  The cradle is of course from the Monogram F-80, I've been working on it slowly as I build other stuff.  It's a little flimsy until its all together.

Up to today it has been a pretty good build, but in the small parts area the kit is frustrating.  There were no locating pins or marks whatsoever for the skid and landing gear.  I even pulled a third kit out of the attic and it is still in the sealed bags.  Couldn't see any marks on it either.  I went to photos and finally a drawing that had section of the landing gear installation.  The front of the skid lines up with the front of the wing, and I keyed off of that to locate the landing gear, although it's just a best guess how far from the centerline that the main gear v struts attach to the fuselage.  Did my best.  Super glue was used, there will be some scraping and cleaning later.  I bent the axle parts of the V struts so the main wheels would have a believable amount of camber.  I lengthened the nose strut with music wire and brass tubing, otherwise the nose would set much lower than any photos I could find.  There seems to be a lot of variation in how high off the ground the fuseage sits.  The v struts on the tail had little circles where the end should fit, so I drilled them out.  The struts didn't match up too well, but at least I have some confidence they are in the right place.


http://goldeneramodel.com/mymodels/gliders/horsa/1horsa/0111horsa.jpg

John

To see build logs for my models:  http://goldeneramodel.com/mymodels/mymodels.html


  • Member since
    April 2010
Posted by Theuns on Thursday, January 23, 2020 11:33 PM

Bish its a Revell box but im sure its a monogram .


I have pix of the work I did sofar, not allot, I started it this week and will post soon.


Theuns

  • Member since
    April 2003
  • From: USA
Posted by keavdog on Friday, January 24, 2020 1:23 AM

Bit more work on the chopper.  Some flash on the detailed truss that needs work.  Subassemblies coming along, need more detail work

Little motor

Instrument panel - WWII gauges..shhh don't tell anyone.  Little stretched sprue here too

And the truss - will require cleanup but I wanted to get it put together and 'square'


Thanks,

John

  • Member since
    July 2008
Posted by Est.1961 on Friday, January 24, 2020 6:12 AM

Lunch time here, great work going on John, Ziggy and Keavdog. I'm adding more sub assemblies to the Scammell but have only had two short periods this week after work, hopefully get to do more on Sunday if not sooner. 

  • Member since
    March 2019
  • From: Post Falls, Idaho
Posted by Sigep Ziggy on Friday, January 24, 2020 6:47 AM

The gun was still not right, it needs to be liquid cooled, so I added the smallest tube I had.  If I am happy with this gun, I will use it, if not, I will try styrene rod.

Sorry the image is blurry, its just so small and I cropped the image.

Keavdog, great work on your chopper!

your shipmate,

Ziggy


  • Member since
    November 2009
  • From: SW Virginia
Posted by Gamera on Friday, January 24, 2020 7:57 AM

Hey guys- Ziggy, John (Keavdog), and John (Jeaton) those all look cool!!! 

Est 1961, looking forward to more photos and Theuns looking forward to seeing how she looks!

"I dream in fire but work in clay." -Arthur Machen


  • Member since
    April 2015
Posted by Mopar Madness on Friday, January 24, 2020 8:15 PM

John, that instrument panel looks fantastic!

Chad

God, Family, Models...

At the plate: 1/48 Airfix Bf109 & 1/35 Tamiya Famo

On deck: Who knows!

  • Member since
    April 2015
Posted by Mopar Madness on Friday, January 24, 2020 8:16 PM

Got a yellow filter applied, laid down a wash, a matte coat, and wrapped it up with some dry brushing. I'll start the environmental weathering next and hopefully have this one wrapped up this weekend.


Chad

God, Family, Models...

At the plate: 1/48 Airfix Bf109 & 1/35 Tamiya Famo

On deck: Who knows!

  • Member since
    April 2003
  • From: USA
Posted by keavdog on Friday, January 24, 2020 10:03 PM

Wow Chad - the color modulation looks great!

Put the first coat of paint down on the Sioux


Thanks,

John

  • Member since
    December 2002
  • From: Northern California
Posted by jeaton01 on Friday, January 24, 2020 10:35 PM

The tank and the Bell look great.  I went to maintenance school in the Army and that was one of the helicopters in my MOS.  We had several in our guard unit, all Franklin powered.  If the panel didn't have WW II instruments in it, it would be wrong!

John

To see build logs for my models:  http://goldeneramodel.com/mymodels/mymodels.html


  • Member since
    December 2002
  • From: Northern California
Posted by jeaton01 on Friday, January 24, 2020 10:43 PM

More progress on the Horsa.  The nosewheel is just stuck in too large of a hole.  Tamiya Dark Earth and Dark Green, the black and white are Model Master.


http://goldeneramodel.com/mymodels/gliders/horsa/1horsa/0121horsa.jpg


http://goldeneramodel.com/mymodels/gliders/horsa/1horsa/0131horsa.jpg

John

To see build logs for my models:  http://goldeneramodel.com/mymodels/mymodels.html


  • Member since
    April 2003
  • From: USA
Posted by keavdog on Friday, January 24, 2020 11:16 PM

He's definitely hanging a hard left John!  Looks great.  What did you use for the masks on the cammo?  Demarcation looks great.  And what an interesting - rarely modeled subject.

Thanks,

John

  • Member since
    December 2002
  • From: Bury St Edmunds, Suffolk, England
Posted by Bish on Saturday, January 25, 2020 2:58 AM

Theuns

Bish its a Revell box but im sure its a monogram .


I have pix of the work I did sofar, not allot, I started it this week and will post soon.


Theuns


Thanks Theuns, i'll get you added.

I am a Norfolk man and i glory in being so


On the bench: Airfix 1/72nd Harrier GR.3/Fujimi 1/72nd Ju 87D-3

  • Member since
    December 2002
  • From: Bury St Edmunds, Suffolk, England
Posted by Bish on Saturday, January 25, 2020 2:59 AM

John, thats looking great. Love that IP, really nice work on that.

I am a Norfolk man and i glory in being so


On the bench: Airfix 1/72nd Harrier GR.3/Fujimi 1/72nd Ju 87D-3

  • Member since
    December 2002
  • From: Bury St Edmunds, Suffolk, England
Posted by Bish on Saturday, January 25, 2020 3:00 AM

Chad, thats looking really nice, great paint work.

I am a Norfolk man and i glory in being so


On the bench: Airfix 1/72nd Harrier GR.3/Fujimi 1/72nd Ju 87D-3

  • Member since
    December 2002
  • From: Bury St Edmunds, Suffolk, England
Posted by Bish on Saturday, January 25, 2020 3:00 AM

Ziggy, thats a great mod to that gun. You should deffinetly use that.

I am a Norfolk man and i glory in being so


On the bench: Airfix 1/72nd Harrier GR.3/Fujimi 1/72nd Ju 87D-3

  • Member since
    December 2002
  • From: Bury St Edmunds, Suffolk, England
Posted by Bish on Saturday, January 25, 2020 3:02 AM

John, thats a nice camo job. Looks good with the strips on.

I am a Norfolk man and i glory in being so


On the bench: Airfix 1/72nd Harrier GR.3/Fujimi 1/72nd Ju 87D-3

  • Member since
    November 2009
  • From: SW Virginia
Posted by Gamera on Saturday, January 25, 2020 2:56 PM

Chad: That looks superb! I love the shading!

Keavdog: Love that, the lattice work for the tail boom looks like a bear to assemble. Great job on it. 

Jeaton: Great job on the camo and the invasion stripes look perfect!

"I dream in fire but work in clay." -Arthur Machen


JOIN OUR COMMUNITY!

Our community is FREE to join. To participate you must either login or register for an account.

SEARCH FORUMS
FREE NEWSLETTER
By signing up you may also receive reader surveys and occasional special offers. We do not sell, rent or trade our email lists. View our Privacy Policy.