SEARCH FINESCALE.COM

Enter keywords or a search phrase below:

The group build to end all group builds - THE GREAT WAR

155831 views
1091 replies
1 rating 2 rating 3 rating 4 rating 5 rating
  • Member since
    June 2010
  • From: Austin, TX
Posted by DoogsATX on Sunday, May 1, 2011 3:44 PM

EBergerud

I know Ed and he's a great guy. Unfortunately I'm Eric and opinions vary. Thanks for nice words about the Camel. Not sure whether I should be congratulated or not for finishing an airplane in less time than it took wingnut and Doog to build engines. (Of course there were probably more parts in the cockpits and engines in a WingNut kit than an Academy aircraft by a factor of two. And they know what they're doing and I don't.)

Believe me, I DON'T know what I'm doing with the Pup...just trying to take my time and be careful!

Of course, it's finally getting to the point where I can start thinking about paint and what happens? Storms blowing in tonight (although, with this drought, I'll take a good rain in exchange for a lost night of airbrushing).


On the Bench: 1/32 Trumpeter P-47 | 1/32 Hasegawa Bf 109G | 1/144 Eduard MiG-21MF x2

On Deck:  1/350 HMS Dreadnought

Blog/Completed Builds: doogsmodels.com


  • Member since
    August 2005
  • From: Oshawa, Ontario
Posted by u-69 on Monday, May 2, 2011 1:29 PM

Started working on the TechMod Friedrichshafen FF-33 for the group build last night. 

Not much good to say bout the kit - nothing in fact, detail is poor, being either WAY overdone and very mushy or too light [wings], sink marks in the most irritating places, deep mold gouges in the fuselage, tons of flash on the struts...  - Looks like a big challenge. Luckily I did locate a PE set for it that looks quite nice. 


Luckily only the very top of the cylinder heads will be visible - this is a pretty mushy piece.


I used some india ink to try and "find" the rib detail on the wings, it' almost non-existent and they have lots of blemishes, sink marks and other flaws ... will have to redo all the ribs somehow.


The floats had the worst of the overdone detail, they were completely sanded down & replaced with brass and evergreen. 


Gonna be a challenge...


-sean


BigBlock Studios web design:
http://www.bigblockstudios.ca

My Models:
http://www.onetofortyeight.com

  • Member since
    December 2002
  • From: NYC, USA
Posted by waikong on Monday, May 2, 2011 3:03 PM

Sean, that's a interesting looking kit, I'm sure you will overcome the obstacles.

Well, I've got some pics of my 1/48 Dragon DR1 and frankly, it's not coming out too well. The cockpit parts are small and fiddly, their attachment points are large. This makes for many small broken parts. Fit is so-so and the PE seems to be made of steel? Much much harder to bend, cut, and shape then brass.  I added cushion from milliput, but didnt' mix th right proportions, so it stayed a bit soft.

I just closed up the fuselage, and there is a large step on the bottom. So I'm a bit dissapointed at my effort so far, the only consolidation is that the cockpit details is hard to see once everything is buttoned up. 

On a good note, the engine is nicely detailed.  Time to step away for a day or two to recoup.


My website: http://waihobbies.wkhc.net


  • Member since
    April 2005
  • From: Piscataway, NJ!
Posted by wing_nut on Monday, May 2, 2011 6:49 PM

Rob... looking forward to see what you do with that

Eric... The Camel looks great.  I love the 2nd to last shot where you see the under isde of the wings. Finsishing that before I got an engine done may be a good thing.  My AMS really kicked in.  Kit engine parts=11.  With what I've done so far...140. I need helpWink

Sean... great start.  I did that to the wings on a 1/48 Camel as preshading.  Worked well too.

Waikong...  Engine and pit look real nice.


Nice to start working on something that's is not engine.  Pic #1-I added some Plastruct 1/2 round around the cockpit since the coaming doesn't look as thick as in some ref pics.  I pulled it over a finger nail a few time to get is flexible.  This will be covered with thin lead foil to replicate the folds form the leather gathering on the coaming.  Pic #2- I cut out the shock absorber (?) for the tail skid to clean the seam inside the notch and wrapped it with some wire as long as i had the piece out.

I have a question for pic #3.  is that series of holes down the centerline on the bottom of the fuselage supposed to be there?  If yes... for what purpose?  drainage?

Marc  

  • Member since
    August 2005
  • From: Oshawa, Ontario
Posted by u-69 on Monday, May 2, 2011 7:20 PM

Hi Marc;

yes those holes are supposed to be there and yes - that's exactly what they are for 'drainage' they should actually have a bit of a lip as they had a little metal collar - not just drilled into the wood.


I wasn't actually pre-shading - I used the ink so I could find the engraved lines, you couldn't actually see them they were so fine and shallow.


-sean

BigBlock Studios web design:
http://www.bigblockstudios.ca

My Models:
http://www.onetofortyeight.com

  • Member since
    February 2006
  • From: Smithers, BC, Canada
Posted by ruddratt on Monday, May 2, 2011 8:02 PM

Waikong, that engine is lookin' sweet, and the 'pit looks fine from where I'm sitting. Hard to tell there were any issues with it.

Marc, very clever use of the half-round for the combing. I saw where you plan on adding foil to it - are you going to add texture to it before it's foiled?

Sean, I like your technique for locating the ribs. What I've used to beef 'em up in the past is to take some Evergreen styrene strip (0.8 x 0.01) and stretch it thin, glue it in place, apply some Mr. Surfacer over each rib, and 'em down with some micro-mesh sanding pads. HTH

Mike

 "We have our own ammunition. It's filled with paint. When we fire it, it makes pretty pictures....scares the hell outta people."


  • Member since
    April 2005
  • From: Piscataway, NJ!
Posted by wing_nut on Tuesday, May 3, 2011 8:30 AM

Sean-thanks for the confirmation

Mike-no texturing, just wrapping

Some of the rougher spots got filed and sanded to smooth them out a bit.


Marc  

  • Member since
    June 2010
  • From: Austin, TX
Posted by DoogsATX on Tuesday, May 3, 2011 4:14 PM

Some great work going on here, guys!

Not much in the way of Pupdates. Just this tediousness.

Primer starts going on tonight!

On the Bench: 1/32 Trumpeter P-47 | 1/32 Hasegawa Bf 109G | 1/144 Eduard MiG-21MF x2

On Deck:  1/350 HMS Dreadnought

Blog/Completed Builds: doogsmodels.com


  • Member since
    March 2006
Posted by TD4438 on Tuesday, May 3, 2011 4:15 PM

I gotta start paying more attention to this GB.I'm missing out on some nice WIPs and the finished builds are starting to stack up.Well done guys.

  • Member since
    November 2006
  • From: Coastal Maine
Posted by dupes on Tuesday, May 3, 2011 5:52 PM

Wingy - I'm sure you officially hit "crazy" status a while back...but this latest round of pics affirms it.


WOW.

  • Member since
    June 2010
  • From: Austin, TX
Posted by DoogsATX on Wednesday, May 4, 2011 10:52 AM

Another morning Pupdate! 

Primer went on last night...first time really painting with the new H&S Evolution, and I have to say, I do prefer it to my Iwata. 

I'll be priming the underside tonight...figured, especially with the top wing, breaking it up would just make sense. 

Now...I'm trying to figure out two things. First...to pre-shade or not to pre-shade? I'm considering going with a straight paint scheme, then isolating the ribs with tape and using the three-layer blend technique. So...regular color, then mask and spray lightened color, then remove mask and spray highly thinned regular color to blend things together.

Second - the rudder. It's marked with red/white/blue vertical stripes, and WnW provides decals, but I'm considering masking and painting instead. Only issue is making sure I match the roundels...but I figure paint would look a lot better than trying to match the decals up along the edges.

On the Bench: 1/32 Trumpeter P-47 | 1/32 Hasegawa Bf 109G | 1/144 Eduard MiG-21MF x2

On Deck:  1/350 HMS Dreadnought

Blog/Completed Builds: doogsmodels.com


  • Member since
    April 2006
  • From: ON, Canada
Posted by jgeratic on Wednesday, May 4, 2011 12:22 PM

Look'n good Doogs, as are all the updates from everyone.  MisterkitUSA does stock specific paints for roundels, though it would be another question if they are an exact match to the kit decals.

regards,

Jack

  • Member since
    June 2010
  • From: Austin, TX
Posted by DoogsATX on Friday, May 6, 2011 7:36 AM

Yeah Jack, it's the color matching that worries me. Still have awhile to decide, though.

Big Pupdate today! The first actual paint got shot out of an airbrush in the general direction of the Pup!

I also think I've got a shading plan! Isolate the rib tapes with, er, tape, and spray Tamiya Deck Tan mixed 50% with white. Then spray the valleys between the tapes with Deck Tan dirtied up a bit with maybe Khaki. Then come back over with a highly thinned straight Deck Tan to blend things together. 

Sort of the three-layer blend I use on WWII aircraft, but reversed and along the ribbing path versus panels.

Just don't want to overdo it, since I still want to add some weathering after the cockades go on.

On the Bench: 1/32 Trumpeter P-47 | 1/32 Hasegawa Bf 109G | 1/144 Eduard MiG-21MF x2

On Deck:  1/350 HMS Dreadnought

Blog/Completed Builds: doogsmodels.com


  • Member since
    April 2005
  • From: Piscataway, NJ!
Posted by wing_nut on Friday, May 6, 2011 10:25 AM

Doogs she is really taking shape.  Looks great.  Tough call on whether to paint if the colors a just a tiny bit off.  if they are close it may be better than the decals.  With some distance between the tail and the roundels a slight mismatch will likely be less noticeable than using slight off color to touch up the edge or seams since it would be right on the decal.


A light evening at the bench, if you can call straining to see .4 mm brass rivets, light.

I worked on the elevator hinges covering the them with lead foil and putting brass bolts for each.  Small pieces of brass tube were glued to the controls horns and the pipes at the front of the vert stab (for lifting?) where replaced.  Evergreen strips were used to tighten the gaps at the outer parts of the elevator.

The cockpit coaming was finished off with a thin strip of foil glued around the edge then drilled for the afore mentioned rivets.  I lost more rivets than I used since they would tweezerpult into oblivion when trying to get them in the holes.  The engine is just there for the photo-op but I didn't realize the exhaust pipes fell off.

I made the grommets for the drains out of wire but there are a little big and I may re-do them.

Marc  

  • Member since
    June 2010
  • From: Austin, TX
Posted by DoogsATX on Friday, May 6, 2011 1:25 PM

Marc, wow, just...wow! I hope to one day have enough familiarity with these birds and creativity with little bits to even attempt some of the things you're doing. Can't wait to see it hit the paint stage!

Yeah...I'm leaning toward painting the rudder. Realistically, it can go on extremely late in the game, so I could feasibly apply the decals, then paint some sample plastic to see what matches best. Regardless, it'll need a white base for the white and red, so I'll probably paint that tonight. Also realized in the light of day that I didn't get entirely uniform coverage on the wing undersides, so I'm going to be hitting them with another coat tonight. I'd been hoping to start the blending work tonight, but that basecoat needs to be right first...

On the Bench: 1/32 Trumpeter P-47 | 1/32 Hasegawa Bf 109G | 1/144 Eduard MiG-21MF x2

On Deck:  1/350 HMS Dreadnought

Blog/Completed Builds: doogsmodels.com


  • Member since
    April 2005
  • From: Piscataway, NJ!
Posted by wing_nut on Friday, May 6, 2011 3:12 PM

Thanks doogs. And familiarity?  Have none whatsoever.  There is a reproduction that is supposed to be very accurate and I am just following that.  This is the part of the hobby i like... and it plays to what dupes refers to as crazy.  BTW... thanks for  looking in the comments FUPES!!!!!.  Figuring ways to do things is one thing.  With this build I have been lucky so far that I am actually able to do what's in my head.  And I am having an absolute blast building this bird. I don't think this will be my only WNW build.

Marc  

  • Member since
    October 2009
Posted by PANZERWAFFE on Saturday, May 7, 2011 10:15 AM

Some real nice work guys! 

SEAN - Does sound a bit of a challenge but I sure it will all come togther.  I too think I may have some of the same issues with this MK IV.  It also has sink marks, thick / inaccurate parts, lack of or no small details (does have many rivets but some of those rivets should be bolts). 

Did receive the tracks in and believe these are a huge improvement over the kit supplied ones.

The tracks came on 37 different sprues so there will be a lot of cutting out and clean up but they do look as if they will seperate quite easily.  One feature with them is that they are a two part link.  You first construct the run of the shoes and then add the treadplates on top.  And yes there are small modifications that must be made on the hul top and the deletion of the sprocket and idler in order to fit the tracks properly.  May also have to add a shim to the inner portion of the sponson's armor plate to give the shoes a ledge to sit on?  Will have to see when the time comes.  Hoping to get a start this weekend, I am finishing up my PZjager I so should be able to put all attention here.

Everyone keep up the great work.

Rob

  • Member since
    June 2010
  • From: Austin, TX
Posted by DoogsATX on Monday, May 9, 2011 10:43 AM

wing_nut

And I am having an absolute blast building this bird. I don't think this will be my only WNW build.

Ditto. In many ways, bipes feel as different from metal-skinned birds as armor does. Nice change of pace.

I think I'll need a bit of a break when I come out the other side of the Pup, but this won't be my last biplane, especially with the new goodies WnW has in store!

On the Bench: 1/32 Trumpeter P-47 | 1/32 Hasegawa Bf 109G | 1/144 Eduard MiG-21MF x2

On Deck:  1/350 HMS Dreadnought

Blog/Completed Builds: doogsmodels.com


  • Member since
    June 2010
  • From: Austin, TX
Posted by DoogsATX on Monday, May 9, 2011 10:54 AM

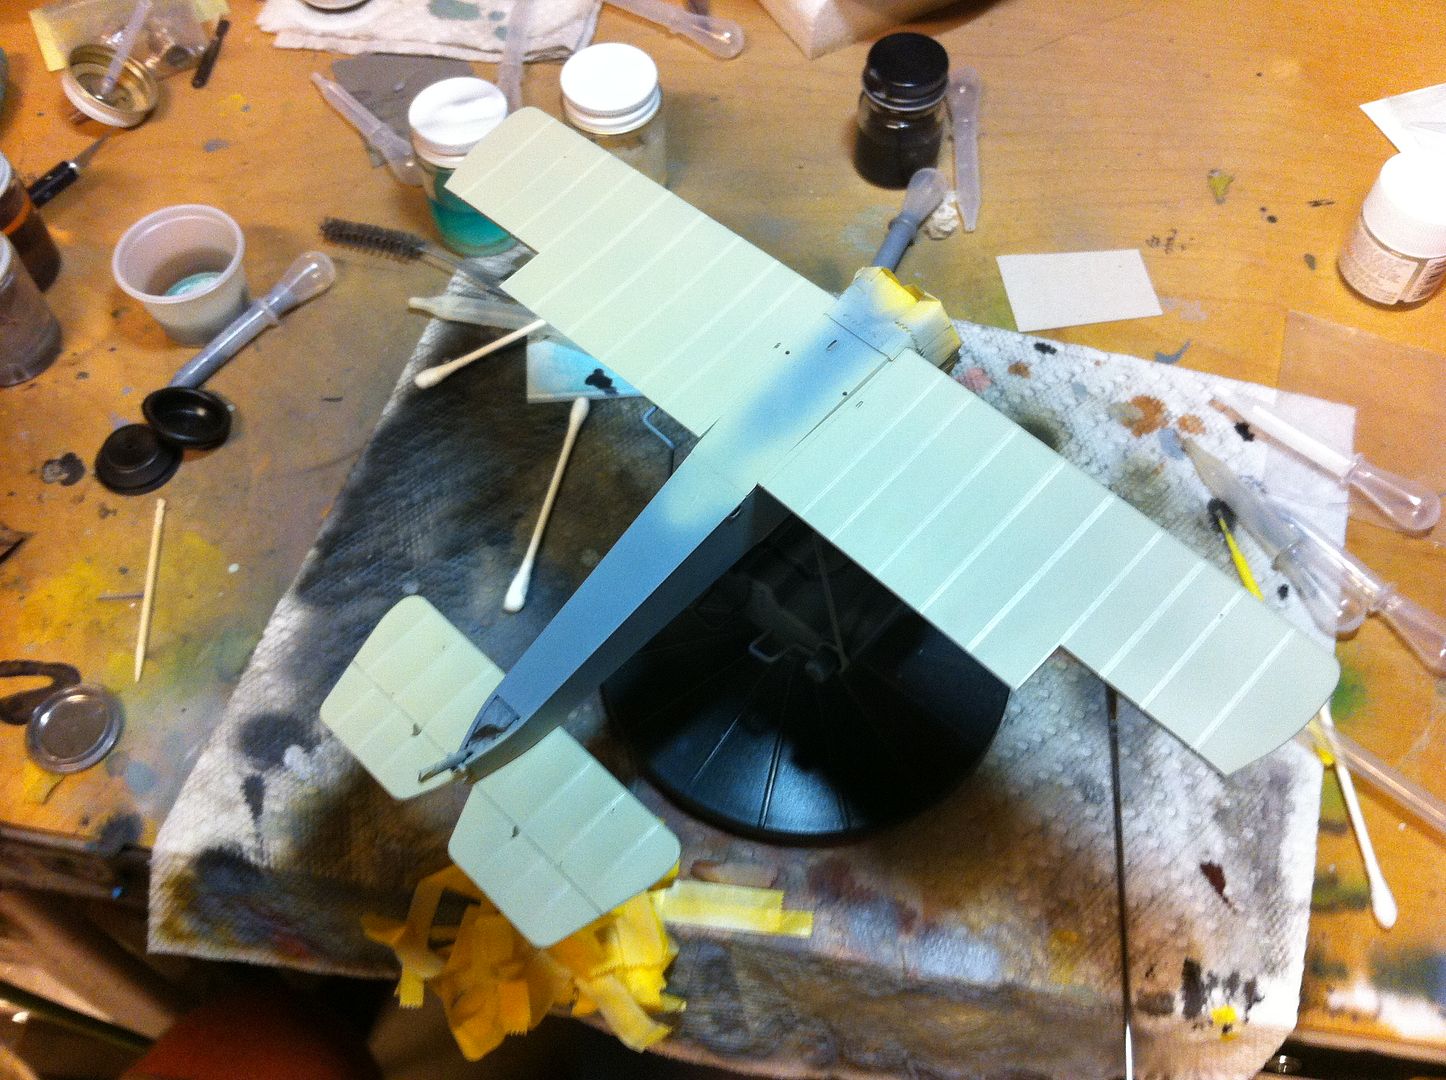
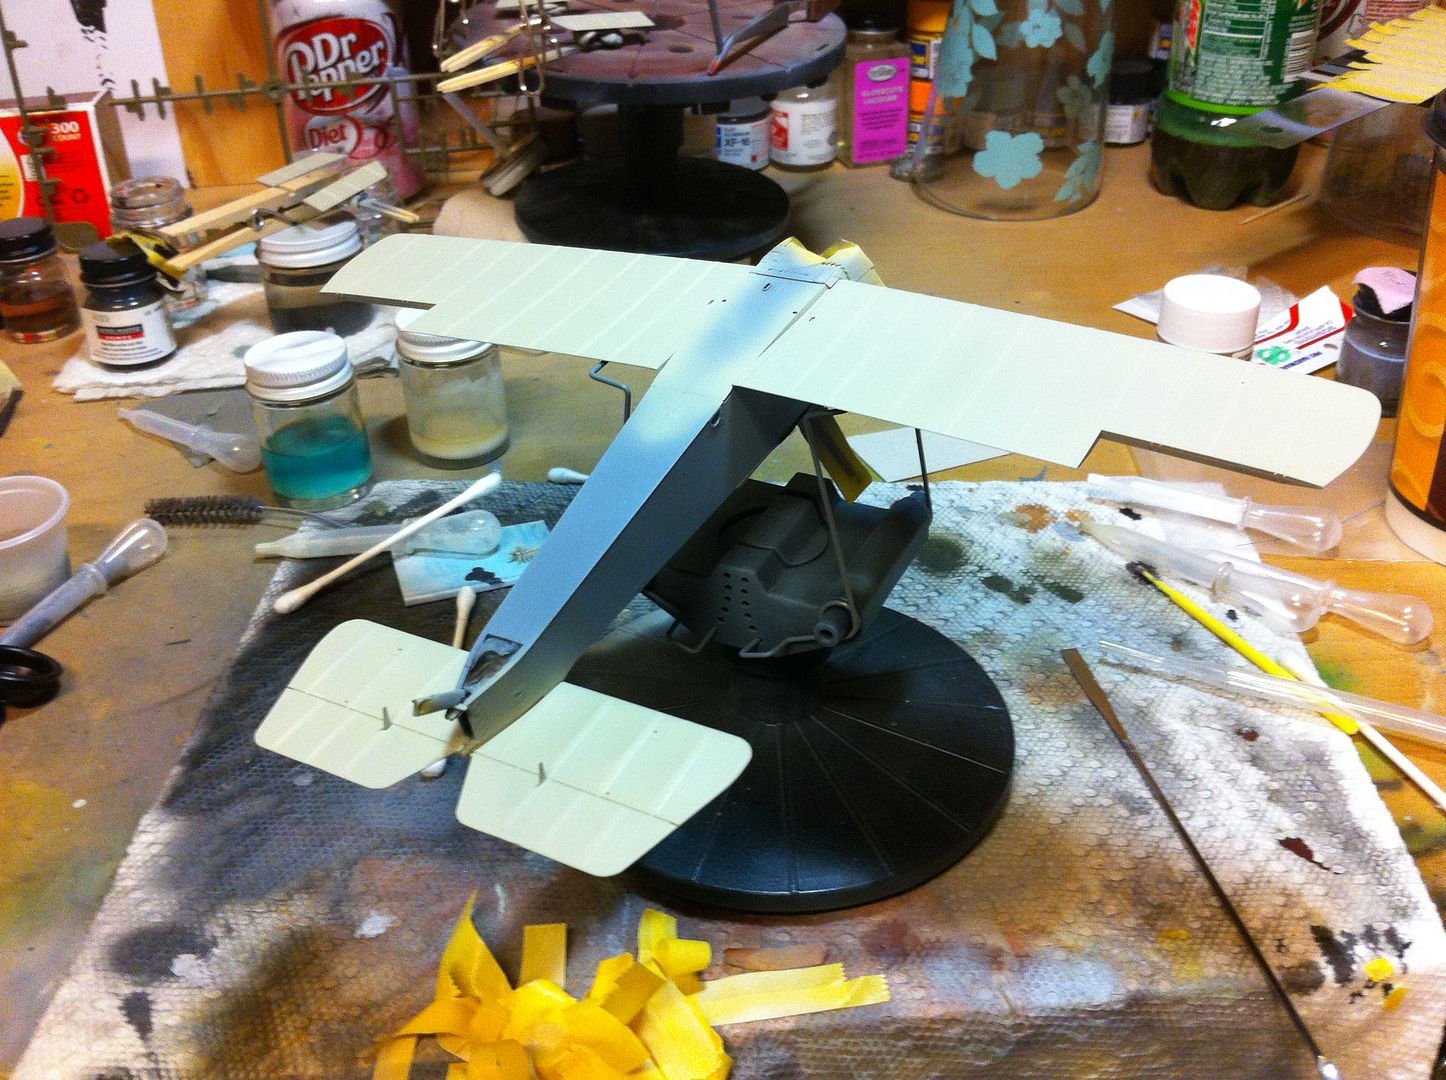
Finally time for a fairly major Pupdate - started the underside shading last night. 

While I've seen various pre-shading methods that emphasize the ribs being darker due to sunlight coming through the linen, I haven't really seen any indication of that on this particular Pup, maybe with the drab upper surfaces killing the effect. Whatever the case, I've decided to go with a lightened-ribs approach.

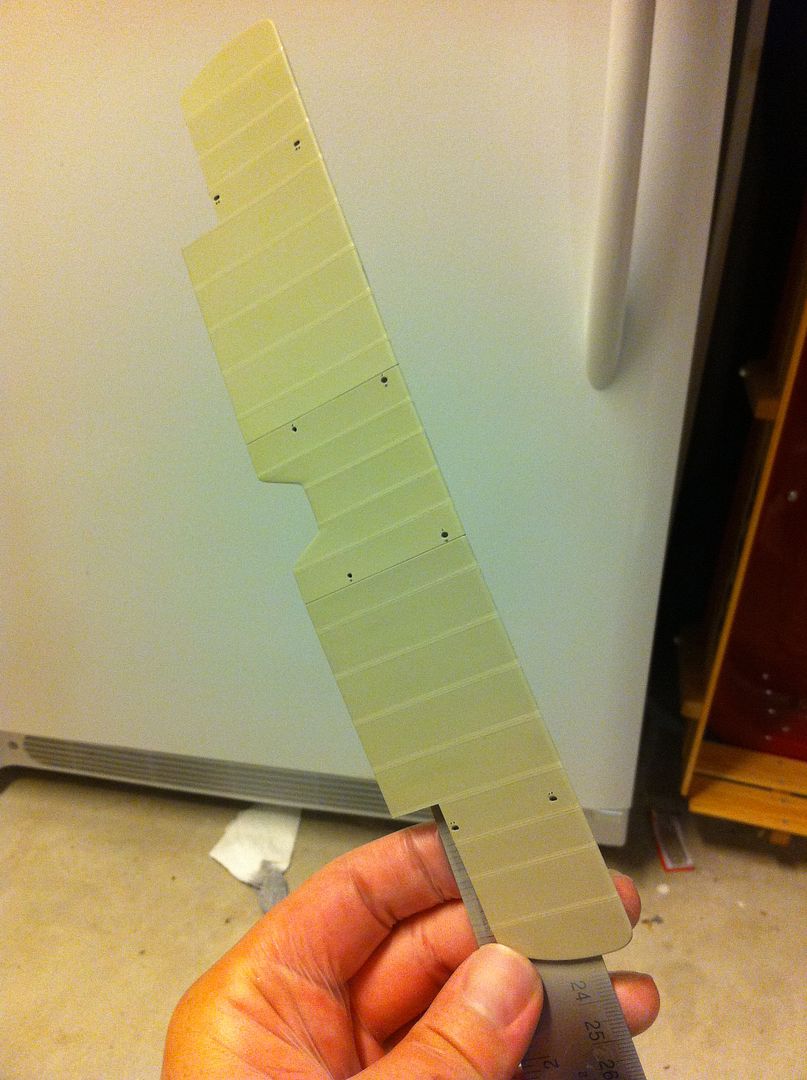
First, I had to mask off the individual rib lines. This was frustrating!

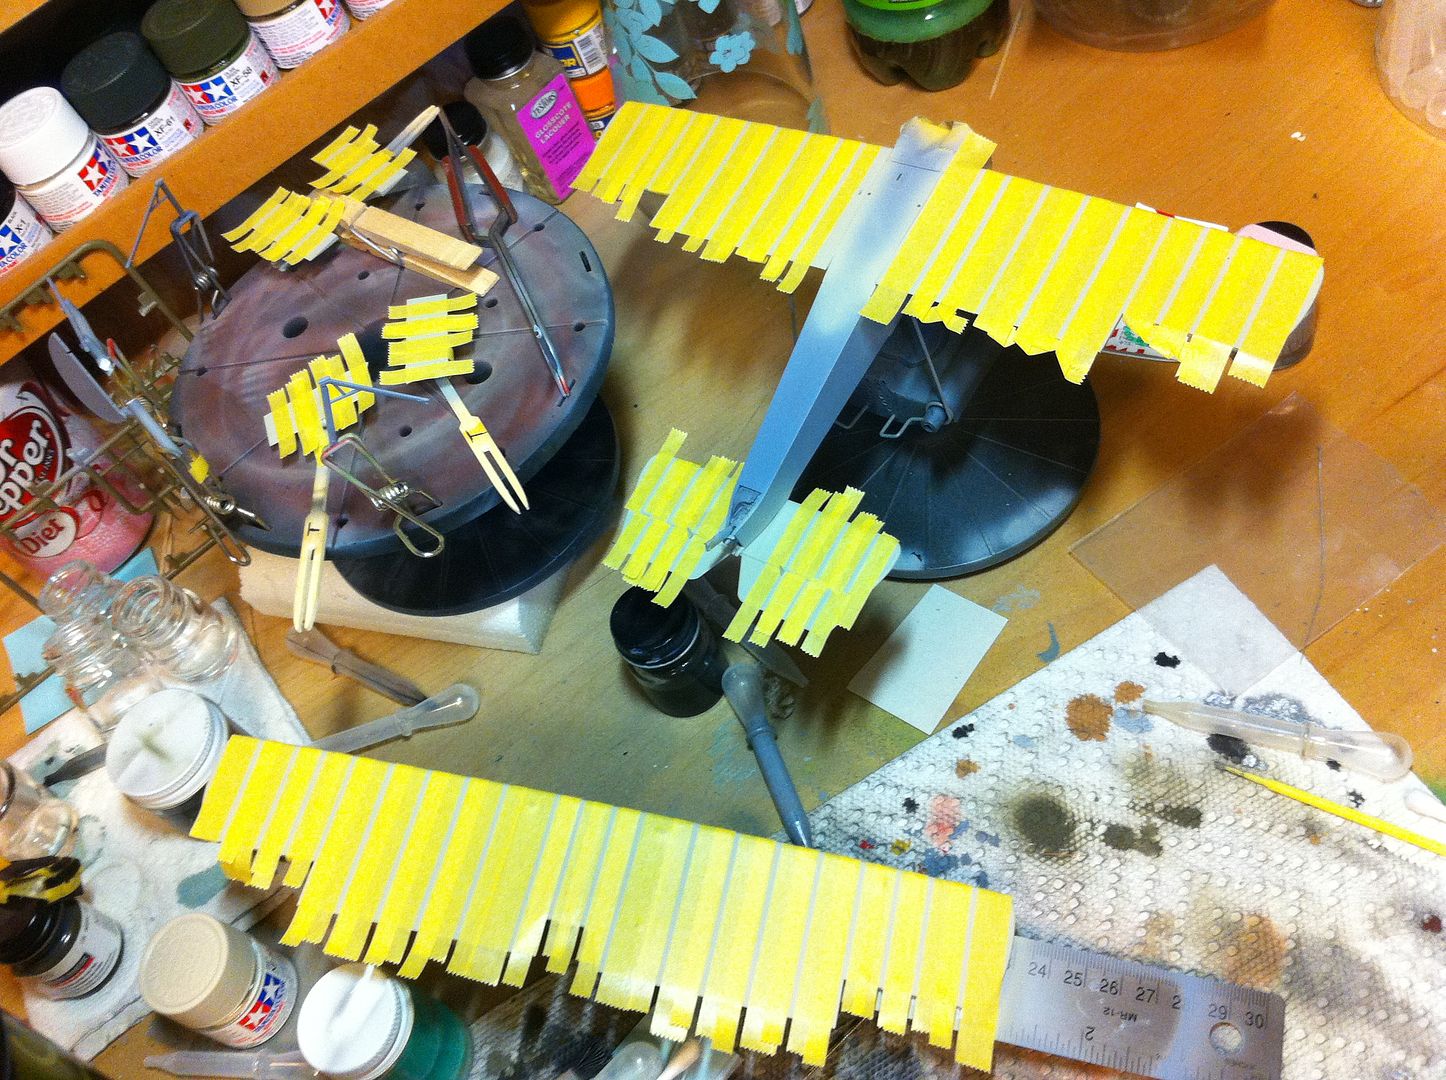
Next time (read - upper surfaces) I'm going to spray the light coat first, then just mask the rib lines, rather than isolate them. I'm also going to be sure to use flat white as a lightener, versus, gloss. It won't matter in the end I guess, but it makes the lines stand out a lot more in pictures than intended.

Looking forward to moving on to "darkening" the valleys of the wings. Slight snag, though. I've gone and run out of Deck Tan, and, starting a new job, it's not going to be easy to get out to the LHS this week to pick up more. May have to order some through SB...

On the Bench: 1/32 Trumpeter P-47 | 1/32 Hasegawa Bf 109G | 1/144 Eduard MiG-21MF x2

On Deck:  1/350 HMS Dreadnought

Blog/Completed Builds: doogsmodels.com


  • Member since
    February 2010
  • From: Berkeley CA/St. Paul MN
Posted by EBergerud on Monday, May 9, 2011 3:59 PM

Looks good Doog. I did some more checking around on the dark/light rib question. There was a thread on the matter on a board called ARC (nice, never seen it before) and the biplane purists (two or three guys mind you) went for light. So I signed onto an old fashioned Listserv list on World War I Modeling (wwi.wwi-models.org). Figured a list of that antique style would have veteran modelers and it does. So I posed the light/dark question and found out this question has been going around for a very long time. The consensus now is if you do either it is to emulate some kind of lighting condition and because those varied all over the map anything you did was fine as long as it was done well. (This is why the photo archive evidence is also all over the map.) One gent commented that when done correctly it wasn't that easy to tell the difference unless you were really looking for it - what you see is a shaded wing. I think you can see that point illustrated below: the pic is from Des' WNW Pup build on WWIaircraft.com. He favors dark ribs but I'd say either approach works nicely. One thing they brought up on the list was that painting the edge P10 was an option. Sometimes the RFC did it, sometimes not. I wish I'd known that a couple of weeks back. I did edge my wings and it took a surprisingly long time and it still didn't look like Des'. I would have been better off leaving it straight linen.

I'm working on a tank now: the biplane excursion was great fun but more than a little odd. For me it was much more like building a ship than an airplane with all of that detail work. (The tank seemed to fall together in comparison. It's a Trumpeter KV-2 and makes for a very good build. I can't figure that out that company.)  But your result will be a really sweet display model if nothing else. I'm going to build the Academy Nieuport 17 as a last warm-up and then tackle a WNW Pflaz that I bought myself for my birthday. Unless really screwed-up either should be easier on the eye than a KV-2.

Eric


A model boat is much cheaper than a real one and won't sink with you in it.

  • Member since
    February 2010
  • From: Berkeley CA/St. Paul MN
Posted by EBergerud on Monday, May 9, 2011 4:16 PM

One more thing. Within limits, I wouldn't worry about over-shading. (Think your work looks great.) I wonder if there isn't a kind of "scale" effect at work when doing a biplane. I don't doubt that 2lb mono is a good scale for the rigging. But even when colored black, you can barely see it from ten feet away. I definitely over-did the wing shading, but, again, from ten feet away it looks pretty good. Had it been subtle I don't think you could see it at all. I shaded the fuselage on both the khaki and grey portions and it's essentially invisible unless examined very closely. Unless it won't fit through the tubing, I'm going to give 4lb line a shot next time around even if it's in theory a little thick.

Eric


A model boat is much cheaper than a real one and won't sink with you in it.

  • Member since
    April 2006
  • From: ON, Canada
Posted by jgeratic on Monday, May 9, 2011 6:58 PM

Update on my second figure...

Unfortunetly after test fitting an aftermarket helmet to use on the figure, it was noticably small, particularly the front view.  So the helmet was split in two as best as I could.  While masking tape held the two pieces together in their new position, several mall strips of lead foil were glued to the inside.  The huge gap was filled with squadron putty, followed by a coat of Tamiya's liquid surface primer.  After sanding, the helmet as a whole looked more square than round.  Since I was going to all this trouble, it was here that I decided to make the shape resemble that of the Austrian manfactured helmet - the Berndorfer.  The brim was smaller than it's German cousin, there were no lugs or "horns" and overall appeared to be more shallow.  At the apex of the helmet were small ventilation holes covered with a metal disc.  Cutting a thin strip of lead foil, this was glued along the bottom edge, leaving a bit of space in the front and rear to bring back the roundness.  More putty, surface primer and sanding.  Final pic has the helmet painted with a mixture of earth and fieldgrey.

The figure - first base coat is fieldgrey with significant amout of blue mixed in.  This is followed by a spraying of straight fieldgrey, and then a third coat of lighter toned fieldgrey.  Some historical background: It was in the autumn of 1915 that Austria-Hungary switched to this colour.  As the war progressed, shortages of coloured cloth for the collar patches grew.  To compensate, these patches (which represented regimental colours) were reduced in size to the the point where by 1917 were just a vertical stripe located behind rank insignia on the collar.  During this year a major decision was made which broke with the colourful tradition of the past.  The colours on the collar no longer represented individual regiments.  They would now indicate arms and branch of service.  For the common army, this would be blue.

The base - only thing I did different here was the addition of brass rod in the four corners to better anchor the celluclay. 


regards,

Jack

  • Member since
    April 2005
  • From: Piscataway, NJ!
Posted by wing_nut on Monday, May 9, 2011 7:41 PM

37 SPRUESTongue Tied

Doogs even though you did take the tough route on the bottoms it looks sweet.

Jack, nice work.

Marc  

  • Member since
    August 2003
  • From: Connecticut, USA
Posted by Nachtflieger on Tuesday, May 10, 2011 3:06 AM

Great looking work going on here guys!

Nate


  • Member since
    April 2008
  • From: Philadelphia PA
Posted by smeagol the vile on Tuesday, May 10, 2011 3:37 AM

Good luck with those AM tracks.  I was building a 1/35th Whipped, from Emhar, same company and all that your buildings.  Id did one whole side of the tracks, started on the second... when I droped it and broke off one of the MGs... so much work down the drain.  Still kicking myself over it.


  • Member since
    October 2009
Posted by PANZERWAFFE on Tuesday, May 10, 2011 4:48 PM

SMEAGOL - Soory to hear that, bad luck.  I have done the same in the past.  Was you able to salvage?

Got started on the build.  Cut off the barrels and put some new Evergreen tube in place of them.  Might be able to get some pics up tonight or soon anyway.

Rob

  • Member since
    April 2008
  • From: Philadelphia PA
Posted by smeagol the vile on Tuesday, May 10, 2011 5:28 PM

no, I was not able to salvage.  When the MG broke it's mount fell into the turret.  The whippet turret doesn't turn and is part of the chasis.  It was also so very well glued I wouldnt have been able to break it appart without destroying it...


If I can get a new whippit kit it would be perfect, heh.


  • Member since
    March 2006
Posted by TD4438 on Tuesday, May 10, 2011 9:40 PM

You could cut a hole in the bottom of the tank,then patch it up after recovering the mount smeagol.

  • Member since
    April 2008
  • From: Philadelphia PA
Posted by smeagol the vile on Wednesday, May 11, 2011 2:30 AM

That is very true... But at the moment I am going to leave it as is.  I also dont like how I did the armor on the turret, I didnt line it up correctly enough for my liking...


  • Member since
    June 2010
  • From: Austin, TX
Posted by DoogsATX on Thursday, May 12, 2011 6:47 PM

Ugh. The wait feels like it's been interminable, but the skies have cleared, and I have a brand new bottle of Tamiya Deck Tan on the bench.

Tonight, I WILL finish the shading work on the underwing surfaces. 

On the Bench: 1/32 Trumpeter P-47 | 1/32 Hasegawa Bf 109G | 1/144 Eduard MiG-21MF x2

On Deck:  1/350 HMS Dreadnought

Blog/Completed Builds: doogsmodels.com


JOIN OUR COMMUNITY!

Our community is FREE to join. To participate you must either login or register for an account.

SEARCH FORUMS
FREE NEWSLETTER
By signing up you may also receive reader surveys and occasional special offers. We do not sell, rent or trade our email lists. View our Privacy Policy.