SEARCH FINESCALE.COM

Enter keywords or a search phrase below:

The group build to end all group builds - THE GREAT WAR

155829 views
1091 replies
1 rating 2 rating 3 rating 4 rating 5 rating
  • Member since
    April 2006
  • From: ON, Canada
Posted by jgeratic on Friday, May 11, 2012 3:11 AM

Mike, that looks really sharp!  Great job on the rigging, and with that shading on the undersides, I think overall it could  pass as the real thing. Very nice!  Yes

regards,

Jack

  • Member since
    April 2005
  • From: Piscataway, NJ!
Posted by wing_nut on Friday, May 11, 2012 8:03 AM

What's not to enjoy?  Nice piece of eye candy..er ... plastic candy... oh hell, you know I mean.Stick out tongue

Marc  

  • Member since
    December 2002
  • From: NYC, USA
Posted by waikong on Friday, May 11, 2012 9:33 AM

What Jack said!  Beautifully done Mike, I like those letters on the tires.

My website: http://waihobbies.wkhc.net


  • Member since
    February 2006
  • From: Smithers, BC, Canada
Posted by ruddratt on Friday, May 11, 2012 2:17 PM

Thank you much, guys! Can't tell ya how much I appreciate the comments - this one was a blast to build! Yes

Mike

 "We have our own ammunition. It's filled with paint. When we fire it, it makes pretty pictures....scares the hell outta people."


  • Member since
    July 2006
  • From: San Francisco Bay Area
Posted by bufflehead on Friday, May 11, 2012 8:05 PM

Holy Smokes Mike!!  That's such a beautiful build!!  Yes YesThe rigging is so intricate, its amazes me how you can do it!  Everything about your SE.5a is superb!!  Its another fine addition to this group build and also to your display shelf!!  KUDOS dude!!Toast

Ernest

Last Armor Build - 1/35 Dragon M-26A1, 1/35 Emhar Mk.IV Female


Last Aircraft Builds - Hobby Boss 1/72 F4F Wildcat & FW-190A8


  • Member since
    February 2006
  • From: Smithers, BC, Canada
Posted by ruddratt on Saturday, May 12, 2012 12:26 AM

Hey Ernest! Thanks man!! Yes This has been a great GB so far. When I look at all the completed builds and see the top-notch quality of workmanship on display here, it makes me feel part of a very elite group of modelers, as well as just overall great fellas!

Mike

 "We have our own ammunition. It's filled with paint. When we fire it, it makes pretty pictures....scares the hell outta people."


  • Member since
    April 2010
Posted by Theuns on Sunday, May 20, 2012 7:04 AM

Hi guys, any space for me and my Revell 1/72 Fokker D-VII (and maybe a wingnut wings 1/32 SE5A later on)?


Theuns

  • Member since
    April 2010
Posted by Theuns on Wednesday, May 23, 2012 1:58 AM

Please ignore my post, the Fokker was a total failure and has put me okk fiddly bi-planes for a while :-(


Theuns

  • Member since
    December 2002
  • From: NYC, USA
Posted by waikong on Wednesday, May 23, 2012 8:12 AM

Sorry to hear that Theuns, what was the problem? The kit or biplanes kits in general?

My website: http://waihobbies.wkhc.net


  • Member since
    April 2010
Posted by Theuns on Wednesday, May 23, 2012 8:16 AM

It's my total lack of any sort of skill when it come to fidly struts ect in 1/72 scale. I have a 1/32 Wingnut wings SE5 on the way and only hope I will be able to finish it off to ant level of acceptence in a few years time.

Theuns

  • Member since
    December 2002
  • From: NYC, USA
Posted by waikong on Wednesday, May 23, 2012 8:29 AM

You know, besides rigging, structs are probally the most problematic when building biplanes. Often times, they aren't even of the correct length so that the top wing will not sit properly.  Many people use a jig of some sort to fit the top wing/structs on.  It's such a problem that they even sell commerrcial ones.

Here's some articles that may be of help.

http://agapemodels.com/?p=602

http://www.clubhyper.com/reference/aligningandriggingabiplanegp_1.htm

http://www.internetmodeler.com/2006/march/aviation/aeroclub_jig.php

Good luck with the SE5.

My website: http://waihobbies.wkhc.net


  • Member since
    April 2010
Posted by Theuns on Wednesday, May 23, 2012 10:34 AM

It's just a case of having to build up my skills with Biplanes, that's all. I will beat this D-7 into submition and depending on how much I am in the mood to battle, I will get a 1.72 Airfix nrw tool Swordfish before even atempting the SE5. I also have a 1/72 CR 42 in the stach.

Maybe the skill level needed for the small D-7 is way highr than I have now LOL!


Theuns

  • Member since
    December 2010
  • From: Memphis TN
Posted by Heavens Eagle on Thursday, May 24, 2012 12:18 AM

Theuns

Please don't get too discouraged!  If nothing else think about the problems you are having and try to work out in your head ways to deal with them.  When you get back to your D7, do so with a plan.  Many years ago I started work on a 1/72 scale Heinkel 51b floatplane.  It is a pre WW2 German biplane.  I had it together and was trying to paint it.  The paint really messed up to the point where I decided to strip the paint and redo.  In the process, literally the model just fell apart.  I got discouraged and just put it back into the box.  I never quite forgot about it though, and a few months later decided to see what I could do to fix it.  Long story short, that time allowed me to go back to it fresh and it turned out 20 times better than it would have if I had kept going.  It actually won several awards at contests.

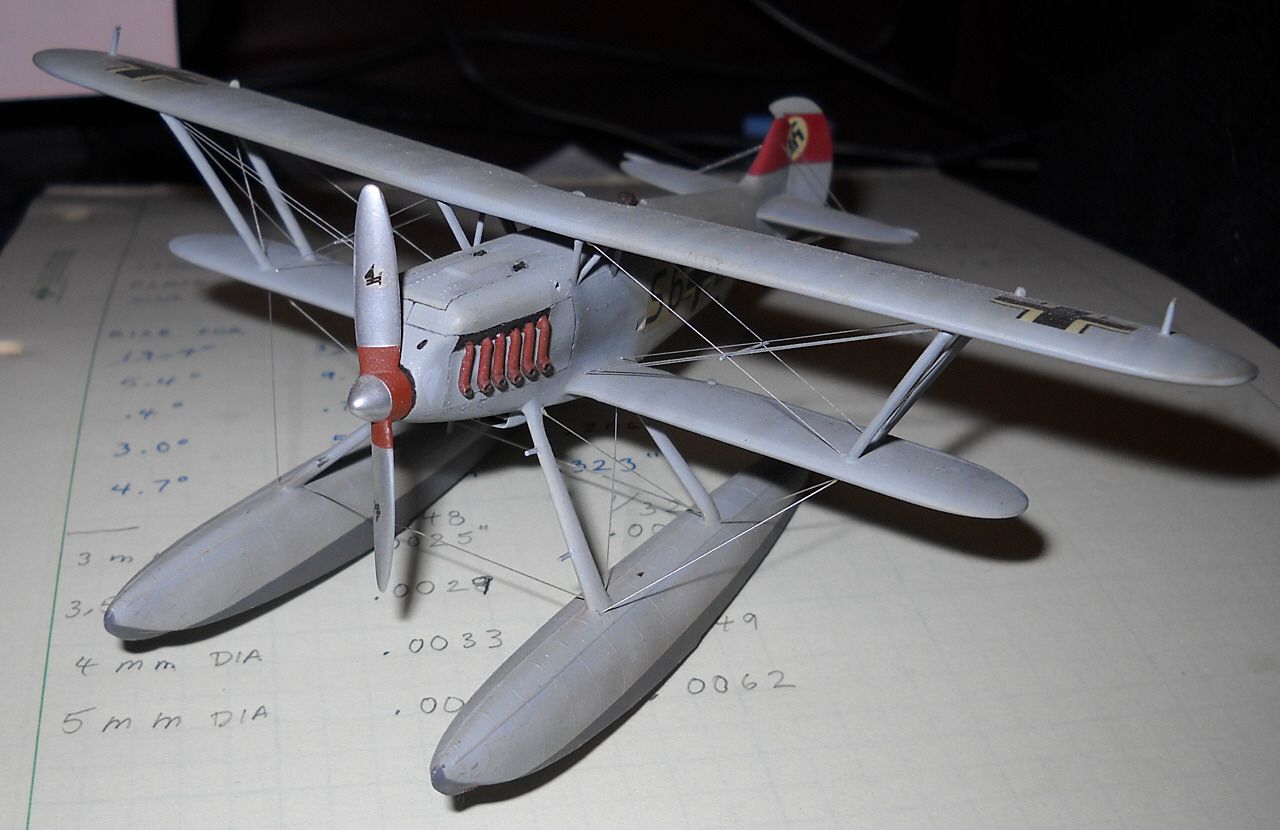
Note that all the rigging is with finely stretched sprue.  No nylon thread used. (Also note that this kit was done about 25 years ago)

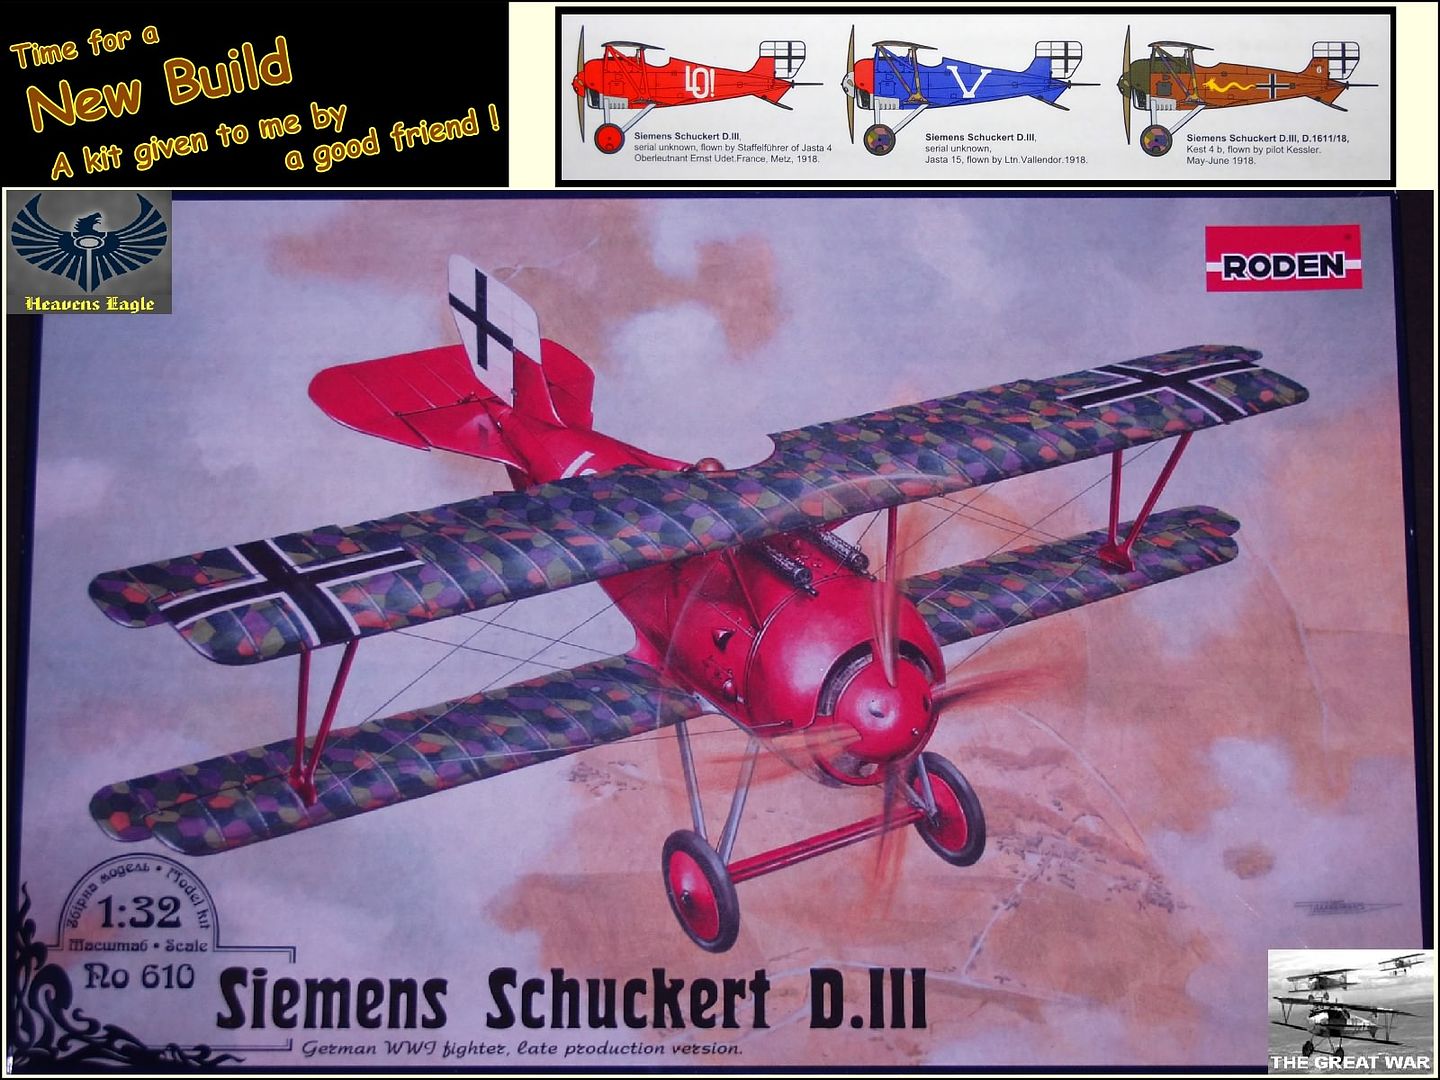
Now to get back on topic!  Here is the first installment on my Seimens Schuckert D.III  !   Have a busy Saturday planned this weekend.  (no, NOT WOMEN!)  Hmm  Local club is hosting a model contest here in Memphis.  Big SmileYeah

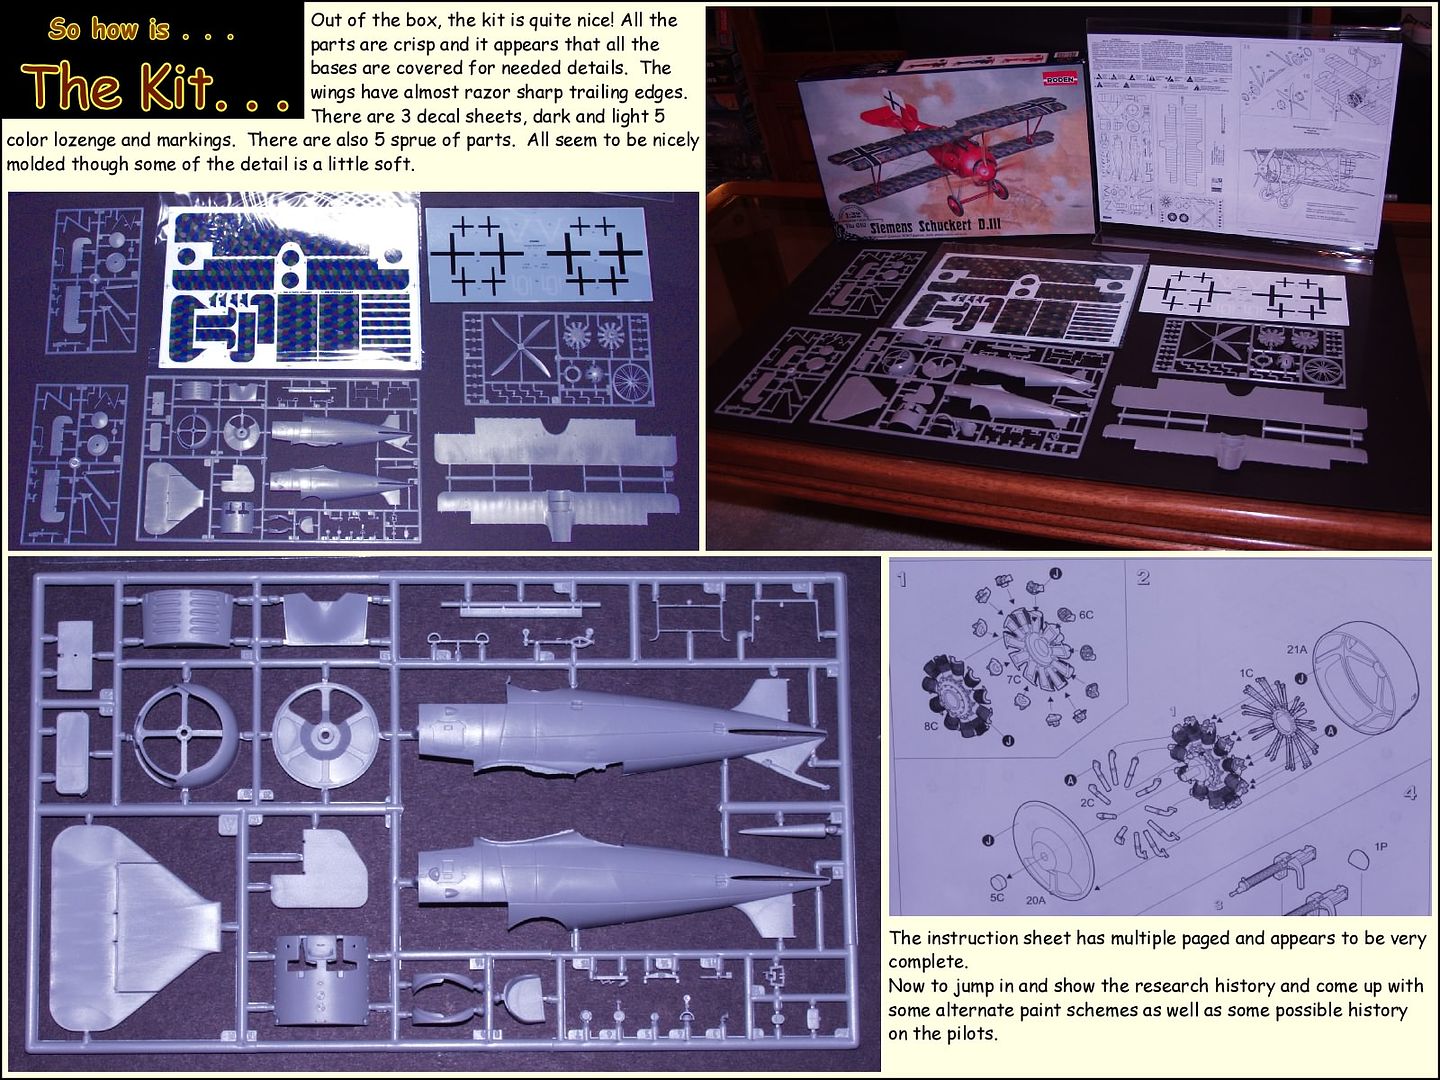
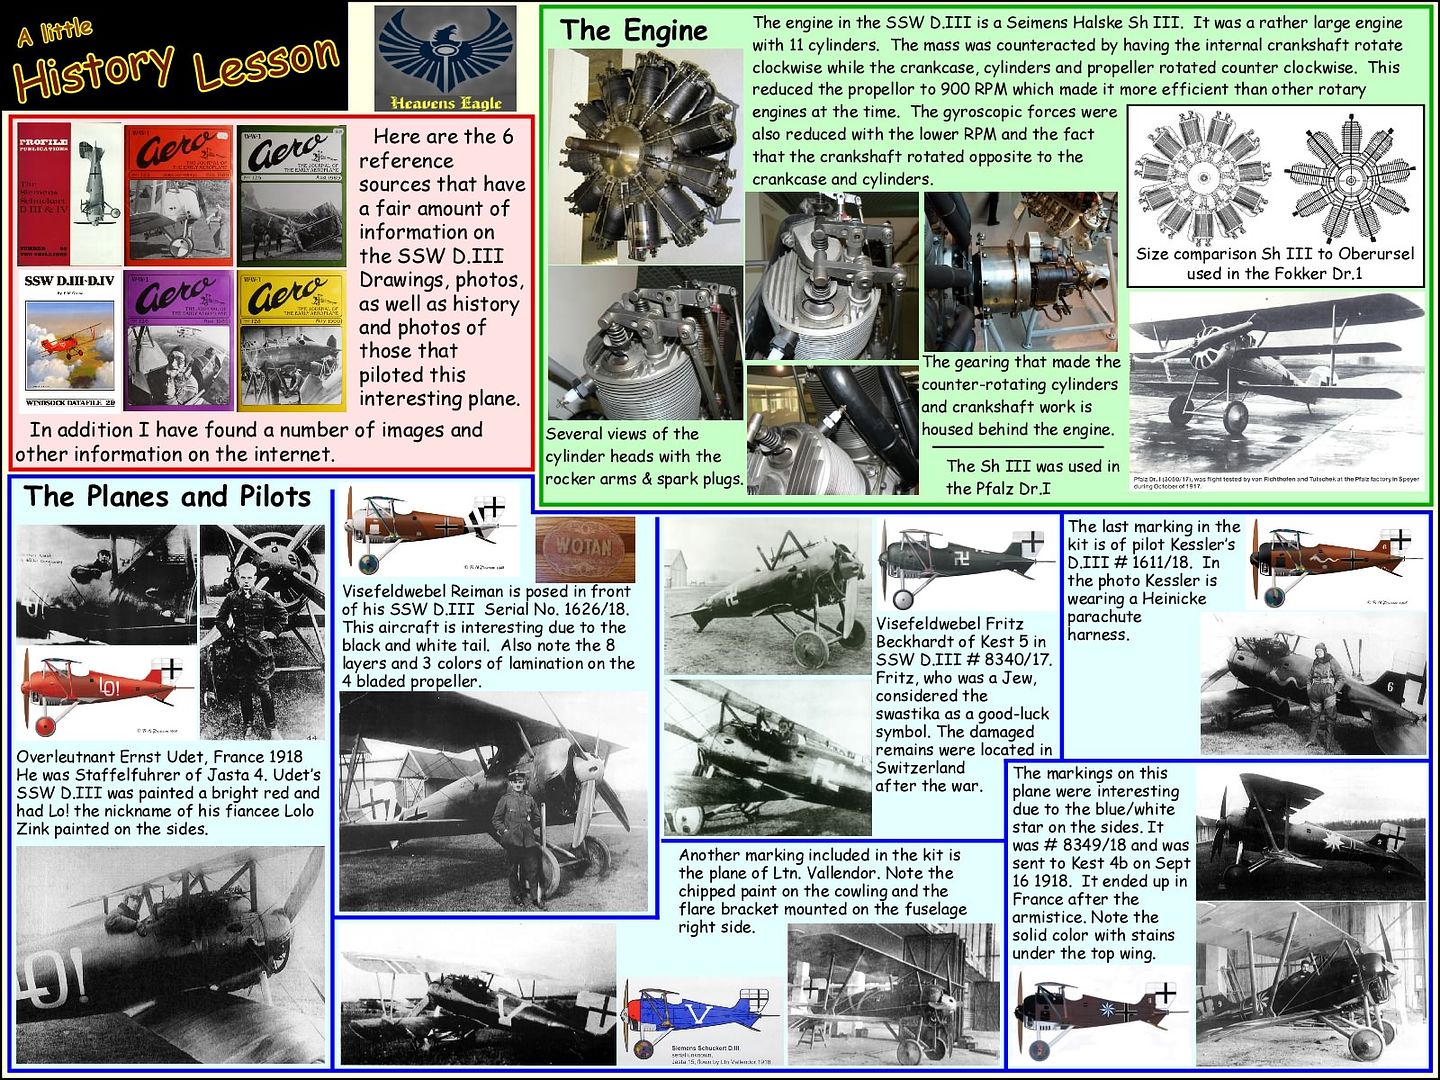
So here are the pics.


There you have my start.  Been quite busy lately with trips and doing the local club newsletters.  If you are interested in our little contest, drop me a line and I will get you some info.  I know that there will be a fair number of sellers at the event.  

Have a good Memorial Day weekend and remember those that gave their lives and why we have it!


  • Member since
    December 2002
  • From: NYC, USA
Posted by waikong on Thursday, May 24, 2012 8:06 AM

Oh Mine H.E!  Bringing the build experience up another notch here.  Fantastica detailing as usual and appreciate the great step by step insights.  Marc's putting real stitiching in and your're creating real vent openings, next thing you guys going to do is shrink a real person to sit in the cockpit.

My website: http://waihobbies.wkhc.net


  • Member since
    April 2010
Posted by Theuns on Thursday, May 24, 2012 10:46 AM

Here is the Revell 1/72 D-7 in kit form.

Revell 1/72 D7

There is no cockpit detail what soever so I will cover it up with a "cloth cover"

They suply decals for the Lozenge that has to then be painted in the blocks, even with the diagram it is still rather confuzing as the pattern changes in the same decal.

1/72 D7

I had to "future on " the decals as they just didn't want to stick down atall.

To attach the top wing was an eye opener as to how fidly these small biplaned really are for the inexperienced.

Almost complete with the model ,will post pix.

Theuns

  • Member since
    April 2010
Posted by Theuns on Sunday, May 27, 2012 9:17 AM

Here is is , warts and all. :-(

Colours of Rudolph Berthold's plane. Hopefully I'll have better luck with the wingnut 1/32 SE5.

D7

As you can see there is a "cover" over the cockpit as there is absolutely NO detail there atall, not even a seat!

D7

1/72 Revell D7

Theuns

  • Member since
    May 2012
Posted by Xstream1 on Monday, May 28, 2012 7:11 AM

G'day, first time posting. Would i be right joining with a Toko 1/72 Pfalz XII? I am considering doing it as a brightly colored mock up, a concept piece if you will similar to something from the Richthofens Squadron and his Albatross D V.

I ordered it last week and it should hopefully arrive by tomorrow afternoon.

Cheers

  • Member since
    December 2010
  • From: Memphis TN
Posted by Heavens Eagle on Monday, May 28, 2012 10:07 AM

Theuns, your D7 looks quite nice from the photos.  We are all our own worst critics on our builds!  After the photos showing the lozenge outline decals, I was quite surprised on how well the lozenge turned out.  I am sure your SE5 will be a lot easier, just take your time and if you need to ask questions.  We are all here to help as well.

Welcome Xstreame1!  I am looking forward to seeing your Pfalz build!

  • Member since
    February 2006
  • From: Smithers, BC, Canada
Posted by ruddratt on Monday, May 28, 2012 10:39 AM

Xstream1 - nice to have you on board! I love the DXII ! WnW makes one in 1/32 and I'm very tempted to pull the trigger on it!

Theuns - that lozenge is phenomenal. Amazing results! Yes I built the WnW SE.5. It's a great kit - goes together easy. The most complex part of the build is the rigging - it's quite extensive, so just take your time and plan ahead. Looking forward to seeing your build!

Mike

 "We have our own ammunition. It's filled with paint. When we fire it, it makes pretty pictures....scares the hell outta people."


  • Member since
    February 2006
  • From: Smithers, BC, Canada
Posted by ruddratt on Tuesday, May 29, 2012 10:43 AM

So, even though our anniversary is not until the end of July, my wife and I decided to exchange gifts yesterday, and I must say see really knows how to pick 'em. Needing some ideas, I showed her a few ebay auctions (Tamiya's 1/32 P-51, Revell 1/32 Float plane), and the link to WnW's site. She made a great choice - when I opened the box, there was a Late version FE.2b from WnW. Man, what a kit! 18" wingspan, tons of rigging, and over 340 parts. This is gonna be a fun build for sure! Yes

Oh yeah, and I have to say that 1.2 carats looks really nice on her finger. Wink

Mike

 "We have our own ammunition. It's filled with paint. When we fire it, it makes pretty pictures....scares the hell outta people."


  • Member since
    July 2006
  • From: San Francisco Bay Area
Posted by bufflehead on Wednesday, May 30, 2012 8:34 PM

Hey Theuns, the D7 came out really nice!  You finished her up quickly!  I really like that vivid color scheme you chose, very eye catching!  Glad to see more bipes here, someone's got to show me how to do it right!  (just kidding Mike, Jack, Paul, & Marc!)

Mike, congrats on the early anniversary gift!  I was going to say you made out like a bandit with the WnW FE.2b, but I think the wifey came out on top with the 1.2 carats!!

I'll be getting back to the Pfalz when I finish up a couple more projects, but still hanging around checking things out!  

Ernest

Last Armor Build - 1/35 Dragon M-26A1, 1/35 Emhar Mk.IV Female


Last Aircraft Builds - Hobby Boss 1/72 F4F Wildcat & FW-190A8


  • Member since
    April 2010
Posted by Theuns on Thursday, May 31, 2012 4:54 AM

[quote user="bufflehead"]

, someone's got to show me how to do it right! 

Yes please' I'll gladly take some of the expert's advice to !


Theuns

  • Member since
    April 2005
  • From: Piscataway, NJ!
Posted by wing_nut on Thursday, May 31, 2012 7:29 AM

Someone stuck a cattle prod up the groups collective keister and once again new life.  Gald to see it.

Theuns... nice... real nice.  the cockpit cover is real time saver.  i get your birds on my site as soon as I am done here.

Xstrea1... welcome to the fray.

Fe.2B...1.2 carats (doing that balance scale thing with my hands)... yup, sounds about right.

Marc  

  • Member since
    April 2005
  • From: Piscataway, NJ!
Posted by wing_nut on Thursday, May 31, 2012 7:36 AM

Theuns brings the completed total to 22. 

Marc  

  • Member since
    February 2006
  • From: Smithers, BC, Canada
Posted by ruddratt on Thursday, May 31, 2012 11:56 PM

Yep fellas, she's a keeper that's for sure!

...and about that kit (and WnW's in general) - man, I don't know how they do it. 1/32 scale, over 300 parts, PE, the best decals and instructions in the biz (IMHO), incredible fit and detail, and free shipping, all for only $89 !? I mean, what the heck are they doing right that so many other companies banging out 1/32 stuff are not? Seriously, those 150-200 dollar price tags are downright insulting.

Mike

 "We have our own ammunition. It's filled with paint. When we fire it, it makes pretty pictures....scares the hell outta people."


  • Member since
    January 2012
  • From: Belgium, EU
Posted by Ninetalis on Friday, July 27, 2012 2:45 PM

Hey all,

I need some thing simple to airbrush, to improve my airbrushing skills,
so I bought this little fokker from reveal, a rebox from eduard.
I don't know if I'm going to do it in 'red baron' markings, or in the colours of 'Lt. Josef Jacobs Fokker'


the box of the Fokker, in unknown scale mwuhahaha.... yeah 1/48 offcourse...
 
So can I join with this quick little build?
With regards, Ninetalis. 

  • Member since
    February 2006
  • From: Smithers, BC, Canada
Posted by ruddratt on Friday, July 27, 2012 4:27 PM

Ninetalis, nice pick-up on the Revell kit. It is indeed a re-pop of Eduard's kit, which I've built one of and have another in the stash. The kit goes together very well. The only assembly I found tricky was the main landing gear. You will need to open up the 4 mounting holes in the part sandwiched between the top and bottom airfoil halves, as well as shorten up the 2 front struts by about 1/16" (from the top of the struts - this is important) to get 'er to sit correctly.

Mike

 "We have our own ammunition. It's filled with paint. When we fire it, it makes pretty pictures....scares the hell outta people."


  • Member since
    August 2007
  • From: back country of SO-CAL, at the birth place of Naval Aviation
Posted by DUSTER on Friday, July 27, 2012 4:49 PM

OH pretty plane


Either scheme would look good

Steve

Building the perfect model---just not quite yet  Confused

  • Member since
    January 2012
  • From: Belgium, EU
Posted by Ninetalis on Friday, July 27, 2012 4:52 PM

Thanks ruddratt, I'll make sure I won't forget,

I do have a question about the rigging, when would be the best moment to do this with this fokker?

With regards, Ninetalis

  • Member since
    February 2006
  • From: Smithers, BC, Canada
Posted by ruddratt on Friday, July 27, 2012 6:10 PM

Happy to help! There's very little to do in the way of rigging on the DR.I. Most of it is confined to the tailplane area in the form of control wires. Up front, you have the bracing wires on the main gear and between the cabane struts, with a pair of control wires connected between the upper deck just aft of the guns and the upper wing. These are all easily installed after assembly and painting.

Mike

 "We have our own ammunition. It's filled with paint. When we fire it, it makes pretty pictures....scares the hell outta people."


JOIN OUR COMMUNITY!

Our community is FREE to join. To participate you must either login or register for an account.

SEARCH FORUMS
FREE NEWSLETTER
By signing up you may also receive reader surveys and occasional special offers. We do not sell, rent or trade our email lists. View our Privacy Policy.