SEARCH FINESCALE.COM

Enter keywords or a search phrase below:

Steel Cats (Sept. 2012-Aug. 2013)

321774 views
3330 replies
1 rating 2 rating 3 rating 4 rating 5 rating
  • Member since
    April 2013
Posted by SchattenSpartan on Wednesday, August 28, 2013 6:13 PM

I have some pics for you, guys!

No whitewash yet, because I had to do a lot of touch-ups on the 3-tone camo scheme (first attempt at that kind of camo). The pics were taken before the touch-ups.

I added a bit more green to that side after taking the pics and changed the shape of the brown area:

The front of the tank looked ok-ish, so I left it alone. The whitewash will hide most mistakes I made during painting anyway:

This side is pretty much unchanged as well:

I had to sand down a blob of paint at the rear, but It is also unchanged otherwise:

I had to take the pics with my phone, so the quality isn't very good. The colors aren't as intense on the real model... I added all the little dots as well and sprayed a coat of alclad clear coat over the whole tank to (hopefully) protect the paint when I wash the white Vallejo paint away using some Vallejo AB thinner (that stuff isn't as "hot" as the other thinners/solvents I have access to....)

My schedule for tomorrow:

  • spray model with Vallejo Air white
  • wash it away with Vallejo AB thinner in some areas (those 2 steps are experimental and I'll try to use them on a piece of painted plastic sheet first)
  • add some washing to bring out details
  • streaking with black/dark brown/white oil paint

Schedule for Friday:

  • Assemble tracks
  • paint tracks with Gunze Metallizer color
  • add mud to the suspension, roadwheels and tracks
  • paint exhausts with rust paint/pigments

Schedule for Saturday (if I'm still allowed to build on the end date?):

  • glue roadwheels and tracks in place
  • paint up all the tools (no brush painting, only AB here) and attach them to the tank
  • add decals (just the number on each side of the turret)
  • spray everything with a coat of Alclad flat coat

More pics tomorrow evening...

Cheers, Clemens

  • Member since
    April 2013
Posted by SchattenSpartan on Wednesday, August 28, 2013 6:15 PM

The whitewash will cover up most of the camo, so It will look completely different once the white paint is on (mostly white with a bunch blotches of brown/yellow/green visible)

  • Member since
    July 2013
  • From: Talent, OR
Posted by bitbite on Wednesday, August 28, 2013 7:16 PM

Awesome, Schatten. This is going to be cool!

I like that you have a schedule. Do you punish yourself if you don't stick to it? Smile

"Resist the urge to greedily fondle the parts . . ." - Sheperd Paine "Modeling Tanks and Military Vehicles" Page 5

  • Member since
    April 2013
Posted by SchattenSpartan on Wednesday, August 28, 2013 7:26 PM

Yes, I kinda puunish myself for not stickiing to the schedule: If I can't get everything done, Icwork untill 4 AM to get as close as possible to finishing all the tasks for that day. I have to get out of my bed at8 AM, so my "punishment" is sleeping only 4 hours. Now have a guess on how much sleep I got this week? Now you now how I make that much progress in such a short time...

  • Member since
    July 2013
  • From: Talent, OR
Posted by bitbite on Wednesday, August 28, 2013 7:28 PM

All that makes your build even more awesome!  Bow Down

"Resist the urge to greedily fondle the parts . . ." - Sheperd Paine "Modeling Tanks and Military Vehicles" Page 5

  • Member since
    April 2005
Posted by Thunderbolt379 on Thursday, August 29, 2013 3:52 AM

Hi all, I was a bit knackered when I came home from work so I didn't get anything some on the KT, but the good news is I have located some balkenkreutzer which should do the job, not in the spares box but on an old Microscale sheet, 71-156, Fighter Insignia #1. I'll compare the sizes but at this point I'm pretty sure the 8mm narrow crosses should do well enough. I'll need to use glosscoat under them, which means I'll be applying Tamiya's new clear flat over the top as well -- there's a first time for everything.

M/TB379

http://worldinminiature.blogspot.com/

  • Member since
    November 2003
  • From: Nashville, TN area
Posted by bobbaily on Thursday, August 29, 2013 6:08 AM

SS-looking good-can't wait to see the white wash

Bob


  • Member since
    February 2010
  • From: Berkeley CA/St. Paul MN
Posted by EBergerud on Thursday, August 29, 2013 6:37 AM

Almost there. Have another day.

Eric


A model boat is much cheaper than a real one and won't sink with you in it.

  • Member since
    November 2009
  • From: SW Virginia
Posted by Gamera on Thursday, August 29, 2013 9:30 AM

Clemons & Eric: Those both look great! Fantastic work guys, looking forward to the completed photos!

"I dream in fire but work in clay." -Arthur Machen


  • Member since
    July 2004
  • From: Sonora Desert
Posted by stikpusher on Thursday, August 29, 2013 10:23 AM

Clemens and Eric, those are both going to be magnificent looking cats when finished! Eric, yours looks about finished now... what else are you planning for that?


F is for FIRE, That burns down the whole town!

U is for URANIUM... BOMBS!

N is for NO SURVIVORS...

       - Plankton

LSM


  • Member since
    April 2013
Posted by SchattenSpartan on Thursday, August 29, 2013 12:21 PM

Thanks a lot guys! The kitten looks completely different now, compared to the pics I posted. I applied a lot (and I mean a LOT) of dots on the camo (yellow in the brown/green areas and green in the yellow ones). That made the camo look completely different. Painting those dots was a royal pain in the a** BTW. I tried using a template for them (a piece of styrene sheet with a hole in it), but it didn't work at all, so I had to paint them freehandedly... Those "dots" are basically small blotches of green/yellow paint applied in an iregular pattern.Then I sealed everything with a clear coat and sprayed the white on there. I tried to achieve a blotchy look and I think I had some success in doing so. Then I removed some of the white paint using acrylic thinner. I'd love to show you pics of all those steps, but I forgot my camera at my LHS (I'm only working there, because the owner helps me a bit with all the weathering...) I'll post all the progress pics together with the new ones tomorrow...

  • Member since
    July 2004
  • From: Sonora Desert
Posted by stikpusher on Thursday, August 29, 2013 12:26 PM

Doh! Well that is how the "ambush" scheme was applied. All those dots applied after the main pattern was on. It looks sweet when done right....


F is for FIRE, That burns down the whole town!

U is for URANIUM... BOMBS!

N is for NO SURVIVORS...

       - Plankton

LSM


  • Member since
    April 2013
Posted by SchattenSpartan on Thursday, August 29, 2013 12:36 PM

The "real" ambush pattern was painted with masks consisting of circles in various sizes AFAIK. That produced "dots" with hard edges:

It seems like the "ambush pattern" I painted on my kitten is a field applied solution. It is basically a normal 3-tone camo scheme (no circular masks used) with blotches of paint applied in various shapes and sizes. It looks a lot better than the "real" factory-applied ambush sheme IMO (at least on the Tiger 2 - the Hetzer looks better with the "real" pattern)

The ambush camo sure looks sweet! I didn't get it to look as nice as most of you guys could, but I'm happy with the results (remember: it's my first 3-tone camo). I wasn't very convinced when I just applied the different colors, but it looks way better with all those dots!

  • Member since
    November 2009
  • From: SW Virginia
Posted by Gamera on Thursday, August 29, 2013 12:47 PM

Hey cool Clemons, I think the 'ambush' scheme is my favorite of all those the Germans used. It's just cool looking and I've read quite effective when hiding in a forest.

Looking forward to seeing this bad boy with all the camo done!

"I dream in fire but work in clay." -Arthur Machen


  • Member since
    April 2013
Posted by SchattenSpartan on Thursday, August 29, 2013 2:07 PM

Yep, that ambush camo, or "Hinterhaltstarnung" (the German term for it) looks completely different than a normal 3-tone scheme. Those little dots change the look of colors completely.

I just reieved my October issue of FSM and there is a pretty neat step-by-step guide for a nice 3-tone camo in there. I have to try that on one of my models (I still have a panther in my stash...)

  • Member since
    April 2011
  • From: imperial beach, ca
Posted by malone duke on Thursday, August 29, 2013 2:20 PM

dang guys, i'm out for a bit and this whole gb restarts itself it looks like...  everyones work looks amazing, still trying to catch up...  just got a new phone so i can update my pics either tomorrow or saturday...  all these big cats really are pretty bad-***!!!

  • Member since
    April 2013
Posted by SchattenSpartan on Thursday, August 29, 2013 4:11 PM

How about a round 3? I have plenty of cats in my stash...

  • Member since
    April 2006
  • From: ON, Canada
Posted by jgeratic on Thursday, August 29, 2013 5:49 PM

It really has been a hectic pace at the end here, and still producing wonderful builds.

Schatten - with those broad bands of colours, I thought you had come up with a new KT scheme until you mentioned the dots thing.  Of course, yes, the ambush scheme.  They can be found both hard and soft edge, but no clue if this reflects whether it was factory or field applied.  I don't think I've ever seen photos of the disc style on Royal Tigers.

regards,

Jack

  • Member since
    April 2005
  • From: Piscataway, NJ!
Posted by wing_nut on Thursday, August 29, 2013 6:07 PM

WHAT THE ...  This is still going.  And what's this about an extended date.  I have not stopped by here for a while and seems top be going strong still and 4 new completions since last I was here.  I got a sweet little AFV  Club 1/48 Tiger I Final I an itching to build.

Marc  

  • Member since
    March 2003
  • From: Rain USA, Vancouver WA
Posted by tigerman on Friday, August 30, 2013 1:23 AM

Marc, I know you're a quick builder, but 2 days?

Gentlemen, I can't believe it's been almost 1 year since we started. Over 3,000 posts! I wonder if that's a record for an Armor GB? Must be close. You guys rock!

   http://i7.photobucket.com/albums/y269/wing_nut_5o/PANZERJAGERGB.jpg

 Eric 

  • Member since
    February 2010
  • From: Berkeley CA/St. Paul MN
Posted by EBergerud on Friday, August 30, 2013 3:03 AM

OK: Kursk Tiger ist Finis

I'll have a build log posted probably tomorrow in the armor section for anyone interested in Cyber Hobby's new Tiger I. Suffice it say it was a Dragon kit which is very good news mixed with some proper ulcers. This was a dumbed-down version of a pretty old kit and not Dragon's finest hour. Fortunately a wise head on Missing Lynx named David Nickles provided a “tweak list” that was invaluable. (Unfortunately he knew so much more about tanks than I do that I wasn't always able to follow his lead. But he did track down a number of very odd errors in the instructions and the part numbers. Considering how many duplicate parts were in this kit, Mr. Nickles saved me a lot of time.) If you're curious about the build check my post or look in on the thread Mr. Nickles started which has better hands than mine working on this kit:

http://www.network54.com/Forum/47207/message/1361225554/my+complete+orange+box+Tiger+tweak+list+%28long%29

Since the last post I tweaked the weathering quite a lot. First I put on some washes over the pigments on the drive wheels. I added more dry mud to the tracks. I splattered dry mud on the fenders. Then I gave the model's upper surfaces a dusting (via airbrush) of very fine pigments suspended in ISP which I think is very close to MIG Thinner for Washes. I did not seal the model in any way.

I could be accused of over weathering this one. Perhaps I'd plead guilty. Two factors guided my approach. I don't have the experience or natural skill at this hobby to find my own answers to a model that's both historically sound and an attractive build. So every kit I try something else. In this case, I used a lot of “Spanish School” techniques found on DVDs from Mig Jimenez and Adam Wilder. I also have Mig's wonderful book “FAQ2.” I also consulted the complex approach to weathering found in Michael Rinaldi's “TankArt Volume I. I can't tell you that I followed a bouncing ball. For one thing these sources give quite an array of possibilities. The real world interfered badly, so I didn't have the time needed delve deeply into Rinaldi's complex use of pigments and oils. His results are very impressive and as I've got Volume II (allied armor) I'll his approach my best shot on my next AFV which I think will be a Tasca Sherman. But as it stood, I spent a lot of time trying this, that, and another thing. Doing this almost guarentees an excess of weathering – but it's a price I'm willing to pay for the experience.

Second, I think a Kursk Tiger deserved some pretty aggressive weathering. Citadel only lasted for a few days, but prior to the battle both armies were in intense maneuvers as Hitler waited for Panthers to show up. The Germans knew Citadel was a desperate gamble and took real chances. Although the day of the tank “cavalry charge” were over by mid-43, the Germans put their tanks very far forward hoping for a fast breakthrough even if it cost them. In tactics both grand and small the Wehrmacht attempted to put their heavy tanks forward and support them with the older and more vulnerable Panzers III and IV. (Painful losses due to mines resulted.) This would have put the Tigers in the line of fire. (And let's not forget that after Citadel was canceled, the fun really began as the hoped for orderly withdrawal of German armor to Italy turned into a mad dash to the Dnieper River when the Soviets ouflanked both Model and Manstein.) So we have tanks that were quite new, but well broken in. And I think they would have been under heavy fire. When weathering gurus talk about chipping they advise looking for places that would receive wear: fair enough. But it's my guess that shrapnel from artillery and mortars, machine gun and small arms fire from infantry (not to mention anti-tank rifles and aircraft mounted canon) would have been prime culprits. And lets' not forget that the reason Tigers were built in the first place was that they could bring a powerful direct fire weapon to the battlefield but still withstand the much of the “storm of steel.” The Germans didn't lose many Tigers at Kursk (many were lost on the later retreat when a mechanical failure likely meant a tank loss in addition to casualties from powerful Soviet tanks and anti-tank gun) but it would have been a tough job to hide a Tiger moving forward and they would have drawn fire. And of course the crew was moving around. So there is a lot of chipping.

Kursk was actually a pretty good place for a battle – sounds a bit like Wisconsin without quite as much water. But dry weather would have been the norm and the Tigers were all pretty new. Hence, except for the mufflers and exhaust I used almost no rust. Although perhaps I should have used artistic license, I also avoided wet mud. But I'm sure that some nice summer sun would have led to some fading, wear and rain would have left a good supply of streaking. Above all, these tanks would have been dirty and dusty. If fifty ton tanks were in action they would have been throwing buckets of dirt and dust – whopping buckets of it. (I've interviewed WWII tankers and the subject of dust and dirt comes up real fast. Imagine driving down a dry road with hatches open behind another tank.) The filters and enamel AK streaking grime that I used began to wear and darken the very bright and heavily modulated dunkelgelb base. I use Iwata Com.Art acrylics for pinwashes. This product is used by railroad fans I like it a lot. It comes in opaque and transparent colors, is a cinch to remove if there's too much and because it doesn't really adhere well to plastic it gives a distinct look grime (if dark) or white wash (if light.) There's a color called “old oil” that when mixed with gloss varnish does a nice job of fuel stains. (I also used AK enamel fuel stains and the two approaches are indistinguishable to my eyes except that Com.Art dries fast and doesn't smell.) The PE over the engines was given a good blast of the stuff and I think that looks pretty good.

All pigments were applied without any kind of white glue or acrylic medium: I used MIG and Sennelier pigments fixed first with a hand spray of Tamiya X-20 (or ISP – same difference) followed by a misting of pigments mixed with Gamsol Oderless Mineral Spirits from the airbrush to fix it. Again, I wanted a good dose of dry mud and clumped dirt but not wet mud. I commit sins with dust. I know many wise heads (like Jimenez, Wilder and Rinaldi) like to use a light dusting of Tamiya acrylics to emulate dust. I beg to differ. My pigments are so fine that when slowly dusted on with an airbrush they look like dust. Clean it up – it is dust. I did end up with one problem that I'm not sure how best to handle. The horizontal surfaces would get the most sun and hence the most fading during the modulation stage. (You can still tell that the top of the turret is lighter than the sides.) However, it is those surfaces that would get the most dust and dirt. The vertical surfaces are shaded more darkly, but that's where you see the streaking. Rinaldi talks about this dynamic and argues that good weathering will darken a model sometimes substantially. Perhaps I should have adjusted the base coats more for scale and lightened the whole kit from the start. I could have also either kept more dirt and dust off the horizontal surfaces or kept streaking and splatter off the sides. That would have led to more visual contrast. Indeed, I frequently seal an AFV model with a satin/flat finish over a very matte hull. But I'm not sure it would have reflected what a vehicle looked like during the summer of 1943 because lot of dust is going to cut reflection. So I'm not there yet. And if anyone has any good ideas, I'd be glad to hear them. That said, it was my first Tiger, it was a very challenging build and great fun. I don't think I'm going to throw it away tomorrow.

Pic below

Eric


A model boat is much cheaper than a real one and won't sink with you in it.

  • Member since
    November 2003
  • From: Nashville, TN area
Posted by bobbaily on Friday, August 30, 2013 6:17 AM

EricB-outstanding build.....love the camo scheme...excellent weathering.....and adding the historic background adds so much to the build....again, job well done!

Bob


  • Member since
    November 2009
  • From: SW Virginia
Posted by Gamera on Friday, August 30, 2013 8:52 AM

I like her EricB! Looks pretty darn close to the photos I've seen of muddy Tigers.

I picked up Rinaldi's TankArt Volume I and II and started trying out some of his techniques on a cheap kit but I really need to work up some more practice on these. Kudos for jumping in and giving them a try!

And thanks for sharing your thoughts on your decisions - it's always great to know why you did this and why you didn't do that, helps me to learn much better than just studying your photos.  

"I dream in fire but work in clay." -Arthur Machen


  • Member since
    July 2004
  • From: Sonora Desert
Posted by stikpusher on Friday, August 30, 2013 10:50 AM

Interesting approach on the weathering EB. I can tell you from personal experience in dry dusty conditions that dust settles on all horizontal surfaces on an AFV primarily from two sources- the stuff thrown up by the vehicle itself, more heavily towards the rear; and the stuff thrown up by any vehicles traveling in column ahead of it, more heavily to the front from that source, but usually is lighter doses than the stuff thrown up by the vehicle itself.... But as I said on the other thread, gorgeous work!


F is for FIRE, That burns down the whole town!

U is for URANIUM... BOMBS!

N is for NO SURVIVORS...

       - Plankton

LSM


  • Member since
    March 2003
  • From: Rain USA, Vancouver WA
Posted by tigerman on Friday, August 30, 2013 10:59 AM

Very cool Eric. I concur with the other comments.Job well done and thanks for sharing. I'll try to get your photo up tonight.

For all you guys racing to the finish line, I'll grant extended time if needed. I don't want anyone to mess up their builds due to time.

   http://i7.photobucket.com/albums/y269/wing_nut_5o/PANZERJAGERGB.jpg

 Eric 

  • Member since
    April 2013
Posted by SchattenSpartan on Friday, August 30, 2013 12:18 PM

Eric: I have to agree with all the others. Your Tiger looks gorgeous! I think the amount of  weathering is spot on!

  • Member since
    April 2013
Posted by SchattenSpartan on Friday, August 30, 2013 12:39 PM

Here's todays update. The pics I am able to show you were taken yesterday though.

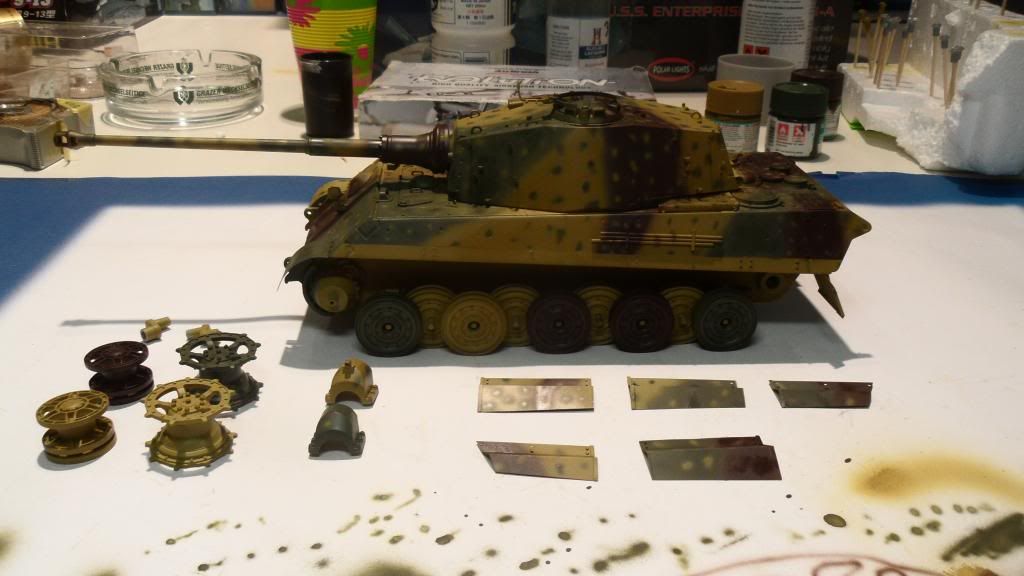
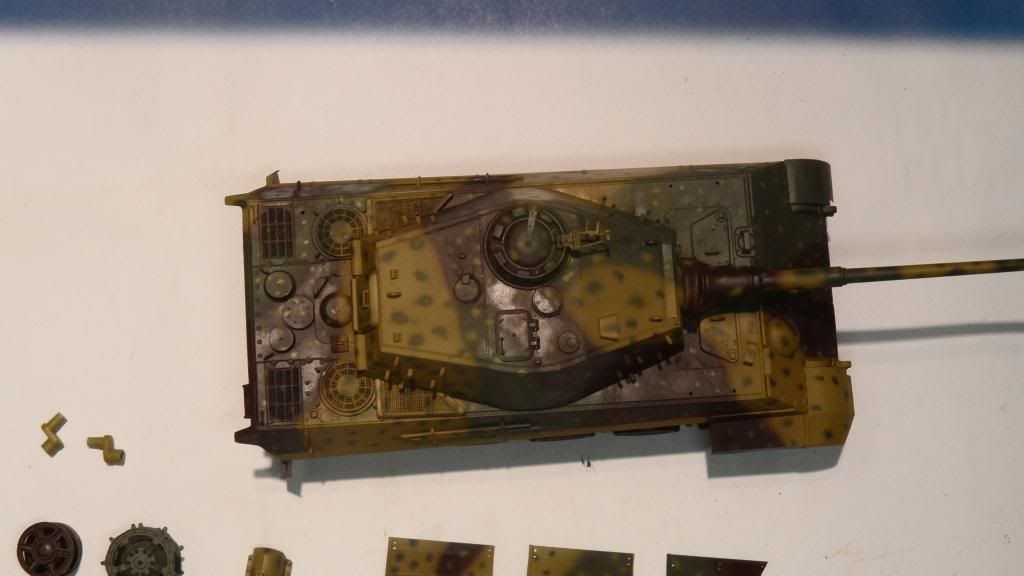
I still owe you some pics of the ambush-camo:

I hope the dots look good enough. I never had to paint something that small without a template...

Note the different form on the brown area in the center of this pic:

  ´

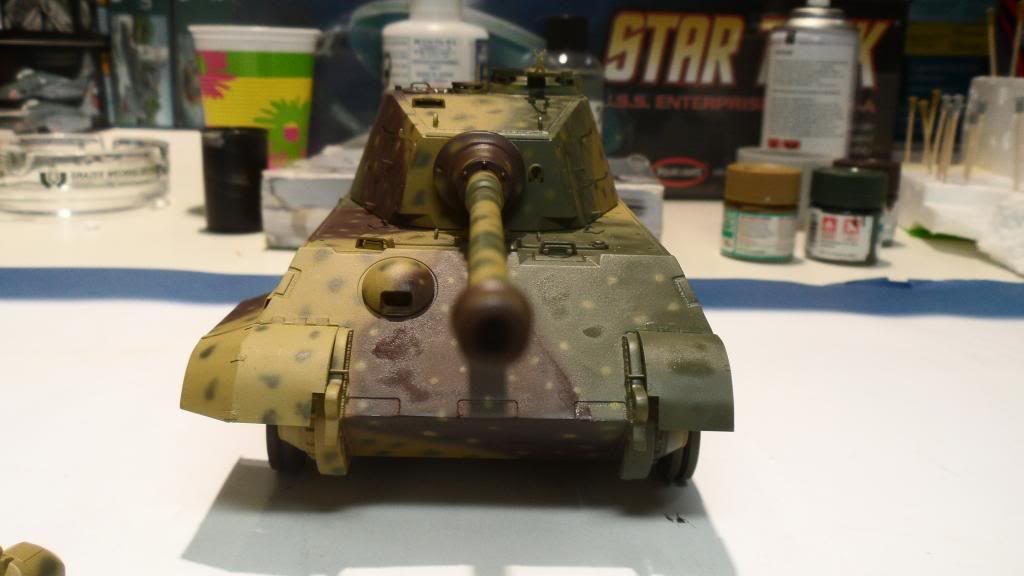
The shiny areas are spots where I had to do some tough-ups. 

Painting all those dots was probably the most frustrating part of the whole build so far, but I still had lots of fun!

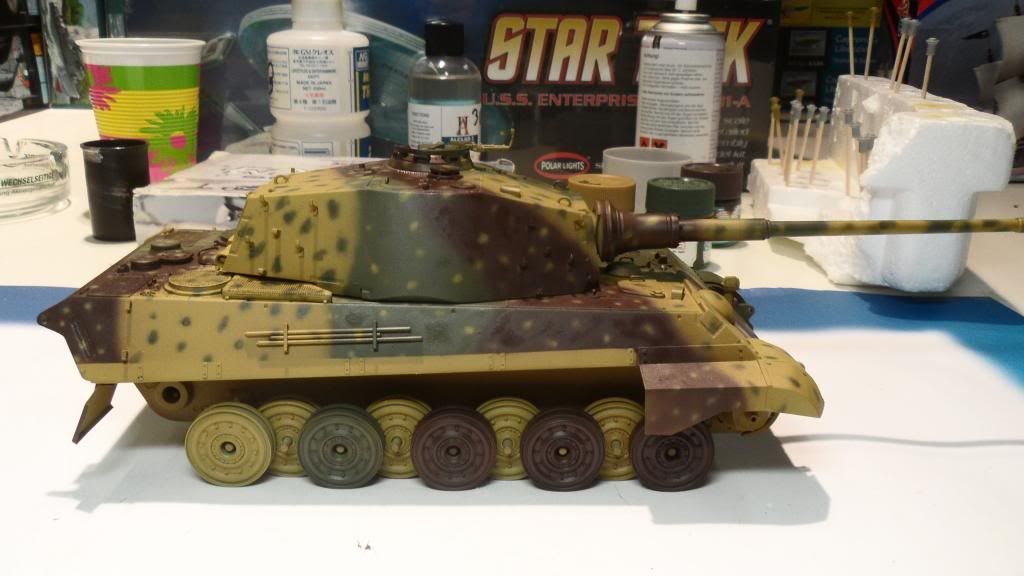
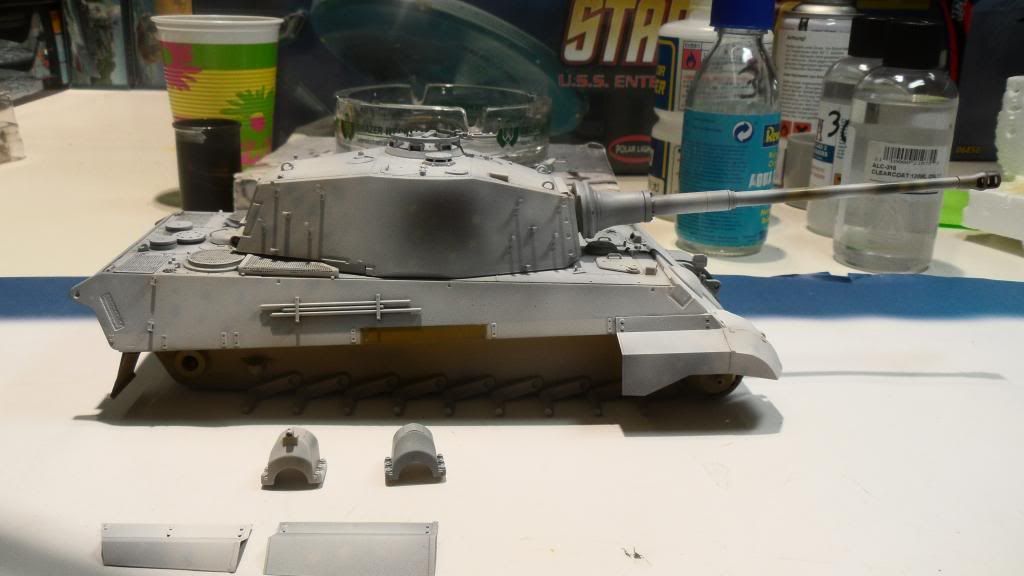
I applied a coat of gloss varnish (Alclad) to protect the paint:

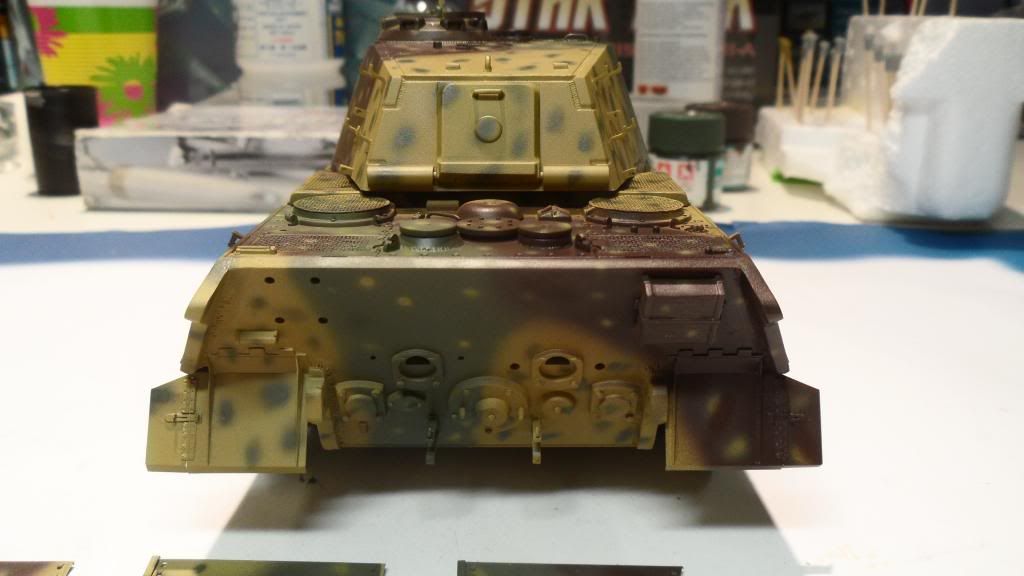
And now to the part I was utterly scared of: Applying the whitewash. I didn't want to screw up all the camo work, so I had a very bad feeling while spraying the whole kitten with Vallejo Air white:

You can't see it in the pics, but I applied the white paint in a blotchy pattern.

I removed the paint after it was dry using Vallejo AB thinner (it isn't as "hot" as my other solvents, so it didn't harm the Alclad varnish protecting the ambush-camo).

Here's a pic I took after the first side was "weathered":

I made a lot of progress since taking those pics, but I didn't take any pics. I'll post some more tomorrow though.

I "weathered" whitewash on the whole tank, including the fenders. Then I applied a black-brown oil wash to bring out some details. I also got most of the streaking done (black and dark brown oil paint), but I still have to add all the white streaking in the areas without whitewash (just to blend everything together). The tools are mostly painted as well and jsut need a treatment with oil wash.

I still have to add all the mud to the lower hull, roadwheels and track and I only managed to complete one of the tracks, so I need to work on the 2nd one as well. I don't really think any chipping is necessary on this vehicle, because I did a lot of chipping of the white paint already, which is enough IMO.

I hope i can get her done untill tomorrow (it's going to be really close though - 11:59 PM or something like that), but I might need another day or two...

I hope you like it.

Cheers, Clemens

  • Member since
    July 2004
  • From: Sonora Desert
Posted by stikpusher on Friday, August 30, 2013 1:59 PM

SchattenSpartan

How about a round 3? I have plenty of cats in my stash...

me too... my old Panthers were purged during my last move early this year and do think we should open this up to modern kitties as well... Leopard, Gepard, Luchs...


F is for FIRE, That burns down the whole town!

U is for URANIUM... BOMBS!

N is for NO SURVIVORS...

       - Plankton

LSM


  • Member since
    April 2011
  • From: imperial beach, ca
Posted by malone duke on Friday, August 30, 2013 2:11 PM

EBERG...  GREAT WORK MAN...

SCHATTAN, THE WHITEWASH IS VERY IMPRESSIVE...

TIGERMAN, A ONE WEEK EXTENSION WOULD BE NICE,

  • Member since
    July 2013
  • From: Talent, OR
Posted by bitbite on Friday, August 30, 2013 2:14 PM

Looks good to me, Schatten!

"Resist the urge to greedily fondle the parts . . ." - Sheperd Paine "Modeling Tanks and Military Vehicles" Page 5

JOIN OUR COMMUNITY!

Our community is FREE to join. To participate you must either login or register for an account.

SEARCH FORUMS
FREE NEWSLETTER
By signing up you may also receive reader surveys and occasional special offers. We do not sell, rent or trade our email lists. View our Privacy Policy.