SEARCH FINESCALE.COM

Enter keywords or a search phrase below:

Steel Cats (Sept. 2012-Aug. 2013)

321770 views
3330 replies
1 rating 2 rating 3 rating 4 rating 5 rating
  • Member since
    April 2006
  • From: ON, Canada
Posted by jgeratic on Sunday, October 13, 2013 11:34 PM

On another forum a member, that utilizes the Spanish method, directly pointed out he painted his models that way because reality was boring - so eye candy might be a good definition. I do believe that is what that style strives for, while reality/historical accuracy would be a close second, again depending on the individual.

I do find they play a lot with lighting, and sometimes turn it on it's head, creating a three dimensional look on what is really just a flat surface.  An example is with camouflage, where the edges are darker and only center is weathered lighter.  It defies reality, but viewers do respond positively to it.  I think has something to do with the fact that the brain  perceives high contrast  as being 3D, and therefore concludes it must be real.

regards,

Jack

  • Member since
    February 2010
  • From: Berkeley CA/St. Paul MN
Posted by EBergerud on Sunday, October 13, 2013 10:14 PM

Spanish School - inspired by Mig Jimenez, Adam Wilder and later Mike Rinaldi. Lots of fine art techniques - changing in color density (modulation) lots of filters, washes, pigments and oils. Maybe should be called the Spanish Store now as MIG industries (Adam Wilder top artistic guru) and AK International (Mig Jimenez) are selling a blizzard of weathering paints, filters, washes, DVDs etc etc: a tidy little business in both cases. Rinaldi has two books out called Tank Art (Vol I and Vol II) that just drip with splendid eye candy detailing how these complex effects are pulled off. Of course a lot of modelers have been using the many of the techniques for years maybe just not in one gulp. But if you compare one of the Spanish School efforts with a "state of the art" AFV model of maybe 15 years ago when Tony Greenland was kind of the hill, the look is greatly different - maybe not better but sure different.

Eric


A model boat is much cheaper than a real one and won't sink with you in it.

  • Member since
    March 2003
  • From: Rain USA, Vancouver WA
Posted by tigerman on Sunday, October 13, 2013 7:51 PM

I posted a thread in the armor forum on the completed builds.

   http://i7.photobucket.com/albums/y269/wing_nut_5o/PANZERJAGERGB.jpg

 Eric 

  • Member since
    March 2003
  • From: Rain USA, Vancouver WA
Posted by tigerman on Sunday, October 13, 2013 7:03 PM

Awesome job clemens. I will post a picture on the Wall of Fame.

   http://i7.photobucket.com/albums/y269/wing_nut_5o/PANZERJAGERGB.jpg

 Eric 

  • Member since
    April 2006
  • From: ON, Canada
Posted by jgeratic on Sunday, October 13, 2013 6:35 PM

Clemens, nicely done that.  Yes

Looks  it would fit quite well in a winter setting.  I also like how your white wash turned out.  Kind of cool in that, at the same time,  the vehicle looks to have had a light powdering of snow that has been somewhat wind swept.  

 I would of liked to have seen a few different coloured weathering powders on the lowers, looks a bit too uniform - or did this get washed out in the photos?

regards,

Jack

  • Member since
    April 2013
Posted by SchattenSpartan on Sunday, October 13, 2013 2:25 PM

Thank you very much, sir!

Regarding those exhausts: Oops, looks like I forgot to do that. Embarrassed I drilled out the barrel of the MG-34 though...

  • Member since
    July 2004
  • From: Sonora Desert
Posted by stikpusher on Sunday, October 13, 2013 2:07 PM

Oh yes, those are nicer photos. The better lighting shows off the detailing and weathering to much better effect. Overall VERY nicely done!!!! One small critiique- on your next Konig, hollow out the exhausts ;-)


F is for FIRE, That burns down the whole town!

U is for URANIUM... BOMBS!

N is for NO SURVIVORS...

       - Plankton

LSM


  • Member since
    April 2013
Posted by SchattenSpartan on Sunday, October 13, 2013 6:28 AM

Ok, here are the nice pics! They are a bit bright because of the white background (the whitewash looks a tad too bright), but they are still way better than mine...


  • Member since
    April 2013
Posted by SchattenSpartan on Sunday, October 13, 2013 6:14 AM

Thanks a lot, guys! You're way too kind!

Stik: Well, I just got the pics and I'm uploading them right now!

Eric: I don't really know what the "Spanish School" is... I just tried to get my kitten to look as beaten-up  as possible. I had no clue what I was actually doing half the time, but I think it worked... And as you already mentioned, I didn't particularly try to make her look realistic, but to create the look of a well worn tank...

  • Member since
    February 2010
  • From: Berkeley CA/St. Paul MN
Posted by EBergerud on Saturday, October 12, 2013 10:20 PM

Very nicely done Clemens. I'm still not sure whether the "Spanish School" heavy weather approach is realistic in the narrow sense or if it evokes an image (in your model's  case  fatigue and menace). Either way it's impressive. I really am going to spend the time to give the Rinaldi/Mig Jimenez approach an honest try on my next tank - hope it looks as good as yours.

Eric


A model boat is much cheaper than a real one and won't sink with you in it.

  • Member since
    November 2009
  • From: SW Virginia
Posted by Gamera on Saturday, October 12, 2013 8:32 PM

Worth the wait Clemons! Great job- the weathering looks very convincing!

"I dream in fire but work in clay." -Arthur Machen


  • Member since
    April 2005
Posted by Thunderbolt379 on Saturday, October 12, 2013 7:47 PM

Clemens, for only your third armour build I would call it remarkable! You've embraced a suite of excellent techniques and your result is very attractive and convincing. I would hope to turn out a tank as good as that one day!

Cheers, Mike/TB379

http://worldinminiature.blogspot.com/

  • Member since
    July 2004
  • From: Sonora Desert
Posted by stikpusher on Saturday, October 12, 2013 7:17 PM

hooray!!!! Well, hopefully the fancy pics will be in first thing tomorrow. But yours look very nice there Clemens. You really achieved a well worn look there.


F is for FIRE, That burns down the whole town!

U is for URANIUM... BOMBS!

N is for NO SURVIVORS...

       - Plankton

LSM


  • Member since
    April 2013
Posted by SchattenSpartan on Saturday, October 12, 2013 5:58 PM

I just got an email telling me that I won't get any pics today due to technical failure... Bang Head

So I thought: If I can't post the Censored pics from my LHS, I'll take some pics myself at least (with worse quality) and show them to you...

So here you go:

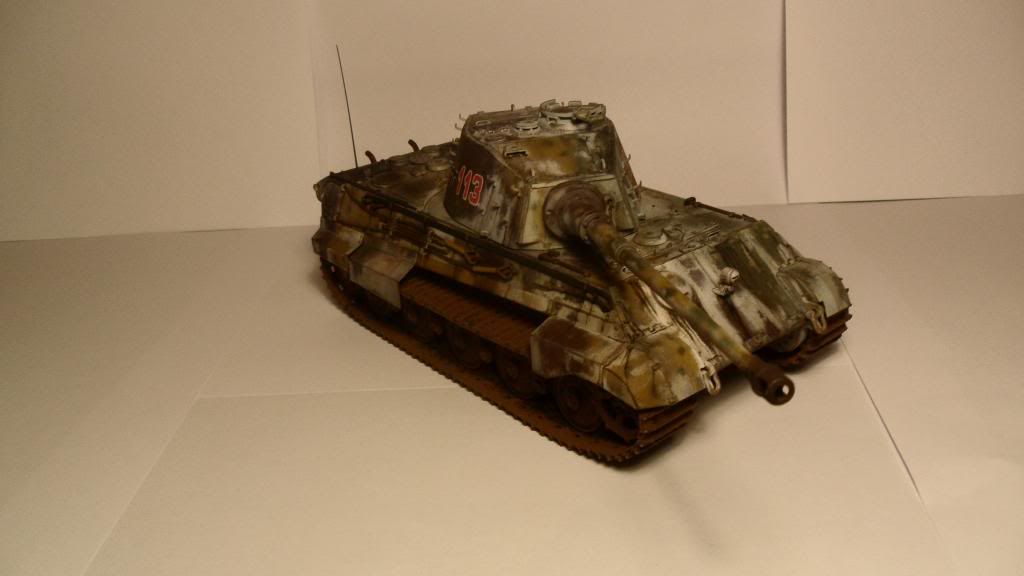
I'm calling her done now!

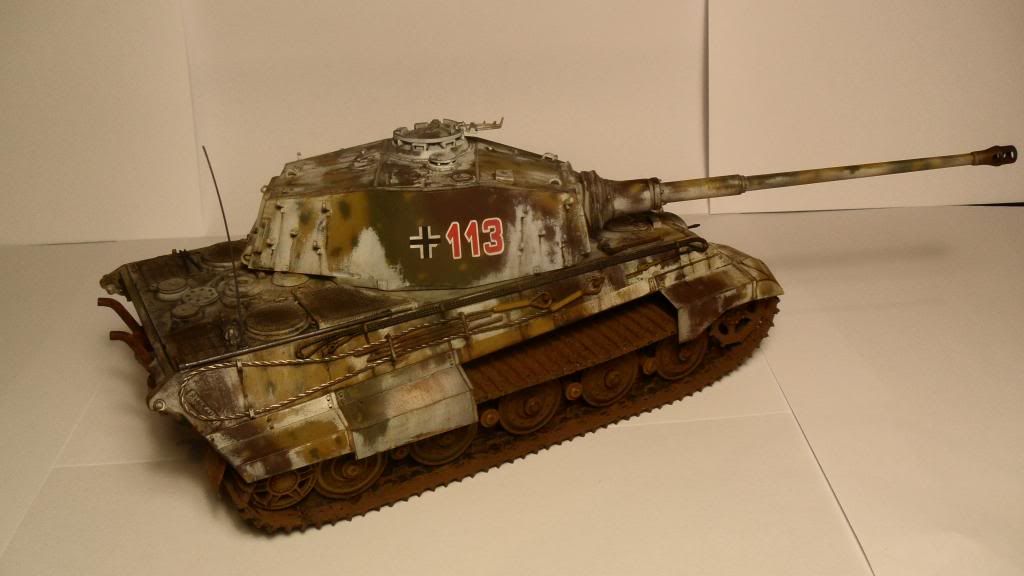
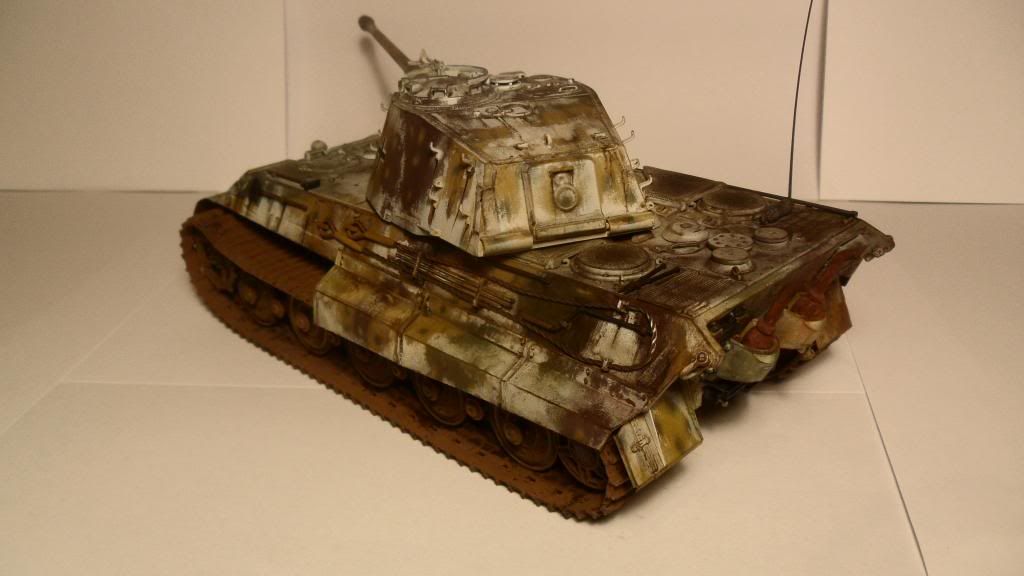
The model was painted with Gunze acrylics (dark yellow, olive green and chocolate brown) and then sealed with Alclad clear gloss. Then I sprayed Vallejo Air white in a blotchy pattern on top. When the white paint was dry, I used Vallejo's airbrush thinner and a large brush to remove the white again. The kitten recieved some streaking with black and brown oil paints, as well as a black washing to give it a grimy and used look and to bring out some details. I sealed everything with Alclad flat clear and applied the pigments (black pigments on the engine grills and muzzle brake, mud on the lower hull and suspesion/tracks, rust on the exhausts).

The inspiration for this kitty was actually this small drawing on the back of my reference book:

I'm quite happy with how she turned out, but I think the mud doesn't look that good.

This is my 3rd Armor model (the other ones being 2 Tamiya Shermans) and my 1st Dragon armor kit.

I really enjoyed this build for the most part, but there were some things I didn't like:

  • Assembling/mounting the tracks - They are magic tracks, but I still had to remove 3 ejector pin marks on every track link. Mounting those things was a royal pain as well. Next time I'll use friuls!
  • Sanding all those roadwheels - I guess I have to live withat issue when building german armor...
  • Mounting the towing cables - This was the last and worst part of the build. They didn't fit under the mounting brackets properly and i almost ruined the model when attachiong them. Everything turned out quite good and I only had to rebuild one of the brackets from scratch. I'll use an AM solution here as well when building another King Tiger (or any other German vehicle with those thick cables)
  • Assembling the bent engine grills - They were wrinkled when I got the kit, so I had to straighten them out before even trying to bend them and glue them in place. Their fit was also horrible to make things worse: They were too big and the shape was completely off...

Everything else was pure joy and I think I have to get me another one of those kits (or the Tamiya King Tiger)!

This little kitten is nothing compared to the amazing work you guys did here, but I did my best and learned a whole lot by building with you folks! Thanks for hosting this great GB, Eric!

I hope I get the good set of pics tomorrow.

Cheers, Clemens!


  • Member since
    April 2013
Posted by SchattenSpartan on Saturday, October 12, 2013 3:47 PM

The owner of my LHS told me that he would send me the pics at approx. 12:00 PM. It's 10:48 right now...

  • Member since
    April 2006
  • From: ON, Canada
Posted by jgeratic on Saturday, October 12, 2013 1:44 AM

Hi SchattenSpartan - the MG42 was a topic very early in this GB thread, I think even before anyone had started building.  It was strictly an infantry weapon, with a very high rate of fire and only one trigger setting, it's doubtful it was issued to the panzer arm - unless you have a photo showing otherwise.

Look forward to those completed build pics.

regards,

Jack

  • Member since
    April 2013
Posted by SchattenSpartan on Friday, October 11, 2013 4:53 PM

Don't worry guys, I didn't forget about the pics. I just thought I'll post way better pics tomorrow. I'll go to my LHS and they have a really good camera there... I found an MG-42 in one of my 251 kits that isn't needed. Were those things mounted on the gun cradle of the King Tiger as well, or was it MG-34s only?

  • Member since
    March 2003
  • From: Rain USA, Vancouver WA
Posted by tigerman on Thursday, October 10, 2013 1:18 AM

Hurry!

   http://i7.photobucket.com/albums/y269/wing_nut_5o/PANZERJAGERGB.jpg

 Eric 

  • Member since
    April 2013
Posted by SchattenSpartan on Wednesday, October 9, 2013 9:44 AM

Hi there gents!

My apologies for the (additional) delay. I simply didn't have any time to post my photos untill now. I'll try to post them either tonight when I get home, or tommorrow evening...

  • Member since
    July 2004
  • From: Sonora Desert
Posted by stikpusher on Saturday, October 5, 2013 11:54 AM

LOL! I was at home here in California working on my T-34 ;-) I was there only in 1/35 scale.


F is for FIRE, That burns down the whole town!

U is for URANIUM... BOMBS!

N is for NO SURVIVORS...

       - Plankton

LSM


  • Member since
    March 2003
  • From: Rain USA, Vancouver WA
Posted by tigerman on Saturday, October 5, 2013 2:06 AM

That was cool Carlos. Which dude was you?

   http://i7.photobucket.com/albums/y269/wing_nut_5o/PANZERJAGERGB.jpg

 Eric 

  • Member since
    February 2010
  • From: Berkeley CA/St. Paul MN
Posted by EBergerud on Friday, October 4, 2013 3:40 PM

There are also some books by Jentz available for download at

bookos.org/.../Thomas%20L%20Jentz

Eric


A model boat is much cheaper than a real one and won't sink with you in it.

  • Member since
    April 2013
Posted by SchattenSpartan on Friday, October 4, 2013 3:07 PM

Hey guys, I'm almost done with the repair work on my kitten. She should be in one piece again on Sunday evening (I won't get any bench time today and tomorrow, so I have to add the last bits on Sunday afternoon)

  • Member since
    April 2006
  • From: ON, Canada
Posted by jgeratic on Friday, October 4, 2013 2:33 PM

Posted this in the armour forum as well, but those wishing to add to their Tiger library, Amazon has a free digital download:

http://www.amazon.com/Tigers-in-Combat-Vol-1-ebook/dp/B00E4UWW4Y/ref=sr_1_1/184-0113776-9767331?s=digital-text&ie=UTF8&qid=1380808628&sr=1-1&tag=vglnk-c914-20

regards,

Jack

  • Member since
    November 2009
  • From: SW Virginia
Posted by Gamera on Wednesday, October 2, 2013 2:38 PM

Good show and congrads on a well deserved win!

"I dream in fire but work in clay." -Arthur Machen


  • Member since
    July 2004
  • From: Sonora Desert
Posted by stikpusher on Wednesday, October 2, 2013 2:32 PM

Ok, just thought I would share it here. My Tiger for this GB was also part of a GB for our local AMPS Chapter (So Cal) which was entered at the IPMS nationals in August in Colorado. Our AMPS GB took 1st place in the Group/Chapter catagory and our AMPS chapter has a one year possesion of that monster cup trophy. One of the chapter members who went there, recorded this and shared it with the Chapter after posting it on You  Tube. I told them we need to mix a grog for that cup and all have some in proper armor fasion.


F is for FIRE, That burns down the whole town!

U is for URANIUM... BOMBS!

N is for NO SURVIVORS...

       - Plankton

LSM


  • Member since
    October 2009
  • From: Oil City, PA
Posted by greentracker98 on Wednesday, October 2, 2013 3:05 AM

Hello,

All of you have built some really great looking "Kitty Cats" Earlier, I found this show on You Tube. http://www.youtube.com/watch?v=1KQ8x52FMsM Maybe someone already posted it, but here it is (again)

I haven't built any thing armored. The closest thing I've done/doing is the halftrack Lee marvin and his remaining members of his Dirty Dozen leave the chateau (sp) in. I'm still working on it for the Hollywood GB.

A.K.A. Ken                Making Modeling Great Again

  • Member since
    July 2004
  • From: Sonora Desert
Posted by stikpusher on Sunday, September 29, 2013 2:27 PM

Lets go Clemens... there is a whole battalion of Tigers waiting on you... ;-)


F is for FIRE, That burns down the whole town!

U is for URANIUM... BOMBS!

N is for NO SURVIVORS...

       - Plankton

LSM


  • Member since
    April 2013
Posted by SchattenSpartan on Sunday, September 29, 2013 2:11 PM

Ok guys. I finally  recovered from my jetlag and decided to take some pics for you. I ran into a problem though. I forgot to place the kitten in my display case before leaving so it had a lot of dust on it when I came home. I dusted her off, but by doing so I broke off a decent amount of tiny bits including both rear fenders, half of the right front fender (I should've used more superglue on those PE bits), the headlight, various tools, one of the towing cables and the tip of the MG cradle. I need to glue all those parts on and replace some of the fender parts I lost (about 3 of them) before I can take some pics for you. It is nothing serious but I have only limited time this week, so I should be done by next sunday.

Cheers, Clemens

JOIN OUR COMMUNITY!

Our community is FREE to join. To participate you must either login or register for an account.

SEARCH FORUMS
FREE NEWSLETTER
By signing up you may also receive reader surveys and occasional special offers. We do not sell, rent or trade our email lists. View our Privacy Policy.