SEARCH FINESCALE.COM

Enter keywords or a search phrase below:

The 2014 Automotive Group Build

62970 views
717 replies
1 rating 2 rating 3 rating 4 rating 5 rating
  • Member since
    March 2012
  • From: Corpus Christi, Tx
Posted by mustang1989 on Monday, December 8, 2014 10:08 PM

Seabe
go figure

No pun intended. lol 

Thanks Raven and Seabe for the encouragement.Yes


 Forum | Modelers Social Club Forum (proboards.com) 

  • Member since
    March 2011
Posted by ewheeler454 on Monday, December 8, 2014 10:11 PM

Thanks Raven and Seabe.

Has anyone heard from Tony?? It's been a while since he posted or updated the GB.

Got a good start on the 37. Chrome is in the bleach but this stuff if tough so it may need to soak a few days.

Filled in the pin marks under the running boards.

Door panels, trunk and side chrome has been scribed. Body is sanded and ready to primer.

Got the transmission welded together.Once dried and sanded the seam will be gone. I used pro-weld with a touch-n-flow glass tube. Mustang, it will also get rid of the engine seams.

Sanded all the mold lines off the seats. They have a cool pattern on them so I may do somthing with them.

The rest is just parts cleanup.

L8TR,

Eric

  • Member since
    April 2014
  • From: Australia
Posted by lostagain on Saturday, December 13, 2014 2:08 AM

Eric, finished Buick looks great. That's bare metal foil for the chrome, right?

Mustang, the gloss plastic has come up really well - would never have thought of it.

So spent a few hours on the Lotus, results have been variable, but we are progressing. Did the distributor and its wiring. There is also an unseen wire to the starter motor.

Also got an out of focus fuel line into the carbies with a filter in line.

And the seats are in too. Did white piping around the seat upholstery, but it disappears when the seats went in.

Next it is on to the instrument panel. Trouble is, when I bought the (very cheap) model in a bargain bin in Tokyo, there was a sticker in Japanese that said something I did not understand. Now I think it probably said NO DECALS because there are no decals, so I will have to improvise to fill out the instrument dials. It could take a few attempts.

So the next step may take some time. 

  • Member since
    March 2012
  • From: Corpus Christi, Tx
Posted by mustang1989 on Saturday, December 13, 2014 4:33 AM

Thanks lostagain! Your's is coming along nicely. Say......did you get that PM?


 Forum | Modelers Social Club Forum (proboards.com) 

  • Member since
    March 2011
Posted by ewheeler454 on Saturday, December 13, 2014 9:07 AM

Thanks lostagain,

Yes it is bare metal foil. I think it's one of the greatest inventions for modelers hehehehe.

Your build is coming along nicely.

L8TR,

Eric

  • Member since
    April 2014
  • From: Australia
Posted by lostagain on Saturday, December 13, 2014 6:17 PM

Hi Mustang

Have worked out the messages now. Reply is on its way.

  • Member since
    May 2005
Posted by pyrman64 on Sunday, December 14, 2014 9:00 AM

I was finally able to get started on the GMC wrecker.  Here's the chassis, it still needs weathered.

I de-chromed almost everything in Westley's Bleche-Wite

I filled in the sunroof with Evergreen "V-groove" styrene

thanks for looking.....

Greg H

"There is many a boy here today who looks on war as all glory, but, boys, it is all hell." Gen. Wm T. Sherman (11 April 1880, Columbus, Ohio)

  • Member since
    November 2013
  • From: Jerseyville, ON
Posted by elass0wyp0 on Sunday, December 14, 2014 1:28 PM

Hey Fellas!  Well it's that time of year again for me.  I'm back in the man cave.  It looks like I have missed a lot over the spring, summer and fall. 

I made it through all the new pages, I confess that I didn't necessarily read everything but I certainly took my time with all the great pics everyone has been sharing.  Well done everyone.  The Gremlin, that semi, the Monkee car, the GTX, every one's stuff is really looking great.  Inspiring.

So I just finished the last bits of my second mustang vs corvette build entry that I had to roll over to the general 2014 auto GB.  The pics aren't the best and I screwed up quite a bit but was more in a 'giter dun' mode.  I also have a van half completed I want finished asap so I can start something new for the winter.

Anyway, onto the pics.

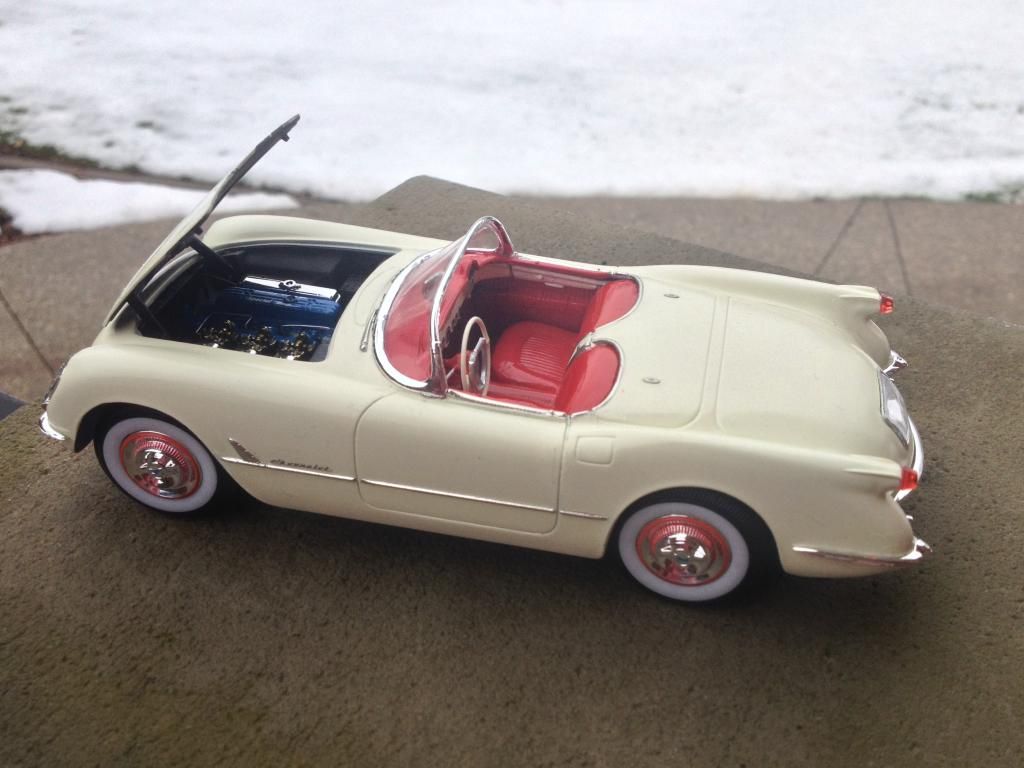
Revell 1953 Corvette Roadster with the 1953-54 photo etch parts.

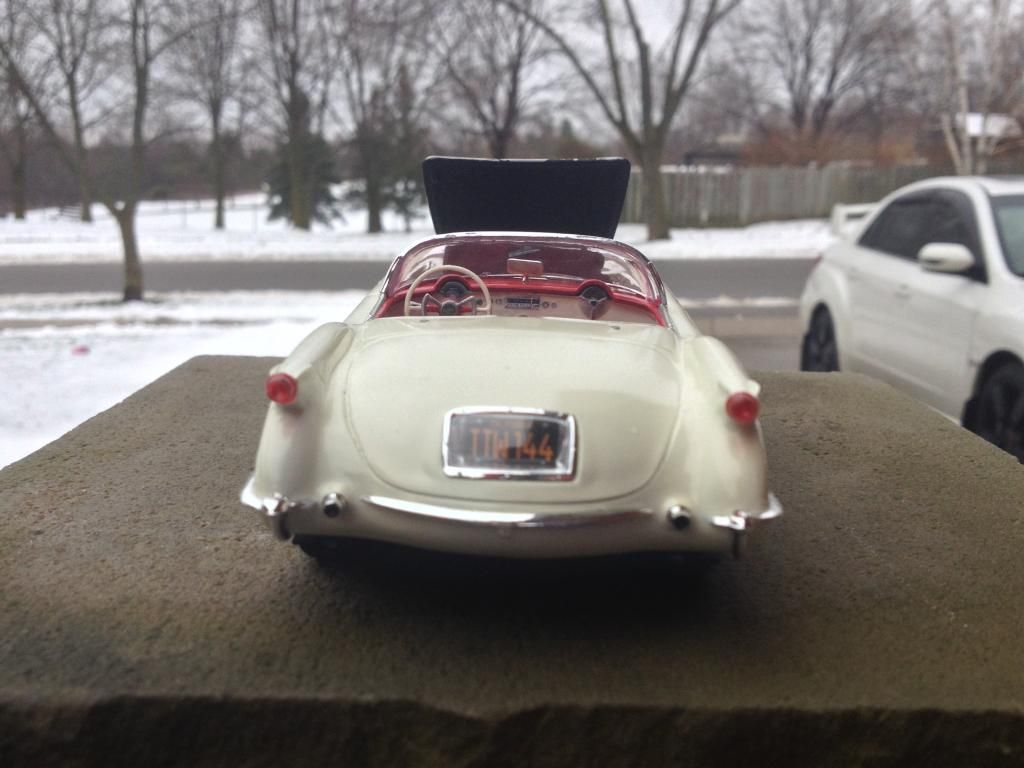
I painted it Vallejo ivory, PE headlights, dash rings, key and key chain, soft top hold downs, and emblems. 

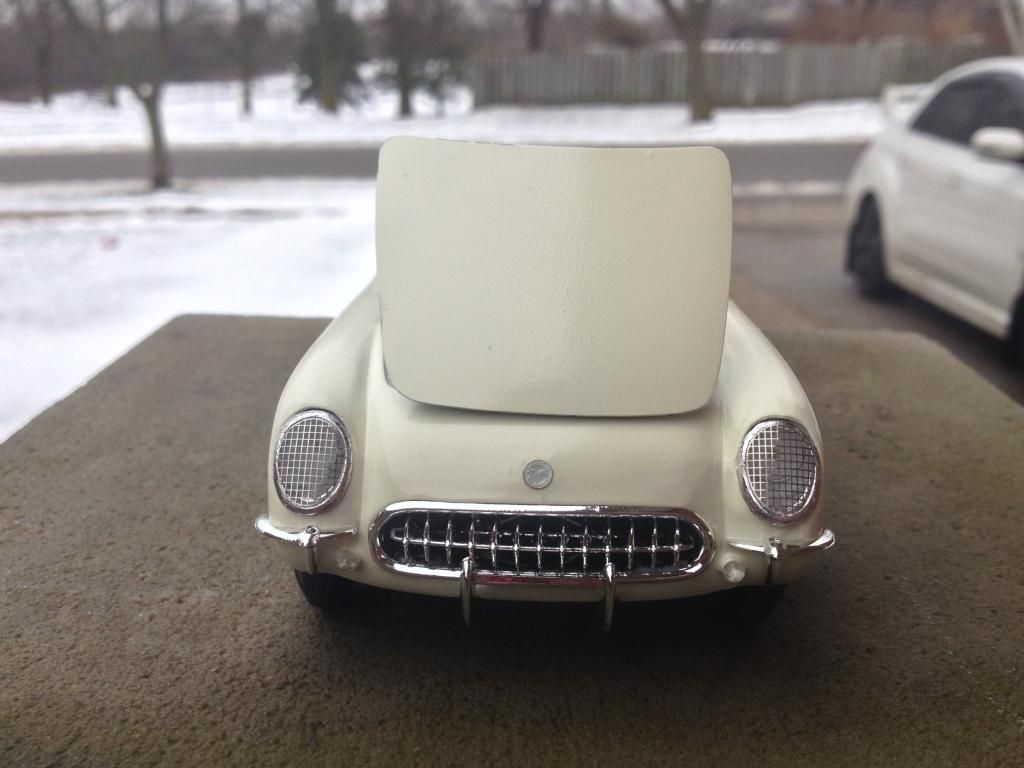
The rear wheels sit a bit too far forward.  It was simple enough and went together okay I suppose.  A couple of weird things like the bumpers have nothing to align them and attaching them after painting was a bit of a messier than I would have liked challenge but they eventually stuck so whatever. Other than that it was pretty good. It does seem very fragile tho.  The front grill guard is held on by next to nothing.  I can see that snapping off soon.

I'm not sure I would bother with PE again, it was ok but aside from the side emblem-not really worth the effort IMO.  Maybe skill or practice could produce better results.

PS- I also did bare metal foil for the first time.  Awesome stuff.  If your not using it, use it.  Super easy and amazing results.  I'm excited to do a fifties car with lots of chrome trim now.  I'm so glad I learned this new skill.  Best new skill/tool I've acquired in years.  Seriously next level stuff.

The final pics blow but I couldn't wait for sunshine.  Took 'em this AM, and moving on to the next project.

The rest of the pics are here. I've probably already shared most of the WIP pics.

http://s293.photobucket.com/user/elass0wyp0/slideshow/Scale%20Models/Revell%201953%20Corvette%20Roadster

I hope to be back with some more timely updates with the next project. 

Thanks for looking and sharing,

Gord

  • Member since
    September 2013
Posted by Raven728 on Sunday, December 14, 2014 1:41 PM

Greg, looks good so far, looking forward to more.

Gord, really nice looking Vette! That's one to be proud of. It's funny - lacking a sense of scale, the first pic kind of looks like the car's on a cliff over the ocean. Nope, it's snow, lol.

- Steve

  • Member since
    September 2013
Posted by Raven728 on Sunday, December 14, 2014 1:59 PM

Since this is a car GB I'm hoping no one minds if I post a completed non-GB build (I did a Cobra here earlier this year). I'm a 67-69 Camaro junkie, and this is the first one I've finished that I'm not ashamed to have on my desk. Revell 1969 Camaro; the color is meant to be Hugger Orange, it's a bit too light I think but close enough (I used Tamiya ratlle can orange). I also clearly need more practice applying BMF. Stick out tongue Just wanted to share, thanks for looking.

- Steve

  • Member since
    March 2011
Posted by ewheeler454 on Sunday, December 14, 2014 8:52 PM

Hey Greg, good to see ya back.

Great start on the Wrecker.

Hi, Gord. I like that color. Goes good with that body style. I agree with the Pe. I've used it before but end up using a few pieces and wasting the rest hehehehehe. I usually use thick crazy glue to attach bumpers so I don't get any smears, plus it sticks to paint. I use a toothpick to apply a very thin coat.

Steve,

That's a smooth paint job on the Camaro. Adding BMF can be a pain hehehehe. I run a scribe around everything I plan to add foil to so I have a nice edge to cut against.

I didn't get a lot done to the 37Ford this weekend. Just more parts cleanup and also started on the jig to make the plug boots. If it works I'll post it hehehehe.

L8TR,

Eric

  • Member since
    November 2013
  • From: Jerseyville, ON
Posted by elass0wyp0 on Monday, December 15, 2014 9:09 AM

Eric, great advice on that glue.  I had to use that old skool sticky kid stuff, bad memories-worse results. lol

Raven- I couldn't quite get it figured out but I was going for that scale car parked on the street type thing I see that Don fella does with his pictures.  So I'm glad it sort of turned out, it's not the ocean tho -just some great Canadian snow :( lol  and that camaro looks fantastic-be proud and display that bad boy.

Keep atter boys.

Gord

  • Member since
    March 2012
  • From: Corpus Christi, Tx
Posted by mustang1989 on Monday, December 15, 2014 10:34 AM

Gord that Corvette looks great!!!

Same goes for that Camaro Steve. BMF is something I need to work with a little more myself.


 Forum | Modelers Social Club Forum (proboards.com) 

  • Member since
    November 2013
  • From: Jerseyville, ON
Posted by elass0wyp0 on Wednesday, December 17, 2014 9:16 AM

Ha.  Thanks 'Stang.  I hope I didn't diminish anyone's BMF efforts stating it was so easy.  I should restate that I expected it to be a complete nightmare and it was not.  I was surprised that it wasn't a night mare and that I was able to be half decently successful on my first try.  That's a little more sensitive I think.  lol

I thought I would post up some wip pics of the delivery van.  I didn't complete it this fast.  It was already painted with assembled chassis.  So just adding the details between coats of future. 

I still want to get some sort of decal or lettering to add some more delivery truck realism like the word delivery and address or something.  My printer blows for custom printed decals so I'm gonna hit the lhs today and see if they have any thin decals or those scratch transfers letters I can use.

It's a little further than these pics show now and I hope to have it completed for the weekend.  I'm rushing a bit as I'm jonsin' to start something new but don't want to have too many incomplete projects on the go.

Anyway-on to the pics.  Once again the camera blows and the camera operator is under the influence so the pics aren't the best.

The rest of the older pics are here - http://s293.photobucket.com/user/elass0wyp0/slideshow/Scale%20Models/AMT%20Rescue%20Van

Thanks for looking and keep her sticky side down boys,

Gord

  • Member since
    March 2011
Posted by ewheeler454 on Wednesday, December 17, 2014 10:47 PM

Hey Gord,

I like it! Especially the wheels.

I did manage to get a little done on the 37 Ford today.

Broke one of the exhaust pipes so had to weld it back together.

Assembled the engine. After mounting the heads where they are supposed to be, there was a large gap under the intake. I used a finger file to sand it down until it fit flush.

Also did some sanding on the running boards and on the pin marks on inside fender wells. That is a hard place to reach hehehehe.

L8TR,

Eric

  • Member since
    November 2013
  • From: Jerseyville, ON
Posted by elass0wyp0 on Thursday, December 18, 2014 9:21 AM

I had to share this for a laff.  I picked up the dry transfer letters.  I thought this looked hilarious, the more I look at it the crazier it looks but I'm starting to dig it. 

I'm not sure I can recommend this method.  I started by cutting out each letter and trying to pre-make the word to lay as one but that didn't turn out too well so I then started doing individual cut out letters, but that didn't work out so well either.  So after I realized it was going to look like a pedo van anyway I just started lining up the letters and rubbing them on using a piece of tape as a guide.  I think this could work out better but would take someone with some better detail skill than myself.  Or maybe just some patience and care.

My wife says: "it looks like a serial killer painted that in his garage".  That's actually the look I was going for.  I chose that font, assuming if I was able to lay it down straight that it might turn out like an old school hand painted sign lettering.  It turned out more like a ransom note.  lol

I added my name to the passenger side and my business partner's name to the other.  I thought that was funny.  We don't do delivery and really, would you want this van rolling up to your house and unloading dead animal parts for your dog to eat? lol 

I was half tempted to scratch off the lettering and replace it with "FREE CANDY" and be done with it. lol  The transfer letters I picked up didn't have any numbers so I wasn't able to add the address or a phone number.

  • Member since
    March 2011
Posted by ewheeler454 on Sunday, December 21, 2014 8:38 PM

Hi all,

Here's a little progress I made this weekend on the Ford.

Got the engine and transmission and frame sprayed. Also got the base coat sprayed on the body. Now have wait for some more decent weather to spray again hehehehe.

L8TR,

Eric

  • Member since
    January 2014
Posted by Seabe on Sunday, December 21, 2014 9:40 PM

My Brabham went up the creek... I am super disappointed with the end result. The kit is good, I must have done something small wrong somewhere. Finished, but I put it in the furthest darkest corner of the kits, not a happy chappy. Looks like a primary school effort.

The Jordan build got resurrected. Did some nice effort on the steering wheel face and buttons, only to drop it when I wanted to add it to the wheel itself. And now the mat monster has struck. Not a critical piece, but also quite disappointing. If it's not there, I don't think anybody but an expert (looking at the right place!) will notice. And chances are I'll find it by accident in a month's time, in which case it can be added. At least I can say I've started on that as well. Chances of finishing that before the year is out, is slim, but that's all due to the lull in my building.

  • Member since
    March 2011
Posted by ewheeler454 on Friday, December 26, 2014 5:33 PM

Well,

The 37 Ford is sitting in a tank of Purple Power. I guess it was to cold when I sprayed the second coat. It was gloss in some spots, flaky in others. I don't see me getting it done by the end of this GB so Iwill finish it in the 2015 GB.

L8TR,

Eric

  • Member since
    April 2014
  • From: Australia
Posted by lostagain on Sunday, December 28, 2014 5:44 PM

Okay I will try to add a positive note after some of the bad news.

Seabe, sorry to hear about the Jordan's dive. My desk is on floorboards, but still bits go missing when they are down there, can't figure it. But then I find pieces from kits I have never owned, it is a worry.

Eric, hope a bath will give you the fresh start you need. I have never tried stripping back a model yet.

As for the van, i liked the dometic carnivore sign, but I am not going near the rest of the discussion.

The Lotus is coming along, and should be (better be) done by the end of the year. Bodged together a dash with whatever decals I could find. Have stuck the dash, pedals and cowling on. Motor now has a fuel line, battery has leads coming off it.


Still got some tape holding it down till the glue goes off. The kit came without decals, but also without chrome on the appropriate parts. So I am using a decade old sheet of Japanese BMF to do the headlights, not a great look so far.

But it will be finished in the next 60 hours...

  • Member since
    March 2011
Posted by ewheeler454 on Sunday, December 28, 2014 6:51 PM

Hi lostagain,

Looking forward to seeing the finished model.

Mine should be stripped this week so I will finish it in the 2015 GB.

L8TR,

Eric

  • Member since
    November 2013
  • From: Jerseyville, ON
Posted by elass0wyp0 on Monday, December 29, 2014 12:48 PM

I got the van beat.  I managed to get the mirrors on but after these pics were taken.  In an effort to complete and move on I present the completed (to my low standards) AMT Rescue Van/DC delivery van.

My business partner's name is Lauren.  My name is on the shotgun side.  It mighta been cool to do that 'delivery' word in reverse like real world vans have.  I'm lucky I got it on at all-next time :)  Clipboard on the dash:

In the store, ready for her first delivery.  It may be her last-she looks rickety.

Basic out of the box build, bare metal for the door handles, dry brush most everything else.  I messed up the paint in quite a few places and had to brush paint fix areas. I learned a lot and will be trying another van soon.  I'd like to try the rescue build or maybe going full 80s shaggin' wagin' custom.  I'd also like to try opening the doors-it looks like it would be pretty simple to attempt for a first timer.

The wip pics - http://s293.photobucket.com/user/elass0wyp0/slideshow/Scale%20Models/AMT%20Rescue%20Van

Anyway, thanks for looking. 

Thanks for a great year of inspiring builds, stories, tips and pictures everyone.  It was a hoot, let's do it again!  2015 Auto GB here I come!

Gord

  • Member since
    January 2014
Posted by Seabe on Monday, December 29, 2014 9:57 PM

Gord, I really like it! Great effort and "story" and small touches behind it. Well done!

  • Member since
    April 2014
  • From: Australia
Posted by lostagain on Monday, December 29, 2014 11:54 PM

Good work Gord, like the personal touches.

Finished the Lotus, although for a while there it was looking like it was held together by tape.

But eventually everything got on board, sort of. Because of the extra piping on the carbies, the hood won't shut properly. And the front wheels are loose, even after working well in dry fitting.

But it has come together pretty well.

The internals look alright.

And the engine bay isn't too bare.

Thanks for a fun GB, and if I can get away from the waiting queue of planes, I will try and get back for the 2015 cycle.

  • Member since
    November 2013
  • From: Jerseyville, ON
Posted by elass0wyp0 on Wednesday, December 31, 2014 8:07 AM

Nice.  I've always been real nervous about doing yellow.  It would seem anything would just jump out at ya as a glaring mistake. Your yellow looks amazing. The wheels, the engine.  Well done.

  • Member since
    April 2014
  • From: Australia
Posted by lostagain on Wednesday, December 31, 2014 1:38 PM

Thanks Gord

Took a few attempts to get it right. A good white coat to start with was the basis. Had a few issues with the yellow (dropping the wet nose cone in the dirt was one - start again!).

And the final one is to be selective in the photos and lighting to hide other mistakes.

  • Member since
    March 2011
Posted by ewheeler454 on Wednesday, December 31, 2014 7:11 PM

Nice van Gord. It looks great.

lostagain,

The yellow really makes it stand out. Congrats on a great build.

Hope to see you guys in the 2015 GB. :)

L8TR,

Eric

  • Member since
    March 2012
  • From: Corpus Christi, Tx
Posted by mustang1989 on Friday, January 2, 2015 9:22 AM

Gord: I like that van! Now that's something different! I remember a long time ago I built a Good Times van with a motorcycle. It turned out like crap but it was a fun build. Almost wished I had a second shot at it.

lostagain:Great job on the Lotus! I don't see these around much either.Yes


 Forum | Modelers Social Club Forum (proboards.com) 

JOIN OUR COMMUNITY!

Our community is FREE to join. To participate you must either login or register for an account.

SEARCH FORUMS
FREE NEWSLETTER
By signing up you may also receive reader surveys and occasional special offers. We do not sell, rent or trade our email lists. View our Privacy Policy.