SEARCH FINESCALE.COM

Enter keywords or a search phrase below:

Weekend Madness 2014-Stick a fork in it, we're done! See you next year!

29764 views
355 replies
1 rating 2 rating 3 rating 4 rating 5 rating
  • Member since
    April 2006
  • From: Denver, Colorado
Posted by waynec on Saturday, January 3, 2015 10:42 PM

this was fun as was the one last year but my build this year was much better. maybe you should consider 2 a year, one in june when folks need a break from the early 2015 GBs and one in december because it's tradition now.

Никто не Забыт    (No one is Forgotten)
Ничто не Забыто  (Nothing is Forgotten)


  • Member since
    June 2008
Posted by lewbud on Saturday, January 3, 2015 7:08 PM

Final updates to the front page have been made.  Once again, thank you all for making this a great group build.

Buddy- Those who say there are no stupid questions have never worked in customer service.

  • Member since
    June 2008
Posted by lewbud on Monday, December 29, 2014 6:17 AM

There had to be one failure and it is my Hellcat.  Whilst spraying the cowling gloss white, paint built up around the edge as it dried.  Had to chuck it in the purple lake to strip it and start again.  Therefore she will not be done in time.  Thanks again to all of you, without you guys this build would have been a lonely place.  See y'all next year!

Buddy- Those who say there are no stupid questions have never worked in customer service.

  • Member since
    June 2008
Posted by lewbud on Sunday, December 28, 2014 9:14 PM

Ernest-great job on the Thunderbolt!  Thanks for joining in!   Glad you had a good time.

A little over eleven hours to go and the gloss white for the underside is dry, and the intermediate blue is about to go on.  Thank goodness for Tamiya spray cans.

Buddy- Those who say there are no stupid questions have never worked in customer service.

  • Member since
    November 2003
  • From: Nashville, TN area
Posted by bobbaily on Sunday, December 28, 2014 6:46 PM

Ernest-great job on your Thunderbolt-amazing work for only 48hrs-would love to see what you could do with more time.

Bob


  • Member since
    July 2006
  • From: San Francisco Bay Area
Posted by bufflehead on Sunday, December 28, 2014 2:23 PM

Lew, thanks for hosting a GREAT GB!!  I thoroughly enjoyed myself and had a great time engaging with all the participants.  Hope to join again next year!

Everyone have a fantastic New Year!!

Ernest

Last Armor Build - 1/35 Dragon M-26A1, 1/35 Emhar Mk.IV Female


Last Aircraft Builds - Hobby Boss 1/72 F4F Wildcat & FW-190A8


  • Member since
    July 2006
  • From: San Francisco Bay Area
Posted by bufflehead on Sunday, December 28, 2014 2:18 PM

AND IT'S DONE!!  With 5 minutes to spare!!  Yeah, I cut this one really close, but I wanted to do a good job on it with any extra time I had left.

The left side teardrop fuel tank started to fall off in the above pic!  I literally glued it on 3 minutes before the photos!  A little more liquid glue and its all better now!

Here she is at 1:00 AM last night after Future gloss coat and kit decals....

.....and with 4 more hours of work.  In my rush I totally missed adding the white stripes to the horizontal stabilizers!  Ooops! Surprise  Oh well, I can always add them in later if I feel like it!

I used Flory's Washes for the panel lines; Black for the OD, Dark Dirt for the gray.  Shows up pretty good on the bottom.  Vallejo Matte Varnish for the flat coat.

Well, that's it guys!  I must say I really enjoyed my first AC build in 30+ years!   Might have to do a few more of these!

Ernest

Last Armor Build - 1/35 Dragon M-26A1, 1/35 Emhar Mk.IV Female


Last Aircraft Builds - Hobby Boss 1/72 F4F Wildcat & FW-190A8


  • Member since
    January 2014
  • From: Nampa, Idaho
Posted by jelliott523 on Sunday, December 28, 2014 1:51 PM
Well, I didn't get it done. I was hoping to get one more build in before the end of the weekend, but Old Man Winter and my job didn't think that I needed to be spending time tinkering with a model, instead, they decided that I needed to deal with motorists who have forgotten how to drive when there is snow on the road.

On the Bench:  Lots of unfinished projects!  Smile

  • Member since
    March 2008
Posted by Caveman on Sunday, December 28, 2014 11:12 AM

That paintwork looks great.

  • Member since
    June 2008
Posted by lewbud on Sunday, December 28, 2014 11:02 AM

Looking good Ernest, keep at it!

About 26 hours into my build, not much progress to report.  First coat of interior green on my Hellcat was too thin and dried with a gloss sheen to it.  Added some more paint to the mix, and it dried to more of a semi-gloss.  Hit it with some Dullcote, and it is now a matte finish which is good enough.  Just waiting for the control stick to dry, then the pit will be complete and the fuselage can go together.  I don't know if this is a harbinger of things to come, but I tore the IP decal trying to get it off the backing paper.  Don't know if I didn't let it soak long enough, or if it was the decal.  Will try again on a spare.  If it's a decal problem, I could be up the creek as the only other decals I have for a F6F are Draw Decals Blue Angels.  I was planning on doing the Hellcat in a tri-color scheme for the Pacific Carrier GB.  Plus I need to add some color to the predominantly monotone schemes of my recent builds. See y'all in a few.

Buddy- Those who say there are no stupid questions have never worked in customer service.

  • Member since
    July 2006
  • From: San Francisco Bay Area
Posted by bufflehead on Saturday, December 27, 2014 11:10 PM

Thanks Lew, modelcrazy, and ajd!  Great tip on the stainless steel gun tube ajd!  I thought I read somewhere that P-47s had some type of protective tube, but I didn't know what color....SS it is!  or rather just plain Testor's Chrome Silver!

Man, this little T-Bolt is kicking my butt! Way more filling and sanding than on armor!  Plus having to redo panel lines after that...whew!  But I finally have another update at the 34 hour mark.

Here's some of the gaps that needed filling.  Thankfully the other side wasn't so bad.

That took up a good chunk of the day.  Here she is all masked off and primered.  Because its so small I used Mr. Surfacer 1200 thinned with Mr. Color Thinner and sprayed with the AB.  Mr. Surfacer 1200 has an extremely fine grain, finer than Tamiya Fine Primer or any other spray primer I've used.

Before I painted the primary colors I did some preshading on top of the primer.  Forgot to take a pic, sorry.

For the neutral gray underneath I mixed Tamiya Light Gray with Sky Gray.  For the topside OD, I decided to try Lifecolo acrylic Olive Drab #220, which is a lighter, somewhat faded OD color.   Can't see much of the preshading, but its there! 

14 hours to go!

Ernest

Last Armor Build - 1/35 Dragon M-26A1, 1/35 Emhar Mk.IV Female


Last Aircraft Builds - Hobby Boss 1/72 F4F Wildcat & FW-190A8


  • Member since
    July 2014
Posted by modelcrazy on Saturday, December 27, 2014 9:29 PM

Huh, that's good to know.

Steve

Building a kit from your stash is like cutting a head off a Hydra, two more take it's place.


http://www.spamodeler.com/forum/

  • Member since
    October 2013
Posted by ajd3530 on Saturday, December 27, 2014 9:14 PM

Bufflehead, gun barrels should normally be gunmetal as crazy said, but the 47's had blast tubes over the gun barrels that were stainless steel.

  • Member since
    July 2014
Posted by modelcrazy on Saturday, December 27, 2014 10:14 AM

bufflehead,

That 47 is looking good. Great work on adding to the office.

Yep, that's typical for a 1/72. For most kits, if you want anything in the office, you have to add it yourself.

The gun barrels should be gunmetal.

Steve

Building a kit from your stash is like cutting a head off a Hydra, two more take it's place.


http://www.spamodeler.com/forum/

  • Member since
    June 2008
Posted by lewbud on Saturday, December 27, 2014 7:56 AM

Ernest- the 'bolt is looking good!  The simplified pit is not normal of 1/72 aircraft, with them being so small there is really not much to see anyways.  I'm getting a late start, but I'll be joining you in a few.  Nice job on the canopy, now that you've learned the hard way look for the Eduard Mask set for your next build.

Caveman-see you next year.  Thanks for joining in.

Buddy- Those who say there are no stupid questions have never worked in customer service.

  • Member since
    March 2008
Posted by Caveman on Saturday, December 27, 2014 1:26 AM

Well gents, I am not able to build this weekend so no more entries from me.  This has been a most enjoyable experience which has also been my first group build.  Excellent work all around by everyone involved.  I look forward to this build again next year.

Thanks for allowing me to participate and Thanks to lewbud for administering this build.  I trust everyone had a happy holiday.  Hopefully I will see you all again next year.

I guess I had better post a better picture of my A-4.  Get to that tomorrow.

  • Member since
    July 2006
  • From: San Francisco Bay Area
Posted by bufflehead on Saturday, December 27, 2014 1:16 AM

Looks like everyone is enjoying some post Christmas cheer! Toast

11 hours into the build and I'm calling it quits for the evening; here's where she is:

One piece fuselage glued to one piece wing assembly!  Yep, that simple!  But I did have to do quite a bit of work first before joining them. 

The cockpit tub is molded into the fuselage along with the joystick and instrument panel.  There's some molded ribbing on the floor too.  The pilot's set is a separate part which just drops in, but that's it!!  VERY
 basic, but not having built any 1/72 aircraft before, I don't know if that's normal.

You do get a nice decal for the instrument panel:

After dropping in the seat, the whole cockpit looked too darn plain, so I dressed it up a bit by making a headrest from scrap plastic.  I painted it with Tamiya Red Brown before gluing in place.  Then I added harness straps made from Tamiya tape.

The radial engine/firewall is a one piece molding.  Painted it up and dry-fitted it into the cowling, then the whole thing dry-fitted onto the fuselage.

The molded on machine gun tubes need to be drilled out.  Question on these:  What color should they be?  Black?  Silver?  Gunmetal?  OD?  Neutral Gray? 

Thanks and I'll be back tomorrow with an update

Ernest

Last Armor Build - 1/35 Dragon M-26A1, 1/35 Emhar Mk.IV Female


Last Aircraft Builds - Hobby Boss 1/72 F4F Wildcat & FW-190A8


  • Member since
    July 2006
  • From: San Francisco Bay Area
Posted by bufflehead on Friday, December 26, 2014 5:12 PM

Okay, here we go!

Started the Razorback at 11:40 AM this morning, Dec.26.  This is my first aircraft build since 1978!  Returned to the hobby 8 yrs ago and been building exclusively armored vehicles since.  I have picked up some AC tips from reading magazines and other online articles, but I'm sure to goof up somewhere along the line!!

2 hrs later.  Before any assembly was done I decided to get some paint in certain places.   Zinc chromate applied to the cockpit, seat, wheel wells and landing gear doors, etc.  Black on the props and radial engine.  Didn't have any ZC stocked so I made some from Tamiya Yellow Green mixed with a bit of Flat Green....looks pretty chromatey to me! X

First time masking off a canopy....took over an hour!  First AC tip used:  spray ZC first, before OD so that the interior color of the frames shows through the clear canopy.   I hope I did a good job...Hmm

While the paint dries I'll start assembling the drop tanks and landing gear. 

Ernest

Last Armor Build - 1/35 Dragon M-26A1, 1/35 Emhar Mk.IV Female


Last Aircraft Builds - Hobby Boss 1/72 F4F Wildcat & FW-190A8


  • Member since
    June 2008
Posted by lewbud on Friday, December 26, 2014 12:30 AM

Thanks Ernest.  .010 might be perfect for 1/48, but I think it might still be a little thick for 1/72.  Width wise, it's probably perfect for 1/72.

Buddy- Those who say there are no stupid questions have never worked in customer service.

  • Member since
    June 2008
Posted by lewbud on Friday, December 26, 2014 12:24 AM

Gentlemen, we are approaching the final hours of this build.  I have to say that it has been an honor and a privilege to lead this build.  To those that have thanked me for leading this build, you're welcome.  However, it is I who should be thanking all of you, because without you guys this build would never have happened.  My hat is off to all of you.  You guys have made this one of the most productive builds going.  Think of it, 22 models in three weeks so far with more to come.  Before this build, I had completed two models.  I should have four done for this build alone by the end of the weekend.  You guys kept me inspired over the course of this build, and I thank you for that.  Now sharpen up those X-actos boys, we've got one weekend left.  I'll see you at the finish line, good luck and good building.

Buddy- Those who say there are no stupid questions have never worked in customer service.

  • Member since
    July 2006
  • From: San Francisco Bay Area
Posted by bufflehead on Wednesday, December 24, 2014 10:15 PM

ajd - Man that is one sweet looking Mustang!  Sorry to hear you got it done just a tiny bit late, but you got it done so congrats!!   Thanks for the tip on the Testors OD spray!  I do have a can of that on hand so I'm going to use it for the TBolt!

lew - nice little Peashooter!!  I like the use of the brass rod for the wires, never thought of that before.  If I ever need to do rigging on biplanes I have some .010 rod that should do the trick!!

Final weekend coming up!!

Merry Christmas All!!Toast

Ernest

Last Armor Build - 1/35 Dragon M-26A1, 1/35 Emhar Mk.IV Female


Last Aircraft Builds - Hobby Boss 1/72 F4F Wildcat & FW-190A8


  • Member since
    June 2008
Posted by lewbud on Tuesday, December 23, 2014 10:09 PM

Modelcrazy-the kit has like 20 part, it does fit pretty good for a forty year old kit.

Yep, this is the FINAL weekend.  Trying to figure out what to build before the cowboy rides away.

Scott-Glad to hear that this has helped.  Look forward to seeing more of your work.

Buddy- Those who say there are no stupid questions have never worked in customer service.

  • Member since
    January 2014
  • From: Nampa, Idaho
Posted by jelliott523 on Tuesday, December 23, 2014 6:44 PM

waynec

jelliott523

Hmmmm... one more weekend???  Tempting...very tempting, maybe I can pick up something quick this week, say Friday.

of course you can. no guts no air medals.

Thanks for the vote of confidence, now just to get to the hobby store to grab something for a quick build!  No thinking here... its "I know I can, I know I can!"

On the Bench:  Lots of unfinished projects!  Smile

  • Member since
    April 2006
  • From: Denver, Colorado
Posted by waynec on Tuesday, December 23, 2014 6:35 PM

jelliott523

Hmmmm... one more weekend???  Tempting...very tempting, maybe I can pick up something quick this week, say Friday.

of course you can. no guts no air medals.

Никто не Забыт    (No one is Forgotten)
Ничто не Забыто  (Nothing is Forgotten)


  • Member since
    January 2014
  • From: Nampa, Idaho
Posted by jelliott523 on Tuesday, December 23, 2014 6:28 PM

Hmmmm... one more weekend???  Tempting...very tempting, maybe I can pick up something quick this week, say Friday.

On the Bench:  Lots of unfinished projects!  Smile

  • Member since
    March 2008
Posted by Caveman on Tuesday, December 23, 2014 5:59 PM

Did someone say.......One more weekend?

  • Member since
    December 2003
  • From: 37deg 40.13' N 95deg 29.10'W
Posted by scottrc on Tuesday, December 23, 2014 10:09 AM

WOW, I could not try a 1/48 scale jet in 48 hrs, great looking A4.  And the same with the P-51 and Peashooter.

Lew, I guess a side shot for the front page.

Thanks for the compliments, this had been a great boost in getting me out of my building mental block I have been in.

Scott

  • Member since
    July 2014
Posted by modelcrazy on Monday, December 22, 2014 10:28 PM

Wow, it went together much faster than the 1/48 I,m working on. Looks good lewbud.

Steve

Building a kit from your stash is like cutting a head off a Hydra, two more take it's place.


http://www.spamodeler.com/forum/

  • Member since
    June 2008
Posted by lewbud on Monday, December 22, 2014 7:41 PM

Ajd-nice job.  It'll still go on the front page.

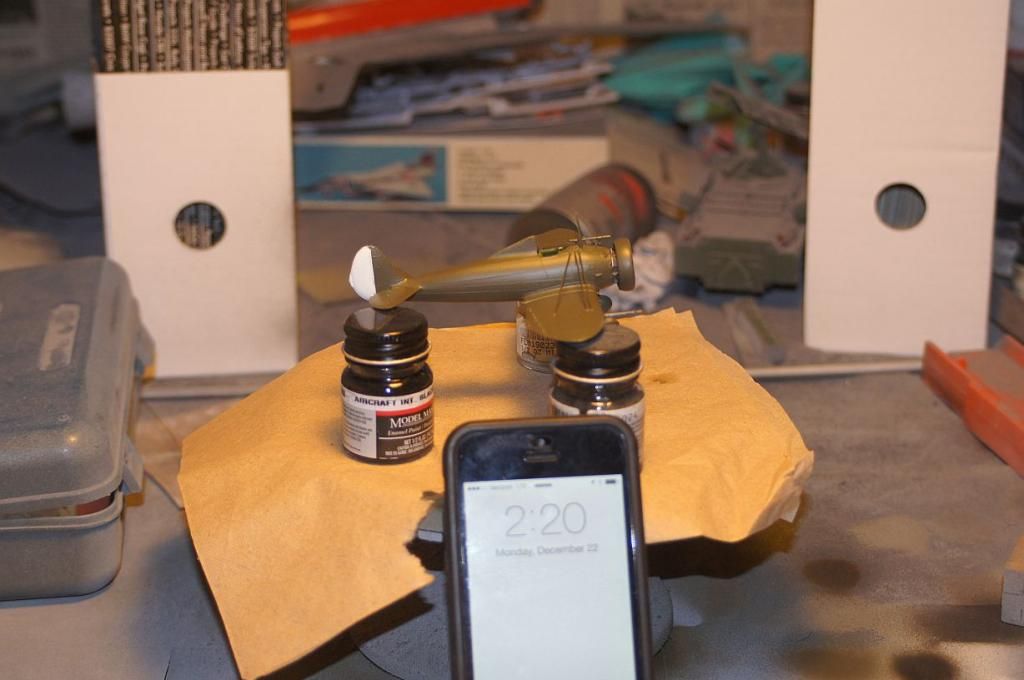
Now for my little adventure.  Proof of non-startage.
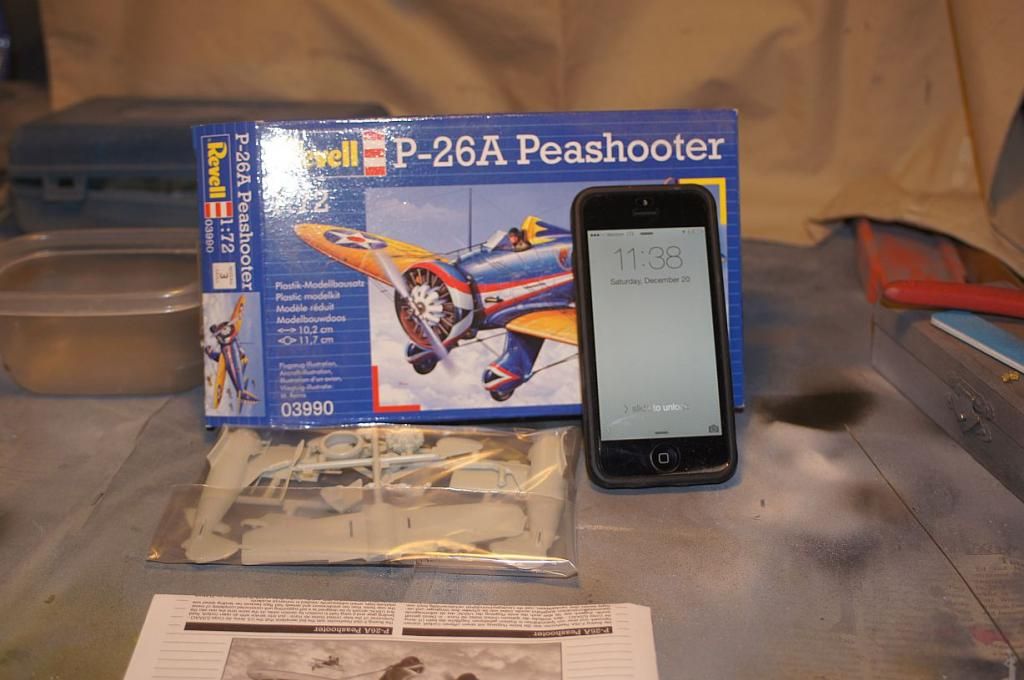
Time to go to work.

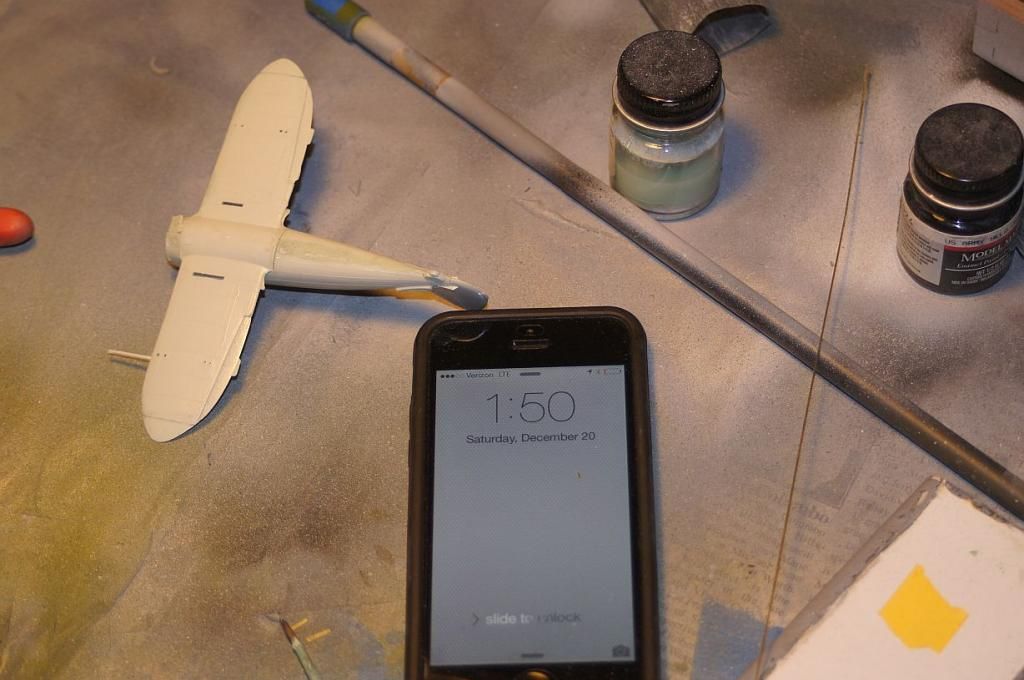
Got home from work about 0100 Sunday morning.  Attached horizontal stablizers, broke out the putty and filled some seams.  Went to bed.  Woke up, piddled round the apartment, sanded stuff, went to the local hobby shop for supplies, came home, fell asleep (Cowboys won anyway, yay!).  Wasn't really feeling this build until I saw what Scott and ajd were doing got inspired and went back to the table.  Somewhere around 11:15pm.

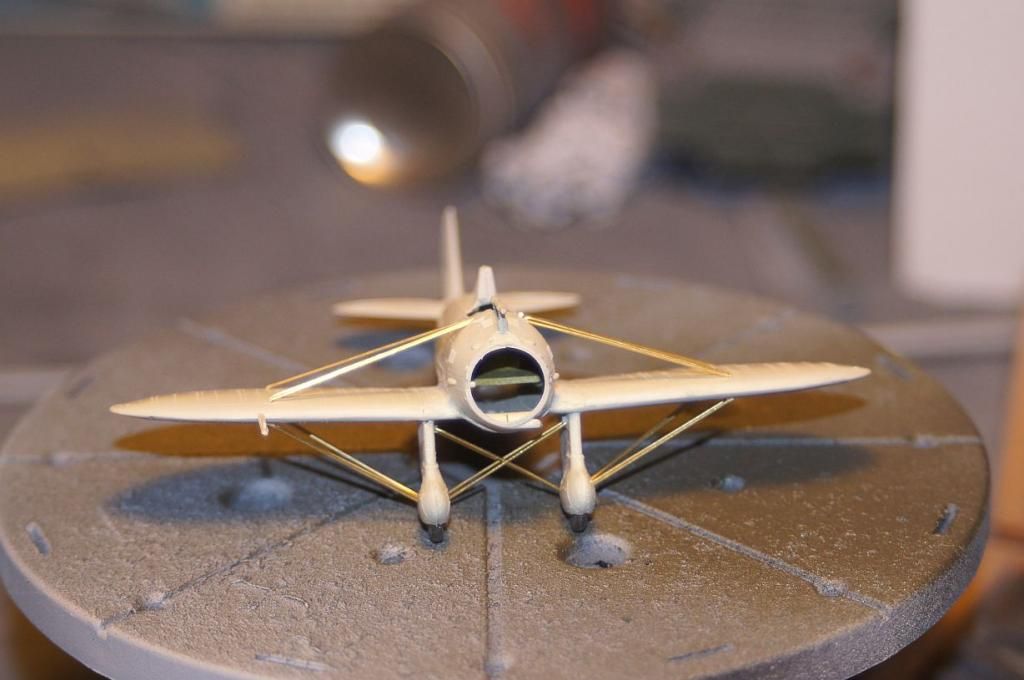
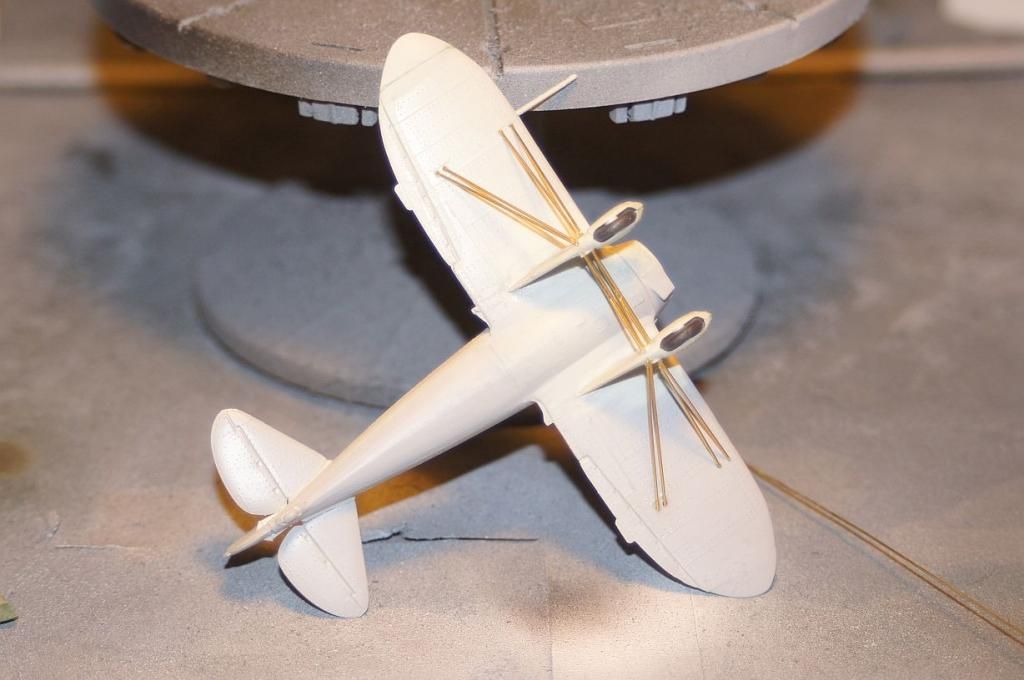
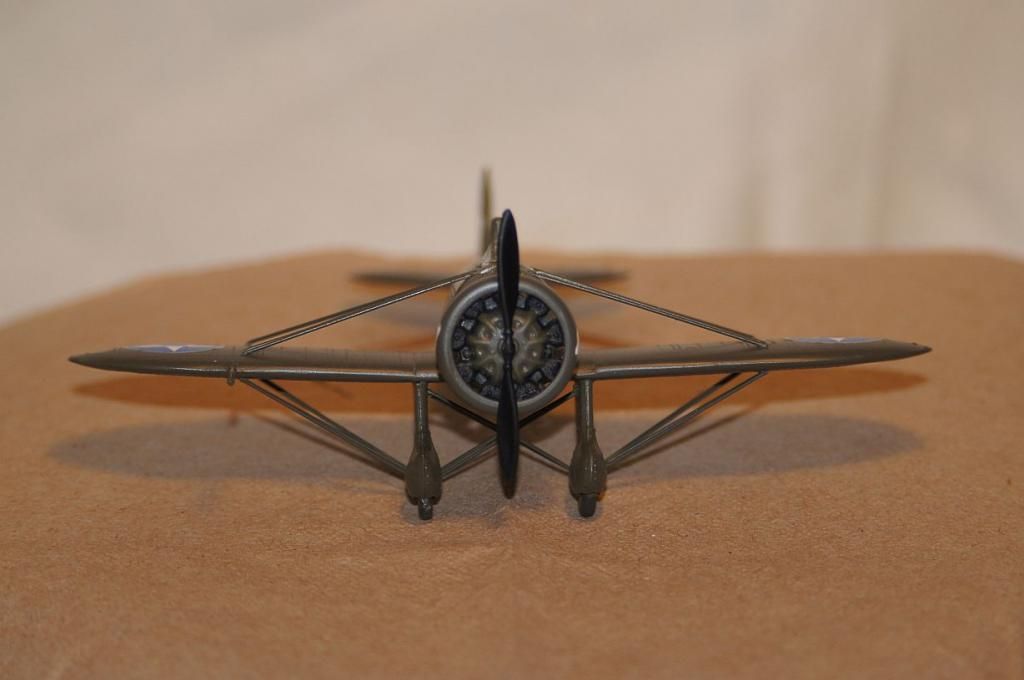
The flying wires are done in .020 brass rod.  It's a little on the thick side for this scale, but it's all could find.  Plus, it was good practice for when I get the Lost Starfighter stuff.

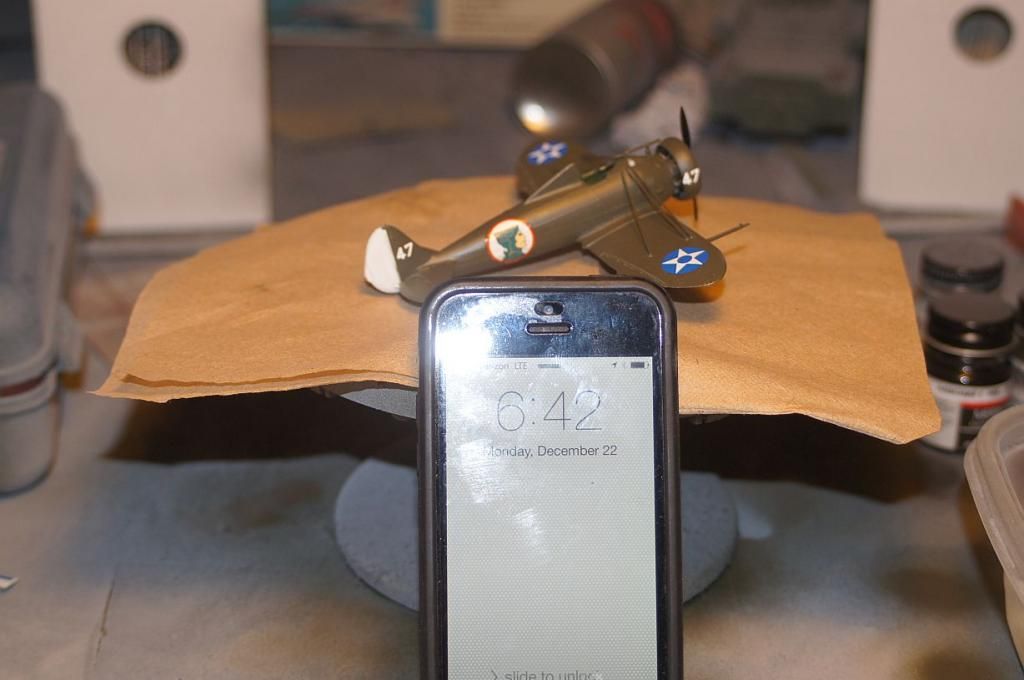
Time for bed Sunday night.

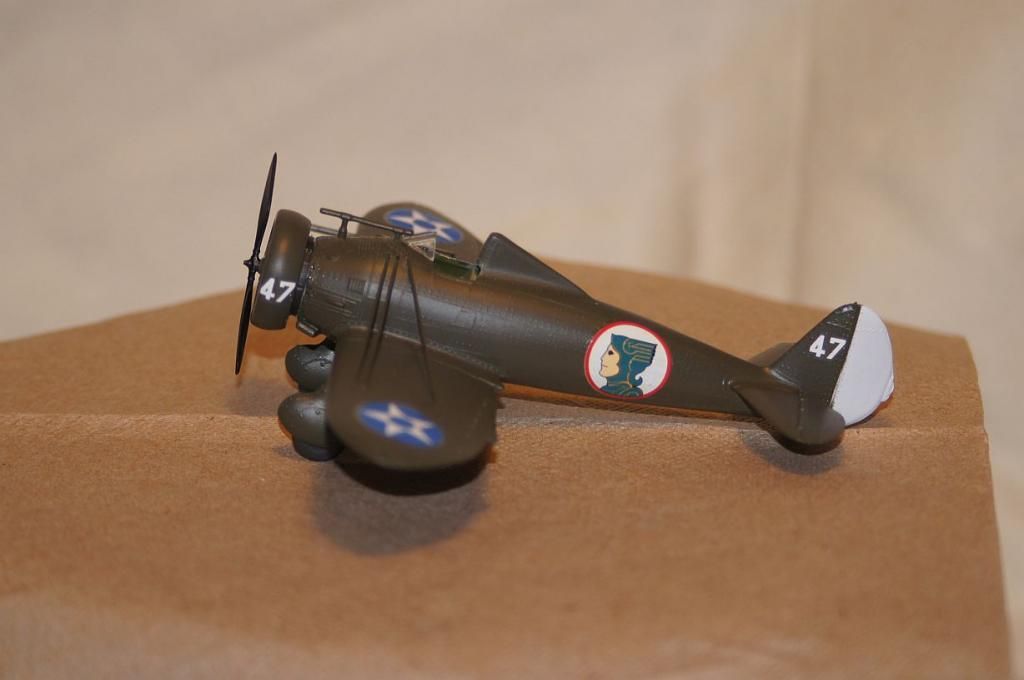
All that was left to do was let the canopy dry, and apply decals.  I used Aztec's Old Warriors set.  A group of P-26s were transferred from the Canal Zone to Guatemala in 1943.  Because only training aircraft could be transferred at that time, they were classified as PT-26s which allowed them to skirt the law.  Aztec's decals are on the thick side, but they are pretty tough.  They seem to lack stick, so I may go back and clear coat them at a later date.  I didn't have the correct blue for the bars on the rudder, so I thought I could use some blue striping included with the decals.  This was a bust because they wouldn't conform to the control horns at the bottom of the rudder.  Aztec does mainly Mexican, Central and South American subjects and for some things they are the only game in town.  She's done.

Somewhere along the way, I lost the antenna.  Here she is in all her glory.

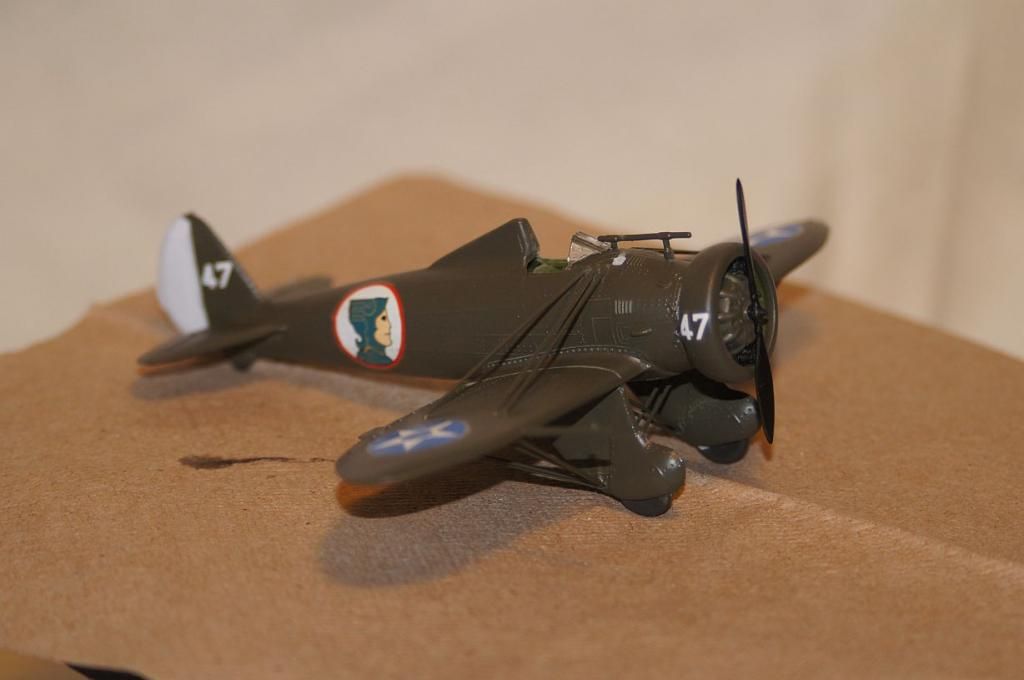
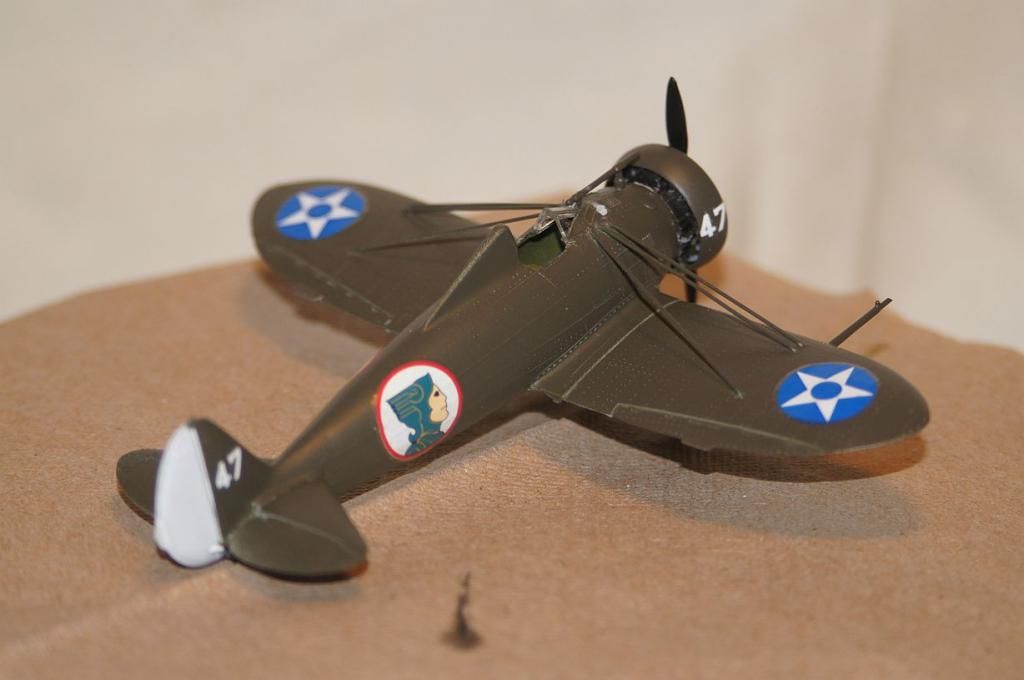
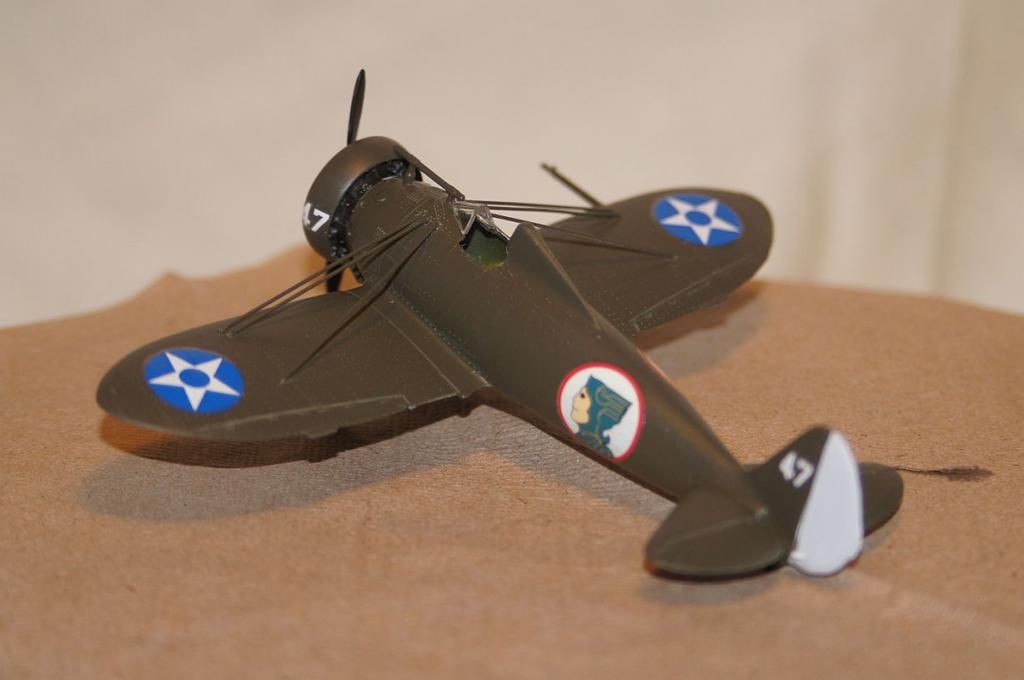
If you're wondering where the pit is, there is none.  This kit dates from the late sixties and all there is is a seat and a pilot with a very fatal wound in the back.  Hope y'all enjoy.

Buddy- Those who say there are no stupid questions have never worked in customer service.

JOIN OUR COMMUNITY!

Our community is FREE to join. To participate you must either login or register for an account.

SEARCH FORUMS
FREE NEWSLETTER
By signing up you may also receive reader surveys and occasional special offers. We do not sell, rent or trade our email lists. View our Privacy Policy.