SEARCH FINESCALE.COM

Enter keywords or a search phrase below:

75th Anniversary of 1941 Group Build (World at War)

36904 views
712 replies
1 rating 2 rating 3 rating 4 rating 5 rating
  • Member since
    September 2003
  • From: AandF in the Badger State
Posted by checkmateking02 on Saturday, September 17, 2016 4:55 PM
That's turning into a work of art, Dan. Looking good.


  • Member since
    February 2006
  • From: Cincinnati Ohio
Posted by DantheMan85 on Sunday, September 18, 2016 2:49 PM

Thanks Checkmate.

Earlier today I airbrushed on model master Gunship Gray, as a post-shade. I'm much happier with the lighter shade of gray, compared to the mix of XF-63 and XF-2 from yesterday. The main color is finished, next up is applying model master Panzer Interior Buff to the inside.


On my Work Bench: Tamiya Ford GT 1/24

Up Coming: ?


  • Member since
    September 2003
  • From: AandF in the Badger State
Posted by checkmateking02 on Sunday, September 18, 2016 2:50 PM
Nice improvement, Dan. Looking better and better!


  • Member since
    April 2006
  • From: ON, Canada
Posted by jgeratic on Sunday, September 18, 2016 11:03 PM

Thank you Dan, and your StuG is coming along great.  Good call on on that second shade of grey, really livens it up.

regards,

Jack

  • Member since
    April 2005
  • From: Australia
Posted by taxtp on Monday, September 19, 2016 1:52 AM

I like the shading on your Stug Dan, it adds a lot of interest.

I haven't got going on my Tomahawk yet, other than the instrument panel.

Cheers

Tony

I'm just taking it one GB at a time.

  • Member since
    September 2014
Posted by rooster513 on Monday, September 19, 2016 6:45 AM

Ok so I've had this one done for a little while but haven't gotten around to posting pics. Overall she went together nicely. I'm not really happy with how the stripes came out on the side of the fuselage but for my first German aircraft I can live with itBig Smile I think I like the first one for the gallery check!

Thanks for hosting the GB checkmateking! Hopefully I'll be building something for the '42 buildBig Smile


-Andy

  • Member since
    April 2006
  • From: ON, Canada
Posted by jgeratic on Monday, September 19, 2016 9:53 AM

Andy, I like how that deset based Emil turned out, a really good job on it.Yes

I think If I were to ever try this scheme, hand painting the stripes followed with the airbrush to give an added faded look might be easier?  In the photo below, they don't look to be quite solid lines.  Actually, you could still fix it by airbrushing the background colour a bit around the stripes.

regards,

Jack

  • Member since
    September 2003
  • From: AandF in the Badger State
Posted by checkmateking02 on Monday, September 19, 2016 5:33 PM

Very nice, Andy!  You did great on that streaky camouflage on the fuselage.  Some good-looking paintwork there.  Great job!

Will update the front page with the first photo.

Thanks for being part of the build.  Look forward to seeing you in '42!


  • Member since
    April 2006
  • From: ON, Canada
Posted by jgeratic on Wednesday, September 21, 2016 4:58 PM

After some further test fitting of the first figure, I've come to a satisfactory placement on the vehicle.

29739876796_7897631482_b.jpg

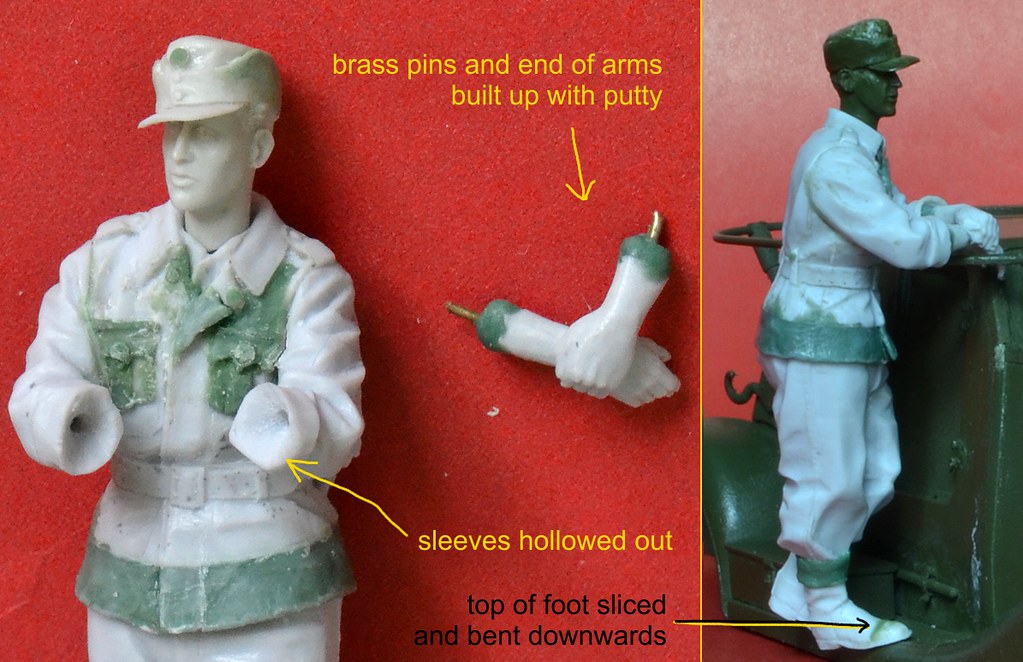
It involved some further surgery - arms sliced off and then repositioned better.  The right foot was also sliced, just deep enough to straighten out the bend.  Also hollowed out the left side of the torso above the waist belt so the body can be pressed into the antenna railing.

Second figure conversion is also done.


29483449560_b36095561d_b.jpg

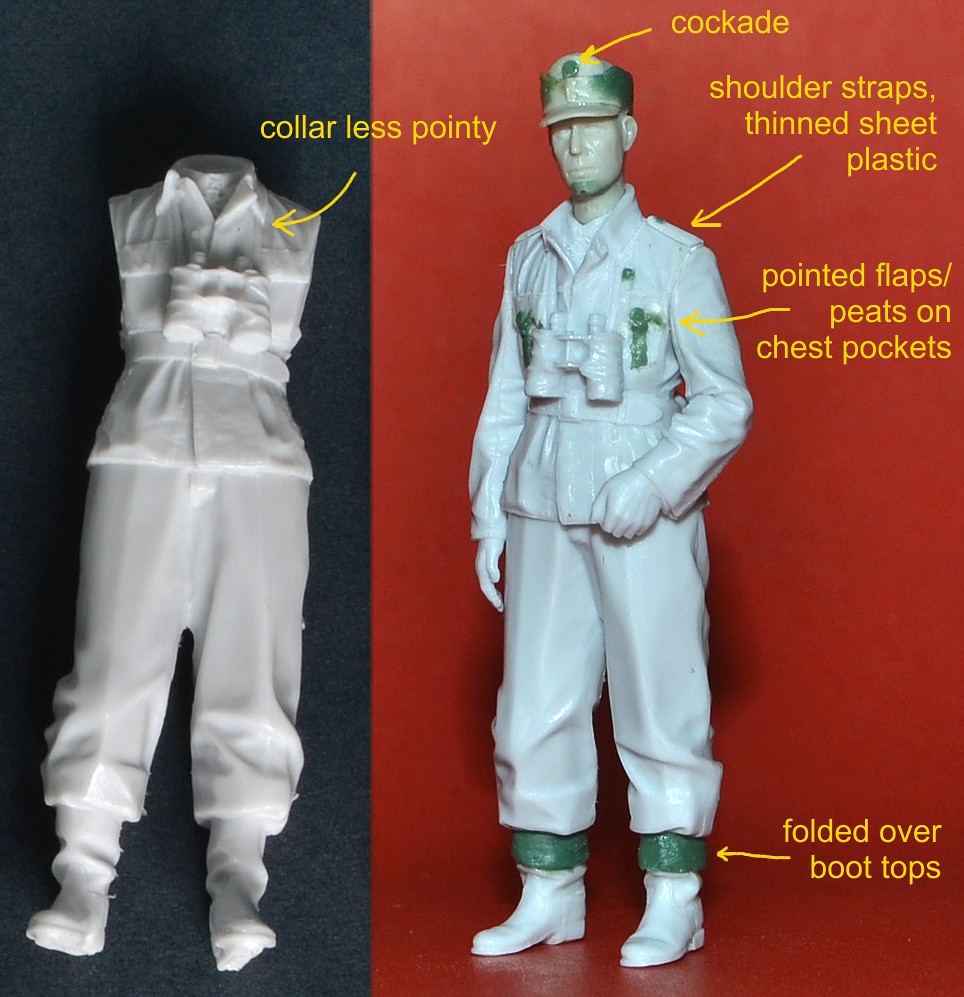
This one went a bit quicker, as the jacket  length was good as is.  Did have to add some shoulder straps, and the Hornet head needed some filling of an air bubble on the chin.  Both figures also had the collar ends chopped a bit to rid of the pointy look to them.


----------------------------------------


29693084721_19960d1f3c_b.jpg

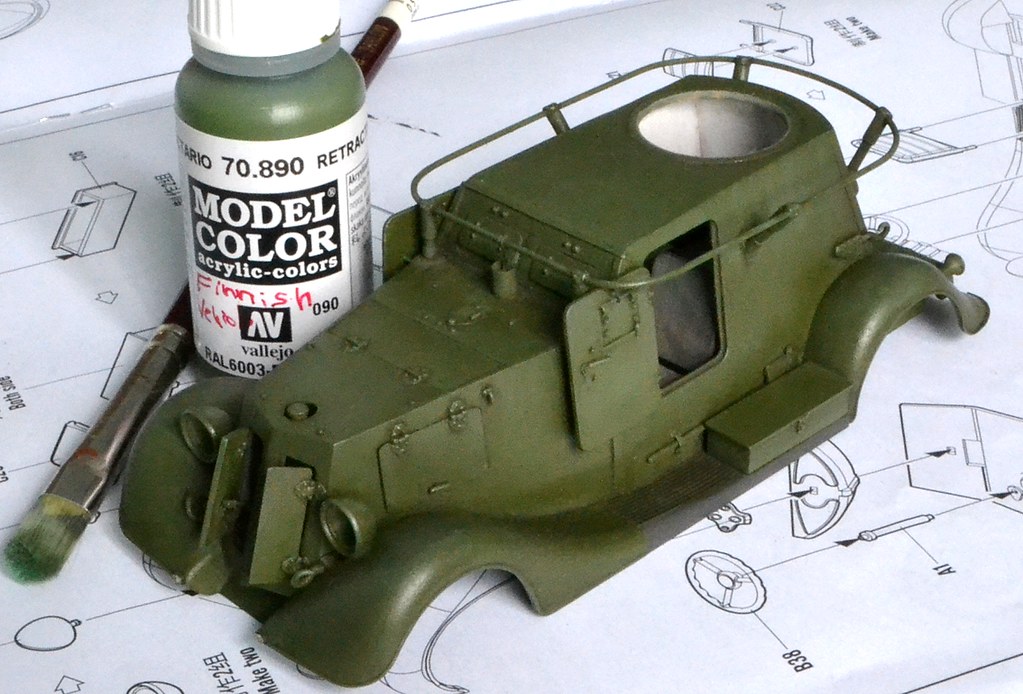
A dark dirt Flory wash has been applied, followed with a light session of colour modulation.

Next up were decals before proceeding further with weathering.

29215172513_bdd2873ddc_b.jpg

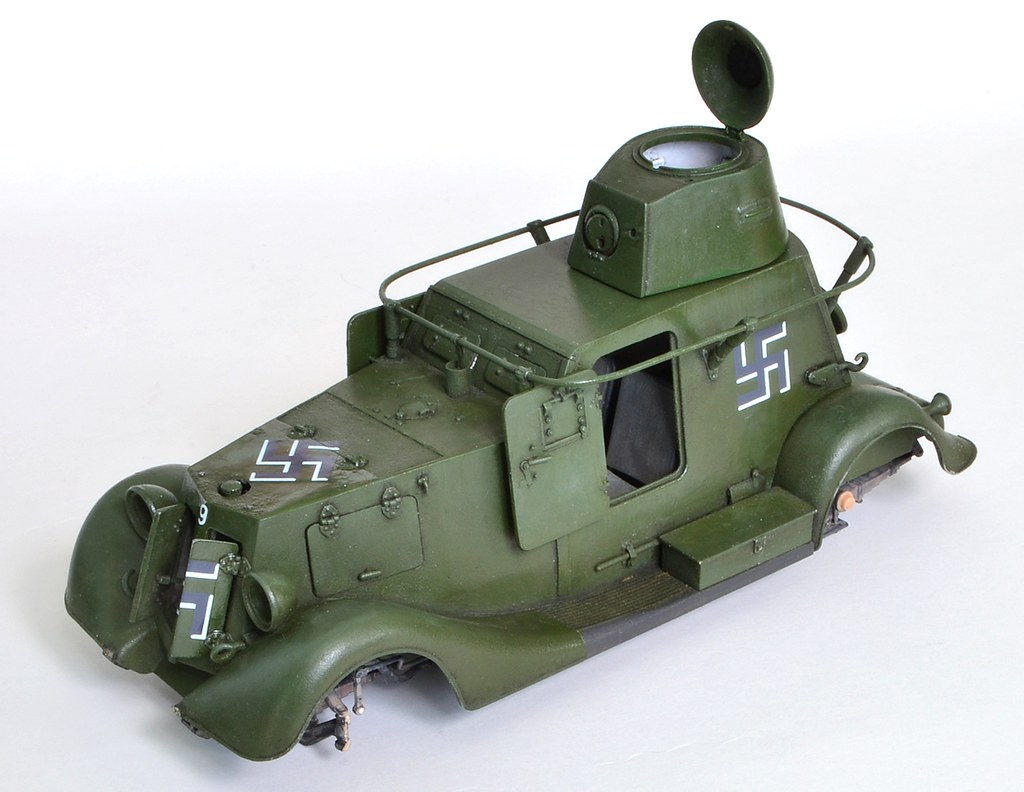
Finnish markings are not provided with the kit, so cobbled these from Star Decals 35-895 Finnish Tanks in WW2.  Don't know the story behind them, but the black sections are more of a dark grey and they didn't look that bad on the sheet.

29215169393_f96e09f1dd_b.jpg

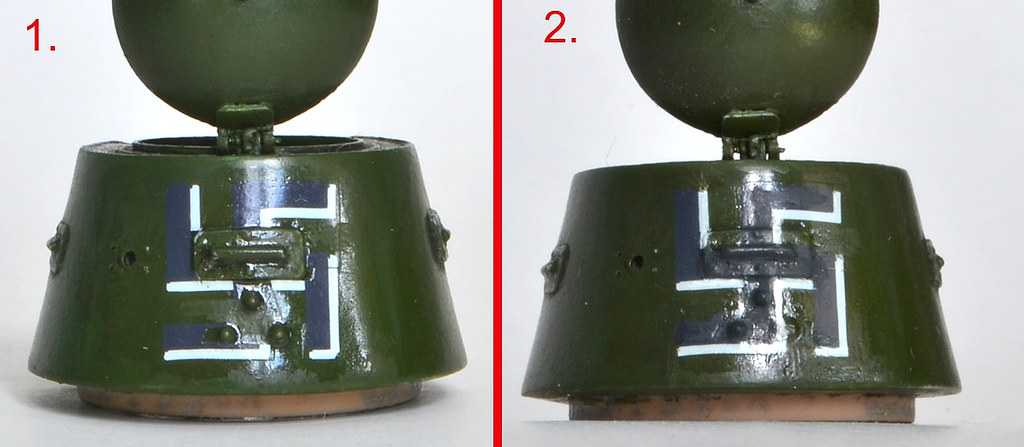
The turret rear has some serious 'terrain' over which the hakaristi decal would not settle down, even when drenched with copious amounts of micro Sol setting solution.

To solve this problem area, the decal was cut in half horizontally.  The top half had a tab like section removed to fit around the vision port, while the bottom half was further cut in half to fit around the three bolts (1.)

The missing sections were then hand painted in (2.)

regards,

Jack

  • Member since
    September 2003
  • From: AandF in the Badger State
Posted by checkmateking02 on Wednesday, September 21, 2016 10:12 PM

This is fantastic artistic work, Jack.  It's great what you're accomplishing.


  • Member since
    February 2006
  • From: Cincinnati Ohio
Posted by DantheMan85 on Saturday, October 1, 2016 10:37 AM

Thanks Checkmate.

Thanks Jgeratic: Nice work on the modifying the figures. And great work on the car body.

Thanks Tony.

Andy: Great job on your Bf-109, she turned out great.

Painting stage is just about wrapped on for the StuG. Wheels, tracks, tools, antenna have been added on. The antenna is made out of heated up and stretched plastic spur. Before I put the tracks on a did a light dry brush with testors steel.


On my Work Bench: Tamiya Ford GT 1/24

Up Coming: ?


  • Member since
    September 2003
  • From: AandF in the Badger State
Posted by checkmateking02 on Saturday, October 1, 2016 11:42 AM

Very appealing results, Dan.  Dry-brushing the tracks worked well; gives them some depth and interest.

Nice-looking figure, too.


  • Member since
    April 2005
  • From: Australia
Posted by taxtp on Sunday, October 2, 2016 11:58 PM

I think I mentioned that I'm building an Airfix 1/72 Tomahawk. The good news is that I've got it all off the sprues and sprayed the cockpit. The bad news is that I haven't taken a photo (yet).

Cheers

Tony

I'm just taking it one GB at a time.

  • Member since
    September 2003
  • From: AandF in the Badger State
Posted by checkmateking02 on Monday, October 3, 2016 4:17 PM

We'll be happy to see photos when you get around to taking them, Tony.

I've been working on Airfix's 1/72 Hawk 82--no pictures posted yet, either. Ran into an issue I hadn't seen in any of the reviews. The wing-to-fuselage fit is not good. It leaves a noticeable "step." I found it necessary to sand down the wheel wells (on the inside of the lower wing) to get the fuselage to settle down--and it's still not that great of a fit. There's also a pretty large gap in the leading wing edges, just inboard of the little landing gear nodules on both sides.

I don't know if the Tomahawk is based on the Hawk 82 from Airfix, but if it is, please be aware these issues.


  • Member since
    April 2005
  • From: Australia
Posted by taxtp on Tuesday, October 4, 2016 12:26 AM

Thanks for the warning CMK. It's pretty much the same kit, not sure if any detail differences, but the interior gets painted differently. 

I built that kit for the Pearl Harbour GB some years back, and I agree with your findings.

Cheers

Tony

I'm just taking it one GB at a time.

  • Member since
    September 2003
  • From: AandF in the Badger State
Posted by checkmateking02 on Tuesday, October 4, 2016 7:24 PM

taxtp

Thanks for the warning CMK. It's pretty much the same kit, not sure if any detail differences, but the interior gets painted differently. 

I built that kit for the Pearl Harbour GB some years back, and I agree with your findings.

Cheers

Tony


And here I thought it might just have been me!


  • Member since
    April 2006
  • From: ON, Canada
Posted by jgeratic on Saturday, October 8, 2016 6:41 PM

Dan, solid looking progress on that Stug.

----------------

Thanks again, Check and Dan.

The car is now done, along with one of the figures. 

So one more figure to go and a base.  I picked up a 5 pack of these plastic photo frames, but the clear top is actually glass.  Surprised really, since I thought it was cheap price, along with a 40% off coupon at Michael's craft store.

Celluclay is on, covering only about 1/8" depth as I left the glass in place to combat possible warping.  There was some shrinkage along the edges, but I'm happy with it thus far, at least the corners didn't curl up.

regards,

Jack

  • Member since
    September 2003
  • From: AandF in the Badger State
Posted by checkmateking02 on Saturday, October 8, 2016 9:01 PM

That is going to make a nice-looking display piece, Jack.  Outstanding work!


  • Member since
    December 2002
  • From: Bury St Edmunds, Suffolk, England
Posted by Bish on Sunday, October 9, 2016 12:49 AM

Lovely job on the car jack. Love the finish. I always get some shrinkage with celluclay, even though i use as little water as possable. I always make up a bit more than i need. I find as long as the left over is left some where cool, it will stay usable for days so i can top up the edges.

I am a Norfolk man and i glory in being so


On the bench: Airfix 1/72nd Harrier GR.3/Fujimi 1/72nd Ju 87D-3

GAF
  • Member since
    June 2012
  • From: Anniston, AL
Posted by GAF on Monday, October 10, 2016 7:00 PM

I apologize for being absent for so long and not commenting more. After an early start on the P-40B project, my enthusiasm for model building plummeted. It was only when I realized it was October and I had 2 Group Builds to finish up that I made myself sit down and get restarted on both projects. So here's where I stand now and sorry for the picture heavy post.

After getting the fuselage together, I turned my attention to the wing bottom. I cut a slot where the drop tank hole was (P-40Bs did not have one) and removed the radiator panels on the fuselage. I filled the slot in with putty and began shaping it as shown in earlier photos.

I cut out some plastic card strips and used them to fill around the wheel wells, and with some aluminum duct tape I scored a couple of pieces to represent the ribbing.

A little paint and some glue and the bottom of the aircraft began to take shape.

Then I glued the bottom part of the wing to the fuselage, fitting and sanding until it had a reasonable fit.

I then glued the top part of the wings to the fuselage and a small part of the lower wing, leaving the rest of the upper wing unglued. The tape will help hold the wings to the fuselage. After this has dried sufficiently, I'll go back and tenax the rest of the upper wing to the lower wing, making sure it retains its dihedral.

And the new radiator flaps have been cut out and are awaiting installation, though that will probably be later on in assembly as I would just knock them off if I put them on now.

Hope everyone is well.  Take care!

Gary


  • Member since
    September 2003
  • From: AandF in the Badger State
Posted by checkmateking02 on Monday, October 10, 2016 11:21 PM

Good to see your progress, GAF!  You've got some good things going!


  • Member since
    December 2002
  • From: Bury St Edmunds, Suffolk, England
Posted by Bish on Tuesday, October 11, 2016 12:48 AM

Was woundering where you had got to GAF, good to see you back. Some nice progress there.

I am a Norfolk man and i glory in being so


On the bench: Airfix 1/72nd Harrier GR.3/Fujimi 1/72nd Ju 87D-3

  • Member since
    April 2006
  • From: ON, Canada
Posted by jgeratic on Saturday, October 15, 2016 4:30 PM

Thanks again guys, and Bish, that is good advice with the celluclay.  Actually have read that you can put in the refrigerator to extend it's life. 

The shrinkage was actually all across the surface, it just looked bad along the edges as the mixture adhered to the sides and formed a bit of a slope.  I smoothed it out with some DAS modelling clay, which also seems to have some paper fiber.

Anyhow, she is done.  I guess photo no. 4 or 5 for the front page.


Finnish Army BAB B armoured car

(captured Soviet BA-20)

Continuation War, Summer 1941

30345443695_dc492d7612_b.jpg

30229305912_f67cc14b58_b.jpg

30259592231_407e15f354_b.jpg

29714201763_28ae696b6f_b.jpg

30345461975_5fb462299a_b.jpg

30345455515_473307d6f4_b.jpg

29714223083_8f510a3e25_b.jpg

29715432824_52f3da5791_b.jpg

29715435294_68f7fcf57c_b.jpg

29714212673_e1e280d3a8_b.jpg

regards,
Jack


  • Member since
    December 2002
  • From: Bury St Edmunds, Suffolk, England
Posted by Bish on Saturday, October 15, 2016 5:17 PM

Jack, ye, the fridge works to. I usually add the celluclay out in the shed where most of the messy stuff gets done and even in the summer its nice and cool in there. I have some left over from the E-100, so i just added a bit of extra water and have left it in the shed for the 251 build coming up. I can just top that up with more celluclay when i need to use it.

Now that is stuning, you really never fail to impress. Everything, vehicle, figures, base just look briliant.

Bravo.

I am a Norfolk man and i glory in being so


On the bench: Airfix 1/72nd Harrier GR.3/Fujimi 1/72nd Ju 87D-3

  • Member since
    February 2006
  • From: Cincinnati Ohio
Posted by DantheMan85 on Sunday, October 16, 2016 3:54 PM

Thanks Checkmate.

Thanks Jgeratic: Excellent job on the Soviet BA-20 armoured car and figures.

Gary: Great progress on your P-40B.

The StuG III Ausf. A and figures are now done, after decals I airbrushed on a mist of XF-57 Buff, and spray can on Testors Dullcote. The figures took longer to complete. I used a base from a Tamiya kit for one of the figures, he doesn't like to stand up.  After painting I airbrush on a flat clear.

As a comparison I put my Dragon StuG III Ausf. G side by side with the A model. Compared with the smart kit of the G model, the older A model kit clearly shows it age. I do plan on building one of each StuG version In the future. Cool

Thanks to Checkmate for hosting this build. Big Smile


On my Work Bench: Tamiya Ford GT 1/24

Up Coming: ?


  • Member since
    September 2003
  • From: AandF in the Badger State
Posted by checkmateking02 on Sunday, October 16, 2016 4:47 PM

Great work, Jack.  Looks very realistic and natural in your photos.  Fine job!  Front page is updated to add your latest addition.  

Dan:  that's exquisite work with the StuG.  Nice job weathering and figure painting.  Do you have a preference for the front page "finished" photo?  I'd think one with all the figures participating.

Glad to have y'all in the GB.  Feel free to contribute anything else you build in the future for 1941.

And 1942 is not all that far away! 


  • Member since
    February 2006
  • From: Cincinnati Ohio
Posted by DantheMan85 on Sunday, October 16, 2016 6:13 PM

I'll take the second from the bottom, for the front page. Cool

On my Work Bench: Tamiya Ford GT 1/24

Up Coming: ?


  • Member since
    April 2006
  • From: ON, Canada
Posted by jgeratic on Sunday, October 16, 2016 7:28 PM

Thank you Bish, Dan and Check.

--------------------------

Dan, you have ended up with a very good looking example of an early Stug.  The figures add a nice touch too - a well rounded build throughout. Yes

regards,

Jack

  • Member since
    September 2003
  • From: AandF in the Badger State
Posted by checkmateking02 on Sunday, October 16, 2016 7:56 PM
Front page now current.


  • Member since
    December 2002
  • From: Bury St Edmunds, Suffolk, England
Posted by Bish on Monday, October 17, 2016 1:23 AM

Nice work on the StuG Dan, i like it.

And its nice to see you Pz IV has some company on the front page.

I am a Norfolk man and i glory in being so


On the bench: Airfix 1/72nd Harrier GR.3/Fujimi 1/72nd Ju 87D-3

JOIN OUR COMMUNITY!

Our community is FREE to join. To participate you must either login or register for an account.

SEARCH FORUMS
FREE NEWSLETTER
By signing up you may also receive reader surveys and occasional special offers. We do not sell, rent or trade our email lists. View our Privacy Policy.