SEARCH FINESCALE.COM

Enter keywords or a search phrase below:

Floats and Boats: Amphibious Aircraft Group Build

28647 views
865 replies
1 rating 2 rating 3 rating 4 rating 5 rating
  • Member since
    April 2006
  • From: ON, Canada
Posted by jgeratic on Wednesday, September 7, 2016 9:12 AM

Scott, great scene you've put together here.  All the elements work very well with one another.   For a first time, that figure sculpting is quite respectable.

regards,

Jack

  • Member since
    July 2014
Posted by modelcrazy on Wednesday, September 7, 2016 9:12 AM

Nice job Scott Yes. I like that scene, great work on all the elements and converting Sara into a woman and not an Amazon. The bottles make a nice touch as well.

Steve

Building a kit from your stash is like cutting a head off a Hydra, two more take it's place.


http://www.spamodeler.com/forum/

  • Member since
    December 2003
  • From: 37deg 40.13' N 95deg 29.10'W
Posted by scottrc on Thursday, September 8, 2016 7:58 AM

Thanks everyone for the nice comments, I could not have completed this project without the forum and the great support here.  The talent and creativity I see just wants me to try harder to get to your guys level.   Unless a couple of 1/700 ships moving in water, or the scene of the Pilgrims landing at Plymouth Rock I made out of cardboard in the 4th grade count, this was my first attempt at a diorama.  One thing I learned, after 30 some years in mechanical drawing and detailing as a profession, perspective and proportion are a lot harder to try to obtain in a scaled, three dimensional environment.  Diorama's seem to be a fun challenge to get everything to look right and be in proportion, and unlike 3D modeling on my computer, I just cannot give a command and everything goes into perspective.  I learned a lot on this project.  

  • Member since
    July 2014
Posted by modelcrazy on Thursday, September 8, 2016 8:21 AM
Yeah, dio's really add a lot to a build. They tell a story and allow you to put focus on a particular area. The tough part, which you pulled off, is making the scene seem real. The figures need to be doing something that people will usually be doing. Showing a point in time can be a challenge.

Steve

Building a kit from your stash is like cutting a head off a Hydra, two more take it's place.


http://www.spamodeler.com/forum/

  • Member since
    March 2006
Posted by simpilot34 on Monday, September 26, 2016 6:16 AM

Hey guys,

Sorry for the absence. Have been busy with life, had to do a move and have just now, like within the last 20 min., got internet access going. It was a short move, like I mean 5 min drive from where I was lol. The bench is up just still have to unpack and sort things out. so, will be back up and running soon. I tried to upload some pics awhile back but it t o o k s o  l o n g to get my library up and made the puter freeze. Hopefully now it will be better. If you see pics up shortly, you'll know lol.

Have been watching the posts, and some stellar work by all!! will catch up on all the posts soon.

Cheers, Lt. Cmdr. Richie "To be prepared for war, is one of the most effectual means of preserving the peace."-George Washington
  • Member since
    March 2006
Posted by simpilot34 on Monday, September 26, 2016 6:25 AM

WOOHOO!! much MUCH better speed now. OOOOOK, this is what I had gotten done before life reared its head. She's on her webbed feet now. Not quite a perfect fit on the struts but that's my fault not the kit.

Cheers, Lt. Cmdr. Richie "To be prepared for war, is one of the most effectual means of preserving the peace."-George Washington
  • Member since
    December 2003
  • From: 37deg 40.13' N 95deg 29.10'W
Posted by scottrc on Monday, September 26, 2016 8:22 AM

Looks like your up and rolling after the move Simpilot.  Keep up the good work.  Was is hard to get it up on the floats?  Looks like its can be an alignment challenge.  

  • Member since
    June 2014
Posted by BrandonK on Monday, September 26, 2016 8:53 AM

S34, that looks fantastic. It's really coming along.

BK

On the bench:

A lot !! And I mean A LOT!!

2024 Kits on deck / in process / completed   

                         14 / 5 / 2  

                              Tongue Tied

  • Member since
    April 2005
  • From: Montana USA
Posted by heepey on Wednesday, September 28, 2016 2:27 PM

Great work on all the builds here. My Goose is on hold along with all my model building for a while - Life.

Meanwhile I will share another float plane build that is also on hold.

An old Monogram Cessna 180 in about 1/41 scale with a Heller 1/42 LandRover and some figures.

  • Member since
    June 2014
Posted by BrandonK on Sunday, October 2, 2016 5:34 PM

That looks good, Heepy. Looking forward to seeing the other one too.

BK

On the bench:

A lot !! And I mean A LOT!!

2024 Kits on deck / in process / completed   

                         14 / 5 / 2  

                              Tongue Tied

  • Member since
    May 2011
  • From: Honolulu, Hawaii
Posted by Real G on Friday, October 7, 2016 4:11 PM

Hey guys, sorry for going under the radar.  I have been distracted from the Mach-2 Seamaster by Amodel's Be-10 "Mallow", its Soviet counterpart.  I started test fitting parts to see how the kit goes together, and can definitely state that it is a more enjoyable build!  One thing led to another, and enough progress has been made to request its entry into the GB.

Although the fuselage pieces have molded-in alignment tabs, they prevented a flush fit so they have all been removed and replaced with strip styrene.

https://flic.kr/p/MEfGTt] 
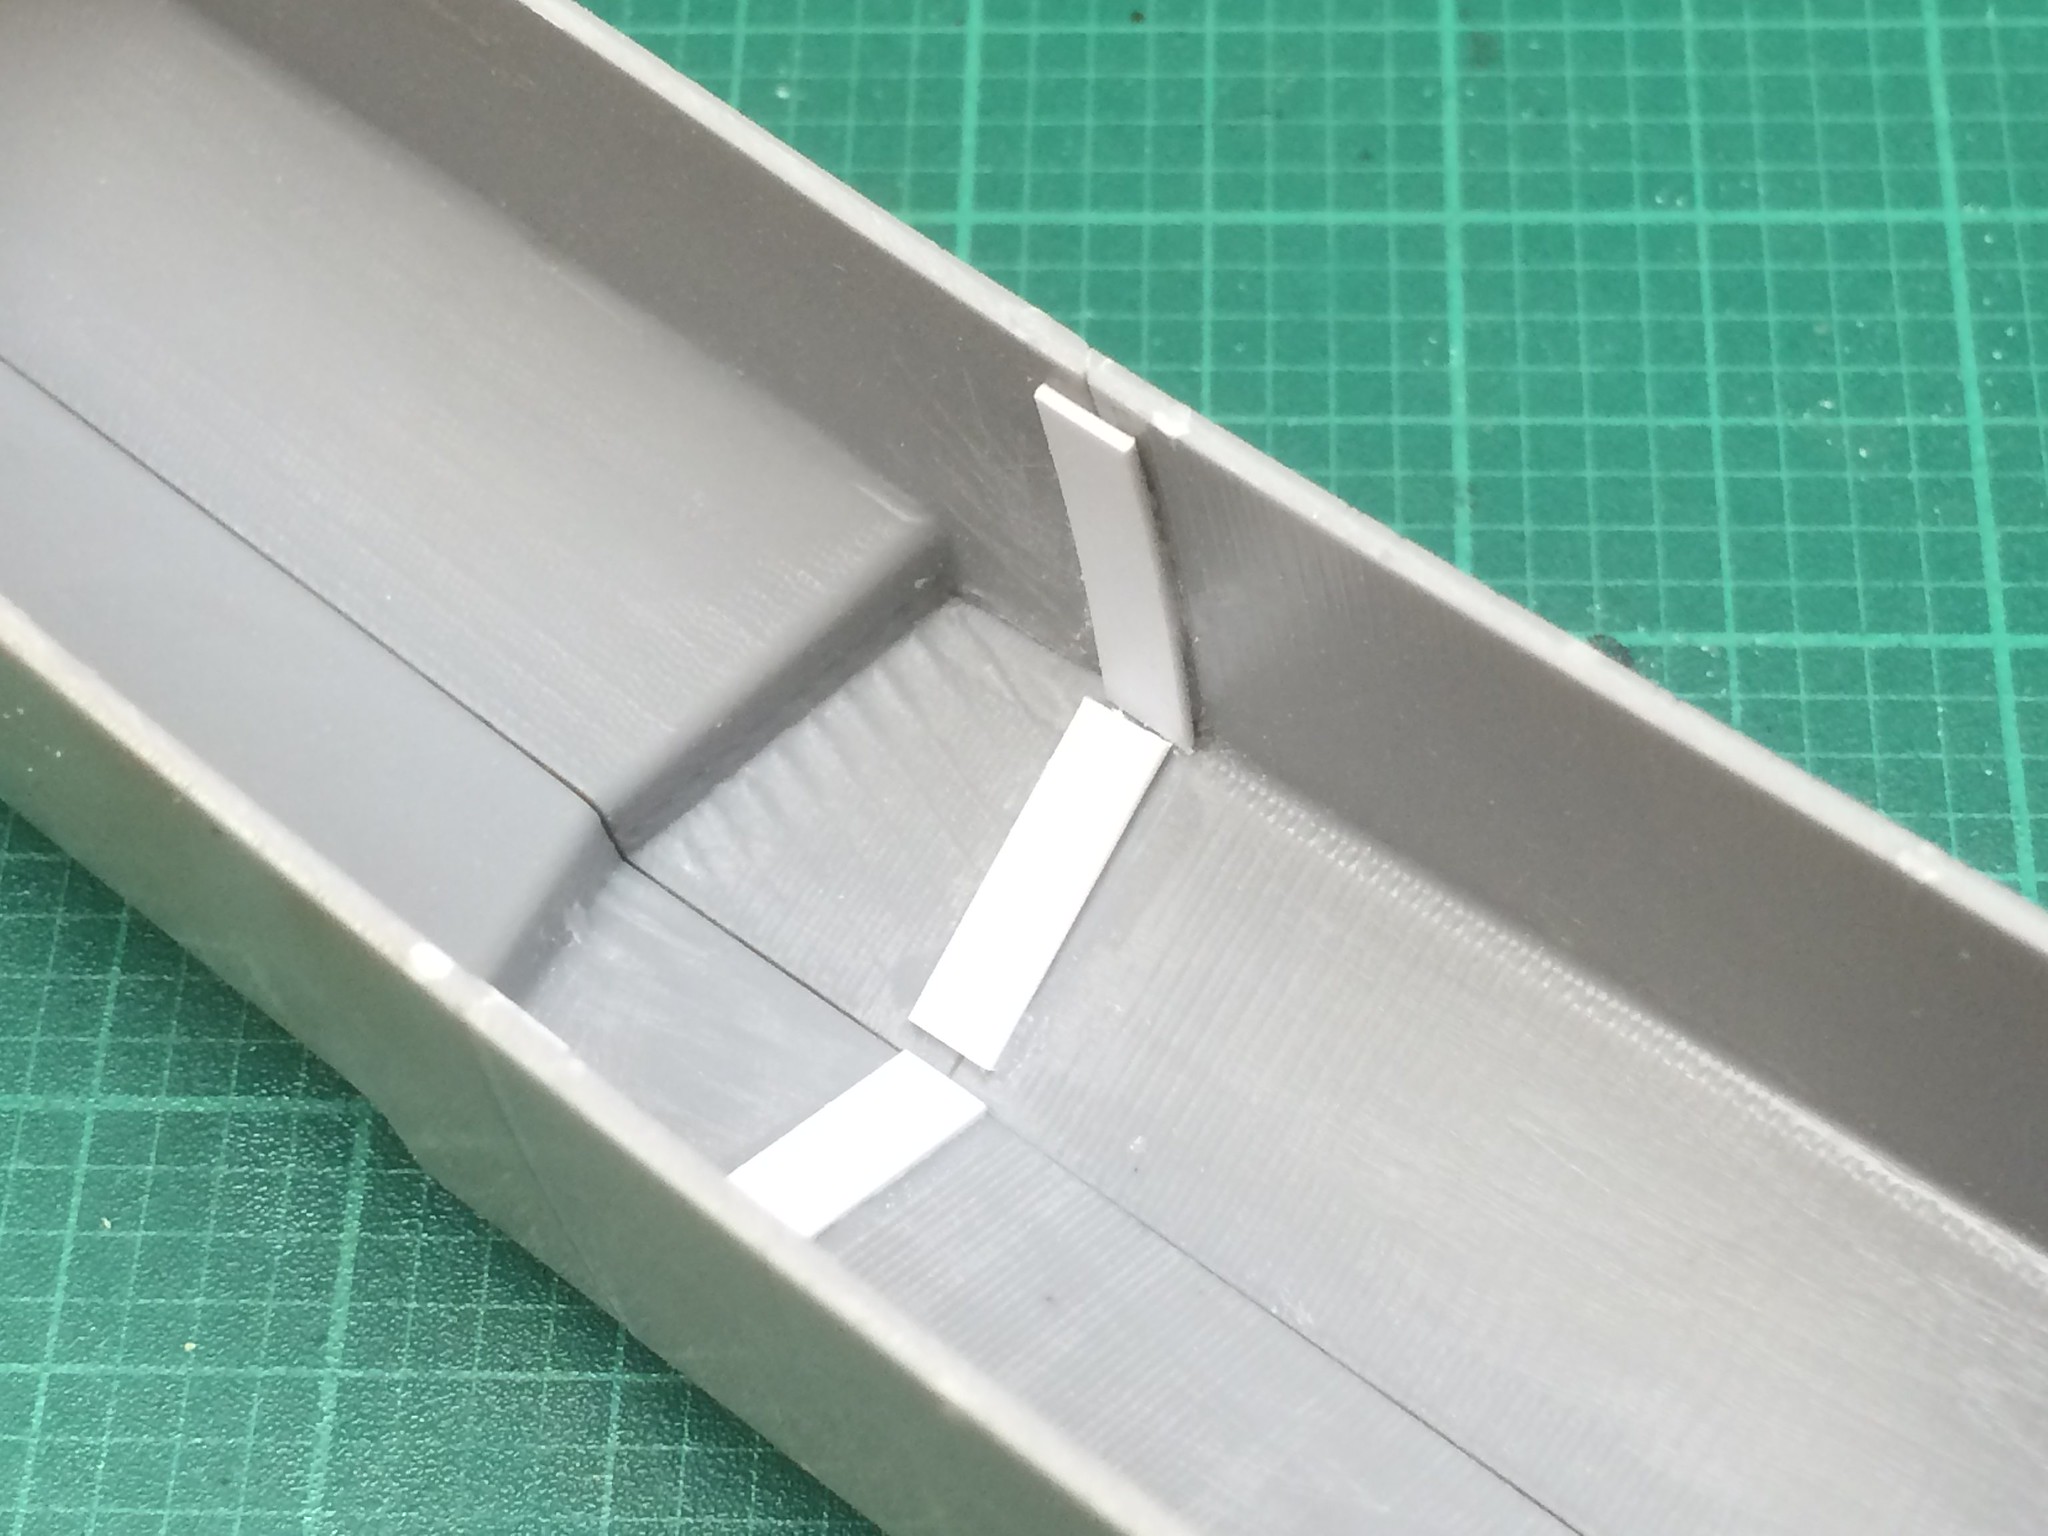
[/url]Be-10-15 by N.T. Izumi, on Flickr

https://flic.kr/p/LWpwAF] 
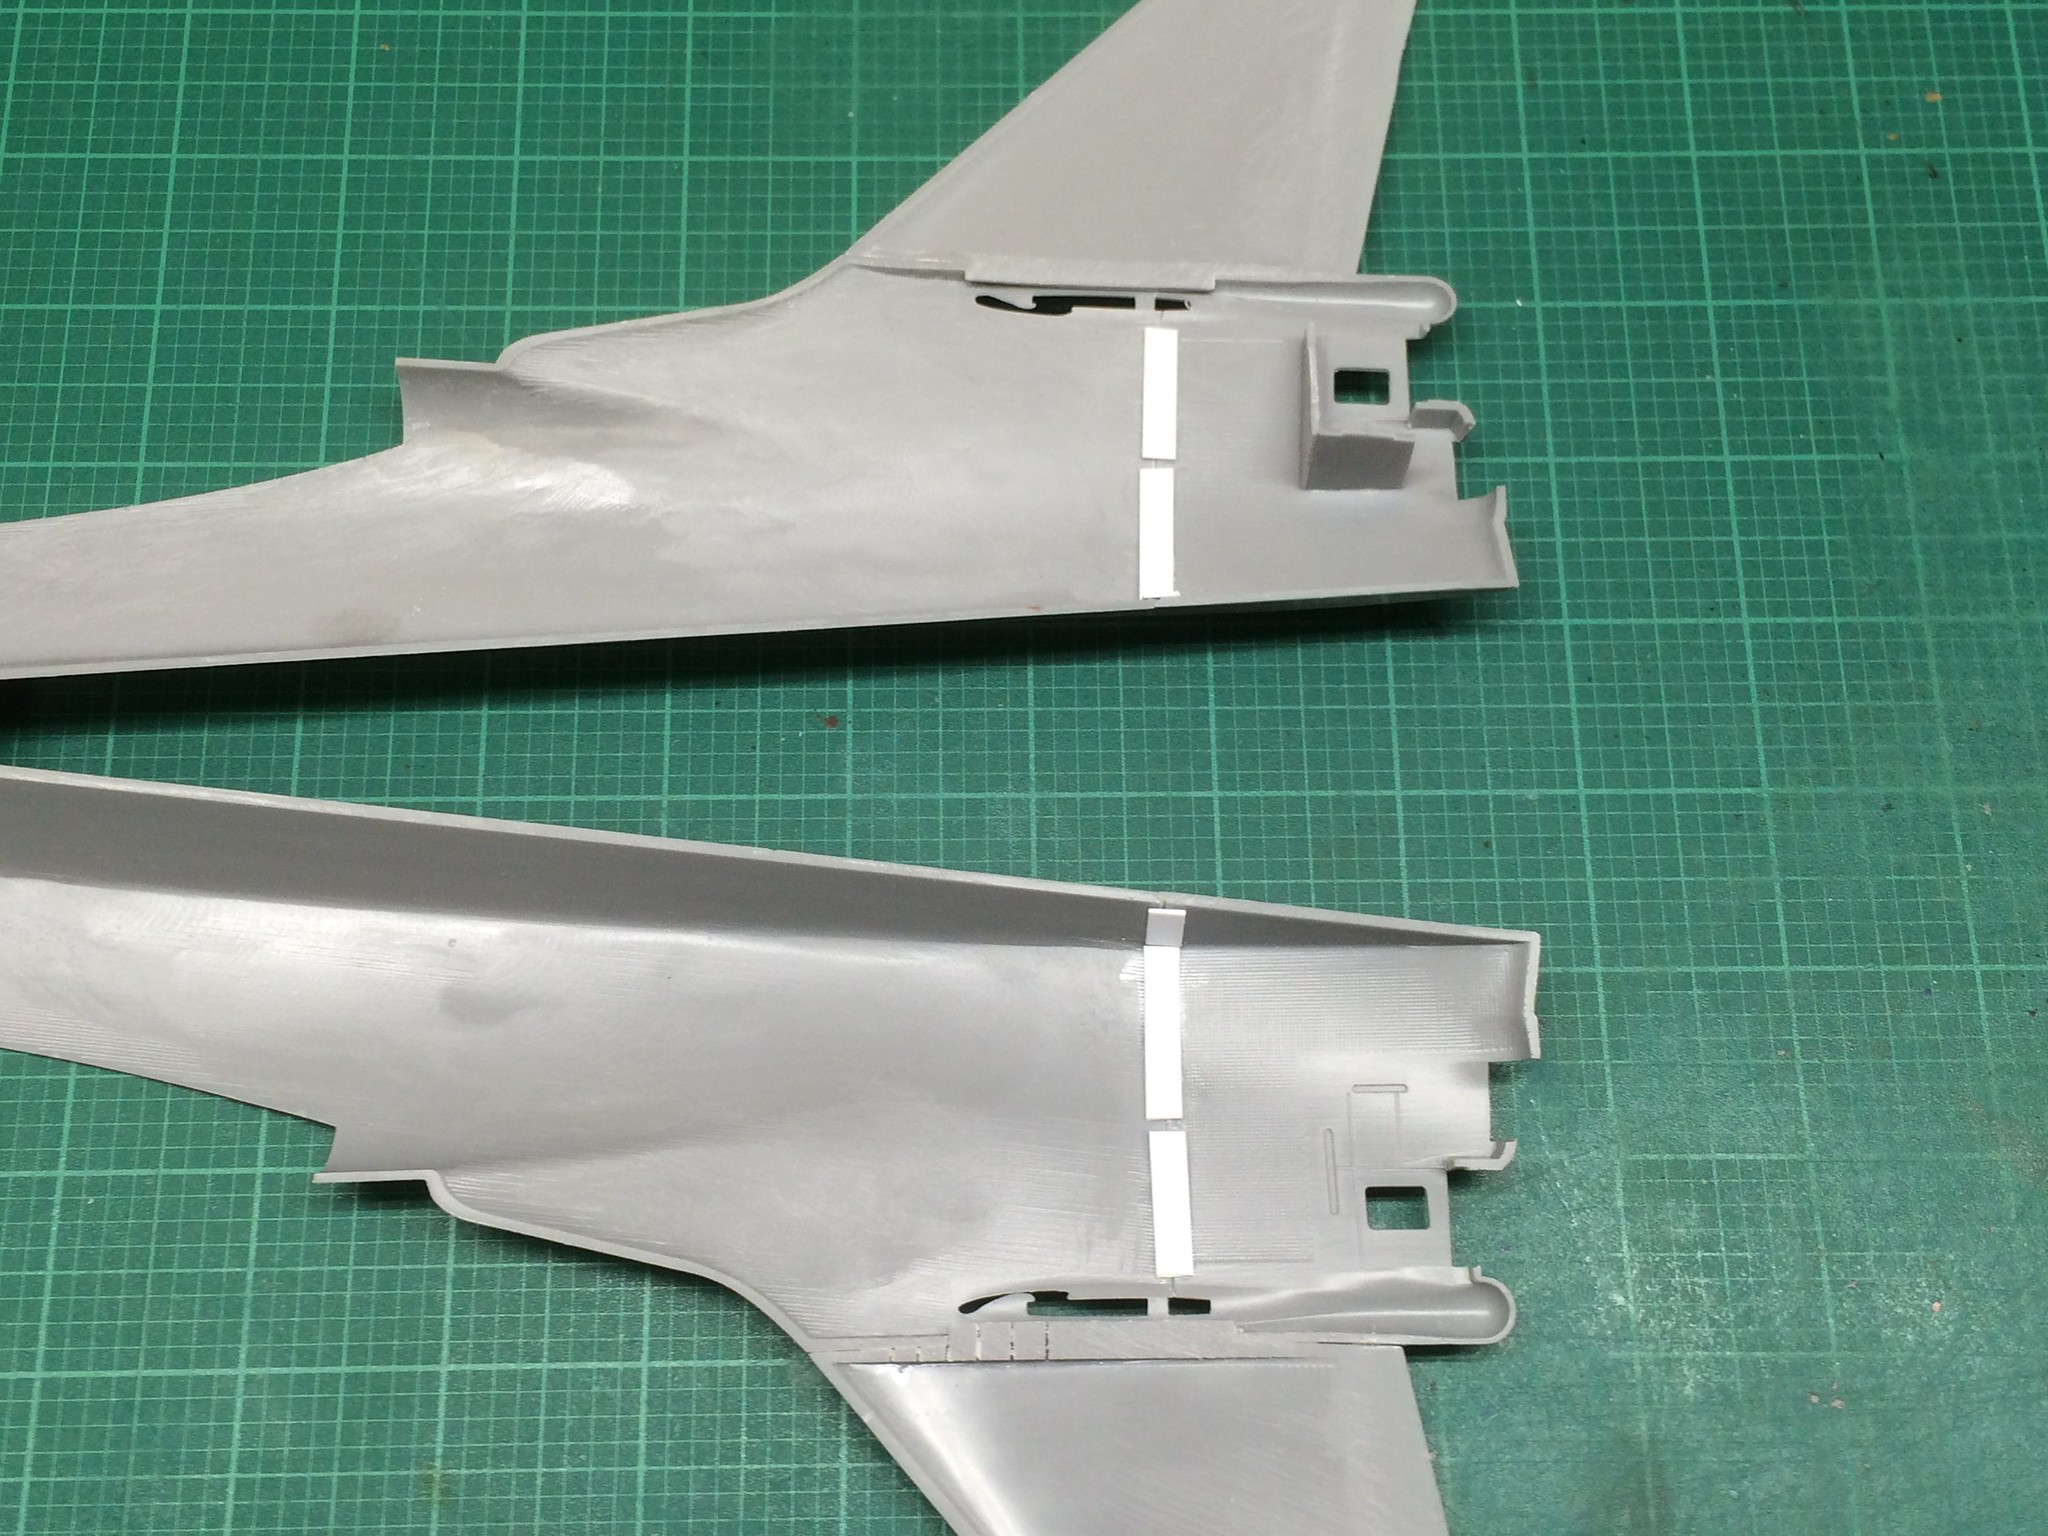
[/url]Be-10-18 by N.T. Izumi, on Flickr

https://flic.kr/p/MJAPkY] [/url]Be-10-14 by N.T. Izumi, on Flickr

https://flic.kr/p/MMBYzD] 
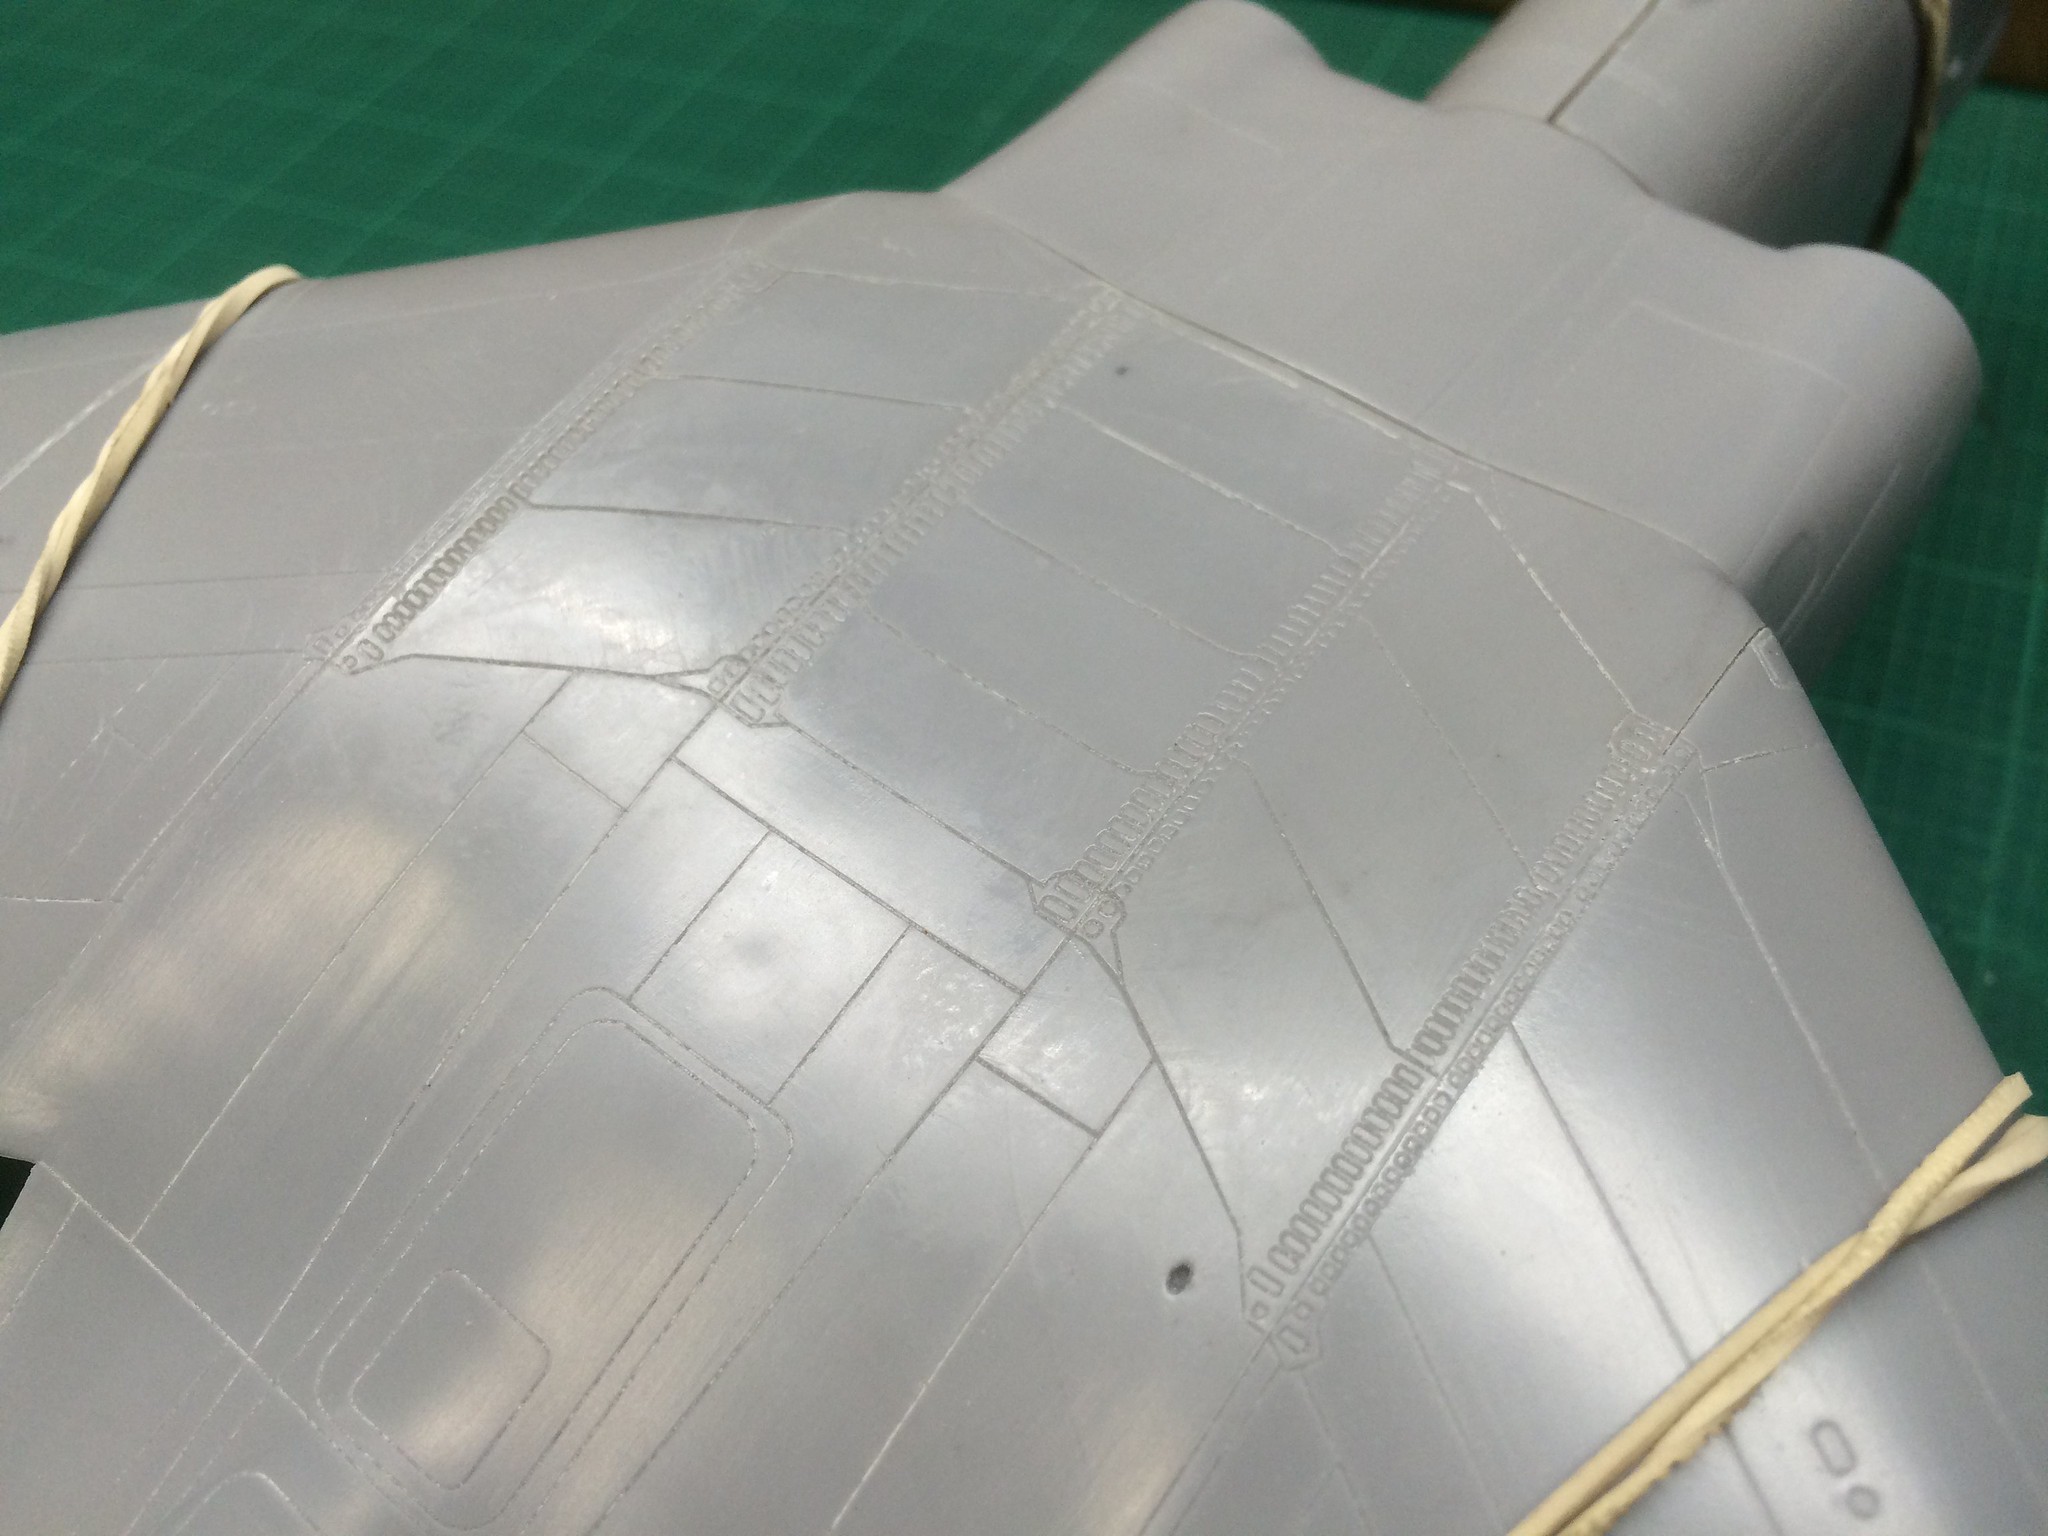
[/url]Be-10-16 by N.T. Izumi, on Flickr

And now alignment is all my responsibility (and fault)!  Fit is actually not too bad.  I was really worried that the wing to shoulder joints would not be good, causing all that wonderful zipper-like detail to be lost to sanding, but it looks like they turned out OK.

The crew stations have a bunch of really tiny boxes that need to be tediously trimmed and sanded before being glued to the fuselage sidewalls.  If anyone else builds this kit, one tip is to test fit the cockpit tub while adding the boxes.  I didn't and had to trim the bottoms of all the boxes on the starboard cockpit sidewall to get the console to fit over the locating edge. 

https://flic.kr/p/MUnauJ] [/url]Be-10-19 by N.T. Izumi, on Flickr

https://flic.kr/p/MUn9jC] 
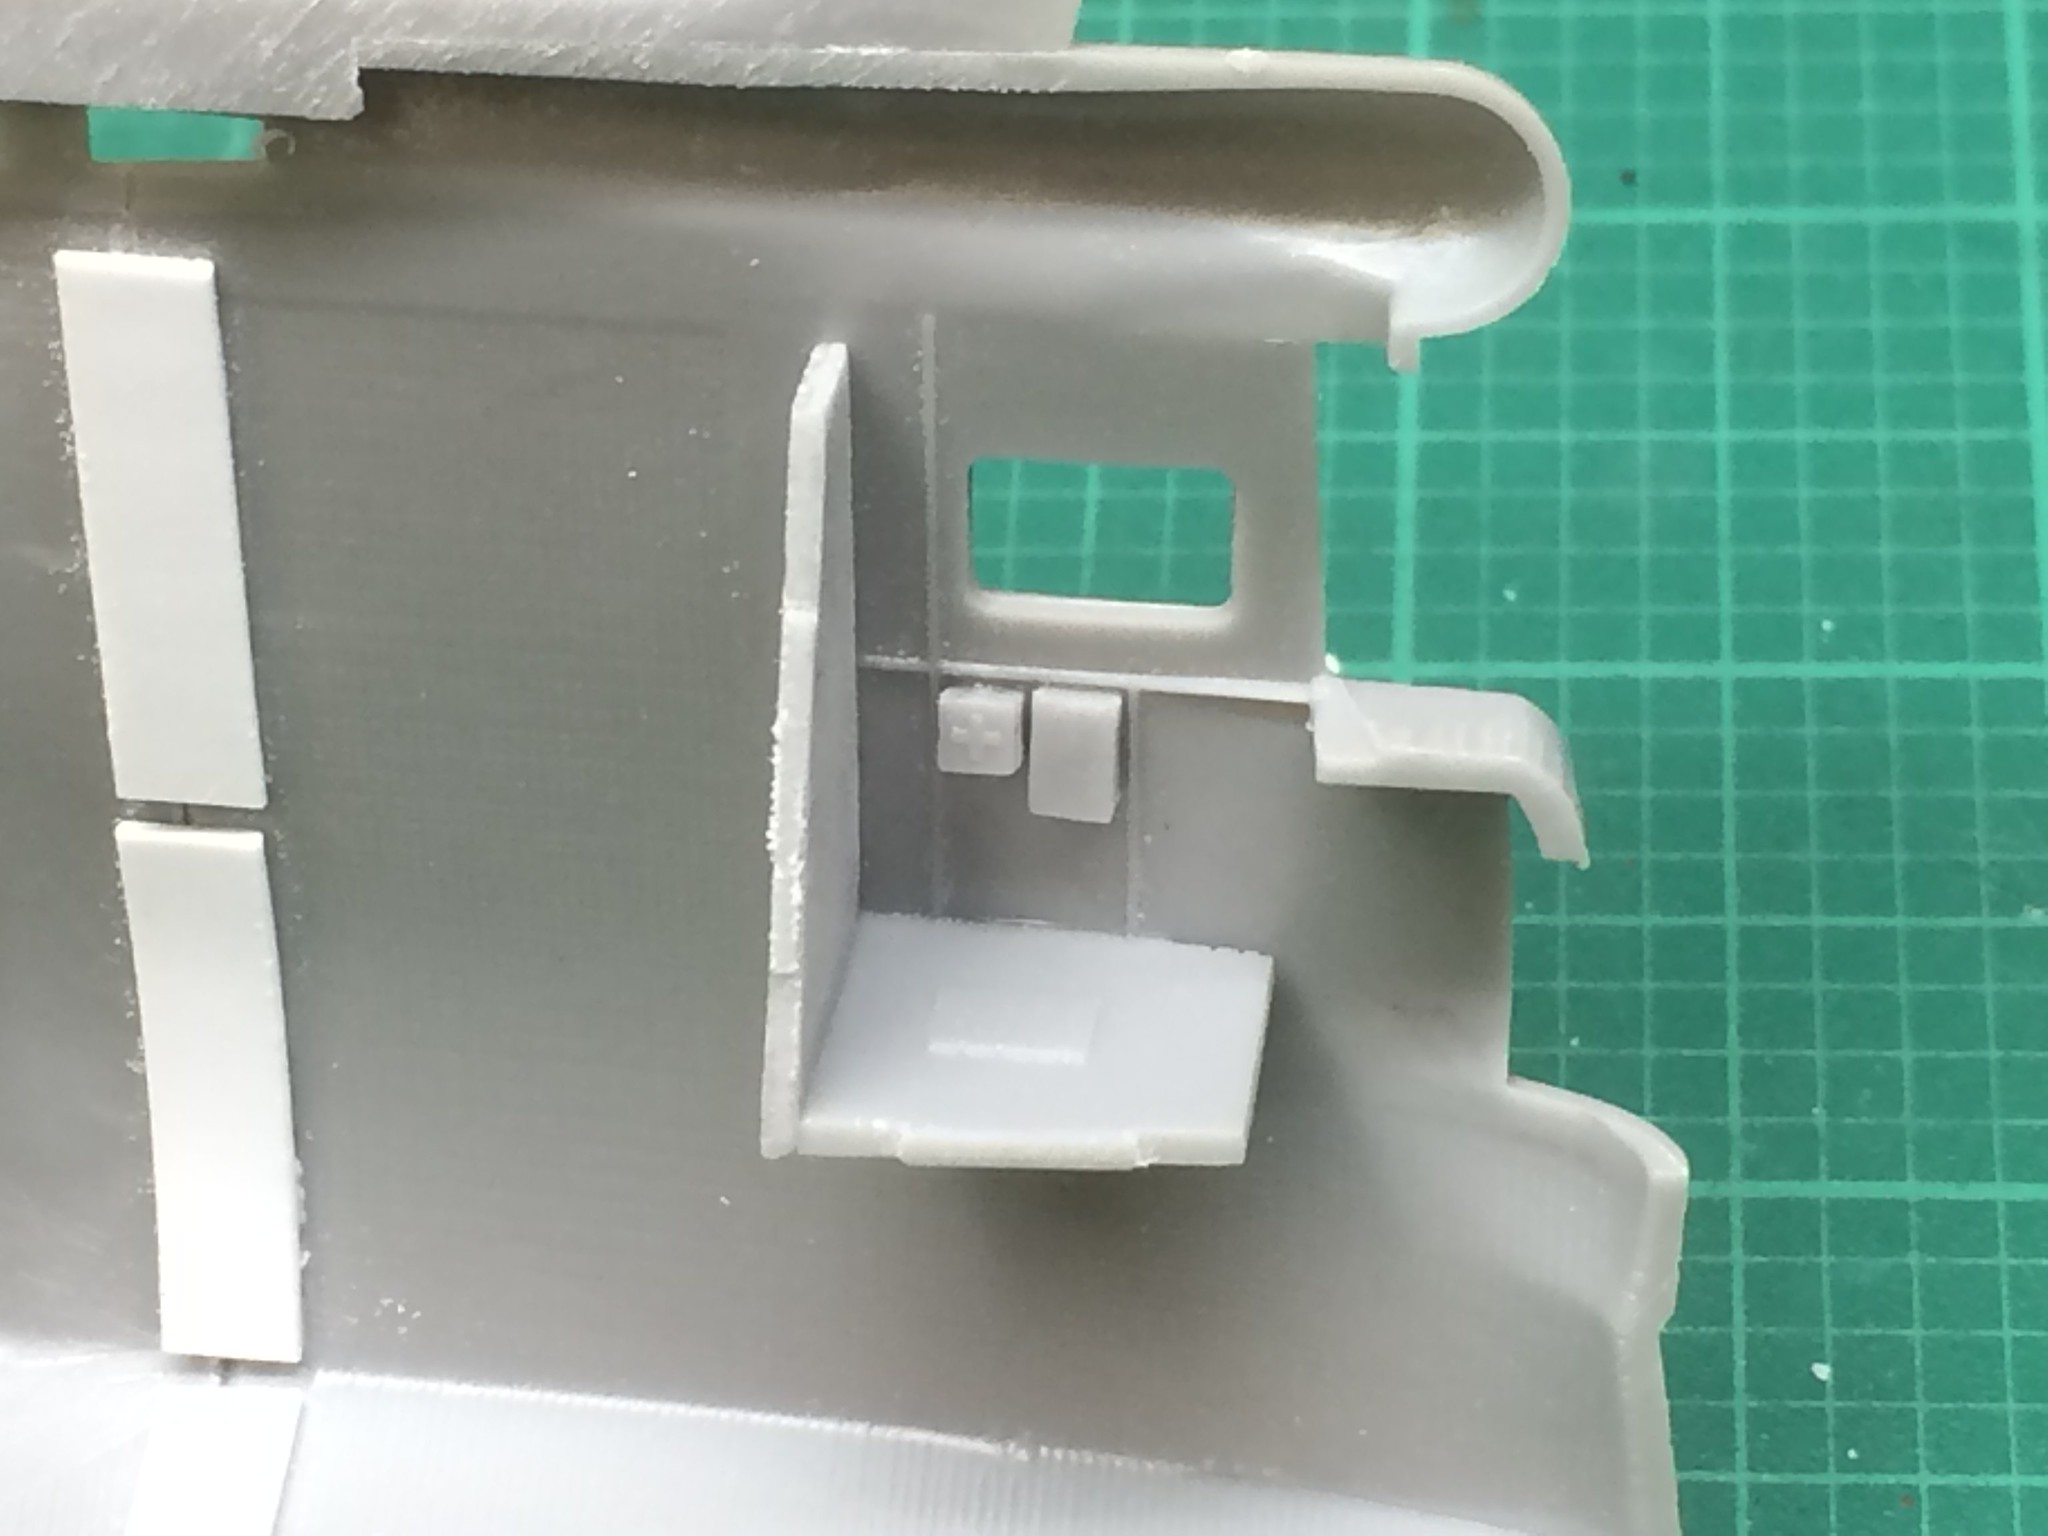
[/url]Be-10-20 by N.T. Izumi, on Flickr

Amodel continues to make improvements, as this is one of those kits that will fit properly if the builder pays attention, cleans up all joints & test fits prior to applying the glue.  I got about 95% in the fit department, but that will be good enough since this one is not natural metal.

https://flic.kr/p/MkEdMU] 
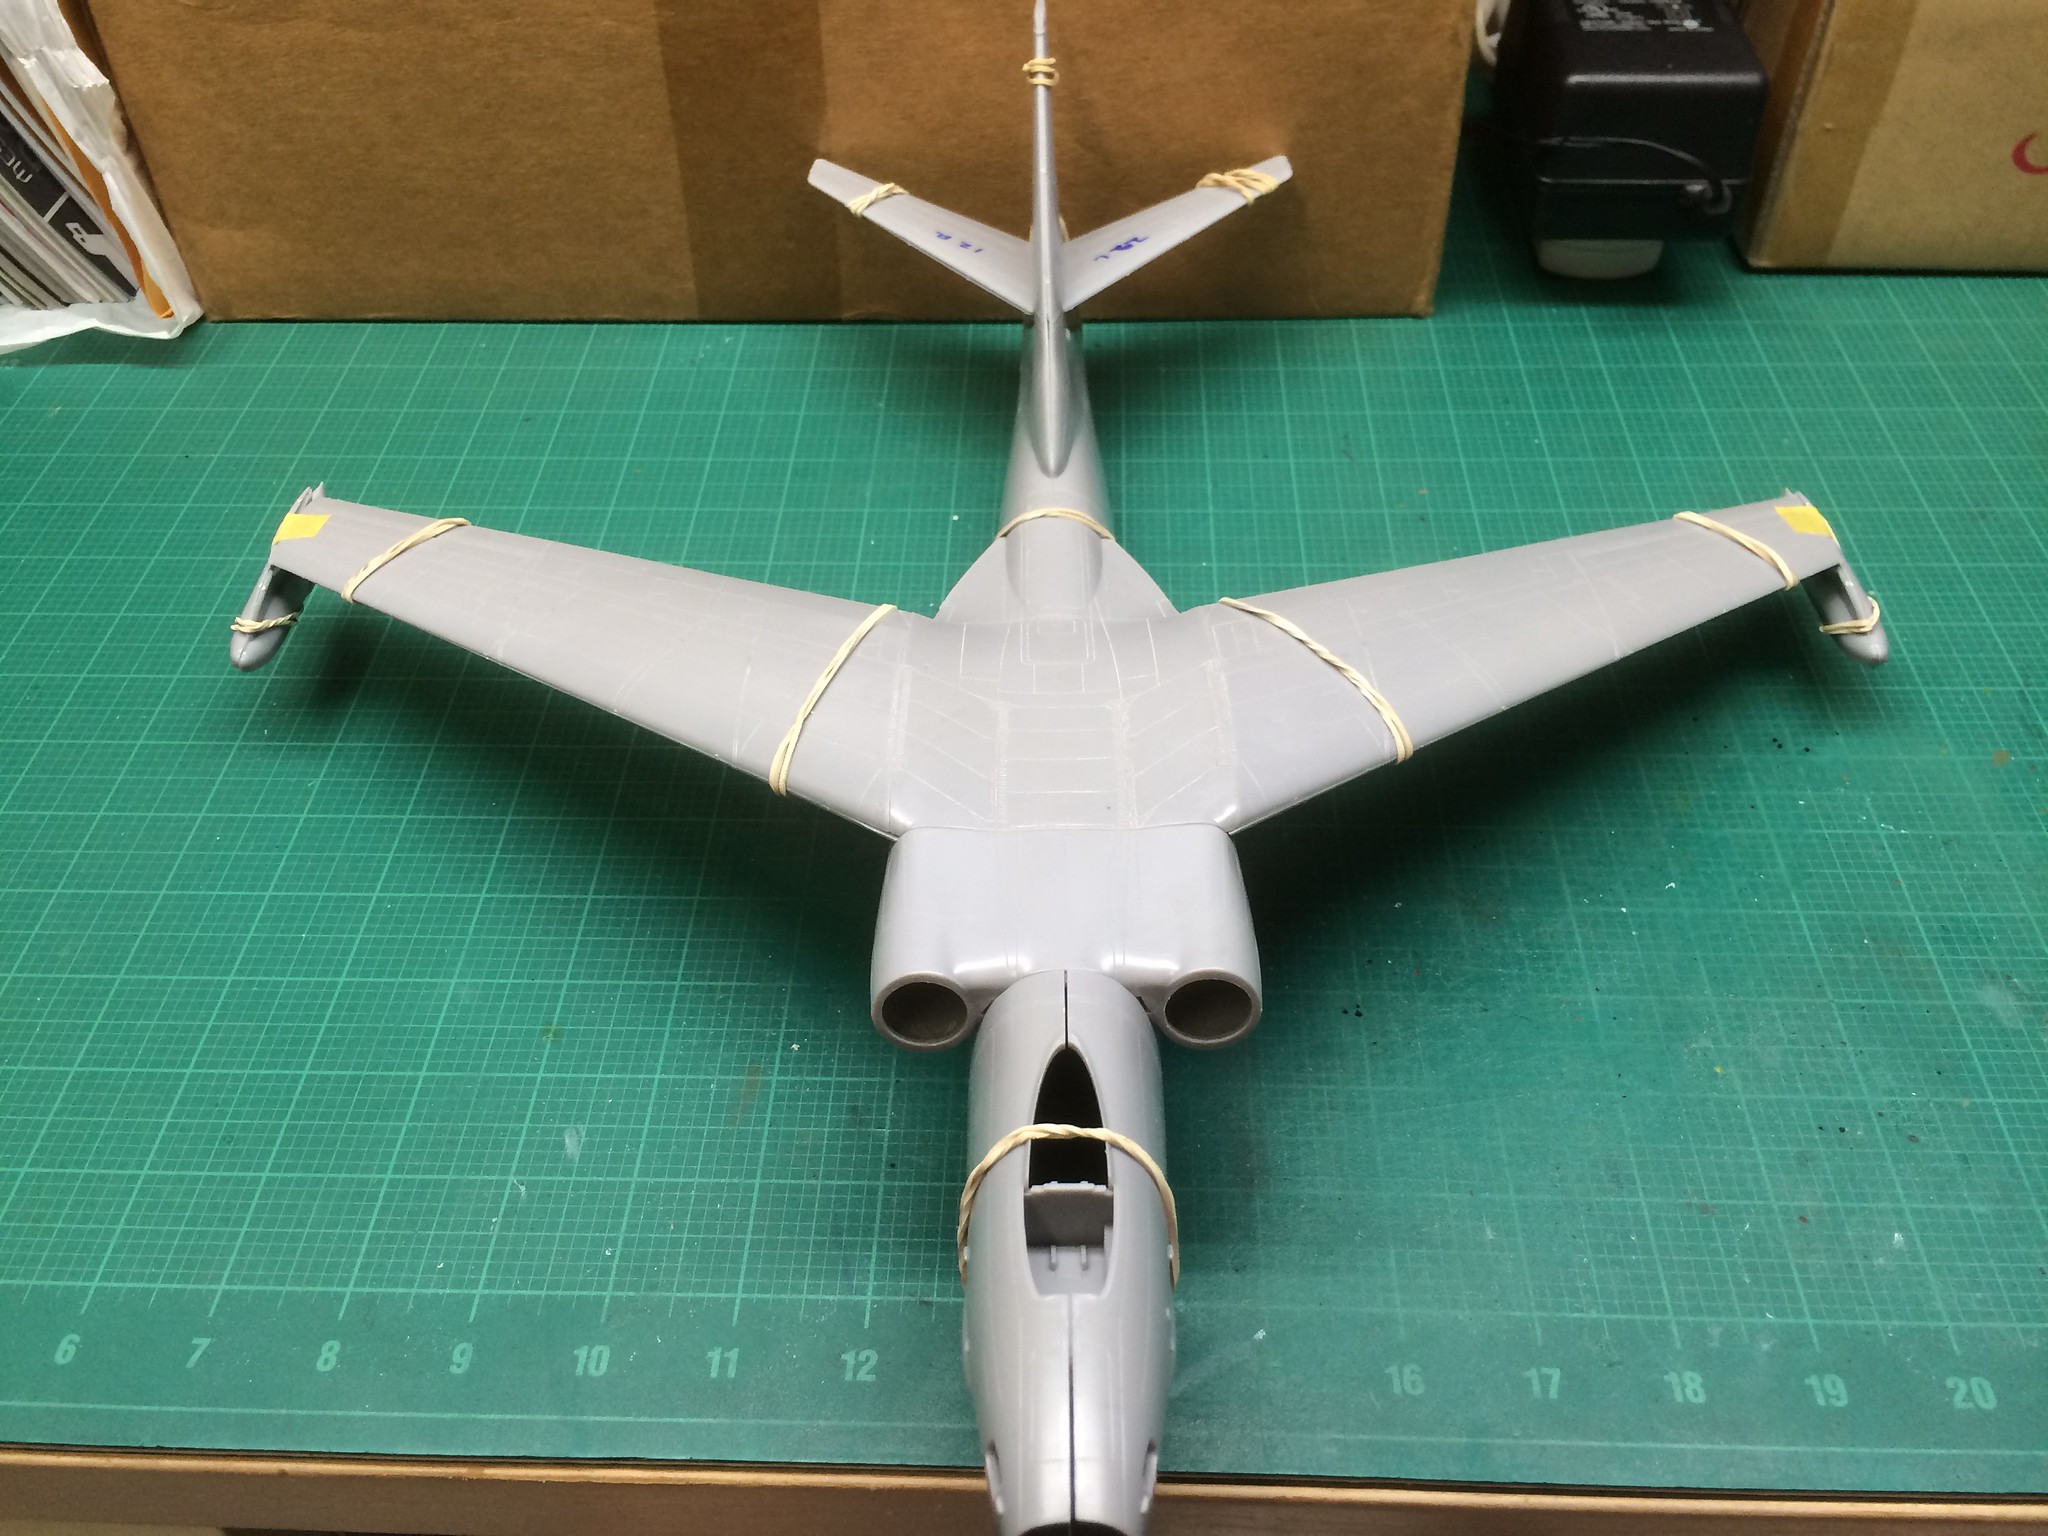
[/url]Be-10-17 by N.T. Izumi, on Flickr

Hope to roll this one out to the seaplane ramp soon!

“Ya ya ya, unicorn papoi!”

  • Member since
    June 2014
Posted by BrandonK on Friday, October 7, 2016 11:36 PM

RG, Ok, Ill get it added. Nice to see you back.

BK

On the bench:

A lot !! And I mean A LOT!!

2024 Kits on deck / in process / completed   

                         14 / 5 / 2  

                              Tongue Tied

  • Member since
    November 2003
  • From: Naples, FL
Posted by tempestjohnny on Sunday, October 9, 2016 3:58 PM
RG that looks great. How big is it?


  • Member since
    May 2011
  • From: Honolulu, Hawaii
Posted by Real G on Sunday, October 9, 2016 8:42 PM

BK - Thanks!

TJ - The Be-10 is about 17" long x 16" wide, considerably smaller then the Martin Seamaster.

“Ya ya ya, unicorn papoi!”

  • Member since
    November 2003
  • From: Naples, FL
Posted by tempestjohnny on Wednesday, October 26, 2016 5:48 AM

Finally started the Ju52  This is a mix of two kits "different color plastuc" My floatplane kit was bought at a tag sale  Looked like it was started by a five year old.  couldn't save it bought another kit.


  • Member since
    July 2014
Posted by modelcrazy on Wednesday, October 26, 2016 7:33 AM

LOL, most of my builds look like they were started by a 5 year old....me.

Steve

Building a kit from your stash is like cutting a head off a Hydra, two more take it's place.


http://www.spamodeler.com/forum/

  • Member since
    June 2014
Posted by BrandonK on Wednesday, October 26, 2016 9:13 AM

TJ, I know how you feel. I'm glad to see you diving in because this is gonna be cool.

BK

On the bench:

A lot !! And I mean A LOT!!

2024 Kits on deck / in process / completed   

                         14 / 5 / 2  

                              Tongue Tied

  • Member since
    November 2003
  • From: Naples, FL
Posted by tempestjohnny on Wednesday, October 26, 2016 11:30 AM

Does anybody have a reference to the color of Ju52 floatplane? NOT sure if it's 65 70 71 or 72 73 65 thanks.


  • Member since
    June 2014
Posted by BrandonK on Tuesday, November 15, 2016 10:13 AM

tempestjohnny

Does anybody have a reference to the color of Ju52 floatplane? NOT sure if it's 65 70 71 or 72 73 65 thanks.


I looked and I couldn't find anything. The Luft website that listed all the colors and patterns and planes has been taken down, so that awesome reference in not available. 

BK

On the bench:

A lot !! And I mean A LOT!!

2024 Kits on deck / in process / completed   

                         14 / 5 / 2  

                              Tongue Tied

  • Member since
    June 2014
Posted by BrandonK on Tuesday, November 15, 2016 10:14 AM

This GB was really a fun one and I was curious if anyone is interested in doing another one next year. I still have a few floaters in my stash that need some love. Let me know. If I get enough feedback, I'll post a feeler.

BK

On the bench:

A lot !! And I mean A LOT!!

2024 Kits on deck / in process / completed   

                         14 / 5 / 2  

                              Tongue Tied

  • Member since
    December 2002
  • From: Bury St Edmunds, Suffolk, England
Posted by Bish on Tuesday, November 15, 2016 10:17 AM

BK< ye, i will be upfor that. I have a Bv 222 in the stash and hopefully will have at least one Ar 196 by then.

I am a Norfolk man and i glory in being so


On the bench: Airfix 1/72nd Harrier GR.3/Fujimi 1/72nd Ju 87D-3

  • Member since
    April 2006
  • From: ON, Canada
Posted by jgeratic on Tuesday, November 15, 2016 10:26 AM

I too was thinking of building another float plane sometime next year.  In my stash is a resin kit of this:

regards,

Jack

  • Member since
    November 2003
  • From: Naples, FL
Posted by tempestjohnny on Wednesday, November 16, 2016 8:10 PM

Got some more work done on the Ju52

Man this thing is bigger then I thought


  • Member since
    November 2003
  • From: Naples, FL
Posted by tempestjohnny on Wednesday, November 16, 2016 8:11 PM

BrandonK

This GB was really a fun one and I was curious if anyone is interested in doing another one next year. I still have a few floaters in my stash that need some love. Let me know. If I get enough feedback, I'll post a feeler.

BK


I'm in for another go


  • Member since
    December 2002
  • From: Bury St Edmunds, Suffolk, England
Posted by Bish on Thursday, November 17, 2016 6:11 AM

Looks good so farJohnny. The 52 is quite a biggy.

I am a Norfolk man and i glory in being so


On the bench: Airfix 1/72nd Harrier GR.3/Fujimi 1/72nd Ju 87D-3

  • Member since
    June 2014
Posted by BrandonK on Thursday, November 17, 2016 10:00 AM

TJ, that certainly does have quite a wingspan. I'm looking forward to seeing that one come together. The Germans had no shortage of interesting designs.

BK

On the bench:

A lot !! And I mean A LOT!!

2024 Kits on deck / in process / completed   

                         14 / 5 / 2  

                              Tongue Tied

  • Member since
    May 2011
  • From: Honolulu, Hawaii
Posted by Real G on Saturday, November 19, 2016 5:22 AM

Sorry guys for not pushing forward.  I snuck off to Japan to have some fun a couple of weeks ago, and then got slammed with work upon my return.  Anyway, it's been a quiet Friday evening so the Beriev is back on the bench.

I have been shadowing somone else's on-line build trying to learn pitfalls and crib fixes.  The other guy is having exactly the same problems as I have.  I shamelessly stole his idea of adding strip plastic to the guide ridges that locate the engine module to the fuselage. It worked great, so fettling continues to ensure the major components will fit properly.

I'd better start slapping paint in the crew stations so that the fuselage can be closed up.   I also need to figure out how to post pics from my phone.  Embarrassed 

“Ya ya ya, unicorn papoi!”

  • Member since
    June 2014
Posted by BrandonK on Saturday, November 19, 2016 10:20 AM

RealG, I am looking forward to seeing your pics and progress.

BK

On the bench:

A lot !! And I mean A LOT!!

2024 Kits on deck / in process / completed   

                         14 / 5 / 2  

                              Tongue Tied

  • Member since
    November 2003
  • From: Naples, FL
Posted by tempestjohnny on Sunday, November 20, 2016 5:05 AM

BrandonK

RealG, I am looking forward to seeing your pics and progress.

BK


Ditto


  • Member since
    May 2011
  • From: Honolulu, Hawaii
Posted by Real G on Monday, November 21, 2016 5:57 PM

Here are a few photos from Friday night's Beriev Build:

https://flic.kr/p/PdK6jz] [/url]Be-10-21 by N.T. Izumi, on Flickr

Strip styrene was added to the molded-in guides to help the fuselage sides algn with the engine module.  The fuselage cutout contour does not match the engines, so the extra material will also ensure contact surface for gluing.

https://flic.kr/p/PoM9CP] [/url]Be-10-22 by N.T. Izumi, on Flickr

Lots of little plastic strips were needed to help parts stay aligned.  The raised rims that locate the tailpipes have been partially ground away to allow the pipes to be inserted after all the filling/sanding is done.  Note stretched sprue filling in the horizontal seam line.  My new favorite over putty.  I'm trying to see how little filler I can use on this not-so-good-fitting kit.  I think a better modeler would use even less.

https://flic.kr/p/NQmzcq] [/url]Be-10-23 by N.T. Izumi, on Flickr

Just have to paint the interior and then the major airframe parts can be joined.


“Ya ya ya, unicorn papoi!”

JOIN OUR COMMUNITY!

Our community is FREE to join. To participate you must either login or register for an account.

SEARCH FORUMS
FREE NEWSLETTER
By signing up you may also receive reader surveys and occasional special offers. We do not sell, rent or trade our email lists. View our Privacy Policy.