SEARCH FINESCALE.COM

Enter keywords or a search phrase below:

75th Anniversary of 1942 (World at War)

38679 views
860 replies
1 rating 2 rating 3 rating 4 rating 5 rating
  • Member since
    December 2002
  • From: Bury St Edmunds, Suffolk, England
Posted by Bish on Sunday, November 5, 2017 1:54 PM

Dan, looks good. Glad to hear the fit is good, i had really issues with my 32nd hase Stuka.

Is that cockpit all out of the box, it looks very nice.

I am a Norfolk man and i glory in being so


On the bench: Airfix 1/72nd Harrier GR.3/Fujimi 1/72nd Ju 87D-3

  • Member since
    December 2002
  • From: Bury St Edmunds, Suffolk, England
Posted by Bish on Sunday, November 5, 2017 2:02 PM

Stunning work there Eric, very impressive.

I am a Norfolk man and i glory in being so


On the bench: Airfix 1/72nd Harrier GR.3/Fujimi 1/72nd Ju 87D-3

  • Member since
    September 2016
  • From: Albany, New York
Posted by ManCityFan on Sunday, November 5, 2017 2:53 PM

Bish

Stunning work there Eric, very impressive.


Ditto  The shot damage and weathering is very convincing.  Pretty ambitious dio.  Looks pretty darn good to me!

Dwayne or Dman or just D.  All comments are welcome on my builds. 

  • Member since
    September 2003
  • From: AandF in the Badger State
Posted by checkmateking02 on Sunday, November 5, 2017 3:38 PM

 Good start, Dan.  Interesting configuration with the skis.


  • Member since
    September 2003
  • From: AandF in the Badger State
Posted by checkmateking02 on Sunday, November 5, 2017 3:41 PM

Well done, Eric.  Very realistic finish.  Looks suitably trashed.


  • Member since
    April 2005
  • From: Australia
Posted by taxtp on Sunday, November 5, 2017 6:15 PM

That area that looks like it's been scarred by fire is very convincing Eric, it really draws the eye to it.

Cheers

Tony

I'm just taking it one GB at a time.

  • Member since
    April 2014
  • From: Australia
Posted by lostagain on Monday, November 6, 2017 5:36 AM

Eric,

Looking good there, the celluclay is doing a good snow job. Looking forward to seeing how the fresh snow comes up.

Dan,

Interesting Stuka variant, looks like it will be fun, and another snow scene coming up!

The Marder is into the weathering stage, started with the dot filter:

Then I went and did the pinwash around the details, and there are plenty on this riviter's nightmare:

My final touch for the session was to break off the two tarp supports at the back of the compartment. Didn't do them together, no I broke one off, thought "better take care not to do that again" and ten seconds later neatly snapped it off too...

oh well at least I didn't drop it - yet...

  • Member since
    December 2002
  • From: Bury St Edmunds, Suffolk, England
Posted by Bish on Monday, November 6, 2017 6:00 AM
Nice work on the marder, some good results with the filter. O don't you love those tarp supports.

I am a Norfolk man and i glory in being so


On the bench: Airfix 1/72nd Harrier GR.3/Fujimi 1/72nd Ju 87D-3

  • Member since
    September 2016
  • From: Albany, New York
Posted by ManCityFan on Monday, November 6, 2017 10:45 AM

Really like the weathering you are doing there, LA.  Those tarp supports were asking for it sticking out there like that.

Dwayne or Dman or just D.  All comments are welcome on my builds. 

  • Member since
    July 2014
Posted by modelcrazy on Monday, November 6, 2017 11:02 AM

If it sticks up or out, I will break it off.

Steve

Building a kit from your stash is like cutting a head off a Hydra, two more take it's place.


http://www.spamodeler.com/forum/

  • Member since
    April 2006
  • From: ON, Canada
Posted by jgeratic on Monday, November 6, 2017 1:27 PM

Eric, that winter scene is coming along quite nicely.

------------------------

Dan, fine start on the ski equippd Stuka. 

------------------------

Lost, outstanding stuff at the weathering stage.

regards,
Jack

  • Member since
    September 2003
  • From: AandF in the Badger State
Posted by checkmateking02 on Monday, November 6, 2017 5:04 PM

Looks great, lost.  The weathering is admirable and realistic.


  • Member since
    February 2010
  • From: Berkeley CA/St. Paul MN
Posted by EBergerud on Monday, November 6, 2017 5:23 PM

Hope you can brighten the Marder pics a bit. I've had very mixed success with dot filters. Maybe it's a matter of definition. I've found a simple dot filter is a terrific way to fade. Use it in conjunction with filters - not sure which should come first. Anyway, the last pic shows a very nice weathering even if something is wrecked. (I doubt I've made a kit without something either omitted or scratched because of "battle damage.") Is there something different about the last pic and the one above it - it appears so?

Anyone keen on oils really should check out Mike Rinaldi's latest YouTube efforts. He's almost completely junking "Tank Art" as developed in four volumes of books. (At least they're reasonably priced and still contain very neat ideas.) Now it's water based acrylics (he's affiliated with Mission Models), oils applied directly and some pigments for basically everything. His use of direct oils for pinwashes is very convincing. You can see it best on a half hour piece he did with an AMPS gent who owns a hobby shop in Toronto. The longer pieces are more talk than action. (Adam Wilder is my favorite for videos. And, perhaps this is a trend, his product range now offers a new range of acrylic filters/washes that can "reactivate": just like Medea Com.Art has been doing for years. Looks like some folk are getting weary of using enamel products. I've been there for a long time - although I still use powerful solvents for airbrush cleaning.) Eric


A model boat is much cheaper than a real one and won't sink with you in it.

  • Member since
    February 2010
  • From: Berkeley CA/St. Paul MN
Posted by EBergerud on Monday, November 6, 2017 7:27 PM


OK: enough with dead Panzers in the snow.


 left by Eric Bergerud, on Flickr

 As I feared, the overall project doesn't work. I got too ambitious. But everything was worth it anyway. I wanted to practice a number of winter effects. If you count the beans, in the Nazi-Soviet War there was a full year of winter – throw in six months of “in between.” Anyway, if one wants to do Eastern Front subjects, especially if put in dios (or “vignettes”) it's a good idea to get acquainted with winter weathering.

  I'd like to briefly explain how I approach weathering. Mig Jimenez is right that it's impossible for any of us to make a small thing look like a big thing. He uses this observation to defend the use of considerable “artistic license” for armor modelers. He agrees that not many real world AFVs really looked like (to use Rinaldi's phrase) “tank art” - but argues that it's great fun to make that a goal. After all, there were thousands of AFVs in WWII alone and no doubt some did look the part of something that could be placed in a museum of modern art. (As I've found, there's a whole genre of photography and painting that specializes in rust and rusty things. And that stuff is intended for galleries.) So, if a modeler wants “wow factor” there is history to support the effort. However, I think most history supports the conclusion that war is the enemy of art. I'm a military historian by trade and have seen thousands of photos of WWII war machines of all types. I think most weapons, unless brand new or just overhauled (quite a few items really) would have shown considerable fading, lots of smudging where crew walked around and a good bucket of dust, petro stains, grime and dirt. (I do not believe that in the front line there were clean tanks, trucks, jeeps or soldiers. Same is true with ships, but if you spend six months on one model, aggressive weathering takes nerve, even if history is on your side.) I'm not so sure about lots of chipping and really not so sure about a lot of rust. In any case, I try to evoke with my efforts (humble enough) the way something might have actually looked. So no one will ever describe anything I do as a treat to the eye. That certainly means I won't write any books or win any prizes – but neither would have happened anyway.

 I tried to do several things on this project and each worked in its own way – just not together. First I wanted to make extensive use of oils to turn a very dark gray tank into a kind of grimy light gray – and no blue tint. Here's where I started from and ended up.

  DECals by Eric Bergerud, on Flickr


 diowos2 by Eric Bergerud, on Flickr


 I wanted to use whitewash. But I didn't want a deep winter dio. So that meant I was looking for a whitewash that was largely worn off as opposed to one largely white with big chips. There are a number of ways to do this and I used tank mules to experiment. I finally decided to go back to my Medea Com.Art opaque white. Com.Art is wonderful paint but too fragile for straight up work on styrene. (Some day I'll put GAC 200 hardener in it – be neat if it worked because Com.Art sprays like a dream from a brush.) So I gave the tank a light brushing of white, let it dry, and carefully wore it away with a brush and water. No chipping fluid required. (AK now makes a fading white that also needs no hairspray or chipping fluid.) I should have taken a close-up before the snow dusting, the photo above shows the effect pretty well. I could have left more on, but I knew there was going to be snow on top of it eventually.

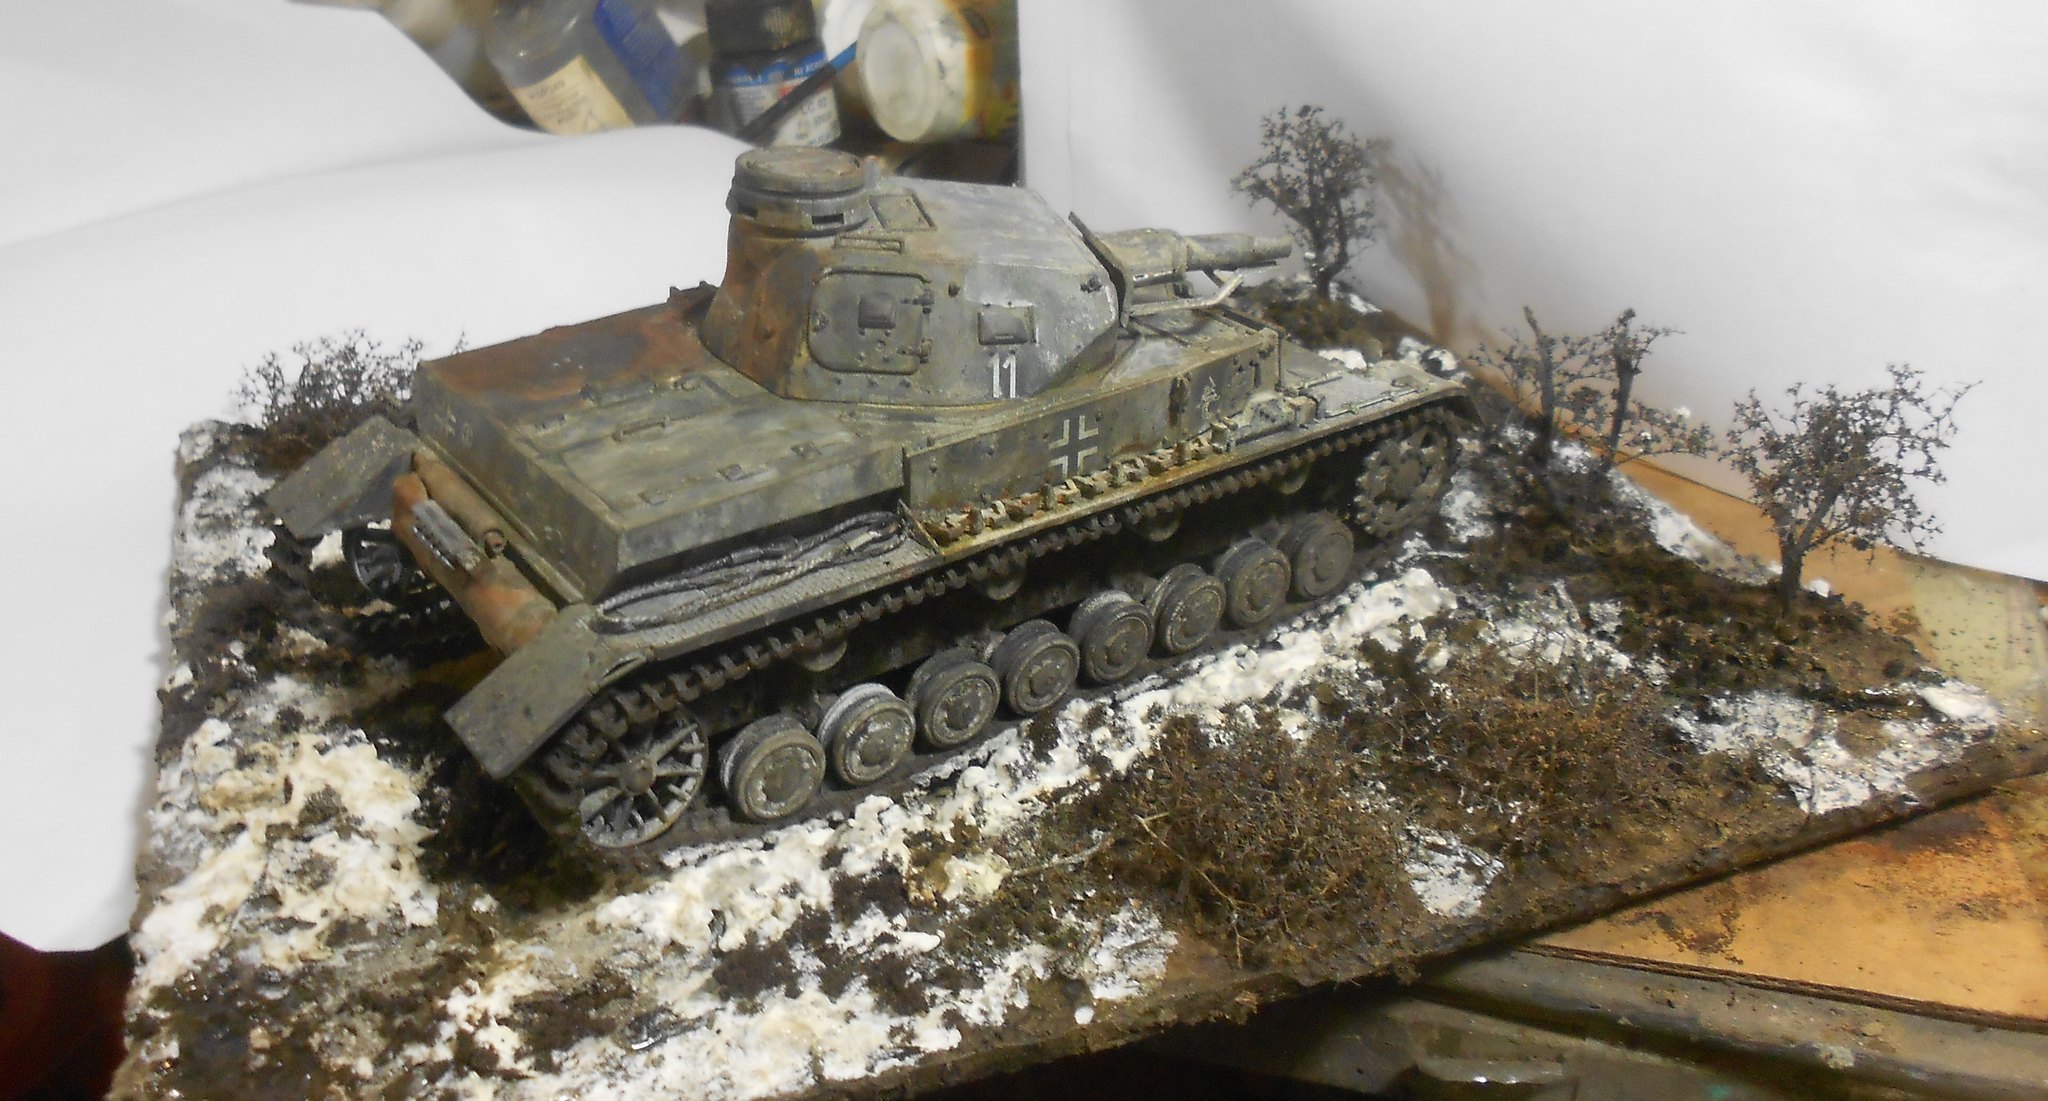
 I wanted to do a knocked out tank. Knocked out tanks, judging from a blizzard of photos online, come in all varieties. I didn't have an interior for the kit (nor the time) to do a really wrecked Panzer. (Whitmann's Tiger had its turret blown off in his last fight – you get the idea.) I could have simply put a hole in it – many a dead tank looked like that. No fire, but the crew all casualties. But I wanted to try for some serious fire damage which would be rust and black dusted with white/gray soot. So I imagined a likely enough scenario. A tired Panzer IV southwest of Moscow in late February 42 runs into an ambush or is simply outflanked by Soviet tanks or anti-tank guns and takes two hits just below the turret – right where some ammunition is stored. But perhaps the shell supply is low. The tank dies but isn't blown up. And here's what I got:

  damage by Eric Bergerud, on Flickr


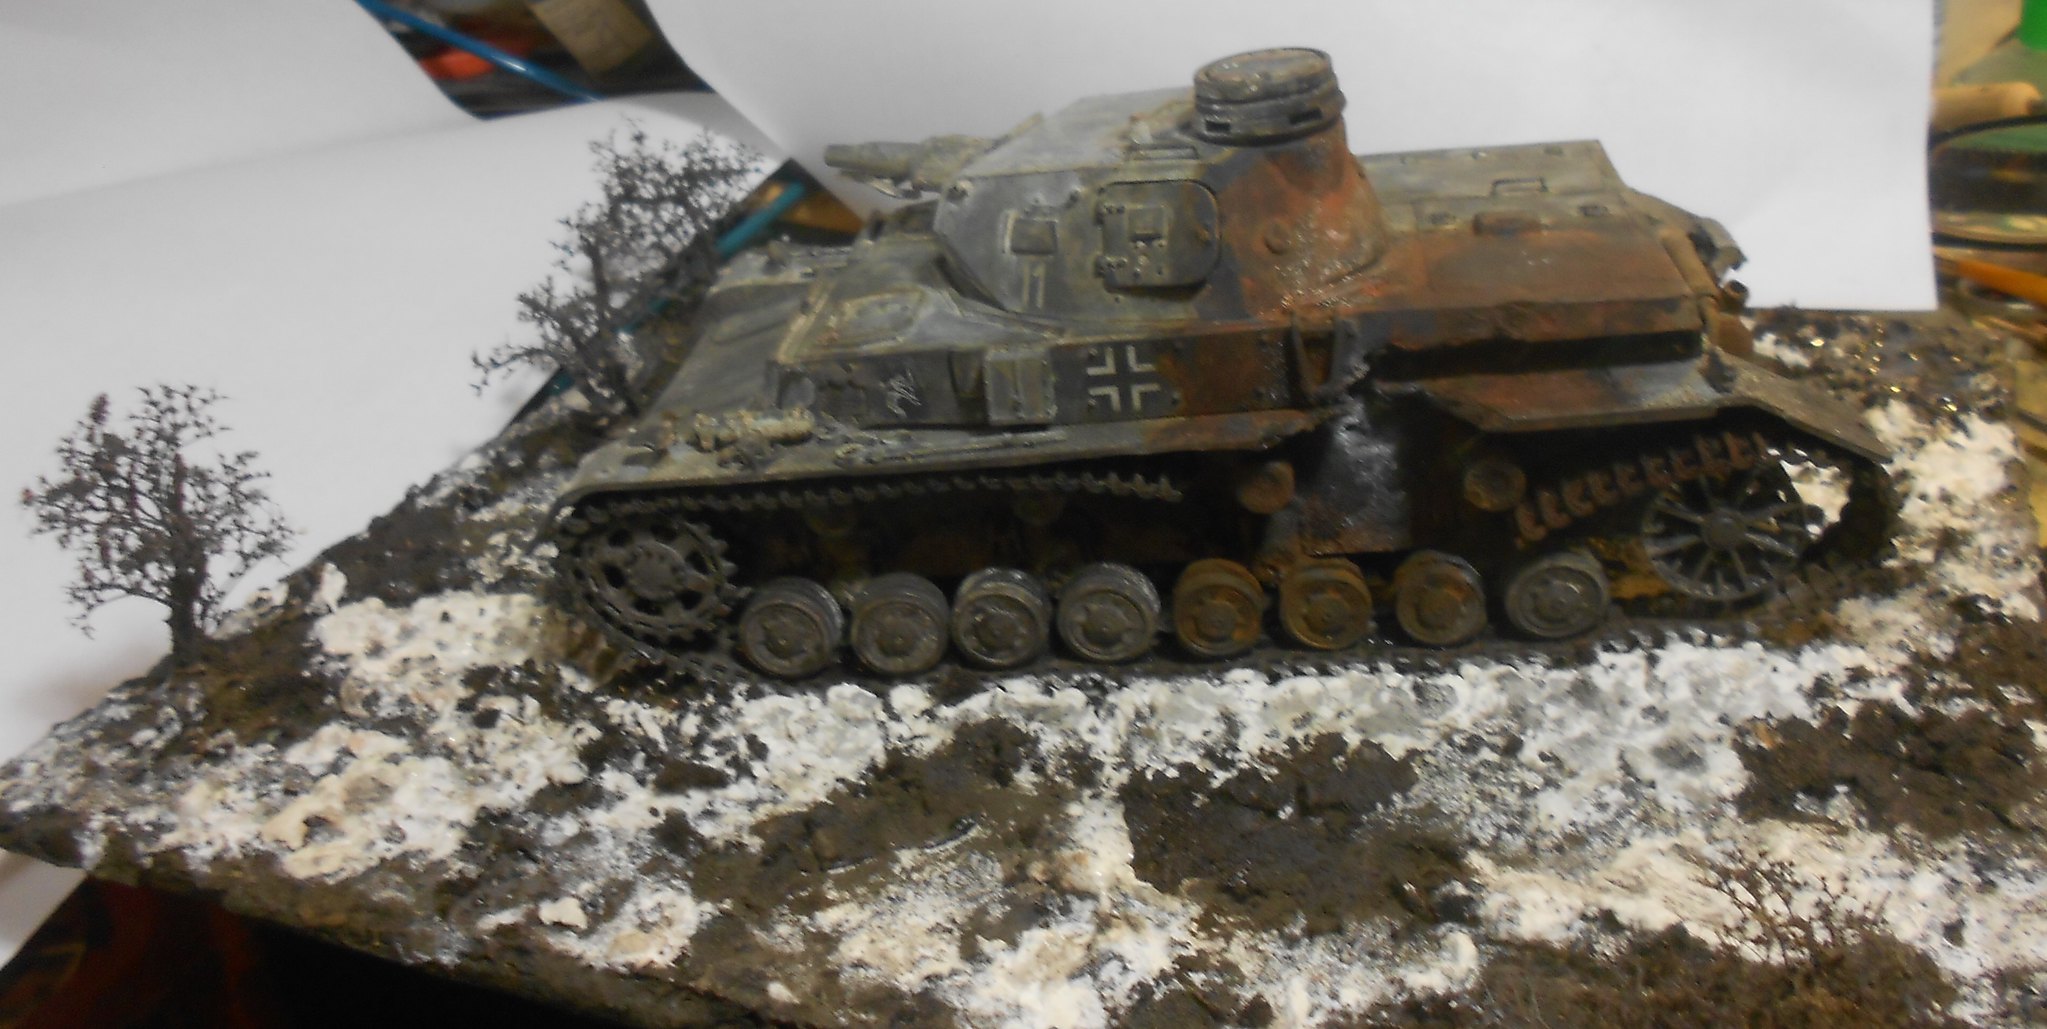
 I did the damage with a hot knife. It's a pity the fenders weren't thinner, but I didn't see the need early. The rust is done with Metal Effects an “Oxidizing Iron Paint” from Modern Masters. I've used this before and I like it. (Craft types do too – several You Tube videos but none for models. Comes in different colors – faded bronze etc.) It does take some getting used to. It's a water based thick paint (smells bad, but cleans with water) that has real rust as its pigment. You activate the stuff with a blue liquid that comes with it. (About $12 for a life time supply.) The color varies greatly depending upon how many coats you use and how activator is put on. Originally all of the rust looked pretty much like the muffler:


 rear by Eric Bergerud, on Flickr


After rusting the damaged area I dabbed some LifeColor Matte Black around the periphery and used a Golden Black Glaze over almost everything else. (The glaze is very translucent.) Then some dabs of black pigment, and a little white pigment. Pretty happy overall.

  I did want a base. I was trying to emulate a rural area with some small trees and foliage in the few weeks between winter and spring – but before the full Russian thaw or “rasputitsa” which would have called for mud galore. So I used Sculptamold on top of a piece of plexiglass. I mixed burnt umber paint into the first batch and then sprayed it lightly with gray and gave it a good dust of several pigments. (My pigments are from the art houses Sennelier and Gamblin – made for professional painters and cost about one quarter what something from Mig or AK would run. I have white, black, yellow ochre, sienna and umber – that will make any earth color imagineable. I have other fading colors in the very useful Tamiya weathering sets and some house brand stuff from Micro Scale. Actually pretty useful for fading green or blue.) I also put on the brilliant flock made by Scenic Express (better than Woodland Scenics except for WS excellent “realistic water” in my view). It comes in about a thousand colors – this was forest floor mixed with a dull pasture brown. The foliage is made with Scenic Express “Super Trees” - a kind of dried lichen from the Norwegian tundra that is far better than anything you can buy or make with wire. I wanted the ground to have a lot of snow – the remnant of what had been a deep cover that was thawing, freezing, thawing, until you've got a lot of thin snowy areas with some revealed ground. So I put on another thin and irregular coat of uncolored Sculptamold. When snow is in this stage, it's dirty and it freezes so I applied both a Com.Art black wash with some Vallejo gloss varnish. (There's just a bit of a frozen puddle made of Golden Gloss Medium behind the tank, but I forgot it was there and didn't make it a major theme.) I also built up more snow than I wanted in the middle so it would hide the bottom of the tank tracks. It didn't help the look, but I didn't want the tank to be “glued” to the base, and without something it sits on top of everything – not too realistic for a 20 ton vehicle. So here's the base without snow dusting, with a close-up of some foliage after being dusted:

  diowoS1 by Eric Bergerud, on Flickr


 foliage by Eric Bergerud, on Flickr


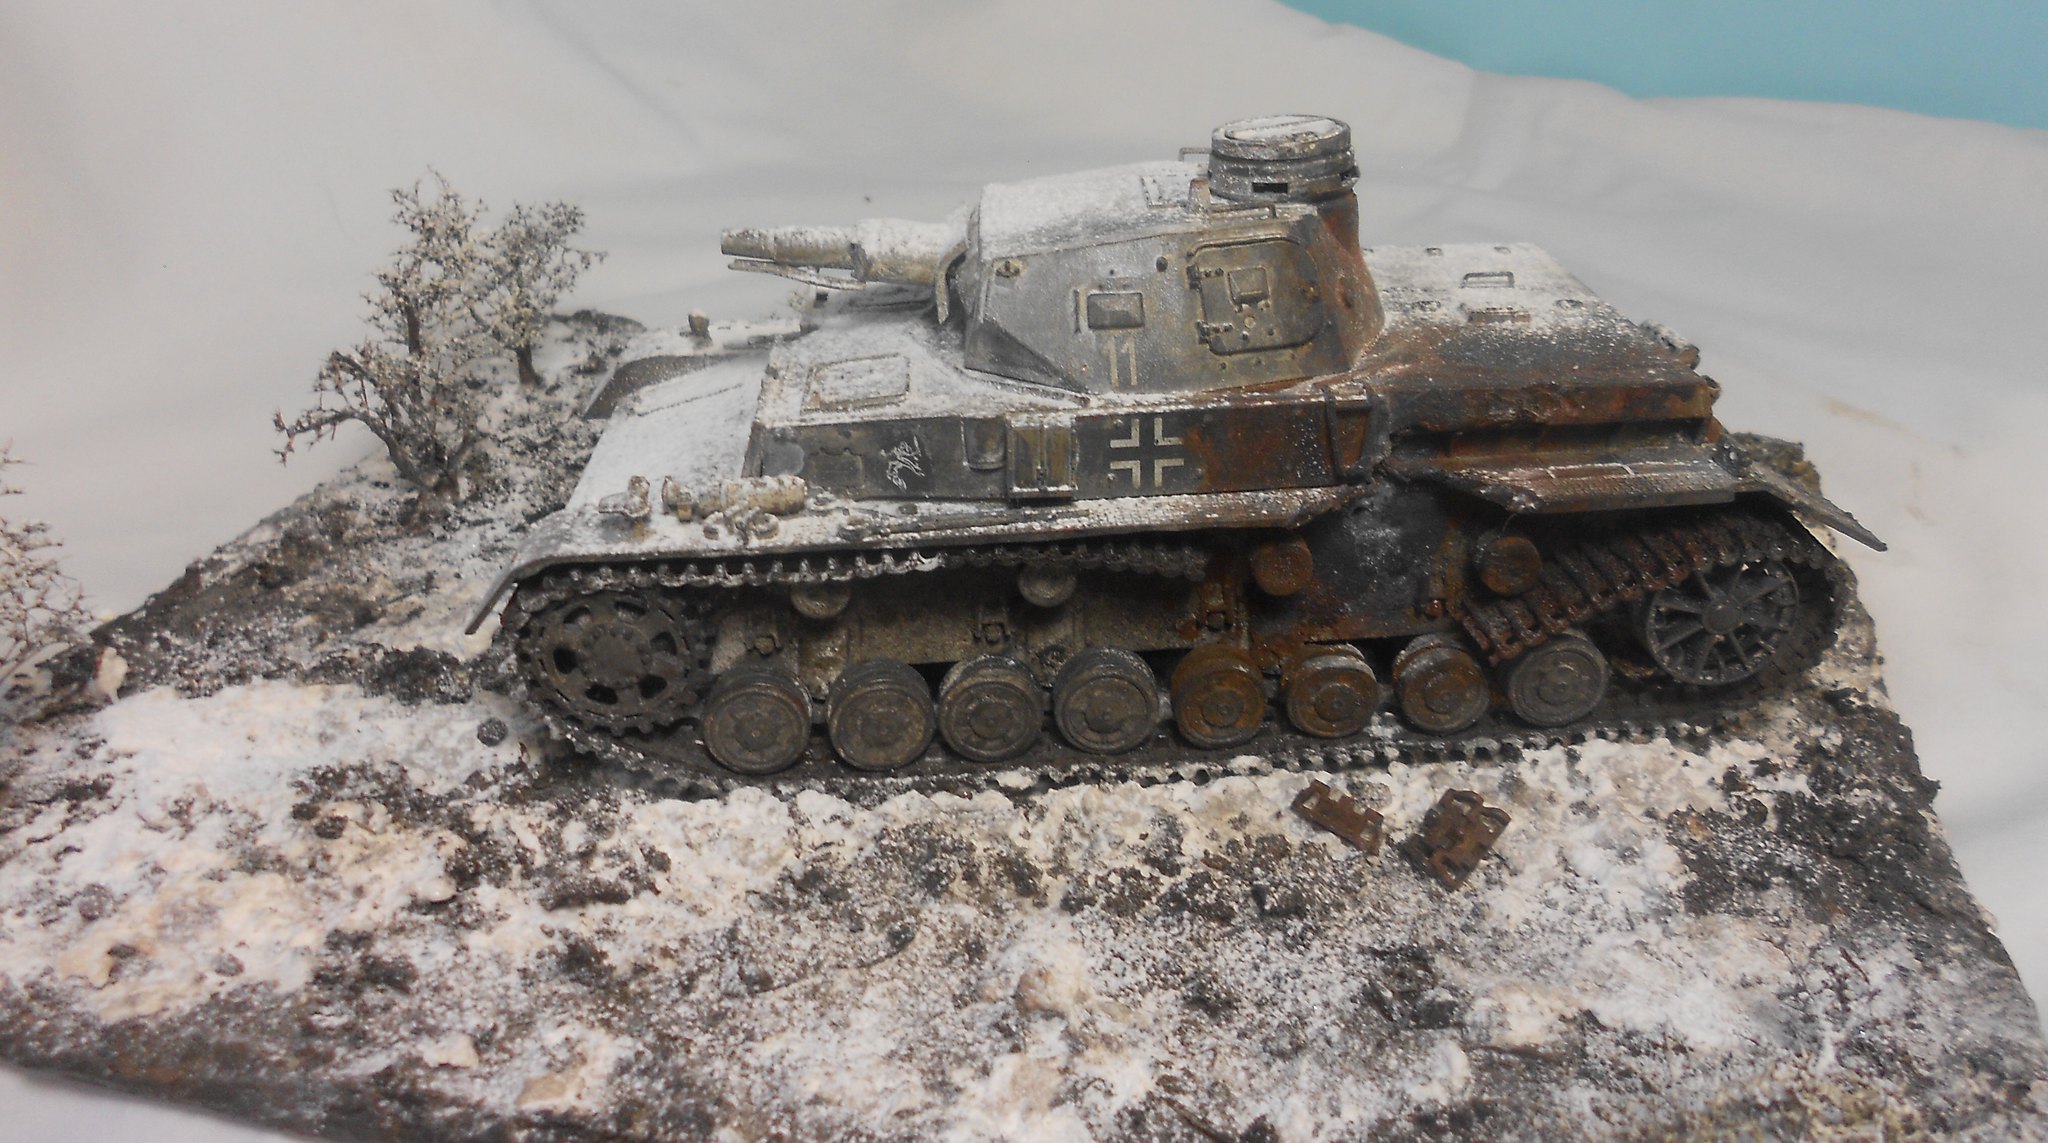
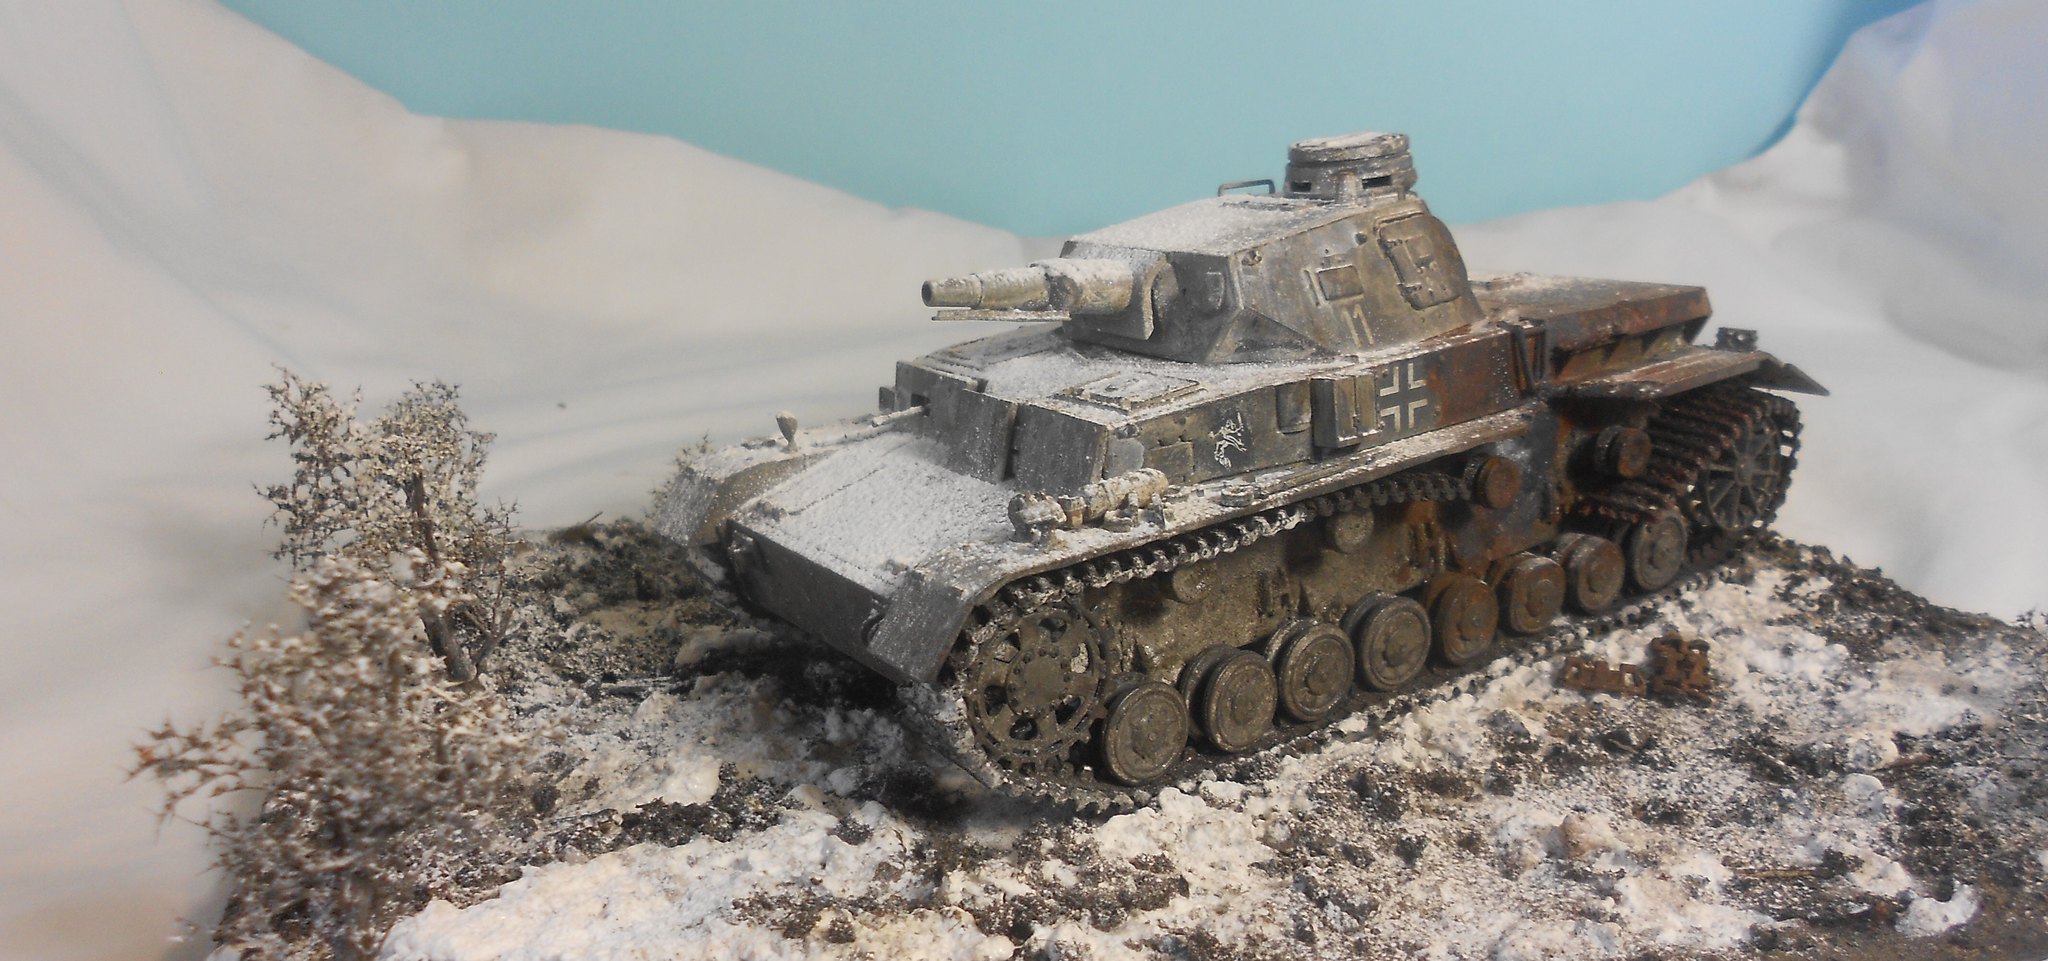
 And I wanted snow. This was a good chance to use Precision Ice and Snow's very impressive Krycell artifical snow. Here's where things kind of went off. I wanted a nice fresh dusting of light white snow. As expected this pretty much covered any remnant of the faded whitewash – or most of the weathering actually. What impressed me about Krycell in the past was its crystal like texture and scale effect and that it has. However, even this stuff is not fine enough for a light dusting of powder to look like a light dusting of snow. That meant I had to lay off the damaged areas or that would have been lost too: not a price worth paying. So, it's a little like two dios at once: one with a snow dusting and one without. We could say that the snowfall came right before the tank was hit and some was melted – so we will. But that's not what things would have looked like. (Soot etc would have been evident over most of the tank and there would have been zones of ice or water between what remained of the snow and what was melted.) Should add that Precision makes a “Snow Effects” wash that is terrific. (It would have made a great white wash because it comes off easily.) It's on the front of the tracks, and would work very well for a vehicle that had been snowed but had mostly melted. Check YouTube – all of the videos from Precision are super. The snow would have worked nicely if I would have used it on an identical dio without damage on the tank. It would work even better if I used a lot more of it to show a tank with a proper snow fall on it. In retrospect I could have built up more snow on the right side at an angle to emulate a wind driven snow. And in retrospect I should also have gone in and done a final pin wash on the wheels. But frankly, it was time to stop. I've been thinking about my next project (maybe a Tamiya Wildcat dressed for the dance at Guadalcanal?) and when that happens it's time to finish. And so I have. Here are some more pics of “Wrecked Tank in Russian Snow.”

 Eric


 right-r by Eric Bergerud, on Flickr


 lft-ft by Eric Bergerud, on Flickr


 front by Eric Bergerud, on Flickr


 left by Eric Bergerud, on Flickr


 right-r by Eric Bergerud, on Flickr


 right by Eric Bergerud, on Flickr


A model boat is much cheaper than a real one and won't sink with you in it.

  • Member since
    April 2006
  • From: ON, Canada
Posted by jgeratic on Tuesday, November 7, 2017 1:11 AM

Eric, I think that's a bang up job.  Yes

Really great scene, it feels cold and abandoned.  As for things that could of been done differently, I think we all have builds that echo this. 

regards,

Jack

  • Member since
    September 2016
  • From: Albany, New York
Posted by ManCityFan on Tuesday, November 7, 2017 7:11 AM

Hey Eric, I think that dio looks excellent. I appreciate the explanation of your thought process.  I have not attempted a dio yet, so this is helpful when I get there.  Thank you for mentioning the products you use, as this is very helpful as well.

I know this did not come out the way you were hoping, but as someone who doesn't have the picture of what you were shooting for in my head, I think this dio works.  That said, I have posted finished models where I got lots of compliments, but when I look at it, I know what I could have done better, and it bothers me, so I know where you are coming from.  I think we all share this, where a build or dio looks really good to others, but we are not satisfied ourselves.  "Occupational hazard"?

I am impressed with both your technique and thought process.  Hats off for trying something so ambitious.  I think you pulled it off quite well.

D

Dwayne or Dman or just D.  All comments are welcome on my builds. 

  • Member since
    December 2002
  • From: Bury St Edmunds, Suffolk, England
Posted by Bish on Tuesday, November 7, 2017 3:25 PM

Eric, i really admire those who can pull off a damaged vehicle build, and yours pulls it off brilliantly. I think the snow dusting is really well done, i really like the look of it on the foliage as well as the tank. I have only used that stuff once, on an aircarft dio, but wil be useing it on an armour dio next year, hope i can pull it off like you have.

Personaly, i am not a fan of the idea that a vehicle has to fit into the terrain. On hard gound, frozen or sun baked, they do run across it rather than sink in it.

I am a Norfolk man and i glory in being so


On the bench: Airfix 1/72nd Harrier GR.3/Fujimi 1/72nd Ju 87D-3

  • Member since
    September 2003
  • From: AandF in the Badger State
Posted by checkmateking02 on Thursday, November 9, 2017 12:38 PM

Exceptional work, Eric.  It makes me cold just to look at it--and it was snowing this a.m. in the Badger State.

You've got quite a few excellent photos posted.  Do you have a preference for the front page?

Thanks for contributing to the GB.  I think you've created quite a work of art with the snow-bound Panzer.


  • Member since
    February 2010
  • From: Berkeley CA/St. Paul MN
Posted by EBergerud on Friday, November 10, 2017 3:52 AM

Check: I suppose any photo with snow on it will do. Doesn't matter. You're running a great build here, so let's continue. Put me down for a 1/48 Tamiya Wildcat - we'll have it join the Marines at Guadalcanal. I wrote a couple of books about the campaign - about time I did a model for it. Also want a quick build. I'll put serious effort into a proper South Pacific fade. But the kit isn't complex and I've got an Eduard Marston Matting base that'll do perfecto so no dio. I owe Bish a Sunderland for the RAF build - want to leave some time for that. The kit is supposed to be very good, but it's not going to fall together by itself - especially if I give it a water base. No snow for either. (I really should do a Stalingrad topic - but I can put that off until next year - battle didn't end until 1943. I've never built a T-34 and I've got what's supposed to be a very good one from DML in the stash.) Eric


A model boat is much cheaper than a real one and won't sink with you in it.

  • Member since
    April 2005
  • From: Australia
Posted by taxtp on Friday, November 10, 2017 4:54 PM
I love your work Eric, and I am really looking forward to a fully faded Wildcat. I've saved the photos of your dio for future reference. Cheers Tony

I'm just taking it one GB at a time.

  • Member since
    September 2003
  • From: AandF in the Badger State
Posted by checkmateking02 on Saturday, November 11, 2017 9:54 AM

Sounds good, Eric.  The Panzer is up--really nice snow effect!

And I've added the Wildcat.  Looking forward to that one, too!

Thanks for another contribution to the GB.


  • Member since
    February 2006
  • From: Cincinnati Ohio
Posted by DantheMan85 on Saturday, November 11, 2017 1:12 PM

Eric: Very nice Panzer IV.

Thanks Bish.

Thanks Checkmate.

Thanks Lostagain: Great work on the Marder.

Thanks Jgeratic.

This Stuka build has just flown by, very simple and easy construction. A little bit of filler, very tight fits. After filling and sanding the wing and fuselage, I went over them with 2000 grit sand paper. The engine fitted perfect in the cowling.

 8 by Daniel Smith, on Flickr


Items prepared and ready for airbrushing. I'm guessing the bombs are painted RLM 02, instruction's don't say.

 9 by Daniel Smith, on Flickr


On my Work Bench: Tamiya Ford GT 1/24

Up Coming: ?


  • Member since
    December 2002
  • From: Bury St Edmunds, Suffolk, England
Posted by Bish on Saturday, November 11, 2017 1:59 PM

Dan, nice to hear that Stuka is going together nicley, i had major issues with my Hase kit. And i am at the point where i am going to put the issues with that Trup B to one side and just get one.

As for those bombs, if your useing that big one on the centre line, leave out the wing bombs. Is there a smaller option for the fuselage. That big 1000KG bomb would be right at the 87B's limit and was only able to be carried if the rear gunner was left behind.

As for colours, the big SC 1000 would be RLM 65 and the small SC 50's on the wings RLM 71.

I am a Norfolk man and i glory in being so


On the bench: Airfix 1/72nd Harrier GR.3/Fujimi 1/72nd Ju 87D-3

  • Member since
    September 2003
  • From: AandF in the Badger State
Posted by checkmateking02 on Monday, November 13, 2017 6:05 PM

Nice progress, Dan.  Looks like things are going well.


  • Member since
    February 2006
  • From: Cincinnati Ohio
Posted by DantheMan85 on Wednesday, November 15, 2017 10:33 AM


Thanks Bish: Sorry to hear about the Hasegawa Stuka, I remember all the problems I had with Eduard Bf-110.


Thanks Checkmate.


About 14 days of assembly the Stuka is finished, I built a stand out of balsa wood and hot glue to hold the aircraft while airbrushing. Also free hand masked the canopy with Tamiya tape. Square shapes are much easier to mask then round ones. Picked up a new bottle of Pledge Future, my old one was not leaving a crystal clear shine anymore.

 18 by Daniel Smith, on Flickr

 16 by Daniel Smith, on Flickr

 15 by Daniel Smith, on Flickr

 14 by Daniel Smith, on Flickr

 13 by Daniel Smith, on Flickr

 11 by Daniel Smith, on Flickr

A soft cloth helps prevent marks on the clear plastic while masking.

 10 by Daniel Smith, on Flickr

Think I'll be using the (B)-R and (B)-L.


On my Work Bench: Tamiya Ford GT 1/24

Up Coming: ?


  • Member since
    September 2014
Posted by rooster513 on Thursday, November 16, 2017 8:40 AM

Heck of a masking job there Dan! That had to be a lot of fun;)

-Andy

  • Member since
    September 2003
  • From: AandF in the Badger State
Posted by checkmateking02 on Thursday, November 16, 2017 11:36 AM

Classic Stuka, Dan.  Looking fine!  Lots of fun in your future with the canopy masking!


  • Member since
    February 2010
  • From: Berkeley CA/St. Paul MN
Posted by EBergerud on Saturday, November 18, 2017 2:34 AM
You're doing a 32 scale Stuka? I'd have to sell my car for space to stick it. I know some really fine modelers have shifted to 1/32 scale. I certainly see it biplanes (the Tamiya Storch is supposed to be a master kit - be nice in 32) but I still find a good 48 scale enough of a challenge. But the big thing is space. A good 1/32 would certainly make a neat "project" build (my projects take longer than 14 days to build) - all of those details on guns, engines, maybe stencils on the decals. Course you can always build a 1/32 B-17: that would keep you busy. In my world where I have to rotate kits so I can see a few, it won't happen. Do have projects though - the Dragon BF 110D; AM B-25, AMT A-20 and the Italeri Sunderland I've promised Bish. Supposedly Tamiya's new 109G has 180 parts - including magnets like their almost worshiped 1/32s. I did a lot of looking for a Stuka and decided that the Hasegawa kit didn't really look that hot. It's a good company, but they have their losers - it's not like Tamiya. (Hope their B26 is good - I just bought it). So I bought the new tool Italeri/Tamiya. And then sold that and have the new Airfix. It looks very good - and enough of a project at 1/48. We're not all brave.


A model boat is much cheaper than a real one and won't sink with you in it.

  • Member since
    February 2010
  • From: Berkeley CA/St. Paul MN
Posted by EBergerud on Saturday, November 18, 2017 3:20 AM

OK: time to start with the Wildcat. It's the Tamiya 1/48 - new tool in the late 90s. In general a nice kit, but there was some filler. This will be another exercise in black basing (check one of Doog's crackerjack videos about the technique if its new). And I'll be using my trustly Golden High Flow which I like better every time I use them. But that does mean I have to make all of my own colors. Golden makes paints for artists and don't see a market for modelers. (Vallejo started as an art house: most of their business is still there. No accident that both companies use water based acrylics exclsively.) But I get a kick out of mixing paints. And Golden has several mixing colors - their patrons expect to mix. (No joke - try out something like Platho Blue (green shade) and it'd be hard to think of something to use it on. Through in some umber and maybe a little red and you're looking at a chromatic black. Finger painting for old people.)

This Wildcat will go to Guadalcanal, so I've made up some non specular blue-gray, light sea gray (the early war two color camo scheme) and interior green. Here I followed my very neat "USAAF Colors, Markings and Camoflauge" by Robert Archer and son. 400 plus large format pages from Schiffer - worth the $50. It has excellent samples but also a "blow by blow" account of how the USAAF handled paints. As we were on the same side and it made sense for the massive construction programs, the Navy actually cooperated, sometimes informerly, sometimes with full standards. (Might mention Archer spent the war as a high level aviation engineer in the UK: came to the US right after the war and spent twenty years with Lockheed. His clearance with Lockheed got him entrance into the USAAF archives in the 60s so the gent had access to a blizzard of color samples that were circulated by the hundred - sometimes thousands - to aviation companies across the country. This incudes the ANA (Army - Navy) regulations. Anyway, according to Archer the standard "interior green" used by both services didn't appear until late 42. Think of a color based on green chromate with a good dose of olive. (AK has a very good rendition.) However Archer insists early war "interior green" was based on yellow chromate and has is lighter and more of a green-gray with very little olive. It's similiar but a little lighter than RAF interior green. I've got a nice Squadron book on navy colors and they appear to agree.

I have a F4 "Walk Around" but there is only one F4F-4 still in existence (in Pensacola I think) so all of the museum planes are either F4F-3s or, more likely, FM-2s. (Digression Warning: I was lucky enough to attend a warbird "fly in" at Egan MN about 15 years back - used to be a Planes of Fame branch. Very cool - dozens of planes flew in. There was a Wildcat and Hellcat sitting next to each other. There are very few flying Wildcats, so its a treat to see one. Anyway, the Hellcat dwarfed it. They've got a family resemblence, but it's only on paper. The Hellcat, depending upon what you're measuring, matched and sometimes surpassed the P-47. Big, docile, whopping big engine - perfect plane for the junior birdmen flocking by the thousands to the USN by the end of 1943 - far better than the Corsair. Until Kamikazes showed the need for speed. The Wildcat is actually kind of petit. Look at pics - a tall pilot almost touches the canopy. Splendid plane in its own right. Certainly the equal to the Zero in an extended campaign. Tough as nails - Grumann Iron Works. Kinda ugly though.) Anyway in the Walk Around there are some color pics from wartime and the green interior primer matched this color to a T. Archer insists that "bronze green" was only used as glare protection on late war fighters - it's very dark. An article from IPMS about US interiors disagrees. It's a little hard to argue with Archer - he's got the documents in summary form for every months of the war. Needless to say, companies did not make exactly the same shade - so there's no single answer. And after weathering, there may be only obviously wrong answers.

Enough: here's the interior green I cooked up. It's on the interior. I do not have the mind to be a great modeler - even if I had the hand-eye. I cannot get enthused about details added that only I can see. So I usually do a basic cockpit and spend time obsessing about base coat colors and base coat weathering. There were no seatbelts on the first pic. The second pic shows the kit near completion and highlights a pretty good engine - and nice seatbelts made out of Aves Apoxie Sculpt. I also didn't kill myself over the engine because you won't see that either. (Both parts were given a Com.Art transparent smoke wash - I really like that stuff because it highlights details and also looks grimy. Warplanes were dirty - maybe not often badly chipped (I can't find a super bad chipped Wildcat from Cactus - the Corsairs flying from the coral strip at Munda Point on New Georgia are very different), but always dirty. And US matte paints faded fast. According to the referenced IPMS article, cadmium was not used in paint pigments because it was needed for armor plate. Hence many US colors faded fast. (Uber modeler Doog claims the gloss blue planes didn't fade: my eyes say they did.)

 interior by Eric Bergerud, on Flickr

 body by Eric Bergerud, on Flickr

And, as noted, I'm going to do some more black basing. Even though I'm now the owner of an Iwata Spray Gun (on Paul Budzik's order - works incredibly well for Stynelrez) I find it hard to beat Duplicolor's black sandable/fillable automotive lacquer primer. Bid bye bye to scratches, most seams etc. Unfortunately it's potent stuff and must be used outside, so no question of decanting it and spraying it on myself. The can has a fan cap, and you can lay down a very nice coat. I think it'll work. I got just a little too much on - no problem at all. A light sanding, maybe two minutes, with very light paper and the stuff turns almost gloss and all the details are there in perfect order. And no worry about anything coming off with masking.

 primed by Eric Bergerud, on Flickr

Next up: mottling the black base.

Eric


A model boat is much cheaper than a real one and won't sink with you in it.

  • Member since
    December 2002
  • From: Bury St Edmunds, Suffolk, England
Posted by Bish on Saturday, November 18, 2017 4:09 AM

Eric, you got that right. I've done plenty of 72nd Stuka's, but the size of my 32nd G really took me by surprise.

I am a Norfolk man and i glory in being so


On the bench: Airfix 1/72nd Harrier GR.3/Fujimi 1/72nd Ju 87D-3

JOIN OUR COMMUNITY!

Our community is FREE to join. To participate you must either login or register for an account.

SEARCH FORUMS
FREE NEWSLETTER
By signing up you may also receive reader surveys and occasional special offers. We do not sell, rent or trade our email lists. View our Privacy Policy.