SEARCH FINESCALE.COM

Enter keywords or a search phrase below:

Japanese Group Build VI

27083 views
536 replies
1 rating 2 rating 3 rating 4 rating 5 rating
  • Member since
    November 2009
  • From: SW Virginia
Posted by Gamera on Saturday, February 25, 2017 11:24 AM

John: They look fantastic to me. I'll throw them up before the end of today. Thanks again!!!

LA: Looks cool, I don't think we've had a merchant ship so far. Just put you down!

"I dream in fire but work in clay." -Arthur Machen


  • Member since
    December 2007
  • From: Beavercreek, Ohio
Posted by Wrinkledm on Thursday, March 2, 2017 5:05 PM

Outstanding. I finished 1 of 2 in the last GB and was sidetracked rebuilding 35' of termite infested walls of my home so I'd like to roll over my remaining build from GB V. Thankfully no kits were damaged by those pesky termites 

1. Ki-43 Oscar (Hasegawa 1/48) - nearly complete from GB V.

2. IJA Type 4 "Ke-nu" (Dragon 1/35) - just started

3. A6M5 Zero (Tamiya 1/72) - just started


Dave Wrinkle

Tags: Zero , Oscar , a6m5 , ke-nu

  • Member since
    November 2009
  • From: SW Virginia
Posted by Gamera on Thursday, March 2, 2017 7:09 PM

Hey Dave sounds awesome!

Sorry about your home, hope you got all the little sobs and won't be suffering any more damage.

"I dream in fire but work in clay." -Arthur Machen


  • Member since
    April 2014
  • From: Australia
Posted by lostagain on Sunday, March 5, 2017 10:51 PM

Dave, hope you keep those little buggers out. Looking forward to your builds.

Nothing much to report on the ship. Started with a bit of white paint on the white plastic - so not much to see really...

Next step is masking before the deck colour - could take some time.

  • Member since
    November 2009
  • From: SW Virginia
Posted by Gamera on Monday, March 6, 2017 7:13 AM

LA: Looks good! Looking forward to seeing how you mask the deck, I've read about how to do it but haven't actually seen anyone do so. 

"I dream in fire but work in clay." -Arthur Machen


  • Member since
    December 2007
  • From: Beavercreek, Ohio
Posted by Wrinkledm on Tuesday, March 14, 2017 6:04 PM

I'm calling my alternate model from last year completed. She is the Hasegawa 1/48 Ki-43 Hayabusa and it is a really fine kit despite my best efforts to screw it up. I honestly believe I spend more time fixing my own mistakes than actually building the kit. Right off the bat, I didn't join the tips to the main panels (prior) to joining the top and bottom wing sections. My problems just snowballed from that point on. The paint is Alclad II and the decals are from Max Models.  Previously, I have had good luck with Max Models but this time the were very brittle. Go figure!   On another positive note,  the Ke-Nu and Zero *my other builds, are progressing at a feverish pace.   So without further ado may I present my captured Ki-43 Hayabusa!   Enjoy...

  • Member since
    July 2014
Posted by modelcrazy on Tuesday, March 14, 2017 8:03 PM

Oh yeah! I love the Oscar. It looks like a mix between the Zero and Frank, Two of my fav's

Steve

Building a kit from your stash is like cutting a head off a Hydra, two more take it's place.


http://www.spamodeler.com/forum/

  • Member since
    November 2009
  • From: SW Virginia
Posted by Gamera on Wednesday, March 15, 2017 7:41 AM

Despite your problems she looks great! The Alclad NM finish looks perfect from the photo. I went ahead and posted you so grab your badge. I'm still working with the last one but you have a choice there now from the three excellent badges John worked up. 

Looking forward to the Zero and Ke-Nu. Yes

"I dream in fire but work in clay." -Arthur Machen


  • Member since
    December 2002
  • From: Northern California
Posted by jeaton01 on Wednesday, March 15, 2017 12:08 PM

Looks real nice, Wrinkledm.

John

To see build logs for my models:  http://goldeneramodel.com/mymodels/mymodels.html


  • Member since
    December 2007
  • From: Beavercreek, Ohio
Posted by Wrinkledm on Wednesday, March 15, 2017 9:29 PM

Thanks gents for the comments on the Oscar.   Not part of this GB, I did finish another Japanese subject tonight that has been languishing for nearly a year.   It is a very old 1/72 (circa 1974) Mania Army Type 97, Ki-15 Babs reconnaissance aircraft. The decals were questionable so I opted to try out the new Silhouette mask cutter and made some very nice Hinomaru masks. :)    Panel line detail was shallow so I tried using an HB pencil over a matt finish followed by a second matt coat.  Please forgive me for posting outside of my GB, but the subject does fit! 

  • Member since
    July 2014
Posted by modelcrazy on Wednesday, March 15, 2017 10:20 PM

Nice Hinomarus and panel line weathering Yes. And with a pencil!

Steve

Building a kit from your stash is like cutting a head off a Hydra, two more take it's place.


http://www.spamodeler.com/forum/

  • Member since
    November 2008
  • From: Far Northern CA
Posted by mrmike on Wednesday, March 15, 2017 10:26 PM

What a cool subject, obviously an older kit, but a really nice build. The masking on the canopy would be totally beyond my eyesight & ability!

Would be great to see this AC done in a modern kit, in 48th or better yet 32nd scale! Thanks for posting - any more photos in the file?

Mike

  • Member since
    December 2002
  • From: Northern California
Posted by jeaton01 on Wednesday, March 15, 2017 10:31 PM

Nice Ki-15!  I have a Silhouette Cameo also and it is a great modeling tool.

John

To see build logs for my models:  http://goldeneramodel.com/mymodels/mymodels.html


  • Member since
    November 2009
  • From: SW Virginia
Posted by Gamera on Thursday, March 16, 2017 11:16 AM

She looks fantastic! And you're more than welcome to post stuff here outside the GB. Yes

"I dream in fire but work in clay." -Arthur Machen


  • Member since
    December 2007
  • From: Beavercreek, Ohio
Posted by Wrinkledm on Friday, March 17, 2017 9:11 PM

Gosh, I'm cranking out my pesky long stagnated builds. This one is the LS 1/144 F-15J and only slightly newer than my recent Mania 1/72 Babs. The tool dates to 1977 and I finished her off with the Platz JASDF F-15J 50th Anniversary / Hyakuri Air Base 305th Squadron markings. If you have every built this kit you will recall it has NO cockpit whatsoever. Thankfully "Retrowings" makes a resin cockpit and with some cutting, hacking and carving I managed to squeeze in the cockpit detail. They also make a nice set of exhaust cans that replace the kit parts.

The kit is a bit long in the tooth and short of dropping $30+ for the far superior 1/144 Tomytec kit the LS kit satisfied my needs just fine. Panel lines are recessed but fat and shallow. I again resorted to the pencil but I really need to start using a straight edge. I promise this is my last overdue Japanese build for at least a week or two anyways.

Next up is 1/700 Yukikaze from Aoshima with the tool dating to 1971. This is my first ship build in a really long time and the kit is just terrible for fit and finish. She is in primer now and with a little luck, I can get the aftermarket railings on along with some paint on the kit sometime early next week.

さよなら


Tags: 1/144 , Eagle , LS , F-15J , JASDF , Sakura

  • Member since
    November 2009
  • From: SW Virginia
Posted by Gamera on Saturday, March 18, 2017 12:47 PM

Wow, that's beautiful!!! Love those air show/ anniversary paint jobs!

"I dream in fire but work in clay." -Arthur Machen


  • Member since
    November 2003
  • From: Naples, FL
Posted by tempestjohnny on Saturday, March 18, 2017 4:56 PM

Gamera

Wow, that's beautiful!!! Love those air show/ anniversary paint jobs!


Ditto


  • Member since
    December 2007
  • From: Beavercreek, Ohio
Posted by Wrinkledm on Saturday, March 25, 2017 10:15 PM

I've been a building fool here lately. Finished (sans weathering anyways) is the new 1/35 Dragon Ke-Nu (Type 4 IJA Light Tank). It was a very delightful build with minimal parts and a great fit. The hull is the same as the Type 95 Ha-Go kit with a new turret and some updated hull parts.  That makes two of three build entries complete and the third, a Tamiya 1/72 A6M5, is in primer nearly ready for paint. :)

Enjoy D


Tags: tank , Dragon , ke-nu , 1/35 , armor , Type 4

  • Member since
    April 2014
  • From: Australia
Posted by lostagain on Sunday, March 26, 2017 9:30 PM

Wrinkled, you are a building machine!

Oscar looks great, and the paintwork on the Babs is super too. The results with the silhouette markings is great.

The Ke Nu is coming along well, looking forward to seeing it with the weathering done.

The Mt Fuji scheme on the F 15 is fantastic. I got to see it on a larger scale model at a show, very good.

The Hikawa maru is coming along at a slow rate. First I maked off the white bits for the deck colour - used Mr Hobby Hemp.

Masked off again and did some other colours. Started doing some painting of details as well.

Further work has been done putting some variation in the decks, starting to do handrails, windows and portholes...

  • Member since
    October 2011
  • From: Henrietta, TX
Posted by Texas Tbone on Monday, March 27, 2017 12:58 AM

You can count me in...I just purchased a tamiya 1/48 A6M2 zero this build will give the confidence and motivation to start it...i have never built a zero so wish me luck

http://farm6.static.flickr.com/5304/5648056204_9a52bddd15.jpg

  • Member since
    November 2009
  • From: SW Virginia
Posted by Gamera on Monday, March 27, 2017 7:18 AM

Gee, guess I need to stop taking weekends off here!!! Embarrassed

WM: Really nice work there, the camo looks great! 

LA: Nice work on the deck, looking forward to the finished result. 

TT: Welcome, I'll try to get you added to the roster at lunch. She shouldn't be too hard, the Zero was stripped down to the bare essentals to make it as agile as possible, it's not that complex a plane. And most of the Zero paint schemes were pretty simple, as compared esp with the Japanese Army's crazy wiggly line schemes. 

Edit: TT- just put you down. 

"I dream in fire but work in clay." -Arthur Machen


  • Member since
    August 2005
  • From: Long Island, New York, USA
Posted by fjs3 on Thursday, April 6, 2017 11:48 PM

Hello Folks!!


I have three Japanese subjects I would like to jump in with.

1)  a Fine Molds A5M4, Model 96 (Claude)

2)  Hasegawa B5N2, Model 97, Carrier Attack Plane (Kate)

3)  Hasegawa A6M2b, Model 0, Carrier Fighter (Zeke)

The "Claude" and the "Kate", are both started, and the "Zeke" is about to get underway.  I was building all these for a Group Build over at another website, and I thought I'd share them here as well, if that's OK?


Starting off, here are a couple pictures of the B5N cockpit.  As you can see, it's a rather busy and involved place.  Good detail, which CAN be seen after the fuselage is closed up, and everything fit well too.

The next couple of pictures, are of the Fine Molds kit.  I have to say this first, that this is probably thir best released model kit, by far.  I've built a few of their kits, and this one really kicks a**!

Overall detail throught the model is excellent.  Inside and out, especially the surface detail on the wings is amazing.  I am very happy with the way the kit is going together.  The cockpit is done, and the fuselage is also closed up.  Painting will begin on the weekend, and I'e chosen a rather unknown scheme for my first "Claude", (Yes I bought a second kit I thought it was so good) That of A5M's that were aboard IJN SHOHO at Coral Sea...

Anyway, here are the cockpit pics, and then a coople closed up, and waiting for the spray booth.

Thanks for looking at my post, folks, and I'll be posting more picsm real soon.  Have a great night everyone!!

Regards,

Freddie from LI


"I'm gonna build all these models one kit at a time!

  • Member since
    April 2014
  • From: Australia
Posted by lostagain on Friday, April 7, 2017 7:39 AM

Freddie, the Kate and Claude both look like they have great cockpit detail. Looks like they are coming along well.

On the hikawa Maru, I have masked off the top deck for the orange ventilation systems.

After the orange was painted, the winch motor and bollards etc were brush painted dark gray with Vallejo acrylics.

On the foredeck:

Windows etc were coloured in on the hull and sides of the different levels.

There are still portholes and doors to be added in a number of walls where there are none moulded in. I have drawn portholes (black dots) on some plain decal paper to add them in.

Here you can see the orange on the top deck; it is more vivid in real life.

Next up I will start assembly before adding finer details. Or maybe I try adding the PE railings before sticking on the details. Not sure, this is my first ship...

  • Member since
    November 2009
  • From: SW Virginia
Posted by Gamera on Friday, April 7, 2017 9:47 AM

Hey Freddie it's good to have you back with us. And really nice work there on the cockpits. I just put you down. 

LA: Nice looking work there too. I haven't built a ship in forever but you, Steve, and a couple of other guys keep tempting me to try one. 

"I dream in fire but work in clay." -Arthur Machen


  • Member since
    April 2006
  • From: ON, Canada
Posted by jgeratic on Friday, April 7, 2017 9:55 AM

I'm liking the progress on that ship, LA - look forward to more.

Freddie, nice trio of builds there, but I'm particulalrly interested in the Claude and it's Shoho markings - do you know if they still sported red tails during Corel Sea engagement?

regards,

Jack

  • Member since
    January 2014
  • From: Nampa, Idaho
Posted by jelliott523 on Sunday, April 9, 2017 2:03 PM

Here are some updated photos of the A6M5C. The fit of the parts is excellent, virtually no seams that needed a lot of attention. I did do a little work on the spine and ventral fuselage area. At first, they didnt appear like they were going to be an issue, but after I shot the black primer on, they showed up. I used some Mr. Surfacer 1200 on them and sanded down and polished, then reprimed and they were gone. The wing roots also needed a little filler. I used Perfect Plastic Putty here and got everything buttoned up, primed with Stynylrez and coated with AK Extreme Metal Duraluminum. I will be coating a few areas with Ammo of Mig chipping fluid for wear and paint fade. I'll also be adding some ignition wiring to the engine.

On the Bench:  Lots of unfinished projects!  Smile

  • Member since
    July 2014
Posted by modelcrazy on Sunday, April 9, 2017 2:29 PM

The Zero is looking good. I envy you buildimg that kit.

Steve

Building a kit from your stash is like cutting a head off a Hydra, two more take it's place.


http://www.spamodeler.com/forum/

  • Member since
    August 2005
  • From: Long Island, New York, USA
Posted by fjs3 on Sunday, April 9, 2017 9:37 PM

Hey Folks!


I have an update on the Finemolds A5M4, "Claude".  Not much on the B5N2, "Kate".

I got paint and decals on the "Claude".  Now it's just the weathering and final assembly, and she's finished.  Here are some of the pictures, AND an explanation as to how I arrived at the finish I chose for my model.  

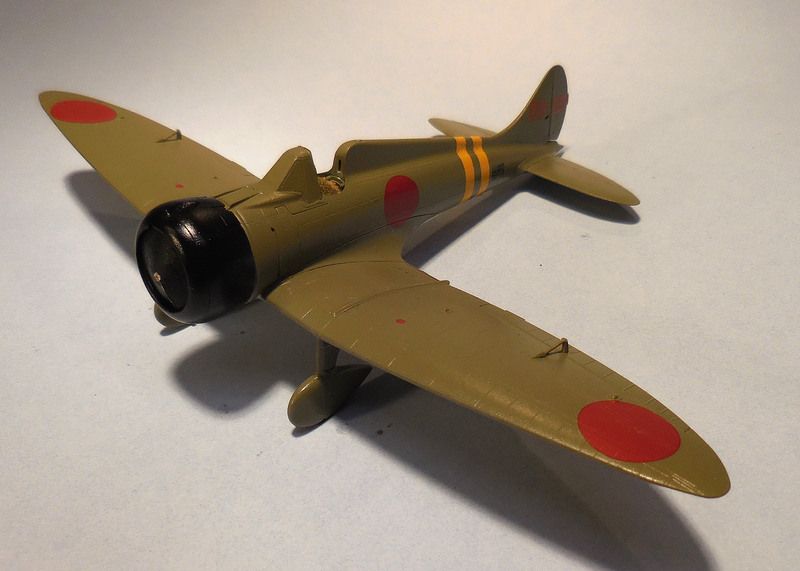
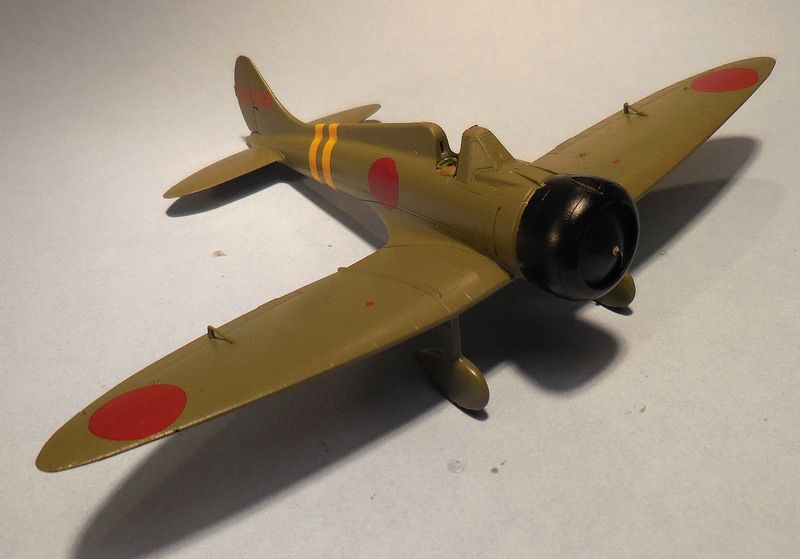
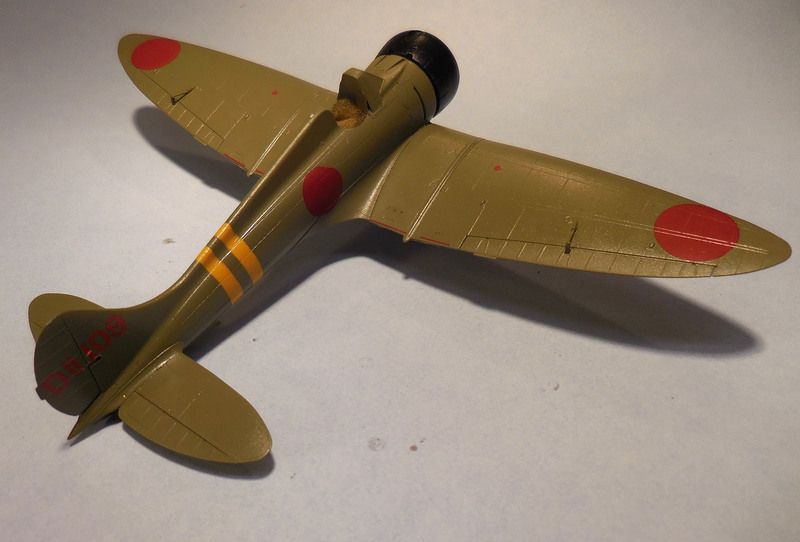
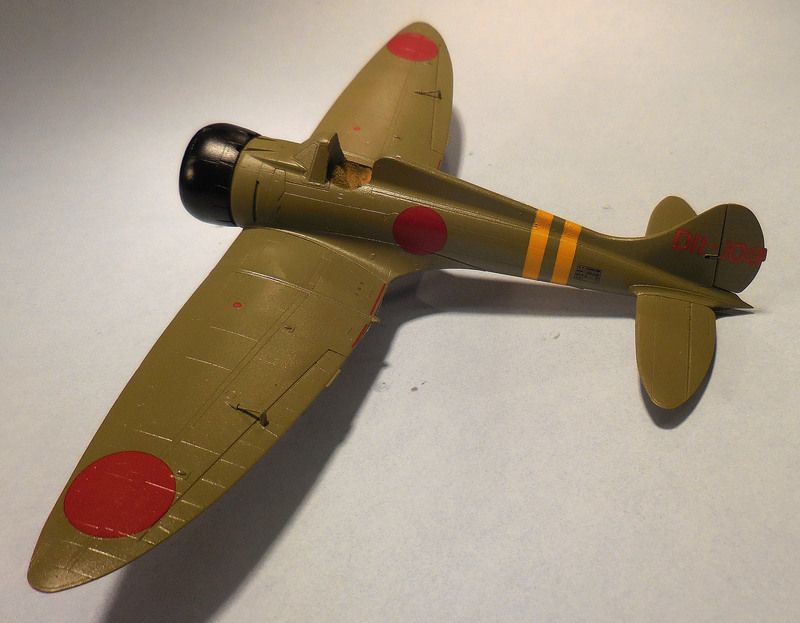
The kit is finished as I believe an A5M4 aboard IJN Shoho would have appeared on 7 May, 1942.  After reading many accounts and ACA Reports from USN Pilots who fought the battle, I took a common profile of an alleged Shoho A5M, and tweaked it to where it made sense.  

First, Shoho carried two types of fighter aircraft for Operation MO, The invasion of Port Moresby.  She carried both A5M4's and A6M2's.  Since both were built by the same manufacturer,Mitsubishi, I believe they would have been painted similarly.  The color I used, was a Testors Model Master Enamel, SAC Bomber Tan, FS 34201, which is a pretty good match to Japanese naval aircraft, based on photographs showing them to be more of a tanish/grey color rather than light grey, as was previously thought.  Unfortunately there are no known surviving pictures of Shoho, or her aircraft, during her one sorte into the Pacific.

Another tell tale piece of evidence was the After Combat Action report, filed by Lcdr James Flatley, who shot down two A5M's during the attack on Shoho.  In the report he describes the enemy aircraft as being a "Dessert Tan, with red balls on the wings..."

I eliminated the red tail normally associated with the A5M, because at this stage of the war, an aircraft with a red tail in a forward combat area would attract unwanted attention.  I know in China, they DID sport the red tail origonally, but I believe that was phased out as the war began to get really hot, and the newer A6M2 began replacing them.  

The two yellow fuselage bands were painted on, and were carried by the Fourth Carrier Division.  Tail numbers were red.  Cowl is painted "Cowling Color", which is sort of a blue/black.

 Shoho was attacked and sunk, on 7 May, 1942 by US Navy carrier aircraft from the USS Yorktown and USS Lexington.  

I hope you enjoy the pictures, and any questions, feel free to ask!


Regards,

Freddie from LI

"I'm gonna build all these models one kit at a time!

  • Member since
    April 2006
  • From: ON, Canada
Posted by jgeratic on Sunday, April 9, 2017 9:54 PM

LI, that is looking really fine, and thanks for including your research behind the Shoho Claude.

regards,

Jack

  • Member since
    August 2005
  • From: Long Island, New York, USA
Posted by fjs3 on Monday, April 10, 2017 12:49 PM

jgeratic

LI, that is looking really fine, and thanks for including your research behind the Shoho Claude.

regards,

Jack


Thank you Jack.  I can't be 1000% sure it's correct, but I believe, given the information available, it's the "best guess" I can come up with.  I did some weathering last night after my last post so I'll have more pics tonight.  Did some work on "Kate" as well.

Best Regards

Freddie from LI

"I'm gonna build all these models one kit at a time!

JOIN OUR COMMUNITY!

Our community is FREE to join. To participate you must either login or register for an account.

SEARCH FORUMS
FREE NEWSLETTER
By signing up you may also receive reader surveys and occasional special offers. We do not sell, rent or trade our email lists. View our Privacy Policy.