SEARCH FINESCALE.COM

Enter keywords or a search phrase below:

The 2017/ 2018 Too Little Too Late Group Build

41529 views
1197 replies
1 rating 2 rating 3 rating 4 rating 5 rating
  • Member since
    April 2005
  • From: Australia
Posted by taxtp on Saturday, January 20, 2018 5:06 AM

Here is the finished thing. In the end I think it looks OK. I've got for a relatively clean look as I figure at that stage of the war, service life was short.

Thanks for hosting this GB Brandon. Please feel free to use any of the photos.

I also included a couple of shots of the two 162s I've finished recently, although the French one doesn't really fit this GB.

Cheers

Tony

I'm just taking it one GB at a time.

  • Member since
    April 2005
  • From: Australia
Posted by taxtp on Saturday, January 20, 2018 4:45 AM

I hope you all get well soon. this year's flu has been particularly nasty.

I got on with the job of finishing my He 162. It's been a busy week so it took some time, and I haven't been able to post here as much as I would like to.

Here are some more WIP photos.

Primed with Mr Surfacer 1200

I forgot to take a photo with the preshading done, but here is the underside with Gunze RLM 76 on it.

One upper surface colour done, and masked for the other. I did this on the same day after waiting two hours, based on my experience with the Weekend GB last year.

RLM 81/82 uppersurfaces, with several coats of Future and decals

That's it for WIP photos, I'll post the glory shots on the next post.

Cheers

Tony


I'm just taking it one GB at a time.

  • Member since
    December 2002
  • From: Bury St Edmunds, Suffolk, England
Posted by Bish on Monday, January 15, 2018 5:58 AM

Joe, its been the same here. My understanding is they have to plan a year ahead and work out which strains of flu they will have to deal with, but some times they get caughtout. In the UK they were ready for a strain from Australia and we have been hit by one from japan. I guess the bugs are always one step ahead.

I am a Norfolk man and i glory in being so


On the bench: Airfix 1/72nd Harrier GR.3/Fujimi 1/72nd Ju 87D-3

  • Member since
    March 2012
  • From: Corpus Christi, Tx
Posted by mustang1989 on Monday, January 15, 2018 5:28 AM

Tony: Looks like you are living the modeling nightmare dude. Wow! I've gotta say that your're doing one helluva job with your valiant attempts in ironing the inaccuracies/ kit weaknesses out though. Drive on brutha.

silentbob: Seems like alot of folks are getting the flu these days. The CDC really goofed this year on the flu vaccine. My whole family has been sick off/ on since 5 December and this crap is getting old. We'll all start to feeling better and then the stuff comes back. Hope you are feeling better and I wish you a swift recovery buddy. Looking forward to your pics when you're able to post them.


 Forum | Modelers Social Club Forum (proboards.com) 

  • Member since
    December 2002
  • From: Bury St Edmunds, Suffolk, England
Posted by Bish on Monday, January 15, 2018 2:34 AM

Bod, sorry to hear that. You just look after yourself first, and look forwardto seeing those pics when you can.

I am a Norfolk man and i glory in being so


On the bench: Airfix 1/72nd Harrier GR.3/Fujimi 1/72nd Ju 87D-3

  • Member since
    December 2002
  • From: Bury St Edmunds, Suffolk, England
Posted by Bish on Monday, January 15, 2018 2:33 AM

Looking good Tony, be nice to see the paint go on.

I am a Norfolk man and i glory in being so


On the bench: Airfix 1/72nd Harrier GR.3/Fujimi 1/72nd Ju 87D-3

  • Member since
    February 2014
  • From: Michigan
Posted by silentbob33 on Sunday, January 14, 2018 7:57 PM

Taxtp it looks like you're going a pretty good job, especially given what you're working with.  I've had my students building them since last school year and they leave a lot to be desired as far as interior detail goes.

So I finally finished my X-Wing and got the Do335 on the bench and I got hit with both the flu and strep throat.  And lucky me, I got the rare strain of strep that also goes after the kidneys.  Antibiotics have kicked in and I'm making some slow work on the cockpit (don't want to overdo it).  Hopefully I'll have some pictures up soon.

On my bench: Academy 1/35 UH-60L Black Hawk

  • Member since
    April 2005
  • From: Australia
Posted by taxtp on Sunday, January 14, 2018 7:47 PM

Thanks guys. It's progressed a little slowly since then. The kit cockpit detail is nothing like a He 162, so I've spent some time in it. It's far from perfect, but it's a little closer to what it should be, and will do for a closed canopy in this scale.

FWIW, I've done the following.
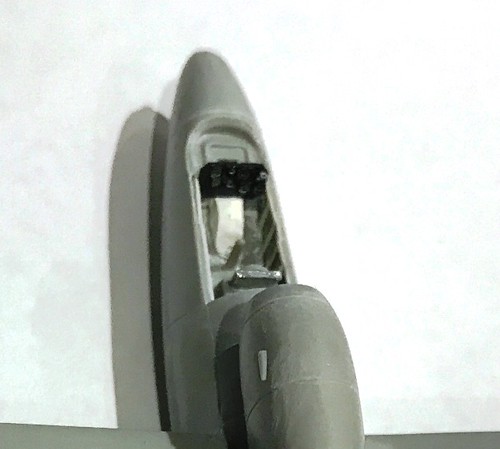
Modified the seat

Added harnesses

Added internal airframe detail

scratchbuilt an IP

added other prominent features  of the He 162 cockpit

Then we get to the canopy. I hadn't realised until I went to cut it from the sprues, that it has two prominent tabs, one on each side, to make it an 'easy build' and fit it into the cockpit opening, much like a snap fit kit.

Very inaccurate, and worse yet, the canopy plastic is thickened inside the canoped where the tab is, so its very obvious. I didn't think to take a photo of them, but I did after I'd used a hot know to slice off the tabs. You have to cut and sand off this thickened plastic, then restore the inside of the canopy back to a clear finish. I've done it, but this feature alone makes my decision that I prefer the Dragon kit. Check out the photos.

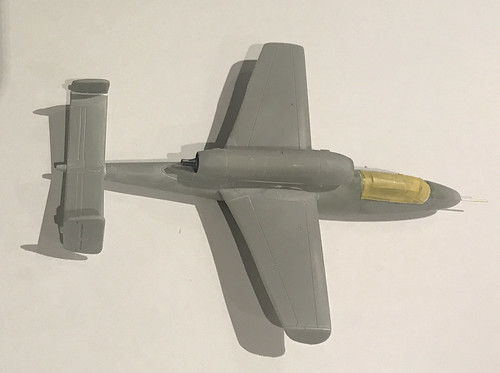
I've primed it before work this morning, I'll have a look at how that went after work tonight.

Cheers

Tony

This shows the original cockpit.

Modified cockpit. I refined that lump in the middle of the floor some more by shaving it down to size and smoothing it out. It's made from Milliput.
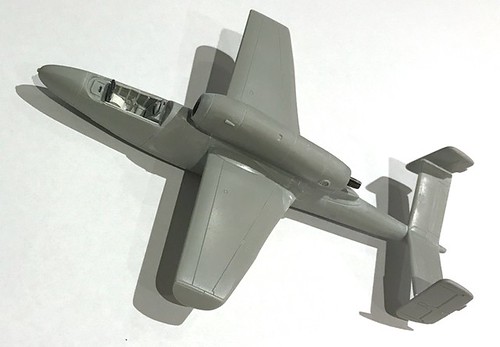
Ready for primer


I'm just taking it one GB at a time.

  • Member since
    September 2014
Posted by rooster513 on Tuesday, January 9, 2018 6:54 AM

Nice start Tony, that looks like it went together nicely!

-Andy

  • Member since
    December 2002
  • From: Bury St Edmunds, Suffolk, England
Posted by Bish on Tuesday, January 9, 2018 4:14 AM

Nice start Tony, that kit looks quite nice, i was not expecting that from one of those kits.

I am a Norfolk man and i glory in being so


On the bench: Airfix 1/72nd Harrier GR.3/Fujimi 1/72nd Ju 87D-3

  • Member since
    March 2012
  • From: Corpus Christi, Tx
Posted by mustang1989 on Tuesday, January 9, 2018 3:08 AM

Hey there Tony. That'll be my department bud. I've got you on the roster and you're all set. Looking forward to seeing what you do here with this kit. Yes


 Forum | Modelers Social Club Forum (proboards.com) 

  • Member since
    April 2005
  • From: Australia
Posted by taxtp on Tuesday, January 9, 2018 1:58 AM
Hi Andy, I've just realised that I'm not on the roster, would you mind adding me please. Hobby Boss 1/72 He 162. Thanks Tony

I'm just taking it one GB at a time.

  • Member since
    April 2005
  • From: Australia
Posted by taxtp on Tuesday, January 9, 2018 1:46 AM

I'm finally getting to the Hobby Boss He 162 that I had committed for this GB.

Although it's an 'Easy Build' kit, you still have a seam to deal with, but in an unconventional place.  I will add a little detail to the cockpit, and perhaps the wheel wells, just to make it interesting. It goes together a lot easier than the Dragon kit, but it's a lot less detailed too, at this stage I think I'd take the Dragon one over this. 

You need to add some nose weight, but the only space available is aft of the cockpit, do I've added plenty to make sure it sits correctly.

Anyway, here goes.

Cheers

Tony

I'm just taking it one GB at a time.

  • Member since
    September 2014
Posted by rooster513 on Sunday, January 7, 2018 1:44 PM

Great finish Armor! I love the scheme and how you pulled it off. I'll get the finished photo added shortly!

-Andy

  • Member since
    April 2006
  • From: ON, Canada
Posted by jgeratic on Sunday, January 7, 2018 12:43 PM

Thanks Eric, that's better, at least now we can immediately see pictures and not linked text.

Still though it's not a complete fix.  Maybe it's Pinterest, but for some reason I have to download to my hard drive first before viewing the larger image, but this isn't working directly from the images.  Weird stuff this Pinterest.

regards,

Jack

  • Member since
    March 2017
Posted by Armor_Aficionado on Sunday, January 7, 2018 10:52 AM
Uhhh, okay. It was hard to tell what you meant; that “Insert/Edit Image” toolbox thing doesn’t appear UNLESS you’re posting a reply to the thread, and I can’t “right click” as I’m not using a mouse, I’m postingvvia my iPad. But yeah, I think I see what you mean.

  • Member since
    March 2017
Posted by Armor_Aficionado on Sunday, January 7, 2018 10:50 AM

  • Member since
    April 2006
  • From: ON, Canada
Posted by jgeratic on Sunday, January 7, 2018 10:09 AM

Eric, fine job on that one. Yes

I too like that white, certainly makes it stand out from the norm.

Not sure why you have the awkward links to your builds, it's really clunky getting to view them.  Let me try something...

Alright, if you just right click and 'copy image location' from the small photo you have, then paste that into insert/edit image from the toolbox above.

regards,

Jack

  • Member since
    November 2003
  • From: Naples, FL
Posted by tempestjohnny on Sunday, January 7, 2018 8:49 AM
Great finish Eric. That white in the camo looks great


  • Member since
    March 2012
  • From: Corpus Christi, Tx
Posted by mustang1989 on Sunday, January 7, 2018 8:31 AM

Man that's a mighty fine turn out you've completed there AA. Thanks for your participation not just once............but THREE times for this GB. Your completed photo'll be posted up front shortly.


 I deeply apologize for the long absence on the forums fellas. Lotsa stuff happening this last year and modeling had to take the back seat. Looks like I'll be making my return to this forum and back to the bench. One things for sure, the break has given me time to clear my head and stop starting new projects and concentrate on finishing those that I've started over the course of the last year. I'm looking forward to being here again and seeing you all around on the forum, Joe


 Forum | Modelers Social Club Forum (proboards.com) 

  • Member since
    March 2017
Posted by Armor_Aficionado on Sunday, January 7, 2018 3:05 AM

Alright, calling this one DONE!  That’s three for me on this group build, that’s enough. Time to move back to the RAF group build and start working on my Hurricane for my Battle of Britain diorama.  Cheers, folks, hope you like it:

https://pin.it/fqj7omxllqm3pl

https://pin.it/micgph7ku5jdnt

https://pin.it/2dhobgjilmzc7g

https://pin.it/mgeiehdff6dkvr


  • Member since
    April 2015
Posted by Mopar Madness on Saturday, January 6, 2018 9:45 AM

Nice choice of camouflage for this rare bird!

Chad

God, Family, Models...

At the plate: 1/48 Airfix Bf109 & 1/35 Tamiya Famo

On deck: Who knows!

  • Member since
    March 2017
Posted by Armor_Aficionado on Saturday, January 6, 2018 7:20 AM
Thanks, Tony!

  • Member since
    April 2005
  • From: Australia
Posted by taxtp on Saturday, January 6, 2018 6:46 AM
Nice work Eric, and an interesting subject and scheme. Cheers Tony

I'm just taking it one GB at a time.

  • Member since
    March 2017
Posted by Armor_Aficionado on Saturday, January 6, 2018 6:04 AM

Alright, decals are on, this one is in the final stages.  Just have to spray it with Dull-Cote, reattach the engine bay doors, and add the under-wing missiles and she’ll be done!  (btw, Joe or Andy, whichever one of you is maintaining the roster, I still need to be added to the roster for this build! Thanks.)

https://pin.it/ud4jjkuh2zv2eo

https://pin.it/3ixshexam3pt24

https://pin.it/3yalhq3he622fg


  • Member since
    April 2005
  • From: Australia
Posted by taxtp on Tuesday, January 2, 2018 6:14 PM
That looks pretty good to me Eric, nice work. Cheers Tony

I'm just taking it one GB at a time.

  • Member since
    March 2017
Posted by Armor_Aficionado on Monday, January 1, 2018 9:48 AM

After numerous attempts to get the paint job right, I’ve finally got something I can live with.  Switching to Silly Putty for masking was a Godsend - it works better than anything else I’ve tried!  Now just have to touch up the underside with Hellblau RLM65, put the engine bay doors back on, and she’ll be ready for decals.

https://pin.it/3xpxjamfrnibsl

  • Member since
    March 2017
Posted by Armor_Aficionado on Sunday, December 31, 2017 10:23 AM
Yep, Jack, that's exactly what it was, paint build-up on both areas you mentioned. I cleaned it real good and we'll see how it works. I used the same amount and type of thinner that I usually use with the Vallejo paints; maybe it'll take a little bit more...

  • Member since
    April 2006
  • From: ON, Canada
Posted by jgeratic on Sunday, December 31, 2017 10:05 AM

A_A, that looks to be paint build up both on the needle tip and also around the inside the protective cap.  Not familiar with Revell acrylics, maybe it needs more thinning for airbrush use? 

Also, freehanding a 'scaled' airbrush look can still benefit from using masks, just have to place them raised from the aircraft surface via rolled up tape  or some form of silly putty/poster tac.

regards,

Jack

  • Member since
    March 2017
Posted by Armor_Aficionado on Sunday, December 31, 2017 6:47 AM

Well, that sucked!  Had a perfectly good topside camo pattern of RLM74 (gray) and RLM83 (green) laid down, then decided to add some white, going for a Baltic/Arctic theater of operations look.  Unfortunately, the white I used was Revell AquaColor, which does not go through the airbrush nearly as well as the Vallejo Model Air colors did!  After much spitting, spattering, and blobbing, the topside paint job is pretty much back to square one.  So, although Revell acrylics work great for brush painting, the lesson for today is NOT to use them through your airbrush!

https://pin.it/z6af5wcpghpbdm


JOIN OUR COMMUNITY!

Our community is FREE to join. To participate you must either login or register for an account.

SEARCH FORUMS
FREE NEWSLETTER
By signing up you may also receive reader surveys and occasional special offers. We do not sell, rent or trade our email lists. View our Privacy Policy.