SEARCH FINESCALE.COM

Enter keywords or a search phrase below:

RAF 100th Anniversay GB

84894 views
3404 replies
1 rating 2 rating 3 rating 4 rating 5 rating
  • Member since
    December 2002
  • From: Bury St Edmunds, Suffolk, England
Posted by Bish on Sunday, February 25, 2018 12:51 PM

Greg, that unused part sound like the raised portion that was fitted to earl;y car door aircraft which housed a mirror.

I am a Norfolk man and i glory in being so


On the bench: Airfix 1/72nd Harrier GR.3/Fujimi 1/72nd Ju 87D-3

  • Member since
    April 2006
  • From: ON, Canada
Posted by jgeratic on Sunday, February 25, 2018 1:43 PM

Bish, I see what you mean.  My reference refer to it as a blister, added to early mid-production of the Ib in the spring of 1943.

regards,

Jack

  • Member since
    December 2002
  • From: Bury St Edmunds, Suffolk, England
Posted by Bish on Sunday, February 25, 2018 1:48 PM

Jack, i only know of it because i have a set of 72nd Xtradecals for a car door Typhoon and the instructions mention it on the aircraft i want to do.

And thank you, blister is the word i could not think of.

I am a Norfolk man and i glory in being so


On the bench: Airfix 1/72nd Harrier GR.3/Fujimi 1/72nd Ju 87D-3

  • Member since
    March 2017
Posted by Armor_Aficionado on Sunday, February 25, 2018 2:55 PM

Got the underside of the Hurricane sprayed Duck Egg Green, and I’m a very happy camper!  I used my old Paasche H model airbrush for the first time in over ten years (until last week, I’d never been able to find a proper connector for it to fit to my compressor, fo the whole time I’ve lived in Germany, 7.5 years); wow, I had forgotten what a great feeling it is to use a GOOD QUALITY airbrush!  I’ve struggled the past couple of years with cheap knock-off airbrushes - what a relief!


  • Member since
    May 2013
  • From: Indiana, USA
Posted by Greg on Sunday, February 25, 2018 5:15 PM

Thanks Jack and Bish for addressing my question about "teardrop".

AA, glad your spray session went well. I'm excited for you also because for now duck egg green is my new favorite color. Smile

  • Member since
    January 2016
  • From: Winnipeg, Manitoba Canada
Posted by iSteve on Sunday, February 25, 2018 5:46 PM

Greg
iSteve

BTW Greg, is that the Hasegawa 1/48 Typhoon Ib with tear drop canopy?

As far as i know, it is the Eduard rebox of that kit, yes. I wonder, can you explain to me what the teardrop in teardrop canopy actually refers to? There is a part at the top of the canopy that goes unused in the version I am building and it sure looks like a teardrop now you mention it!

Nice WIP update you posted there, Steve. Looking good.

Thanks Greg!

Upon closer inspection, they're not the same kit. Your Eduard kit is the car door version; the teardrop kit is just that: a bubble-top tear-shaped canopy. Sorry I couldn't help Greg.

  • Member since
    January 2016
  • From: Winnipeg, Manitoba Canada
Posted by iSteve on Sunday, February 25, 2018 5:56 PM

jgeratic

Steve, thanks, and you are doing a great job on that Airfix Spitfire.   Belts look good, but a bit concerned about how my HGW product will turn out as I keep seeing negative comments about them.  As for rigging I don't mind the work, but it is much easier to grasp when you have the specifics like where the wires are attached and also the type of attachement points.

regards,

Jack

Thanks Jack!

I think the negative comments about the belts out there probably echo my own: a lot of work, the "fabric" can rip (mine did), very tiny parts at 1/48 scale, and not necessarily much better than PE. I think, though, you should try them once to make your own decision. The ones for the Camel look to be a little less problematic than, say, the Sutton harness. Don't forget that the "fabric" is on a backing and that you have to peel them off first (the instructions don't mention that).

I agree about the rigging. It helps to know how and where they connect. There's a guy out there who does the loops and eyelets in various scales: Bob's Buckles. That might help your work.

  • Member since
    April 2006
  • From: ON, Canada
Posted by jgeratic on Sunday, February 25, 2018 10:34 PM

Steve, yes there is indeed a backing on those HGW belts, thank you for confirming this - was wondering what was going as the instructions don't point this out.  I went ahead and put them together, even though they ar not ready to be installed.  Took about half an hour while watching the tv.  I'll post pics once I have a bit more to show along with engine work.

I do have some of Bob's buckles, but have yet to try them.  Also Gaspatch do a variety of turnbuckles cast in metal.

regards,

Jack

  • Member since
    November 2009
  • From: SW Virginia
Posted by Gamera on Monday, February 26, 2018 11:19 AM

Those look great guys!!! 

Steve: I've used one set of those HGW seatbelts. They were 1/32nd so a little easier to handle. Personally I like how they turned out. 

Greg: I think 'teardrop' here is the same as the term 'bubbletop' for the 'blown' Plexiglass canopy.


Still working on stencils now, almost done. Put down the undercoat for the NM on the landing gear as well. 

"I dream in fire but work in clay." -Arthur Machen


  • Member since
    January 2016
  • From: Winnipeg, Manitoba Canada
Posted by iSteve on Monday, February 26, 2018 11:53 AM

Gamera

Those look great guys!!! 

Steve: I've used one set of those HGW seatbelts. They were 1/32nd so a little easier to handle. Personally I like how they turned out. 

Still working on stencils now, almost done. Put down the undercoat for the NM on the landing gear as well. 

I completely get that Gamera. I will use them for my 1/32 kits (which are only WWI Wingnut Wings kits) because they should be easier to mange, but I've ordered a bunch of PE belts and if they look good I'll sell off my 1/48 HGW belts. We'll see.

Keep up the great work on the Tempest!

  • Member since
    August 2015
  • From: the redlands Fl
Posted by crown r n7 on Monday, February 26, 2018 7:18 PM

Jack cool looking sopwithand that engine wow that little plane has a ton of detail.

stik that build is moving along add that weight.

Greg very smooth camo and decals.

castel nuovo awesome interior!

TJ that mosquito camo is stunning.

I hope I didnt leave any body out?

Here are my lastest over due pics on the gloster.


 Nick.

  • Member since
    December 2002
  • From: Bury St Edmunds, Suffolk, England
Posted by Bish on Tuesday, February 27, 2018 1:58 AM

Nick, camo has come out very well, really coming along with that.

I am a Norfolk man and i glory in being so


On the bench: Airfix 1/72nd Harrier GR.3/Fujimi 1/72nd Ju 87D-3

  • Member since
    November 2009
  • From: SW Virginia
Posted by Gamera on Tuesday, February 27, 2018 7:22 AM

Thanks Steve! 

Nick, camo looks perfect! Yes

"I dream in fire but work in clay." -Arthur Machen


  • Member since
    August 2015
  • From: the redlands Fl
Posted by crown r n7 on Tuesday, February 27, 2018 7:55 AM

Bish thank you getting used to tamiya paints where have I been (old dog)

Gamera thanks bud this is my 2nd time around on the gloster

bare bones pit is in, have test fit weathered engine in the other is new in a ways. have the canopy masked and one clear engine pannel I want to try some thing.


 Nick.

  • Member since
    April 2014
  • From: Australia
Posted by lostagain on Wednesday, February 28, 2018 9:43 AM

Nick

Liking the paintwork on the Meteor. Nice restrained weathering is suitable for the plane. The engine is looking sharp in its bay there too.

TJ

The camouflage colours on the Mossie look really good, not sure why you waited so long to get her off the shelf!

Jack as always looking forward to another one of your builds and your attention to detail.

Castel, the Walrus cockpit has some really good detail there, shame it is to be covered up...

Steve, your build of the "unmentionable plane" is coming along very well, looks like the Airfix kit is coming together well. The seatbelts look good to me.

Greg,

The Typhoon is looking good, like the paintwork.

Bish,

Seeing as there is a whole month to go in this GB, thought I might join in with the Airfix 1/72 EE Lightning F2A, since it matches one of the GB badges.

The moulding in my kit has been a bit hit and miss: there are some very large ejector pin lumps on the back side of a number of pieces. The fuselage is a case in point wher they stick out as much as a couple of millimetres.

This then has an effect on the front side where there are small bumps or the panel lines are lost:

So that means a little extra work. However it looks like it could build a nice little kit of a favourite jet of mine.

  • Member since
    December 2002
  • From: Bury St Edmunds, Suffolk, England
Posted by Bish on Wednesday, February 28, 2018 10:01 AM

O thank you LA. This GB would not be the same without a LIghtning. I have the same kit and was thinking about trying to fit it in. You have just saved me the trouble.

Great to have you on board.

I take it those inside bumps have to be removed or they get in the way of fitting parts in there.

I am a Norfolk man and i glory in being so


On the bench: Airfix 1/72nd Harrier GR.3/Fujimi 1/72nd Ju 87D-3

  • Member since
    November 2009
  • From: SW Virginia
Posted by Gamera on Wednesday, February 28, 2018 11:26 AM

LA: That looks sharp. I don't mind cleaning up injection pin marks on the inside but gee that's annoying when they end up messing up the outside. 

"I dream in fire but work in clay." -Arthur Machen


  • Member since
    May 2013
  • From: Indiana, USA
Posted by Greg on Wednesday, February 28, 2018 1:31 PM

LA, that molding process screwing up the outside fuselage detail is disturbing.

I've been eager to try an Airfix kit but I wonder, is that typical of Airfix?

I'm sure you'll have no problem with it, but I am a lazy modeler.

  • Member since
    January 2015
Posted by BrandonD on Wednesday, February 28, 2018 5:08 PM

Well I finished my Bristol F.2B. I like to try new things on each build, and this kit was always meant to serve as a test bed for multiuple things:

-Working with pigments
-Carving a prop out of laminated veneer sheets
-Building a biplane
-Rigging!

I'm not going to say I achieved any of those exactly well, but I am generally happy with the outcome, and I learned a LOT.

Takeaways:

-Don't glue rigging line directly to the wings. Make or buy attachment points
-Be careful when placing interplane struts, especially if they'r very slightly different (duh, right)
-Use a Glue Looper or similar to accurately place CA glue.
-Accelerator is your friend, and you can apparently spray it all over the painted surface without damaging the paint, but an eye dropper works a little better
-For a first biplane, build something easier, where at least the bottom wing mounts to the fuselage instead of on six little struts, and there is less rigging.

Anyway, with that, I'll give you the reason you're actually here:

Brisfit ;

Brisfit 05

Brisfit 04

Brisfit 03

Brisfit 02

Brisfit 01

Brisfit 06

Thanks for having me in this build. I like the first pic for the front page.

-BD-


  • Member since
    January 2015
Posted by BrandonD on Wednesday, February 28, 2018 5:09 PM

Crown - great looking paint on that jet. It's looking sweet!

-BD-

  • Member since
    May 2013
  • From: Indiana, USA
Posted by Greg on Wednesday, February 28, 2018 7:40 PM

Brandon, I think your biplane looks great! YesYesYes

Kudos to you, I don't think I'll ever be brave enough to try one.

  • Member since
    May 2013
  • From: Indiana, USA
Posted by Greg on Wednesday, February 28, 2018 7:41 PM

Nick, good-looking camo/paint job!

  • Member since
    April 2006
  • From: ON, Canada
Posted by jgeratic on Wednesday, February 28, 2018 7:42 PM

Brandon, that is a right bang on job on that Bristol. Yes
Would never have guessed this was your first bipe, will you be building more?

Hello Nick, thanks!

LA, thank you.  Man that looks to be quality control issues on that Airfix Lightning, reminds me of the missing engraved detail on a new tool Emil I had.


---------------------------------------


The Bently BR1 engine construction is complete, and already has a coat of paint.  I've further outlined the steps I took to build it if anyone is interested, but just some quick numbers:
- total number of holes drilled: 54
- total number of sections of cut rods in various diamaters: 99  (11 pieces per cylinder) Propeller

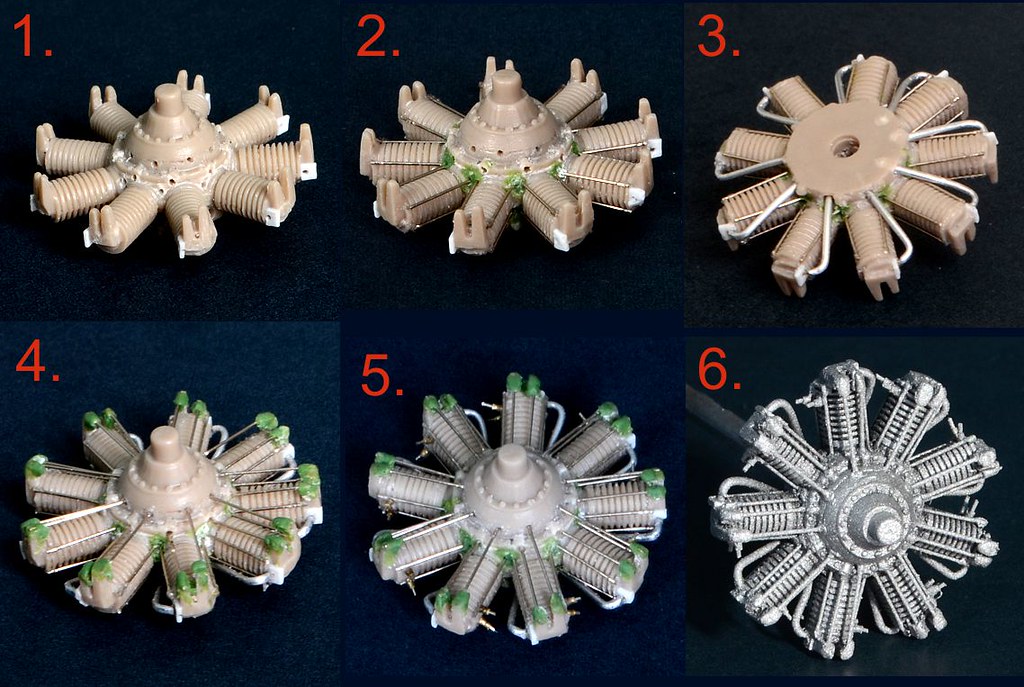
1. -  all push rods removed, drilled location holes in their place.  Also added small sections of plastic sheet to the top  sides of the cylinder heads.  These also had location holes drilled for the piping that reaches out from the backside.

2. - each cylinder is surrounded by four rods, using 0.2mm size (same diameter as push rods).  Decided to just drill one large hole to fit two rods as they come down into a V - but each hole was first packed with green putty.

3. - piping added in the rear, using 0.5mm rod.  To aid in attaching to the cylinder, the curved end of the piping also had 0.3mm rod inserted to fit into the sheet plastic added in step 1.

4.  - push rods finally added (0.2mm).  The green putty was added afterwards for additional strength, but not really accurate in terms of detail.

5. - pair of spark plugs added to the top sides of each cylinder - no holes drilled for this.   Basically just a 0.2mm rod inserted into  0.4mm section and super glued in place.

6. - Base coat of black followed by aluminum, ready for further detail painting.

regards,
Jack

  • Member since
    August 2015
  • From: the redlands Fl
Posted by crown r n7 on Wednesday, February 28, 2018 7:45 PM

lostagain thankyou its waiting for the clear coat now.

BD thanks man that F2B is something special.

Greg thanks bud I cant type fast enough Looks like very bodies here!!


 Nick.

  • Member since
    December 2002
  • From: Bury St Edmunds, Suffolk, England
Posted by Bish on Thursday, March 1, 2018 2:27 AM

You should be more than happy with that BD, it looks superb. Thank you for taking part and shareing that build with us. Front page is updated as requested.

I am a Norfolk man and i glory in being so


On the bench: Airfix 1/72nd Harrier GR.3/Fujimi 1/72nd Ju 87D-3

  • Member since
    December 2002
  • From: Bury St Edmunds, Suffolk, England
Posted by Bish on Thursday, March 1, 2018 2:28 AM

Jack, thats some amazing work on that engine. If that is anything to go by, this will be a cracking build.

I am a Norfolk man and i glory in being so


On the bench: Airfix 1/72nd Harrier GR.3/Fujimi 1/72nd Ju 87D-3

  • Member since
    November 2009
  • From: SW Virginia
Posted by Gamera on Thursday, March 1, 2018 7:52 AM

BD: That's simply amazing! Love her!!! Heart

Jack: Wow, great job there on the push rods- makes my head hurt just to look at all that. 

"I dream in fire but work in clay." -Arthur Machen


  • Member since
    August 2015
  • From: the redlands Fl
Posted by crown r n7 on Thursday, March 1, 2018 8:14 AM

Jack nice Bow Down


 Nick.

  • Member since
    April 2006
  • From: ON, Canada
Posted by jgeratic on Thursday, March 1, 2018 9:40 AM

Thank you Bish, Cliff, and Nick. Beer

I think if I had planned more ahead of time, would of probably pulled the trigger on an aftermarket resin engine (either Vector or Small Stuff brand), though it still would have to start out as the French Clerget 9 - but at least it would of had the spark plugs included.  That was something added last minute.

regards,

Jack

  • Member since
    May 2013
  • From: Indiana, USA
Posted by Greg on Thursday, March 1, 2018 11:39 AM

Jack, wow, no holds barred on that engine.

Thats some seriously nice work! YesYes

JOIN OUR COMMUNITY!

Our community is FREE to join. To participate you must either login or register for an account.

SEARCH FORUMS
FREE NEWSLETTER
By signing up you may also receive reader surveys and occasional special offers. We do not sell, rent or trade our email lists. View our Privacy Policy.