SEARCH FINESCALE.COM

Enter keywords or a search phrase below:

OTS (1/72) GB 2017

11973 views
160 replies
1 rating 2 rating 3 rating 4 rating 5 rating
  • Member since
    June 2003
  • From: Rowland Heights, California
Posted by Duke Maddog on Thursday, August 3, 2017 9:36 AM

Wayne, I also got started on my kit too.

This is Dragon's LCM-3 that I started:


I started with the pilot house. For the life of me I could not get that assembly to line up. This was the best looking job I had managed to do:


I then moved on to the front ramp, adding the hinge parts to the bottom:


Of course, that meant that I now had to finish adding the bars on top:


That is all ready for installation now. Man, I expected this model to fit better, but it has been a mass of ill-fitting parts and unclear positioning!

Moving on I added the top deck to the lower hull and that is as far as this got to date:


Hopefully I'll be able to get to this sometime soon again. My house is torn up while we upgraded our electrical system. Stay tuned, more to come.

  • Member since
    February 2010
  • From: New Jersey
Posted by 68GT on Sunday, August 6, 2017 6:42 PM

More progress this weekend on the Tigercat.  Going to uise the Eaglestrike decals for a Skyraider since the lit ones are very yellowed.

On Ed's bench, ???


  • Member since
    February 2010
  • From: New Jersey
Posted by 68GT on Sunday, August 13, 2017 11:27 AM

Some more Tigercat progress with gaps in the wing roots being filled and a fresh coat of blue.

On Ed's bench, ???


  • Member since
    May 2009
  • From: Poland
Posted by Pawel on Sunday, August 13, 2017 3:37 PM

68GT - I like how you tackle two models at once! It's interesting to see you working on that LCM3. I also have this one, I planned to build a Vietnam-era tango boat out of it, but it would require a stretch to LCM6 first. Sorry to hear the fit is not so good - Dragon models have that problem pretty often. Their P-38 Lightning is a prime example. Good luck with your builds and have a nice day

Paweł

All comments and critique welcomed. Thanks for your honest opinions!

www.vietnam.net.pl

  • Member since
    June 2003
  • From: Rowland Heights, California
Posted by Duke Maddog on Thursday, August 17, 2017 3:18 PM

After a month of my life in total upheaval, I finally found some time to 'play' on the workbench. Let me show you the latest from Maddog Manufacturing. It is a very small update, so...

 I completed the interior part of the landing craft here:


And then test-fit it inside to see how it fit. Surprisingly, this fit fine:


Meanwhile, I tried to get the forward door to fit on that but found out I had glued something wrong on it so I had to repair that. Maybe next time I'll be able to get it to fit right.


Well that completes my small update. I'll be going back to work so I might not have much time to work on my models again for awhile, but at least I was able to get this much done. I'm thrilled.

Thanks all for looking in, comments are welcome.


  • Member since
    July 2005
  • From: Texas
Posted by painklr on Saturday, August 19, 2017 11:52 PM

Sounds like fun.  Please add me to the group.  I still need to figure out what to build.

  • Member since
    April 2010
Posted by Theuns on Sunday, August 20, 2017 2:09 AM

Wayne, pencile this little model in please. It is a MPM 1/72 P-35 "upgrade kit"

I still need to figure out how I will be able to pose the one piece canopy open to actually show off the nice PE and resin cockpit.

 . by Theunis van Vuuren, on Flickr

 . by Theunis van Vuuren, on Flickr


Theuns

  • Member since
    April 2006
  • From: Denver, Colorado
Posted by waynec on Sunday, August 20, 2017 4:53 PM

Theunis how do you post your photos from FLICKR? i see the link but want the photo to show up.

Никто не Забыт    (No one is Forgotten)
Ничто не Забыто  (Nothing is Forgotten)


  • Member since
    March 2017
  • From: Mid Michigan
Posted by shamoo on Sunday, August 20, 2017 8:33 PM

waynec

Theunis how do you post your photos from FLICKR? i see the link but want the photo to show up.


give this a try:

How to make Flickr images work

Between bstarr3 & shamoo
bstarr3 said 10 days ago

I read on Toshi's Corsair thread that you were offering to give him instructions to upload Flickr images so they will embed in posts.  I'm trying to figure this very thing out myself.  Would you mind forwarding the directions to me?  Thanks


Brian


shamoo said 9 days ago

I'd be happy to.  A qualifier though... I have been unable to make this work on my iPhone.  I am using a PC.  I haven't tried on an an Android system yet, but I might try rthat this weekend.

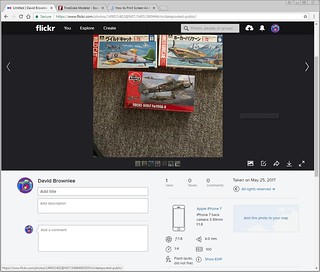
Click on the picture in Flikr that you want to imbed.

 fnsc1 by David Brownlee, on Flickr

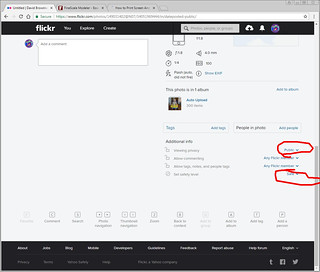
Scroll down to the bottom of that page to check the settitngs of the photo.

 fnsc2 by David Brownlee, on Flickr

Make sure the two settings i have sloppily circled in red are at "public" and "safe"

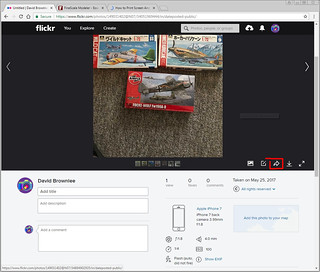
Just under the picture is a curved arrow.

 fnsc1 by David Brownlee, on Flickr

Click on the arrow to reveal this screen:

 fnsc3 by David Brownlee, on Flickr

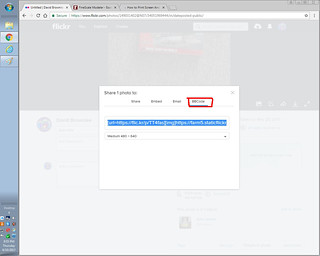
Click on the "BB Code" and set5 the size to medium 640x512 is what I use.  Highlight and right click to copy the entire line of code.

Now go to your post on Finescale, put the cursor where you want the picture in the body of your message, right click, and select paste. Your picture will apperar in a few seconds or when you save and post your message.

Good luck.

Dave

  • Member since
    April 2010
Posted by Theuns on Sunday, August 20, 2017 11:34 PM

here is how I do it.

I click on the pic, it then gives the little "arrow" share icon on the R/H bottom of the pic.

Click on this and it then gives me the IMG code highlited in a blue bar, I right click on this , copy and then go paste.

Sofar it works well for me.....took a while to figure it out though LOL


Theuns

  • Member since
    July 2005
  • From: Texas
Posted by painklr on Monday, August 21, 2017 8:26 AM

Hi Waynec,

You have me down for the wrong plane.  I just picked mine out yesterday morning.  Please pencil me in for Academy's SB2C-4 Helldiver.

Progress pics up soon.

  • Member since
    April 2006
  • From: Denver, Colorado
Posted by waynec on Monday, August 21, 2017 8:55 AM

OOPS. shouldn't do this sans coffee


Никто не Забыт    (No one is Forgotten)
Ничто не Забыто  (Nothing is Forgotten)


  • Member since
    April 2006
  • From: Denver, Colorado
Posted by waynec on Monday, August 21, 2017 9:02 AM

Shamoo and Theunis  thanks. now to spend some time learning the program.


Никто не Забыт    (No one is Forgotten)
Ничто не Забыто  (Nothing is Forgotten)


  • Member since
    February 2010
  • From: New Jersey
Posted by 68GT on Sunday, August 27, 2017 3:54 PM

Today I sat down and applied some leftover skyraider decals I had.

On Ed's bench, ???


  • Member since
    June 2008
Posted by lewbud on Sunday, August 27, 2017 5:38 PM

Wayne,

Put me down for one of Dragon's 1/72 Humvee's.  I've done two in NATO green, maybe it's time for a desert tan one.


Buddy- Those who say there are no stupid questions have never worked in customer service.

  • Member since
    March 2017
  • From: Mid Michigan
Posted by shamoo on Monday, August 28, 2017 3:16 PM

Wow, great work here!  

Finally got a little time myself:

 2017-08-28_03-24-12 by David Brownlee, on Flickr

I'm going to attempt detailing the engine next, as well as fixing up a coiple seams to get ready for primer.

Dave

  • Member since
    May 2009
  • From: Poland
Posted by Pawel on Monday, August 28, 2017 3:59 PM

68GT - How come you're using Skyraider decals here? Did you think about tweaking them a little?

Dave - It can only be a Corsair, right? What make is that kit?

Good luck with your OTS builds and have a nice day

Paweł

All comments and critique welcomed. Thanks for your honest opinions!

www.vietnam.net.pl

  • Member since
    March 2017
  • From: Mid Michigan
Posted by shamoo on Monday, August 28, 2017 8:26 PM

Pawel

68GT - How come you're using Skyraider decals here? Did you think about tweaking them a little?

Dave - It can only be a Corsair, right? What make is that kit?

Good luck with your OTS builds and have a nice day

Paweł


pawel, it is indeed a Corsair, Revell of Germany's F4U-4.  Seems to go together fairly well.

 Untitled by David Brownlee, on Flickr

  • Member since
    March 2006
Posted by simpilot34 on Saturday, September 2, 2017 6:58 AM

Heyyyy guys!!! hope all is well with everyone!! glad to see this GB is still going too!! I'm working on an Academy FW-190A-8 at the moment, hope it's not too far along to join in. Getting the m-o-j-o back and know that te greatest inspiration is a GB. Wayne if I may finish this one here and start/continue another i would be greatful. here's a few pics of where it sits now.

Have a thread posted in Aircraft put up today too, miss the good times on here and I'm ready to keep building!!

Shamoo a note on their kit is they got the rocket rail numbers and locations wrong. they only had 8 rails and the two inboards are staggered wierdly. Started this kit years ago and sidelined it due to life getting in the way. Don't know who had it first but have  both the Italeri and Revell kits and they are EXACTLLY the same. Wish I would have known that because I got an Eduard Zoom PE set for the Italeri kit and a full PE set for the Revell one Sad Put a fully wired Engines N Things R-2800 on the Italeri one that I started and it looks great compared to the relief molded piece in the kit. Forgot to mention I bought the Revell kit as a -5 lol but you could build it as a -4B if you wanted too by changing the cowl ring, HOWEVER, the exhaust ports on a -5 are higher than those on a -4/-4B so that part is ok for the boxing you have.

Cheers, Lt. Cmdr. Richie "To be prepared for war, is one of the most effectual means of preserving the peace."-George Washington
  • Member since
    February 2010
  • From: New Jersey
Posted by 68GT on Saturday, September 2, 2017 10:40 AM

That 190 looks awsome!


Pawel

68GT - How come you're using Skyraider decals here? Did you think about tweaking them a little?


The kit decals were junk and I wasnt using these so thats why I used the Skyraider decals.  What kind of tweaking are you talking about?

On Ed's bench, ???


  • Member since
    March 2006
Posted by simpilot34 on Sunday, September 3, 2017 1:10 AM

Thanks GT!! getting closer to the end, and thats where you start trying to rush it along lol. Needed to pull the reigns back a few times, she'll be on her feet soon.

Cheers, Lt. Cmdr. Richie "To be prepared for war, is one of the most effectual means of preserving the peace."-George Washington
  • Member since
    February 2010
  • From: New Jersey
Posted by 68GT on Thursday, September 7, 2017 1:18 PM

I was thinking that I might start up a Fujimi F-4N this weekend.

On Ed's bench, ???


  • Member since
    February 2010
  • From: New Jersey
Posted by 68GT on Friday, September 8, 2017 6:23 PM

Not really the look I was going for on the Tigercat but its not bad.

On Ed's bench, ???


  • Member since
    June 2008
Posted by lewbud on Friday, September 8, 2017 7:20 PM

Looking good 68GT!  I love the Tigercat, wish someone would make a modern kit of it.  I know Pavla did one about fifteen years ago, but it never made it to this side of the pond, and is now rarer than hen's teeth it seems.

Pawel, sometimes you have to forego accuracy for what looks right.  I think the last time this kit was popped was for the Heritage Edition back in the early eighties.  Outside of Starfighter Decals sheet, your only other option is the kit decals which are 35+ years old (and they weren't that great back then).

Buddy- Those who say there are no stupid questions have never worked in customer service.

  • Member since
    February 2010
  • From: New Jersey
Posted by 68GT on Saturday, September 9, 2017 8:09 AM

Thanks, I wanted to try something new so this is the perfect candidate.  I would say it was a white box or earlyer judging from the instructions.

On Ed's bench, ???


  • Member since
    March 2006
Posted by simpilot34 on Sunday, September 10, 2017 4:25 AM

68 the tiggercat be looking good man!!

Got a lil more done on my FW, wheels and struts painted. used some AK true metal paste on the oleos and quite like how they turned out. Picked out the nuts on the rims with a toothpick. Here'sa few progress pics.Toast

Cheers, Lt. Cmdr. Richie "To be prepared for war, is one of the most effectual means of preserving the peace."-George Washington
  • Member since
    February 2010
  • From: New Jersey
Posted by 68GT on Sunday, September 10, 2017 7:25 AM

Very nice!

On Ed's bench, ???


  • Member since
    April 2010
Posted by Theuns on Sunday, September 10, 2017 9:33 AM

It has been slow building on my side but the engine paints up nicely.

 . by Theunis van Vuuren, on Flickr

The cockpit is very busy with loads of resin and extremely small PE bits, I left some of them off that are so small I can hardly grip them with tweezers and inside the fuse they will not be visable anyway.

Fitting the tub insde the fuse is actually quite difficult, the instructions are vague, there are no locator tabs or indication where it is suppose to fit.

I also had to use a lighter RAF green as the USAAF interior green was way to dark.

 . by Theunis van Vuuren, on Flickr

 . by Theunis van Vuuren, on Flickr

Looking at the pic I see I need to toutch up the buckles on the shoulder straps.


Theuns

  • Member since
    February 2010
  • From: New Jersey
Posted by 68GT on Monday, September 11, 2017 7:49 PM

I got started on that Fujimi F-4N this saterday.

On Ed's bench, ???


  • Member since
    March 2017
  • From: Mid Michigan
Posted by shamoo on Friday, September 15, 2017 8:14 PM

simpilot34
Shamoo a note on their kit is they got the rocket rail numbers and locations wrong. they only had 8 rails and the two inboards are staggered wierdly. Started this kit years ago and sidelined it due to life getting in the way. Don't know who had it first but have  both the Italeri and Revell kits and they are EXACTLLY the same. Wish I would have known that because I got an Eduard Zoom PE set for the Italeri kit and a full PE set for the Revell one Put a fully wired Engines N Things R-2800 on the Italeri one that I started and it looks great compared to the relief molded piece in the kit. Forgot to mention I bought the Revell kit as a -5 lol but you could build it as a -4B if you wanted too by changing the cowl ring, HOWEVER, the exhaust ports on a -5 are higher than those on a -4/-4B so that part is ok for the boxing you have.

Simpilot, thanks for the thought but I believe we are talking about two different kits.  I see the one you are talking about on scalemates, but mine is the newer tool.  It doesn't have the rockets, just a choice of two bombs or two drop tanks.  Thanks for the heads  up though.

I did get a bit done.  Got it ready for some primer.

 2017-09-15_03-56-02 by David Brownlee, on Flickr

I see that I have tweaked one of the wing guns.  Should have left them off for painting.  Thinking of replacing them with some hypodermic needles anyway.  Also got the engine assembled and painted.  Was going to attempt some detailing but after reading about the contest judging standards in another thread, I think for the time being I'll concetrate on getting a satisfactory finish out of the box.

 2017-09-15_08-15-57 by David Brownlee, on Flickr

Dave

JOIN OUR COMMUNITY!

Our community is FREE to join. To participate you must either login or register for an account.

SEARCH FORUMS
FREE NEWSLETTER
By signing up you may also receive reader surveys and occasional special offers. We do not sell, rent or trade our email lists. View our Privacy Policy.