SEARCH FINESCALE.COM

Enter keywords or a search phrase below:

Pride of the Luftwaffe GB

41784 views
1268 replies
1 rating 2 rating 3 rating 4 rating 5 rating
  • Member since
    January 2015
Posted by BrandonD on Friday, January 26, 2018 12:19 PM

Rigidrider - that work looks great - I love how busy it looks. You're a better man than I am, since I was trying to ignore it altogether on my Dora.

Can't wait to see more!

-BD-

  • Member since
    January 2015
Posted by BrandonD on Friday, January 26, 2018 12:19 PM

A little work with Perfect Plastic Putty and Mr. Dissolved Putty got the wing gun bays sorted. I may fix the rescribe line on the one if it still bothers me when I get home tonight.

I got the cockpit and wheel bays built up, painted and washed, but will shoot a photo after I give them flat clear coats tonight.

The Mr. Paint Steel color on the wings is just to check seams, since metal coats show them so much better.


Untitled

Untitled

Thanks for looking!

-BD-

  • Member since
    November 2003
  • From: Naples, FL
Posted by tempestjohnny on Friday, January 26, 2018 1:36 PM

Just a wee bit of yellow on this one 


  • Member since
    November 2008
  • From: Central Florida
Posted by plasticjunkie on Friday, January 26, 2018 2:28 PM

Looks fantastic TJ. Great looking builds everyone. The wife and I are visiting the grandkids in SC do no modeling for a couple of days.

 GIFMaker.org_jy_Ayj_O


Too many models to build, not enough time in a lifetime!!

  • Member since
    January 2018
  • From: Slidell, LA
Posted by dswebb on Friday, January 26, 2018 4:00 PM

The publisher is listed as: Specialty Pr Pub & Wholesalers.


Bish
 
dswebb

Best books I've read on the Fw 190 are the three:

Focke-Wulf Fw 190, Vol. 1: 1938-1943

Focke-Wulf Fw 190, Vol. 2: 1943-1944

Focke-Wulf Fw 190, Vol. 3: 1944-1945

I got all 3 from amazon. They had amazing pictures in them, plus the text was pretty good too. I'd highly recommend them.


Is that the ones from Classic Publications. I have a couple of those on other aircraft, they are really useful.


 Doug

Slidell, LA

  • Member since
    July 2014
Posted by modelcrazy on Friday, January 26, 2018 4:51 PM

Slowly working the Dora, very slowly. I got the underside painted and now it's time for the decals....mabe next month LOL.

Steve

Building a kit from your stash is like cutting a head off a Hydra, two more take it's place.


http://www.spamodeler.com/forum/

  • Member since
    July 2014
Posted by modelcrazy on Saturday, January 27, 2018 3:30 PM

I started on the underside stripes. Since the decals come in three sections tying a few lines together with carrier film I cut them individually to cut down on silvering. The problem is getting them straight, evenly separated and fight the optical illusion at the same time, I hope I got it, at least this half.

They are still a little wrinkly due to the setting solution.

Steve

Building a kit from your stash is like cutting a head off a Hydra, two more take it's place.


http://www.spamodeler.com/forum/

  • Member since
    November 2003
  • From: Naples, FL
Posted by tempestjohnny on Sunday, January 28, 2018 5:31 AM

modelcrazy

I started on the underside stripes. Since the decals come in three sections tying a few lines together with carrier film I cut them individually to cut down on silvering. The problem is getting them straight, evenly separated and fight the optical illusion at the same time, I hope I got it, at least this half.

They are still a little wrinkly due to the setting solution.


ahh looks like a flying candy canePropeller


  • Member since
    December 2002
  • From: Bury St Edmunds, Suffolk, England
Posted by Bish on Sunday, January 28, 2018 5:33 AM

Thats comeing on really well Steve.

TJ, nice description Big Smile

I am a Norfolk man and i glory in being so


On the bench: Airfix 1/72nd Harrier GR.3/Fujimi 1/72nd Ju 87D-3

  • Member since
    October 2008
  • From: Georgia
Posted by Rigidrider on Sunday, January 28, 2018 10:47 AM

Coming along nicely Steve... I did one a few years back, and painted the underside white first since I figured that dark would cover the light better, But had a hell of a time keeping spaced correctly. I had to start in the middle and work my way out in both directions to get it even in the end. Good Luck! 

When Life Hands You A Bucket Of Lemons...

Make Lemonade!

Then Sell It Back At $2 Bucks A Glass...

  • Member since
    October 2008
  • From: Georgia
Posted by Rigidrider on Sunday, January 28, 2018 11:08 AM

Chad, PJ, TJ... Thanks guys... I guess I could have left it as it was, but some of the Club brothers and sisters are "Rivet counters" and They really have shown and taught me some things that I thought didn't really matter. And besides that, its fun to watch them check things over and have no points to make! lol...I had 1 guy tell me one time that the flaps should have been in a different position because the stick was in a certain position. I get a kick out of it though... Any way, A bit more from me!

Bottom wing on and surprisingly no gaps.

I guess it does give it a realistic feel with the plumbing showing through the left out wheel bay pieces.

upper wings going on with just the slightest hint of putty work to be done.

starboard wing about the same..

Gear down and locked...

And you can see where the little bit of putty was, Same on the other side. Well, I'll let this set for awhile now.

Take care all! 

Doug

When Life Hands You A Bucket Of Lemons...

Make Lemonade!

Then Sell It Back At $2 Bucks A Glass...

  • Member since
    April 2006
  • From: ON, Canada
Posted by jgeratic on Sunday, January 28, 2018 11:21 AM

tempestjohnny


modelcrazy

I started on the underside stripes. Since the decals come in three sections tying a few lines together with carrier film I cut them individually to cut down on silvering. The problem is getting them straight, evenly separated and fight the optical illusion at the same time, I hope I got it, at least this half.

They are still a little wrinkly due to the setting solution.


ahh looks like a flying candy canePropeller


... eye candy for sure, looks great!

regards,

Jack

  • Member since
    April 2015
Posted by Mopar Madness on Sunday, January 28, 2018 11:25 AM

Those stripes are looking great!

Chad

God, Family, Models...

At the plate: 1/48 Airfix Bf109 & 1/35 Tamiya Famo

On deck: Who knows!

  • Member since
    July 2014
Posted by modelcrazy on Sunday, January 28, 2018 12:49 PM

Thanks so much guys.

Doug, I didn't go that far on my Dora LOL. That is looking sweet!

I completed the stripes. Now on the the rest of the decals. Hopefully the small amount of silvering will go away after another coat of gloss. That is some serious optical illusion going on there.


Steve

Building a kit from your stash is like cutting a head off a Hydra, two more take it's place.


http://www.spamodeler.com/forum/

  • Member since
    April 2015
Posted by Mopar Madness on Sunday, January 28, 2018 1:20 PM

Those white decals seem to cover that red very well without any transparency.  You must bring this one next week!  

Chad

God, Family, Models...

At the plate: 1/48 Airfix Bf109 & 1/35 Tamiya Famo

On deck: Who knows!

  • Member since
    July 2014
Posted by modelcrazy on Sunday, January 28, 2018 1:45 PM

Thank you Chad. I should be done with it by then.

Steve

Building a kit from your stash is like cutting a head off a Hydra, two more take it's place.


http://www.spamodeler.com/forum/

  • Member since
    April 2005
  • From: Australia
Posted by taxtp on Sunday, January 28, 2018 8:48 PM

Nice work MC, thats a pretty tough decal job.

Cheers

Tony

I'm just taking it one GB at a time.

  • Member since
    April 2013
Posted by SchattenSpartan on Sunday, January 28, 2018 9:56 PM

I'm finally done with moving to my new place (takes forever if you only have half a day each week to do it on)

I haven't posted anything on here for a while now, bit I've been keeping an eye on all the excellent builds in this thread.

Really makes me want to start on mine...

  • Member since
    December 2002
  • From: Bury St Edmunds, Suffolk, England
Posted by Bish on Monday, January 29, 2018 2:13 AM

Steve, thats really well done and ye, those white decals have gone down very well on thered.

I am a Norfolk man and i glory in being so


On the bench: Airfix 1/72nd Harrier GR.3/Fujimi 1/72nd Ju 87D-3

  • Member since
    November 2003
  • From: Naples, FL
Posted by tempestjohnny on Monday, January 29, 2018 5:10 AM
Looks great Steve


  • Member since
    September 2014
Posted by rooster513 on Monday, January 29, 2018 6:34 AM

Steve - Those stripes came out really well! That takes a lot of patience to get right.

TJ - That paint job is just beautiful!

Doug - Contruction looks like it came out really clean! Nice work. I've taken a page from your book on my build and added the landing gears before paint. I havn't done this before but thought I would give it a try.

-Andy

  • Member since
    September 2011
  • From: Milaca, Minnesota
Posted by falconmod on Monday, January 29, 2018 12:07 PM

1/72 scale 190 update.    Got it primed and masked for the yellow paint.  decided to paint the yellow rather than use the decals, I think it looks better.

Now on to camo colors and mottling.

John

On the Bench: 1/72 Ki-67, 1/48 T-38

1/144 AC-130, 1/72 AV-8A Harrier

  • Member since
    July 2014
Posted by modelcrazy on Monday, January 29, 2018 12:08 PM

Tony, Bish, TJ and Andy, thanks.

I finished the decals and going to let everthing dry for a while before moving on to the washes.

Steve

Steve

Building a kit from your stash is like cutting a head off a Hydra, two more take it's place.


http://www.spamodeler.com/forum/

  • Member since
    December 2002
  • From: Bury St Edmunds, Suffolk, England
Posted by Bish on Monday, January 29, 2018 12:23 PM

John, good idea painting the yellow, that look great.

I am a Norfolk man and i glory in being so


On the bench: Airfix 1/72nd Harrier GR.3/Fujimi 1/72nd Ju 87D-3

  • Member since
    December 2002
  • From: Bury St Edmunds, Suffolk, England
Posted by Bish on Monday, January 29, 2018 12:27 PM

Steve, good to see her on her legs and with the decals on. Looks sweet.

I am a Norfolk man and i glory in being so


On the bench: Airfix 1/72nd Harrier GR.3/Fujimi 1/72nd Ju 87D-3

  • Member since
    January 2015
Posted by BrandonD on Monday, January 29, 2018 1:06 PM

Doug - that Dora is looking MEAN. I love it. It's almost makingmy like Doras :)

Steve - same deal with almost making me like Doras. That underside is flawless, and I really like the paint up top, too.

John - A breath of fresh Anton! Nice job painting the stripes. I much prefer paint to decals when I can, and you nailed it.

-BD-

  • Member since
    January 2015
Posted by BrandonD on Monday, January 29, 2018 1:06 PM

Got a lot done on the Dora over the weekend.

Turns out I'm a jerk to myself. I went to pull the PE harness off the fret in my kit, and it's missing. I looked over at my almost-finished Tamiya Fw-190A-3 and remembered robbing it to put in there, thinking I'd buy a fabric harness when it came time to do the Dora.

So, since I didn't want to wait, I went to my stash and grabbed my Eduard Fw-190A-9 to rob the harness out of it...and it was gone because I used it in a Bf-109 at some point. So I just took the next step and robbed a harness from another 109 I have in the stash, and when I go to build it, the cycle will certainly continue.

Anyway, I got the cockpit done, painted with Tamiya German Grey, then washed with The Detailer and flat cleared it.

Untitled

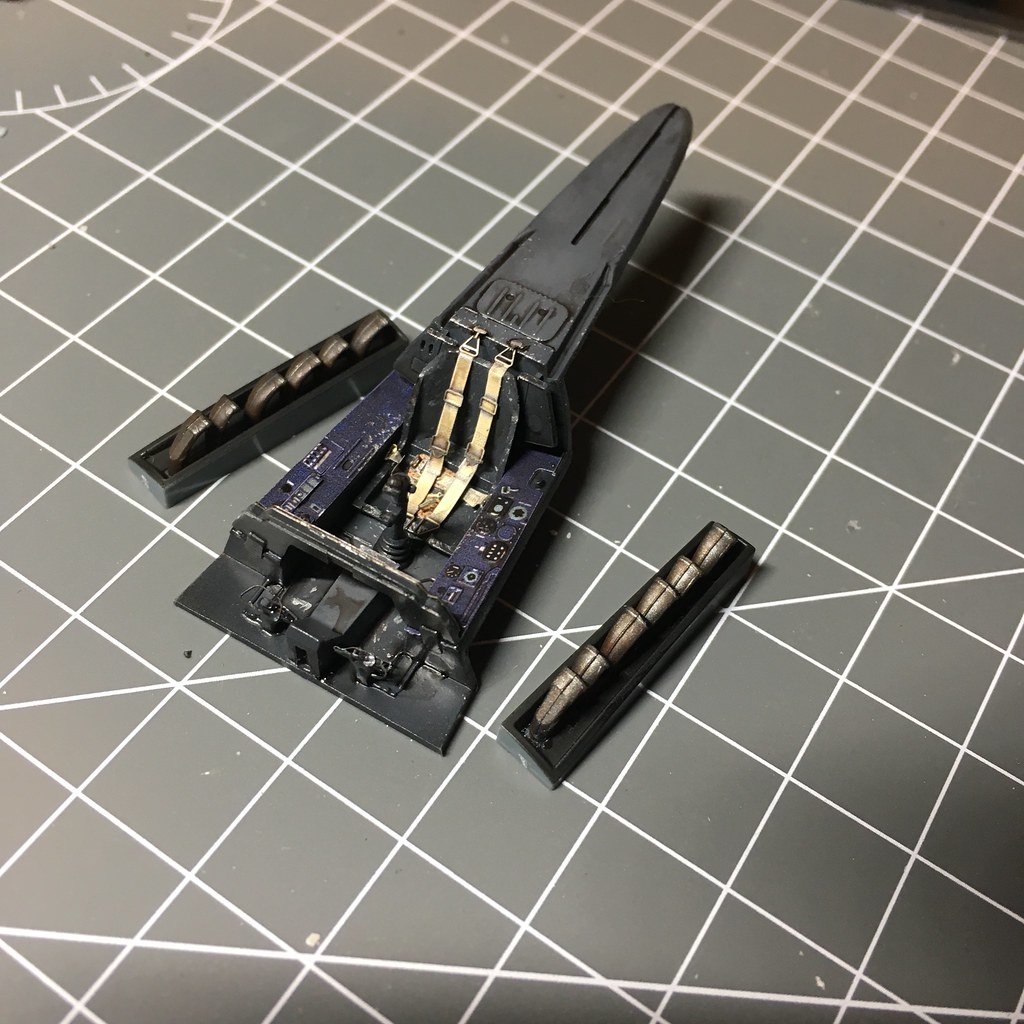
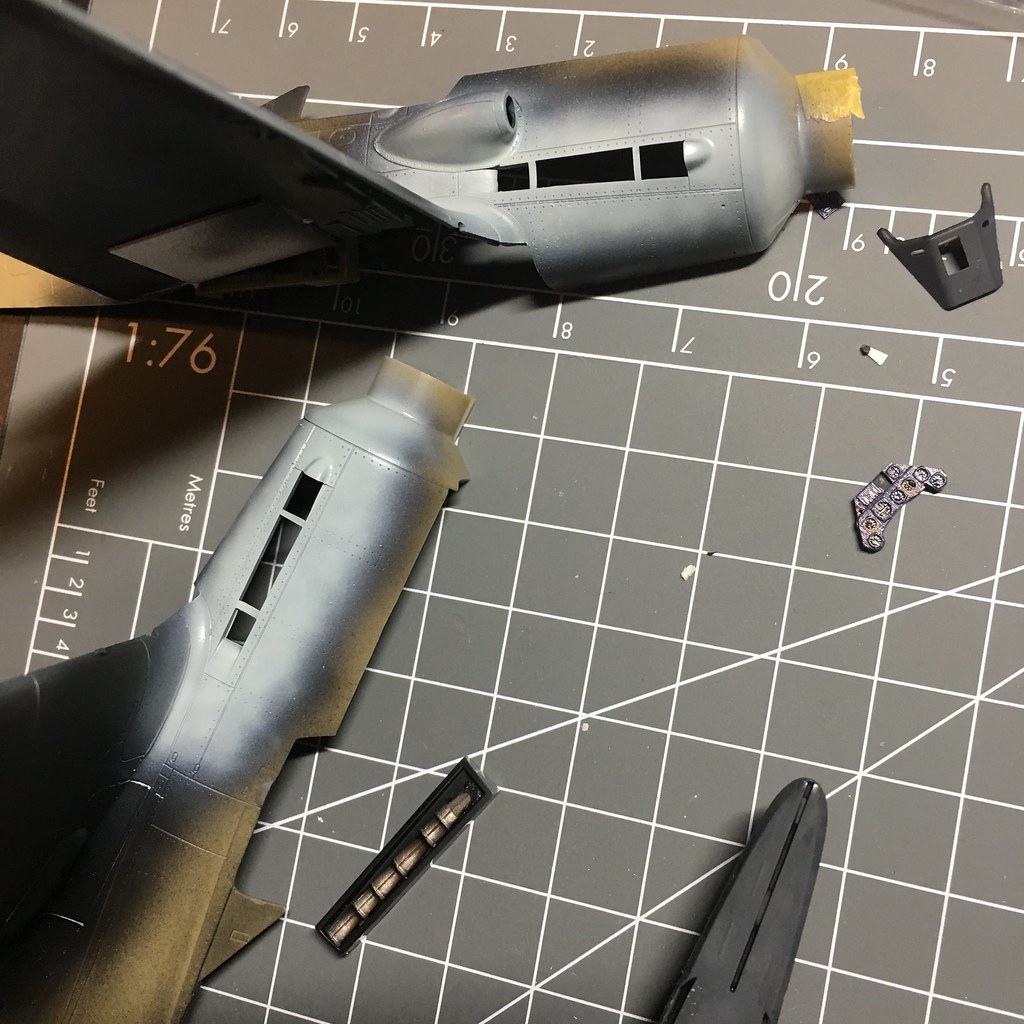
I painted the area around the exhaust pipes before installing them, since I don't want to mess around with masking them, and I'll blend it together with the rest of the paint job when I get to painting the whole thing. Exhaust were painted Mr. Paint Steel, then washed with a Vallejo Rust Streaks wash and then hit with a mist coat of Steel to tone them back. I'll use some black pigments on the tips later on.

Untitled

Next up, I got the innards installed, which were painted with Mr. Paint RLM 02, Tamiya Dark Iron and Testors Silver for the rear of the engine parts and gear bays.

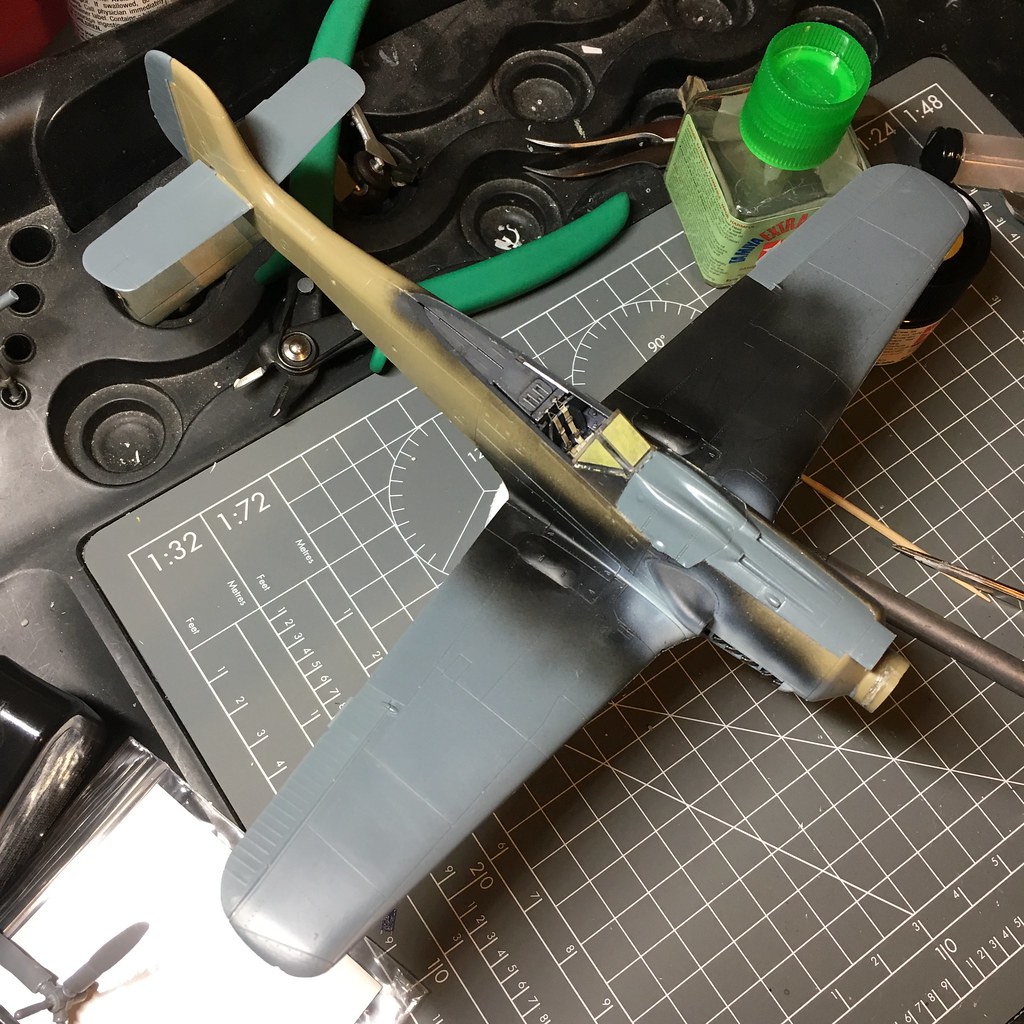
I ran into fit issues with the wings and spent about 45 minutes installing the lower wing, gluing it, holding itin place until it set and moving on. Tamiya Extra Thin Cement was really good to me, and I only have a couple of minor steps on the leading edges of the wings where it will be easy to sand smooth.

The top panels didn't fit amazingly, but I got them where they need to be, and the windscreen fit was perfect.

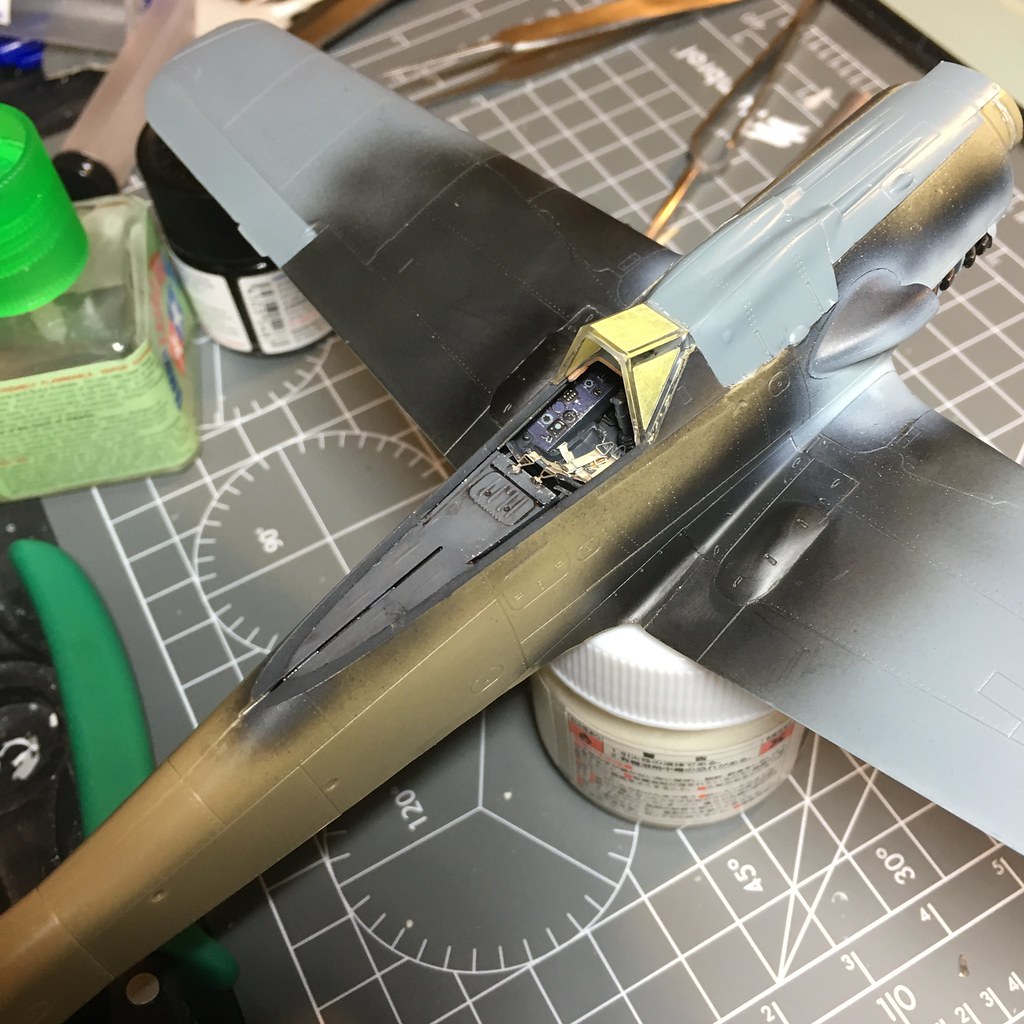
Next step is to sand the seams, all of which are hopefully not going to require filler, and then finish up the headrest assembly, mask the canopy and install it. I'm hoping to get it into primer tonight or tomorrow.

Untitled

Untitled

Looks like I need to paint the control stick handle, too.

-BD-

  • Member since
    April 2015
Posted by Mopar Madness on Monday, January 29, 2018 1:42 PM

John - The painted unit stripes look much better than the decal! 

Steve - It’s hard to believe that 190 is only 1/72 scale! 

Brandon - Those exhaust tips look great. I’m glad this aircraft is getting a decent report, I have a few in the stash that I’m dying to put together. 

Chad

God, Family, Models...

At the plate: 1/48 Airfix Bf109 & 1/35 Tamiya Famo

On deck: Who knows!

  • Member since
    November 2003
  • From: Naples, FL
Posted by tempestjohnny on Tuesday, January 30, 2018 8:16 AM

Markings are on.


  • Member since
    December 2002
  • From: Bury St Edmunds, Suffolk, England
Posted by Bish on Tuesday, January 30, 2018 9:00 AM

Really nice work there BD, pit is looking great.

Johnny, looks really nice with the decals on and those yellow markings.

I have fallen a bit behind on mine. I was hoiping to post an update with completed decals last night, but they have not been compliant. I need to re-paint the tailtonight and hopefully cxan get the last decals on tomorrow.

I am a Norfolk man and i glory in being so


On the bench: Airfix 1/72nd Harrier GR.3/Fujimi 1/72nd Ju 87D-3

JOIN OUR COMMUNITY!

Our community is FREE to join. To participate you must either login or register for an account.

SEARCH FORUMS
FREE NEWSLETTER
By signing up you may also receive reader surveys and occasional special offers. We do not sell, rent or trade our email lists. View our Privacy Policy.