SEARCH FINESCALE.COM

Enter keywords or a search phrase below:

Pride of the Luftwaffe GB

41776 views
1268 replies
1 rating 2 rating 3 rating 4 rating 5 rating
  • Member since
    September 2011
  • From: Milaca, Minnesota
Posted by falconmod on Friday, February 2, 2018 6:52 AM

Got some painting done on my 1/72 190 F-8

Now for some mottling!

John

On the Bench: 1/72 Ki-67, 1/48 T-38

1/144 AC-130, 1/72 AV-8A Harrier

  • Member since
    September 2014
Posted by rooster513 on Friday, February 2, 2018 9:50 AM

PJ - I really like the chipping effect you achieved there!

Finally got a couple pictures of my progress. Main construction done and got a coat of primer on it. This was my first time using stynlrez primer and so far I'm pretty happy with it, went down nice and smooth. They suggest a .5mm needle but I was able to shoot it through my .35mm with out too much trouble. 

RLM 02 was shot where it was needed and next up with be the topside camo!

-Andy

  • Member since
    September 2014
Posted by rooster513 on Friday, February 2, 2018 9:58 AM

Nice camo John! Mottling in that scale is always so much fun!Wink

-Andy

  • Member since
    September 2011
  • From: Milaca, Minnesota
Posted by falconmod on Friday, February 2, 2018 10:04 AM

rooster513

Nice camo John! Mottling in that scale is always so much fun!Wink


Thanks,  Ya I know what you mean,  I'm going to use a stencile attached to a popsicle stick and move it along the side spraying through it as I go.  Done it before and it works pretty well,   you get a very slightly feathered edge and no air brush splatter. Propeller

John

On the Bench: 1/72 Ki-67, 1/48 T-38

1/144 AC-130, 1/72 AV-8A Harrier

  • Member since
    April 2006
  • From: ON, Canada
Posted by jgeratic on Friday, February 2, 2018 11:49 AM

John, that is interesting you masked both top colours individually.  Was that to cut down on paint layers, or to get those lighter streaks in between the main colours?

regards,

Jack

  • Member since
    September 2011
  • From: Milaca, Minnesota
Posted by falconmod on Friday, February 2, 2018 12:32 PM

jgeratic

John, that is interesting you masked both top colours individually.  Was that to cut down on paint layers, or to get those lighter streaks in between the main colours?

regards,

Jack


the lighter shades between the two colors was a mistake on my part, I used poster sticky stuff (the green stuff) for the masks so that I would get a thin feathered edge between them.  I apparently didn't pull  the sticky tack back far enough, I'll have to go over it again to get rid of the line between them.

I think in retrospec I should have sprayed the lightest color first without the masks then put them on and sprayed the dark color.  not sure what I was thinking.

John

"And now for something completely different"

On the Bench: 1/72 Ki-67, 1/48 T-38

1/144 AC-130, 1/72 AV-8A Harrier

  • Member since
    January 2015
Posted by BrandonD on Friday, February 2, 2018 1:04 PM

falconmod


jgeratic

John, that is interesting you masked both top colours individually.  Was that to cut down on paint layers, or to get those lighter streaks in between the main colours?

regards,

Jack


the lighter shades between the two colors was a mistake on my part, I used poster sticky stuff (the green stuff) for the masks so that I would get a thin feathered edge between them.  I apparently didn't pull  the sticky tack back far enough, I'll have to go over it again to get rid of the line between them.


I think in retrospec I should have sprayed the lightest color first without the masks then put them on and sprayed the dark color.  not sure what I was thinking.

John

"And now for something completely different"


I used to hate soft-edged camo because of what I thought was the need to do careful masking, but now it's the opposite, and I hate hard-edged camo.

For the soft-edged stuff, I can't emphasize enough how glad I am that I took the time to practice with the right tools to get to the point where I can freehand it. When I first saw people doing it, I thought "Nope. No way. Way too hard," but once I got past the fear and tried it, it took some getting used to, but it's the best way to go, IMO.

I use a Sotar 20/20 with a 0.2mm nozzle, and my paint mixes are as follows (I mix all of them with Mr. Levelling Thinner, but the same ratios are good with Tamiya Lacquer Thinner, in my experience):

Model Master Enamels: 2:1 thinner to paint
Gunze Mr. Color: 4:1 thinner to paint
Tamiya acrylics: 2:1 or 3:1 thinner to paint
Mr. Paint: I rarely thin, as it's pre-thinned, but sometimes I do for amist coat

I shoot at 15PSI for the up-close stuff, sometimes dropping it to 10PSI if I need to be really close. The key is to thin the paint to a point where it almost runs, but not quite.

The following planes are 1/48.

This is Kitty Hawk's Super Etendard painted with Model Master enamels. I shot it tighter (closer to the model, about 1/2 inch to 1 inch and about 18PSI) since I wanted a sharper line.

Untitled

Untitled
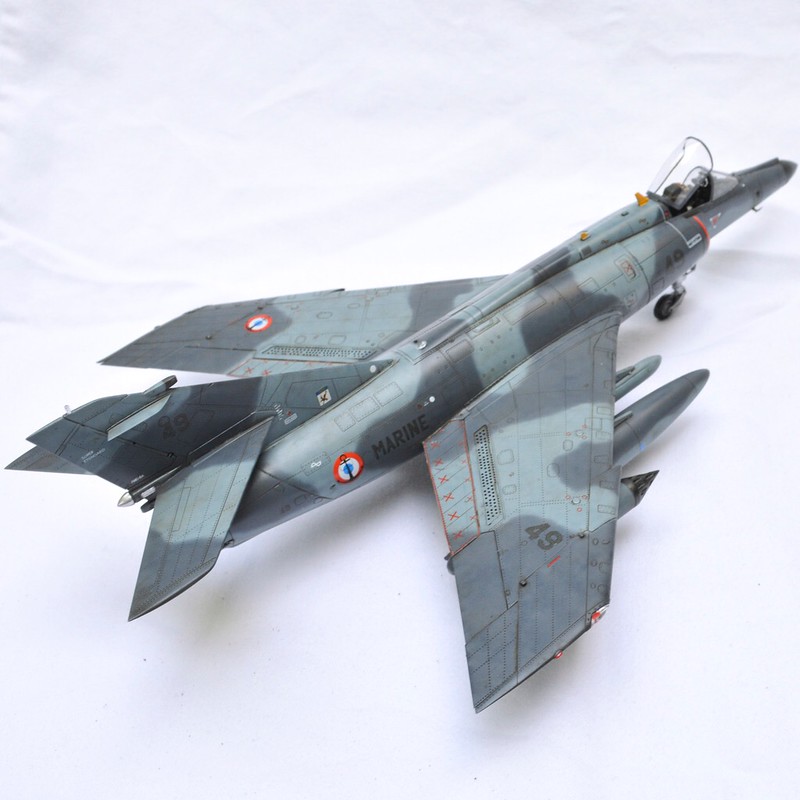
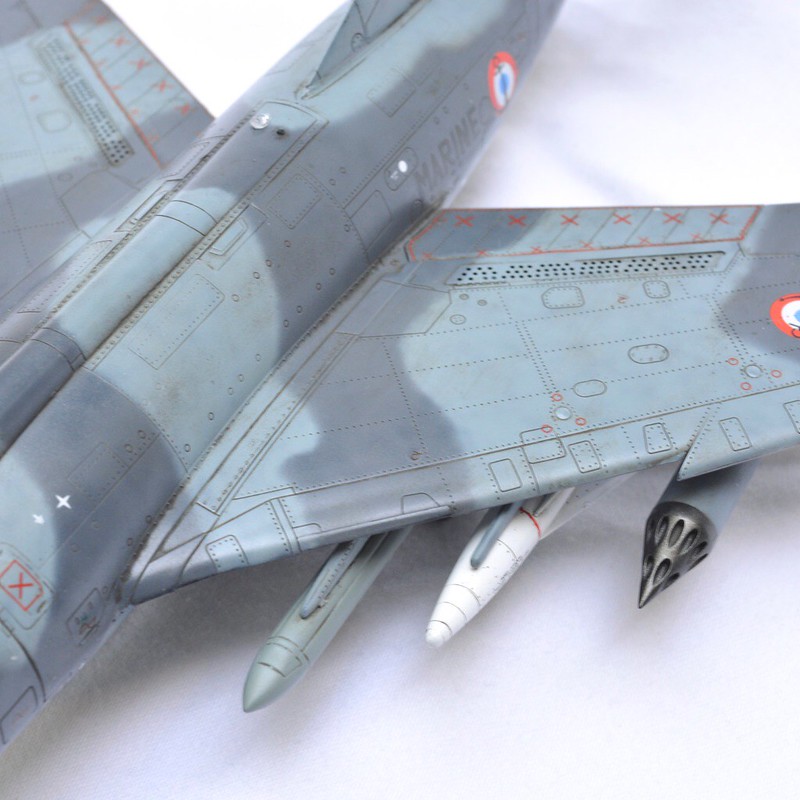
The key to getting a sharp-ish line is to angle the paint flow inward to the color you're painting so any overspray carries over to the part where it's going to be that color anyway.

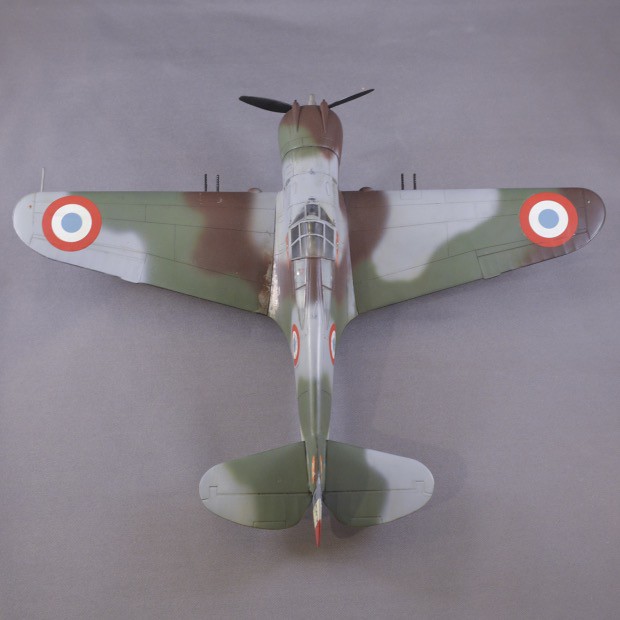
For this Hobbycraft P-36, I wanted a more feathered edge, so I pulled the spraying back a bit, and held it at about a 90-degree angle to the surface to get a softer edge.

Untitled

For Tamiya's P-47 Razorback, I had to use tape on the cowl rudder and invasion stripes (though you can make a good argument for NOT making the stripes hard-edged) but then free-handed the rest with Tamiya paints.

P-47 04

Now, in keeping with this build subject, I'll show my 1/72 Airfix Fw-190 that was kind of the bane of my existence due to the smaller scale.

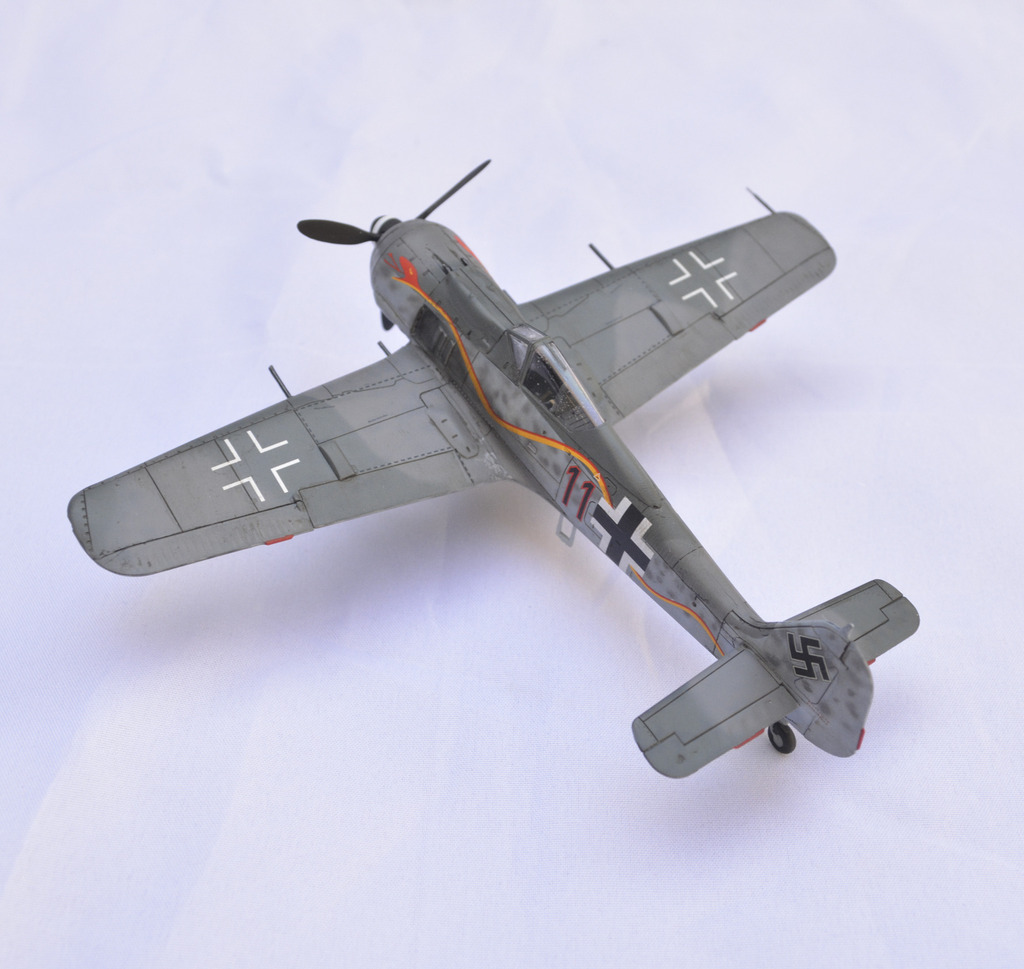
For this one, I used tape for the hard-edged upper/lower fuselage demarcation line, but then freehanded the RLM 74 and 75 where they meet, as well as the mottling. I totally messed up the mottling on the tail and made one spot WAY too big, but the beauty of freehanding soft-edged stuff is that you can just come back with the other color, overspray the error and fix as needed. For the 1/72 mottling, I was at 3.5:1 thinner:paint, 10PSI indicated (so about 8 when actually spraying) and was holding really close to the model.

Hopefully this doesn't come off as my trying to push my way of doing it or seeming like a know-it-all (because I've learned a ton in this thread alone and still have a LONG way to go), but I found that I hated using Blu Tac because I ran into the snag you have with the lighter color, and I found I got inconsistent results because I am not good at pressing the Blu Tac "worms" down consistently, and some of it ends up being hard-edges, while some ends up being soft-edged.

-BD-

  • Member since
    April 2015
Posted by Mopar Madness on Friday, February 2, 2018 1:28 PM

Howdy friends!  Those 190's are looking good guys!  Update #2.  The fuselage has been closed up and the wings attached.  This is where I've ran into my first snag.  I have never made an Fw190 and had the fuselage and wings go together without issue.  No matter the manufacturer.  So, with this one, I had to get creative with the clamps.  I'm sure its builder error.  Also, the wings have a unfortunate seam along the leading edge when combined.  But, I'm still VERY pleased with this kit.  Landing gear is next.

Chad

God, Family, Models...

At the plate: 1/48 Airfix Bf109 & 1/35 Tamiya Famo

On deck: Who knows!

  • Member since
    December 2002
  • From: Bury St Edmunds, Suffolk, England
Posted by Bish on Friday, February 2, 2018 2:42 PM

I have fallen behind a touch so time for soome catching up. So after masking and painting the RLM 71 on top i then did the same for the 65 on the sides and underneath.

Then came the fun part, decals. As i mentioned before, this is my first tamiya aircraft. I have bult plenty of their armour kits with no decals issues. And i hope the ones for this kit on not a reflection of their usuall aircraft decals because they were, as we would say in Blighty, bloody awful. Half of them broke. I applied the underwing decals which also broke up, but after applying i realised they were to big. So i removed them and replaced them from the decal stash. I also applied the swastika as per instructions so it was over lapping onto the rudder. I then found a pic of White 5, bloody typical, and saw this was wrong. So after removing the decals, which had been in place over 24 hours, i had to re-paint the tail and apply new decals, also from the decal stash. So that was a fune 5 days. Bang Head

I also did some work on the base. After the sides wdere stained and varnished, i added the celluclay. This will get a light dry brush and then i will add the grass this weekend.

The winch and crate have also been painted. I could not quite make out the colour of the inside of the crate from the photo. Not sure if its painted a light colour or bare wood. So i painted it buff.

And finally, got started on the tail stand. I was not to worried about it looking a bit rough given that it was knocked up in the workshops. I am thinking about putting some wood on top as i don't think the metal frame of the aircraft would be put straight onto a metal stand.

And thats it for now. I had hoped this would have been completed by last weekend, but you know what they say, perfection can't be rushed right Big Smile. Hopfully i will have it done by early next week.


I am a Norfolk man and i glory in being so


On the bench: Airfix 1/72nd Harrier GR.3/Fujimi 1/72nd Ju 87D-3

  • Member since
    April 2015
Posted by Mopar Madness on Friday, February 2, 2018 2:51 PM

She’s coming along Bish!  I agree with the wood atop the tail stand.  Quick question, have you had an opportunity to build the equivalent Airfix 109?  Based on what I can see, the Tamiya kit looks better eventhough it’s older. 

Chad

God, Family, Models...

At the plate: 1/48 Airfix Bf109 & 1/35 Tamiya Famo

On deck: Who knows!

  • Member since
    December 2002
  • From: Bury St Edmunds, Suffolk, England
Posted by Bish on Friday, February 2, 2018 3:10 PM

Cheers MM. No, i have not got any of the Airfix ones. All the ones they have released recently i already have by other brands. But it would not surprise me if the tamiya kit looked nicer, Airfix has improved, but they still have a way to go to match the likes of tamiya, but then their prices don't compare either.

I am a Norfolk man and i glory in being so


On the bench: Airfix 1/72nd Harrier GR.3/Fujimi 1/72nd Ju 87D-3

  • Member since
    September 2014
Posted by rooster513 on Friday, February 2, 2018 3:30 PM

BD - Thanks for posting a run down of how you do the free hand. I've tried it once but got too much overspray. As you said, I think it just takes a lot of practice.

Chad - Construction looks like it's coming along nicely!

Bish - Paint looks great and the decals came out nice despite you troubles. I'm really looking forward to seeing the dio come together!

-Andy

  • Member since
    December 2002
  • From: Bury St Edmunds, Suffolk, England
Posted by Bish on Friday, February 2, 2018 3:49 PM

Cheers Andy, its starting to take shape now. Just need to get a ladder together and some tools.

I am a Norfolk man and i glory in being so


On the bench: Airfix 1/72nd Harrier GR.3/Fujimi 1/72nd Ju 87D-3

  • Member since
    October 2008
  • From: Georgia
Posted by Rigidrider on Friday, February 2, 2018 6:09 PM

Andy, Bish, John... Paint is looking great! Thats what I like about these two aircraft and their variants... Theres only about 60,000 to choose from! Love em!

When Life Hands You A Bucket Of Lemons...

Make Lemonade!

Then Sell It Back At $2 Bucks A Glass...

  • Member since
    November 2008
  • From: Central Florida
Posted by plasticjunkie on Friday, February 2, 2018 6:22 PM

Chad, that gap is no biggie. Either take some PPP to it or stretched sprue and Tenax to melt it and seal the gap.

Bish

Great job on the diorama items. The Emil looks stunning.

A little update on Dora. Got the canopy mask removed

Spiral's done

Tail band sprayed

RLM02 sprayed in the flap wells

Salt chipping done

other side

Several coats of Future are next


 GIFMaker.org_jy_Ayj_O


Too many models to build, not enough time in a lifetime!!

  • Member since
    October 2008
  • From: Georgia
Posted by Rigidrider on Friday, February 2, 2018 6:30 PM

Mopar... Crusing right along! Shes looking good.

PJ, Thank you! whats the accent color on yours going to be? 

Brandon... Thats a fine collection! Each and every one very well done. I'm working on one on the side (a friend asked me to build) of a downed Bf109E in a wheat field, with the pilot being captured by the farmers. He said his great uncle took place in the capture. The hold up is the fartm figures, #1 there are darn few available, and #2 the ones available are blinking costly. Should have thought to take pictures for this build, but wasn't thinking far enough ahead. If OK with Andy I'll just post finished pictures, not to be considered part of the GB.

OK some more on my end...

I got the campaign band on. I'm trying to stay close as possible to the picture I'm working from.

Thats about it for now... Thanks all and take care!

Doug

OH... Replaced my florescent Lighting with an LED fixture I found on sale at Home Depot today... I LOVE it, maybe I'll be able to see what I'm doing now! 

When Life Hands You A Bucket Of Lemons...

Make Lemonade!

Then Sell It Back At $2 Bucks A Glass...

  • Member since
    November 2008
  • From: Central Florida
Posted by plasticjunkie on Friday, February 2, 2018 6:58 PM

[quote user="Rigidrider"]


PJ, Thank you! whats the accent color on yours going to be? 

[quote]


You are welcome Doug but what do you mean by accent color? 

 GIFMaker.org_jy_Ayj_O


Too many models to build, not enough time in a lifetime!!

  • Member since
    October 2008
  • From: Georgia
Posted by Rigidrider on Friday, February 2, 2018 7:23 PM

PJ, I;m sorry... I can see them now, (The greys) When I first looked I didn't see you had already applied until I opened the picture and blew it up a bit. (DUH) Maybe I need new glasses too. What I was calling the accent colors are the colors that blend the main camo color. In your case the Green I would call the main color and the grey would be an accent color. Sorry again, Guess I should look closer! lol...

When Life Hands You A Bucket Of Lemons...

Make Lemonade!

Then Sell It Back At $2 Bucks A Glass...

  • Member since
    November 2008
  • From: Central Florida
Posted by plasticjunkie on Friday, February 2, 2018 7:41 PM

Rigidrider

PJ, I;m sorry... I can see them now, (The greys) When I first looked I didn't see you had already applied until I opened the picture and blew it up a bit. (DUH) Maybe I need new glasses too. What I was calling the accent colors are the colors that blend the main camo color. In your case the Green I would call the main color and the grey would be an accent color. Sorry again, Guess I should look closer! lol...


No worries. The colors are RLM75,76 and 83.  The grey 75  and green 83 seem like an odd combo. It also has a soft spotted 75 over 83 scheme on the forward nose. The flash actually drowns the RLM 75 down. 

 GIFMaker.org_jy_Ayj_O


Too many models to build, not enough time in a lifetime!!

  • Member since
    April 2006
  • From: ON, Canada
Posted by jgeratic on Friday, February 2, 2018 11:04 PM

Bish, coming along very nicely  that Emil.  Have heard Tamiya decals are thick, but that yours actually broke and that some were the wrong size does rasie an eyebrow.


PJ, great close up shots of the details, but that spiner and spiral look awesome.


Doug, really like that colour combination - very different.


-----------------------


About the question on Airfix 1/72 109e quality - it builds up nice, but it has a few nigggles.  One problem  on my example was the missing wing root detail on the starboard fuselage.  They seem to have corrected this, as some have the same kits or later boxing, and do not have this issue:

Another was the panel lines disappearing on the top and bottom of the fuselage halves:

The other detail was on the underwing, which is just minor - repositioning of a panel line on each wing and filling panel lines that had been extend in both the forward and trailing edges.  Mind you, Tamiya did the same detail on their trailing edge.

... and the finished build from a couple years ago:

regards,

Jack

  • Member since
    December 2002
  • From: Bury St Edmunds, Suffolk, England
Posted by Bish on Saturday, February 3, 2018 12:57 AM

Thanks Jack, and o ye, i forgot to mention that one, they are a bit thick as well.

Nic info on the Airfix kit. They are re-releaseing the E-4 later this year, i am guessing different markings. In fact, this years new releases seem to be mostly re-releases of new toled kit but with different decals or new variants of subjects released ove rthe last few years., Not many new tools to look forward to.

I am a Norfolk man and i glory in being so


On the bench: Airfix 1/72nd Harrier GR.3/Fujimi 1/72nd Ju 87D-3

  • Member since
    December 2002
  • From: Bury St Edmunds, Suffolk, England
Posted by Bish on Saturday, February 3, 2018 12:59 AM

Thanks PJ. Great paint job on the Dora. Really like how the chipping has come out.

I am a Norfolk man and i glory in being so


On the bench: Airfix 1/72nd Harrier GR.3/Fujimi 1/72nd Ju 87D-3

  • Member since
    December 2002
  • From: Bury St Edmunds, Suffolk, England
Posted by Bish on Saturday, February 3, 2018 1:00 AM

Cheers Doug. Very nice job on the svheme there, really like the colour and great job on the mottling.

I am a Norfolk man and i glory in being so


On the bench: Airfix 1/72nd Harrier GR.3/Fujimi 1/72nd Ju 87D-3

  • Member since
    November 2008
  • From: Central Florida
Posted by plasticjunkie on Saturday, February 3, 2018 8:37 AM

Jack

Great looking Emil! The missing wing root detail can be added witha thin strip of plastic sheet and Tenax then add the rivet details. The vanishing panel lines are easy fixes but both should have never hapenned. Quality control was not apparently present.

The decals looked ok but the spiral disintegrated in the water earlier. Decals are from 2005 and are not that old. I''ve used 20 year old decals and have been just fine.

I brushed Superfilm over the decals in hopes of saving them and should work. I will start decaling later today or tomorrow. I used a spiral from another decal sheet in my spares. If the decals don't hold up then I will have to order the markings from Ebay which I have seen.

 GIFMaker.org_jy_Ayj_O


Too many models to build, not enough time in a lifetime!!

  • Member since
    October 2008
  • From: Georgia
Posted by Rigidrider on Sunday, February 4, 2018 9:41 AM

Thanks Jack... Thats what caught my eye on this one. It was a picture on a Strike Eagle decal sheet.

Bish, Thank you! Your about done and I'm so looking forward to a Bish signature dio! 

Well heres more from me... Decals done and starting on the weathering.

And thats about all fon now... Likely finish up monday...

Take care all!

Doug

When Life Hands You A Bucket Of Lemons...

Make Lemonade!

Then Sell It Back At $2 Bucks A Glass...

  • Member since
    April 2006
  • From: ON, Canada
Posted by jgeratic on Sunday, February 4, 2018 11:53 AM

Thank you PJ.  Is Tenax less hot than liquid cement?  Your mention of the root wing detail fix is what I intially thought of doing, but from past experience, a thin strip of plastic sheet tends to just melt.

Doug, nice grunging up of the undersides.

regards,

Jack

  • Member since
    November 2008
  • From: Central Florida
Posted by plasticjunkie on Sunday, February 4, 2018 12:22 PM

jgeratic

Thank you PJ.  Is Tenax less hot than liquid cement?  Your mention of the root wing detail fix is what I intially thought of doing, but from past experience, a thin strip of plastic sheet tends to just melt.

regards,

Jack


You are welcome Jack. Tenax and Plast I Weld are very hot and will melt plastic creating a solid bond. I use a Toucn N Flow applicator to apply these very thin glues that weld the parts together. On thin gaps I run the Touch N Flow applicator along the gap and it is magically closed. The strip fix is tricky when using Tenax. It can be done usinfg the Touch N Flow applicator and a VERY light use to tack it down then run some Tamiya thin to secure things. 

I also use it on seams that somehow surface when you think it was good to go. Again I use the Touch N Flow applicator and run a bead of the solvent cement along the seam and blow on the glue for a few seconds. For some reason the hot breath makes the Tenax or Plast I Weld swell and skin within seconds filling in any imperfection. I let it dry overnight then sand the next day and BAM the nasty stubburn seam is gone. 

 GIFMaker.org_jy_Ayj_O


Too many models to build, not enough time in a lifetime!!

  • Member since
    April 2006
  • From: ON, Canada
Posted by jgeratic on Sunday, February 4, 2018 1:21 PM

Thanks again PJ.  Sounds like the application method is key.  The little brush on the end of the cap probably is too much for small plastic.

regards,

Jack

  • Member since
    December 2002
  • From: Bury St Edmunds, Suffolk, England
Posted by Bish on Sunday, February 4, 2018 1:55 PM

Cheers Doug, i am getting all the detail brought together now.

I am liking the look of that. The scheme could almost be a desert one, i like that.

I am a Norfolk man and i glory in being so


On the bench: Airfix 1/72nd Harrier GR.3/Fujimi 1/72nd Ju 87D-3

  • Member since
    April 2015
Posted by Mopar Madness on Sunday, February 4, 2018 2:25 PM

The underside of that D9 looks great Doug!

Chad

God, Family, Models...

At the plate: 1/48 Airfix Bf109 & 1/35 Tamiya Famo

On deck: Who knows!

JOIN OUR COMMUNITY!

Our community is FREE to join. To participate you must either login or register for an account.

SEARCH FORUMS
FREE NEWSLETTER
By signing up you may also receive reader surveys and occasional special offers. We do not sell, rent or trade our email lists. View our Privacy Policy.