SEARCH FINESCALE.COM

Enter keywords or a search phrase below:

Pride of the Luftwaffe GB

41784 views
1268 replies
1 rating 2 rating 3 rating 4 rating 5 rating
  • Member since
    November 2008
  • From: Central Florida
Posted by plasticjunkie on Thursday, October 12, 2017 3:58 PM

Pinkbooger

This is my first aircraft and there is a seam all the way around where the 2 fuselage pieces come together. Do you putty the whole thing or just visible gaps? do you sand the entire seam? How do you ensure that when you paint it you will not visually see that there was at one time a seam there where two pieces of plastic meet together?


This is when Tenax or Plast I Weld are supreme. I use the Touch N Flow applicator to apply these glues and squeeze the join together crating a small ridge created by the melted plastic that oozes out. I clamp the fuselage and let it dry a few hours. I then sand the entire seam with different grits until the join line is gone. Using this method, I rarely use any filler or putty.

 GIFMaker.org_jy_Ayj_O


Too many models to build, not enough time in a lifetime!!

  • Member since
    March 2017
  • From: Mid Michigan
Posted by shamoo on Thursday, October 12, 2017 1:28 PM

MrStecks

Hey Rooster, add me to the mix.  I'll be doing this Eduard Fw 190A-9.  Smile


Cheers, Mark


I’m looking forward to watching this one. I’ve been debating trying one of their profipack kits. 

  • Member since
    May 2017
  • From: Denver, Colorado
Posted by MrStecks on Thursday, October 12, 2017 1:25 PM

Hey Rooster, add me to the mix.  I'll be doing this Eduard Fw 190A-9.  Smile


Cheers, Mark


On the bench:  Revel 1/48 B-25J Mitchell

In the queue: Tamiya 1/48 F4U-1A Corsair

  • Member since
    July 2014
Posted by modelcrazy on Thursday, October 12, 2017 11:59 AM

I sand the entire seam usually with 600 or higher grit, brush on a primer to check for evidence of a seam and wipe the primer off with denatured alcohol to remove the brush strokes if needed.

Steve

Building a kit from your stash is like cutting a head off a Hydra, two more take it's place.


http://www.spamodeler.com/forum/

  • Member since
    September 2017
Posted by Pinkbooger on Thursday, October 12, 2017 11:54 AM

This is my first aircraft and there is a seam all the way around where the 2 fuselage pieces come together. Do you putty the whole thing or just visible gaps? do you sand the entire seam? How do you ensure that when you paint it you will not visually see that there was at one time a seam there where two pieces of plastic meet together?

"You underestimate the power of the dark side"

-Darth Vader

  • Member since
    September 2011
  • From: Milaca, Minnesota
Posted by falconmod on Thursday, October 12, 2017 11:30 AM

I've used a paper template with very small shapes cut out then pressed up against (but not as close as like tape or post-it notes) the fuselage, then use your AB to shoot the correct color at it.   You still get a faint feathered edge which I think is better than the sharp or blotchy egde you would get with a sponge or brush.  imho


John

On the Bench: 1/72 Ki-67, 1/48 T-38

1/144 AC-130, 1/72 AV-8A Harrier

  • Member since
    July 2014
Posted by modelcrazy on Thursday, October 12, 2017 9:58 AM

So many great ideas. I'll have to try them all on a scrap piece and see how they work.

Steve

Building a kit from your stash is like cutting a head off a Hydra, two more take it's place.


http://www.spamodeler.com/forum/

  • Member since
    April 2006
  • From: ON, Canada
Posted by jgeratic on Thursday, October 12, 2017 9:53 AM

For that 1/144 mottle, another idea might be weathering powders applied with the tip of a fine brush.  It will require some mixing to come up with Luftwaffe shades.   Actually am surprised the market hasn't come up with such colours with the amount of choices out there.

regards,

Jack

  • Member since
    July 2014
Posted by modelcrazy on Thursday, October 12, 2017 9:21 AM

I like the sponge idea. I applied some putty last night and will work on the seams tonight. I'm encited to see how the painting is going to work out.

Steve

Building a kit from your stash is like cutting a head off a Hydra, two more take it's place.


http://www.spamodeler.com/forum/

  • Member since
    August 2015
  • From: the redlands Fl
Posted by crown r n7 on Thursday, October 12, 2017 7:15 AM

Can try a template 


 Nick.

  • Member since
    November 2008
  • From: Central Florida
Posted by plasticjunkie on Thursday, October 12, 2017 6:31 AM

Bish


modelcrazy

I did think about the drybrush idea but not oils, I should try that.

Here is the little guy so far. I had to use a weak clothespin so I didn’t crush it. There are some seam gaps but it's so small just a dab of Mr. Dissolved Putty should take care of it.


This i got to see, mottling on a 144 kit. Your either very brave or very somthing else.


Something that small is going to be a challenge to mottle. I don't believe any ab no matter how fine a tip can work on such a tiny model.

I was thinking of the sponge/foam  technique. Using a small piece of sponge or soft foam held with twizzers and blotted almost dry, then lightly dab it on the fuselage sides to get a soft mottling effect. 


 GIFMaker.org_jy_Ayj_O


Too many models to build, not enough time in a lifetime!!

  • Member since
    December 2002
  • From: Bury St Edmunds, Suffolk, England
Posted by Bish on Thursday, October 12, 2017 1:47 AM

modelcrazy

I did think about the drybrush idea but not oils, I should try that.

Here is the little guy so far. I had to use a weak clothespin so I didn’t crush it. There are some seam gaps but it's so small just a dab of Mr. Dissolved Putty should take care of it.


This i got to see, mottling on a 144 kit. Your either very brave or very somthing else.

I am a Norfolk man and i glory in being so


On the bench: Airfix 1/72nd Harrier GR.3/Fujimi 1/72nd Ju 87D-3

  • Member since
    June 2010
Posted by 5-high on Wednesday, October 11, 2017 9:38 PM

Andy love the badges..modelcrazy thats just .......well you know !!!..lol .rooster i don't see me on the roster. I started on the D-9. as soon as i can remember how to post wip picks i will for all .

5-high 

  • Member since
    April 2015
Posted by Mopar Madness on Wednesday, October 11, 2017 8:59 PM

Lol, I can’t help but laugh at how tiny that fuselage looks pressed between that clothes pin! 

Chad

God, Family, Models...

At the plate: 1/48 Airfix Bf109 & 1/35 Tamiya Famo

On deck: Who knows!

  • Member since
    January 2006
  • From: Earth
Posted by DiscoStu on Wednesday, October 11, 2017 8:10 PM

I’d like to join.  I posted this on the feeler page, not seeing the main thread.  I can contribute either the new tooled Eduard 190a4, or the Eduard 109.  

"Ahh the Luftwaffe. The Washington Generals of the History Channel" -Homer Simpson


  • Member since
    July 2014
Posted by modelcrazy on Wednesday, October 11, 2017 7:21 PM

I did think about the drybrush idea but not oils, I should try that.

Here is the little guy so far. I had to use a weak clothespin so I didn’t crush it. There are some seam gaps but it's so small just a dab of Mr. Dissolved Putty should take care of it.


Steve

Building a kit from your stash is like cutting a head off a Hydra, two more take it's place.


http://www.spamodeler.com/forum/

  • Member since
    April 2015
Posted by Mopar Madness on Wednesday, October 11, 2017 6:13 PM

I’ve seen examples of small scale mottling done with oil paint that looked very convincing.

Chad

God, Family, Models...

At the plate: 1/48 Airfix Bf109 & 1/35 Tamiya Famo

On deck: Who knows!

  • Member since
    April 2015
Posted by Mopar Madness on Wednesday, October 11, 2017 6:00 PM

Those badges are GREAT!

Chad

God, Family, Models...

At the plate: 1/48 Airfix Bf109 & 1/35 Tamiya Famo

On deck: Who knows!

  • Member since
    September 2014
Posted by rooster513 on Wednesday, October 11, 2017 5:44 PM

I wonder if dry brushing with a small paintbrush would be easiest for the mottling? 

-Andy

  • Member since
    January 2016
  • From: A Galaxy Far, Far Away
Posted by Hunter on Wednesday, October 11, 2017 5:26 PM

Hey Andy,

I have to echo Bish....great looking badges.

Hunter 


  • Member since
    March 2017
  • From: Mid Michigan
Posted by shamoo on Wednesday, October 11, 2017 5:09 PM

Count me in!  Airfix Fw-190 A8. It’s going to be a couple weeks before I get started. 

Dave

  • Member since
    September 2013
Posted by blackdog62 on Wednesday, October 11, 2017 4:43 PM

wow modelcrazy thats a small 1. and i thought 1/72 was small. lol

  • Member since
    September 2017
Posted by Pinkbooger on Wednesday, October 11, 2017 3:36 PM

Nice badge. I can't wait to finish this build so I can put it in my signature. Big Smile

"You underestimate the power of the dark side"

-Darth Vader

  • Member since
    September 2013
Posted by blackdog62 on Wednesday, October 11, 2017 2:18 PM

 2017-09-11_06-11-23 by Jerry Richards, on Flickr

the first thing i see is this filler hole is missing. i dont see any older 109s in the forums and i just came across this 1 and a hobby shop that was selling it on consinement for $15 us. so i figuerd why not. should be fun.

  • Member since
    September 2013
Posted by blackdog62 on Wednesday, October 11, 2017 2:14 PM

howdy everyone this is going to be what i start with 2017-09-11_06-15-30 by Jerry Richards, on Flickr

  • Member since
    December 2002
  • From: Bury St Edmunds, Suffolk, England
Posted by Bish on Wednesday, October 11, 2017 1:15 PM

Nice job on the badges Andy.

I am a Norfolk man and i glory in being so


On the bench: Airfix 1/72nd Harrier GR.3/Fujimi 1/72nd Ju 87D-3

  • Member since
    September 2014
Posted by rooster513 on Wednesday, October 11, 2017 12:50 PM

Pb,

   Below is a link to a past discussion on the Testors putty. I've never used this brand it but from the little bit I've read it's not too much fun. Hopefully this helps some...

http://cs.finescale.com/fsm/tools_techniques_and_reference_materials/f/13/t/126990.aspx

-Andy

  • Member since
    September 2017
Posted by Pinkbooger on Wednesday, October 11, 2017 12:29 PM

rooster513


Pinkbooger

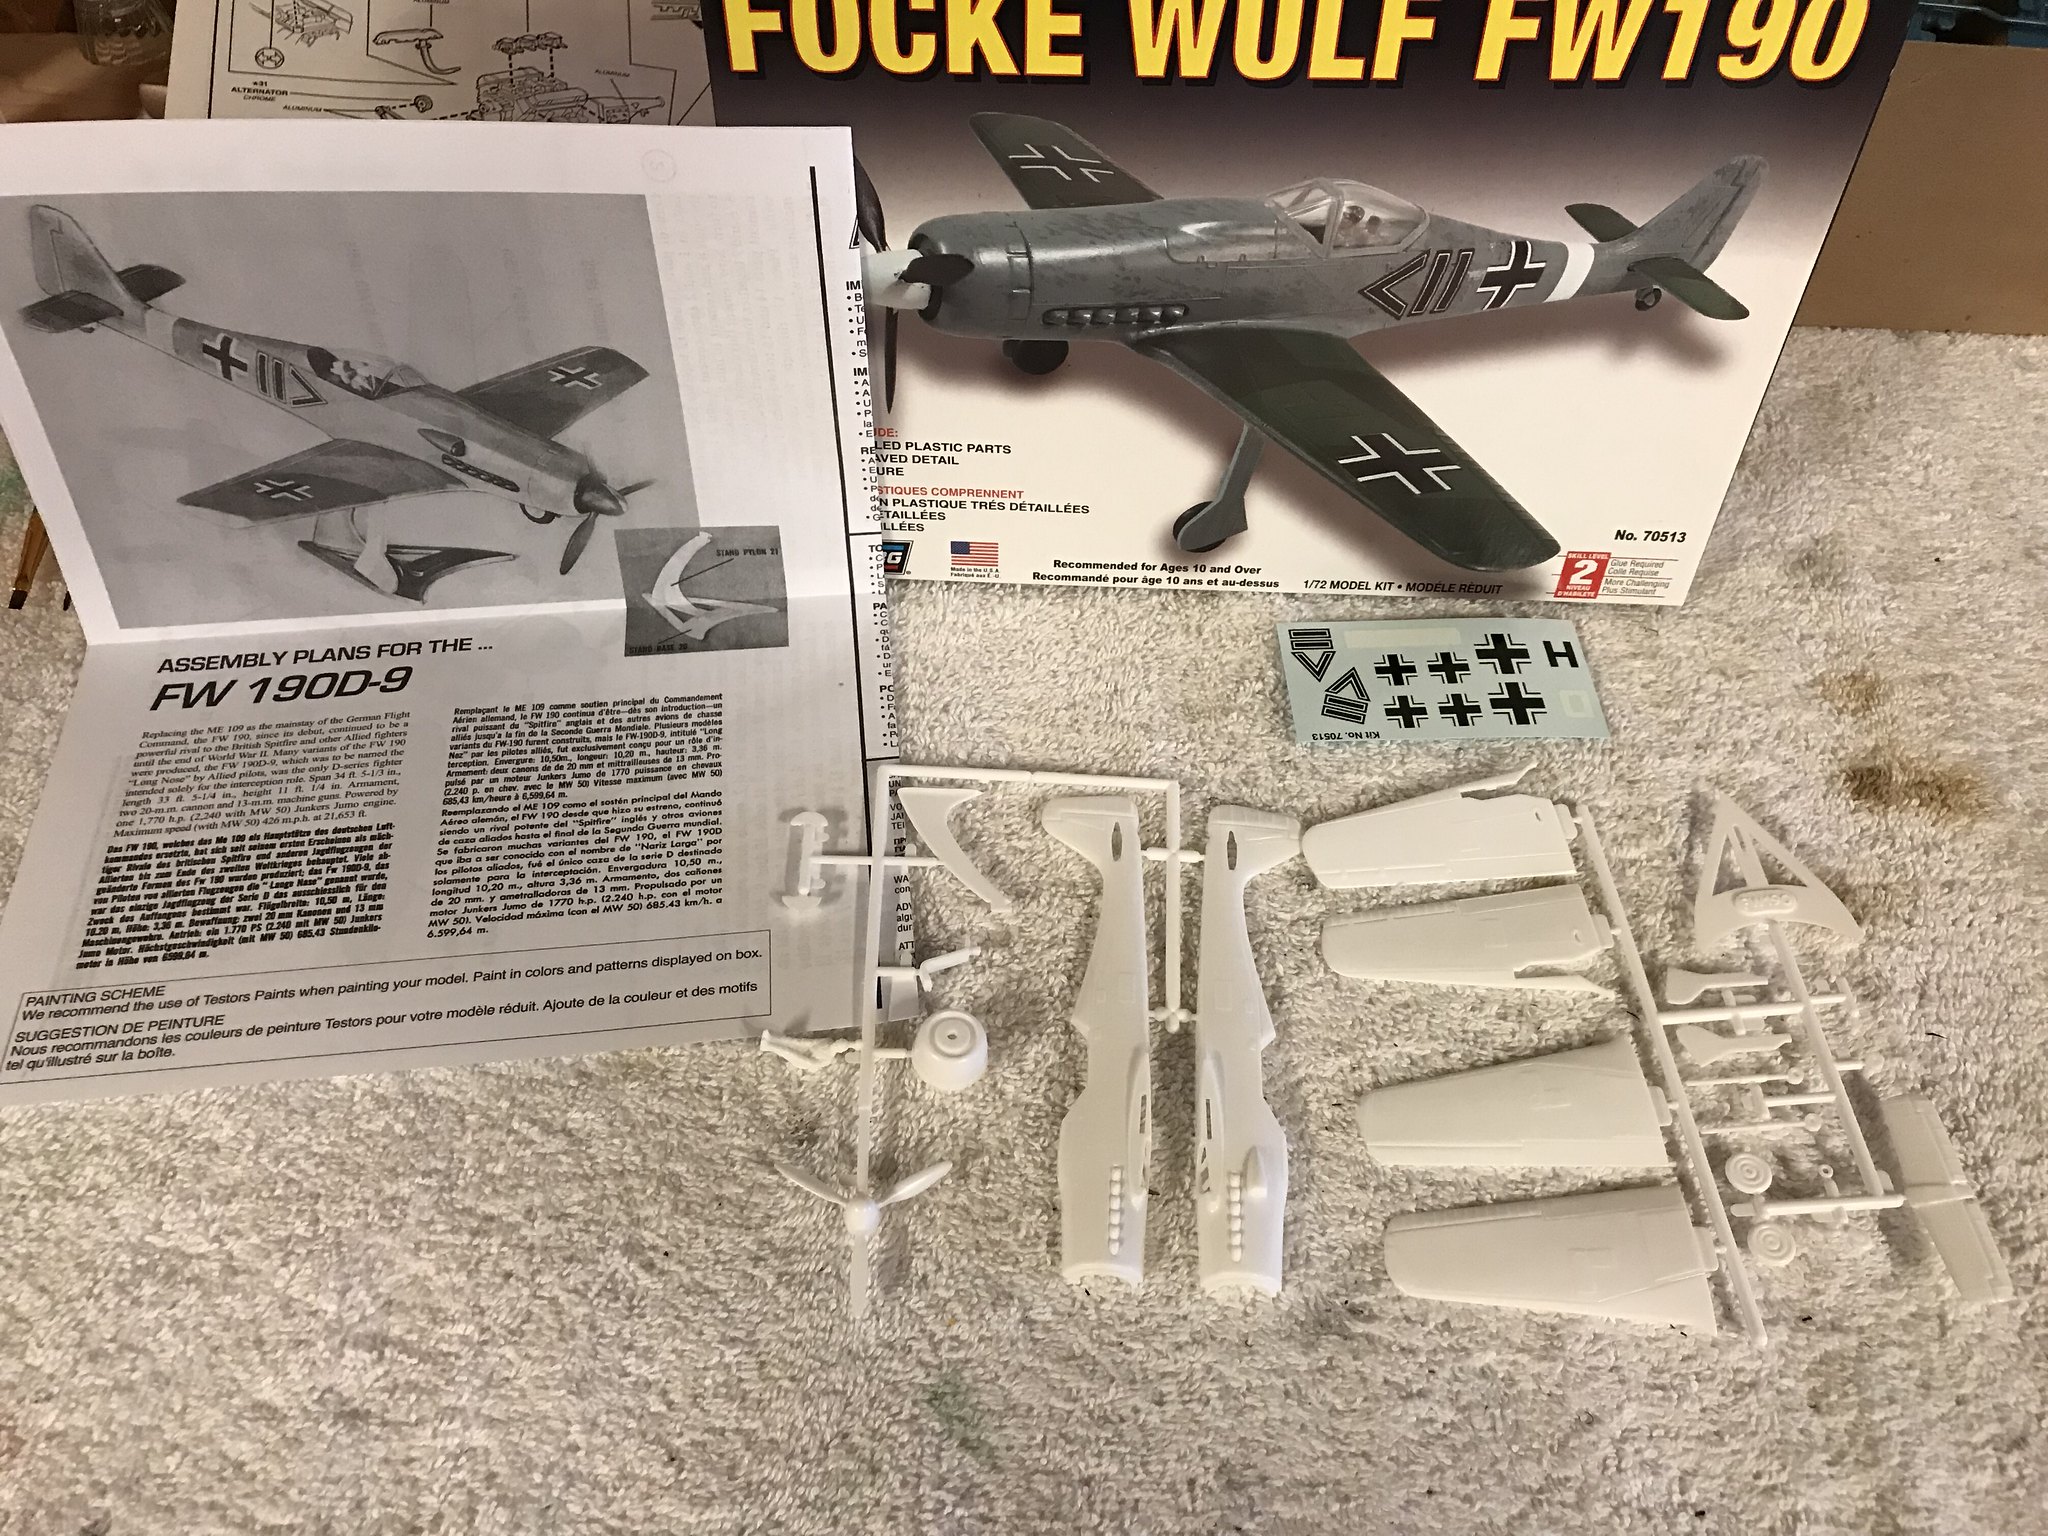
Opened up the box yesterday. It is pretty small but as it was already stated; that just means less glue and paint. lol. Kind of dissappointed that there really isn't any cockpit but not too dissappointed. lol.

2 questions.

1. Random. What dimensions should i use when posting pictures. this one is 600x600

2. I bought model putty but have never used it. I would like to use it on the bod of this one to take away the seam. There are tiny rivets around the seam that will most likely be taken away. Should I worry about that? And what tips for using the putty?


pb, as far as the putty what you can do is put tape along both sides of the seam to protect the river detail from being filled in. Might be able to give more advice if we know what brand of putty you are using.


Testors contour putty

"You underestimate the power of the dark side"

-Darth Vader

  • Member since
    September 2014
Posted by rooster513 on Wednesday, October 11, 2017 11:51 AM

Great to have you aboard BD! I think I've got the roster all updated and I have loaded a couple badges. One Fw190 and one Bf109.

-Andy

  • Member since
    January 2015
Posted by BrandonD on Wednesday, October 11, 2017 11:40 AM

Ok, I'm in. I'll build the 1/48 Eduard Bf-109 E-3 in Condor Legion markings. So, technically Luftwaffe.

-BD-

JOIN OUR COMMUNITY!

Our community is FREE to join. To participate you must either login or register for an account.

SEARCH FORUMS
FREE NEWSLETTER
By signing up you may also receive reader surveys and occasional special offers. We do not sell, rent or trade our email lists. View our Privacy Policy.