SEARCH FINESCALE.COM

Enter keywords or a search phrase below:

Pride of the Luftwaffe GB

41771 views
1268 replies
1 rating 2 rating 3 rating 4 rating 5 rating
  • Member since
    September 2014
Posted by rooster513 on Friday, July 13, 2018 11:26 AM

That's looking really nice Doug! Love that camo pattern!

-Andy

  • Member since
    June 2014
Posted by BrandonK on Friday, July 13, 2018 10:04 AM

Doug, that is one sexy looking 190. NICE!

Steve, nice save, I can't tell that you made any booboo's. It looks great.

BK

On the bench:

A lot !! And I mean A LOT!!

2024 Kits on deck / in process / completed   

                         14 / 5 / 2  

                              Tongue Tied

  • Member since
    July 2014
Posted by modelcrazy on Thursday, July 12, 2018 10:27 PM

Thanks Doug, Bob and D. I stole some balkenkreuzs from another kit for the fuse and will still look for the Gruppe marking and swastikas when I get home, but this is where I'm at for now. When I get these last few decals on I'll start some weathering.

Doug, man I can't imagine what I'd do LOL. Destroying a canopy would be a deal breaker if I couldn't find an AM one.

Steve

Building a kit from your stash is like cutting a head off a Hydra, two more take it's place.


http://www.spamodeler.com/forum/

  • Member since
    September 2016
  • From: Albany, New York
Posted by ManCityFan on Thursday, July 12, 2018 9:03 PM

Steve, glad you caught the problem before it ruined the whole kit.  Looks really good, so I hope you get the decals figured out.

Doug, your 190 looks freakin fantastic.  Looking forward to the weathering.

Bob, your pit looks really good.  Looking forward to the pics.

I got no progress to report.  I did open the box, look at the directions, and cut a couple of pieces off the sprue. LOL

This past week actually has been taking advantage of decent weather to paint a set of unfinished bookshelves we bought.  9 feet wide X 6 feet tall.  Plan is to move the shelves that were in that room to the basement for display cases.  Then my finished kits can come out of the plastic bin they are in and onto actual shelves!  Woo hoo!

Dwayne or Dman or just D.  All comments are welcome on my builds. 

  • Member since
    February 2014
  • From: Michigan
Posted by silentbob33 on Thursday, July 12, 2018 7:58 PM

Glad you caught that mistake before you got too far Steve, hopefully you can find some spares.

Thanks Doug! I really like the look of your 190 and can't wait to see the weathering stage.

I've managed to get the main parts together and primed.  Hopefully I can remember to take some pictures when my phone recharges.

On my bench: Academy 1/35 UH-60L Black Hawk

  • Member since
    October 2008
  • From: Georgia
Posted by Rigidrider on Thursday, July 12, 2018 7:32 PM

Evening all! Steve, I'm sorry to hgave laughed, but it reminded me of something I did a while ago... (I think I got you beat) Depending on the size of a canopy at times on the larger ones I brush the or air brush the clear on. Can you guess where Im going with this? I poured Tenex liquid glue in my air brush and let it rip! lololol... Not only did I ruin a canopy I had to completely re build the air brush. That is after I cooled down a couple days later! lolol...Almost made me swear off building. Any way, you made a good recovery and its turning out well! Silent Bob... Outstanding IP! Brandon, Andy... Yes I'm looking into some different paints too, I like to have a few oprtion. Thank you Tony and D-man! OK, a bit more from me...

I'll have to look up the picture I was using to build this one by, But this will have the staffel markings of ((I think it was ) 4Kg26 and I wont even try to pronounce the airfield in Russia where it was.

Wait a minute... The F turned into a B... Yeah... I forgot to treat the decal with the preservative and it cracked all to pieces. No biggy, just dug through stash and found something I could use for now.

And the Triangle to ID it as a fighter bomber.

OK, Nows where the mottle and splinter will begin to soften and blend a bit. During the aging and weathering I use isopropyl alcahol and such to shade and blend with. That starts tomorrow I hope! Take care all!

Doug


When Life Hands You A Bucket Of Lemons...

Make Lemonade!

Then Sell It Back At $2 Bucks A Glass...

  • Member since
    July 2014
Posted by modelcrazy on Wednesday, July 11, 2018 2:10 PM

Thanks Chad, I believe I have some but.....

I may have to take you up on it.

Steve

Building a kit from your stash is like cutting a head off a Hydra, two more take it's place.


http://www.spamodeler.com/forum/

  • Member since
    April 2015
Posted by Mopar Madness on Wednesday, July 11, 2018 10:20 AM

Steve, I have plenty of 1/72 swastikas and balkenkreuz.  If you don’t find any back home just let me know what you need. 

Chad

God, Family, Models...

At the plate: 1/48 Airfix Bf109 & 1/35 Tamiya Famo

On deck: Who knows!

  • Member since
    June 2014
Posted by BrandonK on Wednesday, July 11, 2018 9:08 AM

Wow Steve, close call and nice save. I wish I had those decals, but I don't. Hopefully, some with turn up for you.

BK

On the bench:

A lot !! And I mean A LOT!!

2024 Kits on deck / in process / completed   

                         14 / 5 / 2  

                              Tongue Tied

  • Member since
    September 2014
Posted by rooster513 on Wednesday, July 11, 2018 7:00 AM

Sorry to hear about your troubles Steve. Hope you are able to find some replacements.

-Andy

  • Member since
    July 2014
Posted by modelcrazy on Tuesday, July 10, 2018 9:52 PM

I would have had this done now but I screwed up. Instead of applying decal setting solution to the fusalage and right wing cross I applied Testers thin cement Bang Head. Yeah....I was a little miffed. Luckly I caught the mistake quickly. It took me a second to figure out why the solution was melting the decal and paint. Anyway, fighting the urge to just toss the thing into the trash I set it aside, thought about it, scrapped off the fues cross and reapplied the paint. I masked the red stripe with a post-it note and peeled off the black Gruppe mark!
I'm going to Boise this weekend for 2 weeks and I'll see if I Have some extra 1/72 German decals in my decal box when I get there. The kit does'nt come with swastikas so maybe I can also find some of those as well. I really don't want to buy a whole new set.

Steve

Building a kit from your stash is like cutting a head off a Hydra, two more take it's place.


http://www.spamodeler.com/forum/

  • Member since
    September 2016
  • From: Albany, New York
Posted by ManCityFan on Saturday, July 7, 2018 7:26 PM

silentbob33

Thanks Andy!

Dwayne it's good to see you here, can't wait to see how your 109 turns out


Good to see you too!  Pleased to see you are getting bench time! 

Dwayne or Dman or just D.  All comments are welcome on my builds. 

  • Member since
    February 2014
  • From: Michigan
Posted by silentbob33 on Friday, July 6, 2018 9:35 PM

Thanks Andy!

Dwayne it's good to see you here, can't wait to see how your 109 turns out

On my bench: Academy 1/35 UH-60L Black Hawk

  • Member since
    September 2014
Posted by rooster513 on Friday, July 6, 2018 6:47 AM

Looking forward to seeing you get started Dwayne! I'll get you added to the front page.

-Andy

  • Member since
    September 2016
  • From: Albany, New York
Posted by ManCityFan on Thursday, July 5, 2018 9:53 PM

Been lurking in the GB, and have seen some really good stuff.

Since I didn't have a 109 in the stash, and have been really wanting to try a 1/72 single prop, I ordered this and got it in the mail today:

 IMG_0838 by Dwayne Munk, on Flickr

So with your kind permission, rooster, I would like to take a crack at this kit for the GB.  Going to try to do the plane on the box cover.  Going to do this OOB, as I still have basic skills I need to work on.  Looking forward to starting this!

Dwayne or Dman or just D.  All comments are welcome on my builds. 

  • Member since
    September 2014
Posted by rooster513 on Thursday, July 5, 2018 2:19 PM

Nice start Silentbob, the cockpit looks really good! 

-Andy

  • Member since
    February 2014
  • From: Michigan
Posted by silentbob33 on Thursday, July 5, 2018 1:54 PM

Paint is looking good guys!  I finally have enough progress to post.  And it looks like we need another 109 in here too.

Despite having many 109s in my stash, this is the first one I've built since I came back to the hobby.  I built one of them many years ago and it has since been destroyed.  I held off on building one because I didn't feel comfortable painting the mottling, but I think I'm ready to tackle it. I'll be using aftermarket decals since there weren't any decals in the box when I bought it at a show (well, there were decals in the box, but there were for a Hs 129).  I'll be building White 7 of 1./JG51.  In doing some research, the plain had a forced landing on the French coast after combat over England during the Battle of Britain.

Here's the office.  It's mostly OOB with the exception of some PE seatbelts, and some added wiring.  Any comments/critiques are welcome.

On my bench: Academy 1/35 UH-60L Black Hawk

  • Member since
    June 2014
Posted by BrandonK on Thursday, July 5, 2018 10:29 AM

Steve, the camo looks great. Another fine build coming together.

Doug, I agree with you on the MM paints. I find that half the time they work fine and the other half I'm fighting them to spray right. I like Tamiya too as they never give you any hassels. My fave paint is Mr Color. They spray great and always lay down right and are super tough.

That splinter camo is unique. I can't say that I've seen that pattern berfore. Very cool.

BK

On the bench:

A lot !! And I mean A LOT!!

2024 Kits on deck / in process / completed   

                         14 / 5 / 2  

                              Tongue Tied

  • Member since
    September 2014
Posted by rooster513 on Thursday, July 5, 2018 6:53 AM

That camo looks really nice Steve!

-Andy

  • Member since
    July 2014
Posted by modelcrazy on Wednesday, July 4, 2018 11:25 PM

Thanks Doug,

I have several other GB's to finish up or start like Bish's and soon my own, so I promised 3 and that's all I can do. Besides my 109 and other 190 is in Boise.

I applied the other camo colors and here is where it sits. Now to get the decals on, finish the prop/spinner, get it on it's feet and do a little weathering.

Steve

Building a kit from your stash is like cutting a head off a Hydra, two more take it's place.


http://www.spamodeler.com/forum/

  • Member since
    April 2005
  • From: Australia
Posted by taxtp on Wednesday, July 4, 2018 10:44 PM

Good work on that 190 camo Doug. It's really good to see it come together bit by bit.

Cheers

Tony

I'm just taking it one GB at a time.

  • Member since
    September 2014
Posted by rooster513 on Wednesday, July 4, 2018 6:45 PM

Doug that's a very interesting splinter pattern. Nick work! I hear ya,  Tamiya acrylics are really nice. I just don't aleays want to have to mix colors. So far I'm happy with the MRP paints. They spray great and I like the way the colors come out.

-Andy

  • Member since
    April 2013
Posted by SchattenSpartan on Wednesday, July 4, 2018 4:18 PM

Andy, looks like you're making good progress with that paint job. It's looking very clean so far! Also, that scratchbuilt pitot tube really adds a lot to the finished model.

Doug: Wow, you're just blasting through this one! I really like that splinter camo. It's something you don#t see too often on 190s.

  • Member since
    October 2008
  • From: Georgia
Posted by Rigidrider on Wednesday, July 4, 2018 8:43 AM

Thanks Andy... Its Model Master acrylic RLM76... I'll tell ya, I'm starting to like the MM paints less and less... I think they are changing the formula. I just bought this last month, and usually thin with Lacquer thinner or isopropol alcohol, and neither thinned worth a blink this time. It looked like oil in water until I worked it for a bit. I think from now on its going to be Tamiya acrylics.

Brandon, Thank you sir! Still a bit more to do, but it needed time to set up... the following pics will show that.

MC.. Looking good! Hate to hear "Third and final" though! 


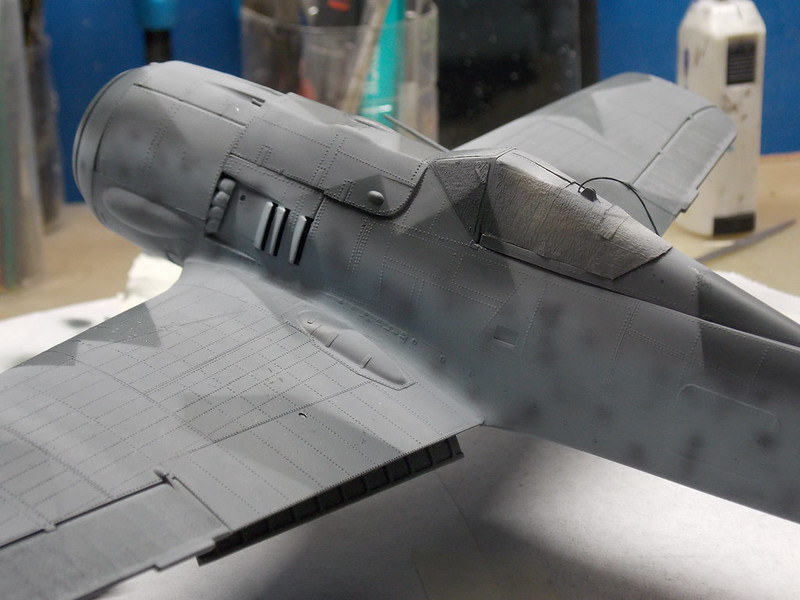
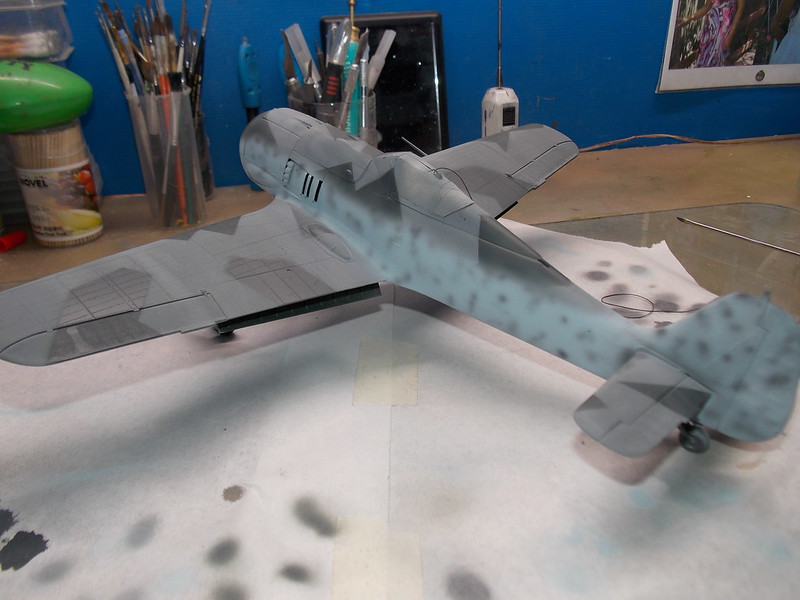
OK, getting the mottling a bit darker and the splinter done. 

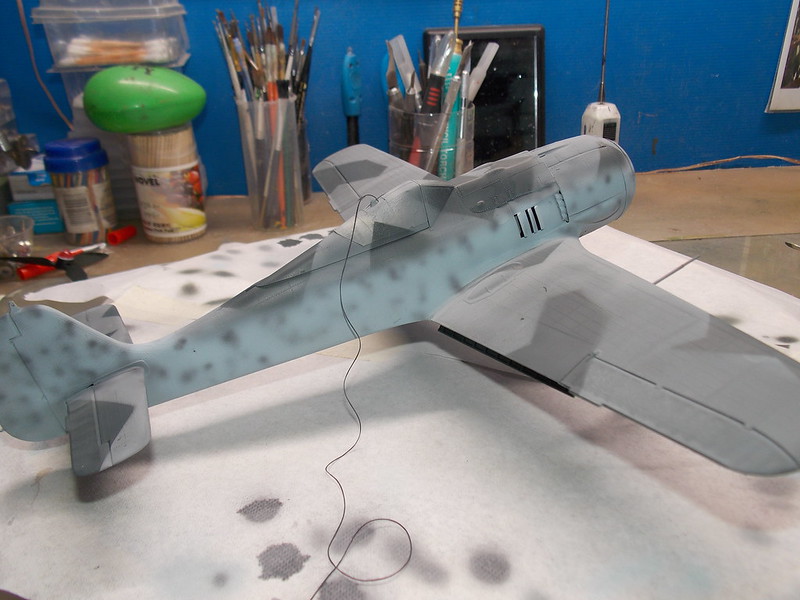
A little better, had to adjust the exposure in the camera, also, the mottle looks a tad dark right now, but later you'll see it fade some as the decals and weathering progress.

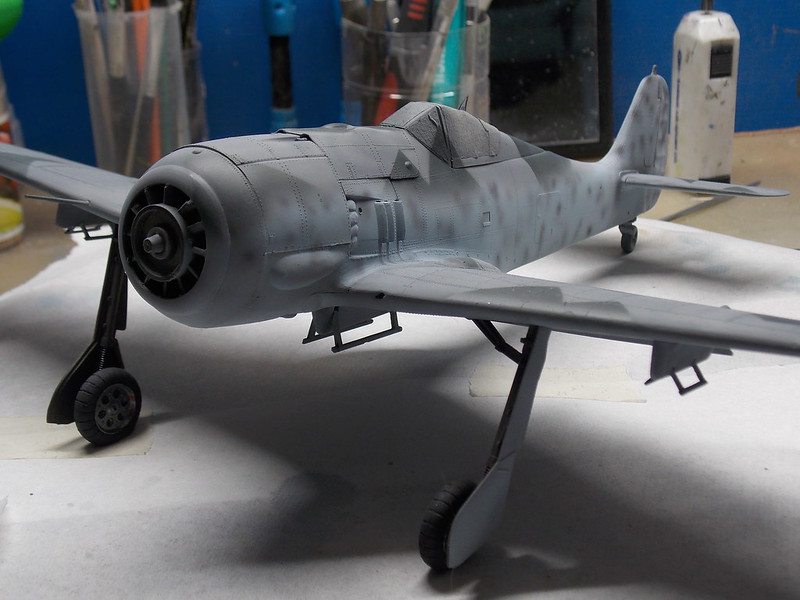
And other then applying the clear, thats where its at now... Take care all and thanks for looking!

Doug

When Life Hands You A Bucket Of Lemons...

Make Lemonade!

Then Sell It Back At $2 Bucks A Glass...

  • Member since
    July 2014
Posted by modelcrazy on Tuesday, July 3, 2018 7:08 PM

There's some great looking work going on.

It's time I finished up my third and last build for this GB.

I sprayed the RLM-76 and it's ready for the 74 and 75.

Steve

Building a kit from your stash is like cutting a head off a Hydra, two more take it's place.


http://www.spamodeler.com/forum/

  • Member since
    September 2014
Posted by rooster513 on Tuesday, July 3, 2018 1:18 PM

Thanks BK, I appreciate it.

-Andy

  • Member since
    June 2014
Posted by BrandonK on Tuesday, July 3, 2018 9:06 AM

Doug, the mottling can be seen under the 76, well done. It must look even better in person.

Andy, freehand camo? WOW, that looks great. I'm not steady enough anymore for that unless you like a jagged edge. 

BK

On the bench:

A lot !! And I mean A LOT!!

2024 Kits on deck / in process / completed   

                         14 / 5 / 2  

                              Tongue Tied

  • Member since
    September 2014
Posted by rooster513 on Tuesday, July 3, 2018 7:29 AM

The RLM 76 looks great Doug! What paint is it?

I was able to get a lot of work done on my A-5 over the weekend. Got all the camo work done and just need to mask off and clean up the fuselage band and paint the top of the tail RLM 65. The RLM 70/71 are pretty close tone wise but you can see the difference better in person. All the camo work was done freehand with MRP paints.


Thanks for looking!

-Andy

  • Member since
    October 2008
  • From: Georgia
Posted by Rigidrider on Monday, July 2, 2018 1:23 PM

Afternoon all... Little bit more from me...

Shes on her feet, taped up and ready to start slinging paint!

Got the 76 on the bottom and half way up the sides.

Due to it being the retractable antena wire, I had to attach it now and just try to keep out of the way due to the internal working inside the canopy. we'll let that set for awhile ansd be back later! Take care all!

Doug


When Life Hands You A Bucket Of Lemons...

Make Lemonade!

Then Sell It Back At $2 Bucks A Glass...

  • Member since
    October 2008
  • From: Georgia
Posted by Rigidrider on Friday, June 29, 2018 9:46 PM

Thanks Andy... Lol... I checked the sprues and the rest of the parts are present. 

Thanks Brandon. Now that I've retired, I have lots of spare time to build, and specially since it's been raining so much! But yes it's coming along. Thanks!

Take care!

Doug


When Life Hands You A Bucket Of Lemons...

Make Lemonade!

Then Sell It Back At $2 Bucks A Glass...

JOIN OUR COMMUNITY!

Our community is FREE to join. To participate you must either login or register for an account.

SEARCH FORUMS
FREE NEWSLETTER
By signing up you may also receive reader surveys and occasional special offers. We do not sell, rent or trade our email lists. View our Privacy Policy.