SEARCH FINESCALE.COM

Enter keywords or a search phrase below:

Russian Armor Group Build November 2017 - November 2018

37796 views
940 replies
1 rating 2 rating 3 rating 4 rating 5 rating
  • Member since
    November 2009
  • From: SW Virginia
Posted by Gamera on Thursday, August 2, 2018 6:47 PM

AA: She's looking sharp!

"I dream in fire but work in clay." -Arthur Machen


  • Member since
    March 2017
Posted by Armor_Aficionado on Thursday, August 2, 2018 12:36 PM

Almost done now; decals and stores mounted, just have to weather it, and maybe include a figure?

https://pin.it/rgbmtq3slmejzl

  • Member since
    October 2016
  • From: .O-H-I-O....
Posted by DasBeav on Wednesday, August 1, 2018 10:43 PM

Haven't popped in for awhile. Everybody is doing great work.

Lostagain, I am paying close attention to your work 'cause I have the same kit in the stash. Have already "bookmarked" the thread.

 Sooner Born...Buckeye Bred.


  • Member since
    September 2016
  • From: Albany, New York
Posted by ManCityFan on Sunday, July 29, 2018 9:28 PM

A-A, I had pretty much that exact issue with a Tamiya T-34 I built not too long ago.  Tackled it the same way you did, with results not quite as good.  Ended up hiding that seam with mud (shh...don't tell anyone).

Dwayne or Dman or just D.  All comments are welcome on my builds. 

  • Member since
    April 2005
  • From: Australia
Posted by taxtp on Sunday, July 29, 2018 7:40 PM

Great detail work on the SU-76 LA, thats really going to make a difference. Excellent fix for that problem on the SU-122 as well A_A.

I still haven't sprayed the white wash on the KV-1 because I can't decide, haha.

Cheers

Tony

I'm just taking it one GB at a time.

  • Member since
    November 2009
  • From: SW Virginia
Posted by Gamera on Sunday, July 29, 2018 5:41 PM

Wow! Those all look great guys!!!

"I dream in fire but work in clay." -Arthur Machen


  • Member since
    March 2017
Posted by Armor_Aficionado on Sunday, July 29, 2018 12:33 PM

Had this problem: when you push the poly caps into place on the pegs in the front of the hull to hold the hull together, you’re left with this huge gap where the upper and lower hull meet at the rear end!  Not up to usual Tamiya standards of fit...

https://pin.it/cd6ypptorwk6uj

But, enough Tamiya Extra Thin liquid cement, and enough manual pressure (so that my hands were cramping up bad from holding the parts just so!), and I’ve got that gap tackled:

https://pin.it/akh2a33cdtfvlb 

Now I just have to add a few accessories, decals, and a crew figure, weather it, and it’ll be done!

  • Member since
    March 2017
Posted by Armor_Aficionado on Sunday, July 29, 2018 12:23 PM

Su-122 lower hull and running gear is done:

https://pin.it/ldqyefutrnfadv

Having a real problem mating it to the upper hull, though...

  • Member since
    September 2016
  • From: Albany, New York
Posted by ManCityFan on Sunday, July 29, 2018 7:41 AM

Nice detail work with the brass.  Looking forward to seeing some paint!  This project is moving right along.  

Dwayne or Dman or just D.  All comments are welcome on my builds. 

  • Member since
    April 2014
  • From: Australia
Posted by lostagain on Sunday, July 29, 2018 6:27 AM

Next stages of construction are done.

The gun was assembled and white glued onto the chassis, so I could test fit the shields around it.

The shields were then glued to each other, and then allowed to dry. A cross bar was put across the back which helped to hold the shape while it all dried.

Next up was making a replacement jack handle out of brass wire and tube, cable lugs out of brass sheet and lifting lugs from copper wire.

So now I am at the step of painting...

Make that masking ready to paint...

  • Member since
    September 2016
  • From: Albany, New York
Posted by ManCityFan on Friday, July 27, 2018 2:26 PM

That KV will look great either way!  Excellent color modulation.

Dwayne or Dman or just D.  All comments are welcome on my builds. 

  • Member since
    May 2015
Posted by Griffin25 on Friday, July 27, 2018 10:09 AM

That looks great! No whitewash, man. Big Smile


Griffin

  • Member since
    April 2014
  • From: Australia
Posted by lostagain on Friday, July 27, 2018 5:27 AM

Looking good there Tony, nice colour work. The green will pop out over the snow.

  • Member since
    April 2005
  • From: Australia
Posted by taxtp on Friday, July 27, 2018 3:27 AM

Thanks Cliff, I went a bit further today. I had intended this as the base for a white wash, but I'm a little tempted to go with green.

Lots more to come.

Cheers

Tony

I'm just taking it one GB at a time.

  • Member since
    November 2009
  • From: SW Virginia
Posted by Gamera on Thursday, July 26, 2018 9:42 PM

Oh wow, she looks great Tony! Great job on the colour modulation!!!

"I dream in fire but work in clay." -Arthur Machen


  • Member since
    April 2005
  • From: Australia
Posted by taxtp on Wednesday, July 25, 2018 7:01 PM

Here it is with a basic Russian green spray job. I still want to do a little colour modulation, then start work on a whitewash. It was still wet when I took these photos, but ut's settled down really well now. I like the way that Vallejo paints do that.

Cheers

Tony

I'm just taking it one GB at a time.

  • Member since
    April 2005
  • From: Australia
Posted by taxtp on Monday, July 23, 2018 9:20 PM

That looks really good Dwayne, well done.

I've primed my KV-1 with black, and painted the base with cheap black spray paint. The snow area has been painted with Tamiya fine white primer.

I plan to use Tamiya Diorama Effect snow (paint) once I get to it, but I'm waiting for some figures to arrive so that I can locate them before painting it.

The next step is to spray the tank with Vallejo Russian Green, with a little colour modulation. Not too much because it's getting a whitewash anyway

Cheers

Tony


I'm just taking it one GB at a time.

  • Member since
    September 2016
  • From: Albany, New York
Posted by ManCityFan on Monday, July 23, 2018 4:53 PM

Thanks Griffin, I appreciate the compliment.  

I do plan to put my finished kits on bases at some point.  Was focused on getting the kits looking decent, but basing them would definitely help them to look better.

Dwayne or Dman or just D.  All comments are welcome on my builds. 

  • Member since
    May 2015
Posted by Griffin25 on Monday, July 23, 2018 10:38 AM

ManCityFan

Zvezda, you are doing a great job of weathering your tank!  Oils are definitely worth learning how to use.

Tony, that sounds like a lot of work.  I think Gam may have a good idea there.  Big Smile  Mud can fix a lot of ills.

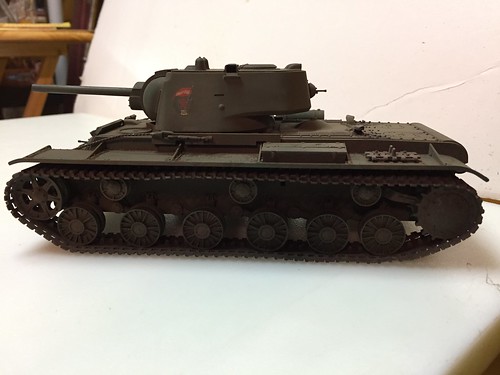
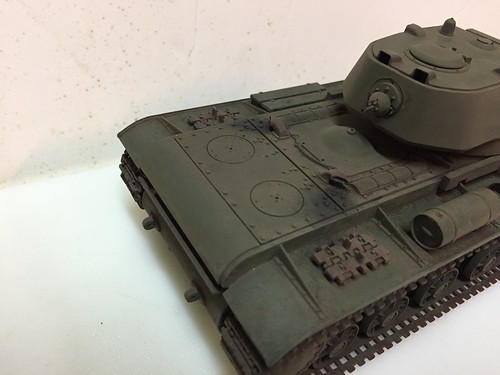
So I am calling my KV-1 done.  Got some smoke pigment today, and just wanted to add some smoke effect for the exhaust.  Here are the final pics:

 IMG_0840 by Dwayne Munk, on Flickr

 IMG_0844 by Dwayne Munk, on Flickr

 IMG_0843 by Dwayne Munk, on Flickr

 IMG_0841 by Dwayne Munk, on Flickr

 IMG_0842 by Dwayne Munk, on Flickr

I am OK with the vinyl tracks.  Not sure I could do much better with them. 

I might add an antenna.  I read somewhere that cat whiskers work well, and I found one while cleaning the other day.  Nice of my cat to part with one so I could try it out.

Any and all comments welcome!


Dwayne I missed that you finished up your KV. Great job! Looks the part. Can't tell that those are vinyl tracks. It needs a base. How come nobody puts their projects on a base, man !!?? LOL. Just jkn. You did a great job.


Griffin

  • Member since
    September 2016
  • From: Albany, New York
Posted by ManCityFan on Sunday, July 22, 2018 7:39 PM

LA: Nice progress on what is looking more and more like a challenging kit.  Looks like you have beaten those tracks into submission.  Big Smile

Dwayne or Dman or just D.  All comments are welcome on my builds. 

  • Member since
    May 2015
Posted by Griffin25 on Saturday, July 21, 2018 2:27 PM

Looking good bud. Those tracks look like a pain in the butt but your doing a good job with them. 


Griffin

  • Member since
    November 2009
  • From: SW Virginia
Posted by Gamera on Saturday, July 21, 2018 8:01 AM

LA: Despite your problems you're making great progress. Looks good!!! Yes

"I dream in fire but work in clay." -Arthur Machen


  • Member since
    April 2014
  • From: Australia
Posted by lostagain on Friday, July 20, 2018 9:21 PM

AA the Su-122 looks menacing without the wheels on, a bit like Martin Sheen rising out of the water in Apocolypse Now…
 
Zvezda, the T-34 looks really good, the weathering effects are looking really good. The painted based has helped the weathering pop out. I don’t drink coffee, but tea leaves do make good autumn leaves…
 
I stopped watching the World Cup when we went out, stopped watching Wimbledon when the last Aussie went out, stopped watching the Tour de France when Richie Porte broke his collar bone. Got no more sports to watch…
 
Tony, the KV-1 has built up quickly (after the tracks were done) and is looking good. I like the look of your base and I look on with interest to see how the snow is done.
 
The SU-76 has been keeping me entertained and is coming along slowly. I have got a few bits of brass lined up for the fenders to show them a bit mangled. That has also given me a bit of space to fit the tracks under the fenders.
I am going to do similar to Stik and build the tracks with the fenders off and add them later. I will however paint it all before assembling, then 'paint over the cracks' with weathering.
Talking of the tracks, I have been having fun with them. I built up the straight bits up easily in a jig. The interesting one was the top run over the return rollers and my solution seemed to work okay. With the links in the jig, I put three thin strips of masking tape on the links, lifted them clear of the jig and laid them over the return rollers. Starting at the drive sprockets, links were glued together with the tape stopping them sticking onto the return rollers. Once they had been coaxed into place (doing one segment per session) to create sag and were stable, I added a bit more glue to maintain their structure.
I have also started to put the gun together, quite a few fit issues there to work through too.
So still chipping away at it, it is starting to come together...

  • Member since
    September 2016
  • From: Albany, New York
Posted by ManCityFan on Tuesday, July 17, 2018 8:28 AM

Tony, your KV-1 is coming along great!  The base and accessories will pull it all together nicely.

Dwayne or Dman or just D.  All comments are welcome on my builds. 

  • Member since
    November 2009
  • From: SW Virginia
Posted by Gamera on Monday, July 16, 2018 8:16 PM

Zvezda: She looks fantastic, great job!!!

Tony: Looks good, love the KV-I- what a brute of a tank!

"I dream in fire but work in clay." -Arthur Machen


  • Member since
    April 2005
  • From: Australia
Posted by taxtp on Monday, July 16, 2018 8:10 PM

Your T-34 looks great Zvezda, I really like your weathing and shading. 

I've finished the construction of my KV-1, although I'm waiting or some accessories to arrive to dress it up a bit. Hobby Boss don't give you much stowage for it, so it looks a bit too factory fresh. I've also started on the base for it, which will be simply a tank traversing the snow covered steppe with a couple of Soviet soldiers alongside. It's made from an old picture frame and some plaster of Paris. However I felt that the tracks I made on it weren't deep enough so I took the mototool to it to gouge it out again and remade the tracks using a different material. That's hardening now, then I'll refine it a little more before applying paint and finishing it.

Cheers

Tony

I'm just taking it one GB at a time.

  • Member since
    September 2016
  • From: Albany, New York
Posted by ManCityFan on Monday, July 16, 2018 4:00 PM

Excellent weathering. I guess coffee and sweat make for dirty tanks.  Stick out tongue 

I really like the boxes on the sides.  They really do look like wood.  You can't be far from done.

No reprimands for watching World Cup in Mother Country.  Very exciting competition this year.

Dwayne or Dman or just D.  All comments are welcome on my builds. 

  • Member since
    May 2015
Posted by Griffin25 on Monday, July 16, 2018 8:49 AM

Awesome job! Everything is very well balanced. Did you come up with the ammo boxes on the sides? Gives it some nice flavor. It deserves a base or a small vignette scene. Great job.  


Griffin

  • Member since
    January 2013
  • From: Athens, Greece
Posted by Zvezda1980 on Monday, July 16, 2018 5:44 AM

Comrades, having been reprimanted by the local Comsomol leader, for watching World Cup games instead of working for the motherland, I was finally urged to make some progress. After fiddling with artist's oils, soft pastels, coffee (spilled) and sweat (dripping from forehead, no A/C in this tank factory), the shading and weathering works reached a point that I consider satisfactory. Furthermore the various boxes, wire rope, etc were placed on the tank. Hope to have it announced completed in a few days. As always, all criticism, comments, denouncements to the KGB, etc more than welcomed.

  • Member since
    January 2013
  • From: Athens, Greece
Posted by Zvezda1980 on Monday, July 16, 2018 5:02 AM

A_A: very nice & clean work. That gun looks scary!

JOIN OUR COMMUNITY!

Our community is FREE to join. To participate you must either login or register for an account.

SEARCH FORUMS
FREE NEWSLETTER
By signing up you may also receive reader surveys and occasional special offers. We do not sell, rent or trade our email lists. View our Privacy Policy.