SEARCH FINESCALE.COM

Enter keywords or a search phrase below:

Japanese Group Build VII

27885 views
664 replies
1 rating 2 rating 3 rating 4 rating 5 rating
  • Member since
    October 2008
  • From: Georgia
Posted by Rigidrider on Wednesday, July 4, 2018 3:59 PM

Thanks Cliff! Yeah this guy was some big name and "famous" figure painter. Sorry, I don't remember his name, but as you said... Plenty of sources to learn from. I'd like to do one some day, I mean a real nice one. I saw one recently on one of the Facebook modeling sights that was just stunning. They had painted a tattoo on the girls back that just blew me away. 

On the chipping on mine, I just painted the whole thing in a no smudge spray can silver, then light scuffed with scotch bright cloth. Added a bit of dry brushed silver as needed, and that's it. By the by...my wife texted yesterday and said she was on the way to Tam Tam ,(I think that's the big hobby store) in Tokyo. Hope she finds the Judy I showed her! Lolol... Well we'll see! Take care!

Doug

When Life Hands You A Bucket Of Lemons...

Make Lemonade!

Then Sell It Back At $2 Bucks A Glass...

  • Member since
    April 2013
Posted by SchattenSpartan on Wednesday, July 4, 2018 4:10 PM

Doug, that pre-shading turned out great and all the tiny paint chips make the overall finish even more stunning! Sometimes, the simplest techniques are the best ones after all.

Do you plan to add any extra weathering on top of all of that?

  • Member since
    June 2018
  • From: Ajax, Ontario
Posted by Sargee15 on Wednesday, July 4, 2018 7:16 PM

Wow Doug!  Your Nick is really looking great! I hope that I can get my Claude to look as good!

Talk to you soon,

Ted

  • Member since
    June 2018
  • From: Ajax, Ontario
Posted by Sargee15 on Wednesday, July 4, 2018 7:26 PM

Hi Cliff and Tony,

Here's the front and back colour guide pictures that came with the kit.

It is indeed by Hinchcliffe and is called Taisho.  It was I believe re-released by a company called Calder Craft and there just happens to be (as of last night) a copy of the original on ebay.  Expensive though at 119.00 BPS.

Ted

  " />

  " />

  • Member since
    June 2018
  • From: Ajax, Ontario
Posted by Sargee15 on Wednesday, July 4, 2018 7:34 PM

Hi guys,

Here's what I've managed to get done on the Claude.

  " />

  " />

  " />

I glued the upper tailplanes to the fuselage and plan to thin down the lowers until they fit as the tailplanes are too thick to fit.

  • Member since
    June 2018
  • From: Ajax, Ontario
Posted by Sargee15 on Wednesday, July 4, 2018 7:40 PM

It's hard to see, but I filled in the seam created by gluing in the sidewalls in the cockpit top edge with green paint which I should be able to sand smooth tomorrow.

I also cleaned up the engine a bit but doesn't show so I'll wait until I get some paint and wires on it before I take any pics of it.

That's all for now,

Ted

  • Member since
    April 2005
  • From: Australia
Posted by taxtp on Wednesday, July 4, 2018 10:43 PM

Hi Sargee,

Nice work on the Claude, thats an aircraft I've never built. Maybe if we get to JGB 100 I might get there haha !

THats a nice figure, complicated to paint though. What scale is it ?

I have a few Samurai figures in the stash too. Maybe, just maybe.

Cheers

Tony

I'm just taking it one GB at a time.

  • Member since
    June 2018
  • From: Ajax, Ontario
Posted by Sargee15 on Wednesday, July 4, 2018 11:15 PM

Hi Tony,

Thanks re: the Claude.  It's a pretty plane and I've wanted to get it under way for a number of years so this group build has given me the inspiration to work on it!  I thinned down and glued one of the lower tailplanes in place just before your text came in.  When I get the other one on I will click a pic.

We'll have to get Gam to keep the group build going long enough so you can build a Claude too...lol!

The Samurai is 120 mm which according to various forums I checked with is approximately 1/15 scale.

Talk to you soon,

Ted

  • Member since
    November 2009
  • From: SW Virginia
Posted by Gamera on Thursday, July 5, 2018 5:24 PM

Ted: Nice work there on the Claude, she's coming along nicely!!!

And cool figure, love the samurai armour, looks like it will be really fun to paint.

"I dream in fire but work in clay." -Arthur Machen


  • Member since
    June 2018
  • From: Ajax, Ontario
Posted by Sargee15 on Thursday, July 5, 2018 7:12 PM

Thanks Gam!

I've actually got the lower tailplane pieces in place and I've cleaned up the cockpit sidewall seams so tonight there will be some paint on the wheels and some parts glued into the 'pit.  Pictures tomorrow.

Yes the figure should be fun, but will have to wait until the Claude is pretty much done.  I'm easily distracted...lol

Talk to you soon,

Ted

  • Member since
    October 2008
  • From: Georgia
Posted by Rigidrider on Friday, July 6, 2018 2:30 PM

Hey clemens.. Thanks for the kind words... Boy you nailed it with me... The simpilest way possible to get the results! lol... Yes I've chipped that way forever, and its usually always produced results. As far as the weathering... just a bit more. Stuff life oil and fuel stains and exhaust staining. 

Sargee... It will! I don't know your modeling background but from what I've seen so far, I'm sure it'll come out fine. From everything Ive read and pictures I've seen, the paint on these Japanese birdies really left alot to be desired. But also taking into account the conditions they existed in, the American birds paint took a beating too, it just didn't peel off in sheets! I read the only thing the pilots wanted almost pristine were the Suns, and maint. crews were punished if they wer'nt kept in good condition. 

When Life Hands You A Bucket Of Lemons...

Make Lemonade!

Then Sell It Back At $2 Bucks A Glass...

  • Member since
    October 2008
  • From: italy
Posted by bsyamato on Thursday, July 12, 2018 9:59 AM

Good finished things and updates guys , the Doug's Nick seems to going outstanding Beer


Sorry for the absence from the group, i'm not sure will unfreeze soon the jake so i'll put a (i hope so ..) speed kit to finish in time Cowboy

Add this one Cliff please

Heres the Takichawa Ki-9 from RS 1/72, short run kit he is


Asap updates


  • Member since
    November 2009
  • From: SW Virginia
Posted by Gamera on Thursday, July 12, 2018 6:27 PM

Bsyamato: Good to see you again and looks like a cool kit! Just put you down.


BTW: Boss's computer at work got hacked somehow so I'm going to be stuck posting from my personal PC for the next few weeks. So no more early morning posts...

"I dream in fire but work in clay." -Arthur Machen


  • Member since
    October 2008
  • From: Georgia
Posted by Rigidrider on Thursday, July 12, 2018 7:01 PM

Evening all! Wow, BSY.. Good to hear from you again! Hope all ,is well in your special part of the world! Well, its been BUSY lately, and Ive had precious little time to build, But everything returning to normal now. My wife made it back from Japan, and brought me (From Tam Tam in Tokyo) the Fine Molds 1/48 scale Judy I had asked for. It'll fit right in on The next Japanese build if our gracious host should offer one this coming year. I don't think I'd be able to do another this year, I have a Revell 1/72 Type IX U-Boat to get working on shortly, and it may take the rest of my build time this year. 

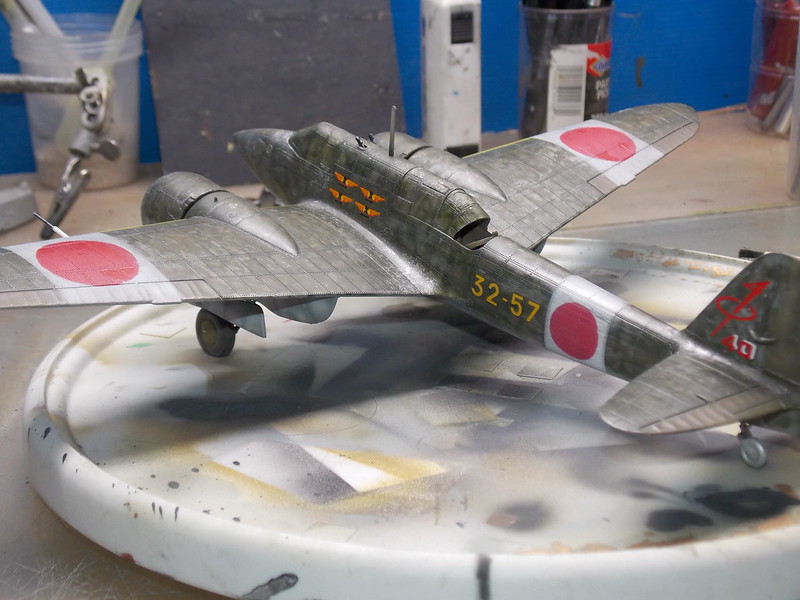
SO... Heres where we're at now..

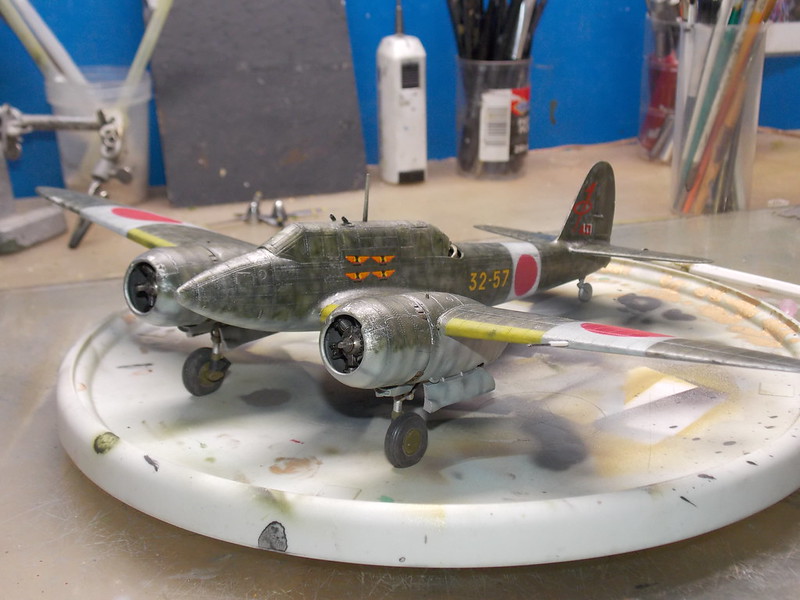
I had a tad of bleed to repair where paint got under the tape... thats done and I'm getting the decals on now.

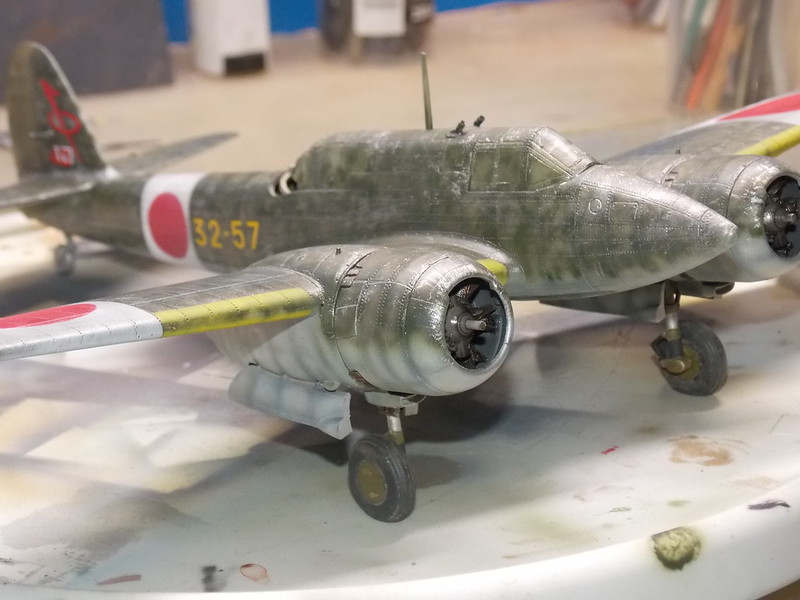
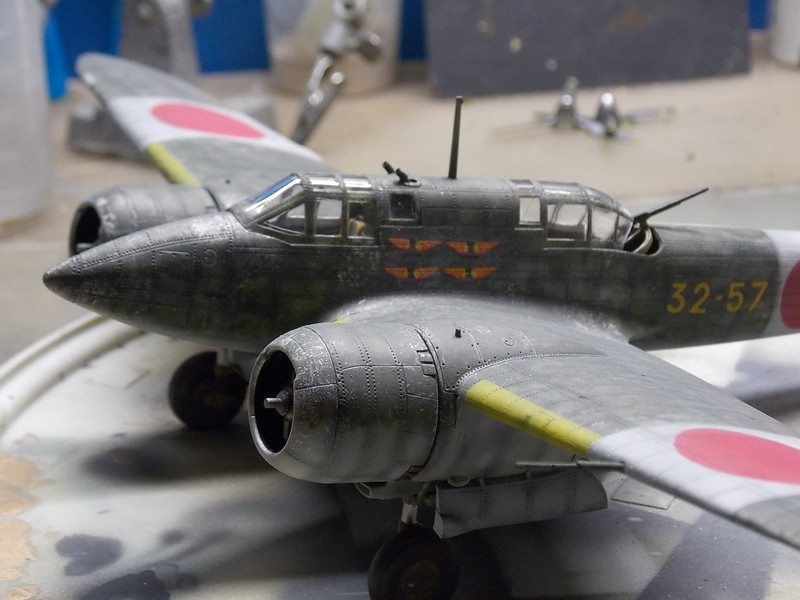
And the tapes off the canopys.

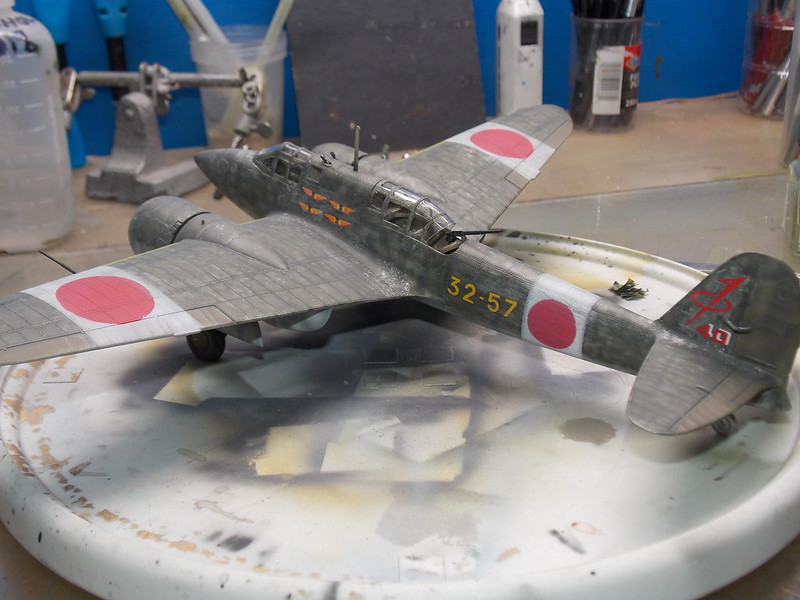
And tomorrow, I'll do some more weathering, and finish coat the paint and make a little base to mount it to! Keep up the great work everyone! 

Doug

When Life Hands You A Bucket Of Lemons...

Make Lemonade!

Then Sell It Back At $2 Bucks A Glass...

  • Member since
    November 2009
  • From: SW Virginia
Posted by Gamera on Thursday, July 12, 2018 7:20 PM

Doug: Looks fantastic!!! And congrads on the 'Judy'!

"I dream in fire but work in clay." -Arthur Machen


  • Member since
    October 2008
  • From: italy
Posted by bsyamato on Friday, July 13, 2018 11:05 AM

Well done on the nick!


heres few updates about the ki-9 (Spruce for allies) 


The cockpit cage withouth the PE parts (prepainted pieces from eduard) , seats and the propeller with some PE, ready for primer


PE wars on the engine, at the end i used old school details 


Exhaust and cowling glued , all black base paint here


that's all for now :)

  • Member since
    November 2009
  • From: SW Virginia
Posted by Gamera on Saturday, July 14, 2018 3:20 PM

Bsyamato: Lookin' good!!!

"I dream in fire but work in clay." -Arthur Machen


  • Member since
    October 2008
  • From: italy
Posted by bsyamato on Monday, July 16, 2018 4:21 AM

thanks Cliff, few updates :

primer and inner color (mix) with acrilics


At the next!

  • Member since
    October 2008
  • From: Georgia
Posted by Rigidrider on Monday, July 16, 2018 7:24 PM

BSY, Cliff... Thanks! I think I'm gonna call my Nick, Finished! 

There wasn't as much left to do as I thought, so I just added some exhaust staining, and made her a simple base to sit on, and I think shes done...

Well, I guess thats about it for the Nick... Choice of finish pics are yours Cliff. I always enjoy your Japanese builds and hope to be back soon, but as I said, I have a Huge submarine to build and theres a chance it'll take the rest of my build time this year. We'll see! Thanks again, and I'll poke my head in from time to time to keep up with all the cool work going on! Take care all!!!

Doug

When Life Hands You A Bucket Of Lemons...

Make Lemonade!

Then Sell It Back At $2 Bucks A Glass...

  • Member since
    November 2009
  • From: SW Virginia
Posted by Gamera on Monday, July 16, 2018 8:21 PM

Doug: Outstanding job there!!! Just more proof older kits can be made to look just as good as the newer ones with some skill and TLC!

Thanks for joining us- good luck with the sub! If nothing horrible happens to me I'll be posting JGB VIII at the end of the year.


Bsyamato: Looks good, you're moving right along!

"I dream in fire but work in clay." -Arthur Machen


  • Member since
    July 2014
Posted by modelcrazy on Monday, July 16, 2018 9:56 PM

Ditto

Looks great DougYes. Nice job on the paint and I like the base.

Steve

Building a kit from your stash is like cutting a head off a Hydra, two more take it's place.


http://www.spamodeler.com/forum/

  • Member since
    April 2006
  • From: ON, Canada
Posted by jgeratic on Monday, July 16, 2018 10:22 PM

Hi Doug, the Nick really stands out.  Yes

Lot of character to the way you have painted it, and neat idea with the groundwork, really has a feel of jungle brush that has been chopped down.


regards,

Jack

  • Member since
    June 2018
  • From: Ohio (USA)
Posted by DRUMS01 on Tuesday, July 17, 2018 12:20 AM

"Better Late Than Never"...

I built this during the GB time period, but I did not take alot of pictures or provide a narrative for the assembly. None the less, here is my toss into the Group Build: 1/24 Bandai Shinden Kai.

The kit was molded in the early 70's, but had recessed panel lines; something advanced for that era. The cockpit, wheel wells, engine, and left gun bay were mostly scratch built. I opened the access panel above the engine to show the various tanks lines, etc. I also kept the prop loose so I could remove the engine cowling. Once again, sorry for the late foray into the GB and not providing process photos; next time I will do better.

Your feedback is encouraged.

v/r,

Ben

"Everyones the normal until you get to know them" (Unknown)

LAST COMPLETED:

1/35 Churchill Mk IV AVRE with bridge - DONE

NEXT PROJECT:

1/35 CH-54A Tarhe Helicopter


  • Member since
    October 2008
  • From: Georgia
Posted by Rigidrider on Tuesday, July 17, 2018 2:17 PM

Cliff... Thank you sir! You know, a lot of folks overlook the older kits and the offerings from the likes of Nichimo, Aari, Otaki... shoot, I think they are great base kits with loads of detail and are great base kits. The pits and such are a bit sparse,  but nothing some spare parts or PE won't  remedy.  I'll  be watching for JGB VIII!

Jack and Steve.... Thank you both so very much!

Drums... outstanding ! 

When Life Hands You A Bucket Of Lemons...

Make Lemonade!

Then Sell It Back At $2 Bucks A Glass...

  • Member since
    November 2009
  • From: SW Virginia
Posted by Gamera on Tuesday, July 17, 2018 6:18 PM

Ben: Looks incredible!!! Esp considering it is an older kit.


I hate to say it but the idea of a GB is to follow along posting photos as you build the model like Bsyamato is doing. You're more than welcome to join us with another Japanese model or join us in the next build in January!


Cliff

"I dream in fire but work in clay." -Arthur Machen


  • Member since
    June 2018
  • From: Ajax, Ontario
Posted by Sargee15 on Thursday, July 19, 2018 11:06 AM

Hi bsyamato,

Nice work on the Tachikawa!

Looking forward to your efforts.

Ted

  • Member since
    June 2018
  • From: Ajax, Ontario
Posted by Sargee15 on Thursday, July 19, 2018 11:08 AM

Fabulous job on the Nick, Doug.

Enjoy your sub!

Talk to you soon,

Ted

  • Member since
    June 2018
  • From: Ajax, Ontario
Posted by Sargee15 on Thursday, July 19, 2018 11:23 AM

Ben,

Marvelous George.  I've got one unbuilt that I take out and look at once in a while.  Did you use the kit engine as your base?

Talk to you soon,

Ted

  • Member since
    June 2018
  • From: Ohio (USA)
Posted by DRUMS01 on Saturday, July 21, 2018 12:37 AM

YES , I used the kit engine for the basic part of the build. 

"Everyones the normal until you get to know them" (Unknown)

LAST COMPLETED:

1/35 Churchill Mk IV AVRE with bridge - DONE

NEXT PROJECT:

1/35 CH-54A Tarhe Helicopter


  • Member since
    October 2008
  • From: italy
Posted by bsyamato on Wednesday, July 25, 2018 4:18 AM

really great finished Nick Doug , i like the weathering level Bow Down

Well done Shiden kai Ben, first time i see a similar kit from bandai :)


Heres update about the Ki-9:

War with PE parts patially won, seatbelts ok, side instruments glued and repositioned various times (no marks on the kit!) and bended and glued the layered IP with glossy paint not thinned.

Also clear layers and light washing on dark blue grey parts.


before to close


I skip my usual drybrush step with interiors, the upper ouverture are too little to add something to realism .


Under pressure


Wings on and some putty/sanding work 


Align of tail surfaces shows bad angle of wings , after i bend them ..


Geras on , not simply but at the end seems at least strong structure. Engine not glued


At the next!


JOIN OUR COMMUNITY!

Our community is FREE to join. To participate you must either login or register for an account.

SEARCH FORUMS
FREE NEWSLETTER
By signing up you may also receive reader surveys and occasional special offers. We do not sell, rent or trade our email lists. View our Privacy Policy.