SEARCH FINESCALE.COM

Enter keywords or a search phrase below:

The Race Into Space GB, October 2018 - July 2019 (Ended)

56044 views
1682 replies
1 rating 2 rating 3 rating 4 rating 5 rating
GAF
  • Member since
    June 2012
  • From: Anniston, AL
Posted by GAF on Thursday, October 4, 2018 12:34 AM

Time to start this off, and since the project I'm working on is about 50 years old, I thought this would be a good video to post.  "It's been a long time..."

This is the old Revell "The Apollo" model from 1969.  It's missing a few pieces that I'm going to have to scratch-build, but I've gotten quite a few plans, dimensions and photos collected so I hope that it won't be too bad.  Here's what the project looks like now.

I'm going to have to do some paint removal, so soaking in Purple Stuff will be one of the first priorities.  While the paint is being removed, I'm planning on starting the LES (Launch Escape System) or Escape Tower.  The piece of dowel in the picture is the beginning of that.  Here's a nice photo of one at Houston.

The NASA patch is one I picked up at the Marshall Space Flight Center back in the early 70s.  I hope to incorporate it into the base the model will sit on when finished.

As a back up, and when I finish the main project, I have a few items I want to refurbish.

These are part of the AMT "Man in Space" rocket collection, and the Revell Saturn V.  I only have the upper portion of the Saturn V (and a few parts of the S-IVB).  I intend to rebuild them, including a new S-IVB scratch-built.  Since I only have one Mercury capsule, I'll use it on the Atlas and turn the Redstone booster into an Army Redstone with a scratch-built upper payload.  I have collected dimensions and photos for that too.

Anyway, good luck with all your builds!

Gary

  • Member since
    October 2010
Posted by hypertex on Thursday, October 4, 2018 6:24 AM

modelcrazy

The vehical has cleared the tower.


Poyekhali!

  • Member since
    November 2009
  • From: SW Virginia
Posted by Gamera on Thursday, October 4, 2018 7:44 AM

Gary: Ohhhhhhhhhh cool! Looking forward to seeing all this come together! 

And thanks for the shots of Houston Launch Control, I've got to get out there to see it someday.  

"I dream in fire but work in clay." -Arthur Machen


  • Member since
    July 2014
  • From: Franklin Wi
Posted by Bakster on Thursday, October 4, 2018 8:12 AM

GAF


The clock is operating!

Mission Clock

Mission Director (GAF)


Awesome launch video, Gaf.

  • Member since
    July 2014
  • From: Franklin Wi
Posted by Bakster on Thursday, October 4, 2018 8:23 PM

Well--we are off and running.

First looks at my kit: 

The kit offers the option to build any of the Mercury (Redstone) missions. I am building MR-3, the Alan Shepard Mission. Btw. Horizon Models appears to be manufactured in Australia.

What's in it:

The kit seems to give you the basics for a good model. It even includes some PE. Love it or hate it, it's there.


But--this model WILL take some work to bring it to a higher standard. There are sink marks in various places, and the panel lines are not only oversized, but a bit wonky. The missle tube seems a bit wavey as well.

This will challenge me in new ways. Though I have been building models for a few years now, I still have a lot to learn and master.

I hope to have a build update this weekend.

That's all for now.


GAF
  • Member since
    June 2012
  • From: Anniston, AL
Posted by GAF on Thursday, October 4, 2018 8:44 PM

Bakster>  Thanks for the update!  Yes, I think I remember Horizon models were from "Down Under".  Big Smile

I also seem to recall that Don Stauffer built their Mercury/Atlas kit.  Not sure how similar they are, but you might want to check his build under "Space".  As for me, I'm still getting some stuff together for the LES.  Should have something to report this weekend also.

Oh, and glad you liked the launch video!

Gary

  • Member since
    July 2014
  • From: Franklin Wi
Posted by Bakster on Thursday, October 4, 2018 8:58 PM

GAF
I also seem to recall that Don Stauffer built their Mercury/Atlas kit.  Not sure how similar they are, but you might want to check his build under "Space".

I recall that build and it was a good one. I'd like to build that kit too.

Looking forward to what you have this weekend. 

GAF
  • Member since
    June 2012
  • From: Anniston, AL
Posted by GAF on Thursday, October 4, 2018 9:03 PM

Bakster

Looking forward to what you have this weekend. 

Don't expect too much!  I'm just getting tubing together to build the support structure for the escape tower.  Got plenty of 2mm plastic rod, but I think I need 1.5mm.  Will drop by the local hobby shop tomorrow and see if they have something smaller than 2mm.

Gary

  • Member since
    July 2014
  • From: Franklin Wi
Posted by Bakster on Thursday, October 4, 2018 9:14 PM

GAF
Don't expect too much! 

LOL.  I won't if you won't.

  • Member since
    July 2014
Posted by modelcrazy on Thursday, October 4, 2018 9:27 PM

Bakster
This will challenge me in new ways. Though I have been building models for a few years now, I still have a lot to learn and master.

LOL, don't we all.

Steve

Building a kit from your stash is like cutting a head off a Hydra, two more take it's place.


http://www.spamodeler.com/forum/

  • Member since
    July 2014
  • From: Franklin Wi
Posted by Bakster on Thursday, October 4, 2018 9:30 PM

modelcrazy


Bakster
This will challenge me in new ways. Though I have been building models for a few years now, I still have a lot to learn and master.


LOL, don't we all.


LOL! "Master Yoda... The Jedi Master that instructed me."  OB1

  • Member since
    November 2009
  • From: SW Virginia
Posted by Gamera on Friday, October 5, 2018 7:57 AM

Ohhhh looks awesome Gary! 

So many options, not sure I'd be able to make up my mind there. 

"I dream in fire but work in clay." -Arthur Machen


  • Member since
    October 2010
Posted by hypertex on Saturday, October 6, 2018 9:44 AM

Here is an update on my Dragon Lunar Module Eagle in 148. I actually started this about two years ago and only got as far as the main structure of the ascent stage.

I have ambitious plans for this kit. I want to go all out on the detail and cover it in actual foil. Then mount it on a lunar base. I would like to correct as many defects in this kit as I can, and add in many missing details.

The first step is to replicate the crinkled skin on the ascent stage.

This stage isn't covered in foil like the descent stage, but it's skin has some subtle wrinkles on it. It reminds me a bit of the oil-can effect found on some ships and aircraft. Of course, all LM kits are perfectly flat on these panels, so I'll have to add this texture myself. I've got about a third of the panels finished at the moment, I'll post more pics when I'm done with the ascent stage, plus some instructions if anyone is interested in how I achieve the effect.

More to come . . .


  • Member since
    July 2014
  • From: Franklin Wi
Posted by Bakster on Saturday, October 6, 2018 10:44 AM

hypertex
I have ambitious plans for this kit

Yes you do! I love it. I am looking forward to seeing how you bring this all about. 

GAF
  • Member since
    June 2012
  • From: Anniston, AL
Posted by GAF on Saturday, October 6, 2018 12:23 PM

Hypertex> Very good!  I have not seen the Dragon version of the LM, so this will be a first for me to see going together.  I only have the old Revell and Monogram (the Monogram being the more accurate) versions.  I've thought that foil or paper would give a nice "crinkled" effect for the flat panels.  Paper, with some white glue, might give the best effect without crinkling too much.

Nothing to report on my end, as I haven't made it to the hobby shop for more rods.  Just a few hours from now and I'll get over there.  Smile

Gary

  • Member since
    March 2010
  • From: Boston
Posted by mach71 on Saturday, October 6, 2018 5:32 PM

Hypertex, I found a bunch of photo's of the NASM's LM from back in 2015 when they were

restoring it in place. I would go 2-3 times a month and talk with the people working on her. They told me they have all the LM spare parts that NASA and Grumman had at the end of Apollo! 

I hope thay can help you. I can email higher quality photos if you need them.


  • Member since
    March 2010
  • From: Boston
Posted by mach71 on Saturday, October 6, 2018 5:34 PM

  • Member since
    March 2010
  • From: Boston
Posted by mach71 on Saturday, October 6, 2018 5:37 PM

  • Member since
    March 2010
  • From: Boston
Posted by mach71 on Saturday, October 6, 2018 5:40 PM

This LM is #2, it was not used because the 1st test flight was sucsessful.

The NASM has fitted it out like Apollo 11.

  • Member since
    October 2010
Posted by hypertex on Saturday, October 6, 2018 6:29 PM

Thanks for the pics, mach71. Prior to the 2015 restoration, LM-2 was known to be an inaccurate restoration of Eagle, so I gather they fixed all of those. I'll PM you about high res pictures.

  • Member since
    July 2014
Posted by modelcrazy on Saturday, October 6, 2018 6:36 PM

Wow Mach, great pics of something you just don't see much of, at least I don't. Even the Boieng museum dosn't have the whole LEM just the ascent stage.

Steve

Building a kit from your stash is like cutting a head off a Hydra, two more take it's place.


http://www.spamodeler.com/forum/

  • Member since
    March 2010
  • From: Boston
Posted by mach71 on Saturday, October 6, 2018 8:17 PM

Hypertex,


I emailed you a few emails with a few pictures each. They are large so I don't know

if they will go into your spam.

I'll be back in DC friday-saturday, let me know if there is any photos  I

can take for you. I use my iphone X.

GAF
  • Member since
    June 2012
  • From: Anniston, AL
Posted by GAF on Saturday, October 6, 2018 8:21 PM

Mach71>  Thanks for those!  That's a great set of images for the LM, and I may have to refer back to those when I'm refurbishing the Monogram LM.

Meanwhile, a couple of links that might be of interest while working on the Lunar Module.

Color guide for the Lunar Modules by Paul Fjeld.

http://home.earthlink.net/~pfjeld/lmdata/index.html

http://home.earthlink.net/~pfjeld/lmdata/otherlms.html

Anyone seen the Mitchell Field, Garden City Long Island, NY version?

ALSO - if you want a detailed interior for your LM, this might be the way to go (if you can print, cut-out and fold all that paper)!

http://uhu02.way-nifty.com/die_eule_der_minerva/041.html

That is just crazy amazing!

*********

Meanwhile, I managed to pick up some more plastic rod today, and am now atempting to piece together the lattice work for the LES.  It's a bit of a "I'm not sure about this" situation, as the LES changed (much like all the equipment) over the years.  I have a paper model that I am using to go by.  Still, the lengths are confusing.  I'll just have to adjust as I go along.  In the end, it will be close to the correct length, though the parts might be a millimeter or so off.

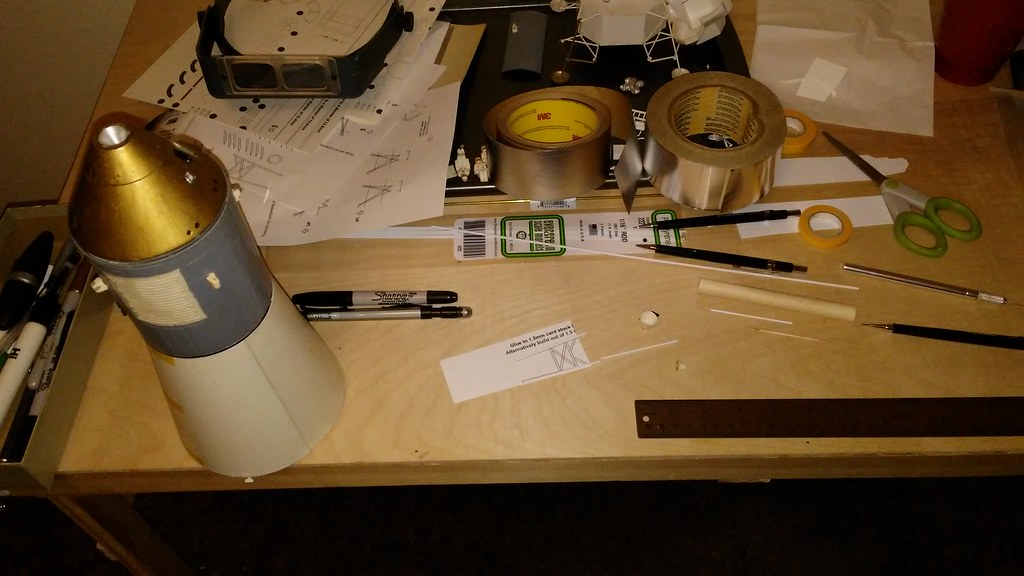
I've taped the folding doors together to get a diameter for the lower section, and broken out the aluminum duct tape to use for covering the dowel that will serve as the main body of the LES.  The mechanical pencils (tips) are being considered for use as the nozzles for the LES rocket engines.  They're conical and filing them down would make them quite acceptable for that use.  Who knew old pens would come in handy?

That's the news so far.

Gary

PS> Here's the one at Mitchell Field, Garden City Long Island.  If anyone is in the area, you might want to drop by as they're having an Apollo exhibit to commemorate the 50th anniversary of the landing

http://www.cradleofaviation.org/history/exhibits/exhibit-galleries/exploring_space/grumman_lunar_module_lm-13.html


  • Member since
    June 2018
  • From: Ohio (USA)
Posted by DRUMS01 on Saturday, October 6, 2018 11:42 PM

Mach71, I have the same kit. Where did you find the Space Model System decals? I've looked everywhere and they appear out of stock. Your pointing me in the right direction would be much appreciated... (THANKS)


Ben

"Everyones the normal until you get to know them" (Unknown)

LAST COMPLETED:

1/35 Churchill Mk IV AVRE with bridge - DONE

NEXT PROJECT:

1/35 CH-54A Tarhe Helicopter


  • Member since
    March 2010
  • From: Boston
Posted by mach71 on Sunday, October 7, 2018 8:01 AM

I got mine at cult tv man, but they are listed as out of stock now.


https://www.culttvmanshop.com/Mercury-Capsule-112-scale-decals-from-Space-Model-Systems_p_889.html

  • Member since
    July 2014
  • From: Franklin Wi
Posted by Bakster on Sunday, October 7, 2018 2:21 PM

Awesome pics, Mach 71.

A very little to show today. Tubes glued.

Below: This shows a little of what I was talking about with the panel lines and such. They are not very clean and they don't even line up well. I will fill them, and rescribe. You can even see some sink marks in this image. 


GAF
  • Member since
    June 2012
  • From: Anniston, AL
Posted by GAF on Sunday, October 7, 2018 3:07 PM

Bakster>  I see what you mean.  Sometimes, model companies should just forego the panel lines and just give you a smooth surface you can scribe or draw on your own.

Any chance you could find a piece of PVC pipe the same diameter?

Gary

  • Member since
    July 2014
  • From: Franklin Wi
Posted by Bakster on Sunday, October 7, 2018 5:16 PM

GAF
Sometimes, model companies should just forego the panel lines and just give you a smooth surface you can scribe or draw on your own.

I sooooo agree. I am so tired of fixing what they mess up.

I toyed with the idea of PVC, but I didn't take that any further. I figured the odd's of finding the same diameter as being pretty remote. Since you mentioned it, I will check anyway. Now, if I had a lathe...I could turn it down on my own. But, I don't.

In the end, I will probably try using spru-goo to fill the joins. Then, sand the tube smooth, followed by scribing. Scribing is not something I have had much success with, thus far. I will practice first. I thought about drawing them on, but they won't show up in the black areas of the paint. Or maybe the best option is to leave the panel lines off entirely! Lol. 


  • Member since
    November 2009
  • From: SW Virginia
Posted by Gamera on Sunday, October 7, 2018 6:00 PM

Gary & Bakster: Those look great guys!!!

Mach71: Those are some awesome photos!

"I dream in fire but work in clay." -Arthur Machen


  • Member since
    June 2018
  • From: Ohio (USA)
Posted by DRUMS01 on Monday, October 8, 2018 2:15 PM

Short story; I found a kit of the original 1/48 Monogram LEM from many years past. The kit was started but the box is incomplete (missing the entire decent stage and the figures). Next I located and bought a 1/48 LEM from Revell, thinking it was the same kit, I was wrong. I noticed when comparing them, they are not only a completely different mold but the size is slightly different too. Looking at them I found I really like the Monogram version better, so I am back to zero. I finally just decided to scratch build the Monogram decent stage (for better or worse). 

I used the foil template found within the instructions to size the main section of the decent stage. Careful measurements allowed me to finish the basic top portion and using scrap (including a paint cap) and spares, I modified a 1:18 belly tank to become the decent stage rocket nozzle. 

Here is the lunar base with the initial coats of paint (still to be detailed)

In the process I also dug other kits from my stash and bought another just in case the scratch build does not turn out. Just asking everyone, which of these kits do you think I should build? (I like them all):

Let me know your thoughts....

v/r,

Ben

"Everyones the normal until you get to know them" (Unknown)

LAST COMPLETED:

1/35 Churchill Mk IV AVRE with bridge - DONE

NEXT PROJECT:

1/35 CH-54A Tarhe Helicopter


JOIN OUR COMMUNITY!

Our community is FREE to join. To participate you must either login or register for an account.

SEARCH FORUMS
FREE NEWSLETTER
By signing up you may also receive reader surveys and occasional special offers. We do not sell, rent or trade our email lists. View our Privacy Policy.