SEARCH FINESCALE.COM

Enter keywords or a search phrase below:

C-47 Skytrain/Dakota/DC-3 GB

30837 views
664 replies
1 rating 2 rating 3 rating 4 rating 5 rating
  • Member since
    August 2016
Posted by Keyda81 on Monday, January 7, 2019 3:51 PM

GMorrison

The stripes came out well. You'll no doubt hear all about how the stripes were painted on by hand on 6/05/44, but your subject is the restored aircraft and judging from the photos, her stripes are nice and sharp.

I suggest you wait a solid week before putting any masking tape on them. No hurry, find something else to work on.


Yep, I've already heard it once, lol.  I just showed said person a picture of Whiskey.  I plan on working on the engines, and the few things I need to scratch build.  I'll probably keep my hands off the plane itself until the weekend.  In fact I just took a trip to the hobby store and picked up some materials so I can work on the engines.  I'll be following lawdog's tutorial.

  • Member since
    February 2010
  • From: Berkeley CA/St. Paul MN
Posted by EBergerud on Monday, January 7, 2019 6:03 PM

Anyone curious on how to airbrush craft or artist acrylic paints might be interested in the tirade below - if you're not, it will be pointless. I've spent years dabbling in the subject and have been advised by Golden Paints on the subject - and they know everything about acrylics. (They can claim to have invented them.) Forewarned.

Craft paints in my experience are not created equal. They vary in pigment load and general quality of the binder - so if two brands are there, plunge for the more expensive one. The one thing you can count on is that craft paints will be water based acrylics. Check the label - if it says "nontoxic" and "nonflammable" - it's water based. (If the label says nothing it will be water based. Law requires "flammable" and "toxic" materials to be labeled. If you bottle says either, it will be an "acrylic/lacquer" like Tamiya or Gunze. The only claim these brands have to "acrylic" is that you can clean them with water. They act very differently at every step and are excellent for airbrushing but bad for hand painting. That said, some people like water based paints for health reasons - I do not think the acrylic lacquers are dangerous if used properly. I use solvents for cleaning my airbrush, but stick to water based paints out of preference.) People that make craft paints want to sell it to schools - and if your pupils might drink the stuff, you want it to be pretty benign. (I'd guess craft paints might also not use extremely useful but not very healthy pigments like zinc.)

Craft paints are widely available and that's a real plus. If you're lucky enough to live where there is an art supply store (Blick Arts is the biggest in the US) or buying enough stuff to justify an internet buy there's a really good alternative. Blick arts sells the artist version of Vallejo paints. Vallejo started as an artist supply company and only branched into model paints later. (Check their website - it starts with a kind of portal - art or model.) Vallejo "Fluid Acrylics" are identical to Vallejo "Model Color" or "Panzer Aces" and thus thicker than Vallejo "Model Air." Standard pigments go for about $5 for a 4 ounce bottle - ritzy mixing pigments are more, but you'd never find those in modeling sites. That's about half the price of Golden Fluids which are made by the top US artist acrylic company. Blick also has proprietary acrylic fluids that are about the same - I like their "matte acrylics" for hand painting. These will be better paints than craft paints. How much better depends on the quality of the craft paint.

You can airbrush craft and thick water acrylics. If you want good results you need to understand a little how water based acrylics work. (Check a very good YouTube video called "Worst Mistake Acrylic Painters Make" for details.) Water based acrylics are pigments suspended in a binder made by some form of polymer. How thick the binder is will depend upon the purpose of the paint. As craft and many artist acrylics are made for hand brushing (ditto for Vallejo Model Color/Panzer Aces) they'll be fairly thick, which allows them to adhere well and quickly to non-porous surfaces - like plastic. If you thin the polymer heavily with water (I'd say anything over 20% is a risk - 50% won't work) it will go through an airbrush, but when the paint dries the binder molecules (the stuff that makes the paint film adhere) won't be able to reform and the surface will be unstable and probably look bad. A lot of home brew thinners are used - the Future/water is common. It sort of works because Future is very close chemically to a polymer - that's why it's used so commonly by modelers. So your 50/50 Future/Water means you're thinning the paint with 25% water and 25% sort-of polymer. Dried Future will hold the paint film, although I wouln't praise the finish. You will get a gloss finish obviously, but varnish will handle that. This is a good home brew, and easily available. (A usually good modeler on YouTube claims you can airbrush Vallejo Model Color with "retarder medium" which is one bad idea in my book. The stuff is a conditioned polymer, but I'd worry about the finish drying properly. Retarder can be very helpful - in drops - not dollops. The best natural retarder is glycerin - cheap, and really effective - unfortunately your paint may never dry if you use two drops.)

A better solution is to run down a bottle of "Airbrush Medium" which is made by several art companies - Liqutex and Golden are two. Very similar is something Vallejo called "Thinner Medium". They all look the same and will all work. They're white, water-like consistency and simply a thinned polymer that's the same as your paint. So this will go through the airbrush nicely and the pigments will bind perfectly when dry. However, you are cutting the pigment load with thinned paints (that's true regardless of what type of paint you use - this effect is very desireable for many applications) so don't expect the paint to be quite the same color - but it will be close. Mix it about 1:1 with craft or fluid acrylics - or less depending upon your airbrush. You might want to track down some Fluid Retarder and use a bit to avoid tip dry - just follow the instructions. All of this stuff can be found on Amazon, but the Blick web site will sell it for less. (I wouldn't experiment with flow improvers made for latex like Floetrol - the stuff is very cheap, but latex and modeling acrylics aren't really quite the same animal. But it's all water solable so who knows?)

If you want to know how acrylic paints work Golden has a splendid web site that's filled with information of all kinds. Artists are good customers and very picky. And there are also more of them. Model makers pay extreme premiums for the things we use - Golden High Flow acrylics are cheaper per volume than any modeling brand. Vallejo makes super acrylic varnishes and they're a third the price on Blick than from a modeling site.

Eric


A model boat is much cheaper than a real one and won't sink with you in it.

  • Member since
    November 2008
  • From: Central Florida
Posted by plasticjunkie on Monday, January 7, 2019 6:15 PM

Never had good luck airbrushing craft acrylics even using all the additives mentioned. I do use them for terrain color and other dio work. I recently played with Mission Model Paints and was impressed how they sprayed. They may very well replace my discontinued MM enamel FS colors once I run out of them. 

 GIFMaker.org_jy_Ayj_O


Too many models to build, not enough time in a lifetime!!

  • Member since
    August 2016
Posted by Keyda81 on Monday, January 7, 2019 6:53 PM

Eric, Thanks for all the info.  You've got me thinking maybe I would be better off brush painting the craft paint on.  It might be a little thick and leave brush strokes, but maybe I could just thin it a bit with Future, so it flows better.  But not thin enough to run through the airbrush.  Something to consider, and test out.  I do have some areas that would be best blended out with the airbrush though.  Maybe I will go with a 60/40 mix of Future/water and give that a go.  I did test the mix out on a trashed kit, and it was obviously a bit more fragile than model paint, but not as bad as I expected.  

plasticjunkie, I use mostly Model Master enamels myself, I've always just had better luck with them.  I have used a couple Tamiya acrylics, but I still prefer the MM enamels.  They just never fail, lol.  I'll have to check out the Mission Models stuff one of these days.

  • Member since
    February 2010
  • From: Berkeley CA/St. Paul MN
Posted by EBergerud on Wednesday, January 9, 2019 1:13 AM
There's a very good YT Channel called Andy's Hobby Headquarters. Andy owns a model shop in Phoenix and builds well and fast. He's a great fan of Tamiya and recommends a technique I'd bet would work great. He takes a bottle of Tamiya and fills it to the top with modeling lacquer thinner (made by Tamiya or Gunze Mr. Color - not hardware store stuff). From watching his painting I'd guess he uses an Iwata Eclipse with a .35 needle. I'd bet real money that his tip would work well. Everything Tamiya makes is good. Just not for me. I modeled a lot when I was a kid - circa 1960. I used Testors everything - glue in a tube and enamel paints. Hand painted natch - I didn't know what an airbrush was. Enamels went out when I got an airbrush - I don't have the space for a spray booth.and my wife didn't even like it when I use Tamiya which are pretty mild. So I got used to water based paints and now I know how they work. Perference and nothing more. I know modelers so good they'd work fine with color crayons. Armor uber-guru Mike Rinaldi is moving toward using acrylics to lay down a base and does everything else with oils. (Testors didn't make oil paints when I was a kid, so I didn't get a head start there either.) Eric


A model boat is much cheaper than a real one and won't sink with you in it.

  • Member since
    August 2016
Posted by Keyda81 on Wednesday, January 9, 2019 12:46 PM

I'll have to check out his channel sometime.  

I've started the masking process, and I'm almost finished.  I'm hoping to get some paint on the plane this afternoon.  Hopefully two out of three colors than I plan on using.  So wish me luck!

  • Member since
    March 2003
  • From: Towson MD
Posted by gregbale on Wednesday, January 9, 2019 4:59 PM

Just wanted to pitch another word of thanks to Mark for his heads-up about the cranky gear struts on the Roden kit. Thanks to that forewarning and a little judicious test-fitting, I was able to drill out the sort-of-represented sockets a bit deeper...deeper on one side, than the other, in fact...and make the little pins seat securely with the struts nice and level.

(I then proceeded to break one of the delicate little 'Y' yokes in half, of course...but that was my own ham-fingered ineptitude. Not exactly a new experience.Propeller)

I salute you, sir!

Greg

George Lewis:

"Every time you correct me on my grammar I love you a little fewer."
 
  • Member since
    August 2016
Posted by Keyda81 on Wednesday, January 9, 2019 7:08 PM

Greg, It always helps to know things about a kit in advance doesn't it!  I'm sure your glad the gear is all set.  Looks good!

I had a rather productive and succesful day.  At first I tried thinning the craft paint I mixed up with a 50/50 mix of Futrue and Tamiya thinner.  That didn't go well.  It caused the paint to clump up, and I couldn't spray it out of the airbrush.  So I went back to my original test formula of water and Future.  But I did a 75/25 mix, Future to water.  That worked pretty well.  I didn't have any issues spraying it from my Iwata with the .35 needle.  The paint was a little thin, but as long as I was careful and didn't stay in one spot too long it was fine.  It dried nicely too.  So I was able to get all three colors painted today.  I do have some spots to touch up, but nothing major.  I'm pretty pleased with how it came out.  The colors might not be completely perfect, but looking at pictures in different light, at different angels the same patch of plane is a slighty different color from picture to picture.  I also discovered my cell phone camera likes to enhance the smallest bit of red, and make it ten times brighter.  So these pics were taken with my Nikon.

In the booth before I unmasked it.

After I pulled off the pound of tape, lol.

Last one is the model on a photo blanket I had made from a pic I took at the airshow last July.

Still lots more to do, but now she looks like Whiskey 7!

GAF
  • Member since
    June 2012
  • From: Anniston, AL
Posted by GAF on Wednesday, January 9, 2019 9:59 PM

Gregbale>  Another tiny aircraft!  Good work, and glad the landing gear problem didn't set you back.  Smile

Keyda> Paint and progress!  Always a good thing. 

Gary

  • Member since
    September 2012
Posted by GMorrison on Wednesday, January 9, 2019 10:37 PM

That is a really impressive model, Keyda81. Only a mother could love it.

See what that paint job does- it scales the thing nicely.

Bow Downand I don't give those out easily.

 Modeling is an excuse to buy books.


  • Member since
    April 2003
  • From: USA
Posted by keavdog on Thursday, January 10, 2019 12:59 AM

Hey Keyda wasn't sure what your were up to until I googled Whiskey 7.... You have nailed it.  I think a dull coat will tie it all together.  Well done!!!!


Thanks,

John

  • Member since
    February 2010
  • From: Berkeley CA/St. Paul MN
Posted by EBergerud on Thursday, January 10, 2019 3:30 AM
You just found out that water based acrylics do not like alcohol. Tamiya A-20 is about half alcohol and a lot of other conditioners - but it's made to thin solvent based paints - like Tamiya. I have no idea why anyone uses A-20 with Tamiya - it airbrushes better with Tamiya or Gunze lacquer thinners. Future/water should work okay - because it's a floor wax, future is "self-leveling" which should give a decent flow. My grandson is painting up an ancient Monogram Tirpitz that we stuck together (maybe 70 parts - perfect model for a beginner - so old that it doesn't list scale.) I was using craft paints. I had Applebarrel Red for lower hull. The kid thought it was too light (he's right of course, hull red is almost a burgandy) so I added a couple of drops of Golden High Flow Carbon Black. It turned the red into a reddish-black. I was very surprised. The pigment load on the Golden was so much higher than the craft paint that even a very small amount absolutely dominated it. But it brushed on fine after I put in some Golden Red and adjusted the hue.


A model boat is much cheaper than a real one and won't sink with you in it.

  • Member since
    February 2010
  • From: Berkeley CA/St. Paul MN
Posted by EBergerud on Thursday, January 10, 2019 3:47 AM

Whikey 7 carries a really interesting paint job. You can see three different colors. It was very common on especially 1942 USAAF planes to paint the leading and trailing edges of the wings and tails with green splotches - I've never seen whole aeilrons done green - but who knows? That reddish OD would certainly not have been standard, but wartime OD faded fast and faded deep - (some people thought it looked almost pink in the desert) - I could see that hue resulting. But much of the plane is painted with a standard OD. I wonder if the people that restored the plane tried to emulate the wartime finish? Most restorations give you a bright gloss OD - very logical paint for use, but not at all what a wartime plane would have looked like. Why not ask them about the paint when you go on your next ride?

Eric


A model boat is much cheaper than a real one and won't sink with you in it.

  • Member since
    August 2016
Posted by Keyda81 on Thursday, January 10, 2019 8:23 AM

Gary, Certainly is!  Makes me feel like I'm making progress. 

GMorrison, Thank you, lol. True not everyone is a fan of the faded paint.  Big Smile

John, Lol, I'm sure you aren't the only one.  A lot of people don't know about good old Whiskey.  Thank you! 

Eric, I figured I would at least try the Tamiya thinner and see what happened.  Well now I know, lol.  I don't plan on using craft paints much, but I know they are an available alternative if I need to match an odd paint color, and they'll work.  It's still a lot less stressful using model paints! 

Whiskey is certainly a bit of a hodge podge of colors.  I have contacted the musuem about her paint, but they don't really know anything about it, since she was painted before they took over ownership.  The only thing I can gather is she was repainted at some point by her previous owners with not so good quality paint, in the wrong colors, and it faded weirdly over time.  The earliest photo I can find of her is from 1989.

Next is while she was the previous owner.

Here was the interior before NWM got her.  She was a flying living room, lol.

Once NWM got her they stripped out the interior and replaced it my something a bit more suiting for the era.  Not what originally came with the C-47, but the cargo seats.  I'm assuming it was either to difficult or expensive to find the original ones.  They changed the exterior markings, and National Insignia to the proper colors.  I would love to know more about her history, and to come across a pic of her before she was taken out of service.  But it seems that kind of info is hard to find. 


  • Member since
    March 2003
  • From: Towson MD
Posted by gregbale on Thursday, January 10, 2019 8:26 AM

EBergerud
I have no idea why anyone uses A-20 with Tamiya - it airbrushes better with Tamiya or Gunze lacquer thinners.

In some peoples' situation, I think the more-noxious odor and fumes of lacquer thinner can be a real problem.

I'm not particularly bothered by them...but I've been using the X-20A thinner since I started using Tamiya acrylics 10+ years ago, and I've had zero problems with paint consistency or pigment separation. Those trouble-free qualities are enough for me to stick with it.Big Smile

Greg

George Lewis:

"Every time you correct me on my grammar I love you a little fewer."
 
  • Member since
    August 2016
Posted by Keyda81 on Thursday, January 10, 2019 9:18 AM

gregbale


EBergerud
I have no idea why anyone uses A-20 with Tamiya - it airbrushes better with Tamiya or Gunze lacquer thinners.


In some peoples' situation, I think the more-noxious odor and fumes of lacquer thinner can be a real problem.

I'm not particularly bothered by them...but I've been using the X-20A thinner since I started using Tamiya acrylics 10+ years ago, and I've had zero problems with paint consistency or pigment separation. Those trouble-free qualities are enough for me to stick with it.Big Smile


I use the X-20A thinner with the Tamiya acrylics as well.  The white gives me some trouble now and then, there is a very fine line between too runny and it spurting out of my airbrush.  It typically levels out when it's spurting anyway.  I only have a few Tamiya colors, and mostly use Model Master enamels.  I honestly think the Tamiya acrylcis smell worse than the Model Master enamels, lol. 

  • Member since
    May 2017
  • From: Denver, Colorado
Posted by MrStecks on Thursday, January 10, 2019 10:59 AM

gregbale

Just wanted to pitch another word of thanks to Mark for his heads-up about the cranky gear struts on the Roden kit. Thanks to that forewarning and a little judicious test-fitting, I was able to drill out the sort-of-represented sockets a bit deeper...deeper on one side, than the other, in fact...and make the little pins seat securely with the struts nice and level.

(I then proceeded to break one of the delicate little 'Y' yokes in half, of course...but that was my own ham-fingered ineptitude. Not exactly a new experience.Propeller)

I salute you, sir!

Glad I could help Greg.  Your gear is looking great.  I didn't break either of the Y yokes, but came close.  Super fiddly parts.

Cheers,
Mark


On the bench:  Revel 1/48 B-25J Mitchell

In the queue: Tamiya 1/48 F4U-1A Corsair

  • Member since
    May 2017
  • From: Denver, Colorado
Posted by MrStecks on Thursday, January 10, 2019 11:02 AM

Keyda
Your paint job is looking fantastic.  Well done.  Yes

Cheers,
Mark


On the bench:  Revel 1/48 B-25J Mitchell

In the queue: Tamiya 1/48 F4U-1A Corsair

  • Member since
    August 2016
Posted by Keyda81 on Thursday, January 10, 2019 2:17 PM

MrStecks

Keyda
Your paint job is looking fantastic.  Well done.  Yes

Cheers,
Mark


Thanks Mark!  She's really starting to look like a Mini Whiskey 7 now, lol.

Working on some fiddly bits that I forgot to add before paint.  No big deal.  They are mostly small scoops in various places on the fuselage.  I've made them out of the small clear drinking straws for the Huggies drinks for kids.  I'm really finding scratch building stuff to be a lot of fun.  It's a bit of a challenge to figure out what I can use to make certain things.

  • Member since
    February 2010
  • From: Berkeley CA/St. Paul MN
Posted by EBergerud on Thursday, January 10, 2019 5:39 PM
Tamiya lacquer thinner is far less aggressive than hardware style thinner: ditto with the even better Mr. Color "Self Leveling" Thinner from Gunze. I started my airbrushing with Tamiya paints and A-20. It wasn't a disaster but I had serious trouble with tip dry. So figure this is about five or six years back. It was then when Armor experts Adam Wilder and Mig Jimenez (the used to work together) claimed that Tamiya and Gunze paints were actually lacquers and that lacquer thinner was preferable. Caused quite a squabble on places like the Flory forum. I think most people that tried the lacquer thinner agreed with Wilder and Mig - I certainly did. I still use lacquers - my Duplicolor Primer is a true blue lacquer and the best primer I've ever used - but I only spray it outside. I use Windsor Newton matte varnish for my final coat and thin that with Tamiya lacquer thinner - it's not at all objectionable. Nothing like something like Alclad. The paint market has become mixed up on the subject. On one hand AK, who previously only made water acrylics, has just come out with a line of "acrylic lacquers" they call "Real Colors" and claim they match WWII colors very closely. MRP paints from Slovakia have gained serious support - another acrylic-lacquer. Mission Models appears to be doing pretty well and it joins Vallejo and LifeColor in the water based acrylic category. Some kind of poison for everyone - and I'd guess modelers with sensitive a sensitive nose will provide the market for Mission. As noted earlier, I think modeling paints are all safe if properly used, but if you don't have a spray booth, water based brands are very nice to deal with.


A model boat is much cheaper than a real one and won't sink with you in it.

  • Member since
    February 2010
  • From: Berkeley CA/St. Paul MN
Posted by EBergerud on Thursday, January 10, 2019 5:43 PM
If anyone wants to keep using enamels, Sovereign Hobby in England took over the White Ensign Brand of enamels and is now selling it under the name "Colourcoats" and it includes all of the major military colors. I've used WEM and Colourcoats to create "paint chips" that I can use when mixing Golden paints. They are very smooth and cover well like you'd expect an enamel to do. About the same price as MM as I recall. Eric


A model boat is much cheaper than a real one and won't sink with you in it.

  • Member since
    November 2010
  • From: Florida-West Central
Posted by Eagle90 on Thursday, January 10, 2019 5:55 PM

WOW!  You guys are making my build look like a Kenner toy!  LOL!  Awesome work everyone!

Sorry for the delay in the pics.  Been rough around here between the holidays and the government shutdown...yeah, I'm one of the lucky ones that still gets to work for no pay during the furlough.  Anyway, I have been able to do some more on the C-47.  Like I said, my work is nothing compared to you guys....all are inspiring to say the least!

As for par for me...the bloody decals gave me a fit.  I think they stink, but it's all I had.  Hey, my decal bad luck has to change some time...right?  LOL!

Here are few more progress pics.  Enjoy!  And everyone...great work!


  • Member since
    August 2016
Posted by Keyda81 on Thursday, January 10, 2019 7:56 PM

I was wondering where you've been Eagle90!  Looks great despite your decal situation! 

I've spent the day making fiddly bits, doing touch ups, and adding a few details.  Also put a gloss coat on her to protect the paint as best I can and get ready for decals.

You can see the addition of some fiddly bits, they look like some kind of air scoop, I don't know what they are, lol.

Painted the red around the windows and on the fuel caps.

Painted the engine cowlings, and started painting the engines....finally.


  • Member since
    September 2012
Posted by GMorrison on Thursday, January 10, 2019 10:12 PM

EBergerud
If anyone wants to keep using enamels, Sovereign Hobby in England took over the White Ensign Brand of enamels and is now selling it under the name "Colourcoats" and it includes all of the major military colors. I've used WEM and Colourcoats to create "paint chips" that I can use when mixing Golden paints. They are very smooth and cover well like you'd expect an enamel to do. About the same price as MM as I recall. Eric
 

Thanks, Eric. Even if they cost more, WEM has been the best source I've ever found for any Navy paints.

 Modeling is an excuse to buy books.


  • Member since
    February 2010
  • From: Berkeley CA/St. Paul MN
Posted by EBergerud on Friday, January 11, 2019 3:22 AM


Getting well into the weathering.


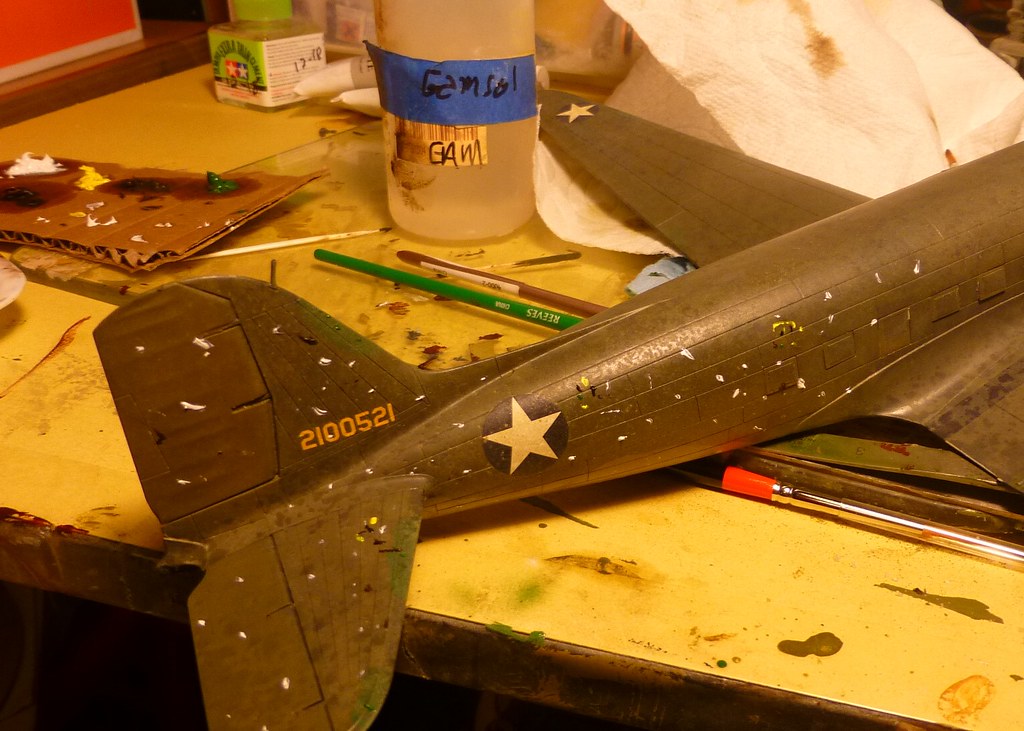
The first step was to do salt fading. Salt is often used for chipping (it's very good for some types of chipping - the hairspray stuff has made people forget it). It's better for fading. It's simple enough: you spray water on the model and then hit it with a good dose of salt (I use kosher and normal).


 salted by Eric Bergerud, on Flickr


When the salt dries, you airspray a very light coat of a grimy color. I did it twice - covered first with a grayish tan - covered second with a grayish brown. The salt makes sure that the filter doesn't hit the whole surface. In addition you get a kind of salty signature on the paint. Here's a detail of the salted C47 (BTW, for some reason the yellow color shift is very muted - you can the color of the plane pretty well in this pic: ditto for the salted plane above):


 saltdet by Eric Bergerud, on Flickr


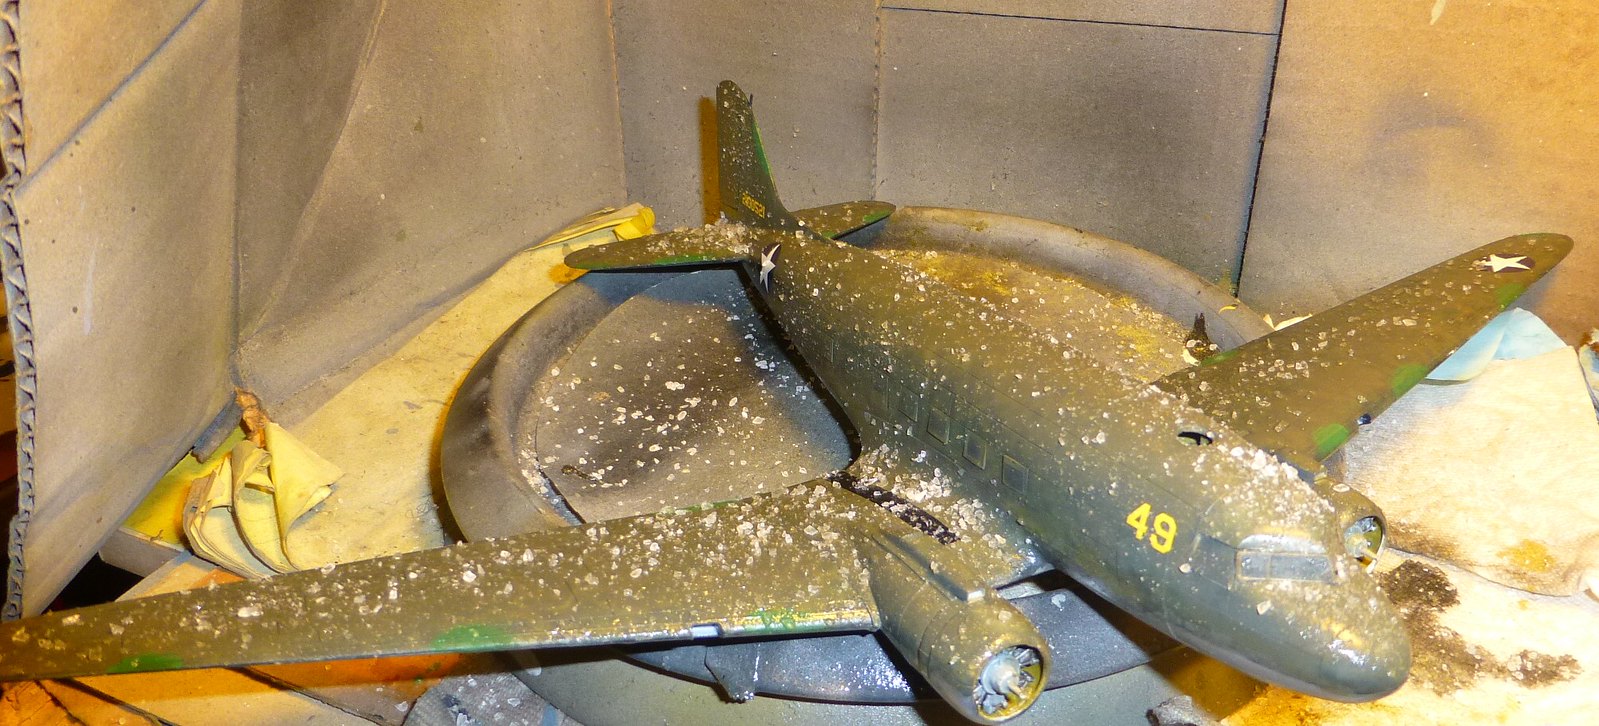
Here's the bird fully salted and rinsed (and the yellow shift back):


 saltfade by Eric Bergerud, on Flickr


The second step is to put on an oil paint dot filter. This also fades the plane, but it also mutes some of the salted effects, and hopefully gives the finish an extra dimension. The trick to dot fading is not to over apply the oils. I have followed Doog's tip and apply oil with a toothpick. Most of the dots are Windsor Newton Transparent White - the perfect fading paint. There a little clusters of yellow/black/burnt umber. This creates a kind of olive drab. For this I use Gamblin "Fast Matte" oils and Wilder modeling oils - both dry quickly and dry matte. My solvent of choice is Gamblin's Gamsol, the most benign white spirit in the universe - you can barely smell it. It also leaves nearly zero marking when dry. If I didn't have it I'd use artist white spirit (companies like AK sell a good version) - turpentine or turpenoid are not a good choice unless you want the plastic marred. Here are the dots applied:


 oildot by Eric Bergerud, on Flickr


Here's a detail pic: the left side of the wing has been filtered, the right has not - I think the difference is quite notable:


 oildet2 by Eric Bergerud, on Flickr


Here's the C47 after the dot filter has been applied and worked in:


 postoils by Eric Bergerud, on Flickr


Compare to the fully salted plane and you can see how the oils mute - but don't elminate - the salt fading. Indeed, both fading steps, when applied over the black basing, gives a grime effect to the entire plane. That's completely appropriate for a New Guinea C-47. The place was beastly hot, and it rained like crazy basically every day. In a climate like that you'll get mud turn to dust in about an hour, and there were no hangars in New Guinea. So it would be hot/sunny - hot/rainy/muddy - hot/dust day in and day out: Nothing was clean in New Guinea - including the aircrew. Place was a hardship post. My father was there for a year and a half and had no desire to visit his wartime station later in life.


 saltfade by Eric Bergerud, on Flickr


We'll let the model dry overnight - the fast drying oils applied in such small quantity will be fully ready. Then it will get a satin or gloss varnish and then out comes the Iwata Com.Art for panel lines and fluid stains. We'll also dirty up the bottom (I don't fade it because it wouldn't get the sun. But it would get the dirt.) Then we finish construction and hope the clear parts have come through okay. At the end I may even apply a lot dusting of pigments - we'll see.


Eric


A model boat is much cheaper than a real one and won't sink with you in it.

  • Member since
    December 2003
  • From: 37deg 40.13' N 95deg 29.10'W
Posted by scottrc on Friday, January 11, 2019 1:32 PM

Nice work on the finishes Keyda and Eric.

I got some progress in this week,  Its together and ready for from minor filling and sanding, then a coat of black primer hopefully this weekend.


GAF
  • Member since
    June 2012
  • From: Anniston, AL
Posted by GAF on Friday, January 11, 2019 3:06 PM

Eagle90>  Nice work, but I see what you mean about the decals.  Perhaps some weathering can blend them in better.

Keyda> Great progress!  You'll be finished very soon.  I take it the PE is for the engines?

Eric> Now that is a well-used aircraft!  Some interesting techniques you're using.

Scottrc> Looks like you're getting her together.  It's nice when you can finally begin the paint process.  Smile

Gary

  • Member since
    March 2003
  • From: Towson MD
Posted by gregbale on Friday, January 11, 2019 3:40 PM

Great to see everybody making such impressive progress! (Also good to see Eagle back among us!)

After wrangling all the teeny-tiny fiddly bits it seemed safe to put on pre-finishing, I, too, managed to get some paint on my 1/144 Roden effort.

Though I use mainly Tamiya acrylics overall, I really love Model Master's white and grey acrylic primers...they always seem to go on extra-smooth, and the satiny finish makes a great base for pretty much anything. In this case it was doubly-convenient, since the silvery-grey shade is a dead-on match for photos of the underside color for the RCAF's Dakotas.

I'll probably try to get the upper-fuselage white areas and the red trim done, before doing the rest of the NMF bits; the masking is usually easier that way.

Have a good (and productive) weekend, all!

Greg

George Lewis:

"Every time you correct me on my grammar I love you a little fewer."
 
  • Member since
    May 2017
  • From: Denver, Colorado
Posted by MrStecks on Friday, January 11, 2019 4:52 PM

Eagle90
Your bird is looking good.  Maybe a flat coat would help with the decal problems? 

Keyda
Really coming along nicely.

Eric
Thanks for the clinic on weathering. I normally just stick to black-bassing and oil paints, but you've got me wanting to try some salt fading.  Smile  I really like the way it's shaping up.  Really looks like I would expect a plane to look that lived in that harsh environment.

scottrc
Always nice to stick the wings on and suddenly have an airplane.  Lookin' good.

Greg
That MM primer looks pretty nice.  I've been using Badger's Stynylrez which I like (apart from it's ridiculous name), for the same reasons... smooth and satin finish.  It self levels perfectly too, even when I accidently flood an area. 


On the bench:  Revel 1/48 B-25J Mitchell

In the queue: Tamiya 1/48 F4U-1A Corsair

  • Member since
    August 2016
Posted by Keyda81 on Friday, January 11, 2019 8:45 PM

Eric, Wow!  That looks great!  I love the little tutorials as you go, I'm certainly learning quite a bit. 

Scott, Now it's really taking up some room on the bench! 

Gary, Thanks!  Some of the PE is for the engines, its an exterior kit, so there are other odds and ends too.  I won't be using all of it though. 

Greg, Looking good! 

MrStrecks, Thanks!

I spent pretty much the entire day following lawdog's tutorial to wire the engines.  It was no easy task, lol.  Then I tried making the "W" for either side of the fuselage, and I've had nothing but difficulty with it.  I opted to make it the same size as a "7" that's on a decal sheet I have, but I can't seem to get the measurements cut right.  I think I've been at it too long, and just need to take a break.  So I gave up for the night.  I'll pick it back up tomorrow. 

JOIN OUR COMMUNITY!

Our community is FREE to join. To participate you must either login or register for an account.

SEARCH FORUMS
FREE NEWSLETTER
By signing up you may also receive reader surveys and occasional special offers. We do not sell, rent or trade our email lists. View our Privacy Policy.