SEARCH FINESCALE.COM

Enter keywords or a search phrase below:

75th Anniversary of 1944 Group Build (World at War)

37914 views
700 replies
1 rating 2 rating 3 rating 4 rating 5 rating
  • Member since
    January 2013
  • From: Athens, Greece
Posted by Zvezda1980 on Tuesday, December 24, 2019 8:14 AM

After adding and highlighting some detail (cabling & hydraulics mostly), a couple of black & brown washes and a carefull painting of the Instrument Panel, the cockpit works were almost completed.

Seatbelts come from Eduard's pack.

The first wash was a  mix of floor finish (local Furute substitute) and black oil, but the glossy look will be tempered when a flat coat is sprayed tomorrow.

Merry christmas to everyone

  • Member since
    September 2003
  • From: AandF in the Badger State
Posted by checkmateking02 on Tuesday, December 24, 2019 9:25 AM

That looks great, Zvezda.  Nice job!

And:  Merry Christmas back at you!


  • Member since
    February 2010
  • From: New Jersey
Posted by 68GT on Tuesday, December 24, 2019 2:41 PM

Thats som really nice work there Zvezda!

On Ed's bench, ???


  • Member since
    February 2010
  • From: New Jersey
Posted by 68GT on Tuesday, December 24, 2019 2:45 PM

I got some blue on the Mustang's ruder and spinner and a few coats of clear on.  Today I have managed to get some decals on inbetween wrapping.

On Ed's bench, ???


  • Member since
    September 2003
  • From: AandF in the Badger State
Posted by checkmateking02 on Wednesday, December 25, 2019 11:54 AM

68:  looks really good; outstanding!  Nice job!


  • Member since
    January 2013
  • From: Athens, Greece
Posted by Zvezda1980 on Saturday, December 28, 2019 8:36 AM

68GT: I like the metal finish and the glossy red very much. It's time I attempt a N.Metal plane (I admit I always chicken out and paint them Olive Drab, up to now)

  • Member since
    January 2013
  • From: Athens, Greece
Posted by Zvezda1980 on Saturday, December 28, 2019 9:12 AM

Some updates on the Shturmovik.

Fuselage halves were joined and after some test-fitting, were cemented together. The fit was quite good.

The cockpit was sprayed with Gunze's flat clear.

The masochistic fun begun when:

  1. I tried to install the Instrument Panel (IP). IP was clearly wider than the available space between fuselage sides. After much testing, it was clear that the problem required urgent surgery. I locked and loaded my little dremel and dug into the inner fuselage, creating the missing space (while trying not to destroy the already painted cockpit details, a couple of milimeter's away). Some extra detail above and behind the IP were made with plastic and a spare PE part. I hope when slightly sanded and painted it will look less ugly...

  2. The cockpit and bottom fuselage-cockpit assembly were brought together.Again much testing, cutting of fuselage sides, trimming of the gunner's floor because it collided with the fuel tank. Then a heavy load of thin cement and some CA glue sealed everything together. A flat piece of plastic was added to the bottom of gunner's compartment, so as to cover the cut out floor.

After all these, I realized that dawn had broken out, so I decided to get some sleep...

  • Member since
    September 2003
  • From: AandF in the Badger State
Posted by checkmateking02 on Saturday, December 28, 2019 9:56 AM

Zvezda:  You certainly handled all those fitting problems well.  Things are looking really good.  Congratulations!


  • Member since
    March 2017
Posted by Armor_Aficionado on Tuesday, December 31, 2019 6:02 AM

Latest progress on the Greyhound: almost there!  Thought I was gonna be able to finish it by year's end, but it looks like it will be my first completion of the new year, instead.


  • Member since
    May 2004
  • From: Land of Lakes
Posted by cbaltrin on Tuesday, December 31, 2019 6:43 AM

68GT

I got some blue on the Mustang's ruder and spinner and a few coats of clear on.  Today I have managed to get some decals on inbetween wrapping.


Looks FG ood GT, been wanting to build that scheme myself. Can't wait to see the finished product.

On the Bench: Too Much

  • Member since
    September 2003
  • From: AandF in the Badger State
Posted by checkmateking02 on Tuesday, December 31, 2019 9:43 AM

Looks great, AA.  The detail inside the turret is excellent.


  • Member since
    February 2010
  • From: New Jersey
Posted by 68GT on Tuesday, December 31, 2019 3:48 PM

Mustang is shaping up.  Decals are on so I'm going to let them dry a bit.

On Ed's bench, ???


  • Member since
    February 2010
  • From: New Jersey
Posted by 68GT on Tuesday, December 31, 2019 3:52 PM

cbaltrin

 Looks FG ood GT, been wanting to build that scheme myself. Can't wait to see the finished product.


Thanks, I feel like I should have used a brighter blue like French blue but this is about the blue the instructions call for.
 

On Ed's bench, ???


  • Member since
    September 2003
  • From: AandF in the Badger State
Posted by checkmateking02 on Tuesday, December 31, 2019 4:07 PM

Very colorful plane, Ed.  Everything is working together, and it's beautiful.


  • Member since
    March 2017
Posted by Armor_Aficionado on Wednesday, January 1, 2020 2:29 AM

Turret is done:


Instead of buying after-market turned metal gun barrels, I just drilled out the MG barrels with a pin vise.  I'm happy with the results:


Ready for gloss-coating and decals:


  • Member since
    September 2003
  • From: AandF in the Badger State
Posted by checkmateking02 on Wednesday, January 1, 2020 9:23 AM

Gun barrels came out very well, AA.  Everything is looking great!


  • Member since
    September 2003
  • From: AandF in the Badger State
Posted by checkmateking02 on Wednesday, January 1, 2020 9:41 AM

Masking the little pieces for USS Iowa has taken a lot of time.  Tamiya built all kinds of little stubs and boxes and stuff all over.  On these parts, I used masking tape for each side of the tub, then applied poster tac on top to seal the gap before painting.

On these tubs, I just used masking tape (cut longer) and pinched the tops together.  The little boxes are (I think) ammunition chests, and they had to be masked one-by-one.

Finally, the finished results, ready to go on to the ship.


  • Member since
    February 2010
  • From: New Jersey
Posted by 68GT on Thursday, January 2, 2020 11:40 AM

Wow, I dont think I would have the patience for that anymore.

On Ed's bench, ???


  • Member since
    September 2003
  • From: AandF in the Badger State
Posted by checkmateking02 on Thursday, January 2, 2020 3:21 PM

There's less of mine than there used to be!  Big Smile


  • Member since
    February 2010
  • From: Berkeley CA/St. Paul MN
Posted by EBergerud on Friday, January 3, 2020 3:42 AM


Hi again gents. See there are still some kits building so I'm not alone. Dio looks very good. IL-2 and P-51 are coming along - I may be going over old ground for the 1945 build. I'm thinking of starting out with either a Meng P-51D (very neat kit - Zero seams, perfecto for NMF) or the great looking Tamiya IL-2. We'll see. (I've got a Hobby Boss FW-190D, an important plane that's been very poorly served by Eduard and Tamiya - the HB looks very good.)


Real world has slowed down important things but I do have some progress. I actually thought that I'd have the Bogue finished by year's end. Events didn't cooperate, but neither did the kit. I figured a 1/700 small vessel with a pretty low part count and not a lot of rigging would be a quick build - for a ship. Hmmm....wrong. First of all, this kit was produced in the early 80s (maybe earlier methinks) by a Japanese company called Pit Road. Tamiya picked it up, reboxed it and through in aircraft found on its 1/700 kits - late war Enterprise and Saratoga, so only the TBF is really authentic. No matter there. This kit was crude. The fit wasn't bad, but it had no holes and pegs - none. Fortunately the hull and deck were all one piece, but everything else had to go on via eyeball. I was using a lot of my mix of Tamiya thin and regular (orange cap) - could only use Extra Thin to finish off the pieces. There were a lot of small bits - 20mm guns, rafts, spotlights etc - easy to get that stuff on the floor and very trying on my eyes that are not getting younger.


And then there was the PE. I got a generic set for a US CVE from Tom's - a good PE vendor in my experience, although the set I got didn't not match the instructions exactly. (I didn't make PE 20mm - that would have taken a very long time - and there weren't anywhere near enough of them.) But there are rails here and there around the hull - you actually have to kind of look for them. Those are worth the bother. So was the PE radar setup on top of the bridge - the plastic was a real dud. It looks okay now. However, ships are so delicate that I worry about breaking something just handling it. Things are tense until it's all done.


The pic below is the kit complete. But what comes next? I think I'm going to black base a ship - hoping that will work on the deck. Definitely going to take some liberties and put it in the standard Atlantic markings (Navy Blue, Haze Gray, Deck Blue) and forget splinter - that would not be worth the serious time - and extra handling - required. And then we have to make a base. And paint the 1/700 scale airplanes. This is a couple or three weeks off from finis. But I will finish barring a California earthquake.


Eric


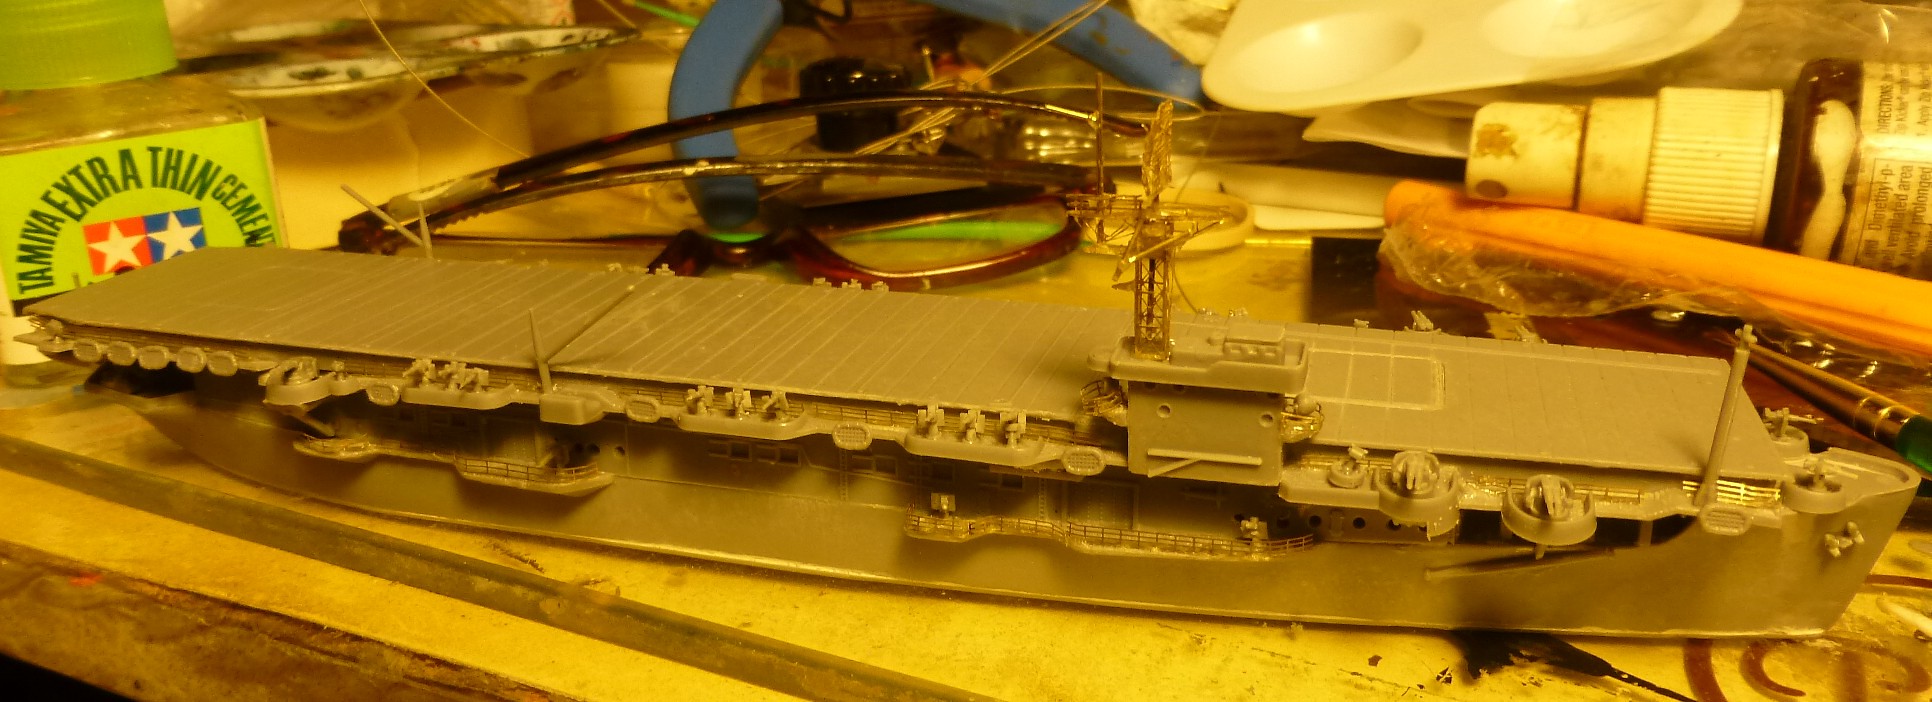
 Kitfinish by Eric Bergerud, on Flickr


A model boat is much cheaper than a real one and won't sink with you in it.

  • Member since
    March 2017
Posted by Armor_Aficionado on Friday, January 3, 2020 2:49 PM

Got the decals applied and the antennae installed.  I wasn't happy with the Tamiya decals.  I used a good thick coat of gloss, and plenty of Mciro-Sol/Micro-Set, and these were very new decals, but they still silvered badly.  Now I just have to weather it and add some stowage, and it will be done!


  • Member since
    February 2010
  • From: Berkeley CA/St. Paul MN
Posted by EBergerud on Saturday, January 4, 2020 1:21 AM

I did a winter M8 a couple of years back - worked out very well. I actually bought resin tires with chains from Verlinden - one of my very rare after market buys. It's a nice kit of a neat vehicle.

OK: I primed Bogue with Stynelrez. I know many people spray it straight and heavy - I had much better luck with a little thinner and low PSI. I had forgotten it's gloss - I suppose for NMF. (I'll be using the satin Duplicolor Hot Rod Black for the P-51 - it's the perfect primer unless you want a super shinny finish.) We'll have to see how black basing works with ships. Tonight I'll have to make some paint colors - that's actually fun in my book.

Eric

 primed by Eric Bergerud, on Flickr


A model boat is much cheaper than a real one and won't sink with you in it.

  • Member since
    September 2003
  • From: AandF in the Badger State
Posted by checkmateking02 on Saturday, January 4, 2020 9:20 AM

That's a novel, approach, Eric--building the ship; then painting it.  And I'm not sure I've ever heard of black-basing a ship either.   This will be interesting to see!

AA:  it's looking good, though.  Too bad about the decals.  If memory serves, I think I've heard that Tamiya's kit decals are uncooperative.  In addition to Micro-Solve and Set, I keep Solvaset around too.  It's pretty tough stuff and sometimes works where others don't.  When you do the weathering, it might cover up the silvering.  


  • Member since
    February 2010
  • From: New Jersey
Posted by 68GT on Saturday, January 4, 2020 10:51 AM

Thanks, went with a dark gray sludge wash this morning to tone down the silver and give subtle highlights to the panel lines.

On Ed's bench, ???


  • Member since
    February 2010
  • From: Berkeley CA/St. Paul MN
Posted by EBergerud on Saturday, January 4, 2020 4:11 PM
It's all in one piece ok. This kit is very small - maybe 8". When I make warships I build the bulk of the kit and then paint (I've never primed at all) and put on turrets etc later. The carrier is so much simpler and there won't be a lot of rigging. I do a fair amount of hand painting regardless (the planes will take a while). The reason I'm giving black basing a shot is that a well used carrier deck has wood showing clearly through the "Deck Blue." In addition, WWII ships were at sea a lot (Bogue was very active) which means they were sort of always being painted bit by bit - salt doesn't like metal and paint. So they're really quite blotchy - even at 1/700. The 1944-45 USN in the Pacific was at sea so much (they had a third fleet made up of oilers and supply ships to complement the temporary harbors like Manus) that many of their ships had substantial discoloration and often rust. Ship builders, in my experience, underweather their ships. I have clear pics of warships that were really beaten up (there are famous color pics of both KGV and Prince of Wales that are seriously weathered - ditto with 1944-45 USN ships) but you don't often see it modeled. The kits take a long time and there's so much detail involved - I think some builders might think that weathering is either risky or can distract from the very high level of build skills shown in a well made ship. I couple of years back I did a USS Hobson (a DD that did important work at Omaha beach) and gave it a well weathered measure 22. I got a note from a Navy vet who served in the same Desron as "Turner Joy" and "Maddox" of Tonkin Gulf fame: he said my weathering was very accurate and that it was rarely done right. That made me feel good. That said, we'll call this kit a success when it's done. Eric


A model boat is much cheaper than a real one and won't sink with you in it.

  • Member since
    September 2003
  • From: AandF in the Badger State
Posted by checkmateking02 on Saturday, January 4, 2020 6:02 PM

Good step, 68GT.

Looking forward to the outcome, Eric.


  • Member since
    February 2010
  • From: New Jersey
Posted by 68GT on Sunday, January 5, 2020 9:03 AM

Was happy with the weathering but I feel the clear is way too flat.  I'll have to play around and come up with a semi gloss mix.

Too flat!

A little more gloss added.


On Ed's bench, ???


  • Member since
    February 2010
  • From: New Jersey
Posted by 68GT on Tuesday, January 7, 2020 4:02 PM

Revell P-51D is done relativly clean put weathered. 

On Ed's bench, ???


  • Member since
    September 2003
  • From: AandF in the Badger State
Posted by checkmateking02 on Tuesday, January 7, 2020 4:11 PM

Excellent, Ed.  This is a great looking Mustang!  Nice job!

Some photos I've seen seem to show a pretty flat, dull NMF on Mustangs after being in service for a while, so I don't think it's a problem for your build.  It's quite effective.

Which photo do you prefer for the finish picture? 

Thanks again for being part of the GB.


  • Member since
    February 2010
  • From: New Jersey
Posted by 68GT on Wednesday, January 8, 2020 10:26 AM

Thanks, I would imagine the 1st or 2nd are the best shots.

On Ed's bench, ???


JOIN OUR COMMUNITY!

Our community is FREE to join. To participate you must either login or register for an account.

SEARCH FORUMS
FREE NEWSLETTER
By signing up you may also receive reader surveys and occasional special offers. We do not sell, rent or trade our email lists. View our Privacy Policy.