SEARCH FINESCALE.COM

Enter keywords or a search phrase below:

75th Anniversary of 1944 Group Build (World at War)

37919 views
700 replies
1 rating 2 rating 3 rating 4 rating 5 rating
  • Member since
    October 2019
  • From: Dayton, Ohio USA
Posted by minitanker on Saturday, June 13, 2020 5:42 PM

Thank you, next is a normal ROCO Hummel w/added details & crew.


  • Member since
    September 2003
  • From: AandF in the Badger State
Posted by checkmateking02 on Saturday, June 13, 2020 4:43 PM

Well done, minitanker!  Nice paint work.


  • Member since
    October 2019
  • From: Dayton, Ohio USA
Posted by minitanker on Saturday, June 13, 2020 9:45 AM

Additional pics of early Hummel conversion. ROCO Nashorn & ROCO 15cm howitzer w/additional details & crew of ROCO & Preiser figs.

  • Member since
    September 2003
  • From: AandF in the Badger State
Posted by checkmateking02 on Friday, June 12, 2020 5:55 PM

Mark:  I'll be interested to see if you can locate a clear coat that will retain the metal look of NMF.  I haven't found one so far, so I've left any NMF's I've done uncoated.


  • Member since
    September 2003
  • From: AandF in the Badger State
Posted by checkmateking02 on Friday, June 12, 2020 5:52 PM

Looks good, minitanker.  I've updated the build roster with your newest project.  Thanks for participating again!


  • Member since
    April 2019
  • From: South west, PA
Posted by Tomcat on Friday, June 12, 2020 11:56 AM

checkmateking02

That's beautiful paint-work on both planes, Mark.  I really like the way the tri-color scheme turned out on the Hellcat.  I've been meaning to try something like that myself.

And an excellent save on the Thunderbolt.  The NMF looks very convincing.  I've never tried a black foundation with an NMF.  Conventional wisdom back 20 or 30 years ago was to polish the plastic, then paint the NMF directly.  

Everything looks great!


After I applied the primer, I polished the fuselage with plastic polish which got the surface very smooth, that's why I was so aghast at the gloss black application. It looked like I was tarring a roof. In the end I think it will work out. Now I need to find a clear coat that won't dull that shiny finish. Looks like more experimentation is in order.

Mark aka Tomcat

On the workbench: Monogram 1/24 '69 Pontiac GTO and a Monogram 1/67 (box scale) B-26 Invader

  • Member since
    October 2019
  • From: Dayton, Ohio USA
Posted by minitanker on Thursday, June 11, 2020 8:32 PM

I'd like to present another dio to the GB if I may. It will use the same base as the Light Armored Recon Company but will be Wespe & Hummel elements moving to the rear. It will depict "upper" discussing w/scout best route to take while everyone else waits. Here is a test fit of crew in a ROCO conversion of an early Hummel. PaulE

  • Member since
    September 2003
  • From: AandF in the Badger State
Posted by checkmateking02 on Wednesday, June 10, 2020 5:09 PM

That's beautiful paint-work on both planes, Mark.  I really like the way the tri-color scheme turned out on the Hellcat.  I've been meaning to try something like that myself.

And an excellent save on the Thunderbolt.  The NMF looks very convincing.  I've never tried a black foundation with an NMF.  Conventional wisdom back 20 or 30 years ago was to polish the plastic, then paint the NMF directly.  

Everything looks great!


  • Member since
    April 2019
  • From: South west, PA
Posted by Tomcat on Tuesday, June 9, 2020 9:58 PM

I've made some progress on the Hellcat and Bolt. First the Hellcat, I am painting the tri-color scheme, working from the bottom up first applied is Insignia white:

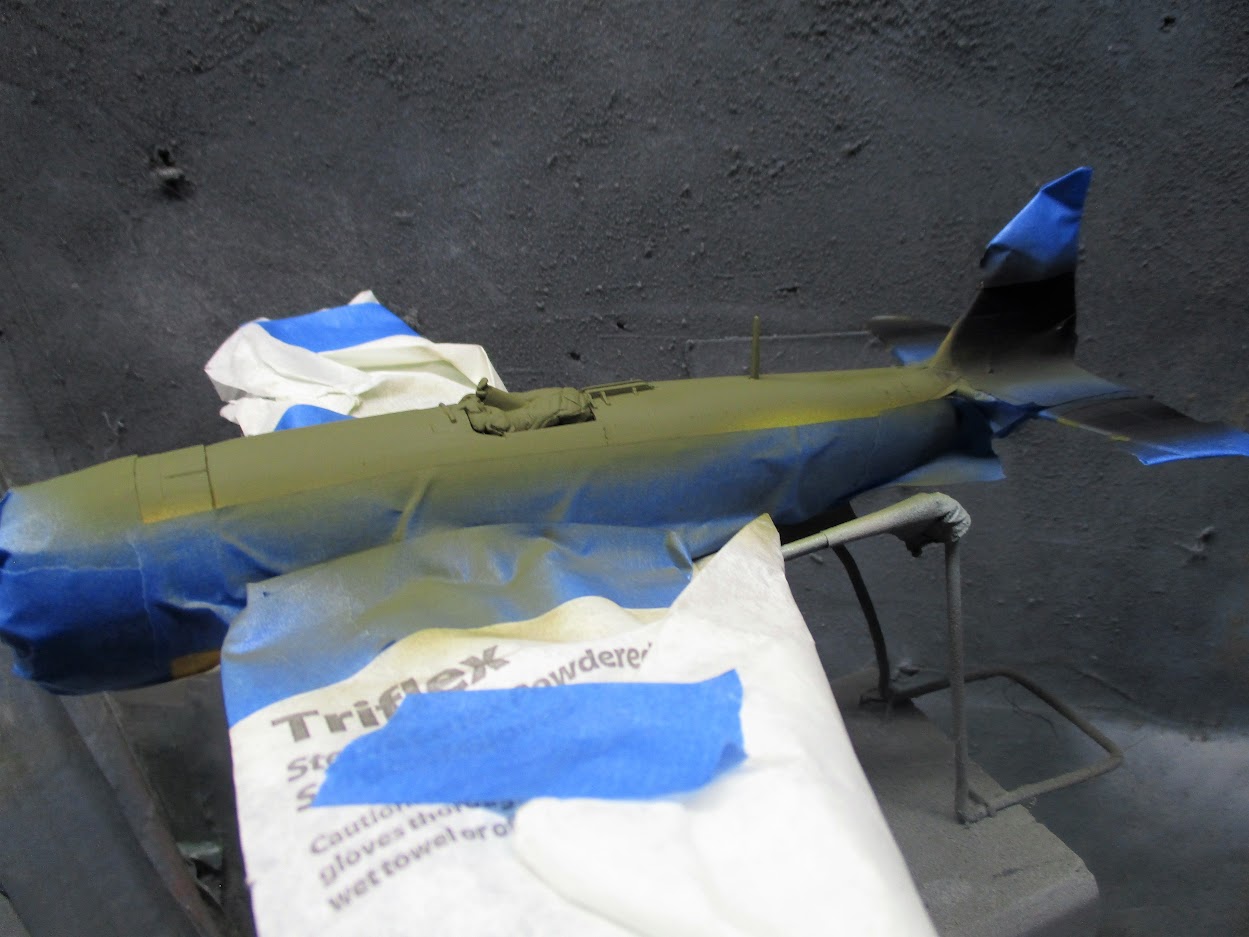
Next up is the intermediate blue. Here I'm trying to make a soft transition line:

and finally the sea blue on top:

Now the decaling begins...

As for the Thunderbolt, I am doing a natural metal finish, with a yellow cowl, a OD green strip across the top and red and black stripes on the tail. I didn't want to first spray the aluminum and then have to mask it all off, with the prospect of lifting off that aluminum finish. In short I wanted to handle the NMF paint as little as possible.

So to that end I painted the "colors" first and then mask those and apply the NMF.

First the cowling and tail:

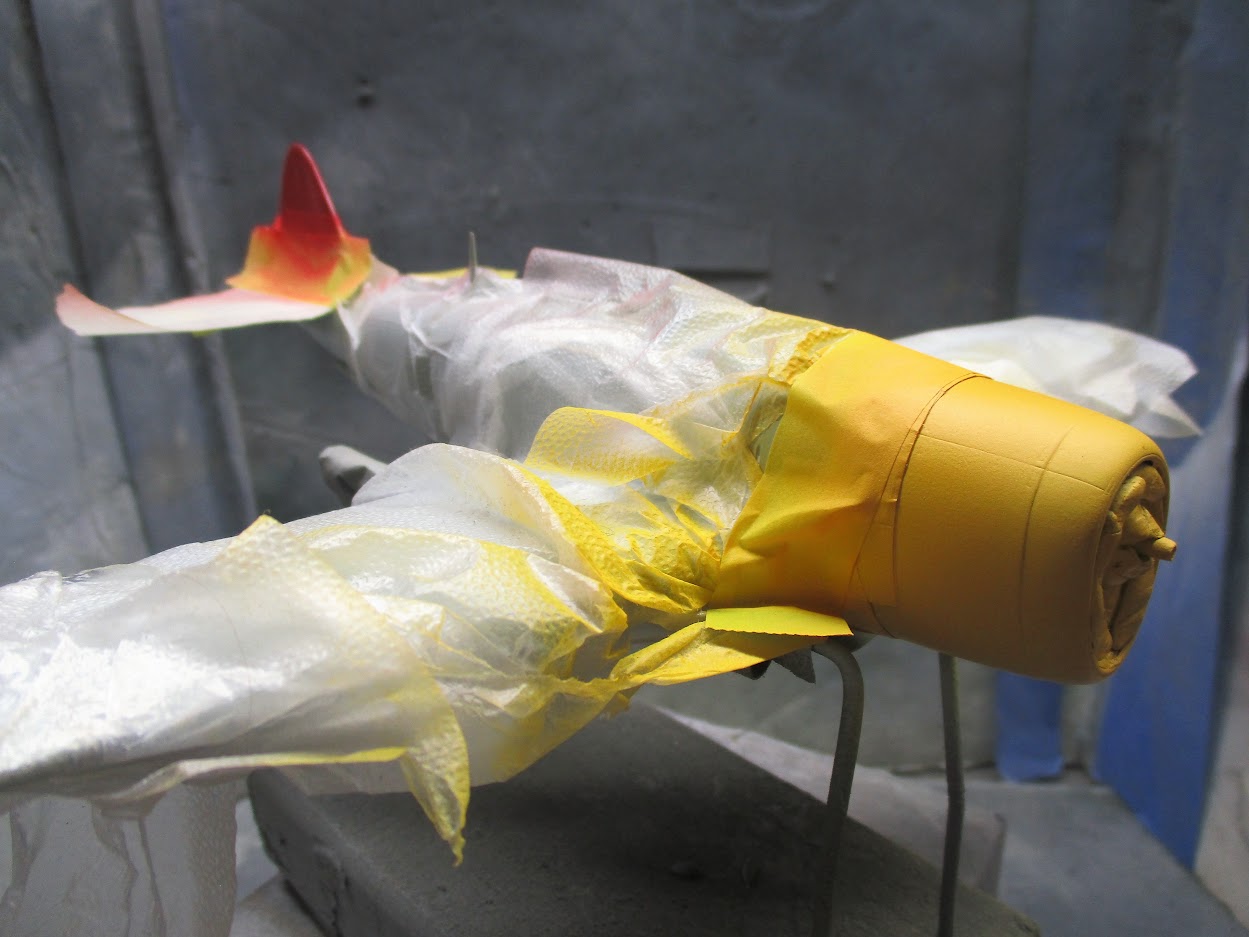
then the cockpit and unit stripes:

Now to mask those colors:

Now onto the NMF. Now, I have head that painting a gloss black sub surface will give the NMF a real nice seen. So I tried it by applying testors gloss black under coat (for color change) from an aerosol spray can. The results were not what I was expecting. It went on THICK. Like black tar. See here:


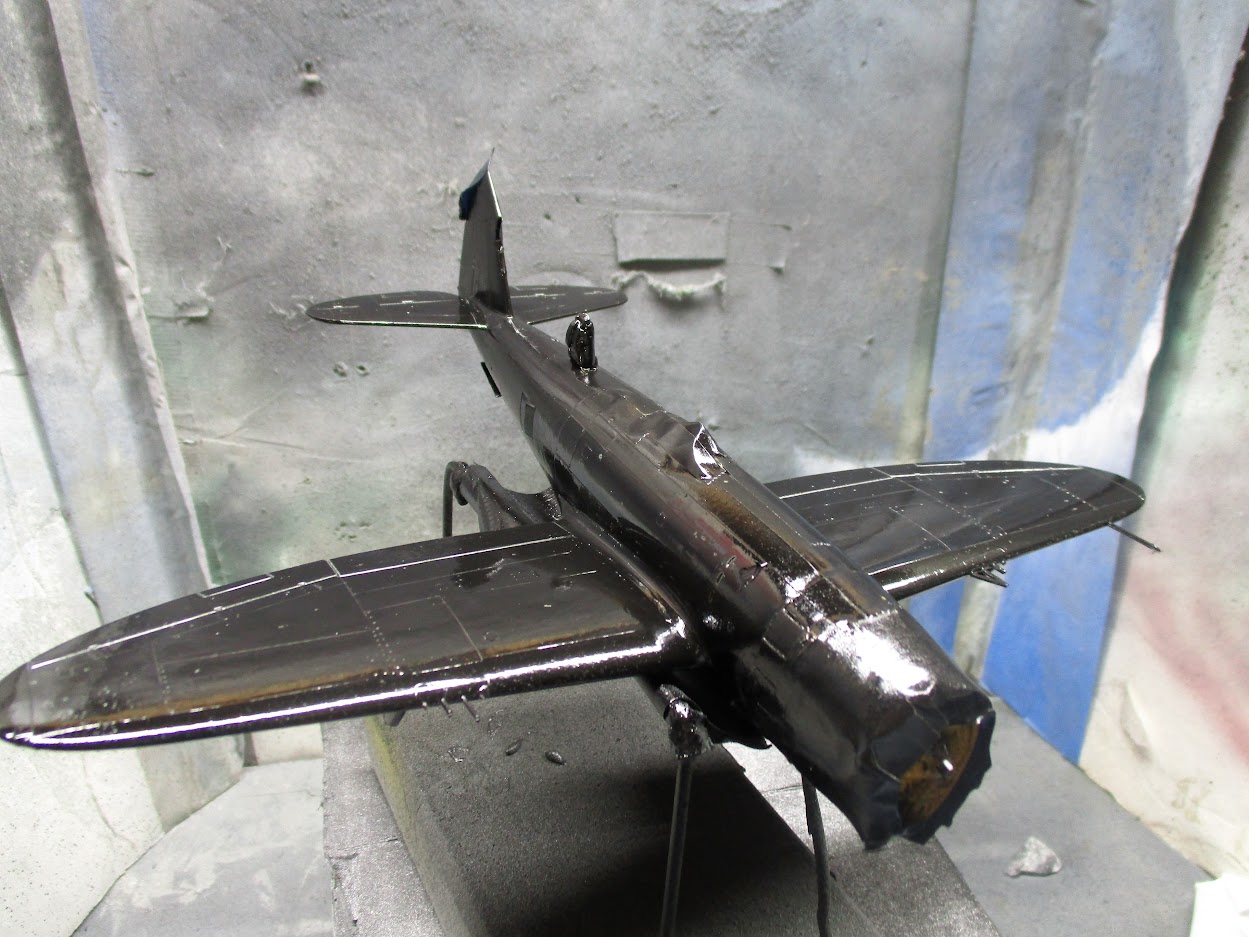
While I was thinking about what to do with that thick black paint. I experimented with an aluminum (again from an aerosol can) on the fuel tank and landing gear doors over that gloss black:

So far it looks promising. Back to the airframe. So I thought I would give the model a light sanding with some 000 steel wool to try and knock down the high spots where the paint oozed to. I was afraid of what would happen if I sprayed the Aluminum onto the sanded gloss so I set it aside and tried an experiment.

I was looking to see which aluminum I would use. Now, I have heard good things about Alclad but have no experience with it. In my experiment I sprayed that black gloss over a sheet of styrene. About half of which I rubbed it down with the steel wool. Then I masked off most of the sheet exposing a small section and resprayed the Aluminum I used on the gas tank. Well that paint crazed, like, a well, crazy. In fact each aluminum I sprayed onto the sanded area crazed, but not on the unsanded areas. So what to do about the airframe? 

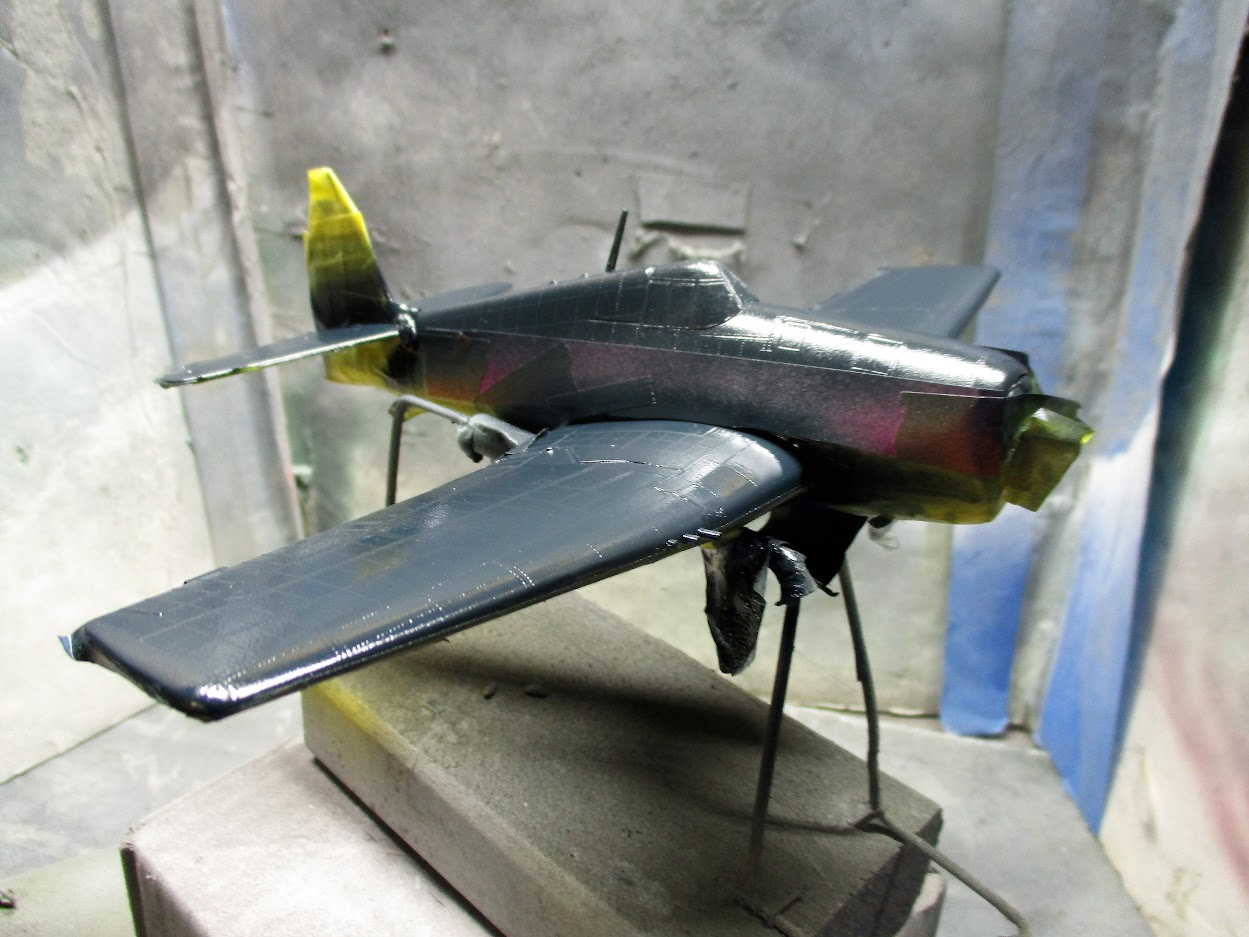
Obviously, I have to respray the gloss, but not out of that spray can. So I decanted it and put through my airbrush where I can better control the flow and amount applied. With the gloss back, I chose my aluminum (yes, from a spray can). But wait. If I can decant the black I can decant the aluminum! So here it is after the aluminum was sprayed:

It does have a shine to it. And now after removing the masked "colored" areas:

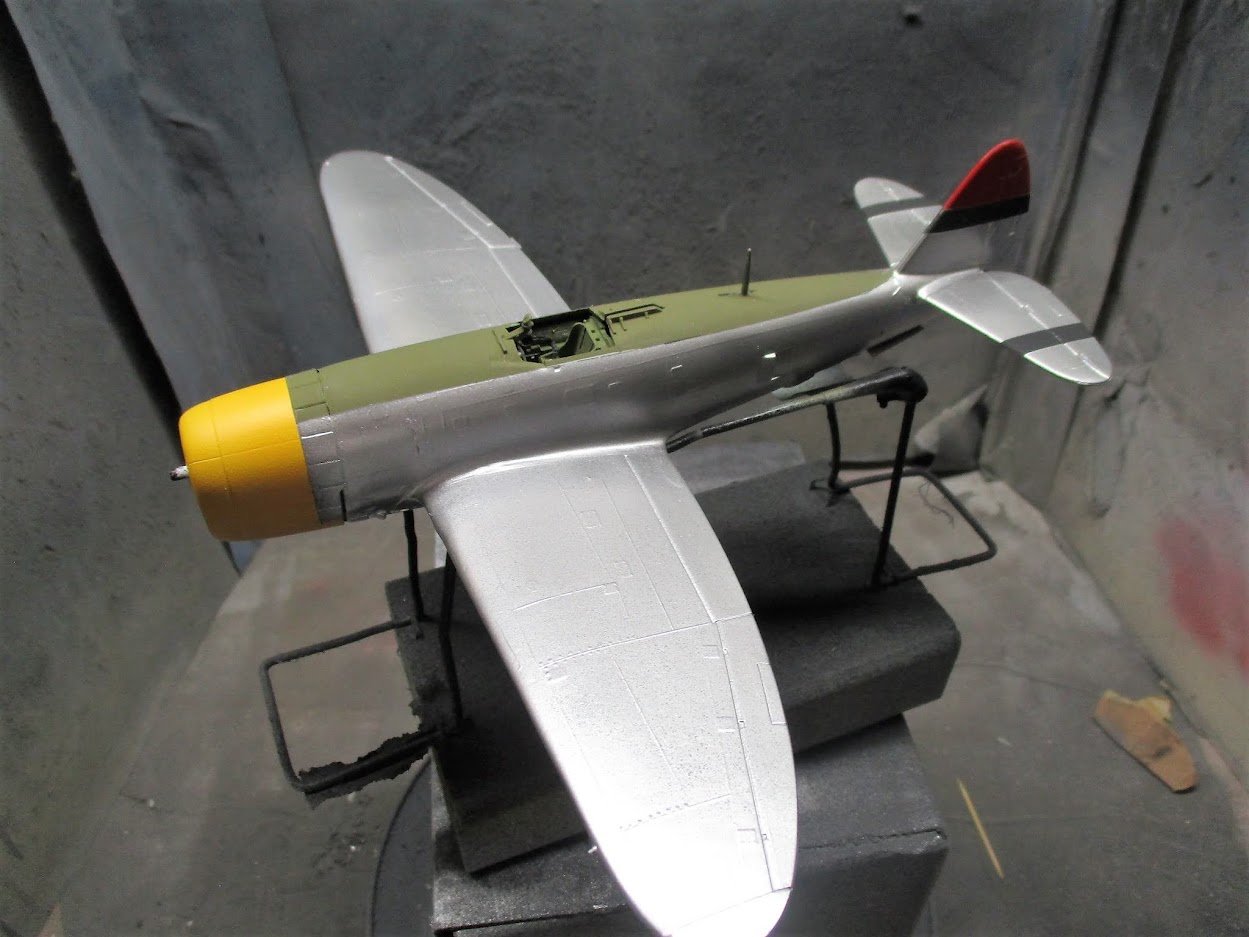
There are a couple of areas to touch up, but all in all I am not too disappointed in the outcome. And, you might have noticed the .50 calibers are missing from the wings. I ended up breaking one off (as I knew I would) so I chose to remove them until the end and readd some better ones (better ones I hope).

Mark aka Tomcat

On the workbench: Monogram 1/24 '69 Pontiac GTO and a Monogram 1/67 (box scale) B-26 Invader

  • Member since
    September 2003
  • From: AandF in the Badger State
Posted by checkmateking02 on Sunday, May 24, 2020 8:50 PM

Nice fix on the drop tank, Mark.  Looks very good in the close-up photo.

A couple of fine looking planes, too.  You've chose some very colorful colors and markings.


  • Member since
    April 2019
  • From: South west, PA
Posted by Tomcat on Sunday, May 24, 2020 8:01 PM

Great work Zvezda, you nailed it!

The Hellcat drop tank repair is complete. It's not perfect but applying the 3ft rule, I think it passes. Heck, with my bad eyes, it passes from 1 foot Wink

The Jug and Cat are ready for primer...

and with primer (Model Master Aircraft grey) applied...

I have a few areas that need addressed and given some TLC before painting. Speaking of paint, for the Hellcat I'm going with the tri-color scheme and Techmod decals...

for the Jug, NMF color/paint and these decals...

Specifically I'm going with...

The only change i'm planning on making is adding the partial invasion stripes under the fuselage belly (as in the middle pic).

Mark aka Tomcat

On the workbench: Monogram 1/24 '69 Pontiac GTO and a Monogram 1/67 (box scale) B-26 Invader

  • Member since
    September 2003
  • From: AandF in the Badger State
Posted by checkmateking02 on Saturday, May 23, 2020 5:31 PM

Excellent work, Zvezda!  Very convincing weathering!  It's a very attractive aircraft!

Front page is updated with the finish photo.  Thanks for being part of the GB.  It's a pleasure to see your work.

Hopefully, we'll pass through "our own troubled times" quickly and safely!


  • Member since
    January 2013
  • From: Athens, Greece
Posted by Zvezda1980 on Friday, May 22, 2020 3:10 PM

Eventually the final inspection lasted for more than a month (ts,ts, shame on me). 

This build is proclaimed as finished.

This Il-2 is a machine operating during autumn of 1944 in the fierce fighting over the Baltic countries and the Memel offensive.

I enjoyed this kit so much, all the problems and the process of solving them.

I also like how the AKAN paints look, they are so close to the result I wanted, based on the various references.

Speaking of references, I highly recommend the book of Jason Nicholas Moore 'Red Avenger' to anyone wanting to build an IL-2. Great historical research and a source of inspiration, from a fellow who is also a modeller. His book gave this modelling session a sense of historical immersion.

Many many thanks to our host for this GB and to all fellow participants with their excellent projects.

It's time to leave the war torn 1944 and return to our own troubled times.

Check you may pick any photo you wish for the front.


  • Member since
    January 2013
  • From: Athens, Greece
Posted by Zvezda1980 on Friday, May 22, 2020 2:36 PM

Steve your work is a true pleasure to watch (and learn).

  • Member since
    September 2003
  • From: AandF in the Badger State
Posted by checkmateking02 on Wednesday, May 13, 2020 3:52 PM

Great progress, Mark.  Nice fix on the wings.

Wonder how they could let the drop tank leave the production line with a hole like that!  Innovative solution you came up with.  Hope it works out well.


  • Member since
    April 2019
  • From: South west, PA
Posted by Tomcat on Tuesday, May 12, 2020 7:41 PM

Getting started with this build. Since these two Monogram kits are fairly simplistic, I have decided to pursue these a "dual build", that is building the Hellcat and Thunderbolt at the same time. so far I've completed some of the common components of these two craft...

Bombs...

props...

interior colors...

engines...

and pilot figures...

While working on the Hellcat I came across a situation that required and unusual approach. The port/starboard upper wing halfs are two seperate pieces that glue together in a butt joint with three small tabs that are about the size of a pencil point.

See pic...

notice the small tab near the bottom. I circled them here...

and on the underside...

So I decided to take an unconventional approach. I spanned the butt joint underneath with a peel and stick label cut to fit. Before applying the label I gave the bare plastic a coat of Future so as to give the label a little more adhesion power. Then sealed around the edges with more future. With out this "reinforcement", I was afraid the joint would fail with such a flimsy joint, or so it seems to me. So far the joint is holding up and seems pretty strong.

And now a problem. While waiting for paint to dry, (that always seems to be the case with builds, doesn't it?) I decided to assemble the drop tank when I noticed this little snag...

I'm pretty sure there isn't supposed to be a gaping hole in a fuel tank! Sad

to fix this, I cut a small piece of dowl rod and expoxied it into the huge maw...

My plan is to cut, hack, file and sand it down into something approaching a decent looking drop tank.

Here are the initial cuts...

So I'll keep sanding and filing and putty the heck out of it. Let's see how this works.

Mark aka Tomcat

On the workbench: Monogram 1/24 '69 Pontiac GTO and a Monogram 1/67 (box scale) B-26 Invader

  • Member since
    July 2014
Posted by modelcrazy on Thursday, May 7, 2020 6:13 PM

Est.1961
No problem I liked seeing the pictures and as the saying goes a picture is worth a thousand words, that's a lot of work there. 

Thank Est.

Steve

Building a kit from your stash is like cutting a head off a Hydra, two more take it's place.


http://www.spamodeler.com/forum/

  • Member since
    July 2014
Posted by modelcrazy on Thursday, May 7, 2020 6:12 PM

checkmateking02

What a load of PE, Steve!  Must have kept you busy for weeks.  Beautiful work!


Yes sir, it did.

Steve

Building a kit from your stash is like cutting a head off a Hydra, two more take it's place.


http://www.spamodeler.com/forum/

  • Member since
    July 2008
Posted by Est.1961 on Thursday, May 7, 2020 3:53 PM

[quote user="modelcrazy"]But since I dont have a lot of time I'll just upload lots of pics.[/quote

No problem I liked seeing the pictures and as the saying goes a picture is worth a thousand words, that's a lot of work there. 

  • Member since
    September 2003
  • From: AandF in the Badger State
Posted by checkmateking02 on Thursday, May 7, 2020 1:40 PM

What a load of PE, Steve!  Must have kept you busy for weeks.  Beautiful work!


  • Member since
    July 2014
Posted by modelcrazy on Thursday, May 7, 2020 7:57 AM

I've been away from this GB for a while and had a lot to show. But since I dont have a lot of time I'll just upload lots of pics.

Guns and superstructure set in for the pic.

The 5" didn't work out (the dog ate one) so it was fortuitous that I had ordered a set from Alliance Model Works

Everything is ready for paint.

Steve

Building a kit from your stash is like cutting a head off a Hydra, two more take it's place.


http://www.spamodeler.com/forum/

  • Member since
    September 2003
  • From: AandF in the Badger State
Posted by checkmateking02 on Monday, April 27, 2020 4:41 PM

Sharp-looking aircraft, Est.  Nice paint work!


  • Member since
    July 2008
Posted by Est.1961 on Sunday, April 26, 2020 1:31 PM

Enjoyed catching up with these great builds well done everyone. Sprayed the upper and lower part of the Brewster Buffallo using Vallejo light grey and olive drab next the black scheme for the camouflage, under carriage prepared will be patient and take my time with the canopy.     " alt="" />

  • Member since
    September 2003
  • From: AandF in the Badger State
Posted by checkmateking02 on Sunday, April 19, 2020 10:33 AM

Yep, it works fine, Mark.  Everything shows!


  • Member since
    April 2019
  • From: South west, PA
Posted by Tomcat on Saturday, April 18, 2020 11:30 PM

lets try this again. Monogram F6F...

And the Thunderbolt...

Lets see if this works.

Mark aka Tomcat

On the workbench: Monogram 1/24 '69 Pontiac GTO and a Monogram 1/67 (box scale) B-26 Invader

  • Member since
    September 2003
  • From: AandF in the Badger State
Posted by checkmateking02 on Saturday, April 18, 2020 9:35 PM

Est.1961:  Looks good.  That's a handy little stand you've got the plane on.


  • Member since
    September 2003
  • From: AandF in the Badger State
Posted by checkmateking02 on Saturday, April 18, 2020 9:34 PM

Mark:  I updated the build roster to include the P-47.  The photos are not coming through; just little "minus signs in a circle."  Ain't technology wonderful?


  • Member since
    July 2008
Posted by Est.1961 on Saturday, April 18, 2020 8:26 AM

Hope to get a bit more done this weekend unfortunately so does someone else on another wavelength completely. Fingers crossed  for the weather to be onside, gardened in the rain before no need to make a habit of it though.

  • Member since
    April 2019
  • From: South west, PA
Posted by Tomcat on Friday, April 17, 2020 11:10 AM

I am beginning this group build, with two American classics...

An F6F Hellcat...

And this one...Monogram 1/48 P-47D Thunderbolt. (this is a change from the F7 Tigercat I previously announced).

Mark aka Tomcat

On the workbench: Monogram 1/24 '69 Pontiac GTO and a Monogram 1/67 (box scale) B-26 Invader

  • Member since
    September 2003
  • From: AandF in the Badger State
Posted by checkmateking02 on Thursday, April 16, 2020 2:40 PM

Beautifully done!  Congratulations on an exemplary aircraft!


JOIN OUR COMMUNITY!

Our community is FREE to join. To participate you must either login or register for an account.

SEARCH FORUMS
FREE NEWSLETTER
By signing up you may also receive reader surveys and occasional special offers. We do not sell, rent or trade our email lists. View our Privacy Policy.