SEARCH FINESCALE.COM

Enter keywords or a search phrase below:

Ships of the American Flag GB 2019 -2021

87117 views
2198 replies
1 rating 2 rating 3 rating 4 rating 5 rating
  • Member since
    June 2018
  • From: Ohio (USA)
Posted by DRUMS01 on Thursday, June 11, 2020 10:18 AM

Thanks everyone on the comments for the OSU2 aircraft. I went out and purchased a set of lite guage guitar strings. The smallest "E" string is only 0.010" and works perfectly for the pontoon bracing and wing sensor. I should be getting the new (period correct) decals for them today in the mail. 

The guitar strings are a hack of a deal. Most range from $6-12 and with the length of each string will provide you with various sizes foe many odels to come. 

I will show the updates once the ship and planes are base painted.

MONGOOSE: Are you saying I should replace the struts or "they are a must" as to leave them as is? As for the space for the foam and foil in the base, thanks for the reminder!

Ben

"Everyones the normal until you get to know them" (Unknown)

LAST COMPLETED:

1/35 Churchill Mk IV AVRE with bridge - DONE

NEXT PROJECT:

1/35 CH-54A Tarhe Helicopter


  • Member since
    July 2014
Posted by modelcrazy on Thursday, June 11, 2020 10:55 AM

Good call Ben,

I use to use guitar string all the time before EZline and Uschi options came out. I also used and still use stretched sprue quite often, especially if I'm making flag lanyards and need a sag or show a wind blowing. I think the guitar string is a good choice Yes

Steve

Building a kit from your stash is like cutting a head off a Hydra, two more take it's place.


http://www.spamodeler.com/forum/

  • Member since
    September 2012
Posted by GMorrison on Thursday, June 11, 2020 11:20 AM

Ben, be sure you paint the E strings. They are steel and might rust otherwise.


Bill

 Modeling is an excuse to buy books.


  • Member since
    January 2015
Posted by TheMongoose on Thursday, June 11, 2020 2:05 PM

DRUMS01

...

MONGOOSE: Are you saying I should replace the struts or "they are a must" as to leave them as is? As for the space for the foam and foil in the base, thanks for the reminder!

Ben


well that funny thought got lost in translation lol

yes, I was saying you should replace them. That little plane just keeps getting more complicated on you.

In the pattern: Scale Shipyard's 1/48 Balao Class Sub! leaning out the list...NOT! Ha, added to it again - Viper MkVii, 1/32 THUD & F-15J plus a weekend madness build!

  • Member since
    December 2003
  • From: 37deg 40.13' N 95deg 29.10'W
Posted by scottrc on Friday, June 12, 2020 10:18 PM

Ben,

The Kingfisher is looking good, its good to see you putting time into it. So many models seem to leave the observation planes off or use those horrible planes that come with the kit.


  • Member since
    December 2003
  • From: 37deg 40.13' N 95deg 29.10'W
Posted by scottrc on Friday, June 12, 2020 10:25 PM

I'm back at the bench.  I made a simple display base and am trying this new Uschi thread that Steve generously sent me.  I did not like the stretch sprue and EZ line was just too hard to keep taunt and would pull the masts. So I am re-rigging the model with this new thread.  It has a learning curve that I need to work on, but the end result is much more satisfying.  This model is all about trying new things for me.  First resin kit I am building, and now a new material to rig a small ship.


  • Member since
    January 2015
Posted by TheMongoose on Friday, June 12, 2020 10:57 PM

scottrc that is such a huge difference! Well worth your time. Looks lke you mastered it.


im working on deck painting still. In your best Bob Seger voice - God bless the man who put the white lines on the 'flite deck' lol

took 2 evenings to tape it up. Almost missed a section and painted the flite deck itself. Par for the course ;-)

Saturday will do yellow centerline dotted red foul line and the steel plates on the catapults.

In the pattern: Scale Shipyard's 1/48 Balao Class Sub! leaning out the list...NOT! Ha, added to it again - Viper MkVii, 1/32 THUD & F-15J plus a weekend madness build!

  • Member since
    December 2003
  • From: 37deg 40.13' N 95deg 29.10'W
Posted by scottrc on Saturday, June 13, 2020 7:39 AM

All that painting on the flight deck is the only way to do it. Decals won't make it look right in the end.  That flight deck will look great in the end.

  • Member since
    January 2015
Posted by TheMongoose on Saturday, June 13, 2020 12:43 PM

Spent all morning on the flight deck. All the major components are painted now. The sequence here shows how i built things up. I lightened the center of the grey rectangles along the runway edge, laid down natural steel for the catapults, added grimey black around the edges of the catapult tracks, added some lines and a generally blacked out area around the2-wire area, then darkened up the whole flite deck so that all the colors started to blend together. It's just slightly darker in eal life then it looks undermy shop light in the pics.


next i need to do the tie-downs. Then maybe blend those in if needed. since my MCW paints are all gloss I'm thinking to decal after that, then clear coat it for final weathering. Any thoughts on that order of operations? Yes 

In the pattern: Scale Shipyard's 1/48 Balao Class Sub! leaning out the list...NOT! Ha, added to it again - Viper MkVii, 1/32 THUD & F-15J plus a weekend madness build!

  • Member since
    May 2020
Posted by Keyserj on Saturday, June 13, 2020 12:51 PM

Ben: Those float planes are just a never ending problem. The time you have put in to make them accurate will be well worth it.

Scott: Really digging the simplicity of the base. The rigging looks great, kudos to Steve for sending you some of his Ushci thread

Mongoose: All that masking sure is complex. Can't wait to see the deck once you are finished.

The island for the Kitty Hawk threw me a nasty curveball. Seemed like I could never catch a break with all of the fit and mold issues that were present on almost every part. No Anyways, I finished it up and it is now glued onto the deck.

This is the first time I have ever done rigging and it was done using black sewing thread. It was a pain to tie to the masts but I am pleased with the results. 

  " alt="" width="500" height="350" />

  " alt="" width="500" height="350" />

For the flags, I printed them out and sandwiched a piece of foil in them to make it look like they are waving in the wind.

Next step will be to weather the hull. Any advice, reference photos and knowledge you guys have on this would be greatly appreciated.

"Why don't you knock it off with them negative waves?"- Oddball


John

On the bench:


  • Member since
    January 2015
Posted by TheMongoose on Saturday, June 13, 2020 12:59 PM

John your flight deck looks like its well worn and seasoned. Great job! 

In the pattern: Scale Shipyard's 1/48 Balao Class Sub! leaning out the list...NOT! Ha, added to it again - Viper MkVii, 1/32 THUD & F-15J plus a weekend madness build!

  • Member since
    August 2009
  • From: MOAB, UTAH
Posted by JOE RIX on Saturday, June 13, 2020 8:27 PM

Scott: Oh yeah. That looks much better. Glad I stocked up on some Uschi line some time ago. Definitely looks the part.

Mongoose: That is some righteous paint work on the flight deck. It all appears to have come out wonderfully. That there is a job well done my friend.

I've been chipping away at the Oakland. Mostly cleaning up parts and getting things closer to the initial primer stage. Going to be out of action here for a short while. I'm going in for surgery tomorrow to repair my umbilical hernia. Long over due precedure. As such, I may not be able to lean over at the bench for a bit. Although, I might rig something up at the recliner where I can sand on parts of something.

Cheers All.

"Not only do I not know what's going on, I wouldn't know what to do about it if I did". George Carlin

  • Member since
    July 2014
Posted by modelcrazy on Saturday, June 13, 2020 10:45 PM

OK, where do I begin.

Scott, your most welcome. Now that is much better Yes. Looks superb!

Chris. WOW! I thought at first it was a little light but I can see I was completly wrong! Absoulty fantastic work my friend.

John, Your Kitty Hawk is looking excelent as well. Very nice!

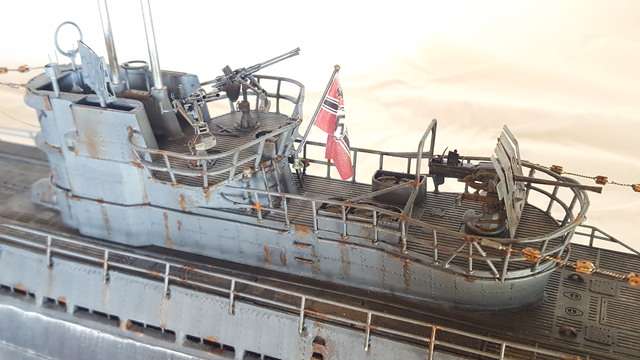
For the flags, that's what I do. I will also crumple them some so they look less like the flag on the moon. That's what makes the foil so nice, it makes it easer to bend some. Now if the weather is bad with high winds, I'll shread the flag ends and then stand them out with a slight ripple. Flags just get beat to shreads in gale winds.

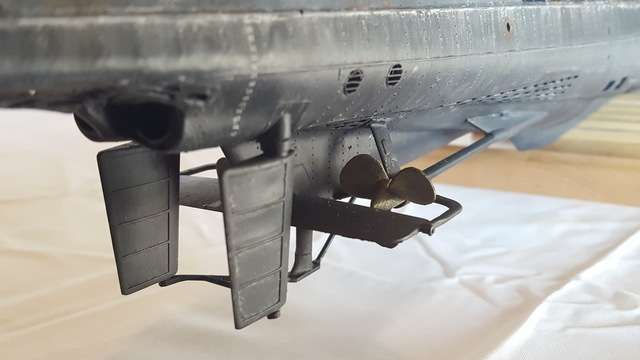
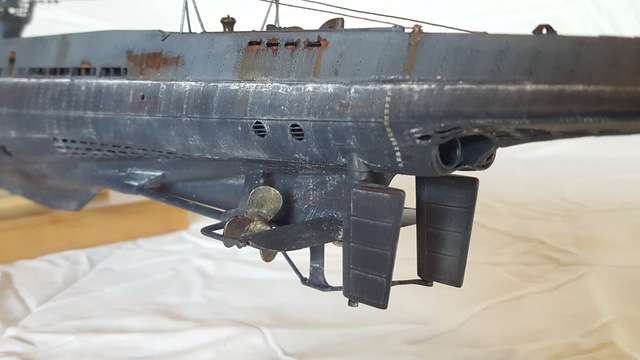
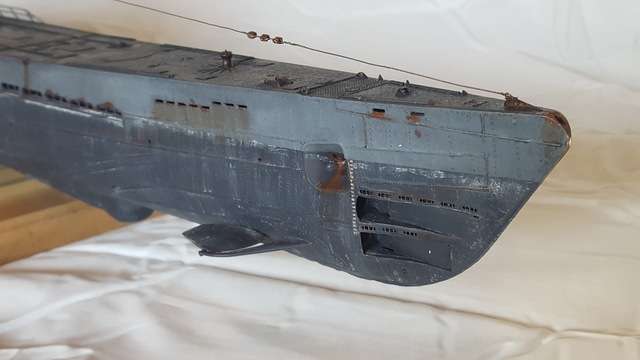
As far as weathering, I will spray light grey vertical lines on the anti foul paint, maybe add some pastels and oils. There is a whole world of mediums that can be used for weathering hulls, also including dry brushing. Honestly, you will have to try some techniques to see what works for you. Now above the waterline, I can't go wrong with oils. I use Burnt Umber and Sienna for rust. I will put a little in some Turpenoid and just touch where you want some rust and let it do it's own thing. Don't like it, wipe it off. For heaver rust, I'll put a small bit of the Umber for newer rust, sienna for older rust on the area, and again, put some Turpenoid and let it do it's think. The smaller the scale the less you need. US naval ships are constantly cleaned and painted even while underway so a little goes a long way. Rust won't usually form on items that remain underwater due to the lack of oxygen exposure.

My U-Boat showing the flag, hull weathering and rust. This is a 1/72 scale kit. The hull weathering was made with pastels and water. It kinda makes a mud that can be drawn with a paint brush.

Joe, I'm looking forward to see what you got when you're ready.

Steve

Building a kit from your stash is like cutting a head off a Hydra, two more take it's place.


http://www.spamodeler.com/forum/

  • Member since
    May 2020
Posted by Keyserj on Monday, June 15, 2020 10:24 AM

Mongoose: I must have missed your post of your deck. The masking you did was really impressive and the deck turned out great.

Joe: Hope you are feeling better after your surgery. Take it easy, there is no rush for you to get progress done.

Started experimenting with pigments on the Kitty Hawk. Some areas are better than others and I will have to go back and redo parts of the hull.

The bow section is the looks the best. It has got the rust streaking and a little bit of the salt residue from sea water.

The weathering above looks really bad so, I am going to wipe it off and start fresh. I am going to look for some more reference photos before I do this section. It was easy to find pics of the weathered bow but, the mid section of the hull is tricky to find a photo of.

"Why don't you knock it off with them negative waves?"- Oddball


John

On the bench:


  • Member since
    November 2009
  • From: SW Virginia
Posted by Gamera on Monday, June 15, 2020 11:17 AM

Wow! Those look awesome guys! 

Great work just keeps going on here!!! 

"I dream in fire but work in clay." -Arthur Machen


  • Member since
    July 2014
Posted by modelcrazy on Monday, June 15, 2020 11:25 AM

Good start John, keep at it. It's not going to be perfect on your first try. The removeable options like pastels and oils are best, as you have found. Stay away from enamels or anything that can't be wipped off either with a dry rag, turpenoid or water. Also when doing rust, let it bleed as it would in nature. Think of gravity, airflow, waterflow, slipstream ETC. Again, with most navies, less is more especially on modern ships. Unless the ship just came off a long patrol, they won't have a lot of rust. The Boatswains mate will have the deck apes over the side faster than you can say needle gun. The spit and pollish of the brite work is the pride of every BMC. Ship shape and in Bristol fashon!

Steve

Building a kit from your stash is like cutting a head off a Hydra, two more take it's place.


http://www.spamodeler.com/forum/

  • Member since
    December 2003
  • From: 37deg 40.13' N 95deg 29.10'W
Posted by scottrc on Monday, June 15, 2020 12:51 PM

Mongoose, John, 

Nice paint work on your carriers guys.  Good balance of the weathering.  The ships look underway, not in rusting in Ordinary.  

  • Member since
    January 2015
Posted by TheMongoose on Monday, June 15, 2020 9:30 PM

MC thanks in advance for the refresher on rust streaking! Been saving that part until the deck is ready to be flat coated so I can do the whole model at once. 
I'll tell you guys, I bought 560 pieces of electrical shrink tube just to get the 1mm tubes i needed for a custom smoke tube on my F-100 and I NEVER thought I would use them all...


...not quite 1/2 done and I'm sure I'll make a dent in that case! These things splay everywhere lol

In the pattern: Scale Shipyard's 1/48 Balao Class Sub! leaning out the list...NOT! Ha, added to it again - Viper MkVii, 1/32 THUD & F-15J plus a weekend madness build!

  • Member since
    May 2020
Posted by Keyserj on Monday, June 15, 2020 10:28 PM

Just realized I still have to do the decals for the planes. Bet you can't guess what I will be working on tomorrow.

"Why don't you knock it off with them negative waves?"- Oddball


John

On the bench:


  • Member since
    September 2012
Posted by GMorrison on Monday, June 15, 2020 10:55 PM

Tomorrow?

Oh ha ha ha.

My only advice is not to hand hold them.

Set up some kind of clamp and down it under magnification.


Bill


 Modeling is an excuse to buy books.


  • Member since
    January 2015
Posted by TheMongoose on Monday, June 15, 2020 11:00 PM

All I can say is set up the assembly line! Seemed that approach worked best. Like Bill I did quite a few under magnification but once i got the pattern down practically wasn't using it for the last half of the planes. Those decals have to look like spots at that scale lol

In the pattern: Scale Shipyard's 1/48 Balao Class Sub! leaning out the list...NOT! Ha, added to it again - Viper MkVii, 1/32 THUD & F-15J plus a weekend madness build!

  • Member since
    July 2014
Posted by modelcrazy on Tuesday, June 16, 2020 7:23 AM

That's a lot of fiber optic cable Chris. That reminds me of the starburst lights in the 70's. I never bought one but always wanted one.

Steve

Building a kit from your stash is like cutting a head off a Hydra, two more take it's place.


http://www.spamodeler.com/forum/

  • Member since
    November 2009
  • From: SW Virginia
Posted by Gamera on Tuesday, June 16, 2020 7:55 AM

Mongoose: Oh wow, now I'm hungery for spagetti. Great job there with all those fiber optic cables- I've got boatloads of starships I want to light but never seem to get around to them.

John: Oh gee... Well I guess it's the point of doing all the starboard wings, let them dry overnight, then do the portside wings... I hope you're watching TV or YouTube to something while you're doing this- I'd go nuts without some distraction during repeatative stuff like this. 

"I dream in fire but work in clay." -Arthur Machen


  • Member since
    May 2020
Posted by Keyserj on Tuesday, June 16, 2020 11:41 AM

I got them done and it only took a couple of hours. I am sure all of you can relate to this, I spent 15 minutes looking for my tweezers and found them right in front of me.

The decals don't look very noticeable in the pics but, they really made the planes look better.

A big shoutout to Academy for the detailed guide on how and where to apply the decals on the planes.

I could put decals on the bottom of the planes but, I am not going to do it because you won't be able to see them anyways.

"Why don't you knock it off with them negative waves?"- Oddball


John

On the bench:


  • Member since
    July 2014
Posted by modelcrazy on Tuesday, June 16, 2020 12:22 PM

Look for tools that are right in front of you? Ha never. My tools are ALWAYS where I place them and I NEVER set something, such as my arm, on a piece of PE or sweep a part off the table whithout thinking. Confused

Yeah, there's no reason to strugle with decals that no one will ever see. You'll be the only one to know.

For the life of me I can't understand why Academy made a carrier in such a odd scale.

Steve

Building a kit from your stash is like cutting a head off a Hydra, two more take it's place.


http://www.spamodeler.com/forum/

  • Member since
    January 2015
Posted by TheMongoose on Tuesday, June 16, 2020 6:17 PM

John i flet the same way, the decals change the whole appearance of the plane. Noticed them right away. You made good time on them for sure. You must be coming down the home stretch!

MC now that I know how they did those starbursts I realize how easy they were to make. They made a fortune on those things, had to 

In the pattern: Scale Shipyard's 1/48 Balao Class Sub! leaning out the list...NOT! Ha, added to it again - Viper MkVii, 1/32 THUD & F-15J plus a weekend madness build!

  • Member since
    September 2012
Posted by GMorrison on Tuesday, June 16, 2020 6:58 PM

modelcrazy

Yeah, there's no reason to strugle with decals that no one will ever see. You'll be the only one to know.

No there isn't. Spares are always handy too.

modelcrazy

For the life of me I can't understand why Academy made a carrier in such a odd scale.

The kit was originally an Otaki kit released in 1980, then Arii, Ki-Tech and Academy. I don't think 1/350 was common back then. It's nice to see someone build the old classic.


Bill

 Modeling is an excuse to buy books.


  • Member since
    July 2014
Posted by modelcrazy on Tuesday, June 16, 2020 7:12 PM

Thanks Bill, that explains it 

Steve

Building a kit from your stash is like cutting a head off a Hydra, two more take it's place.


http://www.spamodeler.com/forum/

  • Member since
    April 2020
  • From: Mountains of Western MD
Posted by BBorBust on Tuesday, June 16, 2020 7:24 PM

I will go ahead and throw my Trumpeter 1/350 USS North Carolina into the hat here. With unlimited time to finish, Might as well give it a go on this GB as well!

  • Member since
    May 2020
Posted by Keyserj on Tuesday, June 16, 2020 7:25 PM

It is nice to have spares just in case but, I also don't think I have enough decals to do the bottom side also. I have a theory that the reason I can't fit all of the planes on deck is that the sprues for them are meant for a different kit. Came across this today, It is hard to see but it says 1/800 Eisenhower Nimitz and makes my point seem valid.

"Why don't you knock it off with them negative waves?"- Oddball


John

On the bench:


JOIN OUR COMMUNITY!

Our community is FREE to join. To participate you must either login or register for an account.

SEARCH FORUMS
FREE NEWSLETTER
By signing up you may also receive reader surveys and occasional special offers. We do not sell, rent or trade our email lists. View our Privacy Policy.