SEARCH FINESCALE.COM

Enter keywords or a search phrase below:

Japanese Group Build IX

33910 views
568 replies
1 rating 2 rating 3 rating 4 rating 5 rating
  • Member since
    August 2014
  • From: Willamette Valley, Oregon
Posted by goldhammer on Thursday, December 12, 2019 8:57 PM

I actually pulled it off the shelf of doom today and finished pulling the masks off after 4+ years.....  Pulled very little paint.


As a body/paint guy for 40+ years, I know about unmasking asap, but didn't with this one.

Have to repaint nose and tail canopies and a little toothpick scraping on the rest.

Thanks for the incentive to get it back on the table.  May finish it up now.

  • Member since
    June 2014
Posted by BrandonK on Thursday, December 12, 2019 10:43 PM

I agree with getting that tape off asap. But, my building method is done with the canopy on till its totally weathered and sealed. So ripping it off right away won't work. I may start painting it seperate in the furture, but with some camos that makes things tricky.

BK

On the bench:

A lot !! And I mean A LOT!!

2024 Kits on deck / in process / completed   

                         14 / 5 / 2  

                              Tongue Tied

  • Member since
    December 2002
  • From: Northern California
Posted by jeaton01 on Thursday, December 12, 2019 10:51 PM

Since I'm waiting for paint to dry on the C-123 I thought I would work on what scheme to paint the Betty.  I had read that G4M's were part of the attack on the Prince of Wales and  the Repulse, I researched that for awhile, and found that the first paint scheme in the Tamiya instructions was for an airplane from the Kanoya Air Group that was part of the attack, flown by Lt. Haruki Iki.  Iki survived the war and I found an interview with him about the attack.  Another account is in a book by Jeffrey Cox, "Rising Sun, Falling Skies", which I liked well enough to buy. 

Still another resource about the attack is from an interrogation transcript of Captain Kameo Sonokawa, commander of the Genzan Air Group, also part of the attack.  The interrogation was in November 1945 during the US Occupation of Japan.

I have made a pdf of an excerpt from the Cox book, listed first, and of the interrogation transcript listed second.  Details of the Cox book are included, it is available as an eBook from Google Books for $10.00.

http://goldeneramodel.com/mymodels/g4m/1g4m/IkiAttackonRepulse.pdf


http://goldeneramodel.com/mymodels/g4m/1g4m/InterviewJavaSea.pdf


I found the book's detailed account of the attack on the Repulse (as well of that of the Prince of Wales) to be riveting reading.

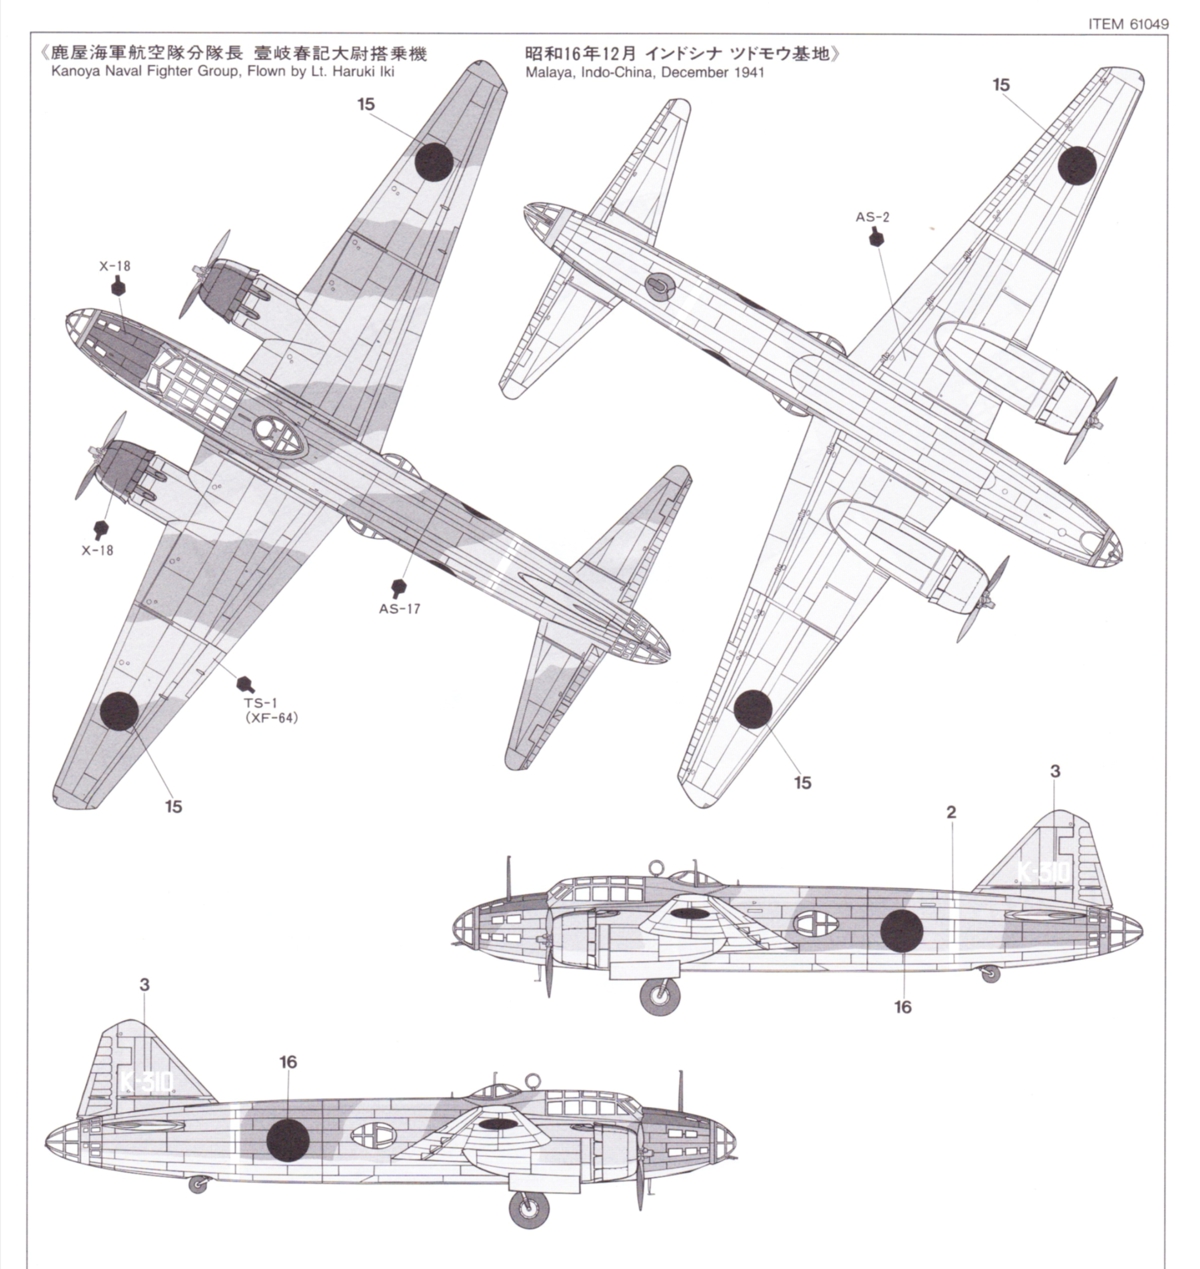
Here's the paint scheme for K-310, Iki's Betty:
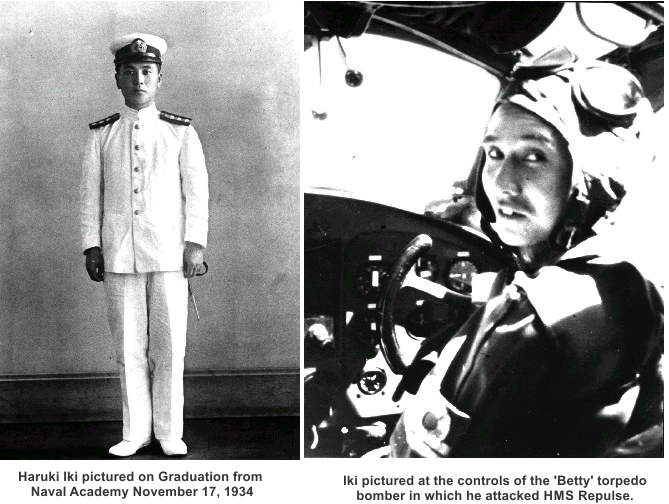


Haruki Iki:


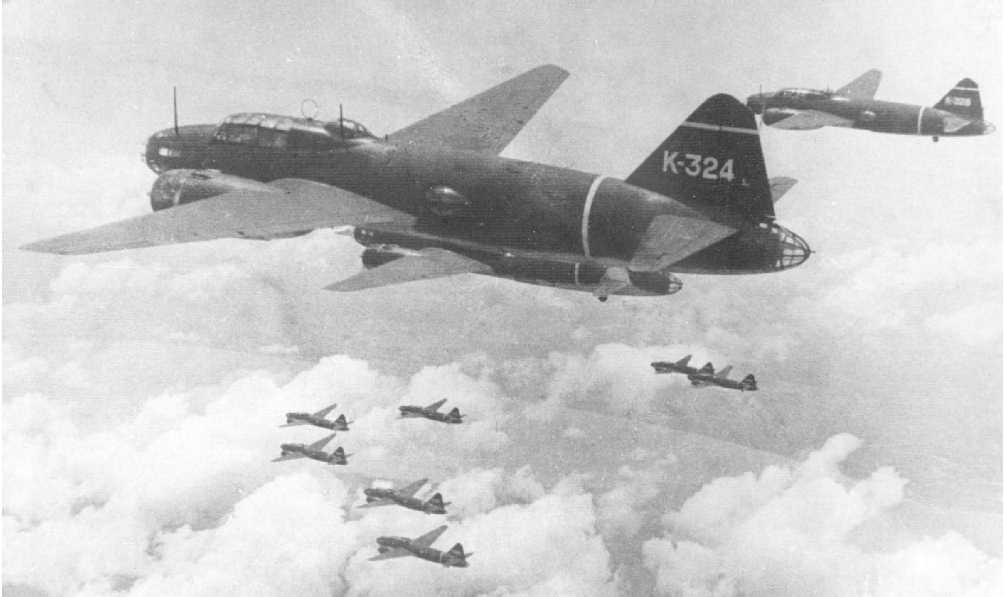
G4M1's of the Kanoya Air Group.  I find it hard to see camouflage demarcations in the black and white photo.  It might be from a later date, or the colors are lost in the shadows.  The Air Group was based near Saigon at the time of the attack and had undergone extensive torpedo attack training in the time leading up to the attack.


John

To see build logs for my models:  http://goldeneramodel.com/mymodels/mymodels.html


  • Member since
    December 2002
  • From: Northern California
Posted by jeaton01 on Thursday, December 12, 2019 11:08 PM

Goldhammer, git 'er done and post pictures!Big Smile 

Painting strategies are endlessly entertaining, aren't they.  I always attach my canopies first and seal the edges before any painting.  Rain gets throught any crack and my eye goes right to those spots for some reason. 

If the scheme needs a lot of work post canopy painting I try especially hard to keep the paint layers thin and weathering away from the canopy, which seems a normal state to me.  I find my enamels build up less than my acrylics.  That's one advantage of a natural metal finish I guess, you get to rip the masking off very soon.

John

To see build logs for my models:  http://goldeneramodel.com/mymodels/mymodels.html


  • Member since
    November 2009
  • From: SW Virginia
Posted by Gamera on Friday, December 13, 2019 9:48 AM

John: That's very interesting. I swear the research is often as much fun as building the kit!! 

Personally I tend to leave my masking on for awhile, probably longer than I should. Thankfully I haven't had much in the way of peeling issues though. I do get raised lines sometimes on colour demarcation lines- if I took the masks off earlier I wouldn't have that problem. 

"I dream in fire but work in clay." -Arthur Machen


  • Member since
    February 2005
  • From: Nashotah, WI
Posted by Glamdring on Tuesday, December 17, 2019 9:25 PM
I enjoyed building my Zero so much this year, put me down for a Aichi M6A1 Seiran.

Robert 

"I can't get ahead no matter how hard I try, I'm gettin' really good at barely gettin' by"

  • Member since
    November 2009
  • From: SW Virginia
Posted by Gamera on Wednesday, December 18, 2019 7:30 AM

Hey Robert, glad to have you! Btw is that the 1/48th Tamiya kit? 

"I dream in fire but work in clay." -Arthur Machen


  • Member since
    December 2007
  • From: Beavercreek, Ohio
Posted by Wrinkledm on Tuesday, December 24, 2019 10:25 PM


 deleted

  • Member since
    November 2009
  • From: SW Virginia
Posted by Gamera on Wednesday, December 25, 2019 7:52 AM

Oh and I talked to Rock Baker the other day. He's started work on the badge. I told him I'd like it done by the end of January if he can pull it off. 

"I dream in fire but work in clay." -Arthur Machen


  • Member since
    February 2005
  • From: Nashotah, WI
Posted by Glamdring on Wednesday, December 25, 2019 8:59 PM

No, the 1/72 iteration.

Robert 

"I can't get ahead no matter how hard I try, I'm gettin' really good at barely gettin' by"

  • Member since
    November 2009
  • From: SW Virginia
Posted by Gamera on Thursday, December 26, 2019 11:27 AM

Glamdring

No, the 1/72 iteration.


Thanks, gotcha! 

"I dream in fire but work in clay." -Arthur Machen


  • Member since
    December 2007
  • From: Beavercreek, Ohio
Posted by Wrinkledm on Saturday, December 28, 2019 10:03 AM

Going Sci-Fi this year with the Space Battleship Yamato Cosmo Zero.   Type 0 Model 52 Fighter.  I'm also (not with this build) starting on the pilot bust in 1/7 scale resin. With luck next December I'll get them finished and posted here.    

  • Member since
    November 2009
  • From: SW Virginia
Posted by Gamera on Sunday, December 29, 2019 6:52 PM

Wrinkledm

Going Sci-Fi this year with the Space Battleship Yamato Cosmo Zero.   Type 0 Model 52 Fighter.  I'm also (not with this build) starting on the pilot bust in 1/7 scale resin. With luck next December I'll get them finished and posted here.    


Ohhhhhhhhhhh that's awesome!!!

Just put you down!

"I dream in fire but work in clay." -Arthur Machen


  • Member since
    November 2009
  • From: SW Virginia
Posted by Gamera on Wednesday, January 1, 2020 3:42 PM

Happy New Year guys!!!


I started on the Zero. And got some work done on Mech-G rocket backpack. Can't complain it's been a decently productive day modeling wise.

"I dream in fire but work in clay." -Arthur Machen


  • Member since
    December 2002
  • From: Northern California
Posted by jeaton01 on Thursday, January 2, 2020 1:08 AM

I think I've signed up for building the Betty for about 3 of these GB's now, and if what's on my workbench now is any indication, it might well happen this time!  Finally.  It's going well, I'm really enjoying the build.  I didn't think I could make a good job of painting the electrical panel below the cockpit so I made a decal for it, with no color where the dials and switches are.  I painted the dials and switches and of course the surrounding area, then applied the decals which are black.  I like the result.  I used the Tamiya instrument panel decal, which worked out pretty well, using the regimen of the heat gun and then Walthers.  I guess that's pretty much the nuclear option but since the panel is a separate piece it wasn't too risky.  Failure of course would entail an order to Sprue Brothers for the Eduard Panel.  I painted all the interior with Gunze 126 Mitsubishi cockpit color, my best guess based on all the raging arguments I found among modelers on the net.

I used the Eduard masks which fit pretty well although there were two or three that I had to redo with the Silhouette Cameo so far.  Close but it's easy enough to make little adjustments when you can see what you need to do.  I plan to build more of these so I'll use my corrections then as well.  In any event, I had to make masks for the inside of the fuselage so I could install those windows before painting.  Very nice clear parts so far.

Here is where it's at:


John

To see build logs for my models:  http://goldeneramodel.com/mymodels/mymodels.html


  • Member since
    September 2011
  • From: Milaca, Minnesota
Posted by falconmod on Thursday, January 2, 2020 6:48 AM

I have 2 roll overs I'd like to add to this GB

LS 1/72 Mitsubishi Ki-67 Peggy

Hobby Boss 1/72 A5M2 Claude

Thanks

John

On the Bench: 1/72 Ki-67, 1/48 T-38

1/144 AC-130, 1/72 AV-8A Harrier

  • Member since
    November 2009
  • From: SW Virginia
Posted by Gamera on Thursday, January 2, 2020 10:45 AM

Guys, I might be better off calling you by your callsigns- I'm going to get my Johns mixed up! 

Falcon: Sounds good, just moved you over. 

Jeaton: That looks good. I entered an AFV Club M40 SPG in about three GBs and still haven't finished the darn thing. He's hoping better luck for you! 


"I dream in fire but work in clay." -Arthur Machen


GAF
  • Member since
    June 2012
  • From: Anniston, AL
Posted by GAF on Friday, January 3, 2020 7:42 PM

Jeaton> Nice start on the Betty.  I really need to find one of those, or a B5N.

This is a roll-over from JGBVIII.  I almost had it finished, but there was just too much for me to tackle in a sitting on New Years.  I find I cannot sit at a desk as long as I used to.


Here's where she stood at the end of the year:


Since then, I've finished up the canopy framing, added the wing lights, did some minor weathering and staining.  At the moment, the aerial wire is drying.  When that is done, I'll trim it and touch up the antenna.  Then all I need to do is minor work on the engine exhaust stains and give a green sage wash on the framing.  Won't be done tomorrow as I'll be away from the desk.

That's it for now.

Gamera>  Go ahead and put me down for another Zero, this time a Hasegawa 1/48 A6M5 Type 52.  It's essentially the same model as the above, with some minor differences.  I guess I just want one that's green!  Big Smile

Gary

  • Member since
    August 2014
  • From: Willamette Valley, Oregon
Posted by goldhammer on Friday, January 3, 2020 9:16 PM

Gamera.. I'll join in with the 1/48 Hasegawa "Myrt" that is also in the Secret Santa GB.  Was my gift from the big guy.


With your approval I'd like to roll over the surrender Betty that was in the GB before clocks became household items.  Will post up pics of new and old early next week.

Betty has only front and rear canopies to paint and attach along with the props.

  • Member since
    December 2002
  • From: Northern California
Posted by jeaton01 on Saturday, January 4, 2020 12:16 AM

Yeah, G, you can call me anything but late for dinner!  Nice to see lots of activity here.

Two more pictures tonight.  I think I've used up 8 fighters worth of Mitsubishi interior green on this bird.   I've put some Epoxysculpt on the leading edge of the flaps, and cut the rudder free from the vertical fin and added some epoxy there as well.  The flaps have that annoying step on the leading edge so they can be put on in the up or down positions.  No good, too much drag!  Not enough lift!


John

To see build logs for my models:  http://goldeneramodel.com/mymodels/mymodels.html


  • Member since
    November 2009
  • From: SW Virginia
Posted by Gamera on Saturday, January 4, 2020 5:26 PM

Guys, I think I got everything down!

Gary: That looks great! Looking forward to you getting the remaining work done.

GH: The Myrt sounds cool and looking forward to seeing the finished Betty.

Jeaton: That looks great! You're making some real progress there!

"I dream in fire but work in clay." -Arthur Machen


  • Member since
    August 2014
  • From: Willamette Valley, Oregon
Posted by goldhammer on Saturday, January 4, 2020 6:00 PM

Thanks Gamera.  Will be starting the Myrt next week when the paint gets here.

  • Member since
    July 2014
Posted by modelcrazy on Saturday, January 4, 2020 10:35 PM

Gam, started the Nick yesterday, painted the interior, masked the canopy and assembled the fuse, wing and stabs. Going together very quickly. I just need work on the seams and assemble the engines.

Steve

Building a kit from your stash is like cutting a head off a Hydra, two more take it's place.


http://www.spamodeler.com/forum/

GAF
  • Member since
    June 2012
  • From: Anniston, AL
Posted by GAF on Sunday, January 5, 2020 12:07 PM

Steve> Nice work on the Nick.  Some people are just assembling machines!  Big Smile

I'll call the A6M2b finished.  I managed to get the aerial wire on and some minor touch-up done, including removing a blob of glue that somehow got on the left tire. Tongue Tied  In addition to breaking off the pitot tube.

The paint scheme represents an aircraft of 2nd section from the aircraft carrier Zuikaku, flown by Tetsuzo Iwamoto in the Pearl Harbor attack.  Nothing unusual about the build.  It was done with spray cans and brushes, so cannot be said to be anything but mediocre.

The build was straight forward, although I did have to guess at how some of the parts went on.  The instructions are not exactly clear when the part is supposed to be oriented in a certain way.  You have to reference outside images to determine that.  No real difficulty in fitting.  The decals were not easy to work with and the fuselage stripes came apart so I had to mask and paint those.  Chalk it up to Hasegawa decals or their age.

The only unusual technique I used was on the canopy.  I painted some decal paper the fuselage color, cut out strips of varying widths and used these to"frame" the canopy.  Worked fairly well, though the curves were more difficult than the straight pieces.

This took awhile, but it was an enjoyable build.  Thanks for looking, and thanks to Gamera for hosting these GBs!

I guess the first photo would be suitable for the front page.

Gary

GAF
  • Member since
    June 2012
  • From: Anniston, AL
Posted by GAF on Sunday, January 5, 2020 12:25 PM

Next up is another Zero, the 1/48th scale Hasegawa A6M5 Type 52.  Since I'm already familiar with this type of model, I'll go ahead and do another.  The only difference is this one will be green!  Big Smile

The wingspan on the A6M5 is supposed to be a meter shorter than the A6M2b.  We'll see if that's true.  Also, I'll probably be adding the pilot figure that came with the A6M2b to this one.  It's too nice not to use.  Smile

IMPORTANT NOTE: Unfortunately, the kit came without any decals.  It appeared sealed, but when I opened it I found the decal sheet had vanished.  Not sure if Hasegawa merely goofed, or if someone had opened the kit, removed them and then rewrapped the box.  Bummer!

I have enough decals left from the A6M2b and a Tamiya A6M kit to make up most of what I need, but I need tail codes for an A6M5 type.  IF anyone has a spare set of tail codes they're not using, I would appreciate a donation (rather than having to buy a complete set somewhere).  Thanks!

Take care!

Gary

  • Member since
    July 2014
Posted by modelcrazy on Sunday, January 5, 2020 2:27 PM

Nice Zuikaku Zeek. I love the Zero.

I might be able to help you on those decals. I just finished a 1/48 Hasegawa A6M5 for Gam's Japanese GB VIII and I never toss spare decals.

When I get home I'll take a look.

Steve

Building a kit from your stash is like cutting a head off a Hydra, two more take it's place.


http://www.spamodeler.com/forum/

GAF
  • Member since
    June 2012
  • From: Anniston, AL
Posted by GAF on Sunday, January 5, 2020 5:40 PM

Thanks, Steve!  I wanted a Pearl Harbor Zero to go along with the P-40, so mission accomplished!

Thank you for the offer for the tail code.  I will note that your last Zero is an A6M5c, while mine is either an "a" or "b" model, so I'm not sure about what air group used what type.  I can always use one of the left over tail codes from the A6M2s, but would not be sure they are the correct air group or color.  I'll do some more research.

Gary

  • Member since
    December 2002
  • From: Northern California
Posted by jeaton01 on Sunday, January 5, 2020 6:07 PM

Gary, nice work on the A6M2.  Looks real good.  If Steve can't help you I probably can.

John

To see build logs for my models:  http://goldeneramodel.com/mymodels/mymodels.html


  • Member since
    July 2014
Posted by modelcrazy on Sunday, January 5, 2020 6:40 PM

Gary, here they are.

Let me know if they'll help.

Steve

Building a kit from your stash is like cutting a head off a Hydra, two more take it's place.


http://www.spamodeler.com/forum/

GAF
  • Member since
    June 2012
  • From: Anniston, AL
Posted by GAF on Sunday, January 5, 2020 7:45 PM

Steve and John,

Thank you!  That's what I need.  I wish Hasegawa had supplied a series of numbers for the A6M2b like they did for yours!

However, after doing a bit of research on A6M5s and digging through my own decal sheets, I think I can cobble together some to do the tail code.  I would consider just printing them out on decal paper, but yellow is a hard color to print dense enough, so professional decals are a must.

Long time to go before I need anything, but right now I'll give you a rain check on those.

Thanks again!

Gary

JOIN OUR COMMUNITY!

Our community is FREE to join. To participate you must either login or register for an account.

SEARCH FORUMS
FREE NEWSLETTER
By signing up you may also receive reader surveys and occasional special offers. We do not sell, rent or trade our email lists. View our Privacy Policy.