SEARCH FINESCALE.COM

Enter keywords or a search phrase below:

Japanese Group Build IX

33906 views
568 replies
1 rating 2 rating 3 rating 4 rating 5 rating
  • Member since
    November 2009
  • From: SW Virginia
Posted by Gamera on Wednesday, May 20, 2020 11:46 AM

Steve: I feel like I've been on the actual ship after looking at all that work on the deck supports! 

"I dream in fire but work in clay." -Arthur Machen


  • Member since
    December 2002
  • From: Northern California
Posted by jeaton01 on Wednesday, May 20, 2020 11:31 AM

tempestjohnny
John what is your approximate mixing ratio for the Mr Color paints. I've got a few bottles and will be using some soon. Thanks


About like Model Master.  With a new bottle I add thinner until it reaches the bottom of the neck, 2/3 lacquer thinner, 1/3 Mr Color Leveling Thinner.  My usual method of testing is to look at the rate and size of the drops off of a mixing stick lifted out of the bottle.

John

To see build logs for my models:  http://goldeneramodel.com/mymodels/mymodels.html


  • Member since
    July 2014
Posted by modelcrazy on Wednesday, May 20, 2020 8:52 AM

Thanks Gam, I was thinking about what glue to use. I'm thinking just a dab of white glue but not sure about that.

Almost complete with the stern girders. Just some pillars and what look to be walkways(?) then on to the mid section. The deck is just dry fitted to the hull. Hase supplied some huge aligling pins to set everything correctly.

Steve

Building a kit from your stash is like cutting a head off a Hydra, two more take it's place.


http://www.spamodeler.com/forum/

  • Member since
    November 2009
  • From: SW Virginia
Posted by Gamera on Tuesday, May 19, 2020 8:42 AM

Wow those bow girders look crazy! Crazy in a good way though! 

And I've seen the laser cut paper aftermarket parts but so far haven't tried any. I'm curious how they work out. 

"I dream in fire but work in clay." -Arthur Machen


  • Member since
    July 2014
Posted by modelcrazy on Tuesday, May 19, 2020 7:49 AM

Thanks guys.

I received a few things last night. I was so busy playing with them that I didn't get a whole lot done. I did get an hour on some more of the stern girder framework. I'm planning on finishing it up with, hopefully, the pillars, or at least get them made. I'm not sure I want to attach them until I fit the deck on just yet. We'll see, I may dry fit the deck, attach the pillars to the framework, then paint it all. I think it would be more difficult masking and painting with everything together.

The pic of the bow girders

The laser cut paper set from South Korea. 12 page instructions and 6 "trees".

Some other items that arrived including the aircraft PE set.

Steve

Building a kit from your stash is like cutting a head off a Hydra, two more take it's place.


http://www.spamodeler.com/forum/

  • Member since
    November 2003
  • From: Naples, FL
Posted by tempestjohnny on Tuesday, May 19, 2020 5:52 AM
John what is your approximate mixing ratio for the Mr Color paints. I've got a few bottles and will be using some soon. Thanks


  • Member since
    November 2003
  • From: Naples, FL
Posted by tempestjohnny on Tuesday, May 19, 2020 5:50 AM

jeaton01

Steve, you're making me crazy!


I don't know about crazy but I'm dizzy just looking at that framework


  • Member since
    December 2002
  • From: Northern California
Posted by jeaton01 on Tuesday, May 19, 2020 1:49 AM

Steve, you're making me crazy!

John

To see build logs for my models:  http://goldeneramodel.com/mymodels/mymodels.html


  • Member since
    November 2009
  • From: SW Virginia
Posted by Gamera on Monday, May 18, 2020 6:01 PM

WOW! Those girders look crazy intricate Steve!

"I dream in fire but work in clay." -Arthur Machen


  • Member since
    July 2014
Posted by modelcrazy on Monday, May 18, 2020 10:05 AM

Much done this weekend. PE girders and dry fitting to the hull to make sure all is streight. I apperently didn't take a picture of bow work. Too bad because that took most of Sunday to do.

Stern girders just about done

A little addition to the fore deck.

All that work covered. used filler to smoothe out the join

The stern girders, not attached. I need to smooth the filler. Also there is a smaller section just aft of this section. I'll work on that then install the pillers. After test fitting, all of this will need to be painted. Again, it's to bad I didn't take a pic of the bow work

Steve

Building a kit from your stash is like cutting a head off a Hydra, two more take it's place.


http://www.spamodeler.com/forum/

  • Member since
    November 2009
  • From: SW Virginia
Posted by Gamera on Friday, May 15, 2020 10:10 AM

modelcrazy

No, just Hase's way of conecting everything and keeping it all sturdy. It's heavy, maybe 1 1/2 to 2 lbs so far!


Good to hear that! With that much weight you really want a good sturdy framework.

"I dream in fire but work in clay." -Arthur Machen


  • Member since
    July 2014
Posted by modelcrazy on Friday, May 15, 2020 9:17 AM

No, just Hase's way of conecting everything and keeping it all sturdy. It's heavy, maybe 1 1/2 to 2 lbs so far!

Steve

Building a kit from your stash is like cutting a head off a Hydra, two more take it's place.


http://www.spamodeler.com/forum/

  • Member since
    November 2009
  • From: SW Virginia
Posted by Gamera on Friday, May 15, 2020 8:53 AM

Oh wow! Can you see down into the hangers? Looks like bulkhead detail there but it's hard for me to tell from the angle. 

"I dream in fire but work in clay." -Arthur Machen


  • Member since
    July 2014
Posted by modelcrazy on Friday, May 15, 2020 8:37 AM

I got the hanger on and am waiting for a few other items to come in before proceding on the hull. I'm working on the girders at the time being.

Steve

Building a kit from your stash is like cutting a head off a Hydra, two more take it's place.


http://www.spamodeler.com/forum/

  • Member since
    November 2009
  • From: SW Virginia
Posted by Gamera on Thursday, May 14, 2020 8:42 AM

Fun Steve!?! Well to each his own! Wink

Great job so far, I love the decking. 

"I dream in fire but work in clay." -Arthur Machen


  • Member since
    December 2002
  • From: Northern California
Posted by jeaton01 on Wednesday, May 13, 2020 3:09 PM

Proof your hands are much steadier than mine, Steve.

John

To see build logs for my models:  http://goldeneramodel.com/mymodels/mymodels.html


  • Member since
    July 2014
Posted by modelcrazy on Wednesday, May 13, 2020 8:04 AM

Thanks Gam

I put in about 4 hours last night. I masked and sprayed the grey and did some fading since this area will be impossible to get to later. I'll add some weathering tonight for the same reason and then continue to add the hanger overhang at the bow. I also worked on the girder system some. something to get my wound up before bed.

This is one of the most fun kits I've done.

Steve

Building a kit from your stash is like cutting a head off a Hydra, two more take it's place.


http://www.spamodeler.com/forum/

  • Member since
    November 2009
  • From: SW Virginia
Posted by Gamera on Tuesday, May 12, 2020 11:54 AM

I love that Steve!!! 

"I dream in fire but work in clay." -Arthur Machen


  • Member since
    July 2014
Posted by modelcrazy on Tuesday, May 12, 2020 8:21 AM
Just a small update. I just got 3 hours on the Akagi last night. I black based and sprayed the linoleum at the bow, most of which you won't really see once the hanger overhang is installed, and stern deck. I then proceeded to work on the stern girder system. Wow, what a delicate interlocking puzzle that is. I first had thought that it attached to the deck while one constructed it....nope. There's no reference. So, to be able to place the deck correctly, aligning with the massive posts, the assembly needs to be built on the bench first. Another issue I see is the deck at the stern is curved on the actual ship, not on the kit. I need to add some curvature to the deck to match the curvature of the delicate mass of PE. Others have done it, so can I. It's going to take a while and I'll work on it while other things are drying.
There are areas of the deck that will be masked and sprayed Sasebo Arsenal Grey A, at least that's what Hasegawa says to paint it, even though she was built in Kure. Whatever Confused It was their ship after all, what do I know.

Steve

Building a kit from your stash is like cutting a head off a Hydra, two more take it's place.


http://www.spamodeler.com/forum/

  • Member since
    November 2009
  • From: SW Virginia
Posted by Gamera on Tuesday, May 12, 2020 7:27 AM

From what the seller showed on Ebay the A6M8 did have a resin cowl, I didn't see any white metal in the photos he posted, guess I'll find out when it gets here. 

I think I have an A6M2-K, I do have a two-seat trainer model. I didn't pull out the box to check. 

As I look around there are a couple of sub-types I don't have. Not that big a deal though. 

My stash there isn't as extensive as yours John! 

"I dream in fire but work in clay." -Arthur Machen


  • Member since
    December 2002
  • From: Northern California
Posted by jeaton01 on Monday, May 11, 2020 12:07 PM

Gamera

I just ordered a Hasegawa A6M7 and an A6M8 from Ebay- they're the last two Zero varients I didn't have. 

I've been on that quest for awhile and have those two.  If I remember right there is some white metal in the A6M8, and maybe a different cowl.  I haven't looked at it in awhile.  How about the A6M2-K?  It's Hasegawa kit 07372.

John

To see build logs for my models:  http://goldeneramodel.com/mymodels/mymodels.html


  • Member since
    November 2009
  • From: SW Virginia
Posted by Gamera on Monday, May 11, 2020 11:37 AM

Yeah that's a pile of time and money Steve- but you're going to end up with a museum quality model. 


Assuming it doesn't kill you... Wink

But you've done stuff nearly that epic before so I'm betting on you! 

"I dream in fire but work in clay." -Arthur Machen


  • Member since
    July 2014
Posted by modelcrazy on Monday, May 11, 2020 9:07 AM

Awesome job on the Ka-14 John. I beilieve you have a few more Zeeks in the stash than I do, unless you count 1/350 scale Huh?

Massive amount of work on the Akagi this weekend, well not so much yesterday. I've been loging hours since I started and I'm up to 21. I'm afraid to find out just how many hours of my life will be spent building this thing.Tongue Tied

I spent about 2 of thoss hours working on the two 13m special landing craft boats, adding PE, weathering, drybrushing, just to find out one will probably never be seen and the other can barrly be seen through the aft port section of the hull. Oh well, at least I know they are there. I also started black basing and spraying the base coat grey to areas that I won't be able to get to with the AB. I know it doesn't look like much work but it is. Most of the work is looking through the three sets of PE instructions to see if I'm suposed to add or replace any parts. I wish the instructions were as clear as Eduard PE, however I'm very impressed with the quallity of the PE itself. You can not see what PE was installed, most of it is so tiny my camera didn't pick it up at this distance. The bow and stern arreas is where most of the detail work will be I suspect.

The area where the landing craft will be installed....on the rail you can't see.

BTW, here are the 3 PE trees for the bow and stern deck girders.

Steve

Building a kit from your stash is like cutting a head off a Hydra, two more take it's place.


http://www.spamodeler.com/forum/

  • Member since
    November 2009
  • From: SW Virginia
Posted by Gamera on Monday, May 11, 2020 7:35 AM

John: Lol, just having a little fun with you. After spending friggin' two days working on three tow cables on two tanks I have to have a little sillyness! 

I just ordered a Hasegawa A6M7 and an A6M8 from Ebay- they're the last two Zero varients I didn't have. 


And looking forward to seeing the torpedo cart done!!! 

"I dream in fire but work in clay." -Arthur Machen


  • Member since
    December 2002
  • From: Northern California
Posted by jeaton01 on Sunday, May 10, 2020 11:33 PM

Ha ha, Cliff.  I'll put it on the list but I have to warn you I still have 31 more Zeros in the stash ahead of it.   Well, at some price I might move it up a few....

If you remember back to the Betty with the torpedo and the mention of a cart for it, I did just finish some wheels for the cart molded using as a master a wheel from the Tamiya 1/48 N1K1 Kyofu's dolly, so I'll get that done soon.  I'm also starting on the Monogram T-6 but that's another topic as it won't be a Hollywood Zero.

John

To see build logs for my models:  http://goldeneramodel.com/mymodels/mymodels.html


  • Member since
    November 2009
  • From: SW Virginia
Posted by Gamera on Sunday, May 10, 2020 9:53 PM

John: That looks beautiful!!! Just put you down on the front page.

And maybe I should box my Zero up and send it to you, I worked on two non-GB projects over Fri. and Sat. - I haven't touched the Zero for a couple weeks now. You might actually get her finished!

"I dream in fire but work in clay." -Arthur Machen


  • Member since
    December 2002
  • From: Northern California
Posted by jeaton01 on Sunday, May 10, 2020 2:25 PM

The Ka-14 finished itself while I was sleeping, I think.   No unit markings as this airplane was a one off prototype.  A second prototype was built without the gull wing, and that wing made its way on to the the A5M4 Claude.  What a shame, the gull wing is so graceful.

Tamiya XF-14 is the overall color, Gunze Mr Color 128 is supposed to be equivalent but I didn't have any of that.  Tamiya X-7 Red and X-1 Black for the trim, and Gunze Mr Color Cowling Color for the cowl.  Hinomarus are XF-7 Flat Red.  Alclad II Matte clear coat.


Ka-14, A5M4, A6M2b.

John

To see build logs for my models:  http://goldeneramodel.com/mymodels/mymodels.html


  • Member since
    December 2002
  • From: Northern California
Posted by jeaton01 on Saturday, May 9, 2020 8:20 PM

I don't know what it is, but somehow these Fine Molds kits are just sucking me in.  Such fun to build, it feels like any little effort has lots of payback.

Eduard seatbelts, Gunze Mr Color 126 Mitsubishi interior green.


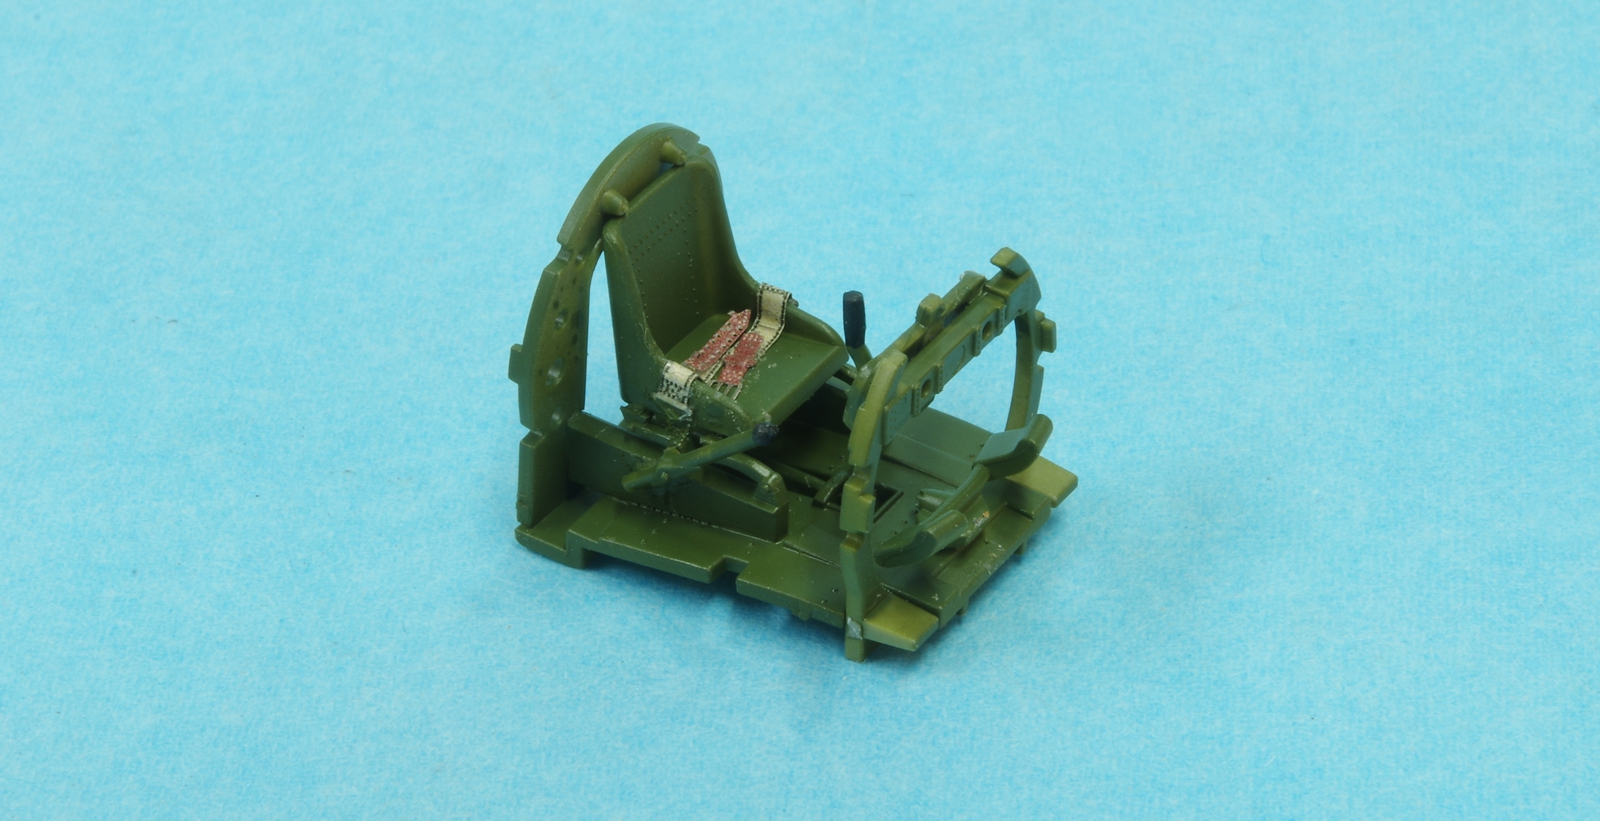
The kit gives you a flat faced instrument panel part for the decal, but I put it on the second part that had relief. The decal settled well just with MicroSol. 
 
 
I used Mr Color interior blue green for the magazine, much better than the acrylic I used on the A5M4.  Take a good look at the pressure bottles, you'll never see them once the fuselage is assembled.
 

 Superb fit.

 
Picture was taken with the camera's HDR mode, high dynamic range, where it takes two different exposures and brightens dark areas and darkens light areas.  Not a large cockpit opening.
 
 
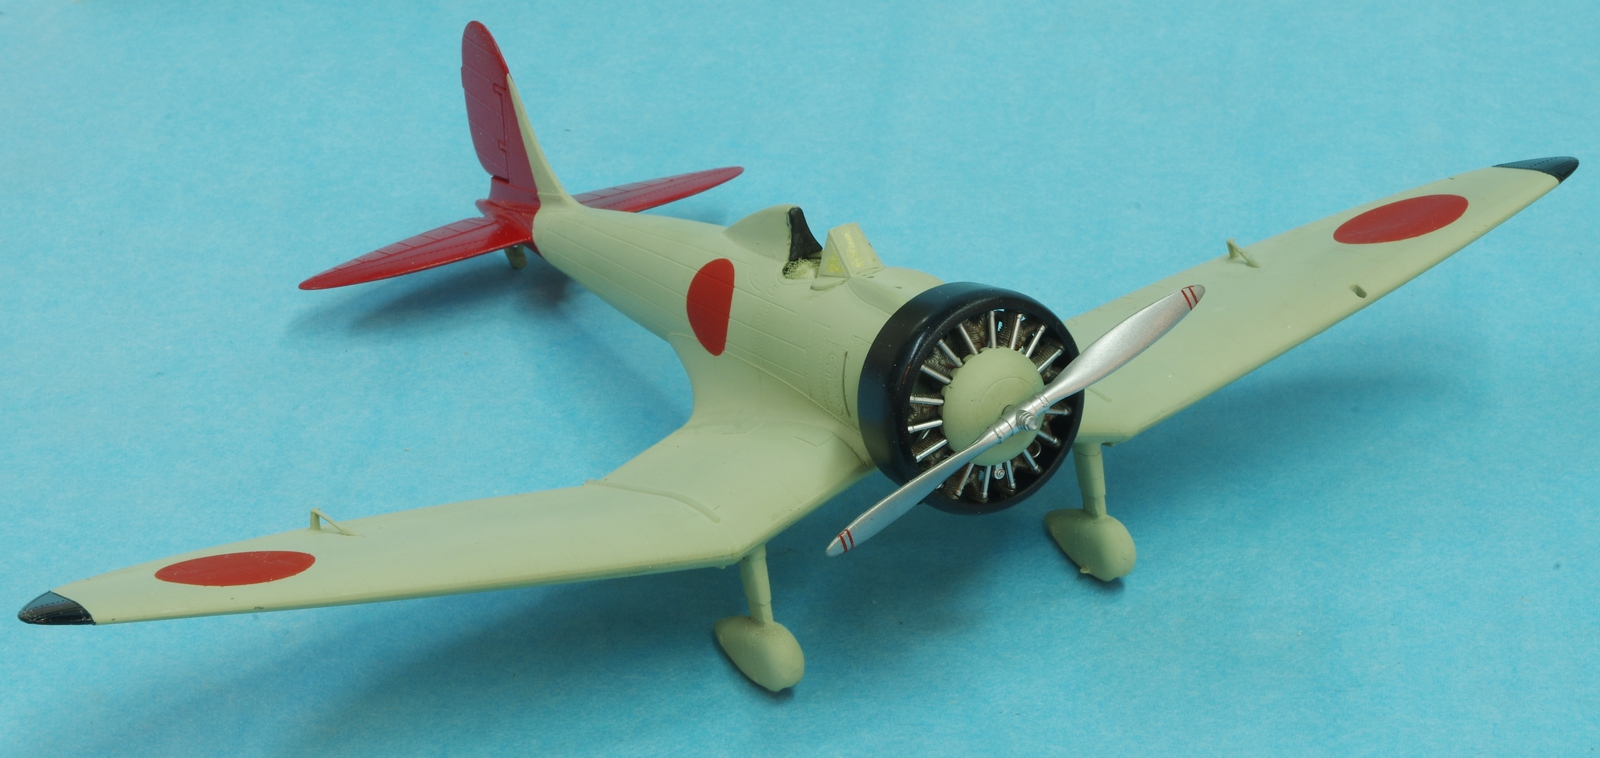
The main wheels were grooved to allow installation after final painting, same as the wheels were molded in the A5M4 kit.  All the engine parts were painted on the sprue.  The ignition wires were painted rust before the engine was assembled.  Touch up will be needed on the cowl after assembly.  Masks were made for the windscreen with the Cameo vinyl cutter.
 
 
Almost a shame to put the cowl on.


The markings were painted, including the propeller stripes.  Still have to do a matte clear coat, paint on the position lights, add the pitot tube that looks like a stork sitting on the wing, and install the main wheels.


John

To see build logs for my models:  http://goldeneramodel.com/mymodels/mymodels.html


  • Member since
    December 2002
  • From: Northern California
Posted by jeaton01 on Saturday, May 9, 2020 7:55 PM

Looking good, Piers!

John

To see build logs for my models:  http://goldeneramodel.com/mymodels/mymodels.html


  • Member since
    November 2009
  • From: SW Virginia
Posted by Gamera on Friday, May 8, 2020 9:23 AM

Piers: That rust looks perfect!!! Yes

"I dream in fire but work in clay." -Arthur Machen


JOIN OUR COMMUNITY!

Our community is FREE to join. To participate you must either login or register for an account.

SEARCH FORUMS
FREE NEWSLETTER
By signing up you may also receive reader surveys and occasional special offers. We do not sell, rent or trade our email lists. View our Privacy Policy.