SEARCH FINESCALE.COM

Enter keywords or a search phrase below:

Lockdown 2020 GB

14792 views
270 replies
1 rating 2 rating 3 rating 4 rating 5 rating
  • Member since
    November 2008
  • From: Hatboro, PA
Posted by Justinryan215 on Tuesday, April 7, 2020 11:55 AM

Thanks for the kind words, guys!


I have started on the Eduard Bell X-1 Profipack since finishing, I just hadnt time to post pics...Its a fairly simple kit that comes with Resin wheels, canopy masks and a small fret of colored photoetch:

These are the only sprues of parts for the main build:


I painted the 'pit interior green, added the photoetch guages and seatbelts and gave it a quick army painter dark wash followed by a dry brush of straight interior green


After the pit was finished, I closed the fuselage up and started on the seam work.  My fuselage halves were sligktly warped, so I needed to do some clamping. Tamiya extra thin was used to attach the canopy.  This morning before work (since my hours were cut), I was able to get the seam work finished and ready for primer...


"...failure to do anything because someone else can do better makes us rather dull and lazy..."

Mortal as I am,I know that I am born for a day.  But when I follow at my pleasure the serried multitude of the stars in their circular course, my feet no longer touch the Earth...


  • Member since
    April 2015
Posted by Mopar Madness on Tuesday, April 7, 2020 5:35 PM

Hello friends. I think I've pretty much wrapped up the body, just need to touch up a couple of white areas around the hood scoop. I didn't have Shelby blue so I laid down a base of Vallejo Metal Color aluminum directly to the body then applied four coats of Model Air blue to give me a nice metallic effect. This was wiped smooth with a soft cloth then I applied four coats of gloss. I added the white racing stripe decals then finished with one more coat of gloss.

Chad

God, Family, Models...

At the plate: 1/48 Airfix Bf109 & 1/35 Tamiya Famo

On deck: Who knows!

  • Member since
    April 2015
Posted by Mopar Madness on Tuesday, April 7, 2020 5:37 PM

Nice X-1 Justin! 

Chad

God, Family, Models...

At the plate: 1/48 Airfix Bf109 & 1/35 Tamiya Famo

On deck: Who knows!

  • Member since
    March 2010
  • From: Boston
Posted by mach71 on Wednesday, April 8, 2020 11:58 AM

That blue viper is looking very nice!

Same with the X-1

  • Member since
    June 2019
  • From: USA
Posted by Cj2785 on Wednesday, April 8, 2020 10:52 PM

Calling her done..please dont be too harsh lol..this was a lockdown build plus an 12 year anniversary gift for the wife.

Charles Johnson

  • Member since
    November 2008
  • From: Hatboro, PA
Posted by Justinryan215 on Thursday, April 9, 2020 8:03 AM

Looks awesome!  I'm digging those pillars!


That viper is looking awesome!  makes me want to build one too!

"...failure to do anything because someone else can do better makes us rather dull and lazy..."

Mortal as I am,I know that I am born for a day.  But when I follow at my pleasure the serried multitude of the stars in their circular course, my feet no longer touch the Earth...


  • Member since
    November 2008
  • From: Hatboro, PA
Posted by Justinryan215 on Thursday, April 9, 2020 8:13 AM

Got a little more work dont on the X-1 last night, and again this morning before having to leave for work. (one advantage of being an early riser and then having my hours cut at work...)

I dont plan on weathering the X1, since it wasnt used and abused like the fighters of its day, but I did want to add some variation in the paint to add interest, so I initially thought to do some black basing,

but the thinned down orange just wouldnt cover at all, so I ended up mixing what was left of my deck tan mixture with vellejo game air Fire Orange to give it is initial faded orange coat:

and then followed that with (after letting it dry overnight) Tamiya clear orange along the panel lines and wing roots and around the gear bays:

and then immediatly followed up with Clear orange over the whole airframe:

I had to go to work just after that, so I will examine it under my "photography lighting" when I get home to see if I am pleased with the color/saturation, and then I will go back and paint the canopy black.


Now...does anyone have any idea where I can get a Chuck Yeager pilot figure in 1/48th scale?

"...failure to do anything because someone else can do better makes us rather dull and lazy..."

Mortal as I am,I know that I am born for a day.  But when I follow at my pleasure the serried multitude of the stars in their circular course, my feet no longer touch the Earth...


  • Member since
    June 2019
  • From: USA
Posted by Cj2785 on Thursday, April 9, 2020 9:27 AM

Thanks Justin, the pillars were fun to do. Never made anything like it before. It was a fun build overall. Now, on to the next one. 

Charles Johnson

  • Member since
    April 2015
Posted by Mopar Madness on Thursday, April 9, 2020 9:55 AM

That Medusa is really cool Charles! 

Chad

God, Family, Models...

At the plate: 1/48 Airfix Bf109 & 1/35 Tamiya Famo

On deck: Who knows!

  • Member since
    April 2015
Posted by Mopar Madness on Thursday, April 9, 2020 9:57 AM

I agree Justin. I think you have the perfect amount of weathering!

Chad

God, Family, Models...

At the plate: 1/48 Airfix Bf109 & 1/35 Tamiya Famo

On deck: Who knows!

  • Member since
    November 2008
  • From: Hatboro, PA
Posted by Justinryan215 on Thursday, April 9, 2020 11:02 AM

Cj2785

Thanks Justin, the pillars were fun to do. Never made anything like it before. It was a fun build overall. Now, on to the next one. 


ocean scene with this one?  I certainly hope so!  If you need any help, let me know!

"...failure to do anything because someone else can do better makes us rather dull and lazy..."

Mortal as I am,I know that I am born for a day.  But when I follow at my pleasure the serried multitude of the stars in their circular course, my feet no longer touch the Earth...


  • Member since
    April 2010
Posted by Theuns on Thursday, April 9, 2020 11:32 AM

Charles Medusa is looking great...or scary, witch ever one it is she uses to make dudes turn to stone LOL

I will post a pix thanx for sharing.

Chad the blue on the Viper is stunning, just like Megan Boone's eyes Bow Down

Justin the orange is a tricky color to paint, you nailed it


As for my Allo, I got some paint on it today

 IMG_20200409_174712 by Theunis van Vuuren, on Flickr

 IMG_20200409_172058 by Theunis van Vuuren, on Flickr

The F-15 filling and sanding continues Ad infinitum...

I used streched spru to fill the gap on the top of the wingroot to aid in rescribing.

 IMG_20200409_152743 by Theunis van Vuuren, on Flickr

 IMG_20200409_152816 by Theunis van Vuuren, on Flickr

Nose section sanded and rescribed

 IMG_20200409_080330 by Theunis van Vuuren, on Flickr


Theuns


  • Member since
    November 2008
  • From: Hatboro, PA
Posted by Justinryan215 on Thursday, April 9, 2020 2:37 PM

DAAAAAAANG....That thing is tiny!  My eyes hurt just imagining working on that thing!

It's looking good though!

"...failure to do anything because someone else can do better makes us rather dull and lazy..."

Mortal as I am,I know that I am born for a day.  But when I follow at my pleasure the serried multitude of the stars in their circular course, my feet no longer touch the Earth...


  • Member since
    June 2019
  • From: USA
Posted by Cj2785 on Thursday, April 9, 2020 8:45 PM

Thank you everyone! That medusa was fun. Justin- I dont know if I have room to make an ocean scene. This model is going to be huge. 1/90 scale. The hull alone is about 18 inches long. 

Charles Johnson

  • Member since
    April 2010
Posted by Theuns on Friday, April 10, 2020 12:50 AM

Our lockdown has been extended by another 14 days (for no, could be more) so I have alot more modling time.

Pity I have no income during this time...


Theuns

  • Member since
    September 2012
Posted by GMorrison on Friday, April 10, 2020 1:23 AM

We (Debra and I) were talking about the changes we are experiencing. 

She's a Super Type A, CEO of a corporation, and I'm a more philosophical but driven type.

We put our company on the cloud several years ago and so we still have more to do than the day allows.

But I have had a ground shift in how I go about my day.

I used to multi-task, It seems now that was kind of poorly executed.

She's taking time to go back to writing from the position of her Theology post grad studies. 

We ankle tackle each other constantly when we go on "get it done" jags.

She's upped her game with the kid (29 and counting), her reading of good literature and pleasure novels.

I've weeded the back half acre, run the business, and modeled.

I've had this silly schtick about the Laws of modeling, however the Third Law of Morrison is being field tested. Rather than "There's never enough time to do it right, but there's always time to do it over"; Morrison's Third Law, corollary 1 is,

"With time to examine the task and what you can bring to it; success will follow".

Stay safe my friends,


Bill


 Modeling is an excuse to buy books.


  • Member since
    April 2010
Posted by Theuns on Friday, April 10, 2020 2:39 AM

Yup the world as we know it has changed for ever, some good ,some bad.

I work in full size aviation re-build. maintenance but ovet the last 2 odd years have been making molds and tooling for RC scale jets and 1/5 P51d that I wil be marketing overseas. We wew supost to test both the 1/9 Mirage III and the mustprang but the undercart is stuck ing the US untill after lockdown.


I Have been using this time to get those demo models and the last of the tooling done but I just wonder what the market will be like after all of this...


Theuns

  • Member since
    February 2010
  • From: New Jersey
Posted by 68GT on Saturday, April 11, 2020 5:57 PM

I did a little  more work on the P-47N today.

On Ed's bench, ???


  • Member since
    February 2010
  • From: New Jersey
Posted by 68GT on Saturday, April 11, 2020 5:59 PM

Lots of nice work going on in the GB

On Ed's bench, ???


  • Member since
    April 2010
Posted by Theuns on Saturday, April 11, 2020 11:54 PM

I want to get working again on the F 15 and allo tomorrow :-)

Theuns

  • Member since
    April 2010
Posted by Theuns on Sunday, April 12, 2020 11:59 AM

This was quite an undertaking in preshading...

 IMG_20200412_164850 by Theunis van Vuuren, on Flickr

I also  added a little mottling to brek up the paint.

 IMG_20200412_164911 by Theunis van Vuuren, on Flickr

Alclad allumunium over dull black, I didnt want it to be to shiny

 IMG_20200412_170551 by Theunis van Vuuren, on Flickr

 IMG_20200412_170603 by Theunis van Vuuren, on Flickr


Theuns

  • Member since
    February 2010
  • From: New Jersey
Posted by 68GT on Sunday, April 12, 2020 12:16 PM

It will be well worth the work though.

On Ed's bench, ???


  • Member since
    November 2003
  • From: State of Mississippi. State motto: Virtute et armis (By valor and arms)
Posted by mississippivol on Sunday, April 12, 2020 1:24 PM

Super work, y'all! 

  • Member since
    March 2010
  • From: Boston
Posted by mach71 on Sunday, April 12, 2020 2:10 PM

Excellent work!

  • Member since
    November 2008
  • From: Hatboro, PA
Posted by Justinryan215 on Monday, April 13, 2020 6:23 AM

Calling my contribution to the lockdown group build finished!

(For now, of course!  I am still searching for a 1/48th Chuck Yeager, and plan on building Revel's 1/48 B-29 as a mothership and having them displayed together....

Here she is, Glamorous Glennis, Chuck Yeager's mount when he became the first man to fly faster than the speed of sound!


The hatch was painted after the fact (hence the color mismatch) as I am planning to display her with the hatch off and a figure of Chuck Yeager alongside.  I decided, for the purpose of this build, to 'tack' it in place with a little white glue, temporarily...

"...failure to do anything because someone else can do better makes us rather dull and lazy..."

Mortal as I am,I know that I am born for a day.  But when I follow at my pleasure the serried multitude of the stars in their circular course, my feet no longer touch the Earth...


  • Member since
    June 2019
  • From: USA
Posted by Cj2785 on Monday, April 13, 2020 10:05 AM

Mopar Madness

That Medusa is really cool Charles! 


Thank you sir!

Charles Johnson

  • Member since
    July 2014
Posted by modelcrazy on Monday, April 13, 2020 10:45 AM

I have three updates for the F-35, pretty much because I forgot I was in this GB Embarrassed

Sorry long post Tongue Tied

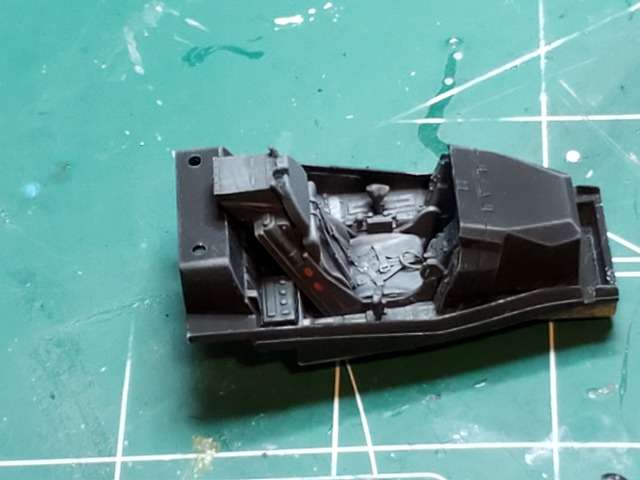
1. I started the F-35 and of course the pit is first. The kit does not have any paint call outs so I did a little research. It looks like I need a little more yellow to the ejection handle


2. Working more on the F-35. I read on a few reviews that there was a problem with the fit of the pit and nose wheel well. I assembled the wheel well, leaving the strut off until later and following the instructions, I dry fit the pit onto the wheel well, installed the well and pit in the lower fuse part. I then dry fit the upper fuse and saw the issue that was of so much consternation. The well/pit assembly sits too high for the fuse to mate. I dry fit the office to the upper fuse, breaking off the ejection seat in the process. The fit of the pit to the fuselage is perfect and held in there without any help. It was very helpful without the seat in there as well. I usually install the ejection seat just before the canopy anyway so no biggie. I took out my grinder and removed around 1mm, maybe more off the pit floor. I then dry fit the two half and found I fixed the offending lack of clearance, but the seam still wouldn’t fit without some force :hmm:. I realized the aligning pin receivers were too high as well so after cutting then down all fit well.

Looking at the instructions, the ladder and ladder door have nice little PE parts. The door needs to be cut out of the lower fuse part to be used. This would be confusing for someone new to the hobby. One, it’s not clear what needs to be done and two, there’s not anywhere where the instructions say this is an option. In between binge watching “Band of Brothers”, I did some research of the ladder door and compartment. Scratching my head and some parts, I came up with what I think is a reasonable facsimile of the compartment. This is going to be an FAA bird so all the panels, at least the ones the kit allows to be open, will be open for the RN lads to inspect.
Next is the engine and fan drive shaft which I read is also an issue.
The nose wheel well in the lower fuse assembly showing the alining pins for the pit.
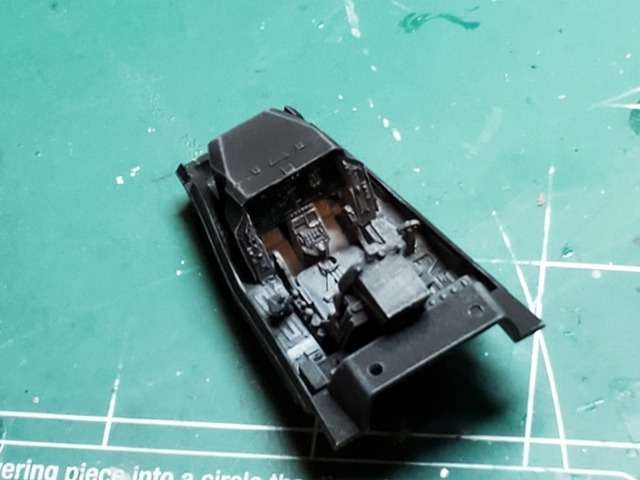
The pit in the upper fuse, ground down and pin receivers cut.
The seam fits well now.
The ladder door cut out with the unclear instructions.
The scratched ladder compartment. I still need to do a wee bit of work on the frame and scribe the RAM tape but I'm happy with it. Paint will really make it pop I think.
 
 
3. F-35 long update, lots of pictures.
So, after working on the F-35 for the past few days, I found that there is a lot more than just a fan driveshaft issue. Anyone planning on building this kit take note. It has nice detail and looks to be a good kit when finished, there are just a few fit issues at the beginning and middle of the build. The cockpit and nose gear well I already mentioned.
After working on the pit and well. The next step is the engine, fan and intake assembly. I did not go step by step here. Assemble the sub-assemblies and dry fit everything before gluing. This is what I ran into.
My first step was to make the assemblies. The engine, exhaust duct, and the intake ducting were easy enough but when I made the fan box assembly, I found the lower fan was too large to close the shroud. I filed the fan part outside until the shroud would close.


While attaching the upper intake fan and shroud to the fan case I saw there are no aligning pins or snug fit. The only aligning tab was on the upper fuselage. So now knowing the orientation, I sat the shroud on the case and aligned one injection pin mark with the case seam.


Next, the driveshaft is too small, or the transmission shaft is too large for them to fit so I filed the transmission shaft, then I could attach the driveshaft. Notice the fan box is assembled. I had to disassemble it to install the lower fan. My fault.


The next issue was the intake assembly and engine assembly. They are too short for the fuse intake opening. The engine is attached to the lower and upper fuse using pins but the intake will not reach the fuse opening with them attached. So, since this join won’t be seen I butted the front of the intake to the fuse intake opening and went with it.
 
 
Filled and sanded
 
 
Next was the exhaust nozzle. There are PE parts for this, but they are not called out in the instructions and the PE tree is numbered incorrectly. The nozzle parts are labeled 1, 2 and 3 on the tree, but 1, 2 and 3 are identified as canopy parts in the instructions. The nozzle PE didn’t match the nozzle anyway, so I didn’t install them. Perhaps they are for the A or C versions.


While the intake filler was drying, I worked on the wings and stabs. Again, fit issues. The stab parts needed filing to fit but the wing, slats and flaps went together very well. So, figuring this could not be this smooth I dry fit the wings to the lower fuse and Ha, there it was. The locating pins are receivers on both the wing and fuse, so I cut off the receivers on the fuse so the wing would fit flush. It still wasn’t completely flush, so a little sanding was in order to the fuse wing attachment. Now it’s just right.


The weapons bays and main gear wells assembled and installed very nicely. Very smooth.
The last thing I did this weekend, before the wife got on to me about spending too much time away, was install all the engine intake and exhaust parts in the lower fuse and glue both halves together, Now again, this step is not even close to the instruction sequence, but I can install the fan just before I attach the lower nose to the completed fuse, which is not in sequence either. I spread some filler on the intake and upper fuse opening and put it aside until tomorrow.
 
 
Oh goody, the intake lines up, yea!
 
 
The completed fan box, transmission, vanes and fan shroud.
 
 
This is a fun kit in the way that figuring out a puzzle is fun. It’s not for the beginner. It would have a beginner throwing it against the wall PO’ed for spending the money and swearing off scale modeling for good. For the large majority of the forum members, it is a nice change of pace from the shake and bake Hasegawa  or Tamaya kit. This one makes you think and exercise some modeling skills.
I think its smooth sailing from now on. LOL, who am I kidding.
More to come

Steve

Building a kit from your stash is like cutting a head off a Hydra, two more take it's place.


http://www.spamodeler.com/forum/

  • Member since
    April 2015
Posted by Mopar Madness on Monday, April 13, 2020 10:57 AM

Great X-1 Justin! 

Chad

God, Family, Models...

At the plate: 1/48 Airfix Bf109 & 1/35 Tamiya Famo

On deck: Who knows!

  • Member since
    March 2010
  • From: Boston
Posted by mach71 on Monday, April 13, 2020 1:21 PM

Justin, the X-1 came out very nice! Well done.


Wow Steve! 

Even with the snags your F-35 is looking good!

  • Member since
    November 2008
  • From: Hatboro, PA
Posted by Justinryan215 on Monday, April 13, 2020 2:10 PM

Thanks guys!

"...failure to do anything because someone else can do better makes us rather dull and lazy..."

Mortal as I am,I know that I am born for a day.  But when I follow at my pleasure the serried multitude of the stars in their circular course, my feet no longer touch the Earth...


JOIN OUR COMMUNITY!

Our community is FREE to join. To participate you must either login or register for an account.

SEARCH FORUMS
FREE NEWSLETTER
By signing up you may also receive reader surveys and occasional special offers. We do not sell, rent or trade our email lists. View our Privacy Policy.