SEARCH FINESCALE.COM

Enter keywords or a search phrase below:

Japanese Group Build X

43353 views
447 replies
1 rating 2 rating 3 rating 4 rating 5 rating
  • Member since
    November 2009
  • From: SW Virginia
Posted by Gamera on Wednesday, March 17, 2021 10:59 AM

Steve: ACK!!! There's very little I hate more than going back to repaint something and try to get it to match what's aready painted. Still fantastic results, everything looks perfect to me. 

And the flags look just great! I'd just do them with the idea that nobody knows if they're right or not and then have some 113 year old Japanese veteran show up and point out they're spelling out gibberish though... 

"I dream in fire but work in clay." -Arthur Machen


  • Member since
    November 2009
  • From: SW Virginia
Posted by Gamera on Sunday, March 21, 2021 11:08 PM

I got a little more work done on the Japanese Bf-109 done. It's been interesting, it's been forever since I've done a German plane. 

"I dream in fire but work in clay." -Arthur Machen


  • Member since
    July 2014
Posted by modelcrazy on Monday, March 22, 2021 8:00 AM

AAk!, Gernan plane,

Just kidding, I like German planes, just like Japanese planes better.

Looks good Gam.

Steve

Building a kit from your stash is like cutting a head off a Hydra, two more take it's place.


http://www.spamodeler.com/forum/

  • Member since
    July 2014
Posted by modelcrazy on Monday, March 22, 2021 10:14 AM

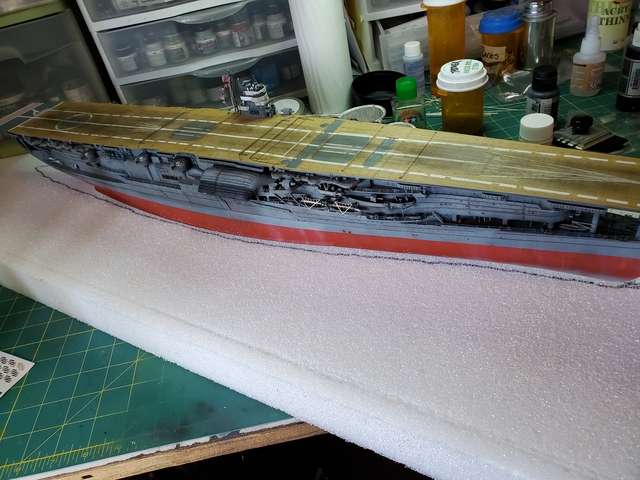
I was able to get quite a bit done this weekend. Almost done with the carrier itself!

I completed the side boats, scratched the landing light system, repaired various area broken off or bent with my fat fingers, scratched the rudder position indicators and touched up the paint.

I started the water base because setting it in the base, while making it difficult to work on it due to the bases large size, 12"x32", will lessen the possibility of breaking items such as the folding aeriels and safety netting hanging off the side of the flightdeck.

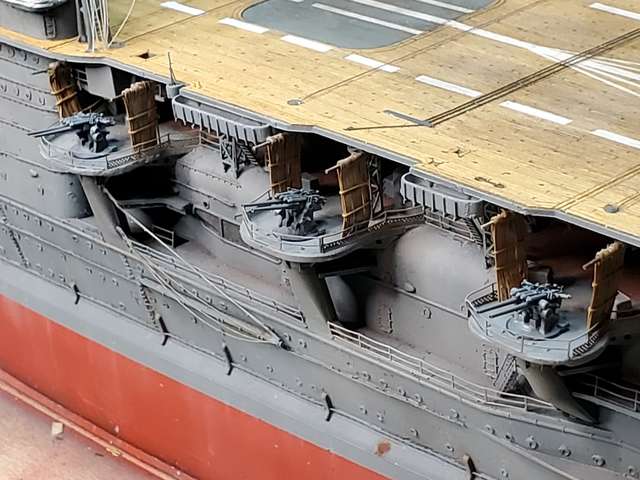
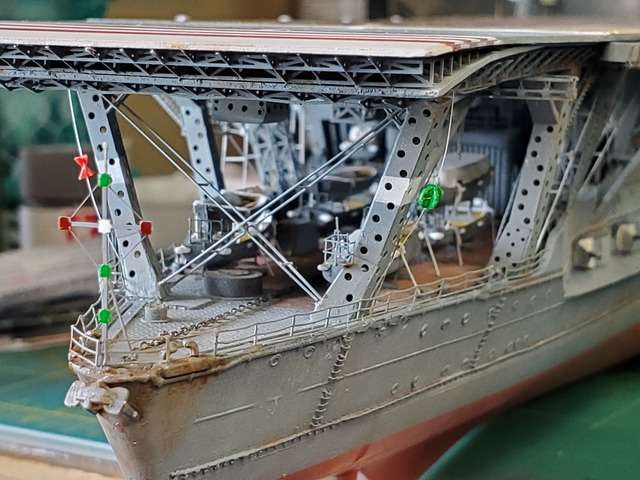
The rope shields with the type 10 120mm AA guns.

Forgive me if I you already saw some of these pics. I loose track.

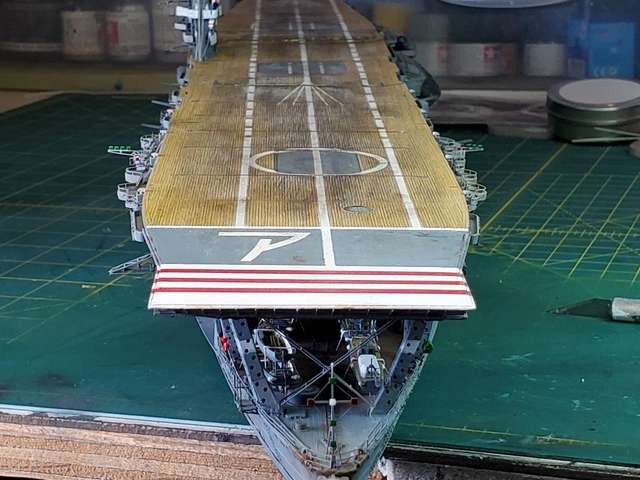
The flight deck, decal carrier paper post surgery. The deck aft of the indicator lines is a little too sanded down but that just adds to show wear, at least I hope it does.

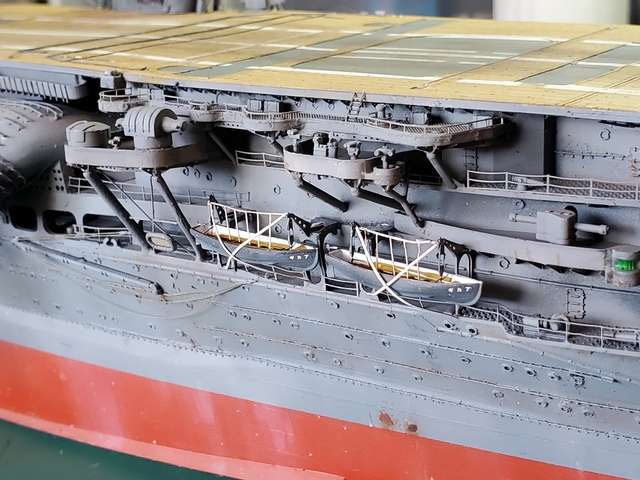
The side boats tied down.

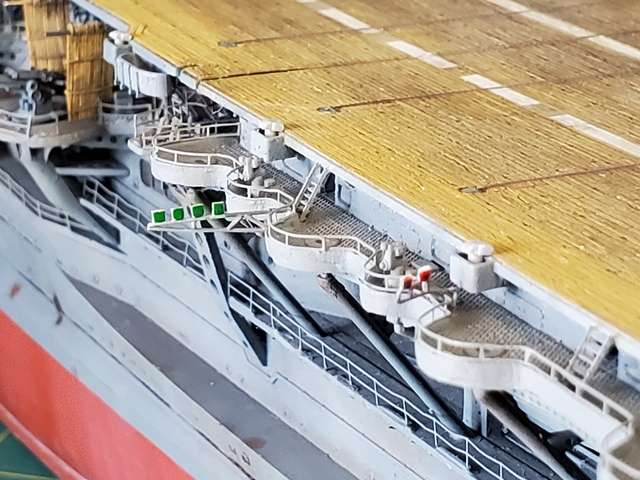
Landing light system

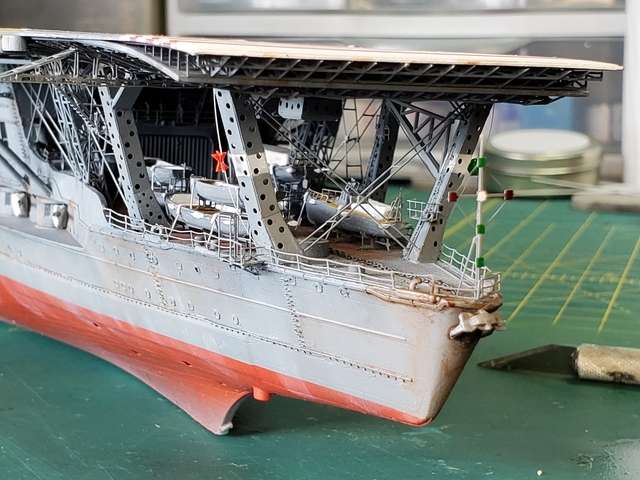
The rudder indicator system. Port, red hourglass, starboard, red ball.

What everything would have looked like landing.

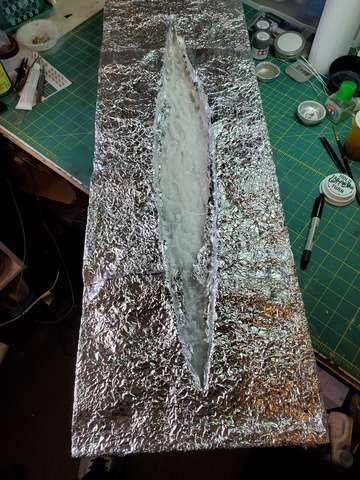
On to the base. I started out as usual tracing the hull. Why I don't do this before I start building is beyond me.

Next, cut out the hull, and grind the waves. The Akagi just came out of a squall so the waves were a little rough before they launched.

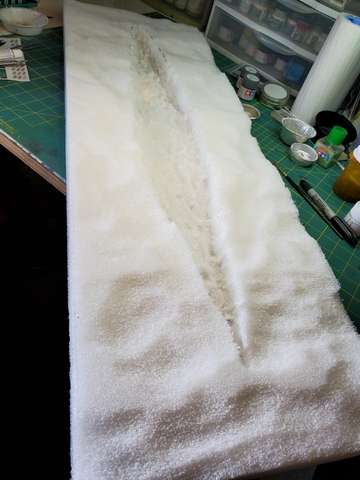
Next, I added aluminum foil for the chop and primed with grey paint to cut down the metallic look, I also added some paper towels soaked with glue to fill and acrylic medium the gaps. I did this by placing Saran Wrap on the base, placing the hull in it and spreading paper towles and acrylic medium to fill any gaps at the hull and removing both the hull and Saran Wrap. This is why I need to do this before building the kit. When will I ever learn. None of this will be seen in the final product.


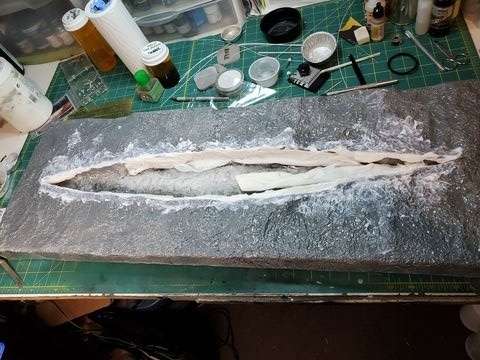
After all is dry in a few days, I will start the acrylic medium and painting process.

Steve

Building a kit from your stash is like cutting a head off a Hydra, two more take it's place.


http://www.spamodeler.com/forum/

  • Member since
    November 2009
  • From: SW Virginia
Posted by Gamera on Monday, March 22, 2021 11:40 AM

Oh gosh no, post as many photos as you want Steve. I don't care if I've seen that angle before I can't get tired of looking at her!!! Heart

Really looking forward to seeing how the water comes out!


And thanks. Don't tell Bish but other than the FW-200 and Me-210/410 I think pretty much every German plane from the Second World War was butt-ugly. Personally I think the Japanese and British had the best looking aircraft. 

"I dream in fire but work in clay." -Arthur Machen


  • Member since
    July 2014
Posted by modelcrazy on Monday, March 22, 2021 11:59 AM

Yep. For me, the Ki-84 Frank was far and away the best looking fighter or the war followed by the Spit. I just love the look of the Zeek though.....so classic.

Steve

Building a kit from your stash is like cutting a head off a Hydra, two more take it's place.


http://www.spamodeler.com/forum/

  • Member since
    December 2002
  • From: Northern California
Posted by jeaton01 on Monday, March 22, 2021 1:59 PM

Well, maybe the waves don't have to move after all.

John

To see build logs for my models:  http://goldeneramodel.com/mymodels/mymodels.html


  • Member since
    February 2005
  • From: Nashotah, WI
Posted by Glamdring on Monday, March 22, 2021 8:32 PM

That ship is beautiful!

I am almost embarrassed to post this feeble project after that magnificent piece, but I have been diligently cracking away at the arty piece.  For most, this would be a weekend build, for me, should not be more than 2 to 3 weeks.  

3 of the 4 sub assemblies are mostly done:

The gun: 

The carriage:

The carriage wheel assembly, with working suspension: 


The last assembly is the trailer that is attached to the swing arms arms.  I will be builing it in the transport position, to minimize the shelf footprint.  Will be picking up the paint at the LHS tomorrow, they fortunately had a can of JGSDF Dark Green in stock.  If the weather clears up enough for outdoor  painting, this may be done by the end the weekend.

I wish this kit  wasn't out of production, it would be fun to make a battery of these.

Robert 

"I can't get ahead no matter how hard I try, I'm gettin' really good at barely gettin' by"

  • Member since
    November 2009
  • From: SW Virginia
Posted by Gamera on Tuesday, March 23, 2021 11:15 AM

Robert: That looks good! You're making some real progress there. 


And I know what you mean, when I look at Steve's work I just want to dump my stuff in a drawer and stand in the corner and hope no one notices me. 

"I dream in fire but work in clay." -Arthur Machen


  • Member since
    July 2014
Posted by modelcrazy on Wednesday, March 24, 2021 11:01 AM

While I'm waiting for the deck to dry I started on the planes. As an update, here is what I'm working with. The Infini 350 detail set and the Hasegawa Carrier aircraft sets.

Here is one of the Zeros with the area to be removed in black and after the PE interior is installed.

I found it difficult to grind out the interior just enough not to either gring theough the exierior or break the fuse where it is thin. I have 15 zeros to pratcice with and the first wave only had nine. The Kates will appreciate the practice.

First wave Zeek markings

Still trying to get a list of the 27 Kates. I found 4 and each are a little diffrent from the other but I may have to make it up.

Steve

Building a kit from your stash is like cutting a head off a Hydra, two more take it's place.


http://www.spamodeler.com/forum/

  • Member since
    July 2019
Posted by Hoss WA on Wednesday, March 24, 2021 9:01 PM

GAF

Hoss,

That is an excellent rendition of the A6M5.  I built the Hasegawa version last year for Japanese GB IX.  I wonder if the Tamiya version is easier to assemble than the Hasegawa?

Gary


Thanks to all for the kind comments. 
Gary, this is actually the first Zero I've built so can't compare the kits. I will say that the Tamiya kit is well engineered and was fun to build. Thanks again. 

  • Member since
    November 2009
  • From: SW Virginia
Posted by Gamera on Wednesday, March 24, 2021 9:23 PM

Again, that's friggin' awesome Steve. Looking forward to seeing them all painted up! 

I've got a couple of Sweet's 1/144th Zeros and they're small enough for me. 

"I dream in fire but work in clay." -Arthur Machen


  • Member since
    July 2014
Posted by modelcrazy on Friday, March 26, 2021 8:23 AM

Thanks guys.

The acrylic medium is dry on the base so now it's time to sand it and paint.

First using rough sandpaper, I sanded the base to remove any sharp peaks caused by painting on the gel.

Next, I mixed the color for the sea. Since the Akagi was in deep water the sea will be a dark blue. I used acrylic tube paint mixed with water to spray. The mix was 1 part green, 3 parts grey and 7 parts blue.

Once that was dry I added some white to my blue mixture to color the water where it churned and caused bubbles.

Satisfied with that I sprayed acrylic varnish thinned with water to protect the coats and give it an initial sheen.

Possably tonight I'll set the Akagi in the base and start on the cotton.

Steve

Building a kit from your stash is like cutting a head off a Hydra, two more take it's place.


http://www.spamodeler.com/forum/

  • Member since
    November 2009
  • From: SW Virginia
Posted by Gamera on Friday, March 26, 2021 11:21 AM

That's sooooo cool!!! 

Thanks for walking us though this Steve, am taking notes here!!! 

"I dream in fire but work in clay." -Arthur Machen


  • Member since
    December 2002
  • From: NYC, USA
Posted by waikong on Sunday, March 28, 2021 11:21 PM
#1 How did I miss the start of another japanese gb? I am in, with what, I don't know yet. #2 My mind is blown with Steve's carrier, the detail is mind boggling!

My website: http://waihobbies.wkhc.net


  • Member since
    July 2014
Posted by modelcrazy on Monday, March 29, 2021 9:22 AM

Thanks guys

I situated the Akagi into the base and started the cotton for the wake and turbulance. I know she looks like she's high in the water but she listing to port and low at the stern. Also much of what I'll be doing will take some of that away.

I used arcylic varnish ot attach the cotton, just pulling off the slightest amout. You don't need much and can always add more not less. Also using arcylic gloss medium, I started crafting the bow wave.

I continues wit the cotton on areas where there should be turbulance and wakes. let it dry overnight and took some pictures out in the light.

Liking what I'm seeing, I started the mutiple varnish process. I'll brush on 3 to 4 coats to add depth to the water. On my last coat I'll add some more cotton the the stern and other areas here and there. There is really no wrong way to do it. You can overdo the effect but if you ever study a wake on a boat or ship just about anything goes as long as the waves are believable. I feel like I'm rambleing.

The first coat of the varnish applied and waiting to dry. This process thakes several days but will dry with a high gloss.

And my helper is trying to pick out his new build.

Steve

Building a kit from your stash is like cutting a head off a Hydra, two more take it's place.


http://www.spamodeler.com/forum/

  • Member since
    November 2009
  • From: SW Virginia
Posted by Gamera on Monday, March 29, 2021 11:31 AM

Waikong: It's good to have you again! Take your time on picking something out.

Steve: You continue to amaze. That ocean looks sooooooooooo good!!! 

"I dream in fire but work in clay." -Arthur Machen


  • Member since
    July 2014
Posted by modelcrazy on Tuesday, March 30, 2021 8:44 AM

Thanks Gam

I added the 25mm AA guns and attached and rigged the fold away antennas. I also applied another coad of varnish.

Yeah Marcus, each ship and situation so so different. I will add some more cotton here and there on the third varnish application. The cotton I already applied is more or less "subsurface", you know, the turbulance of bubbles rather than foam. I won't add a lot more because it would look worse to overdo it.

I also started working on the 27 Kates.

Steve

Building a kit from your stash is like cutting a head off a Hydra, two more take it's place.


http://www.spamodeler.com/forum/

  • Member since
    November 2009
  • From: SW Virginia
Posted by Gamera on Tuesday, March 30, 2021 10:20 AM

PE interior detailing for the Kates!?!?!?!

OMG!!!!!!!!!! Indifferent


Okay Steve, you just blew my tiny little mind.... 

"I dream in fire but work in clay." -Arthur Machen


  • Member since
    July 2014
Posted by modelcrazy on Wednesday, March 31, 2021 8:42 AM

Thanks Gam,

I'm almost done with the Carrier (I really can't believe it). I finished installing the safety nets and orderd another set of 25mm AA gun PE so I can finish the last four. One more coat of varnish and glue on the Chrysanthemum and she's done except for her crew and cargo. I'm going to make a cover for the base out of plexiglass tonight to keep the dust out and protect it from incidental damage. Once shes done, I take a couple of pictures but will wait for the money shot until all he AC and crew are on. I keep thinking I'm missing something.

Steve

Building a kit from your stash is like cutting a head off a Hydra, two more take it's place.


http://www.spamodeler.com/forum/

  • Member since
    November 2009
  • From: SW Virginia
Posted by Gamera on Thursday, April 1, 2021 8:41 AM

A plexiglass base for protection sounds like a good idea after all that work! 

Looking forward to seeing her all done up!!! 

"I dream in fire but work in clay." -Arthur Machen


  • Member since
    July 2014
Posted by modelcrazy on Thursday, April 1, 2021 2:22 PM

Thanks Gam

I applied the last coat of the acrylic varnish last night and am waiting the the AA PE set to come in (probaly in the next couple days) so I can finish the last of the 4 25mm guns, add the chrysanthemum and spray some future to give some areas, hull mostly, a wet look.

I made the cover for it last night then worked on about nine of the aircraft. I ground off the canopies and started removing the material in the middle. The bit slipped and one Zero I melted beyond repair (now I have 4 spares). Tonight I'll grind out some more before working with the file for more precise control. Eventually I'll have them where I can drop in the PE interior. That's the toughest part of the process, the rest is just attaching the exterior pieces IE. stabs and wings, and PE to the plane such as the landing gear, wheels, gear doors wire canopie and the like. I'll most likely have one of the maintance cerw in each plane monitoring the gages as they're idling

I'll have one more picture session before going dark. I want the final revial with the planes and crew on the deck.

Steve

Building a kit from your stash is like cutting a head off a Hydra, two more take it's place.


http://www.spamodeler.com/forum/

  • Member since
    July 2014
Posted by modelcrazy on Monday, April 5, 2021 9:54 AM

OK, so, it doesn't look like much but this

Represents two day of work. I'll install the PE canopy frames and give them a primer coat to see where I may need to add some filler. 8 Kate's and 4 Zeeks (plus the one I already assembled) so far which leaves 19 Kates and 4 more Zeros to build.

The Zeros are the same IJN light grey top and IJN light green/grey underside but the Kates, well the Kates can be a variety of green tops with slotched, peeling paint and a variety of other schemes, mostly green though.

Now I know some of these are fictitious but it does show the variance of the Kate paint schemes.

Fuchida's mount was green with peeling paint. Several pictures to refrence.

All are going to be fun, seriously.

I should be receiving the last of the AA guns tonight so I'll get those built and on so I can take the last pics before I add the planes and crew

Steve

Building a kit from your stash is like cutting a head off a Hydra, two more take it's place.


http://www.spamodeler.com/forum/

  • Member since
    May 2011
  • From: Honolulu, Hawaii
Posted by Real G on Monday, April 5, 2021 12:47 PM

Gamera,

I would humbly ask to throw the Kawnishi KX-03 into the GB.  I'm going to try to push this one through to the end in a short amount of time.

So it starts.

Geez, it's big - compare it to the box it came in!

“Ya ya ya, unicorn papoi!”

  • Member since
    November 2009
  • From: SW Virginia
Posted by Gamera on Monday, April 5, 2021 2:00 PM

Steve: They look awesome to me! I've have ended up with way more than one melted Zero. They're going to look great painted up! 

Real G: How could I resist your monster!?! That's so cool, I'm really looking forward to seeing you build her. Looks like you have to cement the wings on, with a 1/72nd B-29 I left them loose so I could pull them off for transport. 

"I dream in fire but work in clay." -Arthur Machen


  • Member since
    November 2009
  • From: SW Virginia
Posted by Gamera on Thursday, April 8, 2021 10:22 AM

A little more done on the Japanese Bf-109... 

"I dream in fire but work in clay." -Arthur Machen


  • Member since
    July 2014
Posted by modelcrazy on Sunday, April 11, 2021 10:27 AM

Nice Gam!

Steve

Building a kit from your stash is like cutting a head off a Hydra, two more take it's place.


http://www.spamodeler.com/forum/

  • Member since
    July 2014
Posted by modelcrazy on Monday, April 12, 2021 10:59 AM

Here is the Akagi, finished except for the exhaust which I'm still trying to work on and get right. The exhaust is not attached and my just be removed. The planes and crew still need to be added so I'm not calling the build complete yet.


Steve

Building a kit from your stash is like cutting a head off a Hydra, two more take it's place.


http://www.spamodeler.com/forum/

  • Member since
    November 2009
  • From: SW Virginia
Posted by Gamera on Monday, April 12, 2021 11:12 AM

That's magnificent Steve!!!!! 

Thanks for posting a final set of photos before you load up her decks. 

HeartHeartHeart


And thanks, got the final wing painting done on the Japanese Bf-109 done over the weekend and pulled off the masks. Will get the photos up soonish. Looking forward to getting the decals on her. 

"I dream in fire but work in clay." -Arthur Machen


  • Member since
    May 2011
  • From: Honolulu, Hawaii
Posted by Real G on Monday, April 12, 2021 1:19 PM

Steve, the Akagi indeed looks most magnificent!  Yes Yes

The KX-03 meanwhile continues to be hammered into shape.  The stabilizers are heavy and the mounting tabs are short, so I cut them all off and made a 0.060" thick continuous spar.

The wings have a nice pair of spars that do the job of supporting the big wings.

With a bit of sanding, the wings fit well.

It's biiiiiiig:

I finally did a clearance check in my display case and found out the model will not fit!  I guess one of those Rubbermaid under bed storage containers wil be its hangar.  Embarrassed

“Ya ya ya, unicorn papoi!”

JOIN OUR COMMUNITY!

Our community is FREE to join. To participate you must either login or register for an account.

SEARCH FORUMS
FREE NEWSLETTER
By signing up you may also receive reader surveys and occasional special offers. We do not sell, rent or trade our email lists. View our Privacy Policy.