SEARCH FINESCALE.COM

Enter keywords or a search phrase below:

Dragon Sd. Kfz. 234/3 WIP *painting and weathering the interior*

7532 views
8 replies
1 rating 2 rating 3 rating 4 rating 5 rating
  • Member since
    June 2009
  • From: Joplin, Mo
Dragon Sd. Kfz. 234/3 WIP *painting and weathering the interior*
Posted by figure freak on Wednesday, December 30, 2009 1:28 PM

hello everyone, i finally decided to do a WIP and post it so here it goes.  I got this kit for christmas and decided to build it this morning and it really has been an enjoyable build.

The kit


My progress so far is that the suspension is done and my new double action airbrush should arrive tommorow so ill do the interior then.


  • Member since
    April 2009
  • From: Carmel, IN
Posted by deafpanzer on Wednesday, December 30, 2009 1:38 PM

Trust me you are going to love this kit.  Built my DML 234/1 last month for the 8X8 Group Build and I had no issues except for minor hull fitting.  Only needs to be painted and weathered.  It is not too late for you to join the GB as it is still open until spring.

Good luck and I will probably buy all of 234 series from DML one day... my wife is going to kill me! Big Smile


Andy

  • Member since
    August 2003
  • From: Connecticut, USA
Posted by Nachtflieger on Wednesday, December 30, 2009 3:08 PM

I agree with Andy: Dragon's 234's are great kits!

Nate


  • Member since
    July 2004
  • From: Texas
Posted by wbill76 on Wednesday, December 30, 2009 5:28 PM

This one's my favorite variant in the family, looking forward to seeing it built! Yes

  • Member since
    June 2009
  • From: Joplin, Mo
Posted by figure freak on Wednesday, December 30, 2009 7:52 PM

thanks everyone, so far its been a real pleasure to build and Bill, its my favorite one too just the look of that stubby gun sets if off for me, im about halfway through the interior and ill post pictures of it tommorow before i paint the inside and i plan on really making this one look good and worn and spend a ton of time on new techniques.

Thanks,

Brian

  • Member since
    June 2009
  • From: Joplin, Mo
Posted by figure freak on Thursday, December 31, 2009 10:55 AM

Hello everyone heres a small update, work started this morning on the loader seat on to all of the other bits and pieces, im really enjoying every bit of this kit, it is just a jewl.  Most of the pieces like the seats and steering wheels and stuff arent glued in, just dry fitted for a photo shoot.


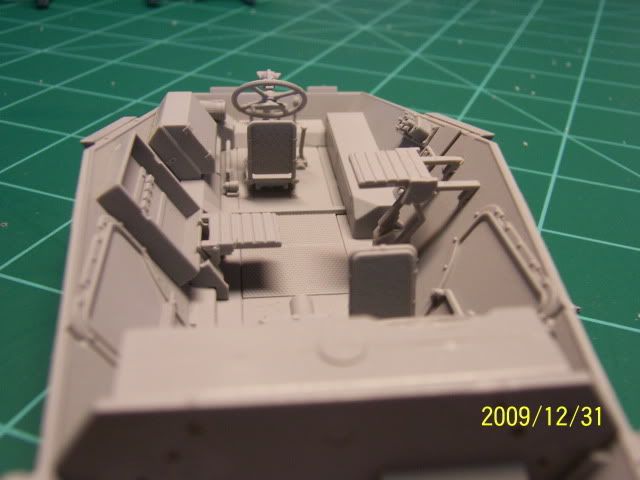
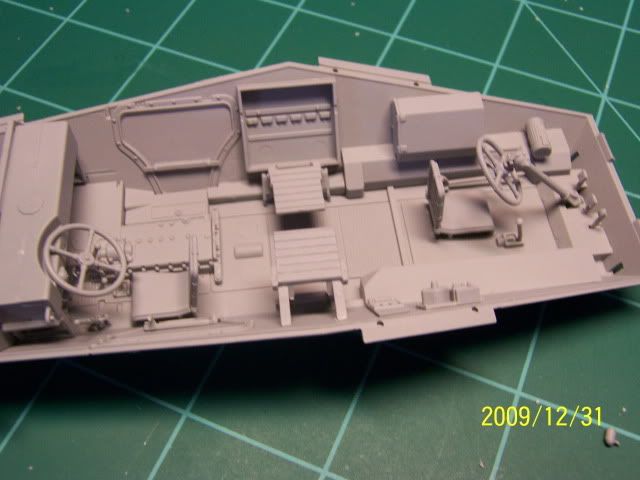
So far only one minor mess up which is i accidently got a little drop of liquid cement on the side but hopefully you wont be able to tell once it is all painted.  Also, im trying to decide which method would be best for the chipping on the interior, i usually use a stiff brush to stipple the scratchs on which works really well but i was thinking that maybe i could try the hairspray techinique for the chipping.  If i use this could someone please explain the materials i need to do this (like base coat color, and top coat color and the hairspray to use).  Any advice or constructive critism is greatly appreciated!

  • Member since
    July 2004
  • From: Texas
Posted by wbill76 on Thursday, December 31, 2009 12:01 PM

Moving right along! A little secret about dealing with the glue spot...if it is still noticeable after the glue dries (liquid glue is more forgiving than standard glue), lightly sand it with a sanding twig or similar and once painted it will not be at all noticeable. Wink

  • Member since
    June 2009
  • From: Joplin, Mo
Posted by figure freak on Sunday, January 3, 2010 10:49 AM

Thanks Bill, i did that and after i primed it you couldnt even tell it was ever there.  Yesterday, i recieved my new airbrush (paasche talon) and it is just outstanding, it layed the smoothest base coat ive ever seen on my interior.  Ive got my interior painted and ive started to weather it.  So far ive done the scratching and an overall wash of raw umber. It was first painted with a 70 percent white-and 30 percent dark yelow the white is model master and the dark yellow is tamiya.  I have yet to paint any details yet and could one of you be so kind as to tell me what color the german's radios and stuff would have been?  

Thanks,

Brian 

Enjoy!


  • Member since
    December 2008
  • From: Northern Va
Posted by psstoff995's lbro on Sunday, January 3, 2010 3:18 PM

Looking good so far, I like the color you used and the rusting/chipping.

-Will young modeler Test fit master
JOIN OUR COMMUNITY!

Our community is FREE to join. To participate you must either login or register for an account.

SEARCH FORUMS
FREE NEWSLETTER
By signing up you may also receive reader surveys and occasional special offers. We do not sell, rent or trade our email lists. View our Privacy Policy.