SEARCH FINESCALE.COM

Enter keywords or a search phrase below:

Hobby Fan M667/M752 Lance Launcher,4/24/10 COMPLETE!!

49118 views
95 replies
1 rating 2 rating 3 rating 4 rating 5 rating
  • Member since
    July 2006
  • From: New Jersey
Hobby Fan M667/M752 Lance Launcher,4/24/10 COMPLETE!!
Posted by redleg12 on Monday, February 8, 2010 8:12 PM

I am on to another fire mission. This one is the Hobby Fan M667 Lance missile carrier which when set with the M740 El is the M752 Self Propelled Lance missile Launcher.

The kit

The Hobby fan kit is marked as the M667 but comes with the M740 so built it is the M752. This is an almost all resin kit as the road wheels and some small parts are from one styrene sprue included from the AFV M730 Chaparral kit.  I will also use the Friul T130 tracks to dress this guy up and of course my usual number of other scratch details. I will be painting this one in 4 color camo for the late 70s look.

The vehicle itself is a derivative of the M548 cargo carrier which is a product of the M113 family of tracked vehicles. If the vehicle is setup with a crane and missile cradles it is the M667 Lance carrier. That equipment can be removed and the M740 air transportable Lance erector launcher can be put into the bay. This transforms the vehicle into the M752.

The Lance missile replaced the Honest John missile and was a medium range nuclear weapon (though there was also an HE warhead available) deployed in Germany during the late 60s through the early 80s. It was also the great “neutron” bomb carrier. It was replaced by the MLRS and the nuclear ability was taken away by the Salt treaties.

Originally deployed in OD, these were changed to 4 color camo in the mid 70s and 3 color camo in the early 80s before being taken out of service.

Pre Build

As an engineer, we begin everyday on a work site with a safety briefing. With this being a resin kit build, I thought I would go through a few items.

First is protection. Unlike styrene, resin kits have pour blocks on all their pieces which have to be removed. The small delicate items can be done with a sharp x-acto blade. A bit thicker and it is time to move to a fine hand saw and for the main chassis items with thick blocks a Dremel with a cut off grinder is required. Also a nice set of small clamps comes in handy for gluing!!

When using the dremel to cut or to sand, the resin will make a large volume of fine dust which tends to hover and cover everything. When using the Dremel for this purpose, you will need at a minimum, a good dust mask for protection.

What is much better is to rig up a wet/dry vacuum or even a regular vacuum to act as a dust collector.

Here I have taken an old wet dry vacuum, extended the hose using 1 ½ inch hosing and used a enlarged funnel as an air scoop. When using the Dremel I run the vacuum and try to work in front of the air scoop thus collecting the bulk of the dust. This will keep you bench, paint area and lungs clear.

Because of sanding off the pour block, some filling and cleanup will also be required. Rather than using standard putty, I much prefer Mr. Hobby liquid putty and Mr. Surfacer  500 depending on the depth and nature of what has to be filled. The Mr. Hobby liquid putty can be brushed into required spots and has a better working time and adhesion to resin than standard styrene putty.


The build

OK…enough preparation. The chassis is made up of 6 major parts not including the rear ramp. The Hobby Fan parts are of excellent quality with no voids or bubbles and quite well made. There is a bottom hull section, cab, 3 parts to make the side panels and the driver compartment roof.

The M667/M752 is a bit unique in that when the vehicle goes into firing mode, the windows all fold down and the roof collapses to the cab where it is secured to protect the cab during missile launch. Since I will show the missile in a launch position, I will have the cab closed and covered.

After cutting off the pour blocks and rough sanding here is the assembled chassis.

After assembly I used the liquid putty and Mr. Sufacer to dress up the rough areas and did the general seam filling.

Keeping with the resin assembly, I moved to the M740PZL which is the air liftable and towable lance missile launcher. When the tires and front tow section are removed the frame can then be locked into the cargo area of the empty M667 turning into a M752. Here is the M740 assembled except for the hydraulic lines which I wile replace the “hard” resin supplied with thin tubing.

Well, I’m off on another adventure. Next, I will be adding and replacing details on the vehicle with PE and adding a lot of weld lines.

As always, all comments are welcome and thanks for stopping by.

Rounds Complete!!

"The Moral High Ground....A Great Place to Emplace Artillery."

  • Member since
    May 2009
  • From: Poland
Posted by Pawel on Tuesday, February 9, 2010 4:12 AM

Redleg, congratulations on another fascinating build and also on your building speed! in the time I'm working on my quad, you start like third build or so, this is fast! And also I've been wondering about this variant of the M548 family a lot, this vehicle didn't get photographed too much, probably because most of the time it was top secret. The collapsible cab also had me wondering, where did the driver seat in this one. But now it's all getting clearer.

As for the resin, my trick is to use the "hook" scriber knive for cutting the pour blocks off, I scribe a deep grove with this knive just off the part and then the rest is cut off with a sharp conventional blade and wet-sanded away. This way most of the block stays away in one peace and most of the shavings are also heavy enough not to be inhaled.

Anyhow, can't wait to see more of your build, have a nice day

Pawel

All comments and critique welcomed. Thanks for your honest opinions!

www.vietnam.net.pl

  • Member since
    July 2006
  • From: New Jersey
Posted by redleg12 on Tuesday, February 9, 2010 5:24 AM

Pawel - You are correct, this was a classified and thus not many pictures taken. If you are interested, there is walk arounds at

http://www.primeportal.net/artillery/dieter_krause/m667/index.php?Page=1  and

http://www.toadmanstankpictures.com/m667.htm

In the walk arounds you will see the cab open. The prime portal walk around has the cargo bay empty

As far as dealing with the pour blocks...for the thick heavy blocks, I prefer the Dremel but you can cut by hand also. Some of the blocks on the chassis were 1/4 - 3/8 inch thick (1/2 mm). I agrre cutting with a blade will give less dust but at the thickness it will take awhile to cut!!

Thanks for stopping by and for the comments!!

Rounds Complete!!

"The Moral High Ground....A Great Place to Emplace Artillery."

  • Member since
    December 2002
  • From: Valrico, FL
Posted by HeavyArty on Tuesday, February 9, 2010 6:11 AM

Off to another great start with a little fire from above. Good job so far.

Gino P. Quintiliani - Field Artillery - The KING of BATTLE!!!

Check out my Gallery: https://app.photobucket.com/u/HeavyArty

"People sleep peaceably in their beds at night only because rough men stand ready to do violence on their behalf." -- George Orwell

  • Member since
    July 2007
  • From: Schoonhoven, The Netherlands
Posted by bankmannl on Tuesday, February 9, 2010 7:19 AM

Lucky you,


I bought mine some years ago at LuckyModel and it came WITHOUT the roadwheels and the track !!!

Thank god, i've saved some old stuff from a M113a1 Italeri model, so I was able to get all my stuff together !!


Good Luck,


Gé Hovens

  • Member since
    June 2005
  • From: Massachusetts
Posted by minimortar on Tuesday, February 9, 2010 9:21 AM

Oh My! (He says with jaw dropping to the floor) I'm about to have another 'flashback' to the early to mid '70's. Cool

I'll be watching this one as well Mike!

Bow Down

Thanks,
Kevin Keefe

Mortars in Miniature
A Scale Model (Plus!) Collection of the Infantryman's Artillery

  • Member since
    October 2007
  • From: N.H.
Posted by panzerguy on Tuesday, February 9, 2010 11:52 AM

Mike I've never tackled a completely resin kit before so this looks like it will be very interesting to watch, but then again when isn't one of your buildsToast.

That vacuum exhaust system you came up with is Yankee ingenuity at its bestBow Down.

"Happiness is a belt fed weapon"

  • Member since
    July 2006
  • From: New Jersey
Posted by redleg12 on Tuesday, February 9, 2010 12:45 PM

Gino - As always thanks for stopping in and the comments

Ge' - What a pleasure to have you stop by. Sorry to hear about your bad experience with the kit. I guess I'm lucky in that respect

Thanks for stopping in and for looking

Kevin - Ah yes.....missles running aroung Germany!!. I thought I would finish the other half of the 70s cold war missile combo.

Glad to have you along and always a pleasure to have you stop in.

Steve - It is the horse of another color. It just take some getting accustomed to. Many of the more rare items are only available in resin and as you know I am a rare bird!!

Always trying to keep it interesting and different. Thanks on the exhaust system. Yep.....figuring out a widget that will work and use what is lying around is always fun.

Thanks for the comments and for stopping by.

Rounds Complete!!

"The Moral High Ground....A Great Place to Emplace Artillery."

  • Member since
    July 2004
  • From: Texas
Posted by wbill76 on Tuesday, February 9, 2010 2:07 PM

Mike you never fail to disappoint in your choice of subject matter. Definitely going to be fun watching this one come to life. Just make sure in your next safety briefing that you also identify the available exits and locations of all fire extinguishers in case of emergency and you'll be set! Wink

  • Member since
    July 2006
  • From: New Jersey
Posted by redleg12 on Tuesday, February 9, 2010 4:20 PM

Bill - You know me....the strange, different and obtuse.

As far as the safety briefing....as an engineer, there is an extingusher anywhere there is power tools or use of flame. Also with all the chemical storage....paint....there is a nice bright extingusher right next to the bench.

As far as exits......well the warning on the door is "You are leaving the estrogen free zone" Wink...

Thanks my friend

Rounds Complete!!

"The Moral High Ground....A Great Place to Emplace Artillery."

  • Member since
    July 2006
  • From: New Jersey
Posted by redleg12 on Tuesday, February 9, 2010 4:23 PM

PS to everyone.....if you want more infor on the Lance missle, (what the hell is Redleg building) here is some things to look at

http://www.globalsecurity.org/military/systems/munitions/mgm-52.htm

http://www.youtube.com/watch?v=NYwJXGbTQ08

You will enjoy the you tube video!!

Rounds Complete!!

"The Moral High Ground....A Great Place to Emplace Artillery."

  • Member since
    March 2003
  • From: Fort Worth, TX
Posted by RESlusher on Wednesday, February 10, 2010 12:20 PM

You're my hero!!  I've been dying to build one of those.  Just can't get past the cost of the kit.

I wish someone would have made a kit of the old Pershing II missile system!


Richard S.

On the bench:  AFV Club M730A1 Chaparral

On deck:  Tamiya Marder 1A2

In the hole:  Who knows what's next!


  • Member since
    July 2006
  • From: New Jersey
Posted by redleg12 on Wednesday, February 10, 2010 1:21 PM

RESlusher

You're my hero!!  I've been dying to build one of those.  Just can't get past the cost of the kit.

I wish someone would have made a kit of the old Pershing II missile system!


Slusher - Yep....it is not a cheap kit and needs a bunch of details added...keep watching.

There was a very limited Pershing 1A which I have built. The kit....if you can find it is $$$. If you have the kit, which also needs a bunch of details added could also be converted to a Pershing II. In either case they both require work and $$$

Glad you are enjoying it. I will be getting to a bunch of details soon. Thanks again

Rounds Complete!!

"The Moral High Ground....A Great Place to Emplace Artillery."

  • Member since
    July 2006
  • From: New Jersey
Posted by redleg12 on Sunday, February 28, 2010 3:44 PM

It’s been a few weeks but I have been picking away. The kit is fairly good but lacks some details. You know how I am with details so I spent a bunch of time studying the photographs of the M667/M752 and went off to my bench to work on the model.

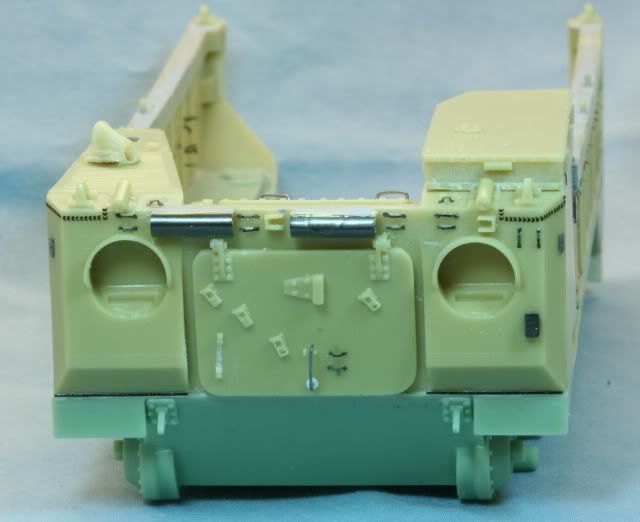
First I tackled the front of the M667/M752. There were two big half round resin blobs on the kit which represent tool holders. I first used my Dremel to remove the resin blobs and then cut some scrap PE to the right size. Using a 1/8 inch drill bit, I rolled and shaped the PE into the hollow half round tubes. All of the PE was applied with Gator Glue and then the tube glue joints were sealed with Mr. Surfacer 500.

There were a number of resin tie downs which like styrene molded ones were not the best. I removed those using an x-acto knife and added PE tie downs from the M548 Eduard set. These are used to tie down the tools which are the handle, pick head, pry bar and shovel.

There was no holder for the pick head so I used the PE holder from the set.

There is a hole in the front door to mount the moving handle which I filled with punched styrene and then mounted a 26 SS wire handle.

There are weld marks in many places on the M667/M752. In the front the lifting hook plates are welded in place. I used Archer weld bead to show those welds.

The carriage welds on the bottom are Archer fine weld which welds the cab to the carriage.

The mirrors are attached with a plate to the cab on either side. Going through my scrap PE I found two plates which were close and had the hole for mounting the mirror assemblies.

I used the Dremel and knife to clean off the shovel holder which I will use a PE holder and will mount with the shovel later. Here is the detailed front.

The driver’s side has a cover door over the oil fill which I again found something close in the scrap PE pile.

From the M548 PE set I used the T hold down latch for the roof of the driver’s cab which is shown in the collapsed position for firing. There is one on this side and one on the opposite side.

Where the cargo sides meet the cab on the driver’s side, the top reinforcement is muted on the molding of the cab and to correct the fit and look I used some .020 styrene sheet to build it up. Again I used Archer Weld bead and fine Weld bead for the welds to the cargo panel to the cab.

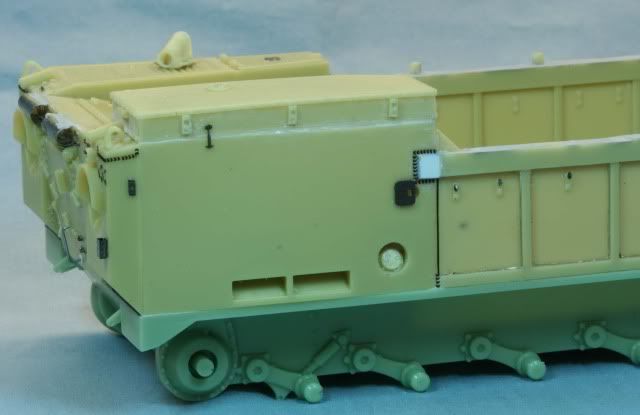
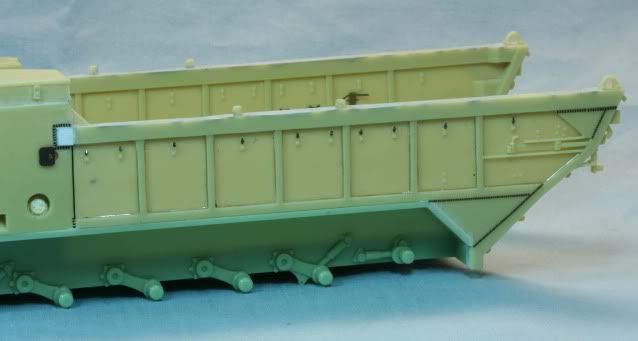
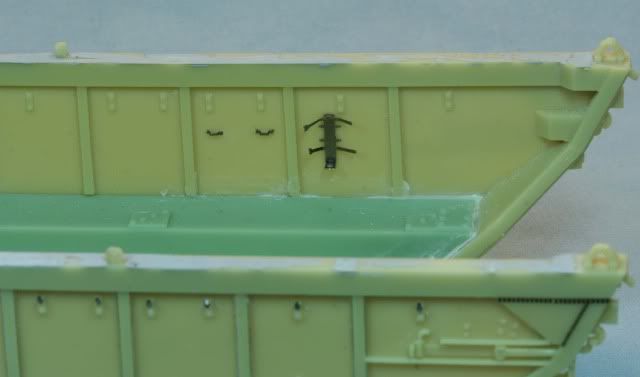
The cargo panel has a number of weld beads in the rear again using Archer weld bead. Inside each panel square I made the bead using 32 gauge SS wire and attaching it with landscape glue.

Running down the side are 10 hooks to hold down a canvas. There are bolted with block through to the inside. The kit has the block and bolts but no hooks. Again, there were from the M548 PE set and applied to both sides for 20 in all.  

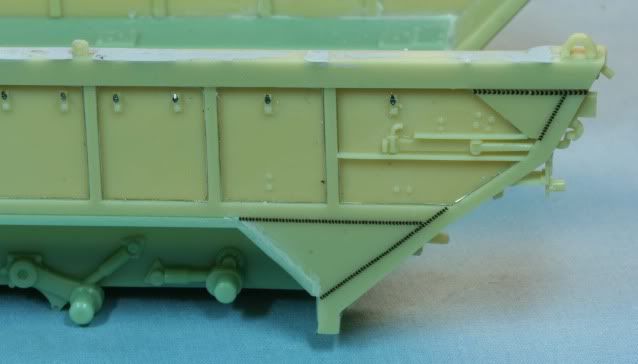
Close up of the rear welds

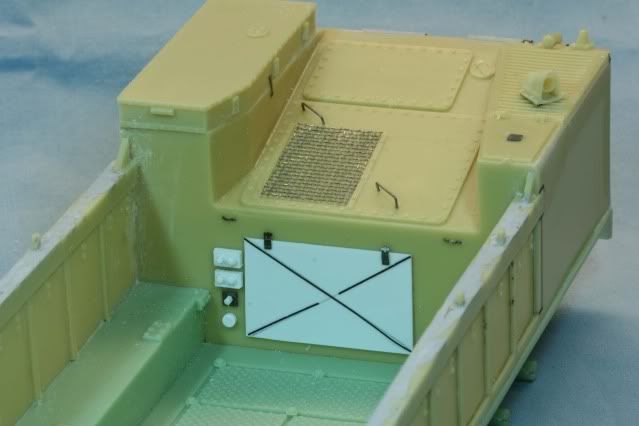
The inside battery cover is just a marking on the molding as opposed to the raised plate with raised X across the plate. The plate is .020 styrene cut to size. The X is using Archer fine welding bead and the locks are from the scrap PE pile.

Next to the plate are a number of connectors. The slave receptacle uses a plate from scrap PE and .040 hex rod. Below it, is a .090 diameter connector punched from .040 styrene. The two blocks are made from .040 styrene and .032 diameter punched connectors from .040 styrene.

Over the engine there are two grab handles which are made from 26 gauge SS wire, drilled and glued into place.

The screen is molded into the kit is YUCH. Using the Dremel I removed the screen and replaced with Eduard 6x6 screen.

The engine access cover has a small square plat on top which is missing on the kit. I found a plate of the right size in the PE scrap pile.

Lastly a couple of PE tie downs were added on the inside wall. Also you can see the T hold down latch on this side.

On the inside wall is a fire extinguisher. The kit supplies the extinguisher with no bracket. I solved this using the M548 PE bracket. Also two tie downs next to the bracket and directly across on the driver’s side.

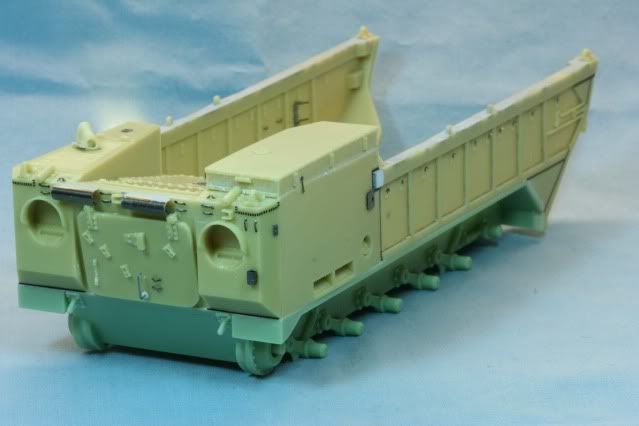
Here is the overall body as it stand now which after a bit of cleanup is ready for the primer coat.

During the week days, I would pass the time at the TV and assemble the tracks. After clean up I used ½ inch Sequin pins and assembled the tracks.

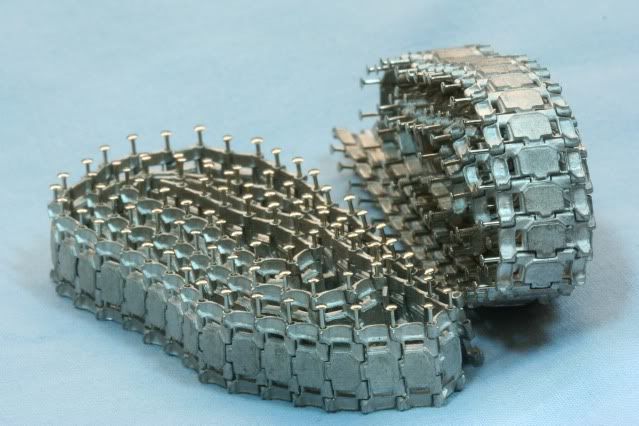
These are ready to have the pins clipped then a vinegar wash and then a dip in blacken-it.

That’s it for right now. Off to the paint booth for the chassis and launcher, cleaning and dipping for the tracks and time to cleanup and get the road wheels ready.

As always, all comments are welcome and thanks for stopping by.

Rounds Complete!!

"The Moral High Ground....A Great Place to Emplace Artillery."

  • Member since
    January 2008
  • From: Bournemouth UK
Posted by Bodge on Sunday, February 28, 2010 5:14 PM

Your quite simply doing a superb job on that, Those details are tiny. The tracks also look superb. My hat off to you.

Andy.

  • Member since
    July 2006
  • From: New Jersey
Posted by redleg12 on Sunday, February 28, 2010 6:47 PM

Andy - Thanks....yep the hooks and tie downs are small....they are a Royal PITA. A good thing the PE sets come with extras.....just when you think you are about to set one.....ping....like tiddle winks it disappears into never space.  Lost a few that way.

As much as a PITA they are....the little items make the kit...IMO....a lot better than resin or styrene blobs.

Thanks again

Rounds Complete!!

"The Moral High Ground....A Great Place to Emplace Artillery."

  • Member since
    July 2006
  • From: San Francisco Bay Area
Posted by bufflehead on Sunday, February 28, 2010 10:38 PM

Redleg, WOW!  That's looking very nice!  Great detail work all around, you're a man after my own heart!  Big Smile.  I guess not all resin kits have major fit problems!  Question:  How long do you soak your Friuls in vinegar and do you rinse them off with water afterwards?

Ernest

Last Armor Build - 1/35 Dragon M-26A1, 1/35 Emhar Mk.IV Female


Last Aircraft Builds - Hobby Boss 1/72 F4F Wildcat & FW-190A8


  • Member since
    July 2006
  • From: New Jersey
Posted by redleg12 on Monday, March 1, 2010 4:58 AM

Bufflehead - Thanks. Not every kit has a problem. Hobby Fan kits are one of the better resin kits. Though as someone mentioned earlier, they had a kit that was missing parts!!

As far as the Fruils....

http://www.fototime.com/ftweb/bin/ft.dll/pictures?userid=F9F3E062FE3B44349898193F749A47C4&inv=B0C9AA56DC75DE8&albumid={B8E32763-BCFB-4D4B-92A9-A5DFA3A0AFAF}&inv=B0C9AA56DC75DE8

As stated here...a few hours....great step by step

Thanks again for stopping by

Rounds Complete!!

"The Moral High Ground....A Great Place to Emplace Artillery."

  • Member since
    April 2005
  • From: Piscataway, NJ!
Posted by wing_nut on Monday, March 1, 2010 7:07 AM

YO Mike.  I missed this 1st time out.    Great work so far.  This is going to be a very cool vehicle when done.

Marc  

  • Member since
    December 2002
  • From: Valrico, FL
Posted by HeavyArty on Monday, March 1, 2010 9:46 AM

Looking great Mike.  This one should be another show stopper with all the added details.

Gino P. Quintiliani - Field Artillery - The KING of BATTLE!!!

Check out my Gallery: https://app.photobucket.com/u/HeavyArty

"People sleep peaceably in their beds at night only because rough men stand ready to do violence on their behalf." -- George Orwell

  • Member since
    July 2004
  • From: Texas
Posted by wbill76 on Monday, March 1, 2010 2:02 PM

Nice work on all the details here Mike! Really dressing this one up nicely and those tracks look good, nothing like whiling away the hours with the TV on in the background for track assembly. Wink

  • Member since
    July 2006
  • From: New Jersey
Posted by redleg12 on Monday, March 1, 2010 3:00 PM

Gino, Marc and Bill - Thanks.....having fun with the details is my part of modeling.that I love Wink

Rounds Complete!!

"The Moral High Ground....A Great Place to Emplace Artillery."

  • Member since
    June 2005
  • From: Massachusetts
Posted by minimortar on Monday, March 1, 2010 6:56 PM

Crusin' along !! quite nicely !! there Mike! Diggin' the fiddley-bits!

Thanks,
Kevin Keefe

Mortars in Miniature
A Scale Model (Plus!) Collection of the Infantryman's Artillery

  • Member since
    July 2006
  • From: New Jersey
Posted by redleg12 on Tuesday, March 2, 2010 5:09 AM

Kevin - Thanks

Big fingers and old eyes with little parts.....leads to periods of colorful metaphores!!.  On to paint

Rounds Complete!!

"The Moral High Ground....A Great Place to Emplace Artillery."

  • Member since
    July 2006
  • From: New Jersey
Posted by redleg12 on Sunday, March 14, 2010 8:23 PM

After the snow….then the flooding rain and worst of all…doing my taxes, here is my current progress in the paint booth

First the chassis and the M740 launched were cleaned and then primed with Tamiya Flat Black. After masking the inside floor of the chassis to keep the black base for the steel paint, the overall chassis was painted with Poly Scale Dark Tactical Green 505388. This is the base Dark Green for the MERDOC pattern.

The MERDOC camouflage pattern is a particular PITA as it is a hard edge camouflage pattern with 4 colors that covers the entire vehicle. The cargo bay on the M667 was not camouflage and so after drying the cargo interior was masked off. Then I pulled out the silly putty. After laying out the patterns and masking the remaining areas, I painted the next color, Poly Scale Interior Green 505096 which is the match for the Light Green in the pattern.

In between each coat, I like to let the paint set up for 24 hours before possibly pushing silly putty on fresh paint. After clean up from the Light Green masking, more silly putty and masking. I then painted with Tamiya Buff XF-57 which is the match for the sand color.

Lastly, I had one more cleanup, more silly putty and masking and then painting with Tamiya Flat Black. After all the masking was removed , here is the 4 color MERDOC camouflage. The two greens are supposed to have about 45% coverage each while the black and sand about 5% each. At this scale 5% is tight!!

With the masking removed from the floor, I masked the cargo area walls and painted the floor deck with Alclad Steel.

While working on the chassis I also worked on the launcher. First was an overall coat of Tamiya OD (JSDF) XF-74 which is a match to the older VN OD green. Many of the launchers were not repainted righ away and I thought to go this route in the interest of contrast.

I was back again with the silly putty to mask off the deflection gear and the slide plates where the upper carriage pivots on the lower. I then painted these areas along with the elevating piston with Alclad Dark Aluminum.

Here is a close up view of the launcher rear. I dry brushed the equilibrator springs with Alclad Steel for paint wear and chipping on the springs. I also added the trailer tail lights. The kit does not include the taillights for the launcher (which are used when removed from the M667 and towed as a trailer). But does have the insert holes where they are installed. After a trip to the parts box I fixed that problem.

Lastly I began assembling the star of this build…the MGM-52 Lance missile. Here the missile is assembled and will be heading to the paint booth shortly.

That’s it for now. Tracks, road wheels and washes next.

As always, all comments are welcome and thanks for stopping by.

Rounds Complete!!

"The Moral High Ground....A Great Place to Emplace Artillery."

  • Member since
    June 2005
  • From: Massachusetts
Posted by minimortar on Sunday, March 14, 2010 9:02 PM

Awesome goings-on there Mike! Man... MERDOC camo... you've got bigger ones than I! I think this is the first time that I've ever seen the Archer Welds on a build (I don't get out much) and I am very impressed.

 Beginning to have the audio flashbacks now. Watching closely... mopping up the drool.

Thanks for the specifics.

Thanks,
Kevin Keefe

Mortars in Miniature
A Scale Model (Plus!) Collection of the Infantryman's Artillery

  • Member since
    March 2007
  • From: New york
Posted by JEFFB on Sunday, March 14, 2010 9:38 PM

very cool project!!!  The your painting skills on a carrier that small is amazing!  Can't wait to see the rest


Evo

  • Member since
    July 2006
  • From: New Jersey
Posted by redleg12 on Monday, March 15, 2010 6:12 AM

Kevin - Thanks. The Archer welds save us old farts time over the method we know of the stretched sprue or putty. They also have a nice "bead"  to them and look great when finished. As far as the MERDOC...it is mainly an exercise in masking.....that's enough exercise for a whileWink

 Now as far as getting out....the fiddly things get nicer but it's still a model!!Wink 

Jeff B - Thanks for the complement. The key, especially with something like this is patience.....then silly putty......and lastly the most important invention to man......blue painters tape Wink

Thanks again

Rounds Complete!!

"The Moral High Ground....A Great Place to Emplace Artillery."

  • Member since
    December 2004
  • From: ohio
Posted by vonryan on Monday, March 15, 2010 6:32 AM

very nice Mike so this is where i have to go to see your amazing work. great build!!! also really like that very fine PE work. sweet panit job to. i keep looking and i could go on and on. again great work as always  

Clay 

  • Member since
    December 2002
  • From: Valrico, FL
Posted by HeavyArty on Monday, March 15, 2010 9:26 AM

The MERDC camo looks great Mike.  Keep up the great wor.  Can't wait to see this one finished.

Gino P. Quintiliani - Field Artillery - The KING of BATTLE!!!

Check out my Gallery: https://app.photobucket.com/u/HeavyArty

"People sleep peaceably in their beds at night only because rough men stand ready to do violence on their behalf." -- George Orwell

JOIN OUR COMMUNITY!

Our community is FREE to join. To participate you must either login or register for an account.

SEARCH FORUMS
FREE NEWSLETTER
By signing up you may also receive reader surveys and occasional special offers. We do not sell, rent or trade our email lists. View our Privacy Policy.