SEARCH FINESCALE.COM

Enter keywords or a search phrase below:

UPDATE: Italeri/AEF Designs M728 CEV project

9602 views
13 replies
1 rating 2 rating 3 rating 4 rating 5 rating
  • Member since
    December 2007
  • From: NE Massachusetts
UPDATE: Italeri/AEF Designs M728 CEV project
Posted by 1SG Davis on Saturday, March 20, 2010 2:59 PM

Hi all,

Have decided to jump strait into my next project.  Converting an Italeri M60A1 into M728 CEV.  I picked up an AEF Designs conversion kit off of E-bay several months ago.  Very soon after begining to size up the various parts of the build it became obvious that the AEF designs product  falls very short in the quality department.  (I've seen several warnings of these issues w/AEF Designs in various theads on this site)  The main component of the conversion kit (the turret) is very poorly executed. 

The AEF kit appears to be made to convert  the Italeri/AMT/ESCi kit.  The pins & holes are the only thing that line up.  The gaps are huge in several areas, the mounts for th boom are very poorly attached and no even close to being strait. ( $80.00 + retail for this ?!?!?!....)

DSCN1235.jpg picture by 1SGDavis


With all the turrets faults I decided to set it aside and work with the Italeri turret.  1/2 an hour with a drill bit, pin vise and some files and I was ready to go.  I had some round plastic stock that fit into some round aluminum  stock perfectly. 

DSCN1239.jpg picture by 1SGDavis

With the lower cross member for the boom fixed into the turret I started on the middle/upper boom assembly.  The kit gives you a resin upper piece and a 6" piece of aluminum that you cut in half to form the middle of the boom.  The resin piece was twisted so I had to VERY carefully heat and twist it back true.  Once that was done it was a simple process to get all the parts together to finish the boom frame.  I cut the two boom cable mount from the resin turret and this how she sits now

Thanks for look'n in


Gary / CSM

DSCN1242.jpg picture by 1SGDavis

  • Member since
    December 2002
  • From: Valrico, FL
Posted by HeavyArty on Saturday, March 20, 2010 3:26 PM

It looks like you are off to a good start.  The AEF stuff is crap.  I stay as far away from them as posible.  I scratched an M728 CEV a few years ago (read about 10, man I'm getting old) using plans in the March '95 FSM.  It has really nice 1/35 line drawings to cut out all the parts and a good how-to article.  I used the Tamiya M60A3 and Verlinden dozer blade set.  Mine came out pretty nicely if I don't say so myself.

Gino P. Quintiliani - Field Artillery - The KING of BATTLE!!!

Check out my Gallery: https://app.photobucket.com/u/HeavyArty

"People sleep peaceably in their beds at night only because rough men stand ready to do violence on their behalf." -- George Orwell

  • Member since
    May 2004
  • From: Kings Mountain, NC
Posted by modelbuilder on Saturday, March 20, 2010 4:34 PM

Several years ago I scratched an M728 using the same article Gino mentioned. I used the Academy M60 with Dozer blade as my base kit. It came out very well.

  • Member since
    July 2006
  • From: New Jersey
Posted by redleg12 on Sunday, March 21, 2010 7:53 PM

OK....you started with the kit now hang in there.....maybe get the scratch info mentioned by Gino to help assist and improve.

Patience will be needed....but I'm sure it will turn out fine

Gino....getting old....Hummmm if your old, I must be ancient......just because I actually knew Saint Barbra, I did not consider myself really old!! Wink

Rounds Complete!!

"The Moral High Ground....A Great Place to Emplace Artillery."

  • Member since
    December 2007
  • From: NE Massachusetts
Posted by 1SG Davis on Sunday, March 21, 2010 11:13 PM

Not much bench time this weekend, the weather was too good here in MA so the wifes outside honey do list was the main effort.  Did get the lift cylinder and winch spool & drive attached though...no pics yet.  I had to redo the lift cylider as the AEF one was warped.  I think I'm going to pitch the dozer blade set up as well in favor of the academy dozer kit.                                                                                                                                   Heavy Arty:  I bought the March 95 FSM last night, thanks for the link, should be here some time this week.  Thanks too for the link towards the end of my M60A1 post WRT weathering tracks, printed it off and will try some of it on this build.  Any more shots of your 728, I looked in your two showcases but only found 1 pic.

Modelbuilder: Thanks for the endorsement of the of the FSM article.  Sounds like you  built yours completely from scratch too.

redleg12/ Mike: Thanks for the encouragement.  I almost bailed out on the whole project after about 10 minutes of looking over the entire AEF conv. kit.  The turning point was taking a piece of stock styrene tube and putting it up against the boom mount on the AEF turret........same size......thats what got the wheels roll'n.   After 1/2 an hour with a drill and some files and I past step one. 

Supposed to rain here the next couple days, should be able to drop the rake and get back to the bench, hopefully an update with pics middle of the week.

Thanks all

Gary / CSM

  • Member since
    May 2009
  • From: Poland
Posted by Pawel on Monday, March 22, 2010 4:28 AM

Hello Gary,

I plan to build a CEV one day too, so I'll be watching your build. I got a conversion from a german company called Perfect Scale Modellbau, now I need to pick up some decent M60 kit with a dozer blade. I'm going to backdate my CEV to Vietnam, do you know what differences there would be? What time frame/camo are you going to show yours in? Good luck with your project and have a nice day

Pawel

All comments and critique welcomed. Thanks for your honest opinions!

www.vietnam.net.pl

  • Member since
    December 2002
  • From: Valrico, FL
Posted by HeavyArty on Monday, March 22, 2010 1:17 PM

I'm going to backdate my CEV to Vietnam, do you know what differences there would be?

I believe the only change is the older (Vietnam ) version would not have the smoke launchers and smoke grenade storage boxes.  The rest should be the same.  The only other possible change I can think of may be the air cleaners.  The original M60s through M60A2s had side loading air filters while later (M60A3) versions had top loading air filters. 

Gino P. Quintiliani - Field Artillery - The KING of BATTLE!!!

Check out my Gallery: https://app.photobucket.com/u/HeavyArty

"People sleep peaceably in their beds at night only because rough men stand ready to do violence on their behalf." -- George Orwell

  • Member since
    December 2002
  • From: Valrico, FL
Posted by HeavyArty on Tuesday, March 23, 2010 8:05 PM

As requested, here are some more pics of my M728 CEV.

With the boom down and stowed:

More pics here

Gino P. Quintiliani - Field Artillery - The KING of BATTLE!!!

Check out my Gallery: https://app.photobucket.com/u/HeavyArty

"People sleep peaceably in their beds at night only because rough men stand ready to do violence on their behalf." -- George Orwell

  • Member since
    December 2007
  • From: NE Massachusetts
Posted by 1SG Davis on Friday, March 26, 2010 10:23 PM

Update on my M728 CEV project.                                                                                                                                                    First off though, Heavy Arty:  Great pictures, very helpful.   Thanks!

Pawel: I'd go with what Heavy Arty says on back dating for Vietnam.  I plan to finish my M728 CEV with Desert Storm era paint and markings.  I've seen the Perfect Scale Modellbau products site.  Big$,  but it looks like its worth it if you can afford it. 

                                                                                                                                                                                                                Now for my latest progress:

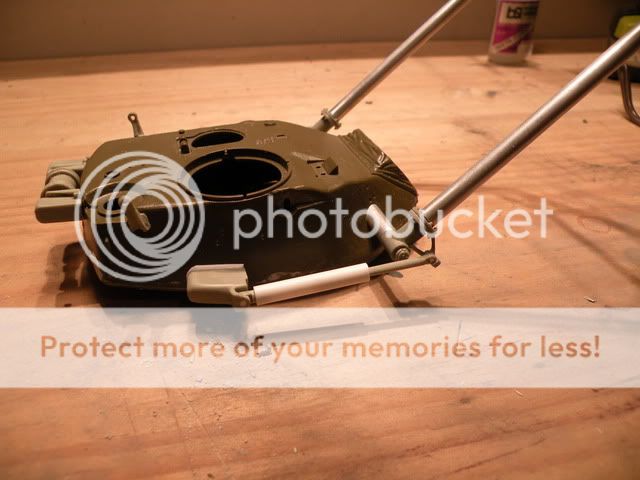
As I mentioned in my previous text only post,  I once again I found myself recreating a botched AEF part.  Their lift cylinder was warped beyond use

DSCN1243.jpg picture by 1SGDavis

With a couple of pieces of hollow round stock and shaving down the rod I was able to scratch together a respectable replacement.  I used some solid round stock to pin it to the housing mounted to the turret side and also to the bracket on the boom

DSCN1245.jpg picture by 1SGDavis

Careful placement of glue and fitting a sleave inside of the cylinder for the rod allowed for full movement of the cylinder & boom after assembly which will give me a few different options for display once I'm done.

DSCN1250.jpg picture by 1SGDavis


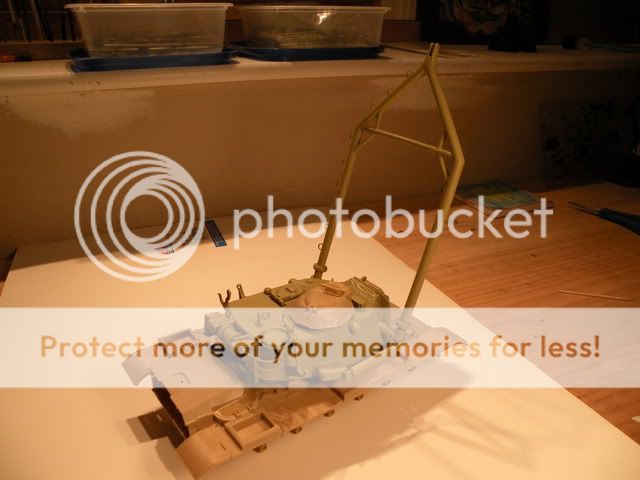
This next picture flashes forward quite a bit.  I've completed the major structural assembly of the boom.  I used several layers of white glue around the boom mounts on the turret to simulate the heavy welds. 

 I completely re-worked the original kit rear stowage basket that previously ran the entire back of the turret into something more like an oversized laundry baasket.  Brass mesh was installed to finish it off.

All of the rail mount holes on both sides of the turret have been filled and sanded

The left side of the boom has nine climbing loops (?) welded on to it.  I drilled out the boom and used copper wire to create these. Again, white glue was used around where the loops went into the boom to simulate the welds. 

DSCN1256.jpg picture by 1SGDavis

Thats all for now,

Thanks for look'n in

Gary / CSM

  • Member since
    May 2009
  • From: Poland
Posted by Pawel on Saturday, March 27, 2010 3:03 PM

Gary - great job on scratching the parts. I'm watching your build closely. I like the way you deal with so called problemsBig Smile

gino - thanks for the tips. Looks like I need to carefully choose the donor kit for my conversion to have the right options. In addition to the changes you mention I also noticed the road wheels. All CEVs seem to routinely use the steel non-ribbed wheels. If I don't get them in a donor kit, I'm gonna have to additionaly get them somewhere (M48?).

Gary - what road wheels are you putting on your machine? Good luck with your project, have a nice day

Pawel

All comments and critique welcomed. Thanks for your honest opinions!

www.vietnam.net.pl

  • Member since
    December 2002
  • From: Valrico, FL
Posted by HeavyArty on Saturday, March 27, 2010 4:50 PM

Gary,  Great job so far.  The lift cylinder and basket look great.  The whole think looks great so far.  Keep up the good work.

All CEVs seem to routinely use the steel non-ribbed wheels.

From what I found when I did my research, both types of wheels where used.  Often they were mixed as well.  I mixed them on mine for a little variety.

Gino P. Quintiliani - Field Artillery - The KING of BATTLE!!!

Check out my Gallery: https://app.photobucket.com/u/HeavyArty

"People sleep peaceably in their beds at night only because rough men stand ready to do violence on their behalf." -- George Orwell

  • Member since
    July 2006
  • From: New Jersey
Posted by redleg12 on Saturday, March 27, 2010 4:54 PM

Fantastic scratch work.....looking great.....keep on trucking!!!

Rounds Complete!!

"The Moral High Ground....A Great Place to Emplace Artillery."

  • Member since
    December 2007
  • From: NE Massachusetts
Posted by 1SG Davis on Saturday, March 27, 2010 7:18 PM

Pawel, Heavy Arty, & redleg12(Mike):  Thanks much for the kind reviews of my progress so far. Its been slow going but the results have been good.  I'm going to set the turret aside for a bit and focus on the hull for the next few days.

I wanted to comment on the road wheel question as well as put in my opinion on a good donor kit.  I second what Heavy Arty said, both types of roadwheels were used and often mixed as well (see picture below) a quick thumb through my reference books showed two photo's of M728's in the early vietnam era.  One shot was of a 728 in Vietnam the side shown in the picture had all alum/ribbed road wheels.  The other shot in that era also showed all alum/ribbed road wheels, in both photo's the CEV's had OD paint.    Later pictures of M728's did seem to show mostly all steel, but on occasion there was a mix of the two.  For my project, If I can find them I'd like to put on steel or maybe a mixture of the two.

 My vote for a donor kit would be the AMT M60A1 Blazer kit, Italeri M60A1 or ESCi M60A1.  They all seem to be produced from the same mold.  The advantage of the AMT/Blazer kit is you get an additional sprue with all the Blazer parts,  plus, of the three it also seems to be the least expensive on E-bay.  They all have the side load air cleaners & aluminum road wheels.  You would need to swap out the tracks though, they all come with the T142 octagonal track.  AFV club makes a nice set of "chevron" type tracks that work great. 

Here's a shot of an M728 I took at Fort Drum last August.  The rear three road wheels are aluminum/ribbed all the others are steel

Gary

Picture180.jpg picture by 1SGDavis

JOIN OUR COMMUNITY!

Our community is FREE to join. To participate you must either login or register for an account.

SEARCH FORUMS
FREE NEWSLETTER
By signing up you may also receive reader surveys and occasional special offers. We do not sell, rent or trade our email lists. View our Privacy Policy.