SEARCH FINESCALE.COM

Enter keywords or a search phrase below:

Meng FT-17 French Light Tank Riveted Turret

21498 views
137 replies
1 rating 2 rating 3 rating 4 rating 5 rating
  • Member since
    July 2004
  • From: Texas
Meng FT-17 French Light Tank Riveted Turret
Posted by wbill76 on Sunday, September 21, 2014 7:20 PM

After spending the last few weeks down in the Ships forum building a 1/350 HMS Dreadnought, I decided it was time to return to some familiar territory! For my next victim, I chose Meng's 1/35 French FT-17 Light Tank (Riveted Turret).

I started work on this little guy with Step 1 which deals with the hull floor plate and various elements of the driver's station and controls. As I'm contemplating painting the interior and leaving the access hatches open for this area, I left off the driver's seat cushion and control levers for the time being.

Next I cleaned up the hull sides and the nose and rear plates so I could get a good idea of how the hull would come together. Left side of the hull received the two-gauge instrument panel which was a little challenge to place since there aren't any locater marks or guides for where it should go beyond the one diagram in Step 2.

I assembled the hull roof plate as directed in Step 6 and added the angled side armor plates for the driver's view hatch outlined in Step 7. The nose plate, B8, was also installed on the hull floor. A quick check with some strips of masking tape let me mock up the hull and make sure that everything will fit together properly. The slight gap visible at the front of the hull roof is due to the limitations of the tape contact/tension in that area and not a fit flaw in the kit.

Skipping ahead a bit to Step 13, I cleaned up the driver's view hatch and the two access hatches and added their grab handles.

At this point I'm not 100% sure I will go ahead and leave the driver's area hatches open. This particular kit doesn't include any additional detail for the interior past the driver's seat back so I'm rethinking the notion. I may just pose the driver's vision hatch open instead...or just keep things simple and close it all up. Have to see how I feel about it and go from there I guess.

  • Member since
    January 2006
  • From: California
Posted by SprueOne on Sunday, September 21, 2014 8:24 PM

Here Eats 

Hmmm, interior, can paint everything behind the driver seat flat black or go "curb side" with this one 

Anyone with a good car don't need to be justified - Hazel Motes


Iron Rails 2015 by Wayne Cassell Weekend Madness sprueone

  • Member since
    January 2013
Posted by jibber on Monday, September 22, 2014 8:29 AM

Bill timing is everything, I picked up this kit for the WWI GB a bit ago but haven't started it yet. The kit is so well detailed and Meng does a great job in engineering I can't wait to get started on it. I think I'm going to pass on painting the interior, even with the hatches open not much will be visible, but like you I'm still not sure. I love the paint schemes on these old guys and how about those rivets…Terry

  • Member since
    March 2003
  • From: Western North Carolina
Posted by Tojo72 on Monday, September 22, 2014 9:44 AM

looking forward to this one

  • Member since
    September 2006
  • From: Dripping Springs, TX, USA
Posted by RBaer on Monday, September 22, 2014 10:21 AM

A ship, and now something French? Wow.......

Apprentice rivet counter.

  • Member since
    July 2004
  • From: Texas
Posted by wbill76 on Monday, September 22, 2014 11:07 AM

SP1

I'm contemplating something along those lines perhaps, have to think on it a bit! Wink

Terry

agree with you on the appeal of all those rivets and angular sides! It's about time the WWI subjects got their due and I figured this one was just right for a little centenary-acknowledging project.

Anthony

glad to have you along!

BeerRuss

got to keep things interesting every now and then you know! This one will be French-American since the kit includes markings for a US vehicle in 1918.
  • Member since
    March 2012
  • From: Corpus Christi, Tx
Posted by mustang1989 on Monday, September 22, 2014 1:33 PM

Lookin' forward to peepin' in on this one Bill.


 Forum | Modelers Social Club Forum (proboards.com) 

  • Member since
    July 2004
  • From: Texas
Posted by wbill76 on Monday, September 22, 2014 5:42 PM

Glad to have you onboard Mustang! Wink

  • Member since
    July 2003
  • From: On my kitchen counter top somewhere in North Carolina.
Posted by disastermaster on Tuesday, September 23, 2014 3:40 AM

wbill76

After spending the last few weeks down in the Ships forum building a 1/350 HMS Dreadnought.....

So http://rpgmaker.net/media/content/users/27827/locker/HEADSHAKING_SMILEY.gif THAT'S where you've been.

Sherman-Jumbo-1945

"I was so much older then, I'm younger than that now"


  • Member since
    July 2004
  • From: Texas
Posted by wbill76 on Tuesday, September 23, 2014 10:04 AM
disastermaster

wbill76

After spending the last few weeks down in the Ships forum building a 1/350 HMS Dreadnought.....

So http://rpgmaker.net/media/content/users/27827/locker/HEADSHAKING_SMILEY.gif THAT'S where you've been.

You caught me Steve! It's not cheating though...it was armored, had turrets, and some big guns! Big Smile
  • Member since
    July 2006
  • From: New Jersey
Posted by redleg12 on Tuesday, September 23, 2014 7:09 PM

First you cheat on us and go to ships (still waiting for you to do a car...nice German staff car), now you screw with our heads and go French. What is this world coming to...first legalized pot, same sex marriage, Bill builds a ship, now he goes French!!! OMG

Rounds Complete!!

"The Moral High Ground....A Great Place to Emplace Artillery."

  • Member since
    July 2004
  • From: Texas
Posted by wbill76 on Tuesday, September 23, 2014 7:41 PM
redleg12

First you cheat on us and go to ships (still waiting for you to do a car...nice German staff car), now you screw with our heads and go French. What is this world coming to...first legalized pot, same sex marriage, Bill builds a ship, now he goes French!!! OMG

Rounds Complete!!

But at least I will finish it in the American markings for 1918... Wink As for the staff car, you may have to wait a while for that one. Big Smile
  • Member since
    January 2007
Posted by the doog on Tuesday, September 23, 2014 7:42 PM

Cripes, but you don't slow down for a minute, Bill!

Cool beans--didn't even realize they released this!

I'm going to start the Takom Mark IV Male soon! It'll be a WWI party!

  • Member since
    July 2003
  • From: On my kitchen counter top somewhere in North Carolina.
Posted by disastermaster on Tuesday, September 23, 2014 11:01 PM

wbill76
disastermaster

wbill76

After spending the last few weeks down in the Ships forum building a 1/350 HMS Dreadnought.....

So http://rpgmaker.net/media/content/users/27827/locker/HEADSHAKING_SMILEY.gif THAT'S where you've been.

You caught me Steve! It's not cheating though...it was armored, had turrets, and some big guns! Big Smile

Yeah, yeah, yeah, but it ain't got no dad burn-tracks, darn it.

http://heathersanimations.com/military/edpanz3.gifhttp://heathersanimations.com/military/edsherm4.gif


http://z5.ifrm.com/30179/46/0/e5148760/e5148760.gif Next thing I know, you'll be

       building flying saucers..........http://dhammawheel.com/images/smilies/saucer.gif http://www.allempires.com/forum/smileys/smiley29.gif

                                      (like some other guy I know here)

Sherman-Jumbo-1945

"I was so much older then, I'm younger than that now"


  • Member since
    January 2010
Posted by CrashTestDummy on Wednesday, September 24, 2014 8:40 AM

I've read good reviews on this kit, and picked one up on sale.  When I opened the kit up when it arrived, I almost started on it right then.  It's a very nice kit.  I have too many other half-started projects, though, so I'm working through those first.  

I'll be watching this build, though.  

G. Beaird,

Pearland, Texas

  • Member since
    July 2004
  • From: Texas
Posted by wbill76 on Wednesday, September 24, 2014 11:41 AM

Steve

I don't know what you're talking about...Wink

CTD

I got mine for a good price as well so figured why not? Very impressed with the fit and detail so far on this little guy. Glad to have you along! Beer
  • Member since
    July 2003
  • From: On my kitchen counter top somewhere in North Carolina.
Posted by disastermaster on Wednesday, September 24, 2014 2:18 PM

wbill76

Steve

I don't know what you're talking about...Wink

http://images.yuku.com.s3.amazonaws.com/image/gif/1b5251a4b65a7bc83cbd612cee9209dd1887f5f.gif  Ahh, get outt'a here http://www.armywivesforums.com/forums/images/smilies/new2012/kicked-out-smiley.gif

                                      http://vladsokolovsky.com/forums/public/style_emoticons/aaa/laugh1-smiley.gif


Sherman-Jumbo-1945

"I was so much older then, I'm younger than that now"


  • Member since
    June 2006
  • From: Michigan
Posted by ps1scw on Thursday, September 25, 2014 12:38 PM

Very cool subject.  Gotta love all the WWI subjects coming out.

  • Member since
    July 2004
  • From: Texas
Posted by wbill76 on Thursday, September 25, 2014 4:45 PM

Glad to have you on board ps1! Wink

  • Member since
    July 2004
  • From: Texas
Posted by wbill76 on Sunday, September 28, 2014 2:49 PM

After some back and forth I decided ultimately to go ahead and button up this little guy and not display the driver's hatches open. So with that decided, I set about assembling the hull. Since it's all separate panels, I used regular glue on the hull sides so they could have some stability and then followed that up with careful applications of liquid glue where needed along the bottom edges.

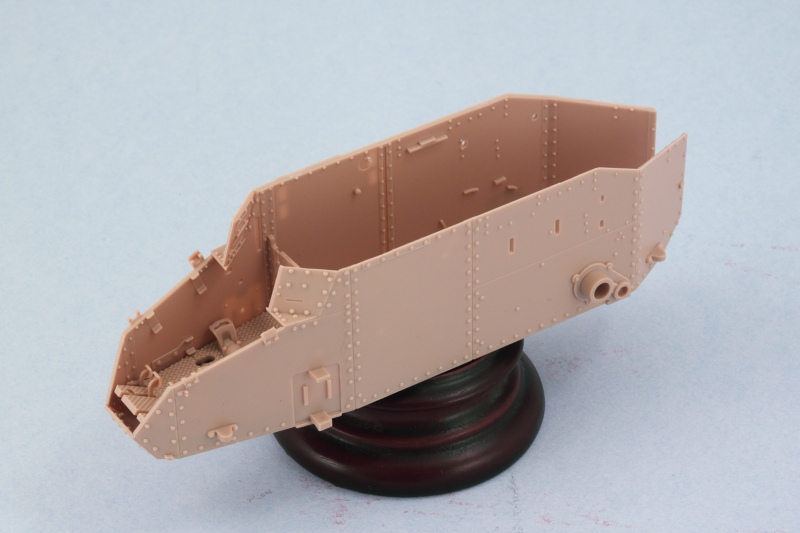
Then I added the roof plate next so I could use it to get the hull sides lined up square and the small driver's area side plates lined up with the view port hatch hinge and the top edges of the roof plate. This all requires some careful use of finger pressure and glue as the areas involved are tiny and rubber bands or clamps can't do the job. Then I added the angled top plate for the nose and the driver's access hatches since all three need to line up just so with each other to avoid issues or gaps. Last but not least, I added the driver's visor in the closed position.

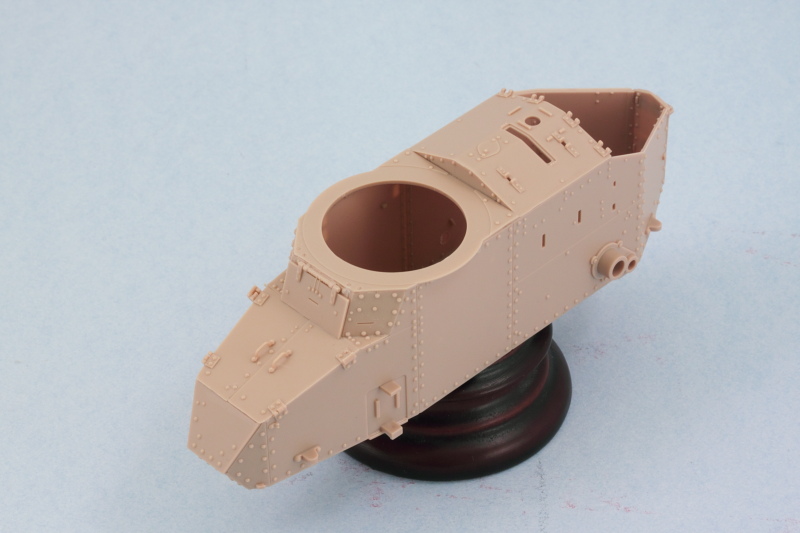
That got a chance to set up nice and solid overnight and attention turned to the engine deck area under Step 6. It's important to note (as the instructions do) that the sledgehammer is trapped in place by the little vent cover, B9, so that means it will have to be detailed in place later on. To help make that easier, I didn't glue the sledgehammer down, just placed it and am allowing B9 to hold it in place for now. In Step 7, the instructions would have you place part B11 and then add the engine bay hatches in Step 14. I found it easier to add them all together at the same time as B11 needs to be lined up very precisely in relation to the hatches for everything to play nice with each other here. This isn't a kit flaw or an engineering issue, quite the contrary...the engineering is very well done for these parts but since the vehicle itself is so small, fractions of a mm do matter in getting everything lined up correctly with all the plates/parts involved.

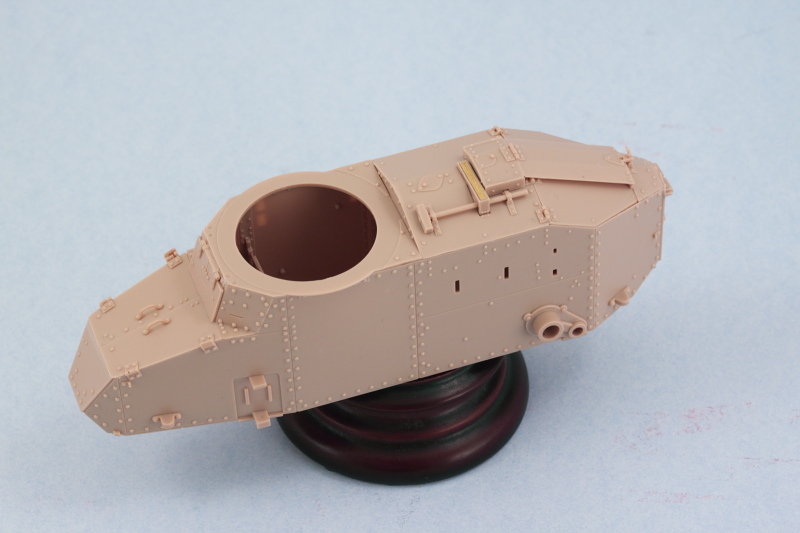
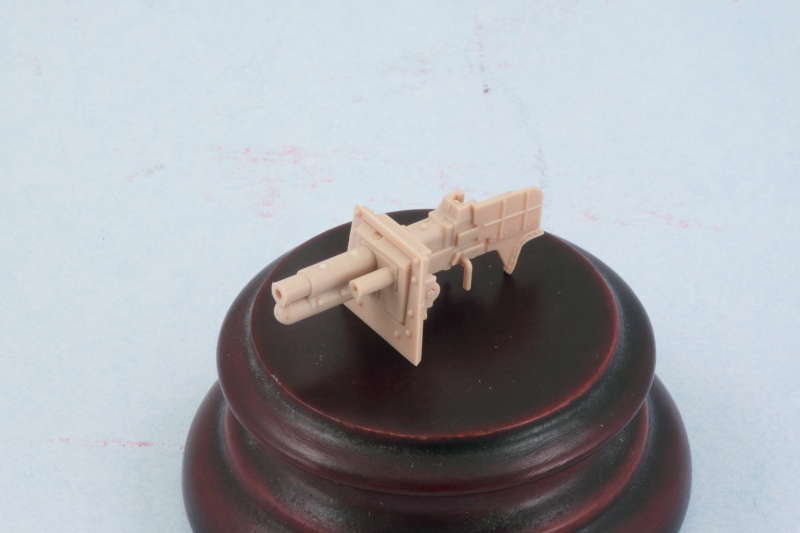
In preparation for working on the turret, I opted for the 37mm cannon version in Step 15. I assembled the gun as directed and used a drill bit to open up the cannon muzzle a bit more. The molding on the end of my barrel wasn't perfect, so some careful sanding and trimming was needed to get it into shape. I also installed it into the turret faceplate so that its all one module now and ready to go into the turret.

Since the turret assembles as a series of plates onto an octagonal base, that's going to require some careful attention to get all the plates together and lined up between the roof and base, so that will be what's on deck for the next round of effort

  • Member since
    August 2006
  • From: Oromocto, Canada
Posted by Gun Tech on Sunday, September 28, 2014 9:54 PM

Nice!  

I wanted to see one built up for a little while now.

I'll gladly follow!

Jean-Michel    "Arte et Marte"

  • Member since
    March 2012
  • From: Corpus Christi, Tx
Posted by mustang1989 on Monday, September 29, 2014 5:13 AM

wbill76
Since the turret assembles as a series of plates onto an octagonal base, that's going to require some careful attention to get all the plates together and lined up between the roof and base

That sounds like a PIA! ..............and intense!


 Forum | Modelers Social Club Forum (proboards.com) 

  • Member since
    July 2004
  • From: Texas
Posted by wbill76 on Monday, September 29, 2014 11:58 AM

J-M

glad to have you along for the ride! Wink

Mustang

I can understand why Meng went this route since that's how the actual turret was constructed...a series of octagonal riveted plates on a frame. It also allows them to mold detail on both sides of the plates for greater realism on the interior if you choose to have the rear turret hatch open as well. It does make for a more intricate assembly though, no question about that! Smile
  • Member since
    December 2002
  • From: Bury St Edmunds, Suffolk, England
Posted by Bish on Monday, September 29, 2014 12:31 PM

Damn, missed the start of this one. But then its hard to keep up with your builds. Nice subject, its good to see something different, even if it is French Zip it!

I am a Norfolk man and i glory in being so


On the bench: Airfix 1/72nd Harrier GR.3/Fujimi 1/72nd Ju 87D-3

  • Member since
    July 2004
  • From: Texas
Posted by wbill76 on Monday, September 29, 2014 1:20 PM

Bish

Glad to have you along! This one will serve to scratch my WWI itch just about right I think! Wink

  • Member since
    January 2013
Posted by jibber on Monday, September 29, 2014 2:05 PM

Bill I was going to start my FT-17 for the next WWI GB but I think I'll ride this one out and pickup some tips along the way, I hope you don't mind. Its a little like watching another golfer putting the same line and you sneak a peek to see what its going to do, anyway are you going to use the provided base? I looked at it, and just by itself it should make a very nice presentation. Terry

  • Member since
    July 2004
  • From: Texas
Posted by wbill76 on Tuesday, September 30, 2014 11:55 AM

Works for me Terry! No harm in following along to see how this one builds up and avoiding any pitfalls that might pop. Happy to be the guinea pig. Big Smile I haven't yet decided if I'm going to use the base or not...it's kind of a 'dio in a box' arrangement which I think is neat but may not fit inside my available display cabinet space, so that may end up being the ultimate deciding factor on that front.

  • Member since
    January 2013
Posted by jibber on Tuesday, September 30, 2014 7:09 PM

Thanks Bill.

  • Member since
    January 2010
Posted by CrashTestDummy on Wednesday, October 1, 2014 12:36 PM

wbill76

J-M

glad to have you along for the ride! Wink

Mustang

I can understand why Meng went this route since that's how the actual turret was constructed...a series of octagonal riveted plates on a frame. It also allows them to mold detail on both sides of the plates for greater realism on the interior if you choose to have the rear turret hatch open as well. It does make for a more intricate assembly though, no question about that! Smile

Yeah, but on the actual tank, I'm sure they had templates, and stabilizing brackets to help with assembly. 

Sad to see you're not opening it up, but I understand fully.  It'll speed up the assembly, and cut down on the 'how much additional detail do I add to this one?' decisions.  Wink

G. Beaird,

Pearland, Texas

  • Member since
    July 2004
  • From: Texas
Posted by wbill76 on Wednesday, October 1, 2014 3:05 PM

That's true CTD! Meng does offer the full interior version in a different FT-17 kit and if I had that one, it would've been worth it. In this one there's so much that's not there that closing it up made life a lot easier.

JOIN OUR COMMUNITY!

Our community is FREE to join. To participate you must either login or register for an account.

SEARCH FORUMS
FREE NEWSLETTER
By signing up you may also receive reader surveys and occasional special offers. We do not sell, rent or trade our email lists. View our Privacy Policy.