SEARCH FINESCALE.COM

Enter keywords or a search phrase below:

Dragon Vorpanzer---FINISHED PICS!

23546 views
154 replies
1 rating 2 rating 3 rating 4 rating 5 rating
  • Member since
    December 2007
  • From: Eagle River, WI
Posted by PANZERJAGER on Thursday, February 26, 2015 1:33 PM

M1GarandFan

Please excuse my ignorance, but what are DS tracks?

they are a type of 1 piece glue able vinyl track.

 PANZERJAGER


  • Member since
    July 2014
  • From: Rifle, CO. USA
Posted by M1GarandFan on Thursday, February 26, 2015 2:00 PM

Danke Schon, Mein Herr!

  • Member since
    July 2003
  • From: On my kitchen counter top somewhere in North Carolina.
Posted by disastermaster on Thursday, February 26, 2015 2:54 PM

Following along Karl.......

    http://stkr.es/p/g6 Looking sweet!

Sherman-Jumbo-1945

"I was so much older then, I'm younger than that now"


  • Member since
    January 2007
Posted by the doog on Tuesday, March 24, 2015 10:11 AM

FFFFFFFFFFFFinally got some work to show on this model!

In the last three weeks, I've been through a bout with food poisoning, had the flu, and--worse than that--had to endure the agony of making all these PE tool clamps. All in all, given the comparison, if I had to do it all again, I"d take either the flu or the food poisoning over re-doing the PE. Whistling

Here's an example of some of the problems I faced with this kit. See that nice, pre-formed shovel mounting there? Yeah, nice, huh? Yet totally unusable, Angry This shovel is supposed to fit UNDER the antenna trough there, in the two mounting holes. As you can see, it's literally impossible to use.

There's absolutely NO way to fit this under the trough. I checked every reference and the instructions three times, and yup, it's SUPPOSED TO fit under there. But there's just no way at all to fit it. How frustrating! I wound up making a replacement head from plastic, and just added the rear clamp--which, uh, STILL looks way out-of-scale to me. (you can see the inside rollers of the return rollers there; part of my tracks method)

I found Dragon's clamps to be extremely troublesome to build---an average of 30 minutes to do each one--some took me well over an hour to complete. The ends just don't fit into each other; the tabs are too large, and I wound up basically shaving off tabs and actually having to needle-file correct widths of other parts to try to get them assembled. The size of the clamps were also an issue--several times, I had a problem fitting the tools in them snugly. They were alternately either too large, or too small. Ugh. This honestly was NO FUN at all, and that's NOT what modeling is supposed to be about. Sad

Anyway, I got them all finished for the most part. I didn't use the fire extinguisher parts--they just looked like crap after I finished them; the plastic part looked so much better. FINALLY, it's ready for primer!

I did some battle damage with a low-heat pyrogravure that I got at AC Moore's--this is actually a "Stencil Cutter" that heats up to the perfect temp for scribing plastic. I used it to make these cool shell hits. I think they came out pretty good.

This step took me over two hours to engineer and make. All hail my perseverance and tenacity! Propeller

Well, I've got some masking to do to protect the interior paint, and then I'll shoot a coat of primer...man, I haven't done a gray tank in quite a while....should be fun! Smile

  • Member since
    September 2012
Posted by GMorrison on Tuesday, March 24, 2015 10:17 AM

RBaer

They've also gone to DS tracks with separate guide horns, not too bad, and ala your MBT70 adventure, joined in an obvious way. However, they need shortening, anyway, so I generally cut out the nasty part and re-attach them by cutting exactly in the middle of the two blocks to be joined. Works great.

That's a great tip.

Karl, this is looking really good, even without paint. Following with great interest.

 Modeling is an excuse to buy books.


  • Member since
    November 2009
  • From: SW Virginia
Posted by Gamera on Tuesday, March 24, 2015 11:48 AM

Great to see you back underway on this Karl. Sorry to hear about your illness but glad you're feeling better now. I guess at least all the PE would take your mind off feeling queasy by giving you a headache!

Still the PE looks fantastic as it should considering the work invested in it, and I love the battle damage.  

"I dream in fire but work in clay." -Arthur Machen


  • Member since
    April 2006
  • From: Denver, Colorado
Posted by waynec on Tuesday, March 24, 2015 12:02 PM

Gamera

Great to see you back underway on this Karl. Sorry to hear about your illness but glad you're feeling better now. I guess at least all the PE would take your mind off feeling queasy by giving you a headache!

Still the PE looks fantastic as it should considering the work invested in it, and I love the battle damage.  

OTHO you can legally take drugs to ease the first 2, drugs and alcohol don't work well with PE though alcohol works well with spiking RR track.

Looking good Karl and you're right, it's suppose to be fun. Sometimes i think kit designers forget that.

Никто не Забыт    (No one is Forgotten)
Ничто не Забыто  (Nothing is Forgotten)


  • Member since
    October 2007
  • From: Louisville, KY
Posted by pordoi on Tuesday, March 24, 2015 12:30 PM

Sorry to hear about your illness(es).  Been wondering where this build went to.  The PE work looks great!  All that effort, but once it's over and you see the result, the pain is forgotten.  Well, mostly...

Not only the tool clamps, but it's those friggin' PE pintle chains that always drive me up a wall.  And you did very well there. 

Also, really like the battle damage; very convincing.  Look forward to seeing it primed and painted.

Don

  • Member since
    March 2003
  • From: Western North Carolina
Posted by Tojo72 on Tuesday, March 24, 2015 12:42 PM

Fantastic work on all the details.Bring on the paint.

  • Member since
    September 2006
  • From: Dripping Springs, TX, USA
Posted by RBaer on Tuesday, March 24, 2015 1:02 PM

Gad, I hate PE.....

Karl, you're running into the same issues I had with a PE set a while ago. You'd think that somewhere, somehow, somebody would have actually built something and said: "Wait a minute, this doesn't fit, we need to fix this".  Most especially when the kit and PE are from the same manufacturer......

Or, this could also be said: "PE is from the devil", my frequent mantra......

Good looking shell hits, too.

Apprentice rivet counter.

  • Member since
    July 2003
  • From: On my kitchen counter top somewhere in North Carolina.
Posted by disastermaster on Tuesday, March 24, 2015 11:35 PM

 Yeah, I've had a recent bout with Dragon PE http://www.aladdin.st/bilder/388-5.gif

   http://blackdesertonline.nl/Smileys/animaticons/thumbs-down-emoticon.gif None of the tool clamps had the "ears" on the base part for the outer clamp to interact with........http://i139.photobucket.com/albums/q303/EarthAngels_bucket/EA141.gif~original   heh, heh, heh,

               so, I disasterised 'em; I done it myyy way

 When the fun goes out of it, it just becomes a job. Those shell impacts are super. I think you've done a splendid job here....

                                           http://www.sherv.net/cm/emoticons/confused/being-confused-smiley-emoticon.gif

                             ....but then, is it ever any other way?

 What's sooo aggravating is that the average person will look at it - never see the beauty of all that hard PE work, and chant that feeble line.....

                                  "Oh, that's really pretty."

                                                                       http://www.missouriwhitetails.com/forums/images/smilies/lame.gif

Sherman-Jumbo-1945

"I was so much older then, I'm younger than that now"


  • Member since
    December 2002
  • From: Bury St Edmunds, Suffolk, England
Posted by Bish on Wednesday, March 25, 2015 3:32 PM

I have not yet worked with Dragon PE clamps, and after reading that, I don't think I want to. Aber and Voyager clamps take me about 15/20mins each and I thought that was a pain.

Its looking good despite all that, I like the damage as well. That can look so wrong but you have pulled it off nicely. Going to have to try that one day.

I am a Norfolk man and i glory in being so


On the bench: Airfix 1/72nd Harrier GR.3/Fujimi 1/72nd Ju 87D-3

  • Member since
    June 2007
Posted by Labour In Vain on Thursday, March 26, 2015 3:43 PM

Good effort Karl!

The battle damage looks very convincing.

Was the issue about the position of the drive wheel corrected in this release?

As allways

Boarder

Avatar © David Byrden 2005 http://Tiger1.info/
  • Member since
    October 2007
  • From: Louisville, KY
Posted by pordoi on Thursday, March 26, 2015 5:24 PM

Labour In Vain

Was the issue about the position of the drive wheel corrected in this release?

As allways

Boarder

The Vorpanzer kit corrected many of the errors of the DML6264 PzIV ausfE kit, including the position of the drive sprocket, the size of the return rollers and many others.  This and the PzIVD Superkit are some of the best PzIV kits available, in my opinion.  But complicated builds.

Don

  • Member since
    January 2013
Posted by jibber on Friday, March 27, 2015 1:44 AM

Karl after all the blood sweat and beers, the PE really does look fantastic. I don't know about you but on PE frets that have a millions pieces, many still have a lot of parts I didn't use. After a while enough is enough and as you say it just isn't enjoyable. Besides that, it's looking fantastic and I'm a fan of working in battle damage, nice job there. So pump up the air and get that very cool tank painted up.

Terry

  • Member since
    March 2013
  • From: Puebla, Mexico
Posted by garzonh on Friday, March 27, 2015 11:48 AM

Oh my god, where have I been while tha magic of Karl is going on...oh yes...working..

That is really looking good, like the interior details, those damages to the tank look so realistic!

As for the PE, yep, been there, done that, and yes, sometimes you spent 1 or 2 hours making a single PE assembly, thats why my Hummel took me 6 months to complete since then I tried to keep away from PE....for now...

Definitely, need to keep this build on my list.

  • Member since
    January 2007
Posted by the doog on Friday, March 27, 2015 1:41 PM

Guys, thanks for all positive messages and posts!!! I'll be doing an update later tonight and responding more in -depth!!!

  • Member since
    January 2006
  • From: California
Posted by SprueOne on Saturday, March 28, 2015 3:20 PM

Nice control with that battle damage to the front. I can't wait to see how that gets/looks painted 

Anyone with a good car don't need to be justified - Hazel Motes


Iron Rails 2015 by Wayne Cassell Weekend Madness sprueone

  • Member since
    January 2007
Posted by the doog on Saturday, March 28, 2015 3:26 PM

Guys,

Once again, thanks for all of your commiseration with the Dragon PE. I appreciated knowing that I'm not the only one who has had such an unpleasant time with the PE in these kits.

Well, I've made progress on the painting. Here's the promised update!

I started off with a base coat of pure Tamiya Black. This will help give adequate shadowing to the eventual Pz Grey real coat.

The wheels got a coat of Primer Red--my own mix from Tamiya. Hull Red + Red + Red Brown, just mix til it looks right. I did this because of a famous photo of a PZ  III crossing a stream where you can clearly see the wheels are red inside. It's a pretty neat way to give a little more color to the otherwise drab tank,

After masking off the openings, I used straight Pz Grey from Tamiya, and then added about 20% Buf for a second coat of color modulation and highlighting.

The color is a little bit darker than this actually appears--I overexposed the photos to bring out the detail.

Now I painted the outside of the wheels..

Decals on...not much to do here...

And now I painted the tools, as any dust is going to fall on those and they have to be painted underneath it. Then, I patiently went around the entire tank and did pins washes in Black oil to ever line, detail, bolt, and panel line, for definition before I start adding weathering. Here's some shots of where I am now.

Tools were done with tan base coats on the wood, and then rust and Gray and Raw Umber oil paint filters for the wood color.

Details....I added some color to a couple of the handles just for breaking up the greys.

Here's the shell hits. Still have to add "burnt" black pigments to thse...

I'm almost tempted to leave this relatively clean, but I know I wouldn't be able to sleep if I did that, lol.

Next up: highlights and drybrushing, then pigments and spattering..Oh yeah--and those darned road wheels too....sigh...

Thanks for looking in, all! Smile

  • Member since
    December 2002
  • From: Bury St Edmunds, Suffolk, England
Posted by Bish on Saturday, March 28, 2015 3:58 PM

Really nice there Karl. I have still to do a Pz Grey piece, so interesting to see how you do it. Interesting titbit on the road wheels. Is it me, or is the spare wheel nearest to the camera painted red on the outside as well.

And thanks for that red primer mix.

I am a Norfolk man and i glory in being so


On the bench: Airfix 1/72nd Harrier GR.3/Fujimi 1/72nd Ju 87D-3

  • Member since
    December 2003
  • From: Colorado
Posted by psstoff995 on Saturday, March 28, 2015 4:19 PM

Beautiful work on this one so far Karl! I was upset to see you had some major roadblocks on that MBT70 build, but it's really impressive to see you bounce back so far and knock this challenging one out of the park. Definitely looking forward to seeing it weathered up to your usual standard. Happy modeling!

-Chris

US Army Infantryman

  • Member since
    October 2007
  • From: Louisville, KY
Posted by pordoi on Saturday, March 28, 2015 4:28 PM

To borrow a phrase from my daughter (high school aged):

"Too Cool For School!!"

Looking forward see what you do with weathering.

Don

  • Member since
    July 2003
  • From: On my kitchen counter top somewhere in North Carolina.
Posted by disastermaster on Saturday, March 28, 2015 4:56 PM

Totally up to your premium standards Karl....... http://img.photobucket.com/albums/v247/Knitwit1975/Misc%20smilies/wink05.gif~original

Sherman-Jumbo-1945

"I was so much older then, I'm younger than that now"


  • Member since
    January 2015
  • From: Tumwater, WA.
Posted by M. Brindos on Saturday, March 28, 2015 7:06 PM

Fantastic Karl! Simply fantastic! :D:D:D:D

- Mike Brindos "Lost Boy"

  • Member since
    December 2012
Posted by RX7850 on Saturday, March 28, 2015 7:08 PM

Looks perfect as is but if you must soil it...  then soil it....Smile

  • Member since
    January 2006
  • From: California
Posted by SprueOne on Sunday, March 29, 2015 12:34 PM

YES, very nicely represented. Those shell hits are looking as good as I thought they would 

Anyone with a good car don't need to be justified - Hazel Motes


Iron Rails 2015 by Wayne Cassell Weekend Madness sprueone

  • Member since
    January 2007
Posted by the doog on Sunday, March 29, 2015 8:57 PM

Thanks all, guys. I appreciate the comments and knowing that you're with me on this one! Yes

Bish, yeah, that one red wheel is going to be a "spare" road wheel. A little dash of color on the model never hurts! Smile

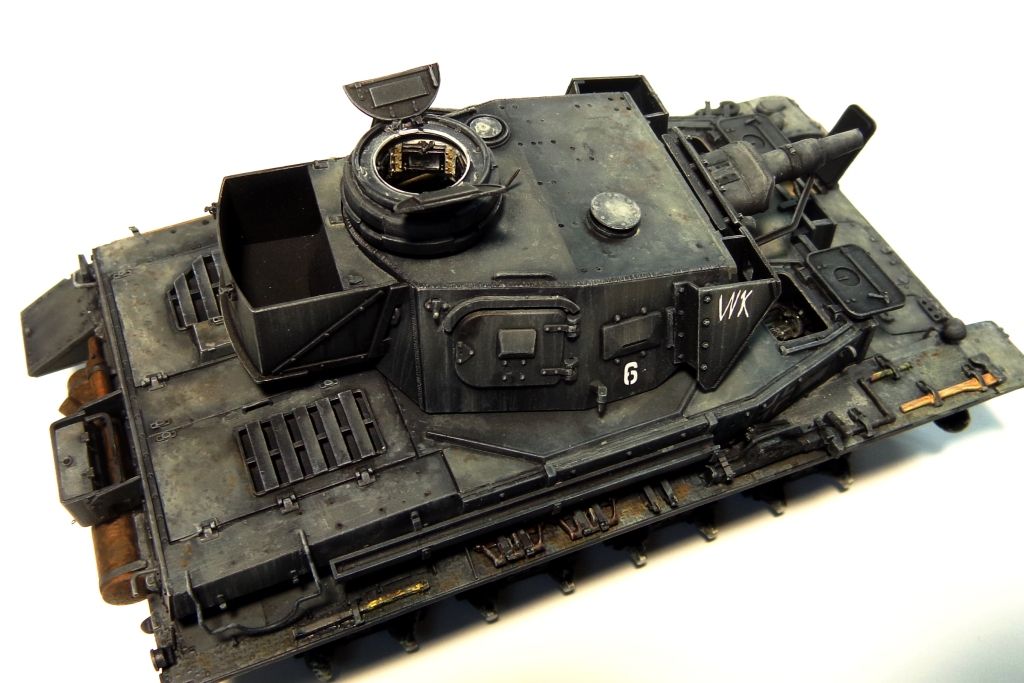
I'm getting on with the upper hull weathering this weekend. I decided to just try something a little different, hey why not? I decided to go with acrylic weathering just to see what I could do with it. I took 4 colors--one white, one black ,and one variation of gray and one of tan--basically everything I'd need to make variations of gray and dust over gray. This is all done with various craft store acrylic paints.

Here's what I used: I put a little of each in my palette, thinned with water...

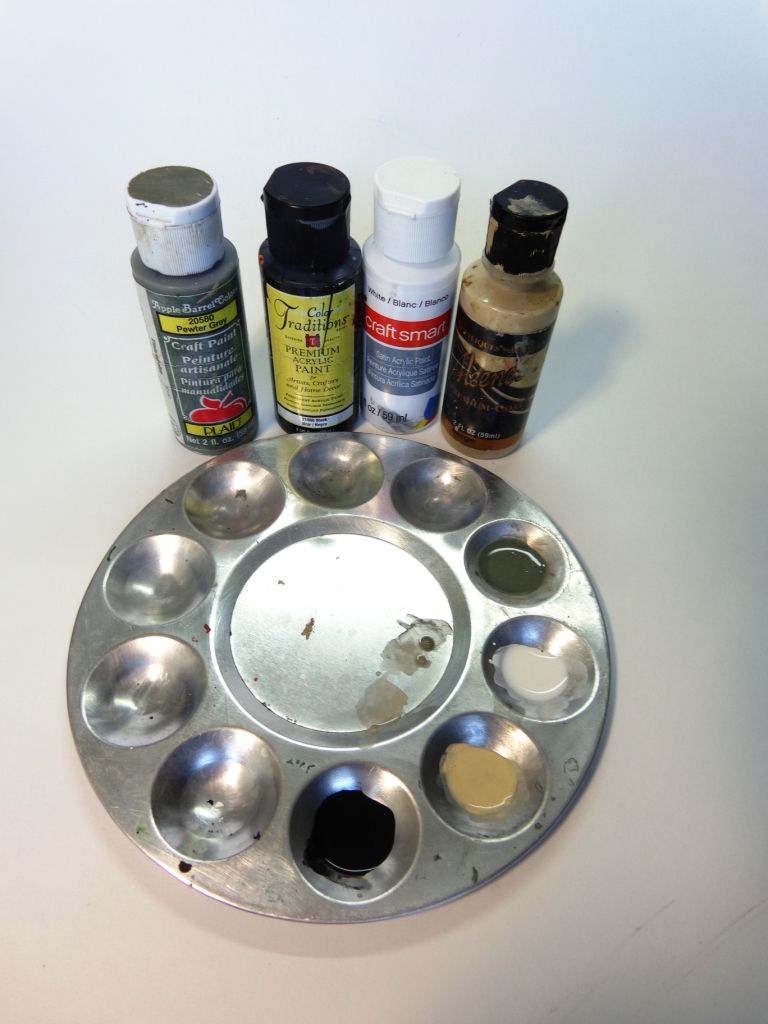
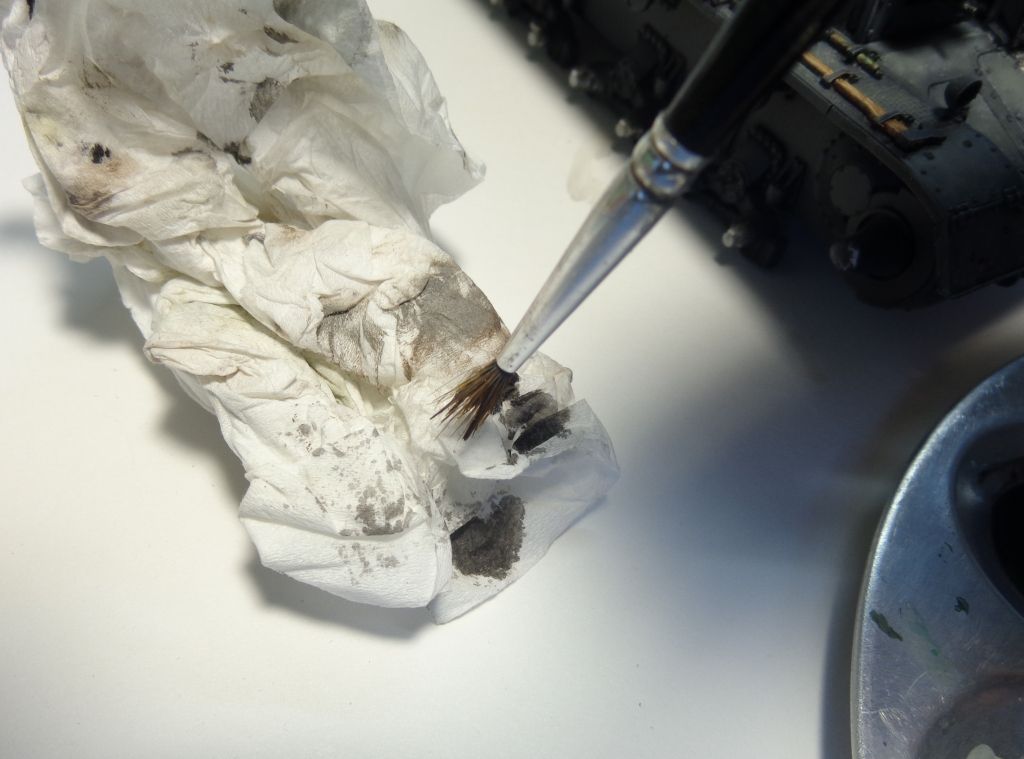
In a bottle cap, I had some dishwater soap to use to cut the surface tension of the water--a necessary step when using water-based effects. I dipped the brush in the soap, and then into the pool of color, dab it off a bit, and added it to the model. It's REALLY thin, consistency-wise...

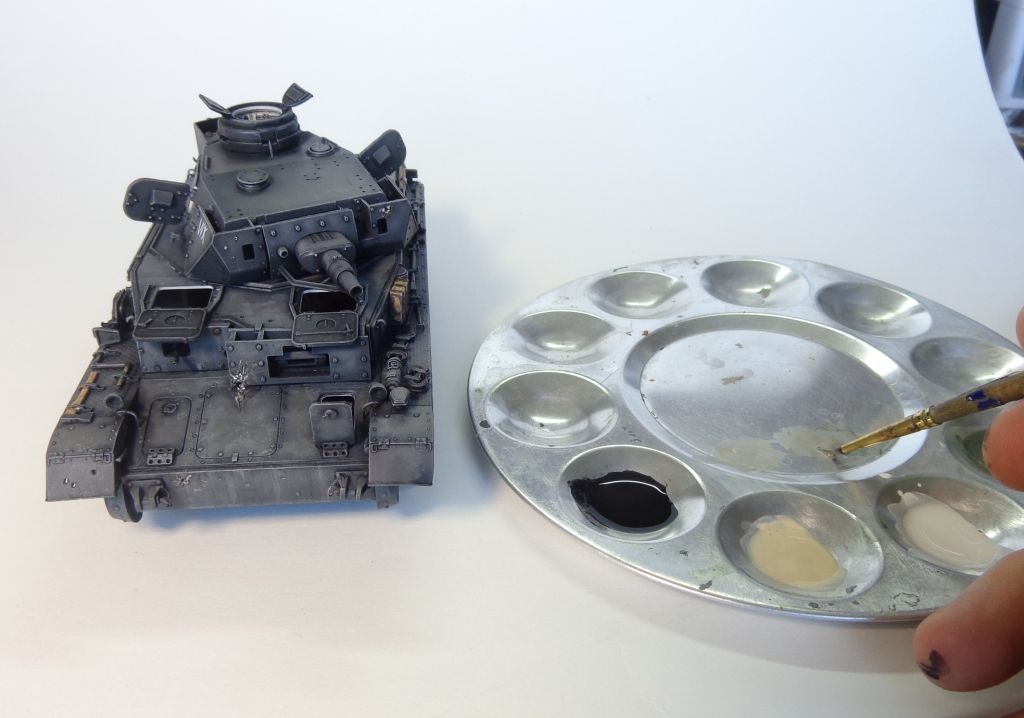
I keep carelessly mixing up the colors, just going with whatever comes on the brush within a range of gray-tan.

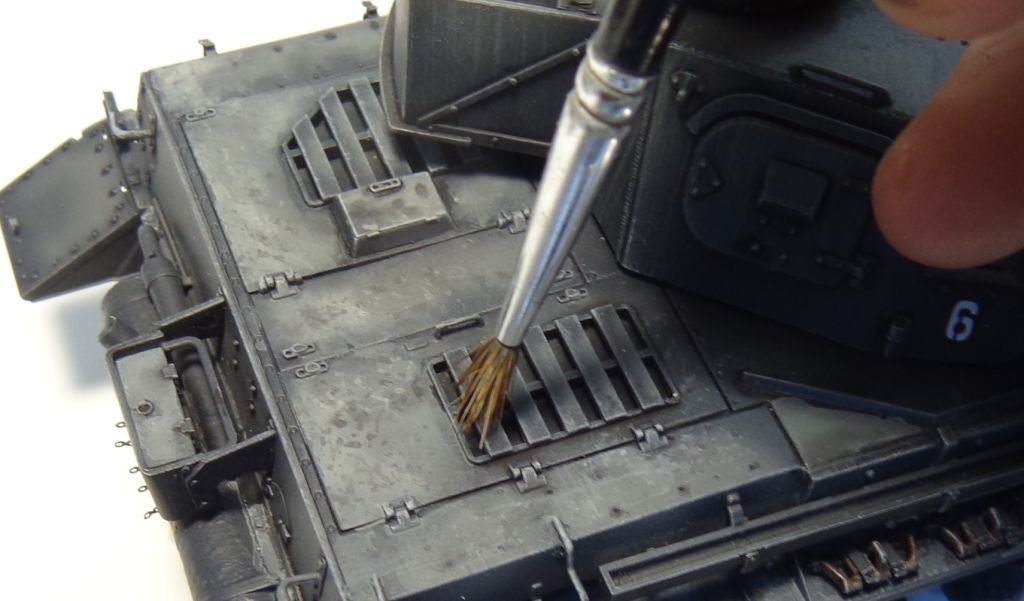
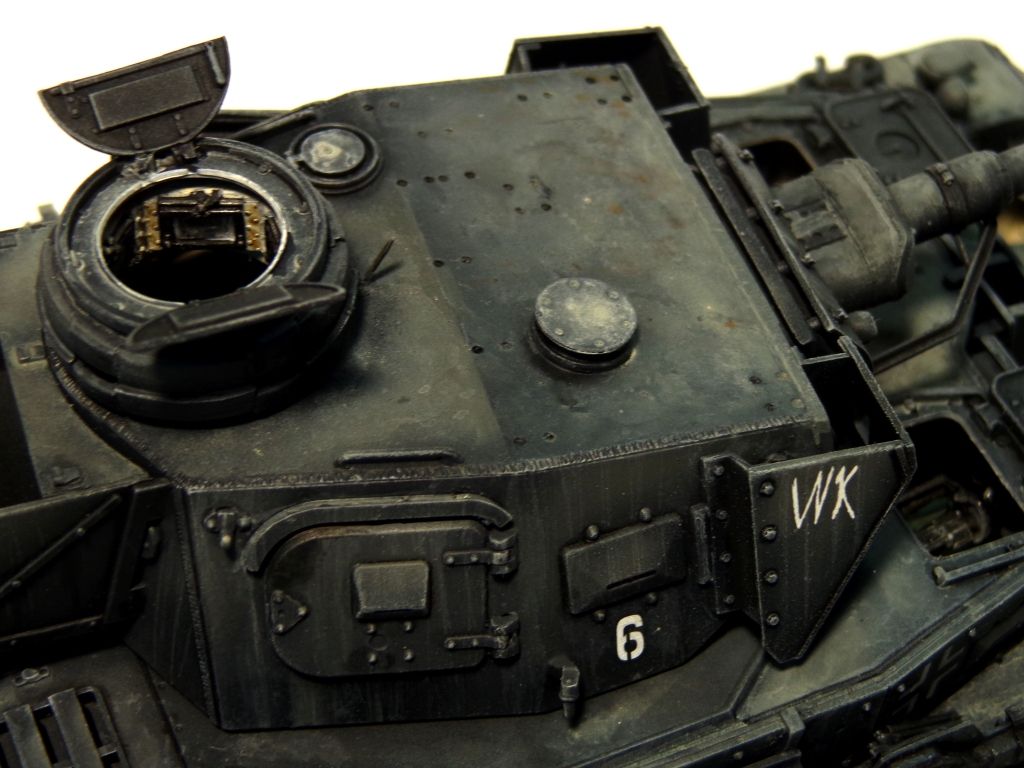
When I had a nice coat over the entire top hull and turret, I added some contrasting dark spots. I dipped an old, slayed brush in the Black soup and dabbed it almost-dry, and then just dropped it repeatedly on the model. adding faint dark spots.

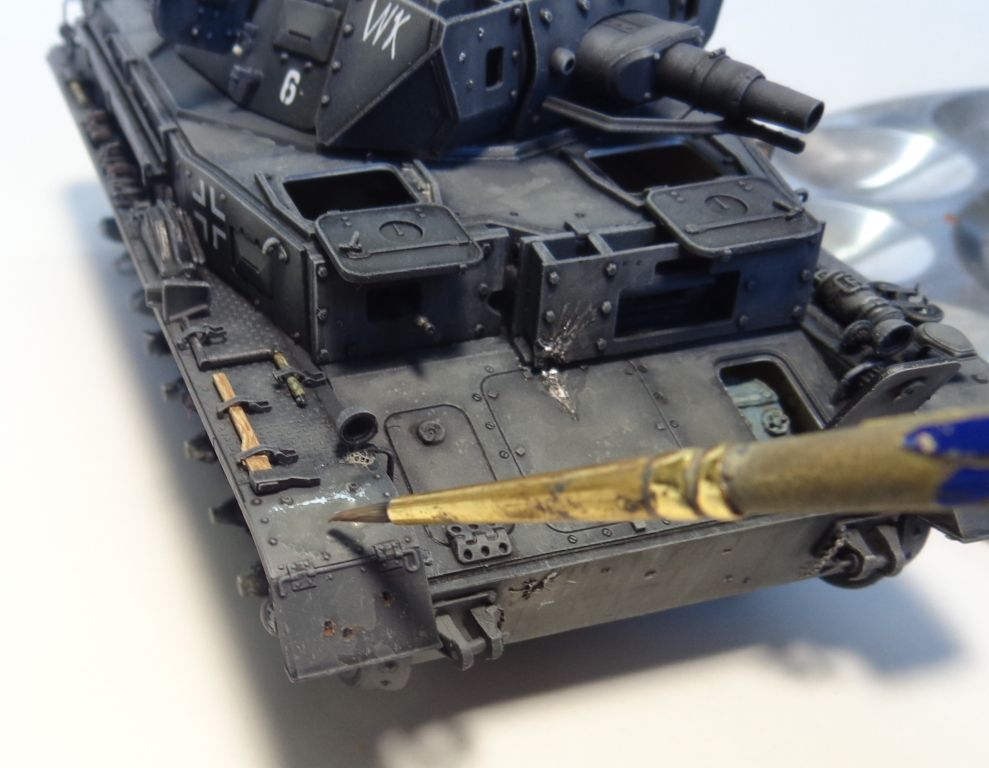
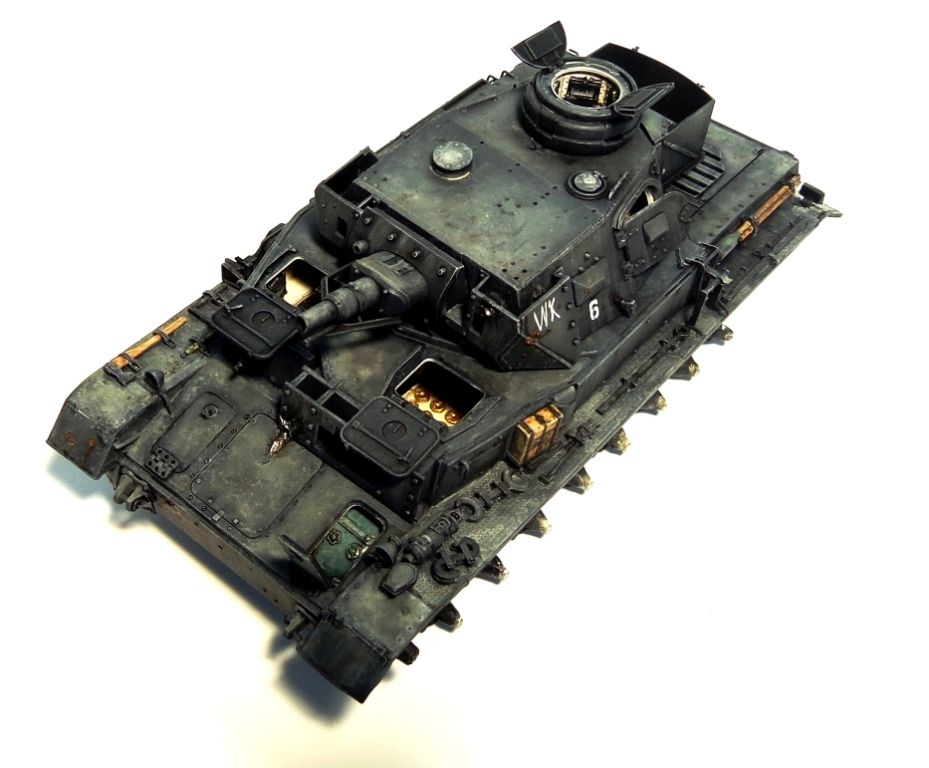
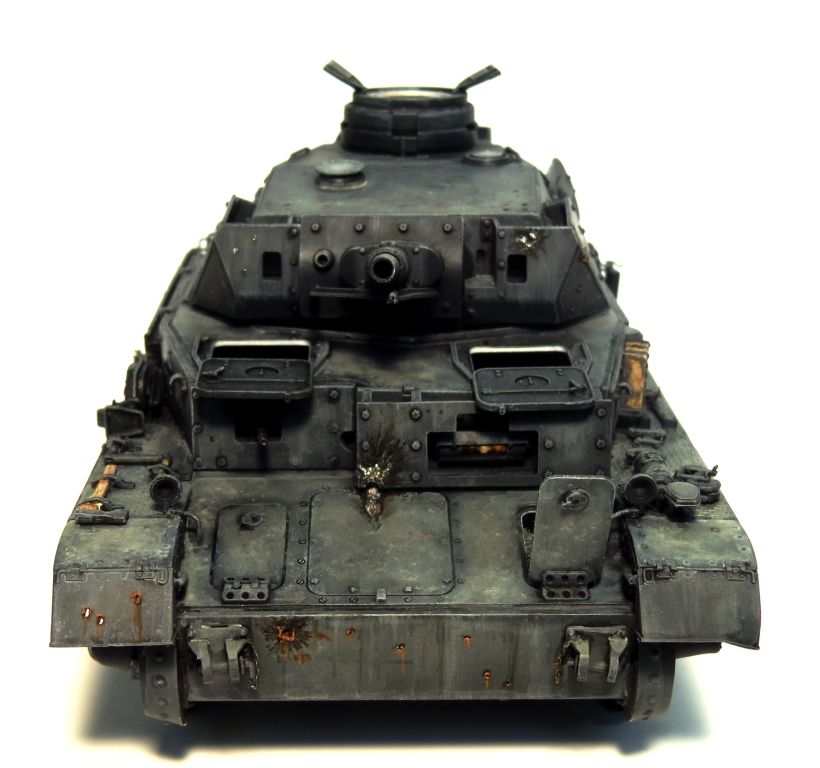
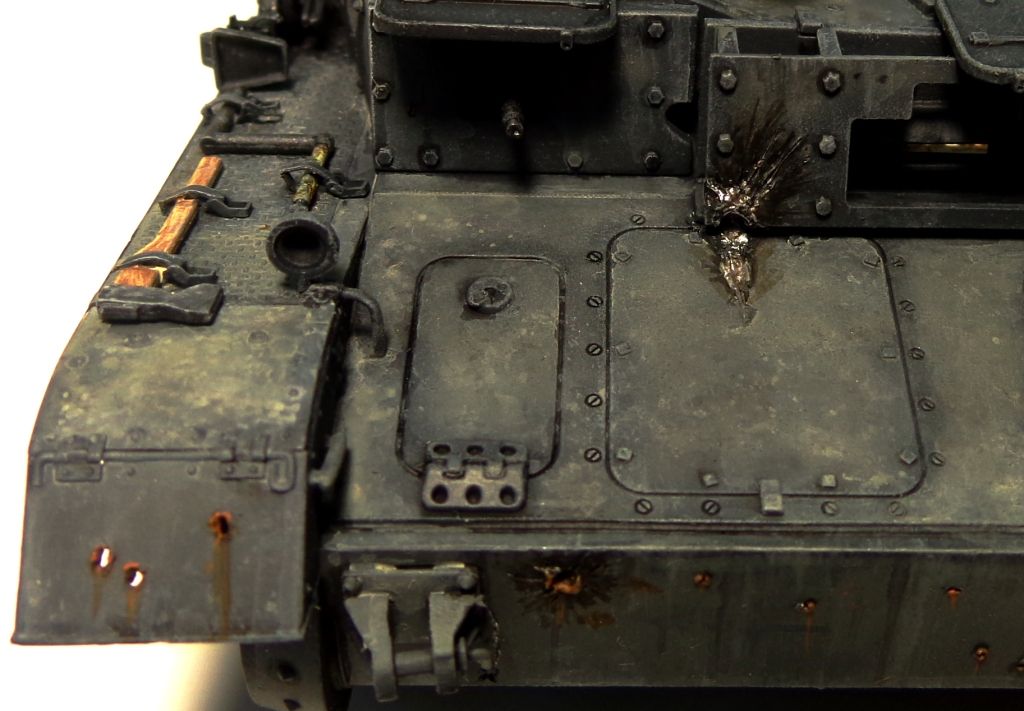
I also did some more detail painting--the shell hits, and the muffler. The muffler too, was painted with regular acrylic craft paints--Raw Umber, Orange, and Pennsylvania Clay--a reddish color. Some of the shell hits were made to look "old" with rust tones; others are "fresh".

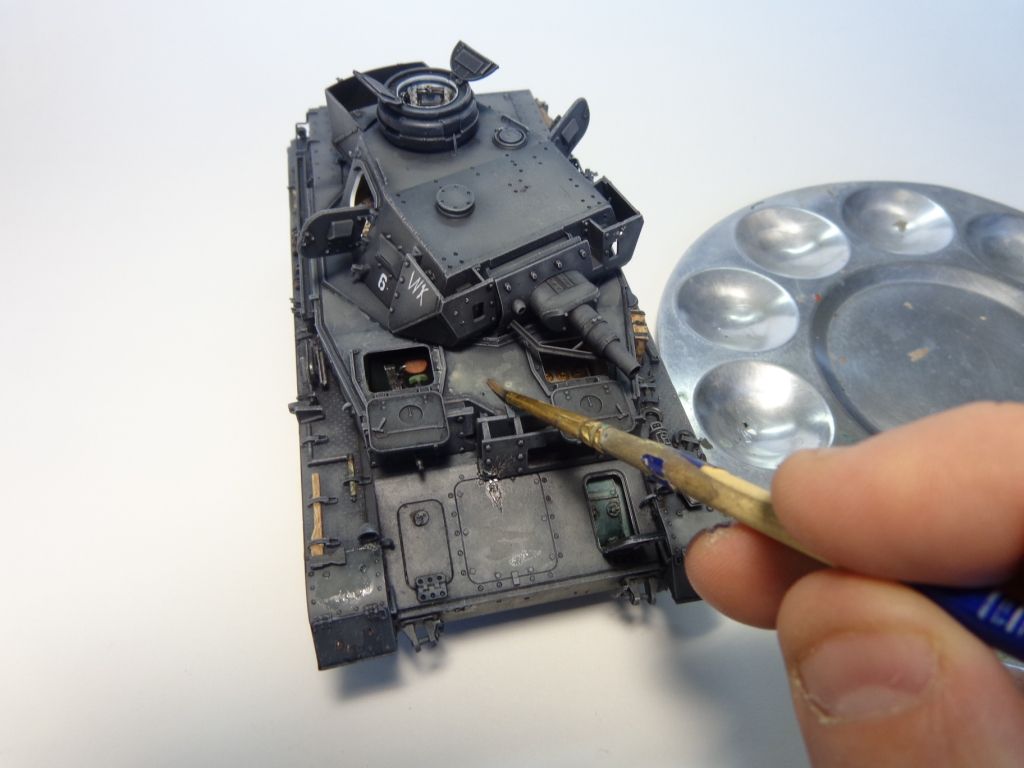
All in all, I'm pretty stoked about how this is looking so far. This is with absolutely NO oils or pigments yet. Of course, I still have to do the lower hull and tracks/wheels.  Here's some detail shots.

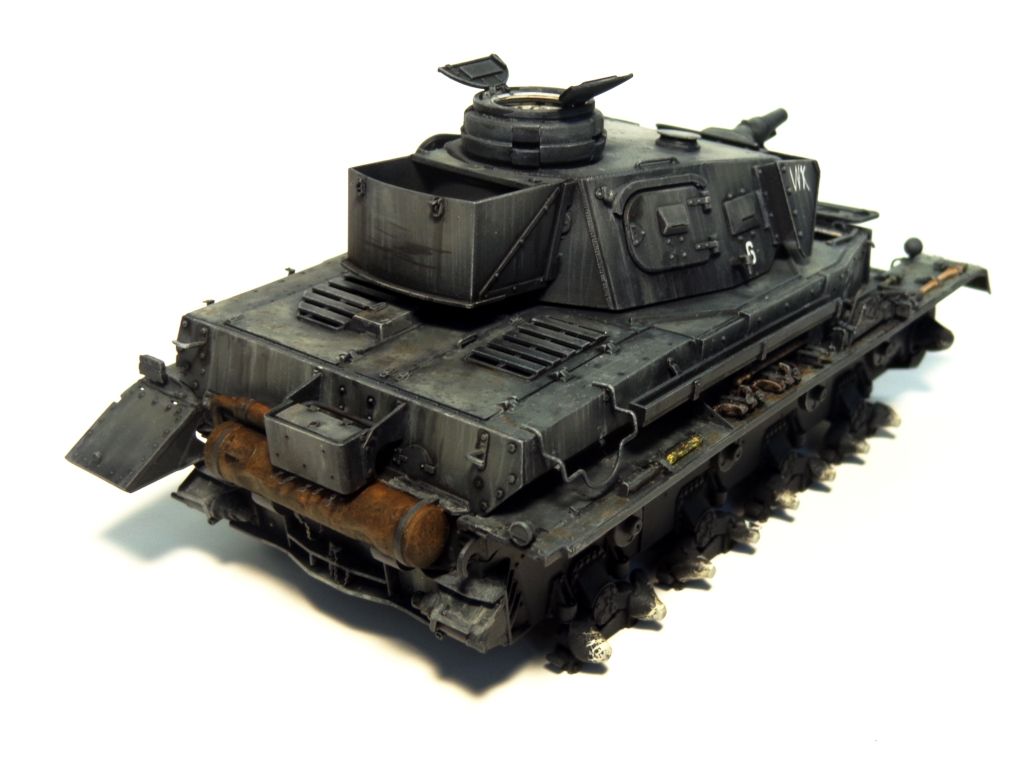
The same mixes were used to do some streaking down the sides of the vehicle.

When I do pigments and oil detailing, it should really make this finish "pop"! Thanks for looking in guys, and comments are always welcomed, pro or con! Big Smile

  • Member since
    December 2003
  • From: Colorado
Posted by psstoff995 on Sunday, March 29, 2015 9:43 PM

It's popping already! So I definitely cannot wait to see you continue to set the bar with the oils and pigments next. I think that light tan/dust color- watered down- really gave it a good "rained on" look, like it was real dirty and the rain just redistributed the old dust into new places. Maybe a little art imitating life after you used the water as thinner? Anyway- looks awesome, never would think you could put so much character into a single tone vehicle.

-Chris

US Army Infantryman

  • Member since
    July 2008
  • From: Vancouver, the "wet coast"
Posted by castelnuovo on Sunday, March 29, 2015 9:54 PM

This looks fantastic Doog. Could you please tell me how did you paint those handles on the tools and the wooden block so that they look like they are actually made of wood? Mine always look like they are just a solid brown piece.

Thanks...

  • Member since
    July 2003
  • From: On my kitchen counter top somewhere in North Carolina.
Posted by disastermaster on Monday, March 30, 2015 6:38 AM

Let's see......

 One word.........

  Nine letters.........

 http://z2.ifrm.com/11551/52/0/e5006924/e5006924.gif MARVELOUS!

Sherman-Jumbo-1945

"I was so much older then, I'm younger than that now"


JOIN OUR COMMUNITY!

Our community is FREE to join. To participate you must either login or register for an account.

SEARCH FORUMS
FREE NEWSLETTER
By signing up you may also receive reader surveys and occasional special offers. We do not sell, rent or trade our email lists. View our Privacy Policy.