SEARCH FINESCALE.COM

Enter keywords or a search phrase below:

1:35 M728 CEV Patton-Mover! WIP

26436 views
164 replies
1 rating 2 rating 3 rating 4 rating 5 rating
  • Member since
    January 2015
  • From: Tumwater, WA.
Posted by M. Brindos on Tuesday, September 22, 2015 4:14 PM

I was really hoping for more progress since you haven't updated in a while.  :D

But I know how progress can be slow at times as well.

Love what you have done so far and I really love how you are approaching this build. That dozer blade is looking sharp and I really like the drilled and pinned hinges and attachment points. They always look better than the stubs and warts. 

Looking forward to another update, Pawel.  :D

- Mike Brindos "Lost Boy"

  • Member since
    May 2009
  • From: Poland
Posted by Pawel on Sunday, October 4, 2015 1:38 PM

Hello!

Mike - this time I have some more progress for you!

The tracks are finally done:

1:35 AFV Club M728 CEV by Pawel

I also started another area - the turret. Perfect Scale Models provides you with a complete turret for the CEV. The turret has some meaningful differences in comparison to the M60A1 turret - there are the A-frame trunnions, the range-finder ports are gone, but on the rear there are large winch housings. The turret consists of two resin castings, which is nice, because it allows for hollow interior. The conversion was originally meant for the Academy kit - so it fits Academy hull and the Academy commander's cupola. I had to do a little tweaking to adapt the conversion to the AFV Club hull and AFV Club commander's cupola. On the turret base I enlarged the round opening and I glued a plastic ring in - a slice of a plastic thinner bottle had just the right diameter! As for the cupola, a ring made out of 1mm plastic plate did the trick, allowing the AFV Club cupola to snap right in:

1:35 AFV Club M728 CEV by Pawel

I plan to have two figures in the turret hatches, so it's undecided yet, how much interior I'll pack in there - Mike sure set the bar high here!

Thanks for reading and have a nice day!

Paweł

All comments and critique welcomed. Thanks for your honest opinions!

www.vietnam.net.pl

  • Member since
    January 2015
  • From: Tumwater, WA.
Posted by M. Brindos on Sunday, October 4, 2015 8:39 PM

I hope I didn't set it too high. I'm not sure how much of it will even be seen, but I do know that some of it will be seen because the lights from the driver's compartment will shine back into the turret which is why I had to put something in there.

Since you're not lighting yours up from the inside you won't be facing that issue nearly as much as I will be so in essence, you'll be able to get away with a lot less than I will.

Your hull looks fantastic and those tracks look great. I can't wait to see that turret come together. It looks amazing just sitting there without the details on it.

I'm very happy to see some progress on this build and I'm left, once again, wanting to see more lol.

Happy modelling my friend.  :)

- Mike Brindos "Lost Boy"

  • Member since
    December 2002
  • From: Valrico, FL
Posted by HeavyArty on Monday, October 5, 2015 7:29 AM

Pawel
I plan to have two figures in the turret hatches, so it's undecided yet, how much interior I'll pack in there - Mike sure set the bar high here!

I wouldn't add any of the turret interior.  With figures in the hatches, you will not be able to see any of it.  The only thing I would add details to is the commander's cupola.  With what AFV Club already provides, it should be enough.  The figures will fill the hatches and block all views into the dark turret.

Gino P. Quintiliani - Field Artillery - The KING of BATTLE!!!

Check out my Gallery: https://app.photobucket.com/u/HeavyArty

"People sleep peaceably in their beds at night only because rough men stand ready to do violence on their behalf." -- George Orwell

  • Member since
    November 2009
  • From: SW Virginia
Posted by Gamera on Monday, October 5, 2015 7:38 AM

Looks great Pawel, those tracks turned out perfect! 

"I dream in fire but work in clay." -Arthur Machen


  • Member since
    May 2009
  • From: Poland
Posted by Pawel on Monday, October 5, 2015 4:15 PM

Hello Gentlemen!

Mike - please don't worry, I'll manage! Thanks a lot for your kind words! I'd like to see some more progress here, too, and I'm working on it!

Gino - thanks a lot for the advice. I'm planning to add some detail, that will be visible through the driver's hatch - the kit supplied interior details are too nice to cover up.

Gamera - thanks, I'm glad you like 'em!

Thanks again for your comments and have a nice day

Paweł

All comments and critique welcomed. Thanks for your honest opinions!

www.vietnam.net.pl

  • Member since
    May 2009
  • From: Poland
Posted by Pawel on Sunday, October 11, 2015 2:32 PM

Hello!

Here's another update - a small one but still. I have built up the fenders - they are very nice, to the point that some of the outrigers straight OOB are better than the parts from the Eduard PE set. I heat-treated the front rubber aprons to show their softness to some extent. Again - I could have used the PE parts, but this solution is more durable. Still, the fit is pretty tight and the fenders require some dry-fitting to get right. The left-rear quarter fender is done as a separate part - that adds some work and it suggests that probably a dozer-blade equipped variant of this baby will be there sometime in the future. Anyhow, here are the photos:

1:35 AFV Club M728 CEV by Pawel

1:35 AFV Club M728 CEV by Pawel

1:35 AFV Club M728 CEV by Pawel

1:35 AFV Club M728 CEV by Pawel

Now I'm working on the turret and on the blade hydraulics. I hope you liked the photos - thanks for looking and have a nice day

Paweł

All comments and critique welcomed. Thanks for your honest opinions!

www.vietnam.net.pl

  • Member since
    January 2015
  • From: Tumwater, WA.
Posted by M. Brindos on Monday, October 12, 2015 11:44 AM

Good to know, I'll have to watch those fenders when I install them.

Looking really good Pawel! I'm trying to catch up!  :)

- Mike Brindos "Lost Boy"

  • Member since
    May 2009
  • From: Poland
Posted by Pawel on Tuesday, October 13, 2015 1:32 PM

Mike - thanks a lot and good luck with your build!

I have done some work on the turret. I have glued the two major parts with two component epoxy glue called Poxipol and filled the gaps with that and with super glue. Then I raised the turret on the ring using 0,5mm (0.02'') styrene sheet to prevent the bustle from scraping the engine deck. I also used black Milliput to correct the turret shape around the ring, using the AFV Club parts as a model. Now the turret looks like on the photos below - just waiting for a coat of primer:

1:35 AFV Club M728 CEV by Pawel

1:35 AFV Club M728 CEV by Pawel

Now I'm also working on the dozer blade raising mechanism. I hope you liked the pictures - thanks for looking and have a nice day

Paweł

All comments and critique welcomed. Thanks for your honest opinions!

www.vietnam.net.pl

  • Member since
    January 2015
  • From: Tumwater, WA.
Posted by M. Brindos on Wednesday, October 14, 2015 12:55 PM

Looking GOOD!

- Mike Brindos "Lost Boy"

  • Member since
    November 2009
  • From: SW Virginia
Posted by Gamera on Wednesday, October 14, 2015 1:52 PM

Yeap, very nice work! 

"I dream in fire but work in clay." -Arthur Machen


  • Member since
    May 2009
  • From: Poland
Posted by Pawel on Wednesday, October 14, 2015 3:54 PM

Mike, Gamera - thanks a lot and have a nice day

Paweł

All comments and critique welcomed. Thanks for your honest opinions!

www.vietnam.net.pl

  • Member since
    January 2015
  • From: Tumwater, WA.
Posted by M. Brindos on Wednesday, October 14, 2015 4:00 PM

I think it is rather smart of you to have made that turret fit the AFVC hull. That turret clearly looks like it is based off of the Tamiya turret and I know the difference between the mating surfaces between the two kits is enormous.

Just wait, in two or three more months there will be a full interior kit for this model lol. Then we'll have to build it again!  :D


- Mike Brindos "Lost Boy"

  • Member since
    May 2009
  • From: Poland
Posted by Pawel on Sunday, October 18, 2015 9:03 AM

Hello!

Mike - thanks a lot for your comment. I also considered grafting AFV Club lower turret under the resin top, but the difference in shapes was too great. This fix was not very comoplicated - hardest part was keeping it wet so as not to let the resin dust rise - and finding that plastic bottle to make the ring.

That interior kit just begs to be done - but I only need this M60 variant for my Vietnam collection.

Right now I'm working on the dozer blade and it's attachment to the hull.As I wrote before, I'm building it out of the Academy set no. 1390 - M9 Dozer Blade. This set shows the M9 blade kit as seen on the M60 dozer tanks - which means it's bolted to the tank and can be eventually removed. For completeness, let me write here, that this set doesn't have the hydraulic reservoir (that goes on the rear of the left fender) nor the hydraulic lines, that in that version run under the belly of the tank.

In the M728 there's a different setup - the blade mechanism is permanently welded to the hull and so the attachment looks different. That meant some surgery!

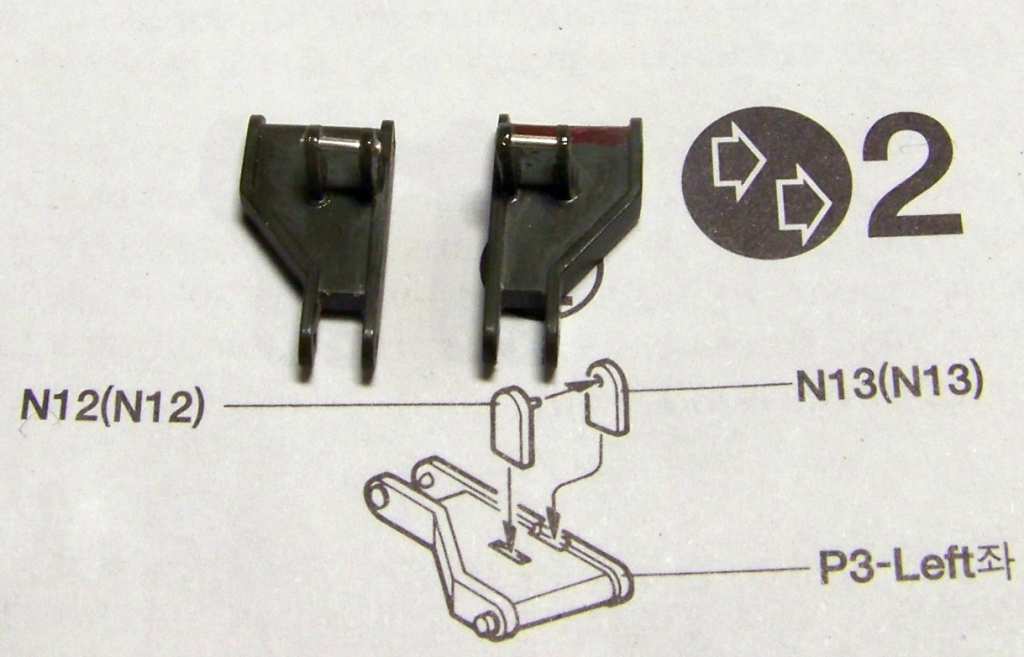
The Academy kit gives you a plate to be "bolted" to the tank. You glue the rest of the parts to this plate:

Obrazek

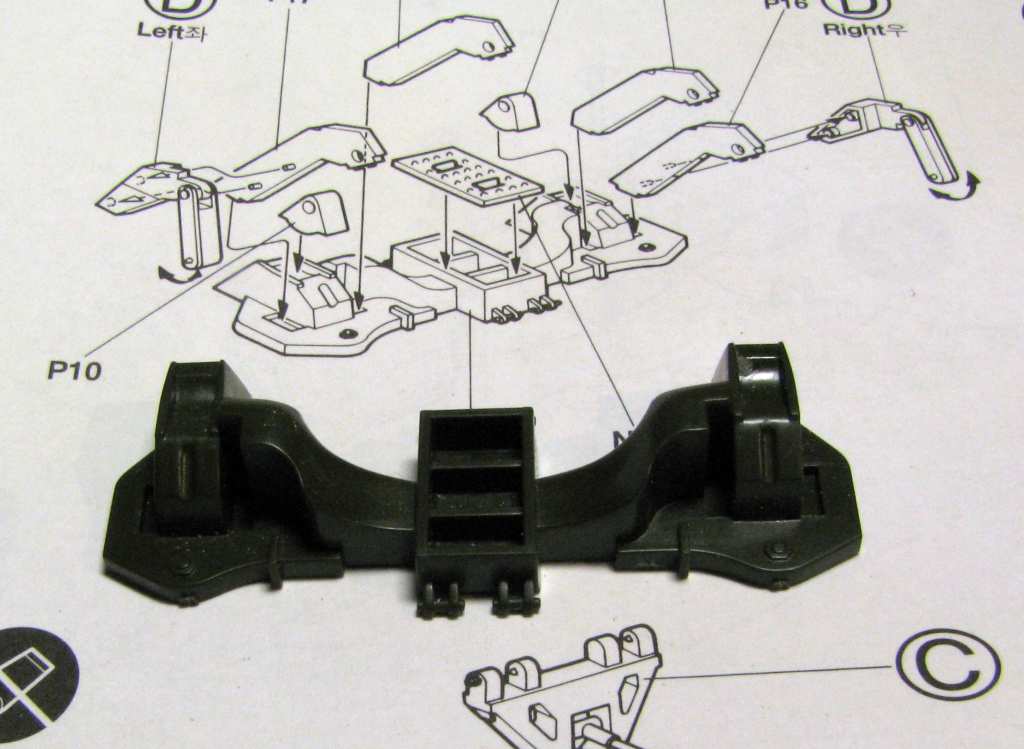
From this part I have cut two mounts and used them as a base for parts that eventually will be "welded" to the hull - here's the hydraulic actuator attachment:

Obrazek

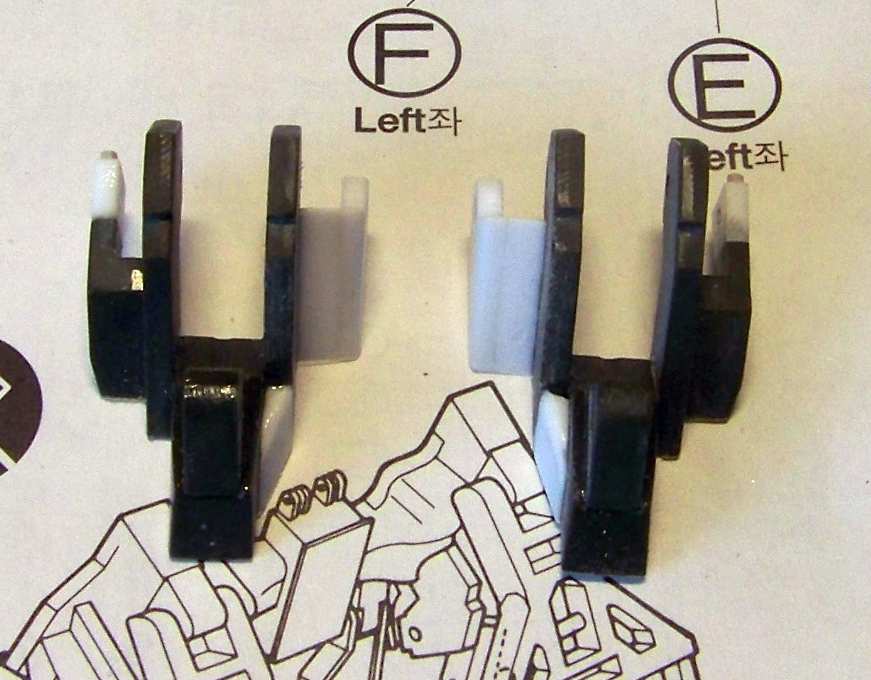
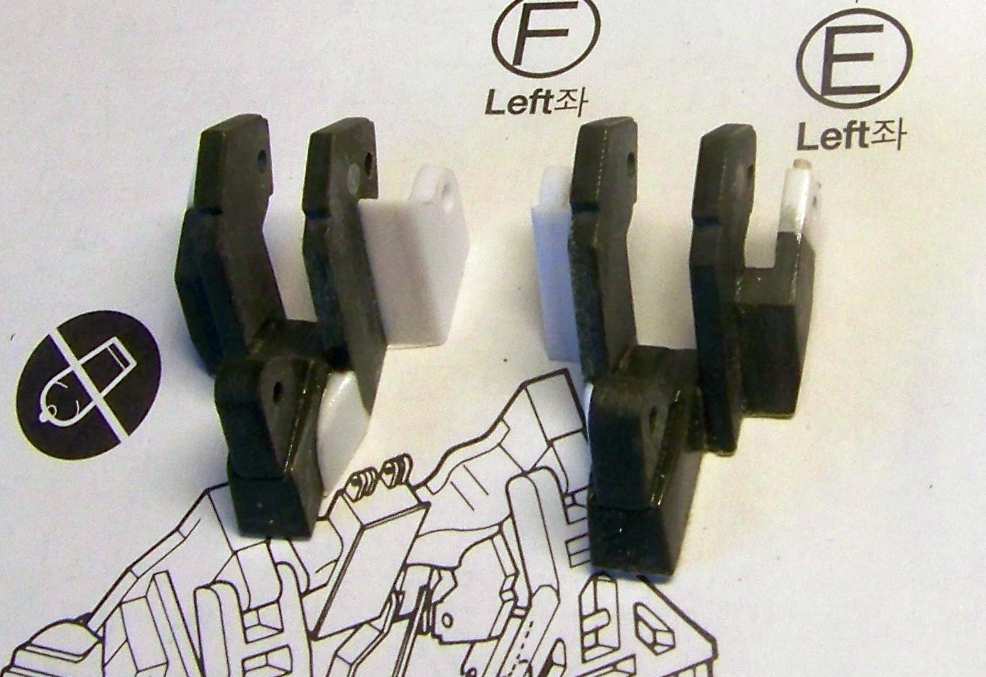
The upper arms of the blade have mounts that also attach to the subassembly above. I modified the outer mounts (top row on the photo below - on the left after my mod, on the righ OOB), and the inner mounts were scratchbuilt (bottom row):

Obrazek

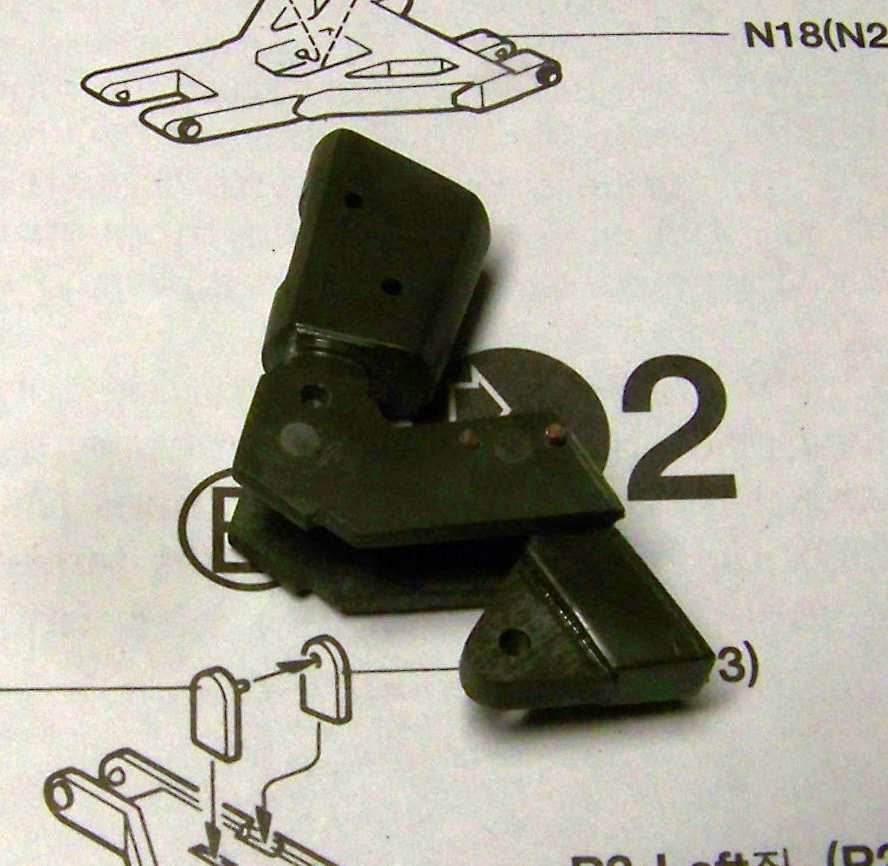
After putting them together it looks like on the photos below:

Obrazek

Obrazek

I modified the upper arms of the blade slightly:

Obrazek

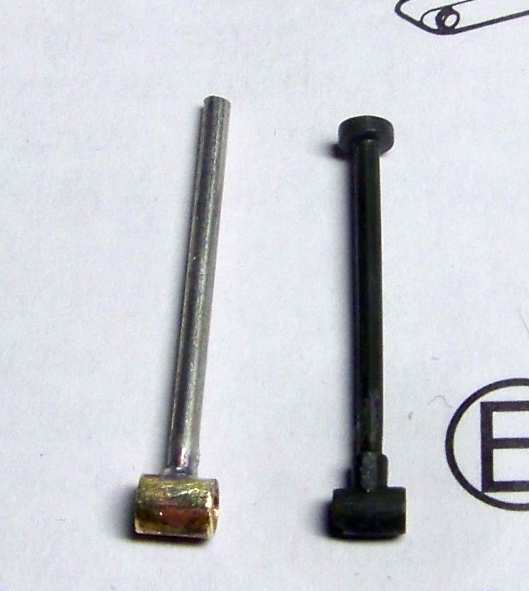
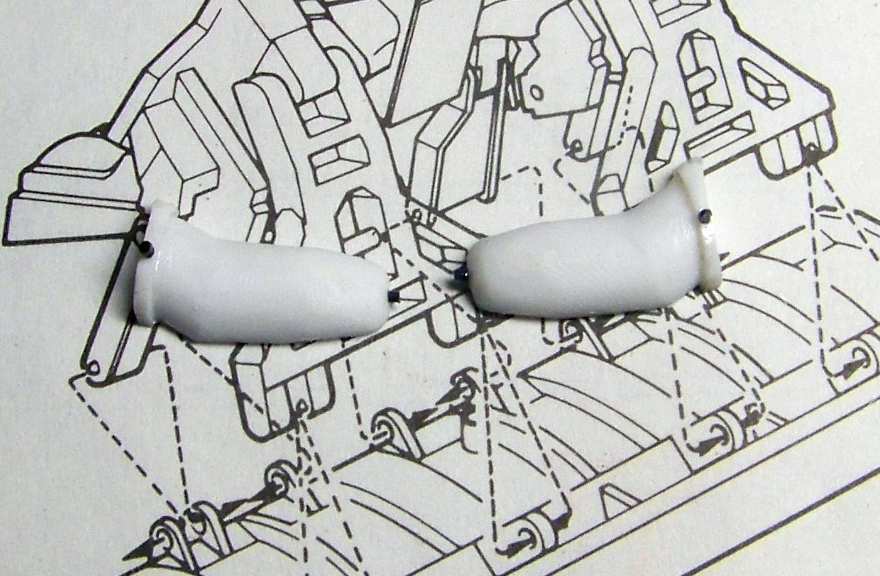
I also scratchbuilt the hydraulic actuator's rams - I soldered them using 1,5mm silver-coated wire and a little brass tube. IMO the kit parts were too thin and out of shape:

Obrazek

After assemblying the blade and it's arms it looks like this:

Obrazek

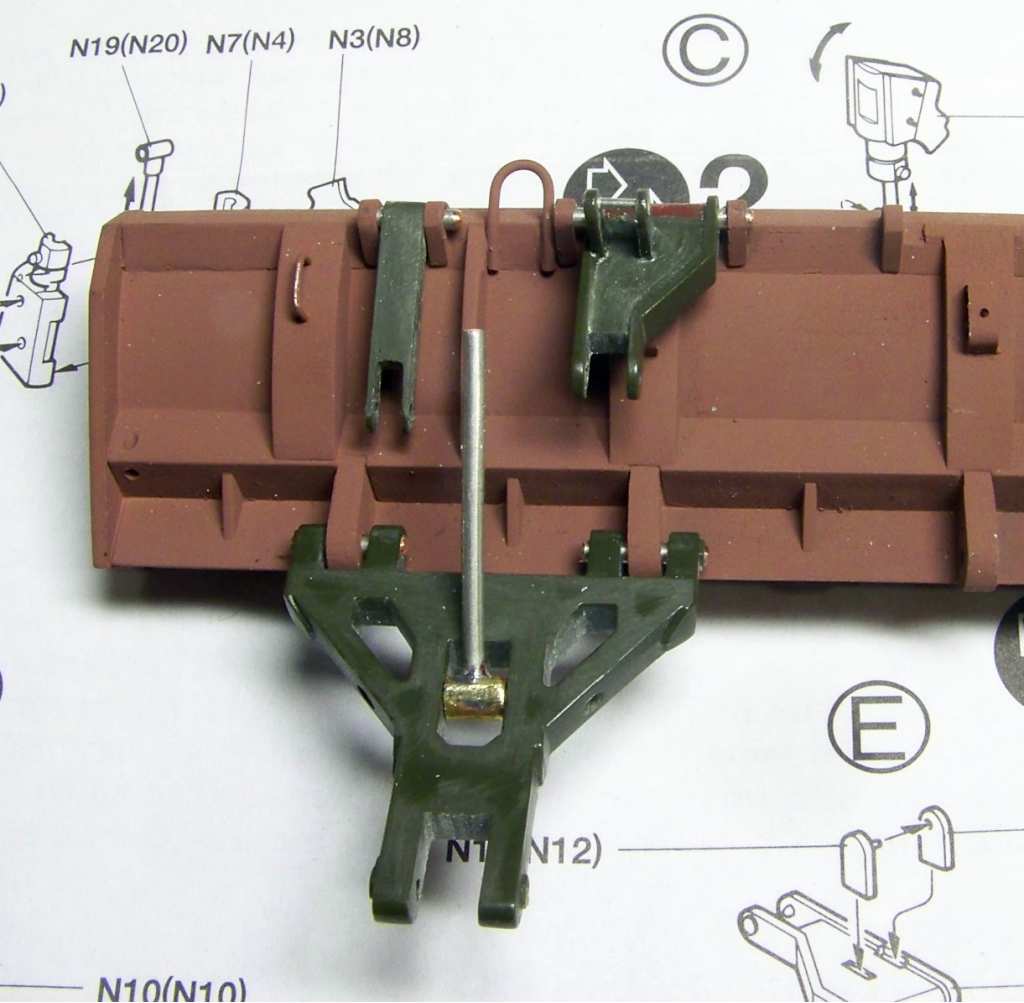
After drilling out the holes, the parts are joined using axles made out of 1,5mm wire. After adding the attachment points the blade looks like follows:

Obrazek

Obrazek

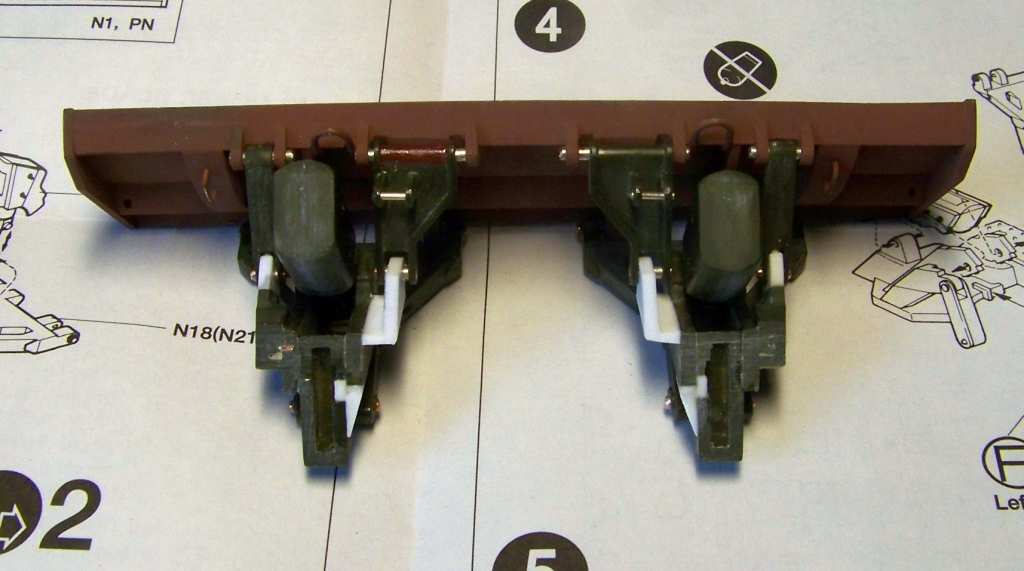
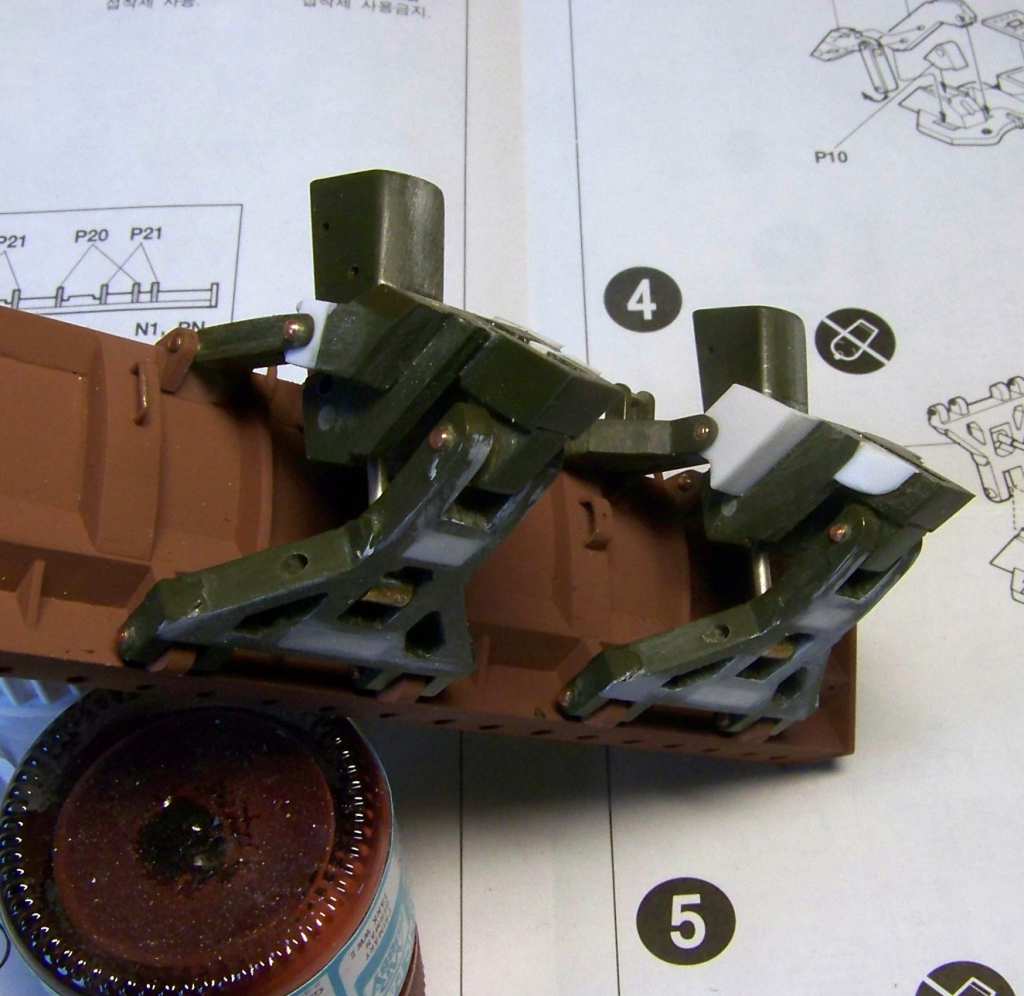
I additionally scratchbuilt the covers of the hydraulic lines:

Obrazek

I will also have to work some on the covers of the hydraulic actuators - in the M728 the blade is mounted a little closer to the hull, and so the covers have cut-outs that allow the actuators to work closer - and so my work isn't done here yet. I hope you liked it so far - thanks for reading and have a nice day

Paweł

All comments and critique welcomed. Thanks for your honest opinions!

www.vietnam.net.pl

  • Member since
    October 2011
Posted by iroquois1963 on Monday, October 19, 2015 1:22 PM
hello pawel . I am your assembly since the beginning and more ok , more that interests because I have M728 but produced by a store in france , AZIMUT , it's a kitbash . the work which you make on the blade pleases me a lot and is going to allow me not to make error , seen that for me too will be a vietnam version . phil .
  • Member since
    May 2009
  • From: Poland
Posted by Pawel on Monday, October 19, 2015 3:40 PM

Hello Phil!

If I can help you any with my WIP, I'm very glad. Thanks a lot for your comment and good luck with your builds, have a nice day

Paweł

All comments and critique welcomed. Thanks for your honest opinions!

www.vietnam.net.pl

  • Member since
    November 2009
  • From: SW Virginia
Posted by Gamera on Tuesday, October 20, 2015 7:26 AM

Looking good Pawel! I think I'd commented here some time back about picking up the regular M60 MBT with the dozer blade. The guys clued me in on how much stuff the kit didn't provide and how much scratchbuilding of the hydralics etc would be required. Love what you're doing here. 

"I dream in fire but work in clay." -Arthur Machen


  • Member since
    October 2015
  • From: Tacoma, WA.
Posted by M60_ tanker on Tuesday, October 20, 2015 8:05 PM

Pawl, you are doing an outstanding job an this. In Mike's M60 thread, you were talking about the sump pump. This was an addition that was added on the RISE version. If I read you posts right, you are building a Vietnam version. It would not have been on that year of vehicle. I hope this answers your question.

Nothing is impossible as long as somebody else has to do it.

  • Member since
    September 2006
  • From: Dripping Springs, TX, USA
Posted by RBaer on Wednesday, October 21, 2015 10:51 AM

Outstanding Pawel, outstanding!

I'm guessing that AFV Club has several versions planned, judging by what you're pointed about about the kit's engineering, and the locator pips that Mike noticed on the right front fender, which look like they could be for IDF tent brackets.

Apprentice rivet counter.

  • Member since
    January 2015
  • From: Tumwater, WA.
Posted by M. Brindos on Wednesday, October 21, 2015 12:33 PM

WOW, Pawel!!

I've seen some detailed Dozer conversions before, but this is phenominal workmanship! Seriously impressed with your conversion so far, buddy!! :D

- Mike Brindos "Lost Boy"

  • Member since
    May 2009
  • From: Poland
Posted by Pawel on Thursday, October 22, 2015 3:35 PM

Hello everybody!

Gamera - like I wrote, you have to watch for the differences between the permanent mount of the blade like here, and one that can be put and then removed from a regular tank - such setup would require the hydraulic tank and the piping, that the kit doesn't provide. What the kit doesn't give you neither, are the emergency lifting cables - I'm going to add them at the end, they are needed for both variants. And thanks for your kind words!

Ray - thanks a lot for your comment and for your kind words. Yes, that's right, I'm going fo a Vietnam - era vehicle. Unfortunately I already opened the hole in the upper hull, as per the instructions - now I'm going to have to seal it back up.

RBaer - thanks a lot! I guess it would only make sense, looking at how popular the M60 was all over the world and how many variants it had.

Mike - thank you very much, I really appreciate it! your build of the M60 also helps me a lot!

And now for a little update. Like I wrote before, I had to cut notches in the hydraulic cylinders so they can operate - here's a before-after photo:

1:35 AFV Clup M728 CEV by Pawel

After putting everything together the tank looks like this:

1:35 AFV Clup M728 CEV by Pawel

The red arrow points to the place, where the kit has you put a sump pump outlet - but, as Ray wrote, on my machine it shouldn't be there - so I already plugged it with a piece of stretched sprue. As soon as the glue sets, I'm going to smooth it a little. The yellow arrows point to the attachments that should be engaged by hooks for the blade to be secured in the "up" position. Right now they are too far away, despite the blade being fully elevated. The secont photo shows you why:

1:35 AFV Clup M728 CEV by Pawel

The blade lower arms touch the hydraulic actuator's mounts in the place indicated by the red arrow. There's just too much material there - I'm going to sand them down a little, to allow the blade to go higher. Then the locking mechanism will have more correct geometry.

So now I'm off to work on this little detail - thanks for reading and thanks again for your comments - have a nice day

Paweł

All comments and critique welcomed. Thanks for your honest opinions!

www.vietnam.net.pl

  • Member since
    January 2015
  • From: Tumwater, WA.
Posted by M. Brindos on Thursday, October 22, 2015 4:12 PM

First, this is just blowing my mind with all the work you're putting into getting this dozer blade correct.

Second, since the pump isn't supposed to be on your vehicle either you'll need to fill in the depression entirely as it shouldn't be there unless the pump is installed. Look to my build for a visual reference, but I think you know what I'm saying.

Keep updating! I feel like you and I are in our own little group build lol. I'm learning from you just as much, even if I'm not installing a dozer blade.

One question I have about your build however is what final paint scheme do you have planned for your build? Did they utilize camo in Viet Nam on the M-60A1? What time frame do you have in mind?

- Mike Brindos "Lost Boy"

  • Member since
    January 2015
  • From: Tumwater, WA.
Posted by M. Brindos on Thursday, October 22, 2015 4:17 PM

RBaer

Outstanding Pawel, outstanding!

I'm guessing that AFV Club has several versions planned, judging by what you're pointed about about the kit's engineering, and the locator pips that Mike noticed on the right front fender, which look like they could be for IDF tent brackets.


Oh, yeah! They are all over the model actually. The turret is absolutely covered in them. Removing them while keeping the cast texture intact has only been a minor task. Removing them from the fenders is easy.

If you've got any varient in mind this is definately the kit to use as a base. You will save yourself a lot of money on AM details. As you can see from both of our builds and the one over on Armorama, this kit is stunning in it's attention to detail.

I've actually prefered the kit parts over AM PE!

- Mike Brindos "Lost Boy"

  • Member since
    May 2009
  • From: Poland
Posted by Pawel on Friday, October 23, 2015 2:05 PM

Mike - thanks a lot for your kind words!

The thing with the pump - I'm not so sure about that. After magnifying some photos of the Vietnam-CEVs I thought I've seen those plates blanking off the hole. But then I've found a photo of an M60 A-nothin' on PrimePortal:

Prime Portal - M60 A-nothin' walk around

So I figure that hole has been there for a long time, before the RISE mod installed that nozzle in it. What do you think?

That little group build is a mighty good thing - I've already got lots of good info here, that makes my build much better than it would have been otherwise.

To answer your question - I'm going for an OD tank with white stars - but one that has it's share of the red Vietnamese mud. I'm going for a vehicle of the 919th engineers that served with the 11th ACR - the Blackhorse regiment around Saigon. That would be around 1969.

And I think you're right - like I wrote before, it's hard to put aftermarket stuff on this kit, because the kit parts tend to be better. That's also why I wanted to polish the blade a bit - so that the detail level is consistent with the rest of the kit.

Good luck with your builds and have a nice day

Paweł

All comments and critique welcomed. Thanks for your honest opinions!

www.vietnam.net.pl

  • Member since
    October 2015
  • From: Tacoma, WA.
Posted by M60_ tanker on Friday, October 23, 2015 3:29 PM

Pawel
So I figure that hole has been there for a long time, before the RISE mod installed that nozzle in it. What do you think?

Pawl, as far as I can find out. All the M60's were updated around the same time the M48A3's were modified to A5. If you look around the web, you will see most of the M60's also have the top loading air filters. You are on the right track. The only one I am aware of that is not modified is the M60 located at the Ft. lewis Military museum. It was mothballed before the mods were added.

Nothing is impossible as long as somebody else has to do it.

  • Member since
    January 2015
  • From: Tumwater, WA.
Posted by M. Brindos on Friday, October 23, 2015 3:40 PM

Well that picture certainly shows where the bilge pump is located. hmmm.......

Only thing I can say is that it is YOUR build, mate. You get to make the decision of whether you keep it or not. I only know what I've been told and I don't have any actual papers or diagrams with dates on them to show me otherwise.

I doubt the internet will be able to give us that information anyways. There is a lot of data missing on cold war era tanks of this type.

I think that if you want to show it being there, there is not much evidence to say you can't lol.

I am doubly uncertain of the CEV and assume that most of what you've seen has probably been M-60A1 RISE with dozer attachments that have had the bilge pump at one time or another, but I'm just ASSUMING.

Pawel, buddy, I really don't know. Honestly, I think you can get away with it either way.

- Mike Brindos "Lost Boy"

  • Member since
    May 2009
  • From: Poland
Posted by Pawel on Saturday, October 24, 2015 3:32 PM

Hello!

I actually like that part of the hobby - research - or playing Sherlock Holmes :D. I checked out a book - Tankograd Publishing on the M60 - it's a great photo album, especially for the US Army Europe pictures, so I heartly recommend it. And my book shows that little plate blocking off the pump nozzle on many tanks - also on the M60s and early M60A1s. But interestingly it also shows the pump nozzle on an early M60A1 equipped with that big tower that allowed the tank to cross a river on it's bottom. So I'm concluding that pump nozzle should be there on tanks equipped for fording. On all others there should be this diamond-shaped plate with two bolts.

I also have a small update - at last I added those emergency lift cables to the rear of the dozer blade. Those cables could be hooked around the track end connectors, and then backing up the tank also raised the blade, should the hydraulics fail. On my model they look like this:

1:35 AFV Club M728 by Pawel

I used 0,6mm copper "rope" from a Polish company called Eureka XXL. The yellow "pipes" are pieces of insulation taken from a telephone wire. There's still some work on the front of the hull, so I'm on it - thanks for reading and have a nice day

Paweł

All comments and critique welcomed. Thanks for your honest opinions!

www.vietnam.net.pl

  • Member since
    January 2015
  • From: Tumwater, WA.
Posted by M. Brindos on Monday, October 26, 2015 6:47 PM

That looks fantastic, Pawel! Those "ropes" look perfect and that insulation looks perfect as well.

Nice work, my friend. Really enjoying this!

- Mike Brindos "Lost Boy"

  • Member since
    May 2009
  • From: Poland
Posted by Pawel on Saturday, October 31, 2015 1:52 PM

Hello!

Mike - Thanks a lot for your comments and for your kind words!

I have another small update - I put all of the hardware necessary to mount the blade on the lower front armor, plus the two relocated towing shackles. All of the parts were dressed up with weld seams I made out of stretched sprue, dipped in lacquer thinner for a few minutes, then put in place and shaped with a tip of a scalpel. Now the lower front armor plate looks like this:

1:35 AFV Club M728 CEV by Pawel

Thanks for looking and have a nice day

Paweł

All comments and critique welcomed. Thanks for your honest opinions!

www.vietnam.net.pl

  • Member since
    January 2015
  • From: Tumwater, WA.
Posted by M. Brindos on Saturday, October 31, 2015 3:02 PM

I really like the way those welds look, Pawel!

M-60 tanker and I will be headed to the Ft. Lewis armor museum this next friday. They have a 728 parked there and we plan on taking a crap load of pictures!

We'll be focussing on the 728 for you, and the M-60A1, and the M-60 slick parked there as well.  :D

Prepare for lots of pictures!


- Mike Brindos "Lost Boy"

JOIN OUR COMMUNITY!

Our community is FREE to join. To participate you must either login or register for an account.

SEARCH FORUMS
FREE NEWSLETTER
By signing up you may also receive reader surveys and occasional special offers. We do not sell, rent or trade our email lists. View our Privacy Policy.