SEARCH FINESCALE.COM

Enter keywords or a search phrase below:

1:35 M728 CEV Patton-Mover! WIP

26432 views
164 replies
1 rating 2 rating 3 rating 4 rating 5 rating
  • Member since
    May 2009
  • From: Poland
Posted by Pawel on Saturday, October 31, 2015 4:10 PM

Mike, that sounds great. You can never get enough of good photo references.

By the way, I found a very nice site with lots of free scanned TMs:

http://www.liberatedmanuals.com/

They have lots of great info on the CEV, unfortunately I coudn't find much on the M60.

I wish you and Ray have a good time at Ft. Lewis!

Paweł

All comments and critique welcomed. Thanks for your honest opinions!

www.vietnam.net.pl

  • Member since
    January 2015
  • From: Tumwater, WA.
Posted by M. Brindos on Saturday, October 31, 2015 5:49 PM

We will! And we'll bring back as many pictures of everything as we can lol.

If it will help us all model better, then I'll be happy. :)

- Mike Brindos "Lost Boy"

  • Member since
    May 2009
  • From: Poland
Posted by Pawel on Sunday, November 29, 2015 6:21 AM

Hello!

It's been a long time, but now I've got a nice update for you!

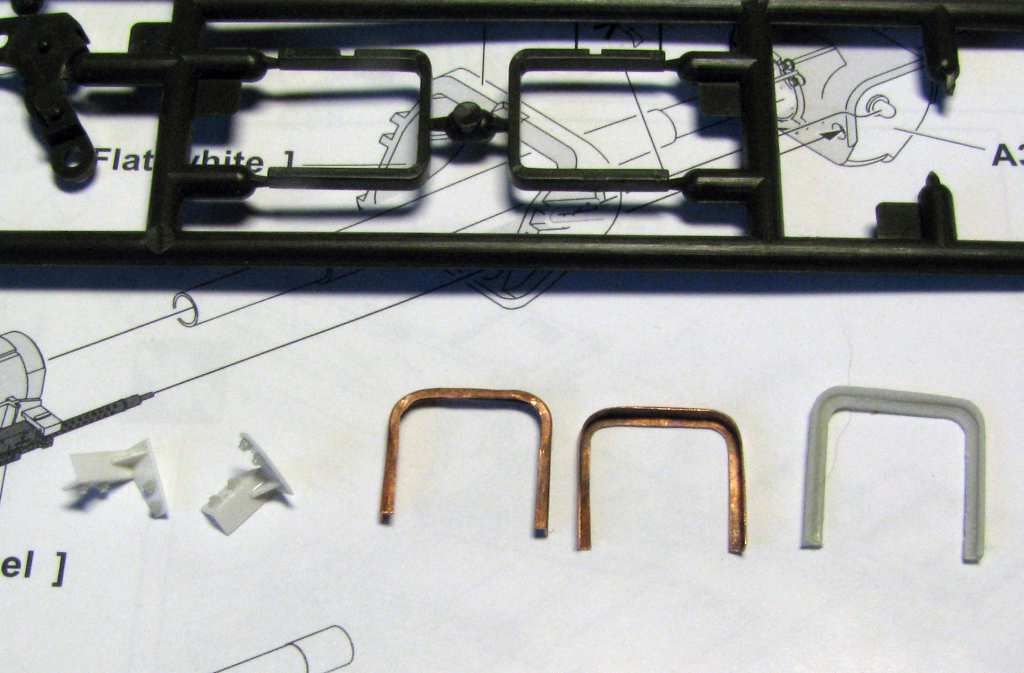
I've been working on the details on the glacis plate. First thing I tackled were the headlights' brush guards. I had two sets of those - one from the Academy dozer blade set, other from the Perfect Scale resin set. I didn't really like any of them - they were too thick and the Academy one was too narrow, and the Perfect Scale one too wide. So I went on to make my own out of copper sheet. It's a rather complex bend, so I heat-treated the copper as a first thing, to make it softer. I also made a jig out of a piece of wood. The parts turned out quite OK, as can be seen on the photo below. On it, we've got the Academy parts (on the sprue, green), Perfect Scale parts (grey resin) and my parts (copper). There are also fittings for the brush guards, that I scratch built out of styrene sheet:

1:35 AFV Club M728 CEV by Pawel

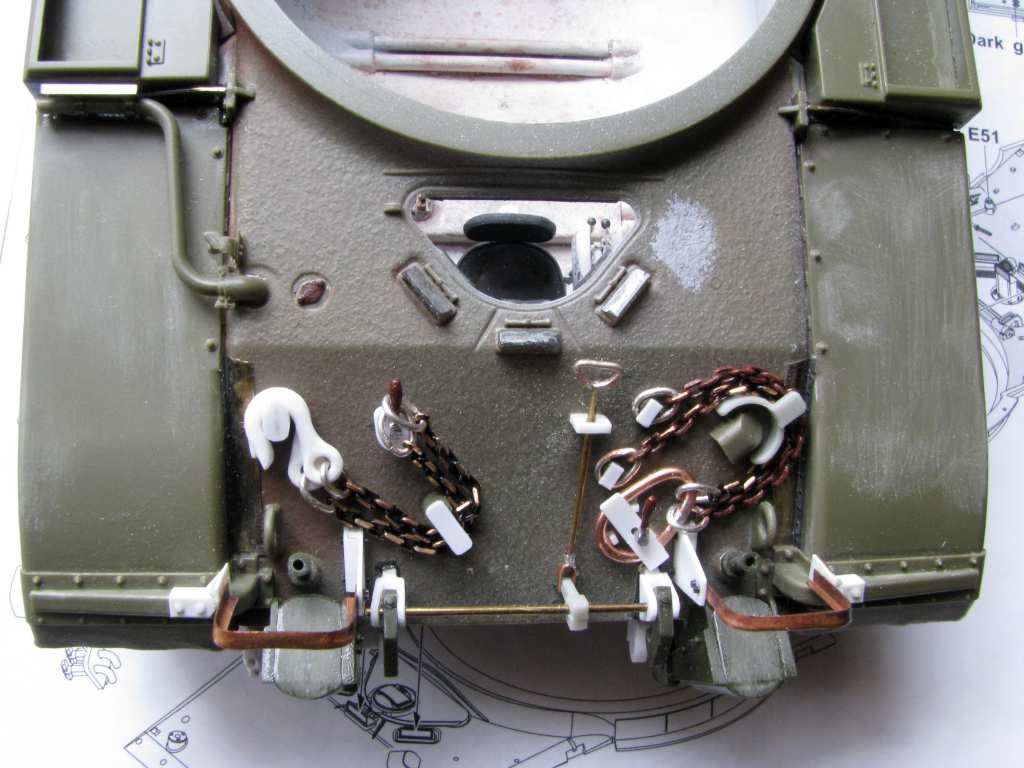
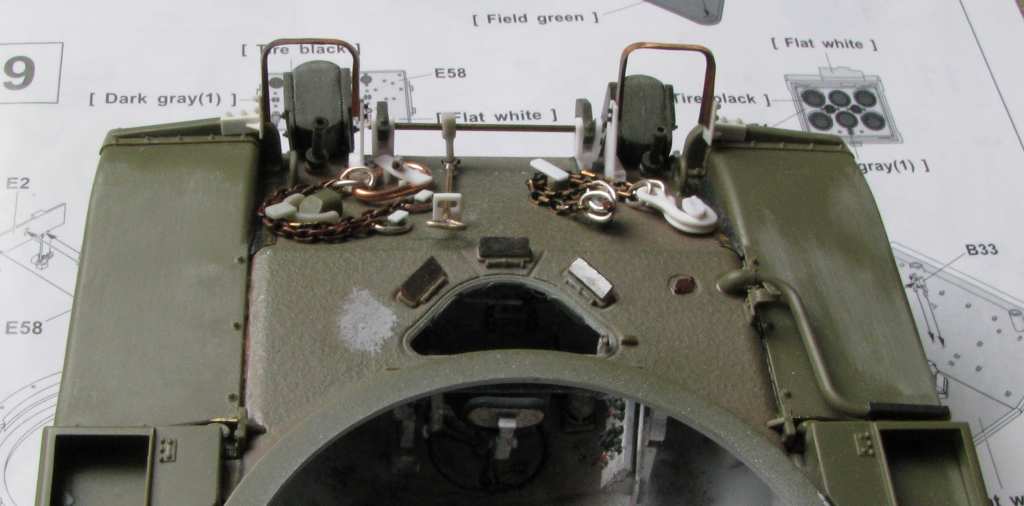
After this was done I had to scratchbuild a lot more of the details - like the mounts for the hooks that hold the blade in the stowed position, their actuating mechanism, the chains to be stowed on the glacis and the hooks to hang them on. What's interesting - the AFV Club glacis has some holes prepared in it, that show you the exact locations of those hooks - for me that's a give away they are going to issue this kit as a CEV - probably right after I finish mine...

I used one chain hook and a link of the blade stowing mechanism from the Perfect Scale set, and I also took the headlight bases from the Academy set, although I had to shorten them. I'm keeping the AFV Club headlights themselves - they are just beautiful. I got the chain from a cheap and crappy piece of jewellery that I bought while shopping with my woman - you have to keep your eyes open for modelling supplies at all times! I also used some Eduard PE. The pars that cover the seam between the hull and the fenders need a really complcated bend! In the end it all looks like on the photos below:

1:35 AFV Club M728 CEV by Pawel

1:35 AFV Club M728 CEV by Pawel

1:35 AFV Club M728 CEV by Pawel

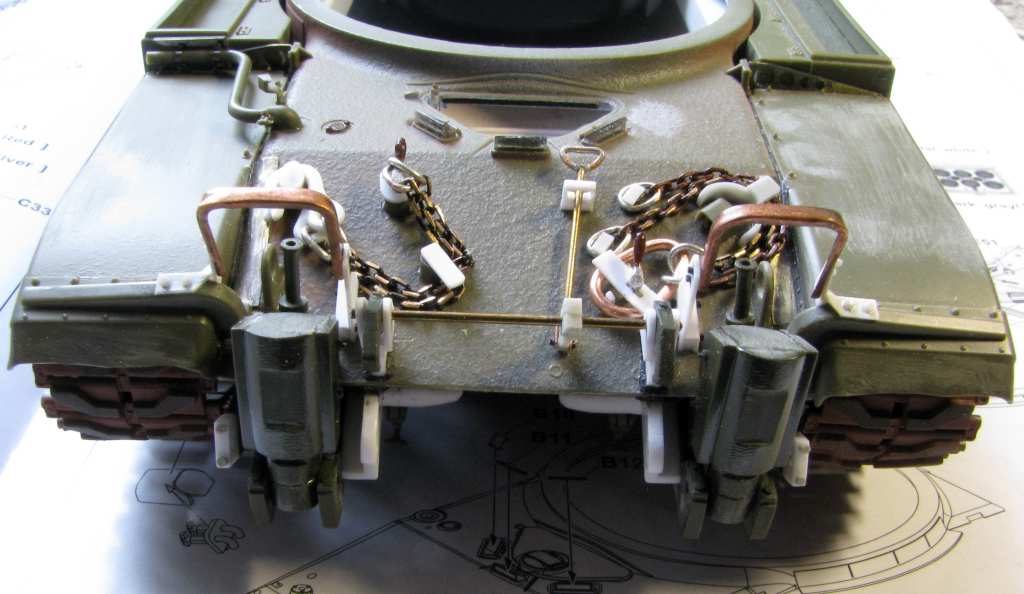
Sorry for the crooked handle of the blade stowing mechanism - it's not glued in place yet.

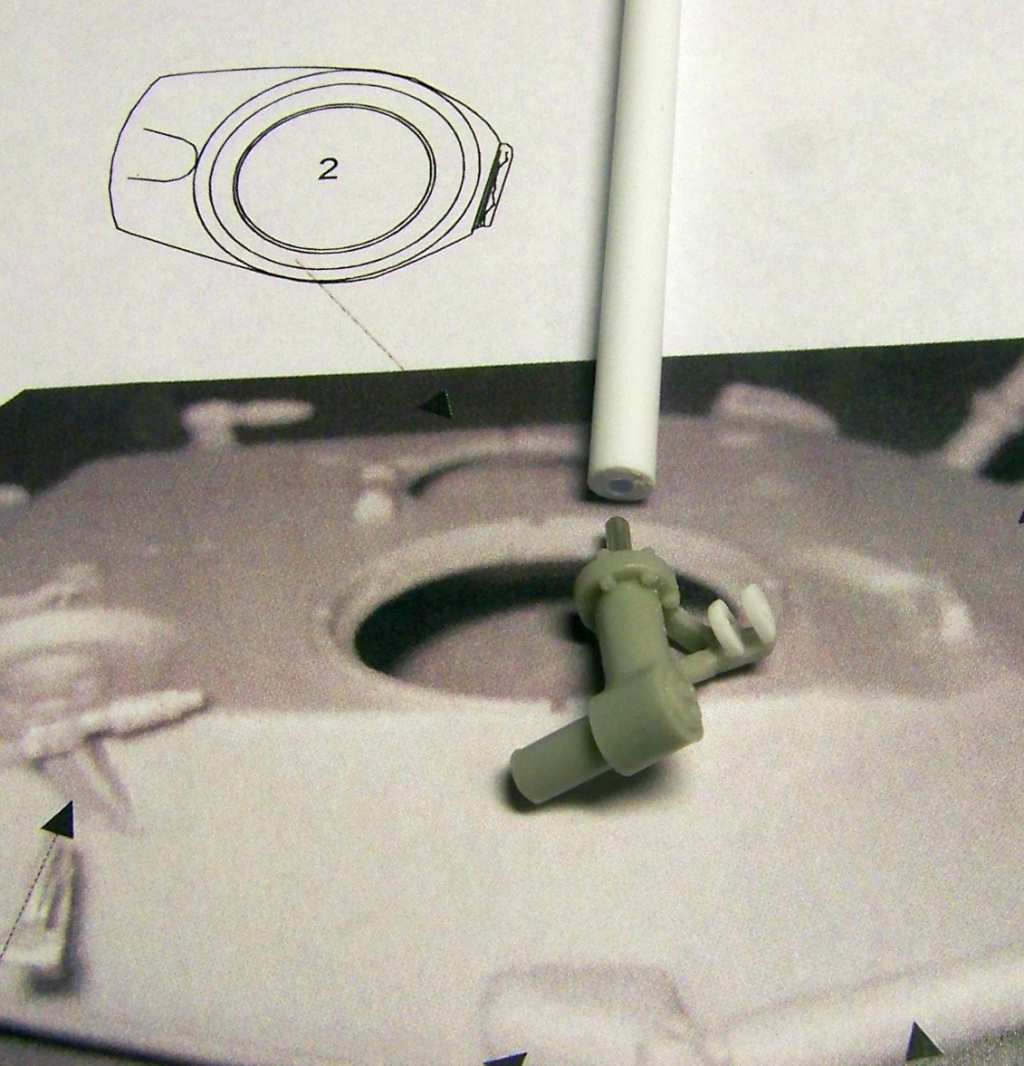
I also went on to build the A-frame boom. Out of the box, from the Perfect Scale kit, you get a part looking like that:

1:35 AFV Club M728 CEV by Pawel

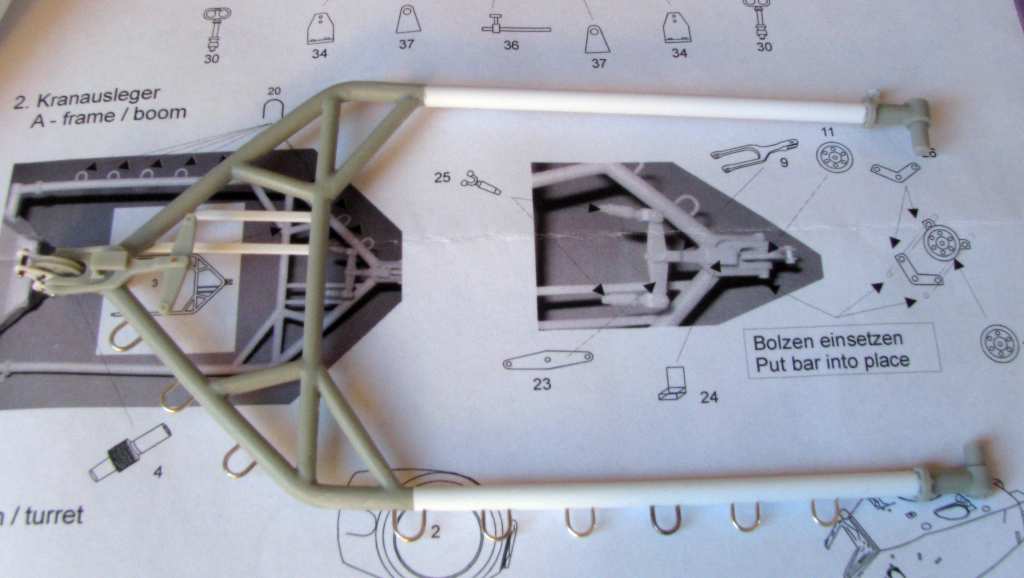
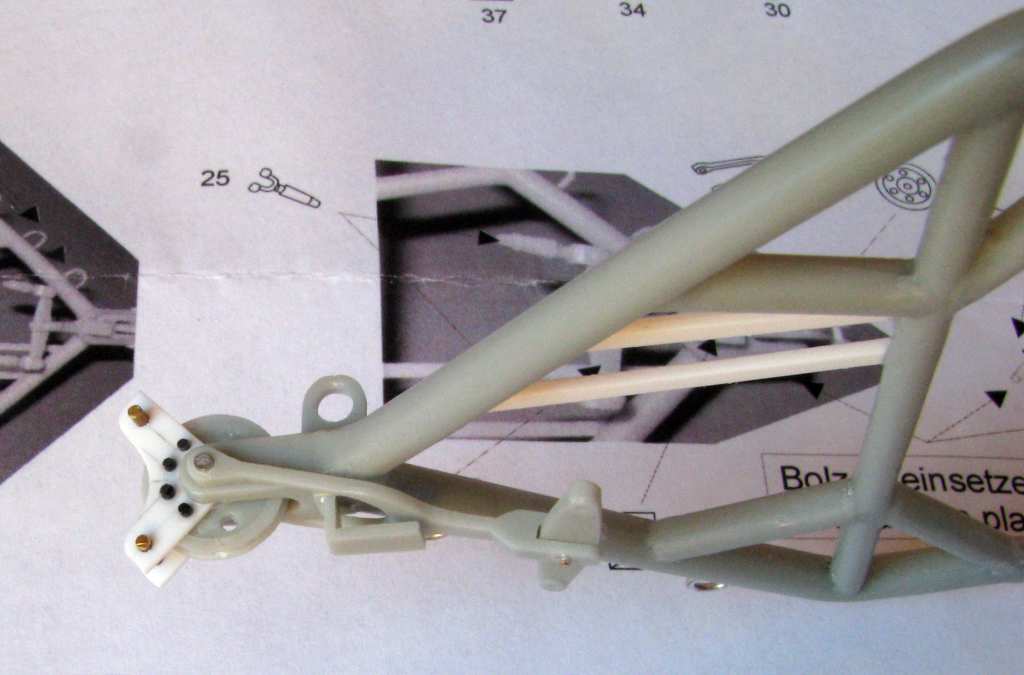
It had a slight bend, so I decided to replace the straight parts with a right diameter styrene rod. That saved me some bending, and also made the parts stronger. I also had to repair some parts, as the got damaged in transport and storage - like this hydraulic cylinder attachment:

1:35 AFV Club M728 CEV by Pawel

Now the A-Frame boom looks like on the photo below. I replaced some resin parts that I didn't like with wire or styrene sheet - they are silver or white on the photos:

1:35 AFV Club M728 CEV by Pawel

1:35 AFV Club M728 CEV by Pawel

Now I'm going to concentrate on outfitting the turret. Thanks for reading and I hope you liked it - good luck with your builds and have a nice day

Paweł

All comments and critique welcomed. Thanks for your honest opinions!

www.vietnam.net.pl

  • Member since
    December 2002
  • From: Valrico, FL
Posted by HeavyArty on Sunday, November 29, 2015 8:20 AM

Looking good.  Keep at it, it will all come together in the end.  Good job so far.

Gino P. Quintiliani - Field Artillery - The KING of BATTLE!!!

Check out my Gallery: https://app.photobucket.com/u/HeavyArty

"People sleep peaceably in their beds at night only because rough men stand ready to do violence on their behalf." -- George Orwell

  • Member since
    May 2009
  • From: Poland
Posted by Pawel on Sunday, November 29, 2015 2:42 PM

Hello Gino,

thanks a lot for your comment and for your kind words. I plan to do exactly as you wrote! Good luck with your builds and have a nice day

Paweł

All comments and critique welcomed. Thanks for your honest opinions!

www.vietnam.net.pl

  • Member since
    November 2009
  • From: SW Virginia
Posted by Gamera on Sunday, November 29, 2015 5:05 PM

You're making great progress there Pawel!

"I dream in fire but work in clay." -Arthur Machen


  • Member since
    May 2009
  • From: Poland
Posted by Pawel on Monday, November 30, 2015 2:33 PM

Thanks a lot, Gamera!

All comments and critique welcomed. Thanks for your honest opinions!

www.vietnam.net.pl

  • Member since
    January 2006
  • From: California
Posted by SprueOne on Monday, November 30, 2015 8:48 PM

Nice mods and adjustments. Excellent details


Anyone with a good car don't need to be justified - Hazel Motes


Iron Rails 2015 by Wayne Cassell Weekend Madness sprueone

  • Member since
    January 2015
  • From: Tumwater, WA.
Posted by M. Brindos on Saturday, December 12, 2015 6:30 PM

Impressive as usual  :D

I can't wait to see this one finished. Oh, and you're probably correct, they'll release the full CEV kit as soon as you're finished lol. That's the way it works!  LOL

- Mike Brindos "Lost Boy"

  • Member since
    February 2010
  • From: Maine
Posted by Stage_Left on Sunday, December 13, 2015 6:44 PM

Pawel- I haven't been around much lately, but.....exceptional work! Most impressive!

Dave

  • Member since
    May 2009
  • From: Poland
Posted by Pawel on Monday, December 14, 2015 3:47 PM

Mike, Dave - thanks a lot! It's good to see you guys back!

I can't wait to finish this baby neither, then again I don't like to rush things. And Mike - the way you set the bar high on the interior, I wouldn't want to skimp here neither!

Thanks a lot for your comments and have a nice day

Paweł

All comments and critique welcomed. Thanks for your honest opinions!

www.vietnam.net.pl

  • Member since
    January 2007
Posted by the doog on Tuesday, December 15, 2015 1:52 PM

Your attention to detail and competency in modeling is just off-the-charts, Pawel!

You're the kind of modeler that makes me nervous to post my own stuff, lol.

SUPERBLY done! Yes

  • Member since
    May 2009
  • From: Poland
Posted by Pawel on Tuesday, December 15, 2015 3:10 PM

Hello Karl!

Thanks a lot for your kind words - they mean a lot to me!

Now I'm in turn nervous to post more photos, just to live up to the expectations!

Anyhow, here we come - I'm working on the commander's cupola. It's top part is molded clear, to aid the modeller in showing it's "windows". In order to do it right, I first masked the viewing ports from inside, then painted three layers of paint: black (Gunze), gray and white (Tamiya spray can primers). The black layer is to be viewed from the outside, the gray is for better coverage and the white is the intended interior colour. Inside the cupola I added a scratchbuilt MG ammo tray (inspiration: mr. Brindos!) and the protective cushions (sheet styrene, painted Humbrol 32 gray). There is also the kit-supplied IR/natural light sight - a beautiful detail. The kit also has a brass cooling jacket for the MG - it really helps to heat this PE part until it glows red and then letting it cool slowly. This process makes the part softer and lets it be shaped better, more accurately. On the cupola bese I also blanked off some unnecessary holes. What I have so far is summarized on the photo below:

1:35 AFV Club M728 CEV by Pawel

I hope you liked it - thanks for looking and have a nice day

Paweł

All comments and critique welcomed. Thanks for your honest opinions!

www.vietnam.net.pl

  • Member since
    January 2015
  • From: Tumwater, WA.
Posted by M. Brindos on Thursday, December 17, 2015 7:38 PM

I didn't heat that cooling jacket up at all and it fought me to get into proper shape. I won in the end, but dang I wish I'd known about heating the metal up first.

Sorry for setting the bar so high my friend lol. But it looks like you're hanging in there with me regardless. ;)

Excellent work!!

- Mike Brindos "Lost Boy"

  • Member since
    May 2009
  • From: Poland
Posted by Pawel on Friday, December 18, 2015 2:14 PM

Hello Mike!

Thanks a lot for your comment and for your kind words!

I heard about heating up copper before, but didn't try it out myself until recently. As it turns out, it also works for brass. It takes the "backbone" out of the material, as Mammy Yokum once said, by which I mean the parts become more pliable and less springy, making it easier to roll round tubes or conforming the part to a surface - so please try it yourself, you'll be glad you did! Good luck with your builds and have a nice day

Paweł

All comments and critique welcomed. Thanks for your honest opinions!

www.vietnam.net.pl

  • Member since
    August 2007
  • From: back country of SO-CAL, at the birth place of Naval Aviation
Posted by DUSTER on Sunday, December 20, 2015 2:50 AM

Pawel

  as Mammy Yokum once said

Paweł


Pawel,

You never cease to amaze me. First your  outstanding builds and the talent you show there.

 Now you're quoteing Mammy Yokum! I haven’t seen or heard of the Li'l Abner comic strip in so many years, it makes my head spin.Yes


Steve

Building the perfect model---just not quite yet  Confused

  • Member since
    May 2009
  • From: Poland
Posted by Pawel on Sunday, December 20, 2015 3:34 PM

Hello Steve!

Thanks a lot for your kind words!

I guess it's kinda unusual fora Polishman to know the Lil' Abner strip - But there was a time like 12 years ago, where I read it regularly on the internet. That was fun and now I also understand some "nose art" better :D

Thanks again and have a nice day

Paweł

All comments and critique welcomed. Thanks for your honest opinions!

www.vietnam.net.pl

  • Member since
    August 2007
  • From: back country of SO-CAL, at the birth place of Naval Aviation
Posted by DUSTER on Thursday, December 24, 2015 6:02 PM

Pawel

No wonder your understanding of U.S. colloquialisms is so good.  Although what that says about my language is another thing altogether.


Merry Christmas and Happy New Year my friend


Steve

Building the perfect model---just not quite yet  Confused

  • Member since
    May 2009
  • From: Poland
Posted by Pawel on Saturday, January 2, 2016 1:45 PM

Happy new year, everybody!

Thanks again, Steve, it was really a good read, those old comics!

And today I've got another update. I'm still working on the cupola - added some scratchbuilt details here, like the traverse lock, traverse gear and the machine gun safety switch - and closed up the cupola. Now it looks like this:

AFV Clup 1:35 M728 CEV by Pawel

AFV Clup 1:35 M728 CEV by Pawel

I also started working on the internals of the turret. Like Gino wrote, they aren't goint to be too visible, so I don't want to go all-out here, but I don't want the turret to be empty, neither. The AFV Club model has some equipment here - like the gun, unfortunately the gun in the CEV is a short barreled 165mm demolition gun - so I'm doing some scratchbuilding here. Here's what I have so far - from left to right we have the Perfect Scale resin barrel, matching ESCI/Italeri gun shield, scratchbuilt gun shield interior, then scratchbuilt recoil sleeve - made out of 10mm aluminium rod wrapped in thin styrene sheet for correct diameter. Under it there's AFV Club's elevation gear, then there are two fittings and finally a breech block built out of 2mm styrene sheet, and a small piece of similar sheet that will become the breech itself:

AFV Clup 1:35 M728 CEV by Pawel

And so I keep working on the cupola and the gun, thanks for reading and have a nice day!

Paweł

All comments and critique welcomed. Thanks for your honest opinions!

www.vietnam.net.pl

  • Member since
    January 2015
  • From: Tumwater, WA.
Posted by M. Brindos on Saturday, January 2, 2016 2:21 PM

The interior of your cupola looks more accurate than mine! Well done!!  :D  I really like the way that turned out.

I hoep you have more for us soon.  :D

- Mike Brindos "Lost Boy"

  • Member since
    November 2009
  • From: SW Virginia
Posted by Gamera on Saturday, January 2, 2016 4:56 PM

The cupola looks really good there Pawel, and looking forward to seeing all those cool extras you scratchbuilt added.

"I dream in fire but work in clay." -Arthur Machen


  • Member since
    May 2009
  • From: Poland
Posted by Pawel on Sunday, January 3, 2016 9:13 AM

Mike, Gamera - thanks a lot for your comments and for your kind words. I hope to have next update soon, too! Please stay tuned, good luck with your builds and have a nice day

Paweł

All comments and critique welcomed. Thanks for your honest opinions!

www.vietnam.net.pl

  • Member since
    April 2007
  • From: Schroon Lake, NY
Posted by SMJmodeler on Monday, January 4, 2016 11:27 AM

Pawel:  I was scrolling through this thread and saw the detail & scratchwork on the glacis and had to jump in on this one, FANTASTIC work!  

You must have the patience of a saint.Angel  

I hope to get the time to go back and read in detail what you've done so far...in the meantime I'll be looking forward to your next post.

  • Member since
    January 2007
Posted by the doog on Monday, January 4, 2016 6:40 PM

Wow, once again, just absolutely superb, Pawel. You do some amazing detail work, and never disappoint!

  • Member since
    May 2009
  • From: Poland
Posted by Pawel on Wednesday, January 6, 2016 1:00 PM

SMJmodeler - thanks a lot! As for the patience - I believe it can be trained, like muscles! The scientists also say keeping a high sugar level in your blood helps strenghten the will power - and I just happen to like sweets :D Anyway, I'm movin on with the build. Started to work on the crew now - the next update will have some drastic surgery photos for your viewing pleasure :D

Karl - thanks a lot for your kind words, glad you're following this!

Have a nice day

Paweł

All comments and critique welcomed. Thanks for your honest opinions!

www.vietnam.net.pl

  • Member since
    May 2009
  • From: Poland
Posted by Pawel on Saturday, January 9, 2016 3:02 PM

Hello!

Here's another update!

I started working on the crew. I put the detailed description of it in another thread, here:

http://cs.finescale.com/fsm/modeling_subjects/f/5/t/169376.aspx

Here are just a couple of photos:

1:35 CEV loader by Pawel

1:35 CEV commander by Pawel

1:35 CEV crewman by Pawel

I've also constructed the turret floor using styrene sheet. I'm doing it mainly to provide something to be seen behind the driver's compartment - this part is very visible through the driver's hatch. On the turret floor are machine gun ammo boxes. I cut out several "banana" shapes out of 1,5mm styrene sheets, layered them and sanded smooth:

1:35 AFV Club M728 CEV by Pawel

I still have some hardware to add here. Thanks for reading, I hope you liked it - have a nice day

Paweł

All comments and critique welcomed. Thanks for your honest opinions!

www.vietnam.net.pl

  • Member since
    January 2015
  • From: Tumwater, WA.
Posted by M. Brindos on Saturday, January 9, 2016 3:21 PM

NICE! I had trouble building those and ended up only adding the one. You should cast that piece for later. I would have bought one if they were available lol.

Excellent work, my friend! EXCELLENT!!  :D

- Mike Brindos "Lost Boy"

  • Member since
    September 2006
  • From: Dripping Springs, TX, USA
Posted by RBaer on Wednesday, January 13, 2016 11:53 AM

Great stuff, Pawel, as always.


Apprentice rivet counter.

  • Member since
    May 2009
  • From: Poland
Posted by Pawel on Sunday, February 7, 2016 11:36 AM

Mike, Russ - thanks a lot for your kind words and sorry for replying so late to your comments!

I've got another update here - I'm still working on the unthankful stuff inside the turret.

I had to make a small breakthrough for myself, but at last I got to building the hangers that hold the turret floor to the turret itself - here's how they turned out:

1:35 AFV Club M728 CEV by Pawel

I've also scratchbuilt a lot of other stuff - the gunner's seat and its base, the periscope and rations box and the TC's footrest and battery acess hatch - there's still more to do, even though I'm doing a simplified version of that interior - let's see where this path leads me:

1:35 AFV Club M728 CEV by Pawel

I also have the third crewman ready for paint:

1:35 M728 CEV crewman at rest by Pawel

Thanks for reading and I hope you  liked it - have a nice day

Paweł

All comments and critique welcomed. Thanks for your honest opinions!

www.vietnam.net.pl

  • Member since
    November 2009
  • From: SW Virginia
Posted by Gamera on Monday, February 8, 2016 7:28 AM

Again looks good Pawel, you're moving right along. 

"I dream in fire but work in clay." -Arthur Machen


JOIN OUR COMMUNITY!

Our community is FREE to join. To participate you must either login or register for an account.

SEARCH FORUMS
FREE NEWSLETTER
By signing up you may also receive reader surveys and occasional special offers. We do not sell, rent or trade our email lists. View our Privacy Policy.