Enter keywords or a search phrase below:
Ok solved the windshield issue with the resin canvas wrapped one. Also started base painting the tools and such and weathering the leather on the seats and top and began to weather the exhaust and such.
On the bench:
1/35th Tamiya Willi's MB
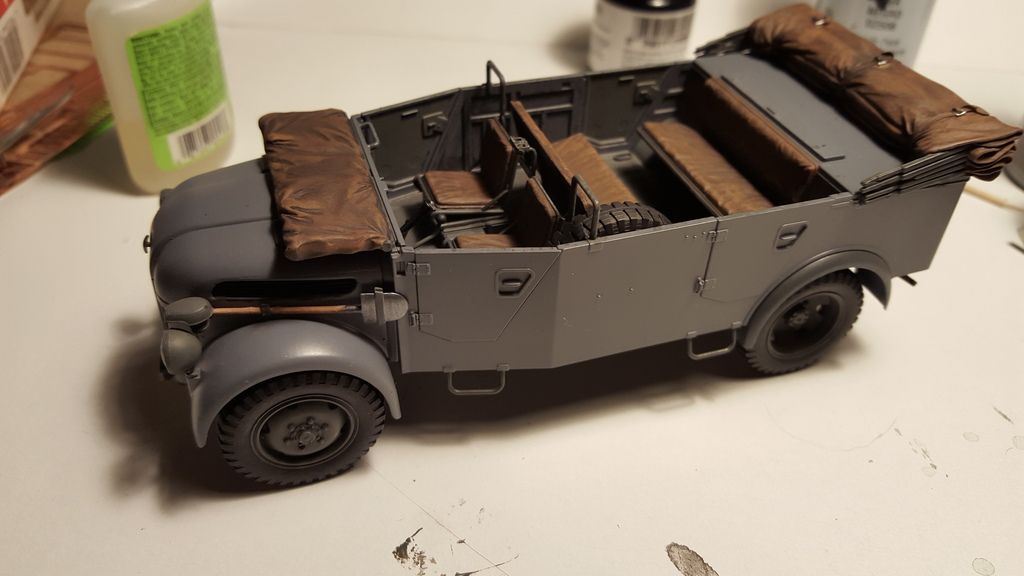
Little more progress, not much more to add before i can start weathering:
it's been a while so any tips on how to weather panzer grey would be very helpful. (for reference this is the 1943 Russia scheme)
One thing you can correct is the placement of the jerry can spout. It was not centered but to the right side. Hope this helps
Roy Chow
Join AMPS!
http://www.amps-armor.org
Thanks Roy. I've made the change :)
Really nice work here. I like the attention to detail, like the black CV boots on the front half-shafts.
Apprentice rivet counter.
Thanks RBaer :) I like to make sure as much is right as possible (which is why im off that i put the jerry can cap on in the wrong spot.) Also when i look at these pics they show me spots i have missed or need to touch up :D
TigerEP1 It's been a while so any tips on how to weather panzer grey would be very helpful. (for reference this is the 1943 Russia scheme)
It's been a while so any tips on how to weather panzer grey would be very helpful. (for reference this is the 1943 Russia scheme)
Hope you have success!
Man Karl your work is amazing, I feel like I'm wasting ml everyone's time after see your stuff...lol you have a gift man
I went back and repainted the tool handles the look better now. I'll have pics up tonight since I'm at work
lol, Thanks, TigerEP1, I appreciate that. I hope you can get a few pointers to help you with your finish here! :)
I am sure i will , here are the pics i mentioned earlier. I haven't gotten much done tonight as i am taking a short break so i don't burn out, plus it's really small stuff, figures and weathering now.
TigerEP1 I am sure i will , here are the pics i mentioned earlier. I haven't gotten much done tonight as i am taking a short break so i don't burn out, plus it's really small stuff, figures and weathering now.
Anyway, just an idea for something you might want to experiment with later. This style of painting is one of the key elements of my style of finishing---it begins with the very basecoat itself.
I like the look of that Tiger. I do like the effects you have on the fabric areas. Nice finish on the paint job as well.
I am a Norfolk man and i glory in being so
On the bench: Airfix 1/72nd Harrier GR.3/Fujimi 1/72nd Ju 87D-3
Thanks doog, sadly i do not yet own a airbrush nor the skill to use one, (i do have someone local willing to teach me once i do get one) I will keep it in mind :)
Bish, ty :) I do what i can with my limited supplies and tools , painting miniatures helps with cloths/leather :)
Oh, sorry man! I didn't know you didn't have an airbrush!
No worries man, i've been meaning to get one but i like hand painting...lol
Ok guys i have not forgottena bout this, i ahve been working on the GMC 6x6 for the group build but tomorrow i am gonna pwrk on the steyr some more :D
What color paint did you use as the base coat on the seats
Your talent for painting miniatures shows on all of that canvas. That looks like a showroom model and I like the look of how clean it is.
So far so good. I'm looking forward to seeing what you can do next with it. :)
- Mike Brindos "Lost Boy"
jersey66, its a craft paint i have here from Folk art called real brown , i use a lot of craft paints...lol
M. Brindos Your talent for painting miniatures shows on all of that canvas. That looks like a showroom model and I like the look of how clean it is. So far so good. I'm looking forward to seeing what you can do next with it. :)
This is a huge compliment coming from someone of your talent, i am humbled :) Im scared to weather it as it will drity it up...lol
Thanks guys, i have a bit of free time now so ill make some actual progress on it tomorrow :D
Our community is FREE to join. To participate you must either login or register for an account.