SEARCH FINESCALE.COM

Enter keywords or a search phrase below:

1/35 HobbyBoss M4 High Speed Tractor, WIP Updated 01/20/16

7855 views
36 replies
1 rating 2 rating 3 rating 4 rating 5 rating
  • Member since
    April 2007
  • From: Schroon Lake, NY
1/35 HobbyBoss M4 High Speed Tractor, WIP Updated 01/20/16
Posted by SMJmodeler on Monday, November 30, 2015 12:43 PM

Guys: 

Well I'm finally back to the workbench! 

After a thoroughly enjoyable sifting through the stash I decided to start an M4 High Speed Tractor. I have both of the HobbyBoss offerings of this vehicle but decided to go with the 3in/ 90mm version. If you're not familiar with this kit here is the boxing: 

I also thumbed through some research material and found some interesting ideas to scratch-build to customize the build.

Scratch-build #1:

The text for this photo says that the wood blocks were experimental and were added to further distribute the weight of the vehicle. This vehicle was based in Oahu so I imagine it worked in boggy areas due to the amount of rain.  Close inspection reveals that this is the 155mm/ 240mm version (other HobbyBoss Kit) of this vehicle but oh well...I like it so I decided it would be plausible for my 3"/90mm version to have this same experiment and so it shall!  I'm still pondering how to best make the wood blocks.  Balsa wood is the obvious choice but I think styrene blocks would glue-up better and bond better...we'll see. Either way the kit-included vinyl tracks will NOT work, so they have to go!  I'll be buying some replacement Bronco indies real soon.

Scratch-build #2: After seeing this photo of the M4 WITHOUT the storage box on the back (note the background vehicle):

AND this photo:

I thought it would be REALLY COOL to build a small version of the flatbed of the M8E2 and replace the kit included mortar rounds storage box.  I'm thinking something about 1/2 the size but with the same look.  I'll use to-scale 4X's for a wood deck surrounded by a metal frame. The wood WILL be balsa with extruded styrene pieces for the frame.  I'll simulate the handles/ hooks by bending small gauge wire.

Anyway...that's the plan!  I am well along on the build portion and will be posting some progress pic's soon.  For anyone following along who hopes to build this kit, I've found some discrepancies in the instructions so I'll copy/ post those too. 

Here's a sketch of the flatbed and wood block tracks idea, this is going to be fun!

Thanks for checking in...

SMJmodeler

  • Member since
    March 2003
  • From: Western North Carolina
Posted by Tojo72 on Monday, November 30, 2015 12:58 PM

Nice project Steve,will be checking in.

  • Member since
    January 2006
  • From: California
Posted by SprueOne on Monday, November 30, 2015 8:21 PM

Go for it! You can't go wrong with Ampersand Pub ref materials either Idea

Anyone with a good car don't need to be justified - Hazel Motes


Iron Rails 2015 by Wayne Cassell Weekend Madness sprueone

  • Member since
    July 2003
  • From: On my kitchen counter top somewhere in North Carolina.
Posted by disastermaster on Monday, November 30, 2015 8:55 PM

http://www.skepticalscience.com/images/cool_smiley.gif Good 'ta see 'ya back Steve!

Sherman-Jumbo-1945

"I was so much older then, I'm younger than that now"


  • Member since
    December 2002
  • From: Valrico, FL
Posted by HeavyArty on Monday, November 30, 2015 9:20 PM

Should be a good build.  Drive on.


This one looks like the grand daddy to the M993 Carrier.

M993 Carrier


Gino P. Quintiliani - Field Artillery - The KING of BATTLE!!!

Check out my Gallery: https://app.photobucket.com/u/HeavyArty

"People sleep peaceably in their beds at night only because rough men stand ready to do violence on their behalf." -- George Orwell

  • Member since
    September 2012
Posted by GMorrison on Monday, November 30, 2015 11:17 PM

I wouldn't use balsa. Basswood is a better choice. Midwest has a kiosk of it in most Ace stores. It saws well, sands well, takes paint or stain well.

Or styrene. But at 1/35 basswood is pretty good.

IMO balsa is good for one thing only- it flies at scale.

 Modeling is an excuse to buy books.


  • Member since
    July 2006
  • From: New Jersey
Posted by redleg12 on Tuesday, December 1, 2015 5:45 AM

Steve....nice to see you back at the bench. Bass wood or even thin plywood. Much tighter grain and harder wood which looks more to scale.

Rounds Complete!!

"The Moral High Ground....A Great Place to Emplace Artillery."

  • Member since
    April 2007
  • From: Schroon Lake, NY
Posted by SMJmodeler on Tuesday, December 1, 2015 8:44 AM

Tojo 72: Thanks for checking in.

SprueOne: The book I'm using is great!  It was very helpful to check details during the model construction.

Sir D: Thanks, this forum is like an old friend.

HeavyArty: "drive on" I like that!  

GMorrison: Great suggestion!  I was concerned about the brittle edges of the balsa while cutting.  I have an Ace nearby, hopefully they'll have basswood.

redleg12: Thanks for the confirmation on the basswood.  Never thought about plywood, I'll keep that in mind.  BTW: I recall you building the 155mm version and then winning some hardware to boot! Can you please give me the link to that thread if it still exists...I could use some references on the engine & interior of the cab.  Hey, you're knowlegeable on US AFV's...Question: what color(s) were used for the engine block? I'd love to use orange!

  • Member since
    December 2002
  • From: Valrico, FL
Posted by HeavyArty on Tuesday, December 1, 2015 10:36 AM

SMJmodeler

Question: what color(s) were used for the engine block? I'd love to use orange!


Not my brother by another mother Redleg12, but a Redleg none the less...

Like all other things that don't move in the US Army, it was painted a shade of OD Green.

Pretty much all US military engines in WWII were either OD or medium gray.  I have seen no original WWII engines in orange.


Gino P. Quintiliani - Field Artillery - The KING of BATTLE!!!

Check out my Gallery: https://app.photobucket.com/u/HeavyArty

"People sleep peaceably in their beds at night only because rough men stand ready to do violence on their behalf." -- George Orwell

  • Member since
    April 2007
  • From: Schroon Lake, NY
Posted by SMJmodeler on Tuesday, December 1, 2015 12:11 PM

HeavyArty: The orange was wishful thinkingEmbarrassed.  Thanks a TON for those pics!  They will be a HUGE help when it comes to weathering the engine!  

I think you just made it easier for me too. The instructions call for flat black tubes, metal gray on that exhaust manifold(?-top thing with fins), etc...By the looks of the things EVERYTHING was OD green or gray.  I expect the belts will be the only thing I'll have to make flat black.

  • Member since
    January 2013
Posted by jibber on Tuesday, December 1, 2015 2:50 PM

A different vehicle and a great project, please post pics as you go. This one sounds cool, and welcome back.

Terry

  • Member since
    November 2009
  • From: SW Virginia
Posted by Gamera on Tuesday, December 1, 2015 6:48 PM

Really neat, looking forward to seeing her come together.

"I dream in fire but work in clay." -Arthur Machen


  • Member since
    July 2006
  • From: New Jersey
Posted by redleg12 on Tuesday, December 1, 2015 7:05 PM

Well here is a link to pictures and has a link to my build log

http://www.redleg2scale.com/model%20gallery/M4%2018T%20HST.html

My younger brother by another mother , Heavy, gave you some nice engine pics. In general, when in doubt, go OD!. The radiator could be black.

Rounds Complete!!

"The Moral High Ground....A Great Place to Emplace Artillery."

  • Member since
    April 2007
  • From: Schroon Lake, NY
Posted by SMJmodeler on Tuesday, December 8, 2015 1:47 PM

redleg12: Thanks for the link...it was helpful.

Guys: I’ve made a lot progress on the M4 and thought I’d post an update.

The build portion went very well.  This is a real nice kit with good engineering.  My only gripe is the amount & placement of ejector marks.  There are several of them along the fenders, inside the cab and the dashboard, some of which are deep and required filling & sanding. The instructions are clear & concise but I did find a couple omissions. The highlighted items need to be addressed:

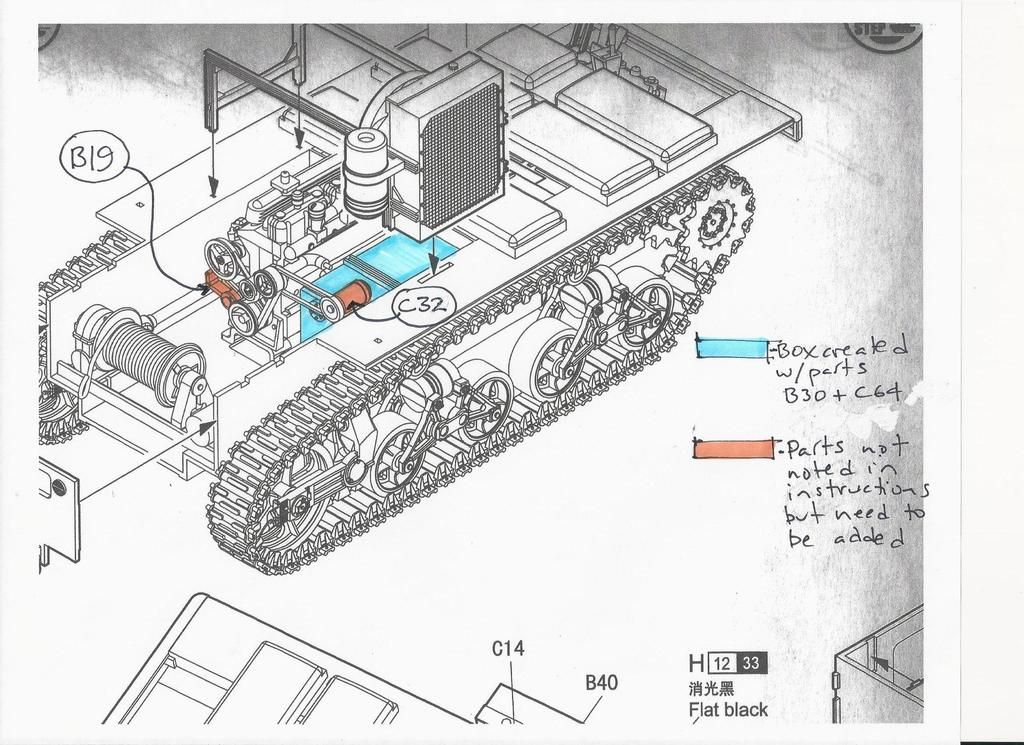
NOTE:  Be sure to mount the front bumper JUST BELOW the fender!!!  I didn’t catch this until AFTER a test fitting and checking of my reference material.  I had to do a good bit of sanding to the front-bottom of the cab to get it to nestle-down correctly.

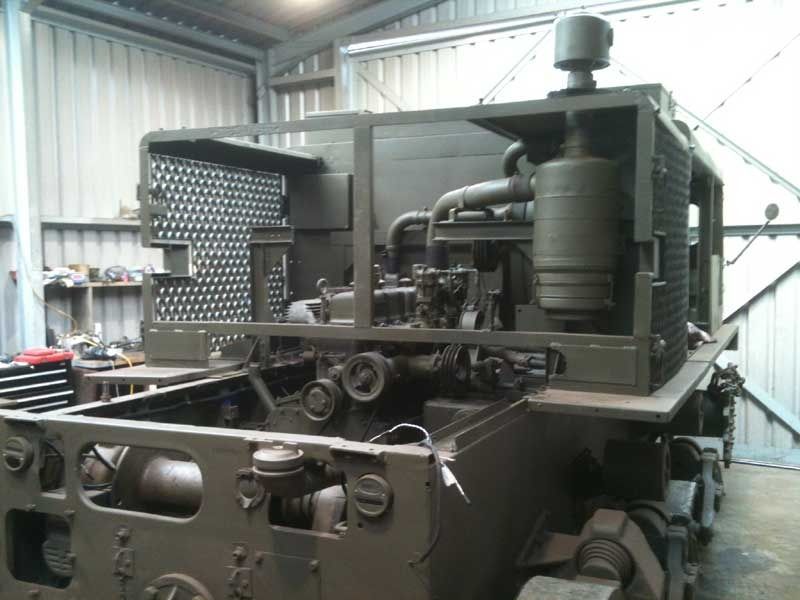
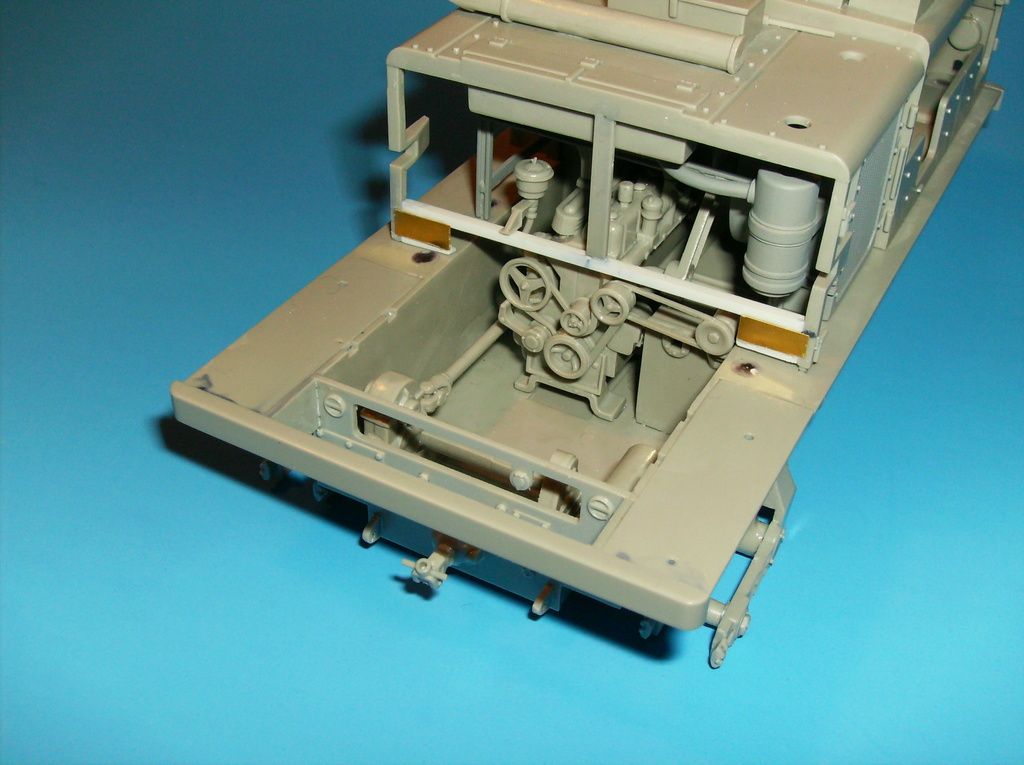
Moving right along...I did a little scratch work at the back of the engine compartment to get ready for the flatbed and fortunately found a great reference photo to work from. I added the lower bar, just above the belt pulley, made from an Evergreen styrene “L angle” and the vertical bar from a spare part. The added PE plates at the bottom corners were sawn from spare PE parts.  Note: Along the way I decided that my other HobbyBoss M4 kit would be helpful as a kitbash (spare parts) and since I picked up this M4 for so cheap I felt it was worth it. I’ve pillaged a bunch of other things which I will note along the way.  

Here’s how it came out:

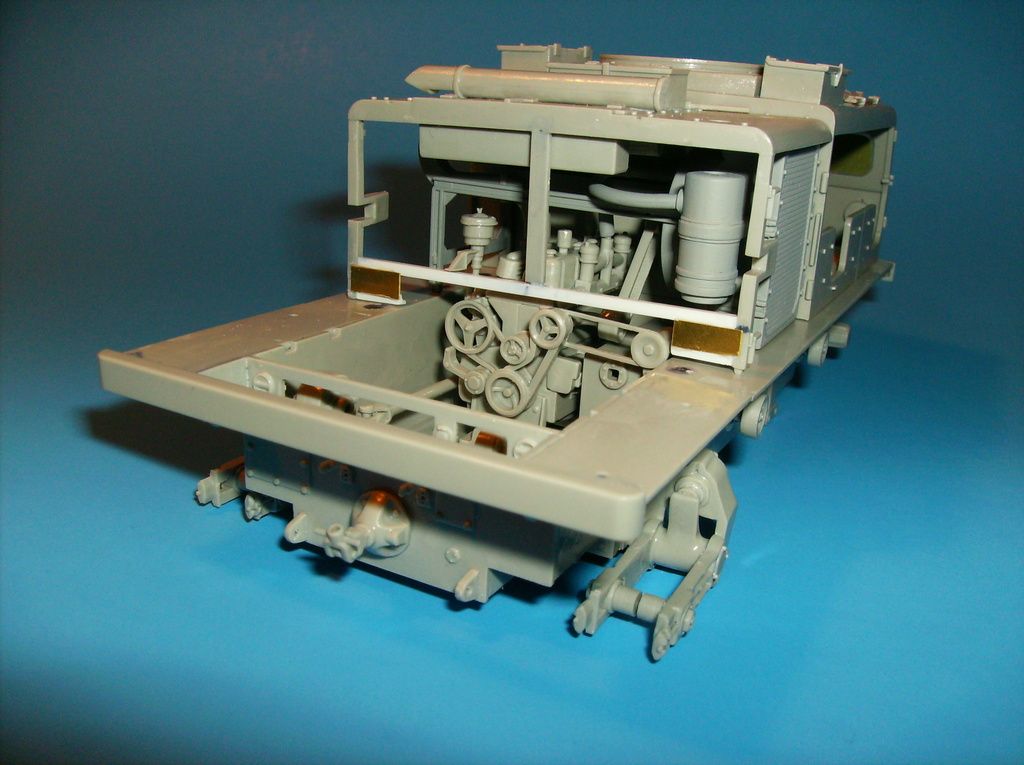
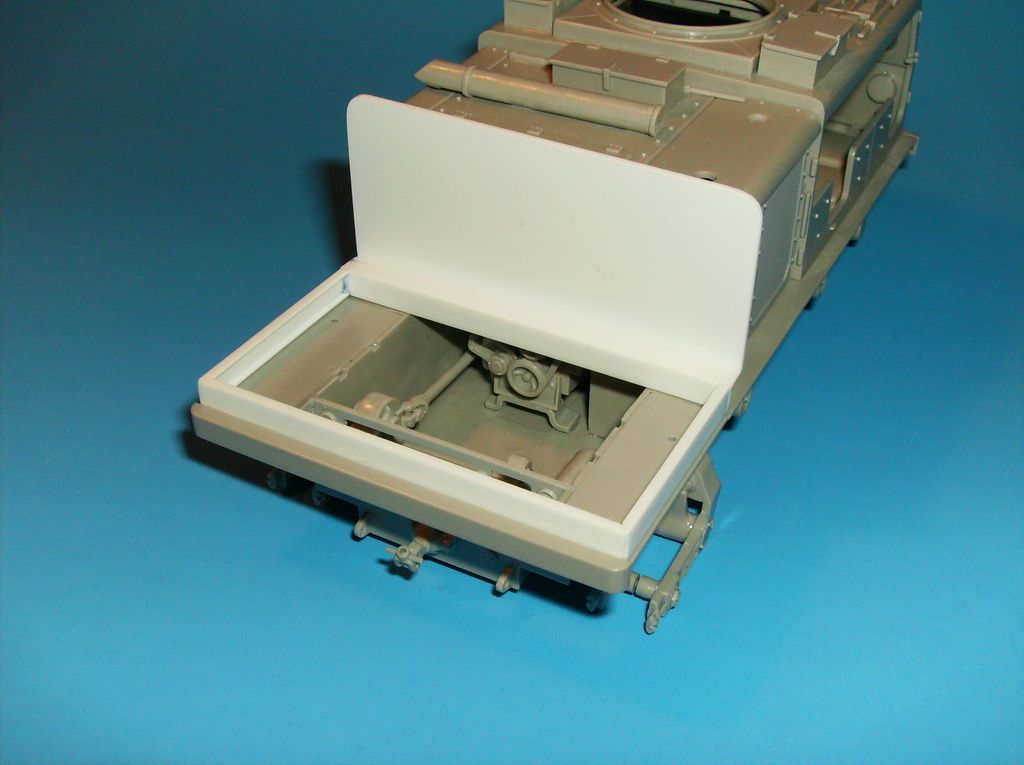
I wanted to make the flatbed area bigger than the kit included ammo box area so I shaped two 15mm long “plate steel” angles from spare parts and added them to the back of the hull.  I stole the bumper from the other M4 kit and added it to the top of the angles. I had to add a filler from where the fenders ended to reach to the bumper but the sheet styrene I bought for this task was too thick.  Again, kitbash to the rescue...(maybe I should buy two of every kit I work on!)  I sawed-off two lengths from the other kits hull and of course the thickness was perfect. Lastly, I had to extend the gas tank filler tube (not in photos) to get past the back of the bumper...again, a kitbash.  Here’s how it all came together:

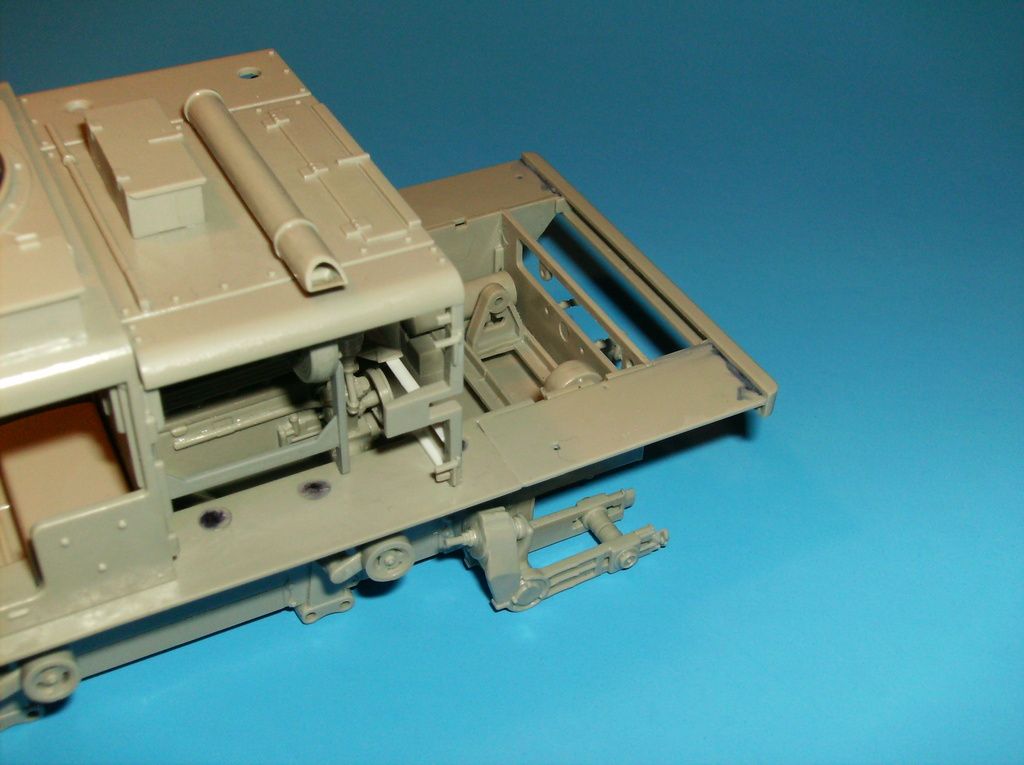
To make the flatbed I reviewed my design idea:

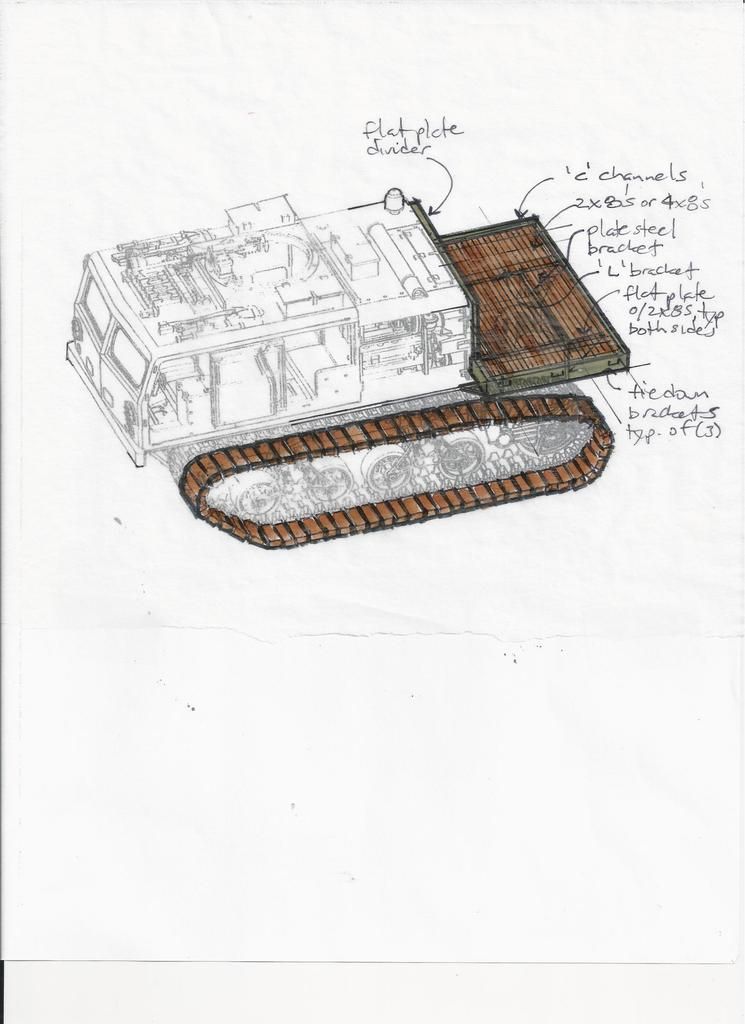
The perimeter frame was made from Evergreen styrene 3/16” “c channels” and the divider plate was made from an Evergreen sheet.  I needed to raise the divider plate a bit to clear the engine belt pulley, that was done by adding  a 3/16” Evergreen “L angle”  I think it came out nice:

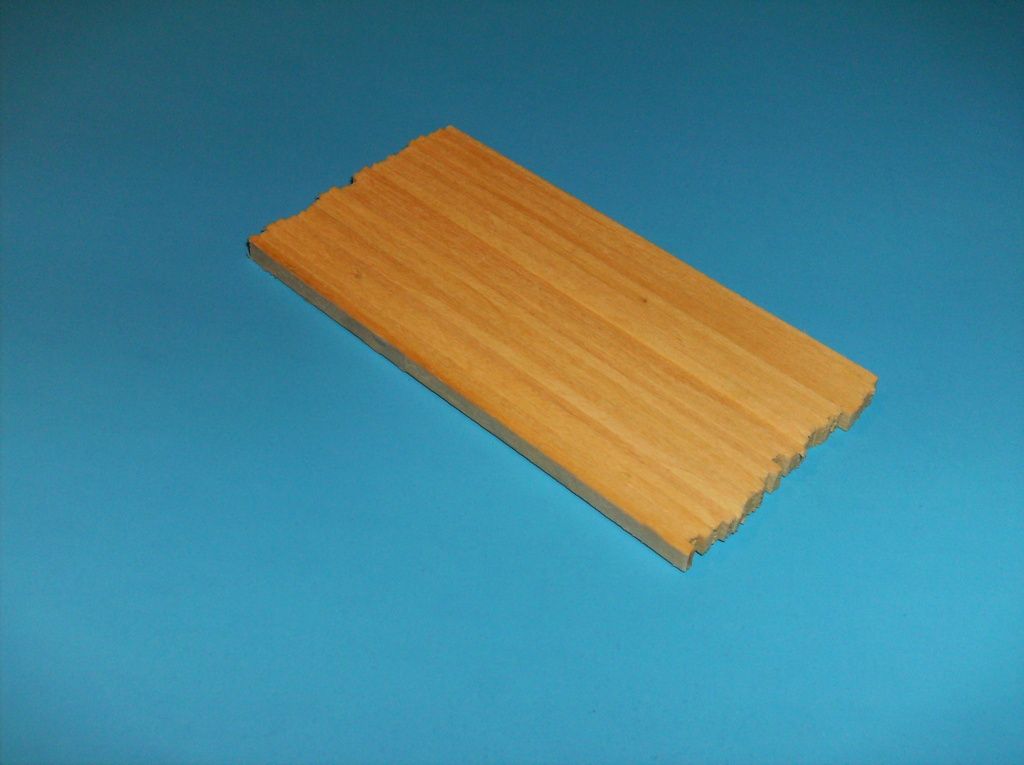
Last but not least I needed to make the bed surface.  I wanted to have it look like laminated 4X8’s standing on edge (like a wooden cutting board) so what better than real wood!  I bought some small ,to scale, basswood strips that would fit in the 3/16” c-channels .  I intentionally cut them a bit long for fittng later and then sandwiched/glued a bunch of them together.  After a night of drying in the clamps here how it looks:

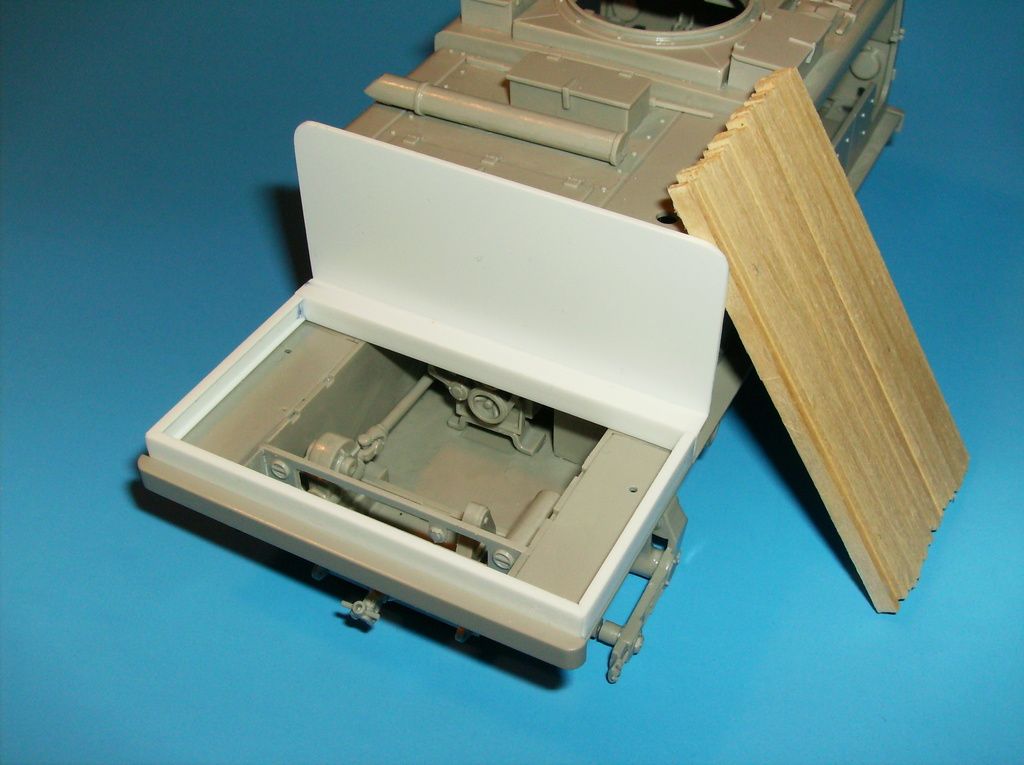
That’s where I am so far, more to come later....

  • Member since
    December 2002
  • From: Bury St Edmunds, Suffolk, England
Posted by Bish on Tuesday, December 8, 2015 2:44 PM

Well, look who showed up. Good to see you back Steve. Interesting looking project.

I am a Norfolk man and i glory in being so


On the bench: Airfix 1/72nd Harrier GR.3/Fujimi 1/72nd Ju 87D-3

  • Member since
    April 2006
  • From: Denver, Colorado
Posted by waynec on Tuesday, December 8, 2015 6:26 PM
Dry spells are quite annoying, to be polite. i have one of these. was thinking of painting it turquoise with NUMA markings ala Clive Cussler's Dirk Pitt. of course that assumes i live long enough to get to it.

Никто не Забыт    (No one is Forgotten)
Ничто не Забыто  (Nothing is Forgotten)


  • Member since
    April 2007
  • From: Schroon Lake, NY
Posted by SMJmodeler on Thursday, December 10, 2015 8:57 AM

Hey Bish!: Thanks for dropping by...

waynec: Turqouise?!Indifferent,  Interesting.  I know the name Clive Cussler but I'm not familiar with Dirk Pitt.

  • Member since
    July 2006
  • From: New Jersey
Posted by redleg12 on Thursday, December 10, 2015 6:44 PM

Looking good....love the wood!

Rounds Complete!!

"The Moral High Ground....A Great Place to Emplace Artillery."

  • Member since
    January 2007
Posted by the doog on Friday, December 11, 2015 2:52 PM

Great work, Steve! Nice to see you bacl!

You get internet in that bomb shelter yet? Big Smile

  • Member since
    April 2007
  • From: Schroon Lake, NY
Posted by SMJmodeler on Tuesday, December 15, 2015 9:16 AM

Thanks doog!

If you mean the bomb shelter of the Adirondacks...yes!  I actually have high-speed net service at home these days...but I rarely use it.  I spend a lot of time on the computer at work so I don't use it much at night.  But my boys love it!!!  They are big-time fans of World of Tanks & Armored Warfare and have become quite the tank afficianados, in fact, they call me a tank "newb"!!!...truth hurtsBlack Eye.

Those games have also rejuvinated their model building interest, which is great!  My younger son just finished a Tamiya Leopard 1 and my older son has just about completed a 1:72 Sturmtiger & a 1:72 M60!

  • Member since
    April 2006
  • From: Denver, Colorado
Posted by waynec on Tuesday, December 15, 2015 9:58 AM

SMJmodeler

waynec: Turqouise?!Indifferent,  Interesting.  I know the name Clive Cussler but I'm not familiar with Dirk Pitt.

Dirk Pitt is the main character.

Никто не Забыт    (No one is Forgotten)
Ничто не Забыто  (Nothing is Forgotten)


  • Member since
    January 2007
Posted by the doog on Tuesday, December 15, 2015 1:45 PM

SMJmodeler

Thanks doog!

If you mean the bomb shelter of the Adirondacks...yes!  I actually have high-speed net service at home these days...but I rarely use it.  I spend a lot of time on the computer at work so I don't use it much at night.  But my boys love it!!!  They are big-time fans of World of Tanks & Armored Warfare and have become quite the tank afficianados, in fact, they call me a tank "newb"!!!...truth hurtsBlack Eye.

Those games have also rejuvinated their model building interest, which is great!  My younger son just finished a Tamiya Leopard 1 and my older son has just about completed a 1:72 Sturmtiger & a 1:72 M60!


Glad to hear that, Steve! Nothing like bringing your boys into the hobby! That's what my Dad did with me! Yes

  • Member since
    August 2007
  • From: back country of SO-CAL, at the birth place of Naval Aviation
Posted by DUSTER on Wednesday, December 16, 2015 10:21 PM

Steve

Well this has the look of a great "hot rod" for towin' and hallin' and just general big gun fun in the sun.


Steve

Building the perfect model---just not quite yet  Confused

  • Member since
    April 2007
  • From: Schroon Lake, NY
Posted by SMJmodeler on Monday, January 4, 2016 9:00 AM

Guys: Happy New Year!!!  I made a lot progress on the M4 during the holidays so I thought I’d get you up to speed. With construction complete I gave everything a coat of primer.  I had a few irregularities that needed some touch-up sanding but overall I was very pleased…so let the paint fly!!! 

The first layer was a complete coverage coat of acrylic flat black…BTW, I use Tamiya acrylics for all my airbrushing.  The next coat was olive drab (OD).  I covered every portion of the model with the OD but I sprayed it thinner inside the engine compartment, lower hull and engine & radiator fan assemblies.  The variation adds depth to the finish and I knew I would want these areas to be darker later-on anyway. (hence the reason I went with flat black first) 

I then mixed a little yellow-green with the OD and did some highlighting on the fenders and the surfaces above that would be exposed to sunlight (both horizontal & vertical).  The second highlighting was an even lighter (more yellow) shade of yellow-green and OD added to heavily sun-exposed horizontal surfaces only.  Finally, I sprayed the seats khaki and then masked for the muffler and sprayed it red-brown. The basswood flatbed deck was brush-stained with AK Interactive Track Wash and slid into the scratch-built frame and bulkhead.

…and then a few decals to give it the final touch!

Note: none of the sub-assemblies were glued at this point but I did do a test fit and then took the photos.

Here’s the results:

Thanks for checking in, more to come....

  • Member since
    January 2007
Posted by the doog on Monday, January 4, 2016 6:44 PM

LOVING that paint modulation, Steve! And that wood deck is awesome!!


  • Member since
    October 2004
  • From: Northern Virginia
Posted by ygmodeler4 on Monday, January 4, 2016 9:09 PM

DittoIndeed!

Looks very good so far and I enjoyed seeing a snapshot of your plans, the highlights and sketches give me good ideas in how to lay things out and think ahead in my future builds.

-Josiah

  • Member since
    April 2007
  • From: Schroon Lake, NY
Posted by SMJmodeler on Thursday, January 7, 2016 10:22 AM

doog:  Thanks for the comments.  I like how the AK stained the wood deck, it was exactly what I was going for...it'll be tough to cover it with the added cargo though. 

ygmodeler4: Thanks!  I'm a planner and I find the pictures & sketches to be very helpful. 


  • Member since
    November 2009
  • From: SW Virginia
Posted by Gamera on Thursday, January 7, 2016 1:10 PM

Wow, she does look great, I too love how the wooden bed came out. 

"I dream in fire but work in clay." -Arthur Machen


  • Member since
    April 2007
  • From: Schroon Lake, NY
Posted by SMJmodeler on Wednesday, January 20, 2016 8:49 AM

Guys: I’m moving right along on the M4!  I finished painting and assembling all of the sub-assemblies.  I think I shared them all earlier except the following.  Here’s the dashboard and the bulkhead between the seats:

…and the drive sprockets, idlers & road wheels:

After spending a little time weathering the engine and radiator assemblies I mounted them to the hull and gave the whole thing a few raw umber washes. These washes are VERY thin and are meant to take away that freshly painted look, add depth to the colors and lessen the contrast.  A few pin washes and some dry brushing were then added to the cabin floor & seats.  Finally, I delineated the worn metal areas where the crew would continually place their hands, feet and arms with a graphite pencil and a silver colored pencil.  These effects were softened & blended a bit with a q-tip.  Here’s the results:

I gave the inside surfaces of the cab assembly and the dashboard the same treatment but unfortunately forgot to take a photos before gluing it to the hull.  

Before gluing on the roof assembly behind the cab I spent a good amount of time really weathering the engine compartment of the hull. It’s fun to think how spinning parts, grease, oil, dust, etc. would gather over time…I’m not a mechanic but I think I did a good job depicting these effects.  I wanted the engine area to look as though it had accumulated some miles but I also wanted it to look as though it still functions properly & reliably.  I think the earlier scratch work paid off here too.  Here’s how that all looks, before adding the roof:

After adding the roof:

It’s a shame that all of this hard work & time will be covered when I add the flatbed to the back…but I know it’s there and I have pic’s to prove it!

Thanks for checking in, more to come...

  • Member since
    September 2006
  • From: Dripping Springs, TX, USA
Posted by RBaer on Wednesday, January 20, 2016 10:26 AM

Paint work is looking very good!

Apprentice rivet counter.

JOIN OUR COMMUNITY!

Our community is FREE to join. To participate you must either login or register for an account.

SEARCH FORUMS
FREE NEWSLETTER
By signing up you may also receive reader surveys and occasional special offers. We do not sell, rent or trade our email lists. View our Privacy Policy.