SEARCH FINESCALE.COM

Enter keywords or a search phrase below:

Takom 1/35th FV 432 Completed

2320 views
19 replies
1 rating 2 rating 3 rating 4 rating 5 rating
  • Member since
    December 2002
  • From: Bury St Edmunds, Suffolk, England
Takom 1/35th FV 432 Completed
Posted by Bish on Sunday, April 7, 2019 9:28 AM

My first armour build of the year is somthing we don't see often. As far as i know, this is the first kit in this scale in plastic of this vehicle. The only option before this was the Accurate Armour resin kits. The only extras i am adding as some metal tracks from masterclub and light guards from Accurate Armour.

First look at this kit showed that the detail is superb, both inside and out. Whats there is spot on. Of course, as with any kit, there are isues. Most are minor and many people would probably not even notice. But, for those who may be interested, i will point them out as i go along.

And one of those issues was obvious as son as i looked at the instruction. Step 2 has you fit the tillers, and they show them with the right tiller forward and the left tiller slightly back.

They can be positioned in any position you like, but the instructions don't indicate this. Without a driver in the seat, the only way to show them for me is both back with the brakes on. Easy fix.

I knew before i started that painting the interiour after it was built would be tricky, especially the driver/comanders compartment. Fortunatly the kit is made in such a way that sections can be put together and painted before fitting. In the hull, i added the panels on the lwer side walls as well as the panels around the back which goes around the fuel tanks.

The first section i put together was the front wall of the main compartment with the left side of the crew compartment. As i mentioned, the detail thats there is first class. But one problem is whats not included. The box at the front should hold the drivers night driving device. This is not included.

And for a vehcile in use in the 90's, there should be a stowage rack for the driver and commanders SA-80's. I had to scratch a lever for the gear range selector as the kit one flew off my tweezers into the great beyond.

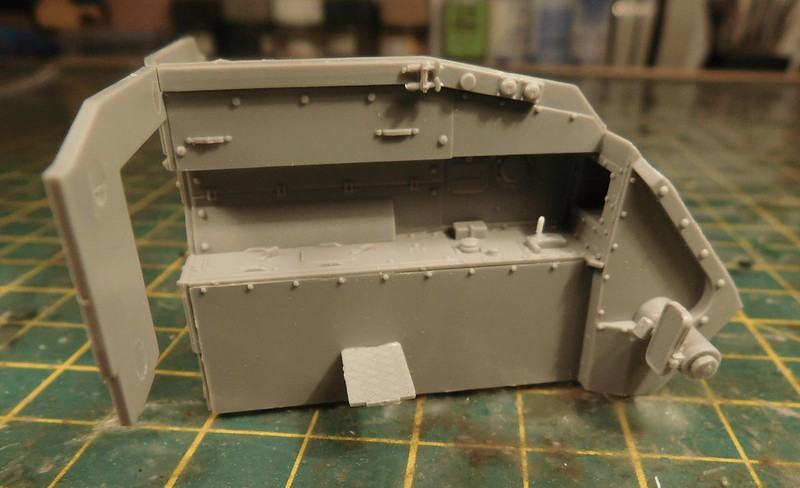
The kit does come with some pretty lethal looking pour stubs. Most are not an issue, but a few are. The are the upper sides of the hulls, the middle stub on the upper piece and the one on the lower piece are both in visible areas.

As are theres around the hole for the rear door.

Once cleaned up, the upper sides were fitted.

Made a start oin one of the Masterclub tracks. These are nice and go together well, and the detail is perfect. better than Fruils IMHO. I have lost a couple of the resin tracks pins but hopefully have enough spare.

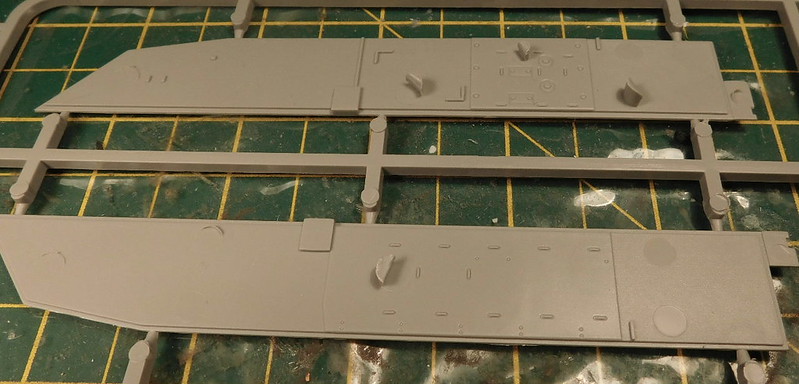
And finally a small selection of bits and pieces that will be painted before fitting. The kit does come with parts which would allow you to build different configirations as well as vehicles from different times. But as with the tillers, the instructions don't tell you this. It comes with 4 radios, though they tell you to fit 3 but then tell you to fit 4 antenna mounts Confused. I will just be useing 1 radio and antenna.

Enjoying this so far, goes together well. My guess is that the issues will be down to the vehicle they used as a referance source, but they don't seem to have looked any futher. But nothing major.

I am a Norfolk man and i glory in being so


On the bench: Airfix 1/72nd Harrier GR.3/Fujimi 1/72nd Ju 87D-3

  • Member since
    July 2004
  • From: Sonora Desert
Posted by stikpusher on Sunday, April 7, 2019 9:48 AM

Nice! I will definitely watch this one! Certainly one that I need for my collection. 

Funny that they tell you to install the tillers (in US Army lingo “laterals”) in such a manner. 


F is for FIRE, That burns down the whole town!

U is for URANIUM... BOMBS!

N is for NO SURVIVORS...

       - Plankton

LSM


  • Member since
    December 2002
  • From: Bury St Edmunds, Suffolk, England
Posted by Bish on Sunday, April 7, 2019 9:53 AM

Thanks Stik. Ye, i know what you mean. It seems as though they replicated what they saw perfectly but have little understanding in how an AFV works. Of course, as i am sure you know, when its somthing you worked with, you tend to notice the smaller things.

Ye, we called them tillers or steering levers. I will have to remember laterals, i'll know what people are reffering to now.

I am a Norfolk man and i glory in being so


On the bench: Airfix 1/72nd Harrier GR.3/Fujimi 1/72nd Ju 87D-3

  • Member since
    December 2002
  • From: Bury St Edmunds, Suffolk, England
Posted by Bish on Sunday, April 21, 2019 5:36 PM
Before I post my next update pics, a bit of background into the vehicle I am doing which will help explain why I am building it this way. In April 1995, my Battalion, 1 KORBR, moved from Londonderry to Catterick and began converting to the Armoured Infantry role. I was in the Anti-Tank Platoon, equipped with the MILAN wire guided missile system. We were supplied with a bunch of 432’s which had clearly seen better days. Even though I was not a qualified driver at the time, I along with a few other guys spent many hours getting the vehicles in reasonable condition. All of the hatch seals had corroded and it looked like the vehicles had been stored outside for some time. We never did quite eradicate the lovely aroma of odeur de stagnant oil and water. The vehicles seemed to have been a rag tag assortment equipped for various roles which meant we had to remove radio frames and various other bits of equipment.
 
So, when it comes to the kit, it provides the options i need, partly i think by error. The fit options and colours are based on the instructions, the few pics i could find and my 20+ year old memory (not the most reliable of sources). My understanding is that the forward compartment was always painted white with the rear in bare metal. This was painted white at a later date, probably during a base overhaul. But i am positive ours where still bare metal, so thats the option i went for. All paints are Tamiya acrylics.


Then the padding was painted, ours was in a por condition with holes and tears all over, but i decided not to replicate this. Then the floor was dirtied up useing AK's engine oil and engine grime mixed with some dark pigments.
 
 
I was really pleased with how that came out.
 
With the smaller parts painted, the interiour was fitted out. When i went to fit the drivers seat, i realised that the tillers were to far back. No major isue bending them forward a bit, but would recomend building the seat and dry fitting before adding the tillers.
 
The kit includes 3 battery boxes, but no radio fit in the rear of the vehicle (I have found pics of a 432 with a similar layout which may be the one they used).  One of the battery boxes is a base and lid in one piece, this is intended to go under the commander’s seat. But i am positive our vehicles did not have these so I have used this to replace the main vehicle batteries. This goes to the right of the driver and the kit does not supply a lid, not a good idea when its right next to the drivers elbow.  So I have modified the complete box but cutting and fitting the top of the batteries inside.
 
The 3rd battery box is in the rear on the left side under one of the bench seats. Again going from memory, i am sure our vehicles had this box but without batteries, so after drilling out the interiour i have fitted this.


The roof was finished off with lights and air ducting.
 
 
And the engine bulkhead and piano boards are done. The painting guide does not show some of the smaller details, such as the cap for the governor oil, bottle for the washers and so on, but the few online pics are enough to provide this info.
 
 
And the drivers instruments along with aformentioned washer bottle.
 
 
And the interior almost completed.


I still have a little to do before i add the roof and front plate. A couple more small bits to fit, some small detail to paint. But mainly adding some wiring. I won't fit the complete wiring harness, but i need to add something as the inside will be very visible. Alos need to come up with some for the drivers seat harness.

I am a Norfolk man and i glory in being so


On the bench: Airfix 1/72nd Harrier GR.3/Fujimi 1/72nd Ju 87D-3

  • Member since
    July 2004
  • From: Sonora Desert
Posted by stikpusher on Sunday, April 21, 2019 7:18 PM

 Very nice work so far! The interior looks more cramped in the troop compartment than that of a 113


F is for FIRE, That burns down the whole town!

U is for URANIUM... BOMBS!

N is for NO SURVIVORS...

       - Plankton

LSM


  • Member since
    September 2018
  • From: Vancouver, Washington USA
Posted by Sergeant on Monday, April 22, 2019 12:50 AM

Hi Bish, I will be following your project too.

Harold

  • Member since
    December 2002
  • From: Bury St Edmunds, Suffolk, England
Posted by Bish on Monday, April 22, 2019 2:20 AM

Thanks guys.

Stik, they felt quite roomy but then we only had 4 guys in the back with our MILAN kit. With a 10 man section, i imagine it would have been quite cosy.

Have you ever seen insid a BMP. Looked in one in Iraq, makes our wagons look roomy.

I am a Norfolk man and i glory in being so


On the bench: Airfix 1/72nd Harrier GR.3/Fujimi 1/72nd Ju 87D-3

  • Member since
    March 2003
  • From: Western North Carolina
Posted by Tojo72 on Thursday, April 25, 2019 11:59 AM
Very interesting build,didn’t know what it was by the title,but glad I checked

  • Member since
    December 2002
  • From: Bury St Edmunds, Suffolk, England
Posted by Bish on Thursday, April 25, 2019 12:57 PM

Thanks Tojo, i am sure its not a vehicle many will be familiar with.

I am a Norfolk man and i glory in being so


On the bench: Airfix 1/72nd Harrier GR.3/Fujimi 1/72nd Ju 87D-3

  • Member since
    July 2004
  • From: Sonora Desert
Posted by stikpusher on Thursday, April 25, 2019 7:38 PM

Bish

Thanks guys.

Stik, they felt quite roomy but then we only had 4 guys in the back with our MILAN kit. With a 10 man section, i imagine it would have been quite cosy.

Have you ever seen insid a BMP. Looked in one in Iraq, makes our wagons look roomy.


Yeah, a four man team would not be bad in there. But a full squad.... 

Ive been on a BMP looking in, but never inside. And yes, that is one cramped vehicle. Like in a Bradley, when you add those outboard facing centerline seats and turret stuff inside. The Marder was a bit roomier. I got to to ride in one of those once upon a time. That was a machine that I really liked.


F is for FIRE, That burns down the whole town!

U is for URANIUM... BOMBS!

N is for NO SURVIVORS...

       - Plankton

LSM


  • Member since
    September 2012
Posted by GMorrison on Thursday, April 25, 2019 11:00 PM

This is an impressive build and a good conversation.

Carlos and Mike, thank you for your service.

APC's never get enough attention.


 Modeling is an excuse to buy books.


  • Member since
    December 2002
  • From: Bury St Edmunds, Suffolk, England
Posted by Bish on Friday, April 26, 2019 6:26 AM

Thanks GM.

I am a Norfolk man and i glory in being so


On the bench: Airfix 1/72nd Harrier GR.3/Fujimi 1/72nd Ju 87D-3

  • Member since
    December 2002
  • From: Bury St Edmunds, Suffolk, England
Posted by Bish on Sunday, May 5, 2019 5:15 PM

Before closeing up the hull, i finished off the weathering by adding a raw umber wash to the sides. This is still understated, i could have spent a week just weathering and it would not have matched how bad our wagons were.

As i am doing a vehicles of our MILAN Plt, i figured i should add a MILAN. I am useing the resin one from Accurate Armour. This is a really nice little kit. In fact, after compareing it to the Hobby Boss one in thier Land Rover kit, i have decided to get another one for that. As well as the detail, the AA kit coems with 6 missiles with end caps and decals. The HB kit gives one with no markings.

With the inside of the vehicles complete, time to add the roof and front. The roof did need some clamping but it got there. I lost one of the handles to the front engine hatch so replaced it with some rod. Also, the kit does not includ blanking plates for the antenna postions your not useing. So i took the antenna bases and sanding them down and added the bolt heads.

After priming i added the exhaust and side bin and then painted. Everything was done with Tamiya Acrylics.

The MILAN post was also painted and put together.

Now to put the decals together and some weathering.

I am a Norfolk man and i glory in being so


On the bench: Airfix 1/72nd Harrier GR.3/Fujimi 1/72nd Ju 87D-3

  • Member since
    August 2012
  • From: Parker City, IN.
Posted by Rambo on Sunday, May 5, 2019 5:20 PM
Very nice Bish, this looks to be a really fun kit to build

Clint

  • Member since
    December 2002
  • From: Bury St Edmunds, Suffolk, England
Posted by Bish on Sunday, May 5, 2019 5:26 PM

Thanks Clint. It is a nice kit, been fun to work on.

I am a Norfolk man and i glory in being so


On the bench: Airfix 1/72nd Harrier GR.3/Fujimi 1/72nd Ju 87D-3

  • Member since
    December 2002
  • From: Bury St Edmunds, Suffolk, England
Posted by Bish on Sunday, May 19, 2019 10:32 AM

Time to wrap up the 432. The kit decals went on nicely but the issue i had was the callsign's and bridgeing plate. In the British army, each company user's a different symbol for its callsign indicator. As i was doing a vehilce of the MILAN Platoon i need the marking for Support Company. While Accurate Armour has a set of yellow callsign markings, they include all the companies apart from Support. So after looking at what i had and woundering if i could modify some thing, i decided to try and print my own.

After figuring out how to draw straight and curved line son paint, i made some i was happy with and printer them out, great. But went i went to place them, the yellow vanished. So then i turned to the forum and got some great advice which boiled down to me having to print on white decal paper. That also meant i had to colour the background to get a close match to the vehicle, one would be on black and on on green.

The decals did come out roug, but for this that was perfect. The callsigns on our vehciles were made useing stencils we did our shelves and then paint was applied with a sponge. So being ham fisted GRUNT's they were never going to be works of art. The decals were a litle thick, what with the decal film and painting to get a closer match, but i was happy with what i had. I hoped the weathering would decal with the slight difference in colour.

The bridge plate was less of an issue as there was no white showing.

After sealing, i did some pin washes useing oil paints. The decals for the rear bins were added after this and they were applied to some styrene sheet, painted steel on the back, before fitting.

After this wet pigments were applied followed by some dry dusting and the final bits fitted. The tracks had been painted and weathered off the vehicle. This master tracks are nice but very fiddly. Some one on Brit Modeller suggested useing wire and i can see why. Each link needs 2 resin pins, one each side, and these are a real pain. I am glad there are spares, i must have lost a dozen. Fit was tight but once together the sag was spot on.

Weathering was restrained some what, apart from anything else, i didn't want to cover the callsign decals after all the hassle, i am really pleased with how they look.

With the base ready, the vehicle was attached and final items fitted. The MILAN is a great little kit and i am deffinetly getting anotehr to replace the one in the Hobby Bose Lanny kit. There are 3 more missles inside. There are also 2 bergans and 2 roll mats inside and the 3 helmits on the roof, all from Accurate Armour.

This build does not represent one certain vehicle, unfortunatly i didn't have any pics to work from. But it does represent the vehcile we had to work with. I am really pleased with how its turned out. This is the first time i have built a subject that i was actually trained to operate, in fact its 2 as i was also a MILAN operator firing 5 missiles during 4 years in the MILAN Platoon.

A huge thank you to the guys who helped pout with the decal issue, it really would not have been the same without those little yellow callsigns.

I am a Norfolk man and i glory in being so


On the bench: Airfix 1/72nd Harrier GR.3/Fujimi 1/72nd Ju 87D-3

  • Member since
    July 2004
  • From: Sonora Desert
Posted by stikpusher on Sunday, May 19, 2019 11:25 AM

Bish that came out great! Excellent work on the build and on the base. 


Was there no mount on the top deck for the Milan? Did the kit come with the Milan? 


F is for FIRE, That burns down the whole town!

U is for URANIUM... BOMBS!

N is for NO SURVIVORS...

       - Plankton

LSM


  • Member since
    December 2002
  • From: Bury St Edmunds, Suffolk, England
Posted by Bish on Sunday, May 19, 2019 11:37 AM

Thanks Stik.

No, the kit didn't come with the MILAN, that was my own addition. And no, these were not fitted with any type of mount, this was somthing improvised by the unit. We never fired live like this, to many saftey restrictions, but we did use them this way on excersise. Had we gone to war, i would like to think we would have got Warriors, we were issued with them in Canada and on other big excersises, and many guys in the Platoon were trained on the Warrior, i was a gunner. The 432's were issued in lieu of getting decent kit if war came.

I am a Norfolk man and i glory in being so


On the bench: Airfix 1/72nd Harrier GR.3/Fujimi 1/72nd Ju 87D-3

  • Member since
    August 2012
  • From: Parker City, IN.
Posted by Rambo on Sunday, May 19, 2019 12:09 PM

This really came out looking great Bish. I think it came out even better with your first hand knowledge of her.

Clint

  • Member since
    December 2002
  • From: Bury St Edmunds, Suffolk, England
Posted by Bish on Sunday, May 19, 2019 1:55 PM

Thanks Clint. I think that does help. I know there are a few things wrong, but i can live with that.


I am a Norfolk man and i glory in being so


On the bench: Airfix 1/72nd Harrier GR.3/Fujimi 1/72nd Ju 87D-3

JOIN OUR COMMUNITY!

Our community is FREE to join. To participate you must either login or register for an account.

SEARCH FORUMS
FREE NEWSLETTER
By signing up you may also receive reader surveys and occasional special offers. We do not sell, rent or trade our email lists. View our Privacy Policy.