SEARCH FINESCALE.COM

Enter keywords or a search phrase below:

Tamiya M41 - and Friend!

7866 views
92 replies
1 rating 2 rating 3 rating 4 rating 5 rating
  • Member since
    May 2011
  • From: Honolulu, Hawaii
Posted by Real G on Monday, August 19, 2019 1:22 PM

Gamera, ha ha, yeah I didn't think about a welding rig for Woody!  Buzz is still in hypersleep in his box, but will be activated at an appropriate time.  Stick out tongue

I got some work on the M41 over the weekend.  I gotta say it's refreshing to work on a kit with so few parts!

I almost felt like I had forgotten to add something to the hull.  The gun crutch would not snap into its socket, so I bevelled its locator pins to allow it to be carefully jammed into place.  Amazingly, it stays in place and still moves.

Since I wanted to use as much of the kit as possible, I started thinning the headlight guards.

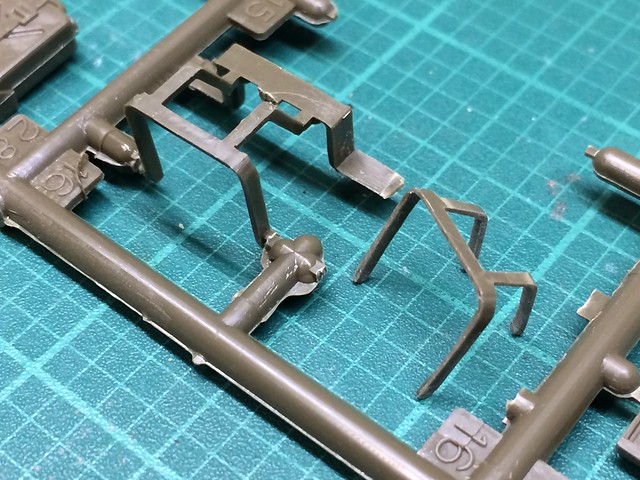
The result is nowhere near P/E and more time consuming, but the hard work is rewarding.

I gave Woody the day off after I sent a tow hook flying off to the ether.  It was just slightly misaligned, so I tried bending it.  It was really glued in good, but suddenly snapped off.  Gaaah, now I have to scratch a replacement.

“Ya ya ya, unicorn papoi!”

  • Member since
    May 2011
  • From: Honolulu, Hawaii
Posted by Real G on Monday, August 19, 2019 6:06 PM

I guess I have no excuses to not crack on with the build, as the AFV Club plastic tracks I ordered arrived minutes ago!

I just hope they fit the Tamiya sprockets...

And I just noticed the track pads are molded from a soft material - vinyl?  If so, I hope the tracks are ABS not styrene.  I have never had any success with vinyl parts on styrene.


“Ya ya ya, unicorn papoi!”

  • Member since
    November 2009
  • From: SW Virginia
Posted by Gamera on Monday, August 19, 2019 8:35 PM

Those are interesting looking tracks. So each link comes with two parts that sandwich pins to hold them together?

"I dream in fire but work in clay." -Arthur Machen


  • Member since
    May 2011
  • From: Honolulu, Hawaii
Posted by Real G on Monday, August 19, 2019 11:36 PM

Gamera, I think the tracks snap together and the rubber shoes glue on afterwards.  I’ll take a closer look tonite.

“Ya ya ya, unicorn papoi!”

  • Member since
    May 2011
  • From: Honolulu, Hawaii
Posted by Real G on Tuesday, August 20, 2019 8:05 AM

OK the tracks definitely snap together.  I tried a few links to see how it would go, and before I knew it, I had two full runs of track!  The links are loose in the bag, and once you develop a rhythm, assembly goes pretty fast.  Pics tomorrow!

“Ya ya ya, unicorn papoi!”

  • Member since
    November 2009
  • From: SW Virginia
Posted by Gamera on Tuesday, August 20, 2019 8:44 AM

Good to hear! The snap tracks are as you said super easy to assemble. The sandwich types are really easy to get a little too much cement on and in the wrong places. 

"I dream in fire but work in clay." -Arthur Machen


  • Member since
    May 2011
  • From: Honolulu, Hawaii
Posted by Real G on Tuesday, August 20, 2019 12:58 PM

Totally agree Gamera!  Compared to the SdKfz.7/1's, where the track pad secured the links together, the M41's track links just breezed together.  And the fact that they came loose was a huge time saver as well.  There was a bit of flash here and there, but not a biggie to deal with.

So here are some pics from last night's work:

The tracks fit the kit sprockets!

A dozen extra tracks are provided.

Aaaaand fit to the running gear is similarly perfect.  Hooray!


“Ya ya ya, unicorn papoi!”

  • Member since
    January 2015
  • From: Tumwater, WA.
Posted by M. Brindos on Tuesday, August 20, 2019 1:45 PM

I'm a fan of AFVC tracks and I think I need a set of these for my M-41.

They look perfect.

- Mike Brindos "Lost Boy"

  • Member since
    May 2011
  • From: Honolulu, Hawaii
Posted by Real G on Tuesday, August 20, 2019 3:19 PM

I think this was the easiest indie link set I have ever done. I still don’t like the soft plastic shoes, but hopefully they won’t cause paint compatibility problems.  My friend will be weathering the model and he uses mostly pigments, so maybe I worry for nothing.

“Ya ya ya, unicorn papoi!”

  • Member since
    September 2006
  • From: Dripping Springs, TX, USA
Posted by RBaer on Tuesday, August 20, 2019 10:03 PM

Quick tracks! They look good too. How are they standing up to handling?

Apprentice rivet counter.

  • Member since
    May 2011
  • From: Honolulu, Hawaii
Posted by Real G on Tuesday, August 20, 2019 11:26 PM

The tracks hold together and don’t come apart.  You will be good if you are careful not to mash off the pins during assembly.  They pass the shakey test, but I wouldn’t try subjecting them to a lot of pulling.  Solvent paints and thinners might weaken the pins.

“Ya ya ya, unicorn papoi!”

  • Member since
    November 2009
  • From: SW Virginia
Posted by Gamera on Wednesday, August 21, 2019 11:28 AM

Ahhhhh, I was looking around at M41 kits and now I want to buy this thing. It's so weird I have to love it.  

Those wacky Taiwanese took a M42 Duster (AA varient off the M41) and slapped a M18 Hellcat turret on it... 

Thanks Real G- your fault!!! Stick out tongue

"I dream in fire but work in clay." -Arthur Machen


  • Member since
    September 2006
  • From: Dripping Springs, TX, USA
Posted by RBaer on Wednesday, August 21, 2019 6:16 PM
I always wondered about that thing. As in: Why?

Apprentice rivet counter.

  • Member since
    May 2011
  • From: Honolulu, Hawaii
Posted by Real G on Wednesday, August 21, 2019 6:32 PM

RBaer, um... maybe the M41 didn’t offer air conditioning as part of the options package?

Gamera, heh heh.  The Devil makes me do it!  Devil

“Ya ya ya, unicorn papoi!”

  • Member since
    November 2009
  • From: SW Virginia
Posted by Gamera on Wednesday, August 21, 2019 7:31 PM

RBaer
I always wondered about that thing. As in: Why?
 

I don't get it either, doesn't seem to offer that big an advantage over the standard M41 or M18.

"I dream in fire but work in clay." -Arthur Machen


  • Member since
    December 2002
  • From: Fort Knox
Posted by Rob Gronovius on Thursday, August 22, 2019 12:40 AM

RBaer
I always wondered about that thing. As in: Why?
 

My guess is that the conversions were cheap. Once the Dusters were out of the inventory and replaced by Vulcans, the chassis were excess and so General Motors, who made both the Duster and Hellcat, combined the more modern hull with a still viable gun from the Hellcat turret.

They've done some very bargain basement conversions, like the M60 hull with an M48 turret brought up to M60A3 standards. It's like why not just get old M60A1s to upgrade or just get M60A3 tanks, we're literally dropping them in the ocean.

  • Member since
    November 2009
  • From: SW Virginia
Posted by Gamera on Thursday, August 22, 2019 7:44 AM

Thanks Rob, that makes a lot of sense. I still think it's a weird vehicle though. 

"I dream in fire but work in clay." -Arthur Machen


  • Member since
    August 2017
Posted by laskdjn on Thursday, August 22, 2019 1:50 PM

Please tell me how you did those weld beads.   They look awesome. 

  • Member since
    January 2015
  • From: Tumwater, WA.
Posted by M. Brindos on Thursday, August 22, 2019 6:10 PM

Weld beads are pretty easy to do. Just like real welding, the more you do the better you get at it and the better your welds look.

The method examples you've seen demonstrated in this thread were just a stretched sprue and glue. There are many different methods, of course, but this peticular one I find is easier to control.

Starting with stretched sprue, like that you would do for an antenna in most Tamiya instructions, you cut the sprue to the desired length to confirm to the shape you wish to "weld" and attach it with liquid cement such as Tamiya's Extra Thin Cement. 

The glue softens the thin sprues of plastic and may require a couple heavy applications to make the sprue pliable. Just wait a few minutes and start poking at the softened sprue with a toothpick or similar shaped tool. Much like sculpting you'll end up pushing the bead into shape. 

If it's too soft give it a little more time before shaping your weld. Not soft enough, add more cement.

I suggest a practice piece first, but this kit is just absolutely perfect for practicing weld beads in this, or any other manner.

Below I have a 1/35 Dragon Su-85M that was missing some welds. It didn't take much effort to add them after all the practice the M-41 gave me lol.

This technique isn't too hard to master. It gets a little tricky on smaller scales, but is totally do-able. 

I hope my instructions are clear enough. It really is simple, but like most techniques, practice makes it simpler.

- Mike Brindos "Lost Boy"

  • Member since
    August 2017
Posted by laskdjn on Thursday, August 22, 2019 9:27 PM

Thank you for that.   Can't wait to try it

  • Member since
    January 2015
  • From: Tumwater, WA.
Posted by M. Brindos on Friday, August 23, 2019 12:48 AM

No problem at all.

- Mike Brindos "Lost Boy"

  • Member since
    May 2011
  • From: Honolulu, Hawaii
Posted by Real G on Monday, August 26, 2019 1:40 PM

I replaced the kit grab handles with some 0.5mm brass wire.  I used the tool in the photo, the "Grabhandler".

Okay, confession time.  This expensive tool is not really worth it.  I seem to ALWAYS need to bend wire at the "in-between" sizes the tool has.  The M41 is no exception, as the closest I could get was slightly too wide.  So I had to drill slightly offset holes to fit the wire replacements.  A clever home made jig would have produced grab handles of the exact size needed.  Take notes, save money, and be creative.

Here are the wire handles just jammed in place with no cleanup.  I'll need to patch the slight depressions molded to the turret to conceal my dirty work, plus make some welds.

That's all I was able to do over the weekend, but I plan on making the missing driver's vision blocks this week.

“Ya ya ya, unicorn papoi!”

  • Member since
    February 2011
Posted by GreySnake on Monday, August 26, 2019 3:27 PM
Nice work so far RG. I’ve always had a soft spot of the Tamiya M41as it was my second ever armor kit I built. You are making the old kit shine. Those grab handles look so much better than the kit ones.  
  • Member since
    May 2011
  • From: Honolulu, Hawaii
Posted by Real G on Monday, August 26, 2019 3:57 PM

Thank you GreySnake!  I’m just having fun, which is what Tamiya models should be about.  My second Tamiya kit was the old M60A1.  I remember using clear tape to make the searchlight “glass”.

I have an idea for making the M41’s vision blocks, so hopefully I‘ll get to them tonite!

“Ya ya ya, unicorn papoi!”

  • Member since
    May 2011
  • From: Honolulu, Hawaii
Posted by Real G on Tuesday, August 27, 2019 1:27 PM

The missing vision blocks for the driver's station were made from bits of strip plastic, cut and arranged to make for painless assembly.

The Chopper tool, unlike the Grabhandler, is very useful and I use it often.  It really is a time saver when cutting multiples of a specific length.  I noticed the manufacturer has an upgraded version, which I plan to acquire.

Here are the periscopes set in place.

...aaaand some braces add a little insurance against them falling in during painting.  Note the one on the right was too big, but I was lazy and just glued it in at an angle.

Here is where the project is at.

I only realized now that this model needs to be finished before the end of September - I'd better hurry it up!

“Ya ya ya, unicorn papoi!”

  • Member since
    January 2015
  • From: Tumwater, WA.
Posted by M. Brindos on Tuesday, August 27, 2019 1:46 PM

Your vision blocks look a heck of a lot better than mine do. I just literally put styrene blocks in mine lol!

I've got the AFV club kit and it looks a ton better as far as details go. But this Tamiya kit will always have a place in my display. I've put a lot of work into it and I'm proud of it. :D

With this level of commitment into this kit, you'll probably feel the same way when you're done.

- Mike Brindos "Lost Boy"

  • Member since
    February 2011
Posted by GreySnake on Tuesday, August 27, 2019 3:22 PM
Those vision blocks look great. It’s going to look really nice once finished.  
  • Member since
    May 2011
  • From: Honolulu, Hawaii
Posted by Real G on Tuesday, August 27, 2019 5:56 PM

Thanks guys!  Making the periscopes was one of the rare occasions where I planned the execution and executed the plan.  I was going to use plain blocks of sheet plastic, but I wanted to try this out.  Usually, my plans go pear shaped midway and I have to fall back on Plan B or punt.  To me, scratchbuilding is an exercise in trying to find the least difficult way to make something, but it usually ends up like watching a "Roadrunner" epsode.  I think that is why I identify with Wily E. Coyote.  But this time, the Coyote caught that darned bird!

Anyway, it's all fun.  Next up is the gun mantlet cover!

“Ya ya ya, unicorn papoi!”

  • Member since
    January 2015
  • From: Tumwater, WA.
Posted by M. Brindos on Tuesday, August 27, 2019 9:35 PM

Be partient with the mantlet cover. Plan it out and measure 3 times. I used a fast food napkin for mine and it looks okay. 

Just take your time with that bugger and it will be alright.

- Mike Brindos "Lost Boy"

  • Member since
    November 2009
  • From: SW Virginia
Posted by Gamera on Thursday, August 29, 2019 11:24 AM

She's coming along great! Good demostration that you don't need to spend a pile of money to dress up a classic kit. 

"I dream in fire but work in clay." -Arthur Machen


JOIN OUR COMMUNITY!

Our community is FREE to join. To participate you must either login or register for an account.

SEARCH FORUMS
FREE NEWSLETTER
By signing up you may also receive reader surveys and occasional special offers. We do not sell, rent or trade our email lists. View our Privacy Policy.