SEARCH FINESCALE.COM

Enter keywords or a search phrase below:

Meng M2A3 Bradley w Busk III and Full Interior: State-to-Finish Build

28394 views
115 replies
1 rating 2 rating 3 rating 4 rating 5 rating
  • Member since
    October 2007
  • From: Louisville, KY
Posted by pordoi on Friday, March 26, 2021 7:35 AM

Builder 2010

I hope that the 200,000 ton container ship that's blocking the Suez Canal is not holding up my "Q" sprue. 


An alternative that you may consider:


https://www.ebay.com/sch/i.html?_from=R40&_trksid=p2380057.m570.l1313&_nkw=meng+bradley+sprue+Q&_sacat=0


From a seller in TN.  If the link doesn't work, search for Meng Bradley Sprue Q.

  • Member since
    March 2012
  • From: Louisville, KY
Posted by Builder 2010 on Friday, March 26, 2021 9:47 AM

Meng has indicated that the Sprue is in the post. I just hope the "post" doesn't go into a container that's now stuck in the Suez. I imagine shipments from China usually go to the West Coast. That's just my assumption. I may be wrong.

As a last resort, I would buy that sprue. Gee... maybe that's where the sprue went in the first place. Just say'n.

  • Member since
    March 2012
  • From: Louisville, KY
Posted by Builder 2010 on Monday, March 29, 2021 9:15 PM

Little accomplished, but plenty of trouble. It was one of those 1 step forward and 2 steps backwards.

I painted some gloss lacquer on the areas to get the few turret decals and when dry, applied them. I then wanted to paint the rubber seal areas of the commander's and gunner's hatches. On its face this shouldn't have been too traumatic, but complacency is a killer. First of all, the commander's hatch LH hinge was frozen. It got glued. Instead of breaking loose, I broke that hinge from its lower part in the turret body. You can't tell that the hinge itself is broken. Lesson learned: Next time put Vaseline in the hinge before assembling to prevent glue intrusion. 

Since painting the seal area, required painting and back-painting a few times, it meant more time with my hands all over the turret. I was TRYING to be careful, but as my mom used to say, "The road to Hell is paved with good intentions!" In this process, I broke off one of the whip antenna at its base. I also bent the 30 cal. coax gun enough that it was not repairable and broke off. And to add insult to injury, I broke off and lost the tiny rear gun sight.

I attempted to drill 0.011" the gun stub and barrel part, but the when I inserted the guitar string pin it broke through the barrel's side. It was almost exactly the same size as some styrene round stock I had. I drilled that and held the two together with that High E Guitar String with some thin CA. It took a while to get it aligned so it was modestly straight. I drilled the business end with the 0.022" drill so it look like a gun. It worked.

I did the same treatment for the broken whip with the guitar string. Worked too.

The lost gun sight is well... lost.

The broken commander's hatch will remain broken, but workable.

The decals are on. I removed the liquid mask from the periscopes, but it was not very successful. Microscale said that their Liquid Mask is not suitable for water-based paints. I'm using water-based paints. I think it dissolves some of the mask and makes it a) hard to remove, and b) lets the paint leak through. Is there a liquid mask that works for water-based paints?

I'm going to try and repaint the periscopes, but that may be an exercise in futility.

For now, Bradley work is on hiatus until the "Q" parts and the new tracks arrive. Stay tuned.

  • Member since
    December 2002
  • From: Valrico, FL
Posted by HeavyArty on Tuesday, March 30, 2021 7:46 AM

Sorry about the troubles.  It looks like it came out well in the end though.  Keep plugging away at it. 

Gino P. Quintiliani - Field Artillery - The KING of BATTLE!!!

Check out my Gallery: https://app.photobucket.com/u/HeavyArty

"People sleep peaceably in their beds at night only because rough men stand ready to do violence on their behalf." -- George Orwell

  • Member since
    March 2012
  • From: Louisville, KY
Posted by Builder 2010 on Friday, April 9, 2021 6:31 PM

Status Report: Picked up the Friulmodel Bradley "Big foot" track kit. I can do that now. Still waiting on "Q" sprue from China. They said it was being posted on March 17. I wonder how long it will take?

Meanwhile, picked up the SH-60b kit so that's now in my possession nad will be put into the building queue.

It's a superb Spring day here in the L'ville and have a nice weekend.

  • Member since
    March 2012
  • From: Louisville, KY
Posted by Builder 2010 on Monday, April 12, 2021 6:32 PM

Started work on the Friulmodel metal "Big foot" Bradley tracks. They're very nice. A little finicky, but better than the Meng plastic ones. The track kit comes with 0.015" brass wire which you must cut for the track pins. I cut a piece and tried it out, and felt it was too narrow and made for a sloppy construction. I have Tichy phos-bronze 0.022" wire that I wanted to use, and have the 0.022" carbide drill needed to clean out the holes. You're instructed to use a .5mm drill to open the holes for their wire. The parts are molded pretty clean and required only a minor bit of filing with a needle file, and less cleanup than Meng's plastic ones.

The wire is cut shorter than the width. One end is blocked by a molded nut head, and the open end receives a tiny cast nut head that seals the end so the wire is captivated and cleans up the look. I taped a piece of the correct length as a gauge to cut the rest. I'm getting 15 pieces from each length and only have enough for one track. I've put an order in for more at my LHS.

This view shows the amount of recess for the track pins. The nut castings get CA'd into position. I'm going to use gel so it doesn't leach down into the pin and prevent movement.

Like I did with the Sherman, and since you need 80 links per track, I'm producing them in lots of 10. It breaks the monotony of drilling and filing 160 pieces.

The tracks are very strong and highly movable, as it should be. I hope the Meng plastic rollers and wheels are able to handle it. It will take a while to complete this, but it's worth it.

  • Member since
    March 2012
  • From: Louisville, KY
Posted by Builder 2010 on Tuesday, April 13, 2021 5:30 PM

Finished the first track of 80 links and started to insert the little nut pieces that plug the open ends. I did order the 0.022" phos-bronze wire, but found that 0.032 wire also could work... maybe even better, so I'm going to try and use that as a test. I still need the 0.022, but maybe not in an emergent situation.

By working on groups of 10 it makes it easy to keep track of where you are. 

These nut pieces are really small and they technically have a right side out... it's the one with the pin extending out of the nut, but I got a couple in backwards. I use gel CA in these applications since it doesn't run at all, stays put and cures slowly giving some maneuvering time. If I need to cure it, I dip a toothpick in accelerator to cure it instantly. The non-running nature is essential in this application since I didn't want any CA to wick into the pin channel and freeze the links.

Their size is evident by the #11 blade in the pic for scale.

I will always use metal tracks going forward whenever possible. Besides their operability, they're metal so when I want to have highlighted wear areas that would show native metal, like on the guide lugs, once I take the paint off, I have bare metal showing. Nothing looks like metal as much as metal.

Still waiting for the Chinese parts. If they don't come I may be forced to buy them on eBay, and I'd really not like to have to do that.

  • Member since
    December 2002
  • From: Valrico, FL
Posted by HeavyArty on Wednesday, April 14, 2021 7:03 AM

The tracks look to be coming along well.  Personally, I don't like metal tracks, to each thier own.

Gino P. Quintiliani - Field Artillery - The KING of BATTLE!!!

Check out my Gallery: https://app.photobucket.com/u/HeavyArty

"People sleep peaceably in their beds at night only because rough men stand ready to do violence on their behalf." -- George Orwell

  • Member since
    October 2007
  • From: Louisville, KY
Posted by pordoi on Wednesday, April 14, 2021 10:41 AM

Are the nuts spaced and oriented on the sprue in a way that would allow you to install them 10 at a time and cut them off after the CA has set?  If so, that might save time and eliminate the orientation errors.  I would go cross-eyed having to work with 160 individual pieces so kudos to your eyesight.

  • Member since
    March 2012
  • From: Louisville, KY
Posted by Builder 2010 on Wednesday, April 14, 2021 5:41 PM

Nope! They're not spaced for installation. Just takes some care, non-shaking hands, and tweezers with the CA removed from them. I can put in about two pieces before the tweezers pick up some CA and end up being more attracted to the tiny part that the hole that's full of the stuff. With clean tweezers, you can place the nut with the shaft side facing up and have decent luck with it.

I did finish one complete track. I connected the ends, but now I'm not so sure that was a good idea. Why? Because I did a test fit on the Bradley and found I couldn't pass the track over the middle idler wheel due to the guide lugs. I have two choices, break the track, which now is almost impossible, since not only are the little nut details glued in place, but the pin below them is glued also and it's sitting deep in the opening so you can't grab it with anything. The track ain't coming apart.

That leaves option two; removing the idler wheel and replacing it when the track is on. I will break its glue joint and pin it with brass like I did with the Sherman for exactly the same reason. The track appears to be the correct length, but it won't have very much slack. It's very flexible as it should be.

I'm going to chemically treat the track to color it, and then paint the rubber track pads. It should work out well... I think.

I was multitasking today building the tracks and 3D printing 190 1/32 scale jumbo concrete blocks. It's a four-step process. I can print 21 at a time. After printing and washing with IPA to remove excess un-cured UV resin, I wash the parts for 15 minutes in an ultrasonic cleaner. They then spend 15 minutes in a post-cure UV chamber. When cured I do a mild hand-sanding to clean up the surfaces, and then they get another quick cleaning and they're done. So while all this was going on I was able to complete on track.

Here's what 177 of them look like. The blocks are for a professional model maker who's doing a municipal model for a NJ authority.

  • Member since
    March 2012
  • From: Louisville, KY
Posted by Builder 2010 on Saturday, April 17, 2021 11:13 AM

Track #2 is 95% complete. I built the 8 groups of 10 in about 3/4 time to build the first batch. Learning curve...

Instead of putting the nut/bolt/washer (NBW) in before connecting the track ends, this time I'm puttin them in after. The track is more stable as a look and I'm able to control it better while positioning these tiny things. There are a lot of extra links and NBWs so I'm no longer panicked over losing any of them.

I'll have these finished on Monday. I only have about 25 more to go. Then it will be an alcohol wash to remove any oils and then chemical treatment to turn it all rust brown, followed by painting the rubber pads and removing paint on the wear points.

I'm toying with putting the model on a diorama base. Since I want the engine compartment open, I'll have to concoct a scenario where that makes sense.

  • Member since
    December 2002
  • From: Valrico, FL
Posted by HeavyArty on Saturday, April 17, 2021 8:12 PM

Coming along nicely.

Builder 2010

I'm toying with putting the model on a diorama base. Since I want the engine compartment open, I'll have to concoct a scenario where that makes sense.

 
Mainenance scenario in a forward motor pool in Iraq.  Still have to do maintenance in a warzone.  You can put it on a concrete pad or in a gravel yard.
 

Gino P. Quintiliani - Field Artillery - The KING of BATTLE!!!

Check out my Gallery: https://app.photobucket.com/u/HeavyArty

"People sleep peaceably in their beds at night only because rough men stand ready to do violence on their behalf." -- George Orwell

  • Member since
    February 2013
  • From: Wichita, Kansas, USA
Posted by Recon89 on Monday, April 19, 2021 9:49 AM

On my tracks, I always leave 2 or 3 long pins sticking out from the track till I know that everything fits. Then I have something to grab and remove if I have to add or remove a track. After that, I can cut them off after installing the tracks.

  • Member since
    March 2012
  • From: Louisville, KY
Posted by Builder 2010 on Monday, April 19, 2021 5:45 PM

Well... now you tell me. I was able to pull out pins that were slightly long and that interfered with gluing in the NBW. I clipped off just a tad and things fit much better. I got both tracks completely built, degreased and cleaned and ready for paint.

My idea to chemically color the tracks did not work. The JAX Brown/Black treatment only works on copper and copper alloys (bronze and brass). It did nothing on white metal. They may have a chemcial to do that. If they do that would be a better more predictable way to apply base color to the track instead of paint. 

After washing in IPA, I put the tracks into a plastic bin with the chemical. After about 10 munutes nothing was happening. With brass, the coloration starts immediately. I then rinsed the tracks in water and put them in the ultrasonic for about 10 minutes. I rinsed in water since the Ultrasonic has some Simple Green in it. After blow drying with the heat gun I hung them up to wait until the next step. I was concerned about the Ultrasonic popping any NBWs loose, but this did not occur. The tracks are spotless!

Re: "Q" parts sprue: It's been a month since the Chinese informed me that they were posting the parts. I sent a note yesterday to prod them and find out what's what and this is what I got.

"Hello Myles, 
 
I checked again and seems that our colleague forgot to send it to you.
I'm really sorry about that. 
We will send it to you and inform you of the tracking number thisFriday.
 
Best Regards,
MENG After-sales team"

They then asked me for my address again which I sent immediately. So at least I know that the parts were not on Ever Given stuck in the Suez Canal. So there's that...

I'll keep y'all posted.

  • Member since
    March 2012
  • From: Louisville, KY
Posted by Builder 2010 on Wednesday, April 21, 2021 11:46 AM

For all intents and purposes, the "Q" parts are underway... again. I am patient.

Meanwhile, I tried to get the complete track look to fit over the center idler and, as predicted, I had to break it off to make it work. So I immediately located and drilled the hub and wheel for a hefty 0.032" piece of phos-bronze wire, and then broke the other side and did the same thing. I will be painting the under-skirt area now, painting and weathering the tracks and installing it and all the wheels. This is okay to do before the Q parts arrive since, the massive ERA skirting covers so much of the tread area. I will mask all of that for the rest of the paint job.

I bought a cheap pine base that will be used in the little diorama upon which I will display the vehicle. It's quite crude, but will mostly covered up with stuff. I stain and finish the exposed areas and seal the parts that will be decorated.

I'm replacing the Microscale Liquid Mask with a product from Molotow. Microscale's is actually NOT formulated for water-based, acrylic paint. It's why it was so hard to remove from the periscope faces after I painted them. It dissolved into the paint and made more of a mess than protect it. Molotow is formulated specifically for water-based paint. I removed the mask on the periscopes that haven't been painted yet and used the new product. It comes in a felt-tipped dispensor like their chrome pens. It also protects against alcohol-based paint i.e., Tamiya.

  • Member since
    March 2012
  • From: Louisville, KY
Posted by Builder 2010 on Wednesday, April 21, 2021 6:15 PM

I was getting a strange, "403 Forbidden" error when trying to upload today's post. So I just ran a test and that worked so I'm going to try again.

Painted the hull bottm and under-sponson stuff in preparation for the track installation. I I also got the first coat of paint on the tracks. 

 I first tried to paint the tracks with Tamiya Dark Iron by laying the loop on its edge and rotating it as best as I could to airbrush the inner and outer facing surfaces. This was so-so. Then I remembered my lazy susan and positioned the track centered on it. I just rotated it smoothly and first aimed the gun at the outer surface, and then inner. I did the same to the second track. I then turned it over and did it again. I ended the exercise by hanging the track onto the handle of a dental tool and twirling the tool slowly which caused the track to rotate over the handle exposing the track joints as they curved around the handle. I lightly airbrushed the joint areas to finish up the first coat.

Next session I'll go over these tracks with some rusty red, then some dusty sand. I will tend hand paint all the track pads and weather the various wear points on the tracks.

As far as I can tell, the "Q" parts should be one there way... for real this time.

  • Member since
    December 2002
  • From: Valrico, FL
Posted by HeavyArty on Wednesday, April 21, 2021 8:20 PM

Tracks look good so far.

Gino P. Quintiliani - Field Artillery - The KING of BATTLE!!!

Check out my Gallery: https://app.photobucket.com/u/HeavyArty

"People sleep peaceably in their beds at night only because rough men stand ready to do violence on their behalf." -- George Orwell

  • Member since
    March 2012
  • From: Louisville, KY
Posted by Builder 2010 on Thursday, April 22, 2021 5:53 PM

Thanks Gino!

Track painting is done today. I studied lots of Bradley pictures (probably 40 of them) to see just what color the tracks become. They're kind of a dusty, rusty, metal-looking color.  I still have to weather it some more with powders and bare some metallic areas like the little flat edges that stick up from the each link. I first airbrushed some rust. I almost blew it because my rust color happened to be Vallejo, and Vallejo doesn't like alcohol as a thinner. I mistook it for Tamiya. It didn't screw it up. I then went back and airbrushed a light coat of Tamiya Buff. When this was dry I hand brushed Testor's Dullcoat on each track pad to seal it in preparation for the tire black paint.

This was after the dullcoat was applied.

When the Dullcoat was dry I hand-brushed Tamiya Rubber Black lightened a bit with Flat White. It was not as difficult as I thought it would be and I didn't use any mask. Here's the first pads being painted.

And here's both tracks fully painted. I'm going to use some light dust pastel to further make them look real. So far I'm pretty happy with them, and I love the fact that you can handle them and they don't fall apart.

In my photo studies I also found that the idler wheels have rubber tires like the road wheels. Having the main idlers now removable facilitated painting them. To further this effort I was able to hold the phos-bronze shaft with a pin vise. The singler idlers were still glued to the hull and I had to paint them where they were.

I also noticed that the tips of the drive sprockets are worn smooth and fully metallic. I will do this here also probably highlighting the tips with the Molotow chrome pen. This tank will be used, but not beat up. I saw a lot of images of Bradleys that weren't all beat up.

I also saw pictures of hundreds of them pouring out of the bowels of RORO ships (roll on roll off). That's the way we move our military hardware around the world in massive ships that hold hundreds of these things. We don't move the bulk by C5-As or C-17s. What follows may or may not be of interest to you, but it was interesting to me.

Here's how that thing looks disgorging some Abrams tanks. This ship, the ARC Endurance is one of a fleet of nine owned by ARC. This one's the biggest at 868 feet long. It's a beast and can hold a lot of military equipment. The ramp alone can support 350 tons.

https://bit.ly/2xSgeWN

and here's a sample of what comes out of it. That's a lot of Bradleys.

Here's the business end of the Endurance.

And here's the full-length of the ship.

The front and rear mudflaps are black rubber that's painted and then worn through back to the rubber. I'm going to that too.

See ya tomorrow.

  • Member since
    March 2012
  • From: Louisville, KY
Posted by Builder 2010 on Friday, April 23, 2021 6:15 PM

Finished the tracks and installed them today. First I scraped off the paint on the alignment lugs to bring them back to bare metal since these things would constantly be polished in use.

Then, as you notice in this close up of a late model Bradley track, that the little bars that extend out from the hinge bosses wear down to base metal,

So I removed the paint from these details on the Friulmodel metal tracks. Also notice on the above image that the tips of the sprocket teeth are worn to bare metal also.

I applied a coating of dust-colored pastels to the track and they were finished ready for mounting. 

After putting on all the road wheels, some of which took some coaxing, I dusted them the pastels also, and then put the idler wheel in the track, put it one and then installed the drive sprocket into the track and then onto its mounting shaft. Finally I replaced the now-removable idler wheel. One track fit pretty well with enough slack over the idlers, 

But the starboard side was too slack. About one link too slack. 

I had to remove a link, which I was dreading. I first popped off the NBW, and then was able to work around the recessed pin. I was able to get it elevated enough to grab it with tweezers, so now the track was broken. Good! Then I had to remove that link. It's pin was not cooperating. I was able to break away the link around the pin in the mid-link area and was able to grab it and push it outwards and remove it. I was sacrificing that link anyway so it was fine that it got wreck. Reconnecting the track and installing a new NBW was easy. Now the track fits like the other side. I don't understand why one track was longer since I was quite careful to make sure that each had 80 links. I was fortunate that I could remove a link even with the CA holding the pin. Again, it was prudent to use the Gel CA which did not weep down the pin's channel and completely seize the pin in place.

Here's a front view showing how the tracks look.

And the rear view,

I think the track looks very real, and going with the metal tracks was the right decision even if I did attempt to use the kit's plastic version.

Here's the drive sprock with its teeth chromed with the Molotow pen.

I got a tracking number from the Chinese, but it's not reporting any status yet. I'm suspecting that Q parts will arrive maybe next week. Until then, I'm going to work on the diorama base.

  • Member since
    December 2002
  • From: Valrico, FL
Posted by HeavyArty on Friday, April 23, 2021 7:41 PM

Looking good.  The tracks still look too loose to me though.  These are live track, which means they have tensioners in them and are not really slack at all.

It may be my screen, but the color looks way too yellow.  CARC Sand is more of a beige color.  The closest model paint color is Testors Model Master Sand (FS33531).  Once weathered, it looks spot-on to me.

Gino P. Quintiliani - Field Artillery - The KING of BATTLE!!!

Check out my Gallery: https://app.photobucket.com/u/HeavyArty

"People sleep peaceably in their beds at night only because rough men stand ready to do violence on their behalf." -- George Orwell

  • Member since
    March 2012
  • From: Louisville, KY
Posted by Builder 2010 on Saturday, April 24, 2021 10:29 AM

I suppose I could take out another link. But... I'm concerned that my luck might run out. It's one thing to damage the link I'm removing and another to damage the link that has to remain. The sag will be completely obscured by the skirting. My top color will be much lighter like I did with the turret. None of the sides or hull top have been painted. I only did the wheels and the under sponson area.

The RyeField Sherman had an eccentric on the idler pulley that let you tension the track. It's a shame you can do that on this model. It's not a problem to remove the track so I guess I will attempt to remove the link. I have a lot of links left, but they're all unpainted.

  • Member since
    March 2012
  • From: Louisville, KY
Posted by Builder 2010 on Saturday, April 24, 2021 4:40 PM

First of all, the elusive "Q" parts arrived today. Just in time! They came from China, halfway around the world.

I found that I hadn't put on one part of the Driver's hatch hinge system, so I did that today. That's after it hit the floor requiring multiple sweepings to find it.

It was a nasty, rainy Saturday so the CinC said I should work in the basement. I started preparing the baseplate for the diorama. The pine end grain was awful. It's also got a little cupping, buy that won't matter in this application. What do you expect of three bucks and change. I sanded, sealed and then filled with light DAP spackle. It's the kind that goes on pink and turn white when dry. I'm not going to stain or do a furniture finish. I'm going to paint the exposed edges, so as long as they're reasonably smooth I'm okay.

Filled before sanding:

And after sanding:

Work will commence on Monday putting all those Q parts onto the hull and turret so the final painting can start. Q includes some of the applied armor, the ERA panels and the Comander's bullet-proof glass shield around the hatch. 

  • Member since
    November 2005
  • From: Formerly Bryan, now Arlington, Texas
Posted by CapnMac82 on Saturday, April 24, 2021 4:59 PM

Builder 2010
My idea to chemically color the tracks did not work. The JAX Brown/Black treatment only works on copper and copper alloys (bronze and brass). It did nothing on white metal. They may have a chemcial to do that. If they do that would be a better more predictable way to apply base color to the track instead of paint.

Yeah, you needed BlackenIt (Bluejacket is a soruce) which blackens britannia metal and similar alloys.

If memory serves, there was a "browning" solution as well, but that may have slipped by the wayside.


  • Member since
    March 2012
  • From: Louisville, KY
Posted by Builder 2010 on Monday, April 26, 2021 5:32 PM

I may actually have some of that left. If not, I'll get some more.

Got deeply into the "Q" parts today and am only a day away from finishing all the assembly. First thing I did was bite the bullet and remove another link from each track. So for all those who are going to build this kit with Friulmodel tracks, it only takes 78 links, not 80. I got it down to a science on how to take the track apart, get the link out and rejoin without making a mess. You have to sacrific the removed link so you can expose the pin and start it out of the hole so you can grab it with pliers to pull it all the way out. If you cut away the sacrificial link carefully, you don't damage the good link. With the tracks tensioned correctly it rides on the road wheels better.

If I was going to adjust the track, it had to happen now because the skirting completely hides almost all of the track area. I started adding the Q Parts with the rear end. The light housings for the ac units hanging on the rear are Q parts. I put them onto the AC and then hung the AC on the vehicle. I also added a filler piece that closes off the mount top area.

I still have to install the light fixtures in the rear. I could have done this before gluing the housings in, and I did so for the front lights.

As I was preparing to throw out any finished sprues, I checked to see if any parts remained on any of them. And there were! There were a couple of odd-shaped add-on armor panels that went around the driver's hatch, and there this:

And this:

With the tracks now correct I was able to install the mud flaps front and rear. I painted the undersides of these while on the sprue. After gluing the flaps in place I painted the topsides, both sides being Tamiya Rubber Black.

Front:

Rear:

I'm going to add some liquid mask to the mud flap faces working from the front edge upward, that will be peeled off after the body color is applied revealing the exposed "rubber" below. I still love those Friulmodel metal tracks.

It was now, finally, the time to build and apply the ERA that had lots of parts on Q. The side skirts with the ERA are massive that totally change the Bradley's appearance. There are quite a few parts in each side skirt assembly.


And now you know why, all of the suspension work and painting of the sponson areas were for my benefit only since they're totally hiddened by the skirting.

The last things I did was start on the front ERA. There is a suspension rack that glues to their undersides and that, in turn, glues to the vehicle. I had trouble figuring out how the headlight box glued to the small ERA on the left. It just couldn't find the right purchase to settle down. And the glue got a little messy. The center large ERA that sits on the engine cover was a challenge also. Again, it was fussy getting it to settle in the correct spot and it probably took me five minutes just to keep fiddling with it until I was satisfied it was correct. Gluing the assembly to the tank was the easy part.

After all the painting is done, I will paint the lamp sockets with the Molotow Chrome pen and then color the back sides of the lenses that are red/orange with Tamiya Clear colors. I will then use Testor's Canopy cement to glue in the lenses. Another possiblity is to glaze them with Bondic, but that's if the kit's lenses don't go well.

Compared to the flimsy armor on the old M113 APC's, this thing looks like a fortress. I think future modifications are going to strengthen the flat bottom against IEDs.

  • Member since
    December 2002
  • From: Valrico, FL
Posted by HeavyArty on Monday, April 26, 2021 5:50 PM

Looking good.  The tracks came out nicely.  One other thing that it looks like you missed are the tow plates on the underside rear of the hull.  They are on the J sprue (J23 x2),  see step 36 below.

Gino P. Quintiliani - Field Artillery - The KING of BATTLE!!!

Check out my Gallery: https://app.photobucket.com/u/HeavyArty

"People sleep peaceably in their beds at night only because rough men stand ready to do violence on their behalf." -- George Orwell

  • Member since
    March 2012
  • From: Louisville, KY
Posted by Builder 2010 on Monday, April 26, 2021 9:08 PM

Not to worry, they're there. Picked that up on Saturday. 

  • Member since
    December 2002
  • From: Valrico, FL
Posted by HeavyArty on Tuesday, April 27, 2021 6:58 AM

Good deal.  Sounds like you have it all sorted out.  Can't wait to see it finished and on the base.

Gino P. Quintiliani - Field Artillery - The KING of BATTLE!!!

Check out my Gallery: https://app.photobucket.com/u/HeavyArty

"People sleep peaceably in their beds at night only because rough men stand ready to do violence on their behalf." -- George Orwell

  • Member since
    March 2012
  • From: Louisville, KY
Posted by Builder 2010 on Tuesday, April 27, 2021 5:35 PM

Gino, I joined the Kit forum after reading your thread on the Rocket Launcher. Another forum on which to contribute. You might think I have a lot of free time...

After installing the last piece of ERA I masked the tread area and painted the four coats on the hull: Straight Desert Yellow, lightened Desert Yellow, some Tamiya Buff and finally a really lightened Desert Yellow. The hull wasn't matching the turret which I painted weeks ago which is why I further lightened it. I did the light coats in the center of panels and upper facing surfaces, but after looking at it, I need to further lighten the ERA side armor. It's still too yellow. Before painting I did apply the Molotow liquid mask on the mud flaps.

And the other side:

I also built and painted the Commander's glass shield. When dry I applied the glazing using Testor's Canopy Cement and then went back and paint the little bit of frame that was attached to the glazing. Other than the main gun, the turret is now complete. I scratched the center glazing when removing the spure nubs. I will diminish it with some Pledge floor finish.

Next session I'll go back and lighten the sides a bit. Then I'll gloss clear coat it in prep for panel accenting and decaling. I also painted the track tools with the light desert sand and will paint the implements before installing them.

The only parts left on any sprue is the main gun and a couple of individual track links that will get some kind of metallic treatment, and then the light lenses. 

  • Member since
    March 2012
  • From: Louisville, KY
Posted by Builder 2010 on Wednesday, April 28, 2021 5:22 PM

Doing punch list items: Track tools, rear lights, spare track link, repaint sides, clear coat, etc.

I don't know about you, but airbrushing a multi-coat, multi-shade finish is almost impossible to touch up easily. I painted the track tools while on the sprue, the glued them to the hull. The paint got a bit munged up on one of the panels so I attempted to brush paint it to bring it back. Trouble was I couldn't get the shading right. First it was too dark, then too yellow and finally, probably a bit too light. It's due to the eveness that an airbrush feathers one shade to another. It's almost impossible to duplicate this with a brush... for me. So you might see some shading differences. I gave up on the brush painting and resorted to the air brush at least get the feathering right.

The tools on the other side came out a little better.

After putting these in place I airbrushed the whole deal with Tamiya Clear Gloss. I pre-mix my colors in the Badger compatible bottles and had some Tamiya Clear Gloss already containing some, although it needed more. After adding the clear, IPA and a few drops of extender to aid in flow, I noticed that it was cloudy. Okay! The bottle didn't have clear gloss. It was clear flat, so I dumped it and made some more. The clear gloss is to facilitate using Tamiya panel accent which, when put on a flat finish, flows all over the place and not just in the targeted grooves. It was still tacky by the end of the session and it was booming like crazy outside with a really classic thunderstorm, so I stopped work early. 

I had installed the rear light and painted the turn signal and fog light lenses with Tamiya clear red, which also need to dry fully overnight.

I also screwed up the paint next to the exhaust stack. I wanted to add some soot powder. The powder stuck to the not-quite-dried clear and made it very black. I attempted to remove it and using a brush with a little IPA, ended up removing the top coat back to the really yellow stuff. I attempted to get that back to the right shade, but it will still need more work I'm afraid. I'll use the airbrush tomorrow. (is "air brush" one word or two... I seem to use both)

All of this trouble goes back to my long-standing understanding of my skills. I am not patient... I am persistent. When I screw up, it's always becasue I didn't give paint or glue enough time to dry properly.

Next session I'll continue to do some final finishing and add the remaining decals. Then I'll dull coat the whole deal and it will be finished. And on to the base.

  • Member since
    March 2012
  • From: Louisville, KY
Posted by Builder 2010 on Friday, April 30, 2021 6:21 PM

Today was the end game for the Bradley itself. I still have to create the display base. A lot of odds and ends and a couple of heart stoppers, and some not-so-acute concerns.

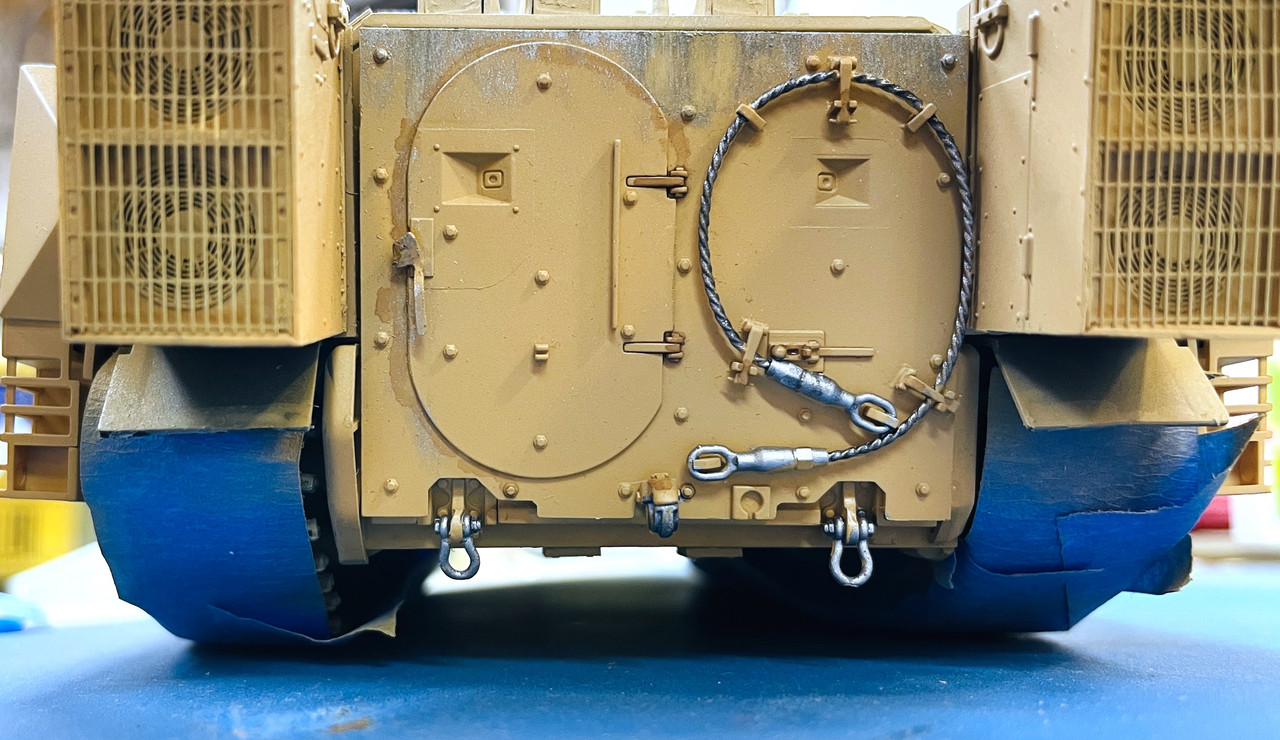
First up; detail painting the back of the lift gate. Unfortunately, all this beauty will be hard to view since I'm posing it with the gate dropped, but we all know it's there. Notice, I repositioned the door handle so it's in the correct downward position. I also made some bare metal where it would be rubbing on the ground. Painted the cable and liked how it worked out. Painted the towing clevises with my "galvanized steel" color which is a flat aluminum and gun metal mix.
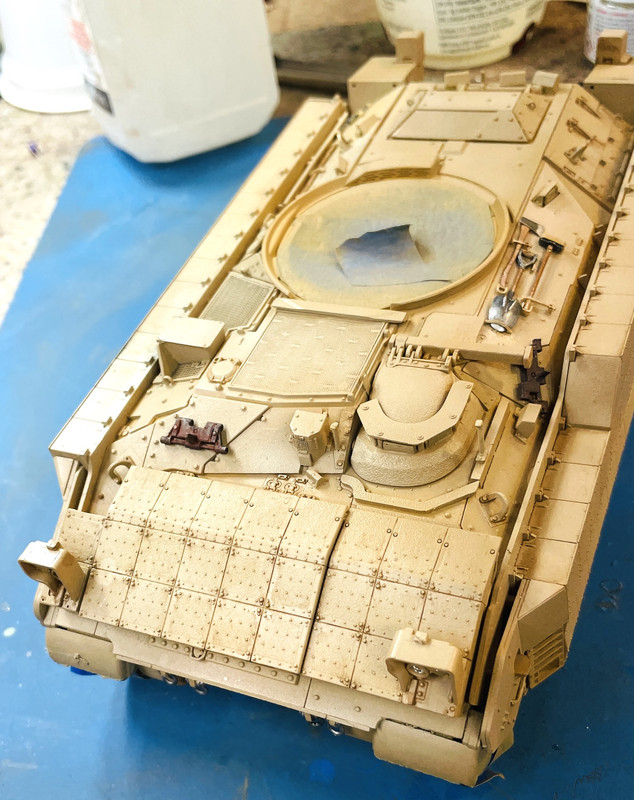
I went over the entire vehicle with Tamiya Brown Panel Accent. I put in in the upper ERA seams, and the granular surface (anti-slip?) on the upper and front blocks, various seams, bolts and hinges, and any other thing that I thought needed accenting. After it dried a bit I removed the excess with Q-tips dampened with low-odor mineral spirits. The effect is subtle, not bold.
I added the "PINCHPOINT" decals the reside at the upper and lower side ERA joint. There are 15 on each side. Meng inlcuded 2 extra. You will need them. 

The decals silvered a bit even with the Tamiya clear gloss coating. 

I opened the drop gate to prepare the exposed upper surface. I glued the hinges into the open position, but they were not holding and were, in fact, breaking. After doing the surface treatment off the vehicle, I drilled and pinned the hinges with 0.022" phos-bronze. Much more secure. I took the pictue before pushing them all the way home. I used med CA on the pins as I inserted them. The drop gate is no longer positionable, but considering how frail the kit hinges were, it really never was.

The lift gate was treated with various pastel powders, brown panel accent and very light coat of AK Interactive Real Metal.

Through all the handling, the vertical thingamabob left of the driver's hatch (Gino, what is that?) kept bending over and was in the process of breaking. I removed it and attempted to drill it with the small 0.011" drill for the guitar string, but the hole was not centering and broke out of the side. I substituted some styrene rod and it worked. I then cut off the tiny flat piece from the original and glued it to the new one.

And then the outer shell of one of the drive sprockets fell off. This was potentially more troublesome since access was severaly limited with the ERA skirts and mud flaps now blocking most of the area. And the sprocket face has a key slot that needs to align with the other half. I use Testor's tube cement, and worked it under all the obstacles and amazingly got it to settle in correctly.

I had trouble installing the light glazing. Instead of breaking anything I chose to use Bondic on the headlights. I was able to put in the turnsignal/breaklights, but they didn't snuggle into the housing as they should. I used Testor's Canopy Cement.

The model was ready for the final coat of Tamiya Clear Flat which I applied.

I had a lot of trouble removing the Molotow Liquid Mask. The stuff just wouldn't pull off in a sheet. It came off in little bits and required lots of fussing, not much better than the Microscale. Next time I do periscopes I'm using masking tape or bare metal foil. I put a coat of Pledge with Future on all the periscopes to give a bit more luster after all the scraping.

I saw that the top hatch also had a rubber seal raised area and thought it should be black. I attempted... poorly... to color it with a black Sharpie and made a big mess. It required a repaint. Actually, I had never painted the underside thinking the kit's yellow might work for an underexposed area. I masked the opening and used the Badger Fine Line airbrush.  No harm no foul!

With that last task... oh... and I put some gloss Tamiya Clear Smoke around the fuel filler caps. Not a lot of spillage, just a little bit... It was time to make the turret to the hull. Got it together without breaking anything. Miracle!

I painted the aft end of the Bushmaster barrel with Gun Metal, used some Testor's Tube Cement and install the gun. I then finish painting it on the tank. I highlight the muzzle wit the metal paste since pictures show that firings polish that area a bit.

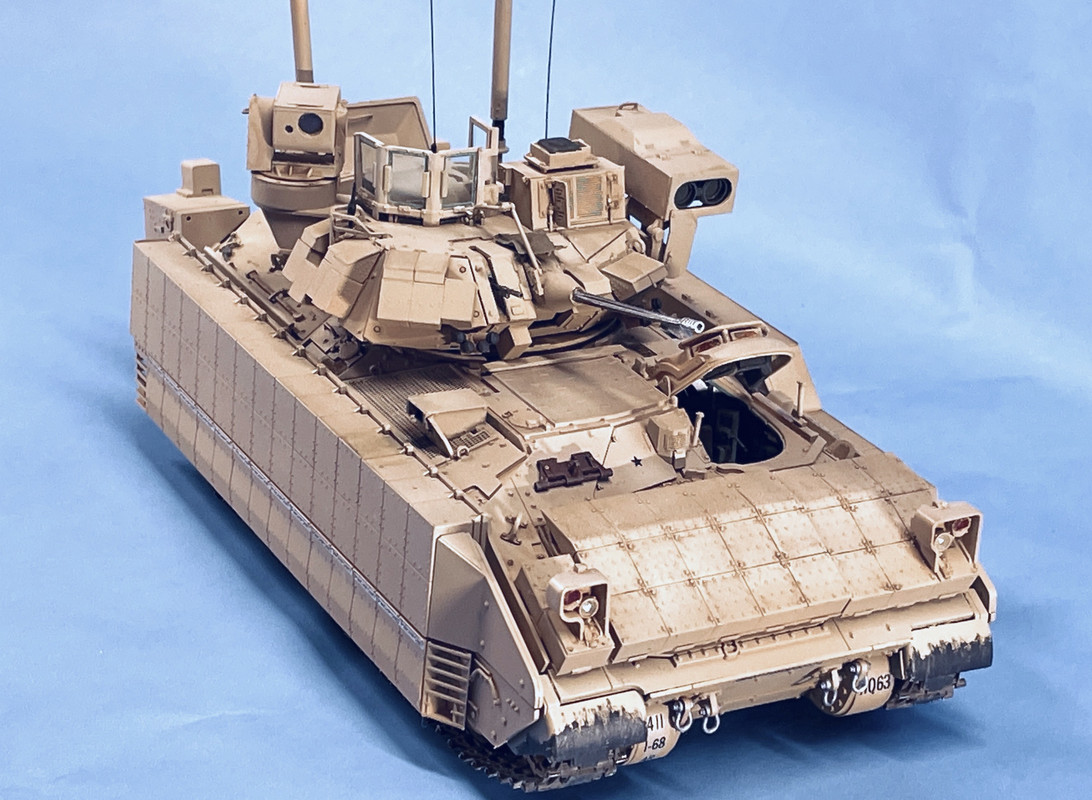
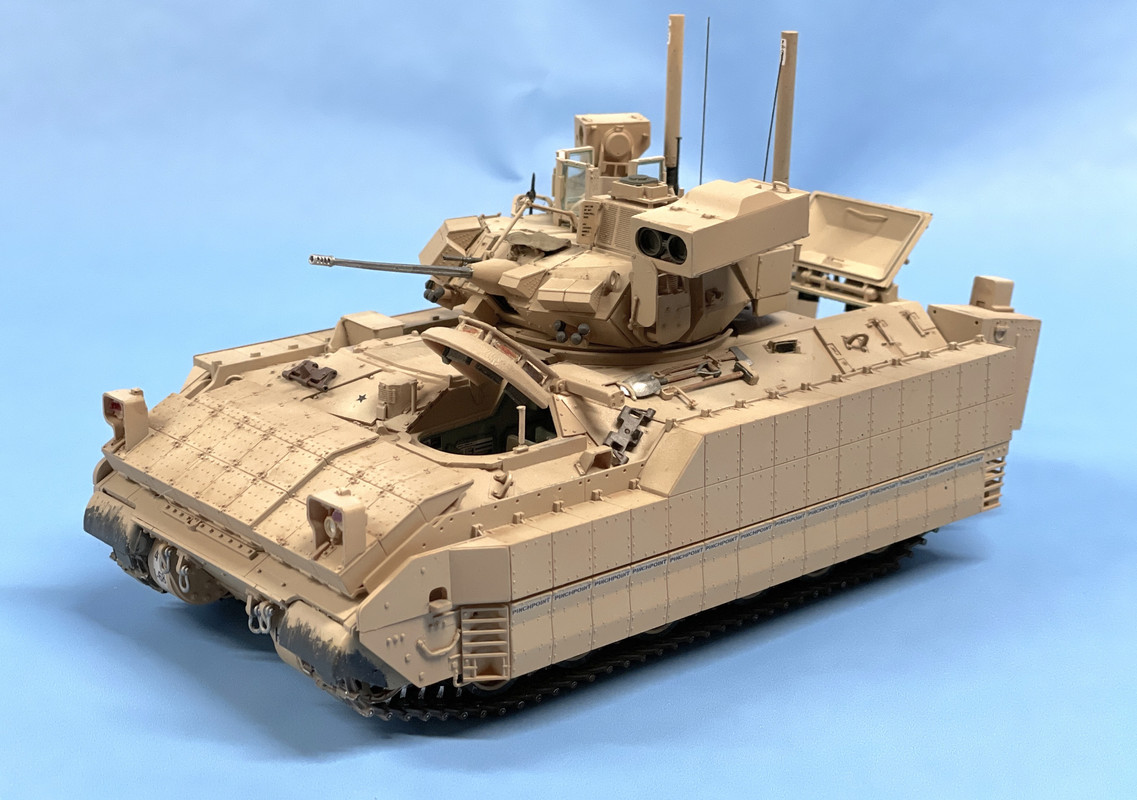
And the model IS DONE! Here are some beauty shots. I found that right out of the phone's camera, the finish was too yellow... much more than appeared to my eyes. I messed with the post-processing controls: Exposure, Temperature, Contrast, Highlights and Shadows and got it a little better. But when I reduced the Saturation, it finally looked like it did in the flesh.
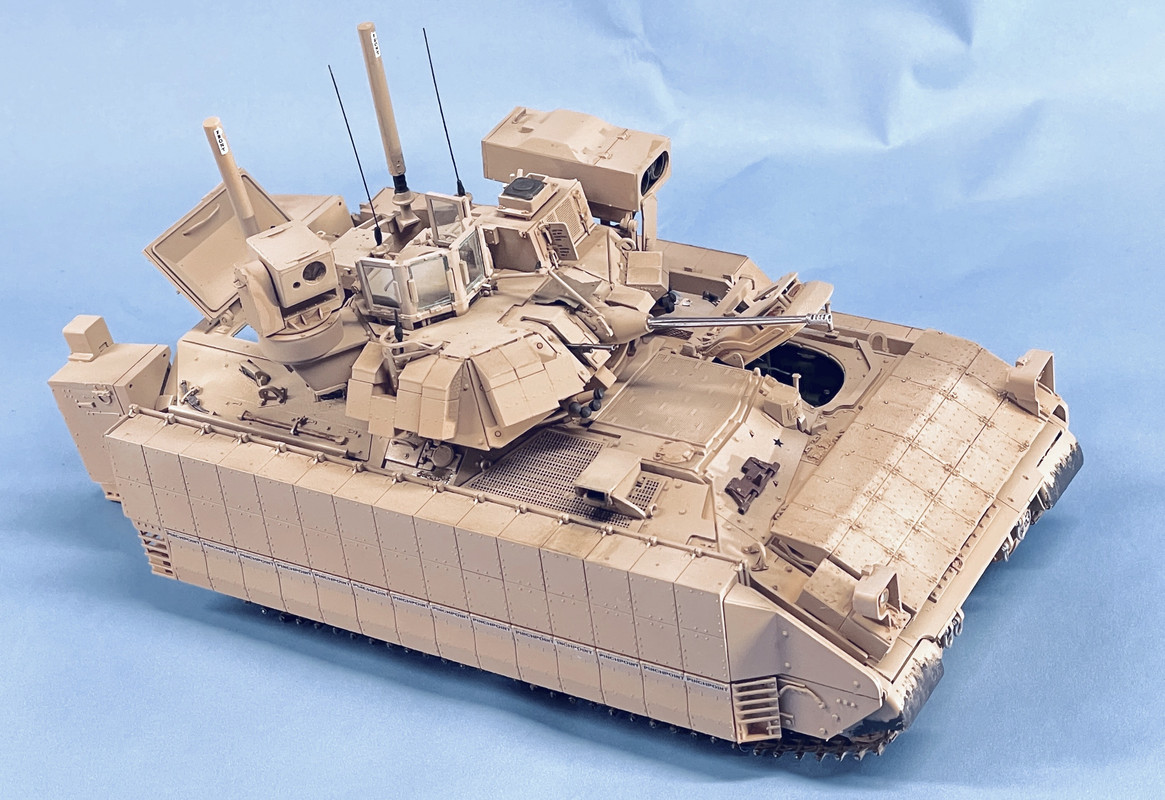
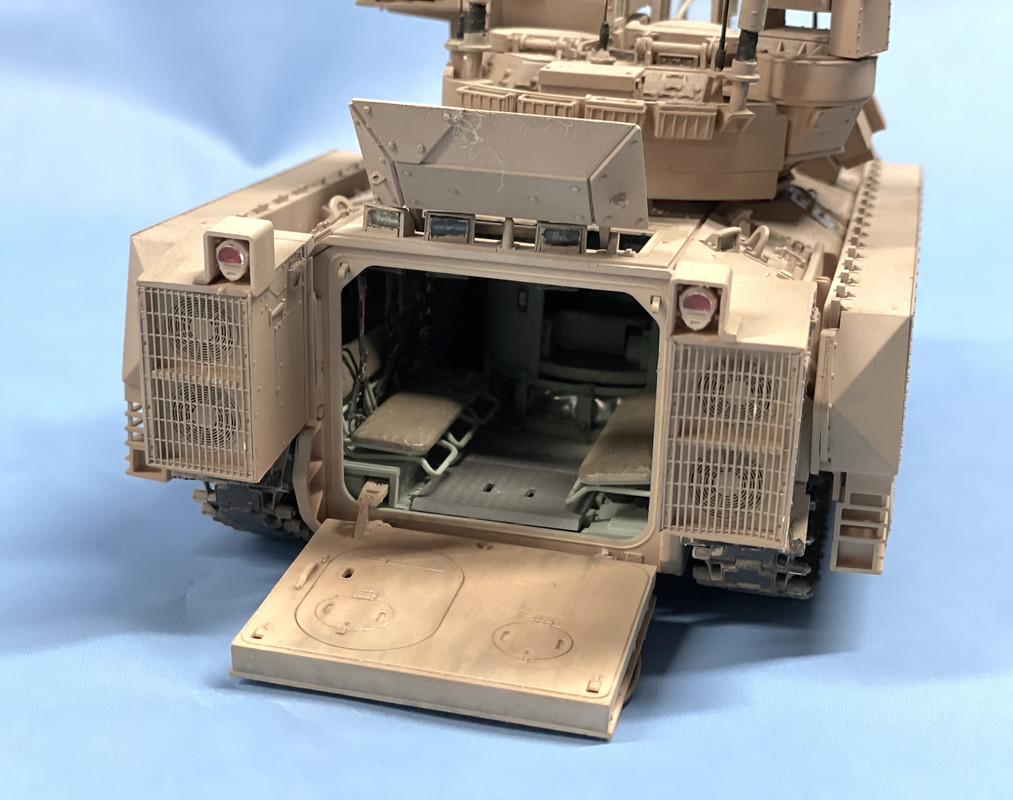
I still have to build the base and will do that next week. Since the machine is going to be sitting with all its opening open, I'm going to situate in an area that looks like motor pool. That means a concrete pad, and not a desert road. I'll be posting that too. I got the hood open, put the metal lift piston rods in place and reinstalled the hold-open latch and then took these pictures.
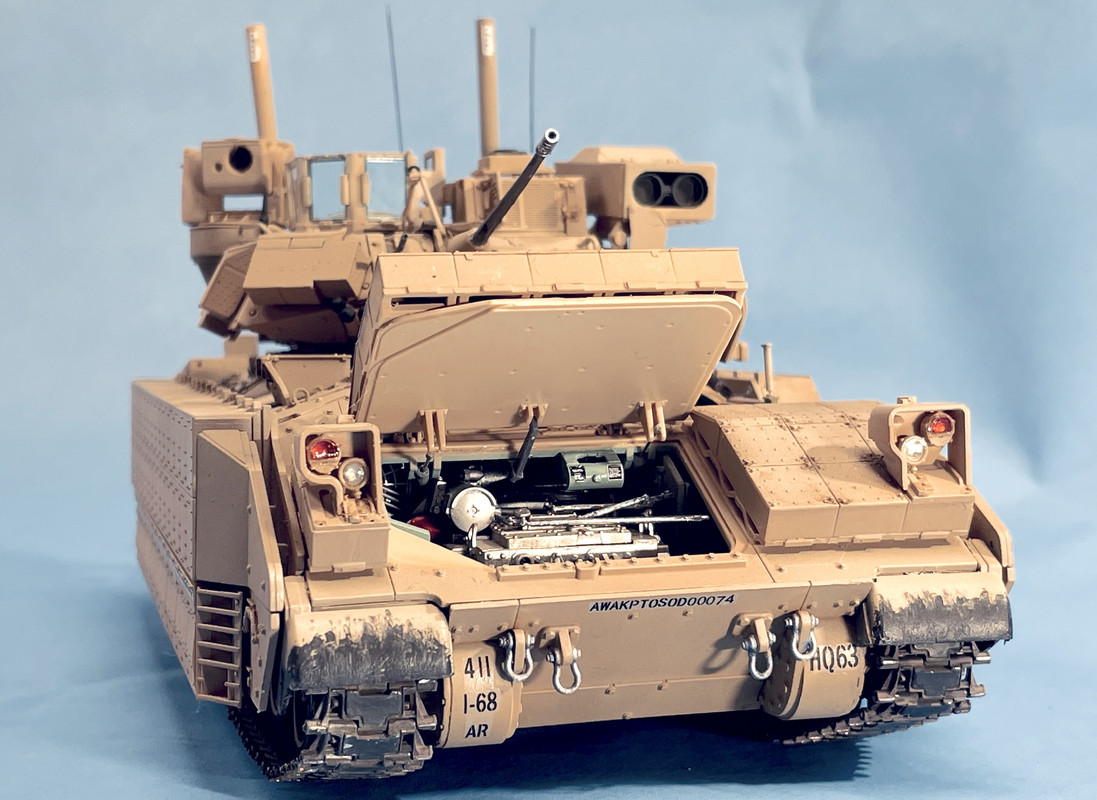
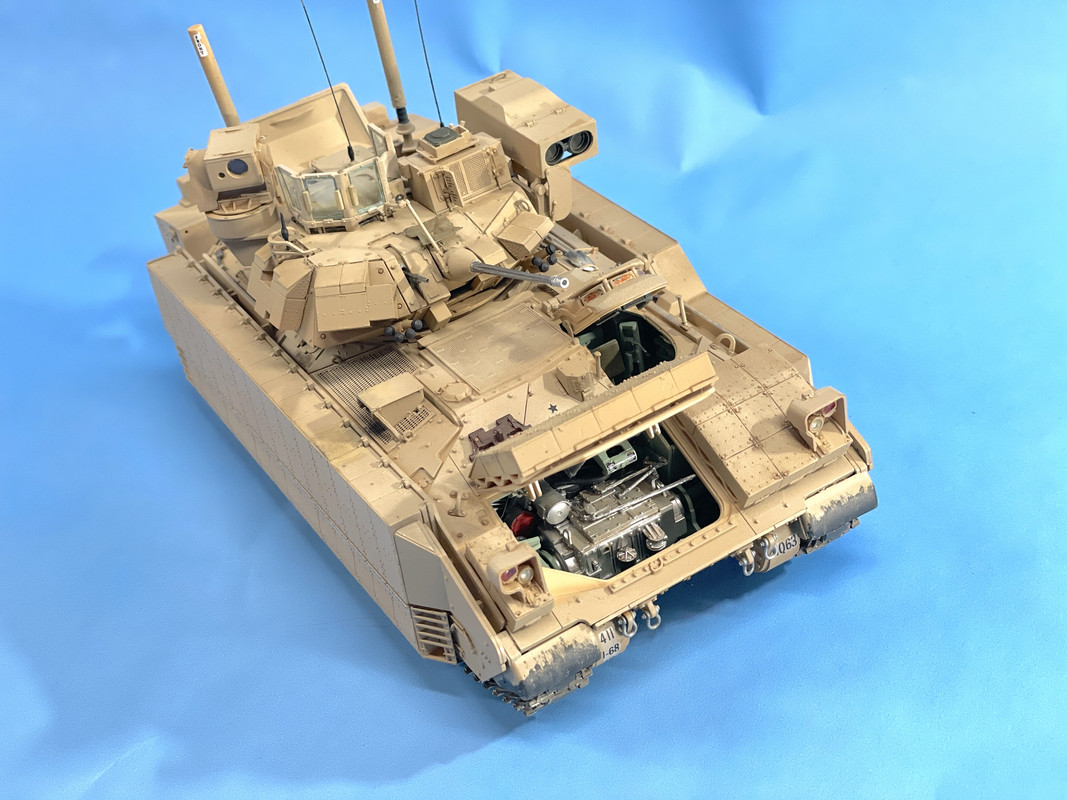
This was a complex and rewarding model. Not quite as complex as the Ryefield Model Sherman, but darn close. The Friulmodel tracks really helped. The kit tracks would have been very frustrating to me unless I glued them together. It would have been less frustrating if the "Q" parts were included, but I was able to work around that without losing much time and all's well that ends well. It was my first Meng kit and it was well engineered. The working hinges on the hood and drop gate, while scale-sized are way undersized if they're actually supposed to work. On both parts one hinge (female side) fractured in just trying to assemble them in the first place, not when I was trying to operate them. While I was disappointed in not having the full gun breach detail, you would not see any of it at all. I'm looking for some crew members for this beast. I have marty at Scale Reproductions, Inc., finding me some.

I learned a lot about Bradleys in researching this build. They're an impressive machine that keeps getting upgraded. This model is not for the faint of heart, but it's a rewarding build.

JOIN OUR COMMUNITY!

Our community is FREE to join. To participate you must either login or register for an account.

SEARCH FORUMS
FREE NEWSLETTER
By signing up you may also receive reader surveys and occasional special offers. We do not sell, rent or trade our email lists. View our Privacy Policy.