SEARCH FINESCALE.COM

Enter keywords or a search phrase below:

AFV M1128 MGS Stryker *WIP*Pg 5, 01-19-09 Finished w Figs

49510 views
109 replies
1 rating 2 rating 3 rating 4 rating 5 rating
  • Member since
    July 2006
  • From: New Jersey
AFV M1128 MGS Stryker *WIP*Pg 5, 01-19-09 Finished w Figs
Posted by redleg12 on Tuesday, November 18, 2008 8:55 PM

Here is the AFC M1128 MGS Stryker

Upon opening the box were are given a HUGE amount of parts all individually wrapped.

There is a total of 14 sprues (one clear), upper and lower hull all in styrene. Also are rubber tires, metal turned scale 105mm barrel with rifling, a small PE sheet, decals and instructions.

Upon examination of the hull sections and about half the sprues through this updated,  the quality of the kit is amazing. As an engineer I appreciate well designed things. Everything on this kit appears to be well thought out. There are no voids or sink marks in any of the parts. The injector pin marks are light but thought out so they only appear on sides which do not show on the model. The fit of the parts is near perfect. A test fit of the hull sections leads me to believe no filling or sanding will be required.

As you review the sprues, there is a bunch of parts for the other Stryker models. If you are into Strykers, this kit should also leave a bunch of parts in the spare drawer

The kit is quite extensive and detailed and the instructions contain 42 steps to building this kit. The good part at least up through this update is the parts fit so well and clean up from the sprue so easy that the first four steps to assemble the lower front plates and the drive train went easy and quickly.

That's where I am at for now. Next steps require the suspension system which will make parts of the lower hull difficult to paint. Before continuing I will let everything set up well and throw a base of NATO Green on the hull section

All comments are welcome, thanks for looking.

Rounds Complete!!

"The Moral High Ground....A Great Place to Emplace Artillery."

  • Member since
    June 2005
  • From: Massachusetts
Posted by minimortar on Wednesday, November 19, 2008 7:20 AM

Off to another great start Mike. Jeeze, I wish that they'd come out with the mortar carrier (not that I could get it completed any time soon anyway). Are you going to base this off a particular photo as per your MO, or just going with your gut and with what's in the box (WITB)?

Keep us posted!


Thanks,
Kevin Keefe

Mortars in Miniature
A Scale Model (Plus!) Collection of the Infantryman's Artillery

  • Member since
    November 2003
  • From: savannah ga.
Posted by GA.modelmaker on Wednesday, November 19, 2008 11:20 AM
i have been want this kit for a while now. i have seen serveal great builds on it  and the more i see it the more i want it. redlleg are you going to put the slat armor on it?
  • Member since
    April 2005
  • From: Piscataway, NJ!
Posted by wing_nut on Wednesday, November 19, 2008 11:54 AM
Mike you are gonna need a BIG box to carry all this stuff to AMPS next year.  I'll be following this as usual.

Marc  

  • Member since
    December 2002
  • From: Valrico, FL
Posted by HeavyArty on Wednesday, November 19, 2008 12:36 PM
Looking great so far Mike.  Keep us posted.

Gino P. Quintiliani - Field Artillery - The KING of BATTLE!!!

Check out my Gallery: https://app.photobucket.com/u/HeavyArty

"People sleep peaceably in their beds at night only because rough men stand ready to do violence on their behalf." -- George Orwell

  • Member since
    May 2003
  • From: Ft. Sill, OK
Posted by beav on Wednesday, November 19, 2008 1:44 PM

YES!  I've been waiting for a WIP!  Are you going to try to depict a deployed vehicle with the modded slat armor? 

I'll be watching this with great interest! 

"First to Fire!"

Steven

  • Member since
    July 2006
  • From: New Jersey
Posted by redleg12 on Wednesday, November 19, 2008 6:51 PM

Kevin - You know better....I always have a photo

There are not many photos of the M1128...this was one of the better ones. Have no fear, I'm sure the mortar carrier M1129  will be coming soon.

Thanks for looking

GA - I presume you mean Strykers in general. Since this version is new I have not seen any WIP on this one out there yet!! Yes, it is a cool vehicle. Thanks for looking

Marc - Well yes.....if I don't go to AMPS International at Aberdeen in April??? Thanks for looking in. Maybe this will get you interested in something other than GermanSmile,Wink, & Grin [swg]. Thanks for looking

Heavy - It's always a pleasure to have you drop by. I'm sure you will keep me honest on this one. Thanks for any help in advance.

Beav - Slat armor....no, for a number of reasons. One, the slat armor used on the M1128 is different than what is used on the M1126 and M1130. The AM kits out there are for those vehicles. I am sure than can be modified, but....I think this Stryker will be a training version. Also the slat armor is almost a build in itself....frankly, I'm not in the mood right now to bend and assmble that much metal. Lastly, this is a unique Stryker. I would like it to stand out for itself than have all that metal to catch your eye.

So with that....the answer is no. There are a bunch of interesting things to do without it. thanks for looking.

Rounds Complete!!


"The Moral High Ground....A Great Place to Emplace Artillery."

  • Member since
    July 2004
  • From: Texas
Posted by wbill76 on Wednesday, November 19, 2008 7:56 PM
As with all your projects Mike, I will be following along with interest to see what you do with this one. Keep us posted on your progress!
  • Member since
    June 2005
  • From: Massachusetts
Posted by minimortar on Wednesday, November 19, 2008 8:41 PM
 redleg12 wrote:

Kevin - You know better....I always have a photo

Just checkin' with ya Mike. Ya had me wonderin' there for a few. Smile,Wink, & Grin [swg]

Will you be including that drip pan too? Kinda looks like standard issue.Confused [%-)]

You've actually inspired me to get to the workbench over the past couple of days... Make a Toast [#toast]

Thanks,
Kevin Keefe

Mortars in Miniature
A Scale Model (Plus!) Collection of the Infantryman's Artillery

  • Member since
    September 2005
  • From: beacon falls , Ct.
Posted by treadwell on Wednesday, November 19, 2008 8:45 PM

Hi MikeBig Smile [:D]

I would call that a 'rave' review!---It is nice to know to some company is able to produce a well fitting,minimal clean-up kit!  Hurray for AFV!-- the stryker is a very interesting vehicle in all its' varients---I'll be watching-- running silently in  the background--as always--lol---treadCool [8D]


  • Member since
    July 2006
  • From: New Jersey
Posted by redleg12 on Wednesday, November 19, 2008 8:51 PM

Bill - Thanks for the vote of confidence. Always love to have you

Kevin - The smell of styrene cement is good for the soul. Glad to see you come back to church. Smile,Wink, & Grin [swg]

As for the drip pan. Hummmm....the modern environmentally friendly Army, Censored [censored] 

Tread - My man.....Run Silent Run Deep....always welcome to put up your periscope here.

Rounds Complete!!

"The Moral High Ground....A Great Place to Emplace Artillery."

  • Member since
    November 2007
  • From: Wisconsin Rapids, WI
Posted by moose421 on Wednesday, November 19, 2008 10:49 PM

Very cool build.  I just love the way that the MGS styker looks.  I want one and now I am going to watch your build.  I to would love to build one based on a photo.  Do you know or can point me to pictures of them?

Thanks

Kim

  • Member since
    July 2006
  • From: New Jersey
Posted by redleg12 on Thursday, November 20, 2008 1:02 PM

Moose - Thanks for looking. There are not that many pics of the M1128. Prime Portal does not have anything yet. This is one of a few photos I picked up by searching the internet.

Thanks Again

Rounds Complete!!

"The Moral High Ground....A Great Place to Emplace Artillery."

  • Member since
    July 2006
  • From: New Jersey
Posted by redleg12 on Friday, November 21, 2008 9:42 PM

For those of you looking for pics....just found a thread in Armorama.....great bunch of pic with and without slat armor

http://www.armorama.com/modules.php?op=modload&name=SquawkBox&file=index&req=modules.php?op=modload&name=SquawkBox&file=index&req=viewtopic&topic_id=128911&page=1#1068180

Rounds Complete!!

"The Moral High Ground....A Great Place to Emplace Artillery."

  • Member since
    July 2006
  • From: New Jersey
Posted by redleg12 on Sunday, November 23, 2008 8:43 PM

After a base coat of Tamiya Flat Black and a first coat of Tamiya NATO Green on the lower section and remaining parts, I then completed the assembly of the lower chassis. Also assembled the wheel hubs and they are ready for paint. To this point I am done with the first nine steps in the instructions with the exception of mounting the tires and wheels which will wait until after final painting.

Next the instructions move to the upper hull. The M1128 like all Strykers has a non-slip coating on the top flat surfaces. Before I do any assembly I masked the upper hull and some hull parts to be coated with Rust-o-leum Terra Cotta surface paint to give the non-slip effect.

Masking all the bolt heads was a chore, punching dots with a Waldron punch.

After the coating and the masking removed, here is what it looked like.

The next 3 steps in the instruction call for the assembly of the side panels. The tools were left out of the tool rack until after painting.

The next 3 steps include mounting the side panels and some other panels including all of the loose parts coated above.

Here is where I will stop for now. The next few step are mounting a lot of detail parts on the upper hull.

All comments are welcome, thanks for looking.

Rounds Complete!!

"The Moral High Ground....A Great Place to Emplace Artillery."

  • Member since
    July 2004
  • From: Texas
Posted by wbill76 on Sunday, November 23, 2008 8:51 PM
While I'm sure it was tedious, looks like your efforts paid off Mike with the Rust-o-leum solution. Thumbs Up [tup]
  • Member since
    July 2006
  • From: New Jersey
Posted by redleg12 on Sunday, November 23, 2008 9:22 PM

Bill - Thanks. I'm sure 3M never invisioned there tape being used in this way. Over 60 bolts took awhile but I'm happy with the way it turned out.

The rust-o-leum paint gives a nice textured finish.

Rounds Complete!!

"The Moral High Ground....A Great Place to Emplace Artillery."

  • Member since
    January 2007
Posted by the doog on Sunday, November 23, 2008 9:55 PM

This is a wicked-cool-looking vehicle!

I was half-thinking of adding it to the stash, but reality intervened! Whistling [:-^]

I'll be watching what you can do with it! 

  • Member since
    July 2006
  • From: New Jersey
Posted by redleg12 on Monday, November 24, 2008 5:28 AM
 the doog wrote:

I was half-thinking of adding it to the stash, but reality intervened! Whistling [:-^]

Karl - Thanks for looking...."Reality"...now how does reality relate to a hobby which is generally wrapped around fantasy and the discussion of a stash of fantasies....I know....it's not German....I have been watching too much Dr. Phil...I'm analyzing too much....Thanks Karl

G - As always a pleasure to have you drop by. Thanks.

Rounds Complete!!

"The Moral High Ground....A Great Place to Emplace Artillery."

  • Member since
    October 2008
  • From: SE Pennsylvania
Posted by padakr on Monday, November 24, 2008 2:39 PM

Very nice looking.

I also took a look at your album, they all look great.  How many of the builds are of vehicles that you have personal experience with?

Paul

  • Member since
    July 2006
  • From: New Jersey
Posted by redleg12 on Monday, November 24, 2008 4:14 PM

Padakr - Thanks for looking....at everything.

I commanded a battery of M102 howitzers....with M35A2 prime movers.

The Hummer was my command vehicle..B6. When we first recieved them we were short rear covers so thats why the strange rear cover.

The M107 was where I started and served on.

Thanks for asking.

Rounds Complete!!

"The Moral High Ground....A Great Place to Emplace Artillery."

  • Member since
    November 2003
  • From: savannah ga.
Posted by GA.modelmaker on Wednesday, November 26, 2008 11:59 AM
well done thier redleg. thats why i asked about the slat armor i seen that on the other site.  and as for those grab handels thier a royal pain in the !!!
  • Member since
    July 2006
  • From: New Jersey
Posted by redleg12 on Wednesday, November 26, 2008 4:18 PM

GA - Yep, I'm in the middle of handle hell. Already have to replace 2 which were broken on the sprue. 24 gauge wire is the right size

As for the slat armor, the M1128 uses a different slat armor than the M1126 AFV or M1130 Command AFV. The slat armor kits out there are not correct and will not work with the M1128....so I am save from slat armor hell. In the future when I do a M1126, I will do it with slat armor. This kit will look cool without it.

Thanks

Rounds Complete!!

"The Moral High Ground....A Great Place to Emplace Artillery."

  • Member since
    November 2003
  • From: savannah ga.
Posted by GA.modelmaker on Wednesday, November 26, 2008 5:14 PM
all right here is a little tip for everyone that is working on a stryker or a mgs. for the grab handles DO NOT USE YOUR KNIFE OR SCRIOSS. ues a razor blade. thats how i got all mine off the spru with out them braking.  i am all most thru with mine. yahoo.
  • Member since
    July 2006
  • From: New Jersey
Posted by redleg12 on Sunday, November 30, 2008 7:23 PM

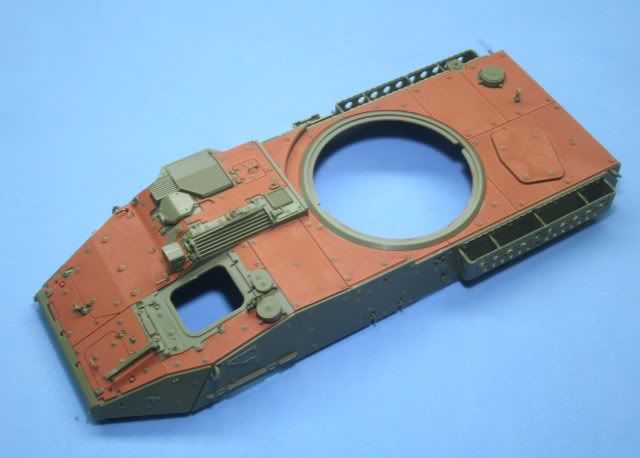
I mounted all the detail parts (another 3 assembly steps) which will be painted green and not to delicate to be broken off during handling. The remaining steps on the upper hull are for mainly the lights, tools mirrors, tow bar mount and screens

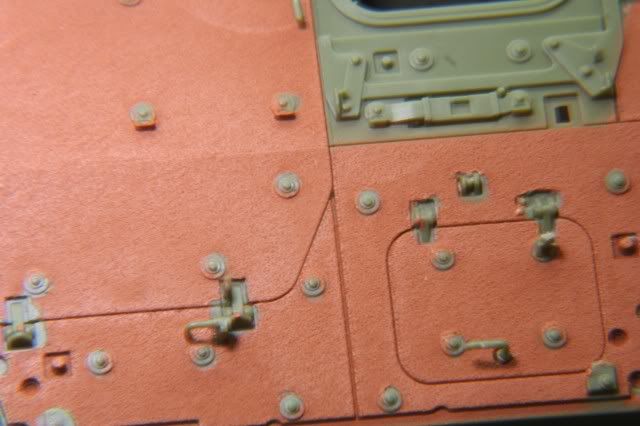
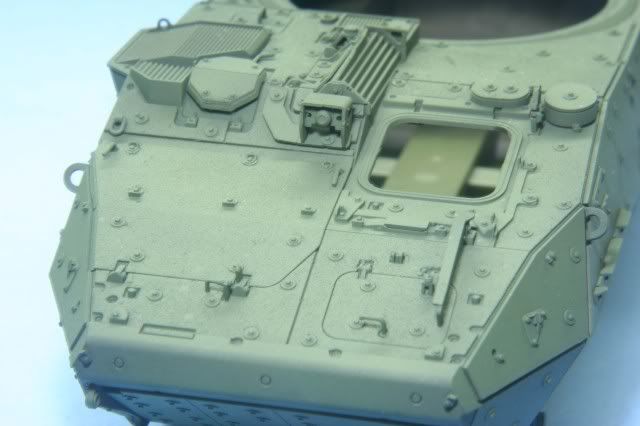
For those of you who wanted to see the anti-slip coating up close, here is a detail shot.

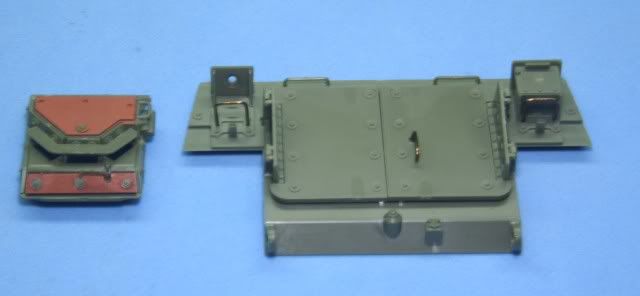
While I waited for glue to dry I finished the drives hatch except for the armor glass, a whole step in itself with all the small parts and also finished the rear section except the antennas which was another two steps. The grab handles over the lights and for the rear door handle were broken on the sprue so I replaced them with 22 gauge wire.

The kit is well built but has a number of very small and delicate parts which make this kit not for the faint of heart.

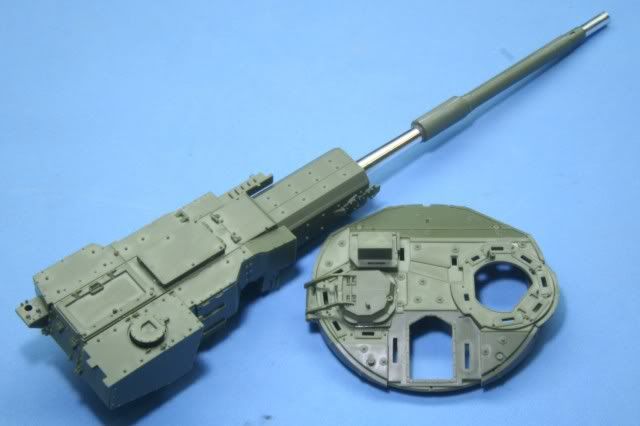
Before we start up the spray booth I completed the first 3 steps for the main gun. Again the fit of the parts are good but AFV defeated the purpose of a metal barrel by having two wrap around halves for the bore evacuator and details. The seam is minimal but will have to be dealt with. 

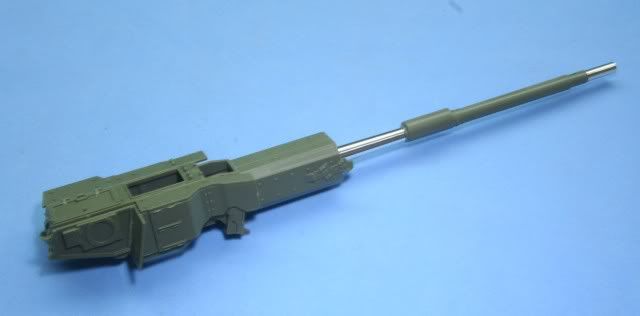
I continued on the gun through another 3 steps and what remains is the last two steps which are mostly grab handles, straps and smoke launchers. Also missing is the gun sight system which has armor glass front.

I also moved through the first 3 steps of the turret assembly, again except for armor glass.

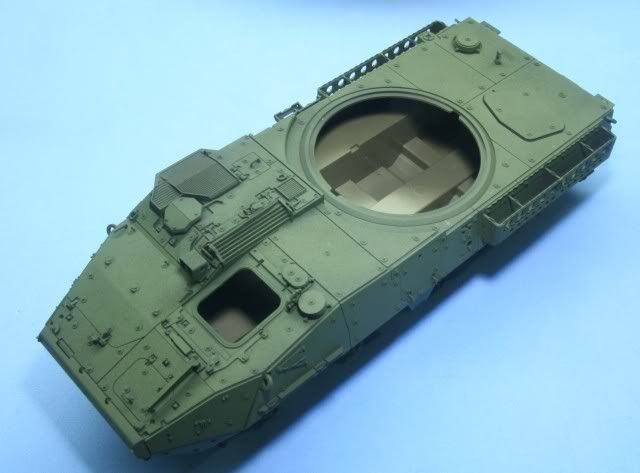
I moved to the spray booth and base coated the upper hull and rear section with Tamiya Flat Black and then put on a coat of Tamiya NATO Green.

Once the paint was dry I assembled the upper, lower and rear sections. First I glued the rear section to the lower hull. Once that set up I assembled the upper and lower hull. The assembly takes time to line up but once in the proper position, the sections snap together nicely. The fit is almost perfect except a slight gap between the upper hull and rear section. I closed this up with a little MR Surfacer and touched up.

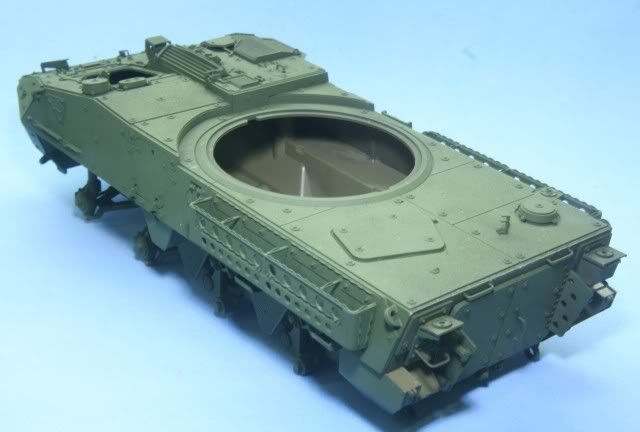
Here is the view from the rear

For those wondering what the anti-slip looks like painted, here is a close shot to give you a better view.

In between these major items, I painted the wheel hubs, removing the right side front wheel cage as it was pointed out to me that the actual M1128 only has one cage (as opposed to what the directions tell you) on the left side.

Also painted the light assemblies and chromed the inside part of the lights along with a few other minor tasks.

That's it for now. Lots of little details still left, the biggest of which is painting all the armor glass. Even with my jumping around, this represents about 75% complete, based on instruction steps.

So far the kit is outstanding. The only drawbacks so far is the split barrel cover, a few broken small parts (mostly hand holds), and a few mistakes on part numbers in the directions. All of this is minor thus far compared to the overall kit quality.

All comments are welcome, thanks for looking.

Rounds Complete!!


"The Moral High Ground....A Great Place to Emplace Artillery."

  • Member since
    October 2008
  • From: SE Pennsylvania
Posted by padakr on Monday, December 1, 2008 9:03 PM
 redleg12 wrote:

The kit is well built but has a number of very small and delicate parts which make this kit not for the faint of heart.

Amen to that.  I have been very fortunate that none of the pieces have been broken on mine (well, except for the ones I have broken myself). 

I have to say, it is looking very nice. I am looking forward to seeing the completed build.  Are you going to build a diorama for it?

Now I'll have to go take some more pictures of my progress (not as far).

  • Member since
    July 2006
  • From: New Jersey
Posted by redleg12 on Monday, December 1, 2008 9:18 PM

Padakr - Thanks, as far as a dio....see some of the other threads on what is considered a dio Wink [;)]

I'm not a dio builder but it will have a base with terrian. I have the Real Models Molle kit for packs. Also add some more water cans, and some MREs. Will also try to add a driver and TC. I have the Verlinden kit for those.

Thanks again

Rounds Complete!! 

"The Moral High Ground....A Great Place to Emplace Artillery."

  • Member since
    July 2006
  • From: New Jersey
Posted by redleg12 on Sunday, December 14, 2008 4:37 PM

To finish up the turret assembly (6 total steps in the directions) I needed to complete the armor glass. Since AFV give you a nice set of clear armor glass, I tried an experiment to add depth when looking at the armor glass. First I masked all the glass areas. (I know the blue tape and blue background are not the best contrast)

Then I painted with successive coats of Alclad Gold, then Tamiya Flat Black and then Tamiya NATO Green. After removing the masking, here was what it looked like

Next I painted some clear decal paper with Tamiya Clear Green and also a mix of Tamiya Clear Blue and Red to make the Clear Magenta. Then I spent time with the digital caliper measuring and cutting and then mounting. To finish the turret I mounted the TC hatch, gunners hatch and sight, miscellaneous handles and the gun travel lock....which was a true PIA.

Without going on a rant, there are some parts which are so small on this kit, and there is no reason not to have molded them on the main assembly. Some of these appear to be parts for parts count sake. The side pars on the TC armor glass is an example. Others could make life better if done different. The travel lock is one of them. It is the one major drawback of the kit and does use up a lot of time to work with them correctly.

Back on the build, you see the assembled and base coated turret and drivers hatch.

Moving back to the main vehicle, the tires were nice and shiny rubber. To get them more the "used" look, I rubbed them down with a Scotch-Brite pad and then assembled them onto the rims.

With the tires assembled, I glued them in place on the chassis. Also I assembled the PE screens onto the vents, mounted the front guards, drilled the antenna mounts for an antenna, mounted the antenna mounts and the last few grab handles. After a final basecoat of Tamiya NATO green here is where I am.

Close up view of the PE screens. These went on pretty easy but do require care.

Close up of the tire assembly. The drive side front is the only tire with the ring. The directions incorrectly tell you to put it on both sides.

That's it for now. I am working on the front and rear lights, mounting the drivers hatch, tow hooks, pioneer tools, some detail painting on the chassis and remaining PE straps for the chassis. Hopefully I will finish up the chassis this week leaving just the gun section to finish.

All comments are welcome, thanks for looking.

Rounds Complete!!


"The Moral High Ground....A Great Place to Emplace Artillery."

  • Member since
    June 2003
  • From: East of Cleveland, along the Amish Frontier
Posted by cameraflage on Sunday, December 14, 2008 4:57 PM

Looking good, redleg! Thumbs Up [tup]

This also answers a question I had about the color of the periscopes...I wasnt sure if they were to be white, black, or some other color. I need to check my wheels, too, as I'm sure I glued those rings onto every wheel.

I find it amusing that we both posted our Stryker construction updates within about ten minutes of each other.

Ranger Joe, Defender of Bunnies

Ranger Joe, Defender of Bunnies "Feed the rangers, not the bears" www.nls.net/mp/cameraflage

  • Member since
    July 2006
  • From: New Jersey
Posted by redleg12 on Sunday, December 14, 2008 5:06 PM

Cameraflage - Thanks for looking...yep I was commenting on yours while you on mine. Be careful, there is only one ring on the M1128. Some of the other models differ. Look at some pics to make sure.

As for the glass, I found it easy to leave the glass color for last. Hope it helps.

Thanks for looking and for your comments.

Rounds Complete!! 

"The Moral High Ground....A Great Place to Emplace Artillery."

JOIN OUR COMMUNITY!

Our community is FREE to join. To participate you must either login or register for an account.

SEARCH FORUMS
FREE NEWSLETTER
By signing up you may also receive reader surveys and occasional special offers. We do not sell, rent or trade our email lists. View our Privacy Policy.