SEARCH FINESCALE.COM

Enter keywords or a search phrase below:

1/35 M1200 Armored Knight, WIP, 09-18-11, COMPLETE

35516 views
94 replies
1 rating 2 rating 3 rating 4 rating 5 rating
  • Member since
    July 2006
  • From: New Jersey
1/35 M1200 Armored Knight, WIP, 09-18-11, COMPLETE
Posted by redleg12 on Sunday, June 19, 2011 8:49 PM

Fire Mission

1/35 Trumpeter M1117 with Formations M1200 Armored Knight conversion set.

Introduction

The M1200 is a wheeled armored vehicle that carries the equipment needed to quickly bring in guided bombs, missiles and artillery shells. The M1200 contains a laser designator, a laser range finder and GPS, plus radios and computers that take target position data and transmit it to distant artillery units, or bombers overhead, and get the firepower on the target. The M1200 Armored Knight evolved from the desire to provide enhanced protection to Fire Support Teams who perform the targeting mission in high threat environments.
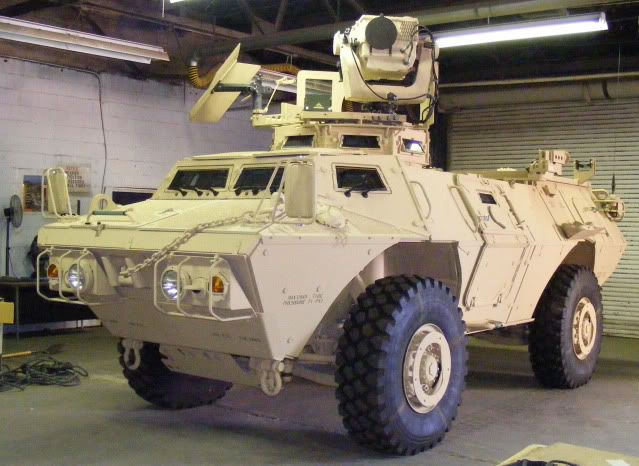
This photo is one of the 150 photos supplied with the conversion set on a CD along with detailed instructions via a slide presentation.

The build

I will be using the Trumpeter M1117 Guardian kit as the base kit for this build.
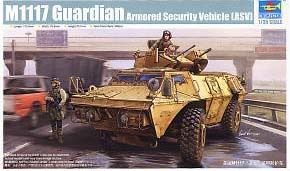
 

The M1200 conversion set is from Formation Models. This is the catalog page view of the conversion kit.
I will also be adding resin tires from New World Models

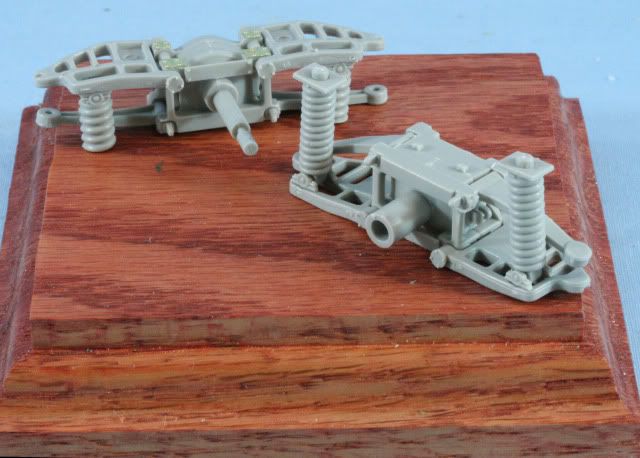
Well, off and running. The first three steps involve the assembly of the suspension and drive shafts. I left the wheels off for painting. The PE is part of the kit supply. The assembly was straight forward and the fit good.
 

Step 4 has the two body halves assembled. There was some slight warp to the body halves so I used some rubber bands to hold them in place after which I injected liquid glue onto the inside seams.
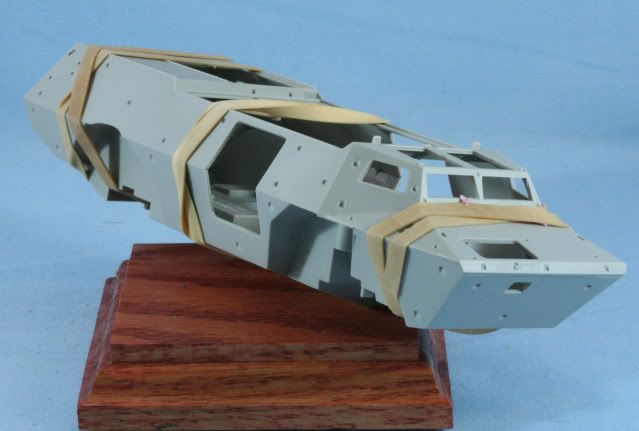
Step 5 adds the armor panels around the outside of the body.  At this stage of the build I am leaving off any small grab handles until later. Again the fit is good and the instruction clear.
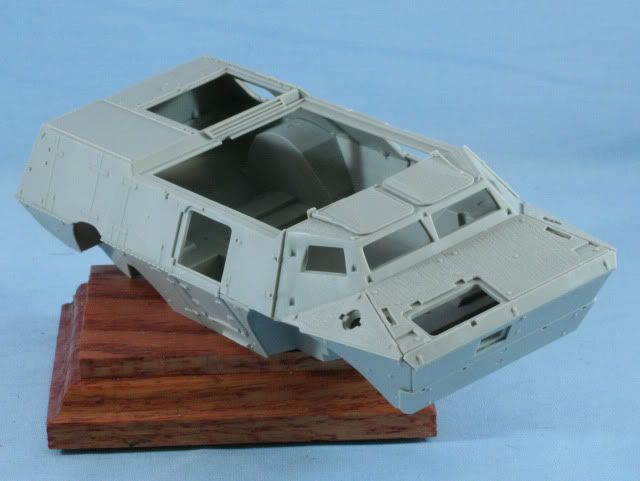
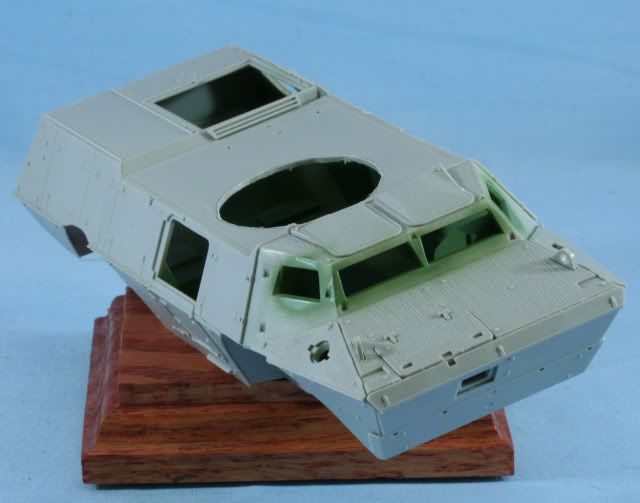
Part of step 5 is adding the main roof. Part C7 has a .765 hole for the M1117 turret. This hole has to be expanded to 1.375 for the M1200 turret. I made a paper template with the smaller diameter inside the larger. Then I cut the template and used the smaller hole marking to properly line up the template on the part. After marking the larger hole on the part it was time for the Dremel.

Before gluing the panel in place, I sprayed the inside and widow insets on the front and on the side doors using Tamiya Cockpit Green. At least what little might show will be the right color. Now was the easiest time to do this painting.

Here is the view after fitting the roof
 

Step 6 includes adding some details to the bottom side including PE armor panels in the wheel wells
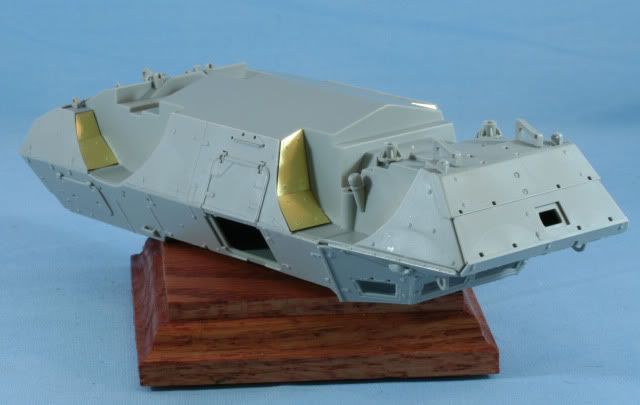
Steps 7 & 8 adds a number of details including the PE engine grill, side doors, rear door, front panels with windshield glass,  and numerous access hatches, grab handles and details

In all cases the Trumpeter instructions were clear. The kit parts are excellent for both fit and detail. All of the pin marks are well planned and let you model without the need for putty.

At this point I wanted the get the M1200 conversion antennas on the vehicle.  Step 22 of the conversion instructions requires removing the required parts from the casting blocks and with supplied styrene strip, adds feet to all the parts. These parts are well cast but delicate. Removing and cleaning must be done carefully. Step 23 assembles the parts onto the model.
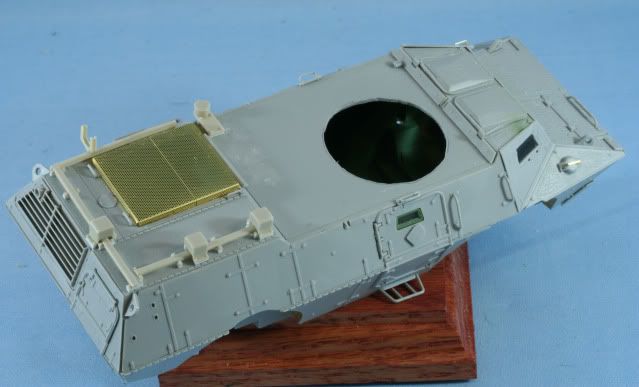
Here is front view
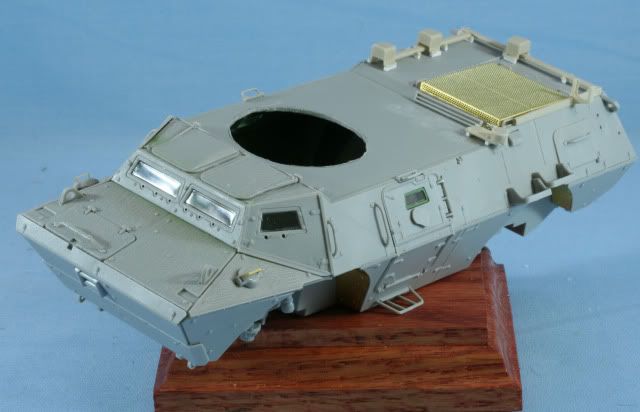
That’s it for now. A few more details on the body section and it will be ready for prime time. Then it will be onto the Armored Knight turret, the heart of the conversion kit.

As always thanks for stopping by. Your comments good or bad are always appreciated.

Rounds Complete!!

"The Moral High Ground....A Great Place to Emplace Artillery."

  • Member since
    October 2009
  • From: South Carolina
Posted by jetmodeler on Monday, June 20, 2011 6:56 AM

Looks great so far. I've been wanting to see a WIP on this kit. Looks like Trumpy did a good job on the anti skid surface.

Can't wait to see more.


  • Member since
    July 2006
  • From: New Jersey
Posted by redleg12 on Monday, June 20, 2011 7:46 AM

Jet - Thanks for stopping in. Yep, Trumpy did a nice job. It is well done and matches the real deal very closely. The kit itself is very nice. The only odd thing is they include the interior handles of the side and back doors, but no other interior Hmm. I guess I will have some leftover handles.

The grille on the top rear over the engine comes with a PE grille or for those who feel the don't want to play with PE, a plastic grille. Obviously the PE grille looks much better.

The kit fits very well and almost falls together. It has been a pleasure thus far.

Rounds Complete!!

"The Moral High Ground....A Great Place to Emplace Artillery."

  • Member since
    July 2004
  • From: Texas
Posted by wbill76 on Monday, June 20, 2011 4:42 PM

Definitely not something you see done very often but cool looking nonetheless! Will be following this one to see you work your usual magic Mike. Beer

  • Member since
    June 2005
  • From: Massachusetts
Posted by minimortar on Monday, June 20, 2011 5:22 PM

Nice piece of rolling stock there Mike... I am assuming that this one's for you?

Thanks,
Kevin Keefe

Mortars in Miniature
A Scale Model (Plus!) Collection of the Infantryman's Artillery

  • Member since
    July 2006
  • From: New Jersey
Posted by redleg12 on Monday, June 20, 2011 6:20 PM

Bill - Thanks for stopping by. You know me, I am the different Propeller   It is a unique vehicle with lots of cool technology.

Kevin - thanks for the visit. Yep this one will go to the display case here at the Villa Hmm. And now for something different, a vehicle with a big eyeball.

When I think of the old hammerhead and how "advanced" we thought that was.....I feel like the stone age!

Rounds Complete!!

"The Moral High Ground....A Great Place to Emplace Artillery."

  • Member since
    November 2004
  • From: Cat Central, NC
Posted by Bronto on Monday, June 20, 2011 7:35 PM

Nice work so far. That's one mean looking truck!

  • Member since
    December 2002
  • From: Valrico, FL
Posted by HeavyArty on Monday, June 20, 2011 9:42 PM

Very nice start.  I'll be watching this one closely.

Gino P. Quintiliani - Field Artillery - The KING of BATTLE!!!

Check out my Gallery: https://app.photobucket.com/u/HeavyArty

"People sleep peaceably in their beds at night only because rough men stand ready to do violence on their behalf." -- George Orwell

  • Member since
    July 2006
  • From: New Jersey
Posted by redleg12 on Tuesday, June 21, 2011 5:39 AM

Bronto - It would look great in the garage but I am sure it gets crappy fuel economy, in not comfortable and is loud.....sounds good to me! Big Smile.  Thanks for stopping in and for the comment.

Gino - Thanks for the peek at the FIST hotel on wheels. Life has come a long way from the hammerhead.

Rounds Complete!!

"The Moral High Ground....A Great Place to Emplace Artillery."

  • Member since
    July 2006
  • From: New Jersey
Posted by redleg12 on Sunday, July 10, 2011 8:14 PM

Like Bill, it has been a few weeks since the last update. Summer chores and holidays have slowed the bench time down.

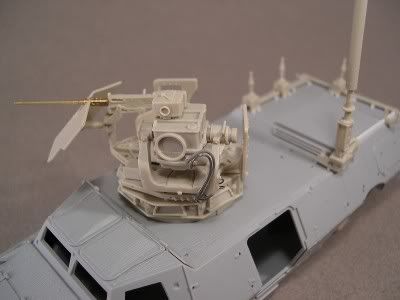
I began working on the Formations conversion set. After making the roof hole bigger in the vehicle, the next 9 steps involve assembly of the turret. Some of the parts are small but all are very well cast with no marks or voids. The parts are well marked and have little or no flash. In other words…..perfect! The instructions are outstanding as they are a Power Point photo presentation, again outstanding

Here is the main turret assembled.  In step 3 the instructions call for the placement of the wiring cables. I will take care of those after painting.

Along with the main turret is the assembly of the electronics package, the package yoke for mounting and the weapon shield. I have kept all of these separate to facilitate details and painting.

The tires are resin from New World Miniatures. Again the molding is excellent. Where the pour block is removed I used a pointed Dremel grinding bit to restore the tire tread pattern. The tires are cast with notches to match the kit parts for the attachment to the axels. Here is the tires cleaned up and ready for painting.


The main vehicle had the last few resin and kit details added with now just a few left off for ease of painting. The windows are prepared and it is ready for the paint hood.

Here is the rear view

Here is a view of the vehicle with a prime coat of Poly Scale Tan. I used a tan color rather than a dark primer since the finish color is sand. I feel it is important to have a prime coat, especially with a mix of resin, PE, brass and grey styrene to get everything a uniform color.

That’s it for now. Now with everything primed, it is time to move on to finish coat and details.

As always thanks for stopping by. Your comments good or bad are always appreciated.

Rounds Complete!!

"The Moral High Ground....A Great Place to Emplace Artillery."

  • Member since
    December 2002
  • From: Valrico, FL
Posted by HeavyArty on Sunday, July 10, 2011 8:30 PM

Very nice Mike.  The conversion looks really nice.  Great job so far.

Gino P. Quintiliani - Field Artillery - The KING of BATTLE!!!

Check out my Gallery: https://app.photobucket.com/u/HeavyArty

"People sleep peaceably in their beds at night only because rough men stand ready to do violence on their behalf." -- George Orwell

  • Member since
    July 2006
  • From: New Jersey
Posted by redleg12 on Monday, July 11, 2011 5:06 AM

Gino - Always a welcome visitor....thanks

Rounds Complete!!

"The Moral High Ground....A Great Place to Emplace Artillery."

  • Member since
    April 2005
  • From: Piscataway, NJ!
Posted by wing_nut on Monday, July 11, 2011 6:18 AM

Another one of Mike's, "Hey guys, bet some of you ain't seen this before" builds taking shape.  And taking shape nicely.   To be entered in JerseyCon perhaps? Whistling

Marc  

  • Member since
    October 2009
  • From: South Carolina
Posted by jetmodeler on Monday, July 11, 2011 6:23 AM

Mike, looks great so far.

Those resin tires look outstanding.


  • Member since
    July 2006
  • From: New Jersey
Posted by redleg12 on Monday, July 11, 2011 7:28 AM

Marc - Thanks....you know me, always building the strange and obtuse. As for Jerseycon...??? I hope so.

Jetmodeler - Thanks for stopping in and for the comments.

Rounds Complete!!

"The Moral High Ground....A Great Place to Emplace Artillery."

  • Member since
    September 2005
  • From: beacon falls , Ct.
Posted by treadwell on Monday, July 11, 2011 8:53 PM

Heya Mike  :  )

I saw this conversion in the Formations web site it looks to really cool and I am sure you will do it justice!

From your pics the fit looks real good.  You have a knack for picking some very interesting stuff ....bet it is done by September  :  )

bill


  • Member since
    July 2006
  • From: New Jersey
Posted by redleg12 on Tuesday, July 12, 2011 4:58 AM

Bill - What a pleasure to have you stop in.

Rob at Formations has done an excellent job with this set.  It is well worth the money. As for interesting.....you know me...different and obtuse.

Now as far as September...Whistling of course.  Hoping I see you there Wink

Thanks again old friend

Rounds Complete!!

"The Moral High Ground....A Great Place to Emplace Artillery."

  • Member since
    July 2004
  • From: Texas
Posted by wbill76 on Tuesday, July 12, 2011 10:46 AM

Glad to see you are also getting in some bench time in between the summer chores Mike, looks good in the primer, can't wait to see it "advance" to the next round! Beer

  • Member since
    July 2006
  • From: New Jersey
Posted by redleg12 on Tuesday, July 12, 2011 8:52 PM

Bill - Thanks...between work and summer chores it seems weeks between bench time....Crying Ahhh what happened to the good old days Confused.

Rounds Complete!! 

"The Moral High Ground....A Great Place to Emplace Artillery."

  • Member since
    June 2005
  • From: Massachusetts
Posted by minimortar on Wednesday, July 13, 2011 7:06 AM

Looking deliciously delicious so far Mike! Stick out tongue

(A little different from what you're cooking up right now but, I think (no one there seemed to know Angry) that this is the basic M1117 ASV...)

Keep on chuggin'!

Thanks,
Kevin Keefe

Mortars in Miniature
A Scale Model (Plus!) Collection of the Infantryman's Artillery

  • Member since
    January 2010
  • From: Wisconsin, Appleton
Posted by autovomatic88 on Wednesday, July 13, 2011 8:49 AM

Well I must say I am glad someone is giving a nice detailed build of this. Cause I am working on this model as well. I am at the placing of the armor on the body. I bought the Rhino for the front. I was wondering on how I was going to deal with all the windows on the turret. Any suggestions? I am still looking for a air brush set up. Its going to cost about 300.00 for everything. But winter is coming and I need new treads for the truck. Love the Wisconsin Winters here. 

Keep it going. Looking forward to seeing this one.


"Mark VI, and we've got it by the ass."

  • Member since
    July 2003
  • From: On my kitchen counter top somewhere in North Carolina.
Posted by disastermaster on Wednesday, July 13, 2011 9:07 PM

Wow Mike, you can always take the more modern stuff and make it interesting.

                               http://i300.photobucket.com/albums/nn1/jeanniebun/thFamilyAlbum001.jpg

I has been a watching, but I'm still recovering from my last build.

http://i20.photobucket.com/albums/b232/gluetank/Animated/th_1-Animated-Disastermaster.gif?t=1296616998

Sherman-Jumbo-1945

"I was so much older then, I'm younger than that now"


  • Member since
    July 2006
  • From: New Jersey
Posted by redleg12 on Wednesday, July 13, 2011 10:42 PM

Kevin - Thanks for stopping in and for posting the pic.

Yes, this is a modification of the M1117 which was designed as an "armored car" for MP and security units. The main difference between the two is the turret and electronics. The M1117 has a gun turret basically.

The M1200 was designed to give artillery forward observers in light units better protection than a HMMWV and make use of an existing body frame. It has a different turret designed for target identification, though it does have a M2 for protection. It is loaded with electronics and radio equipment. That is the essence of the Formations conversion kit. The turret and all the additional radio antennas and the duke antenna.

Hope that helps the clarification and why the artillery guy is building this vehicle!!  

Autovomatic88 - Thanks for stopping by.

Be careful with the rhino setup. I have not seen any pics of an M1200 with a rhino. It does have a duke antenna so they may not be using the rhino. Also I am sure these are deployed with other vehicles for protection....they may have a rhino

As to the glass on the turret, I am working on the turret now. My next update (hopefully this weekend) will go into how I am doing that in more detail.

Steve - Thanks for taking the time to comment. After your last build I am sure you are Sleep  I totally understand.

Thanks again guys 

Rounds Complete!!

"The Moral High Ground....A Great Place to Emplace Artillery."

  • Member since
    July 2006
  • From: New Jersey
Posted by redleg12 on Sunday, July 17, 2011 8:45 PM

Just a quick update for this week.

First, I gave the turret a coat of Model Master Acryl 4720 Sand. The power supply box is painted NATO Green and the race ring for the electronics package mounting is painted with Alclad Jet Exhaust. The connector ends for wiring are painted with my Parkerized mix.

The turret glass was done by first painting the inside of the blocks with NATO Black, then using drops of Future to create a clear casting. It took two coats of the casting Future to create the final effect. When the drops are placed, you have to work any air bubbles out before it begins to set up.

Next was the electronics package. In order to get the rounded effect on the large lens I used a kit unused part. Part A54 is a round rear view mirror which is optional. I removed the mounting from the back and with a bit of sanding it fits perfect in the space on the Formations kit. The “lens” is painted Alclad Jet Exhaust and then was mounted. Once mounted, it was given two heavy coats of Future for the glass effect. I will use the other mirror to create the lens cap which is hinged and hangs down below the lens.

Here is a look without the lens cap

Also the body was treated to a coat of Model Master Acryl 4720 Sand. Here is the body and the suspension painted and the suspension mounted.

Here is the front lights painted internals first with Black and then with Alclad Chrome. The clear headlight lens will be inserted along with the turn signal lens which has been painted on the backside with Clear Orange.

That’s it for now. More details to come.

As always thanks for stopping by. Your comments good or bad are always appreciated.

Rounds Complete!!

"The Moral High Ground....A Great Place to Emplace Artillery."

  • Member since
    December 2002
  • From: Valrico, FL
Posted by HeavyArty on Sunday, July 17, 2011 9:24 PM

Its coming along great Mike.  The turret looks awesome.

Gino P. Quintiliani - Field Artillery - The KING of BATTLE!!!

Check out my Gallery: https://app.photobucket.com/u/HeavyArty

"People sleep peaceably in their beds at night only because rough men stand ready to do violence on their behalf." -- George Orwell

  • Member since
    April 2009
  • From: Carmel, IN
Posted by deafpanzer on Sunday, July 17, 2011 9:32 PM

Looking great!  Tell you the truth this is going to be another great lesson for me because I know nothing about this vehicle. Big Smile  Remember I am into WWII stuff... but I enjoy anything in 1:35 scale!

Andy

  • Member since
    July 2006
  • From: New Jersey
Posted by redleg12 on Sunday, July 17, 2011 11:06 PM

Gino - Thanks for stopping by and for the comments.

Andy - That is one of the major purposes of this forum...teach. Glad you stopped in and hope you enjoy the ride!! Always a pleasure to have you stop in.

Rounds Complete!! 

"The Moral High Ground....A Great Place to Emplace Artillery."

  • Member since
    July 2004
  • From: Texas
Posted by wbill76 on Tuesday, July 19, 2011 5:18 PM

Nice work on the various optics components Mike, starting to take shape and come to life! Yes

  • Member since
    July 2006
  • From: New Jersey
Posted by redleg12 on Tuesday, July 19, 2011 8:04 PM

Bill - Thanks for stopping by an the optical observation Propeller

Rounds Complete!!

"The Moral High Ground....A Great Place to Emplace Artillery."

  • Member since
    September 2005
  • From: beacon falls , Ct.
Posted by treadwell on Wednesday, July 20, 2011 8:49 PM

hey Mike :  )

Just a quick note, I think what you did with the extra piece and using it for the optics came out really well...It's gonna be a stand out job !

Rounds complete !   er oops thats your line..... I gotta get a  byline....

yer pal,

bill


JOIN OUR COMMUNITY!

Our community is FREE to join. To participate you must either login or register for an account.

SEARCH FORUMS
FREE NEWSLETTER
By signing up you may also receive reader surveys and occasional special offers. We do not sell, rent or trade our email lists. View our Privacy Policy.