SEARCH FINESCALE.COM

Enter keywords or a search phrase below:

1/35 Hobby Boss M4 18 Ton HST, WIP, 9/26/12, Complete

40855 views
189 replies
1 rating 2 rating 3 rating 4 rating 5 rating
  • Member since
    July 2006
  • From: New Jersey
1/35 Hobby Boss M4 18 Ton HST, WIP, 9/26/12, Complete
Posted by redleg12 on Sunday, May 20, 2012 6:22 PM

M4 18 ton High Speed Tractor

FIRE MISSION!!

Introduction

The M4 was based on the chassis and drive train of the obsolescent M2 Light Tank. This common practice of re-using old vehicles simplified design, allowed for easy production, and made maintenance in the field easier.

One variant was designed to tow anti-aircraft guns and another for howitzers. The rear compartment carried the gun crew and other equipment. The howitzer variants included a crane to assist with heavier projectiles

The M4 was manufactured by Allis-Chalmers of Milwaukee, starting in 1942 and was in U.S. military service until approximately 1960.
The M4 version I will be building will be the howitzer version with the ammunition box designed to carry 8 inch howitzer ammunition.
My building reference is the book High Speed Tractors by David Doyle
The Kit
The kit I wil be using is the Hobby Boss M4 Tractor 155mm/240mm (which is incorrect as the 8 inch projectile is 203mm), kit #82408
I will also be adding the Eduard PE sets 36072 which is the outside details and 36073 which is the cab doors. I will also replace the M2 MG with a Tasca MG.  
By the start of building this kit I quickly realized it will also require, liquid putty, Mr. Surfacer, .010, .020 & .040 styrene sheet and lots of sandpaper as you will see below.
The Build
Because of the nature of this kit and how it is assembled, the instructions are for guidance but it has to be assembled and painted in small sub assemblies otherwise it will be almost impossible to paint all the details.
First I began with lower hull assembly. This included the hull front plate, rear plate and interior floor plate. The side panels which cover the tracks were completely covered with large deep pin marks, about 6 on each side. After trying to fill and sand, I went the route of using .010 styrene sheet and just covering the marks.
I then primed the top half with Vallejo OD primer and painted with Poly Scale Olive Drab 505 370. The engine compartment was weathered to prepare for the engine and winch installation with AK track wash.

The same problem exists with the inside of the engine roof, covered with part position holes and big pin marks. I covered it again with .010 styrene sheet. Here it is with a roof part added.
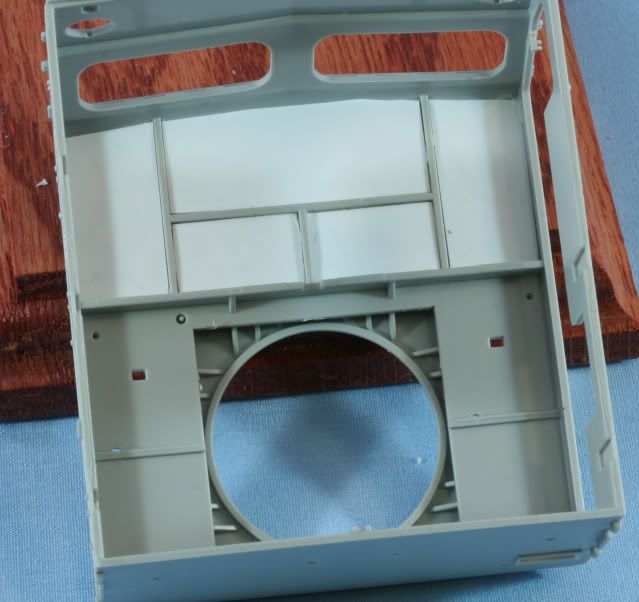
While I have the styrene out, the inside roof of the cab is a mess of pin marks and part holes. It is a bit more complicated and requires panels. Here is the roof in process.
 
As a break from the styrene sheet puzzle, I assembled the engine. The engine on the M4 was painted OD with black hoses and steel hose clamps. After assembly and priming the main engine was painted with Poly Scale OD. The hoses and belts are painted with a rubber mix of Flat & NATO Black. The clamps and belt pulleys are painted with Alclad Steel. The engine was then weathered with AK Track wash.
Also in the engine compartment is the winch assembly. Again after assembly and priming I painted with Poly Scale OD. I then wound some wax coated ship builders string onto the winch spool to create the winch cable. Then I painted the cable with Alclad Steel. Also the PTO connection on the winch was also painted with Alclad Steel.
That’s it for now. Working in 9 different directions at one time on this model. See what I get done for the next update.
As always all comments are welcome.
Rounds Complete!!

"The Moral High Ground....A Great Place to Emplace Artillery."

  • Member since
    July 2004
  • From: Texas
Posted by wbill76 on Sunday, May 20, 2012 6:45 PM

Off to a great start with this one Mike! looking forward to seeing this mission deliver on target! Beer

  • Member since
    December 2002
  • From: Valrico, FL
Posted by HeavyArty on Sunday, May 20, 2012 6:55 PM

Looking great Mike.  It will look good pulling your M115.  Keep up the good work.

Gino P. Quintiliani - Field Artillery - The KING of BATTLE!!!

Check out my Gallery: https://app.photobucket.com/u/HeavyArty

"People sleep peaceably in their beds at night only because rough men stand ready to do violence on their behalf." -- George Orwell

  • Member since
    March 2006
  • From: Right Side of a Left State
Posted by Shellback on Sunday, May 20, 2012 8:33 PM

Mike , now this is going to a wip for me to follow . I have been looking at reviews of this kit for a while . Nothing i read mentioned the pin marks in the roof . Like you i would want to correct that problem also . Thanks for this wip .Yes

  • Member since
    July 2006
  • From: New Jersey
Posted by redleg12 on Sunday, May 20, 2012 9:11 PM

Bill - Thanks for the peek...off on another adventure.

Gino - Thanks for stopping by the firing point. Still figuring out the final layout

Carl - The kit has nice details on one end but is a PIG on the other. It will build into a nice kit but.....the work will continue. Glad to have you peek in and hope my WIP helps when it is your turn. As for reviews.....when was the last review you saw where the reviewer called the kit bad!!

As I said it is a good kit but has a bunch of problems....modelers need to adapt and overcome!

Rounds Complete!!

"The Moral High Ground....A Great Place to Emplace Artillery."

  • Member since
    November 2009
  • From: SW Virginia
Posted by Gamera on Sunday, May 20, 2012 10:09 PM

Mike: Thanks for the WIP! I've got one in my stash too so I'll be eagerly following your work Yes

Cliff

"I dream in fire but work in clay." -Arthur Machen


  • Member since
    March 2006
  • From: Right Side of a Left State
Posted by Shellback on Monday, May 21, 2012 12:13 AM

Mike , about the reviews , thats true Yes

  • Member since
    July 2006
  • From: New Jersey
Posted by redleg12 on Monday, May 21, 2012 5:30 AM

Cliff - welcome and thanks for the peek. As I said to Carl, hopefully this helps when you are ready for yours.

Rounds Complete!!

"The Moral High Ground....A Great Place to Emplace Artillery."

  • Member since
    November 2005
Posted by T26E4 on Monday, May 21, 2012 6:47 AM

Bill: Did you see my remark about your winch cable?

/forums/p/147372/1570580.aspx#1570580

Tell me what you think


Roy Chow 

Join AMPS!

http://www.amps-armor.org


  • Member since
    July 2006
  • From: New Jersey
Posted by redleg12 on Monday, May 21, 2012 10:19 AM

Roy

Hummm....I know it is confusing here...it's Mike

As for the reel. I am contemplating having the cable somewhat run out connected to the M115 M2 Transport dolly. I can add more cable if needed but remember, this is inside the M4 under the ammo box and only visable through the cable slot hole.

I would fully agree with you on front bumper winches where the cable is rolled up.

I like your concept of using the silver cable but it looks a bit clean and shiny to me. Most winch cables I have seen over the years are a dull steel color and usaully have a coating of grease on the cable to protect it from corrision and allow it to release when needed.

Thanks for the peek and the thoughts. If I decide to go with the cable rolled up I will add more to the spool.

Rounds Complete!!

"The Moral High Ground....A Great Place to Emplace Artillery."

  • Member since
    March 2003
  • From: Rain USA, Vancouver WA
Posted by tigerman on Monday, May 21, 2012 10:24 AM

Always nice to see the more obscure subjects being built up. This should be fun.

   http://i7.photobucket.com/albums/y269/wing_nut_5o/PANZERJAGERGB.jpg

 Eric 

  • Member since
    July 2003
  • From: On my kitchen counter top somewhere in North Carolina.
Posted by disastermaster on Monday, May 21, 2012 2:04 PM

A good subject Mike.

            http://th709.photobucket.com/albums/ww91/pq7z4t/smileys/th_eyes.gif 

   I'll be looking in.

Sherman-Jumbo-1945

"I was so much older then, I'm younger than that now"


  • Member since
    April 2007
  • From: Schroon Lake, NY
Posted by SMJmodeler on Monday, May 21, 2012 2:15 PM

YEAH BABY!!!  This is one of my FAVORITE US AFV's!!!  I have this one in my stash and I plan to pair- it -up with the Long Tom Cannon...someday.  I even bought the Doyle book based on your recommendation.

Let me grab a front row seat so I can watch this one from up-close!Eats

Mike: I recall reading comments that this one has a nicely detailed engine...which you've confirmed with that photo, but I also read it's hard to see when it's completed.  Have you thought about that?  Any open compartments?

  • Member since
    March 2006
  • From: Right Side of a Left State
Posted by Shellback on Monday, May 21, 2012 2:29 PM

Dont take my seat ...............lol ...............we need a smiley sitting and eating pop corn while watching this one progress Yes

  • Member since
    July 2003
  • From: On my kitchen counter top somewhere in North Carolina.
Posted by disastermaster on Monday, May 21, 2012 3:29 PM


       http://gprime.net/board/images/smilies/partytime2.gif

Sherman-Jumbo-1945

"I was so much older then, I'm younger than that now"


  • Member since
    July 2006
  • From: New Jersey
Posted by redleg12 on Monday, May 21, 2012 6:27 PM

Eric - Thanks for the peek. you know me, I am always different.

Steve - Glad you and the smile buddies are along for the ride. I presume buttered of course....Confused

Steve - OK....the engine is nice. I have not decided if the mesh door to the engine will be open yet. I still need to "grime" up the engine. Even with it closed, the mesh is fairly open and the engine can somewhat be seen.

I am planning on having the entire cab open. I will have to remake the seat cushions as the kit cushions are blaaa.

Also the ammunition compartment will be open. i am planning to have projectiles and powder cans in the compartment and a projectile on the crane. I am doing it in emplacement or displacement mode. Still to decide if I am coming or going... Stick out tongue

Thanks guys

Rounds Complete!!

"The Moral High Ground....A Great Place to Emplace Artillery."

  • Member since
    March 2006
  • From: Right Side of a Left State
Posted by Shellback on Monday, May 21, 2012 6:40 PM

disastermaster


       http://gprime.net/board/images/smilies/partytime2.gif

Yes Yes Now i am set to follow this one .

  • Member since
    November 2005
Posted by T26E4 on Monday, May 21, 2012 8:42 PM

Mike: sorry -- I was confusing you with Bill Plunk.  I use the silver embroidery thread but it takes paint well.  When I shoot the model w/primer, it gets covered.  I follow up w/gun metal paint and oily gunk too. The cable being extended makes lots of sense then!

Roy Chow 

Join AMPS!

http://www.amps-armor.org


  • Member since
    September 2005
  • From: beacon falls , Ct.
Posted by treadwell on Monday, May 21, 2012 8:55 PM

Hiya Mike :  )

You said in one of your early posts this has 'got you going in 9 different directions ' ..... so what else is new with a multi talented guy like you ? Wink..... looks to me like all 9 are going the right way !

putting the sheeting on the inside roof is the way to go... I sheet you not Whistling

Nice man !

treadCool


  • Member since
    July 2006
  • From: New Jersey
Posted by redleg12 on Monday, May 21, 2012 8:55 PM

No problem Roy....just remember, I'm the ugly one!! Wink

Rounds Complete!!

"The Moral High Ground....A Great Place to Emplace Artillery."

  • Member since
    April 2009
  • From: Carmel, IN
Posted by deafpanzer on Monday, May 21, 2012 11:40 PM

Shellback

Dont take my seat ...............lol ...............we need a smiley sitting and eating pop corn while watching this one progress Yes

And drinking Beer!  Popcorn makes me thirst quickly so gonna have plenty of Beer handy.  Of course please count me in too.  Looking great... finally something other than a cannon from Redleg12 factory. Yes

Andy

  • Member since
    July 2004
  • From: Texas
Posted by wbill76 on Tuesday, May 22, 2012 12:25 PM

I take it as a compliment to be confused with Mike...although his admission that he's "the ugly one" let's me off the hook! Stick out tongue

  • Member since
    July 2006
  • From: New Jersey
Posted by redleg12 on Tuesday, May 22, 2012 8:46 PM

Tread - Thanks for the peek.....I am always humble by your comments. You know the old saying, "so many models, so little time"

Always a pleasure to have you stop by

Deafpanzer - Always welcome....now we have to remember the main purpose of the M4 HST.....Artillery!!. Perfect for towing my big 8 inch.....ok I won't go there. Glad to have you along.

Bill - OK.....here is a picture of me, Karl and you

The picture order can be changed to protect the innocent!!

Rounds Complete!!

"The Moral High Ground....A Great Place to Emplace Artillery."

  • Member since
    March 2006
  • From: Right Side of a Left State
Posted by Shellback on Tuesday, May 22, 2012 9:36 PM

I'm ready Mike !

  • Member since
    July 2003
  • From: On my kitchen counter top somewhere in North Carolina.
Posted by disastermaster on Wednesday, May 23, 2012 3:15 AM

http://i111.photobucket.com/albums/n143/olga9999/forum%20emoticons/4_1_219.gif Exactly as I imagined 'ya.......http://www.onlinemess.nl/int/emoticons/overige/OnlineMess_%20(42).gif

Sherman-Jumbo-1945

"I was so much older then, I'm younger than that now"


  • Member since
    March 2006
  • From: Right Side of a Left State
Posted by Shellback on Wednesday, May 23, 2012 11:25 AM

Well ....i do like pop corn ....................Embarrassed

  • Member since
    September 2005
  • From: beacon falls , Ct.
Posted by treadwell on Friday, May 25, 2012 10:25 PM

Shell, you just like corn !WhistlingWink


  • Member since
    July 2006
  • From: New Jersey
Posted by redleg12 on Sunday, May 27, 2012 4:38 PM

Happy Memorial Day Weekend to everyone. First while you are enjoying that hot dog, remember the 7% of the population who have worn the uniform, and especially those who made the supreme sacrifice. Say thank you to a vet!

OK….now for this weeks update

Going in one direction was completing the lower hull by installing the engine and the radiator and fan assembly


Then I installed the winch assembly and power takeoff

The rear of the hull has some details to add such as the towing hook, Chicago fittings for the air lines and towing clevises. Once these were complete I gave the lower half and bottom a prime coat with Vallejo OD primer and a base coat with Poly Scale OD

In another direction are the road wheels and assemblies. The drive is a two-part assembly, the rear idler wheel is 3 parts for the wheel and then another 3 parts for the assembly. The boogies are a three-part assembly plus the two wheels. The upper idler rollers are mounted on there axels.

After cleaning up and priming all the parts the road wheels were painted with a tire black mix of 50/50% Flat & NATO black. The idler and upper idlers were painted with Alclad Steel. After drying the rims and mounting parts were painted with Poly Scale OD. Once dry, I completed final assembly of the road wheel assemblies.


Now…in a third direction, I began assembly of the ammo box. This included the center floor plate with recess holes for 8 inch projectiles. The kit gives you a choice of two different sizes for 155mm or 8 inch (203 mm). Even with the large size the projectiles are a bit tight. On the internal walls, are the brackets for the projectile holders from the Eduard PE set. On the opposite side of each center wall panel is a divider bracket also from the Eduard PE set

I mounted the internal divider walls and on the right wall is also mounted the crane locking bracket from the Eduard PE set. I then worked on the outside sidewalls removing the styrene blobs for the tie downs and the vent grill. I applied the Eduard vent grills to the outside walls. The Eduard set gives you parts so you can cut the holes through the end walls for the vents. Even though I will have the ammo box partially open when finished, I will have powder cans in those compartments so I took the easy way out and just mounted the grilles since the holes would not be visible. Also, on the inside wall of the end panels is a PE panel divider.

Also working on the ammo box front wall removing blobs for the tie downs and filling some big ejector pin marks on the inside of the door and front panels

That’s it for now, once I finish with the ammo box parts that will head for internal painting, meanwhile I need to mud up the track area before I mount the road wheels.  And lets not forget the cab!! See how many directions I head in by next week

As always all comments are welcome.

Rounds Complete!!

"The Moral High Ground....A Great Place to Emplace Artillery."

  • Member since
    March 2006
  • From: Right Side of a Left State
Posted by Shellback on Sunday, May 27, 2012 6:38 PM

Mike , thats some  good looking engine detail and the winch cable looks perfect .Yes

Ok , i'm ready for more updates ..................


http://i834.photobucket.com/albums/zz267/dabatman22/Motion_Pics/1000x500px-LL-b2fdb6ac_lozGr_GIF_Collection_of_someone_eating_popcorn.gif

  • Member since
    September 2005
  • From: beacon falls , Ct.
Posted by treadwell on Sunday, May 27, 2012 7:51 PM

Happy Memorial Day to you, Mike :  )

Everything progressing well and looks cool... nice details with the winch and PTO and all. 

Is the Vallejo OD primer just a primer or can it be used as a topcoat also ?  

color me curious, 

treadCool


JOIN OUR COMMUNITY!

Our community is FREE to join. To participate you must either login or register for an account.

SEARCH FORUMS
FREE NEWSLETTER
By signing up you may also receive reader surveys and occasional special offers. We do not sell, rent or trade our email lists. View our Privacy Policy.