SEARCH FINESCALE.COM

Enter keywords or a search phrase below:

1/35 Hobby Boss M4 18 Ton HST, WIP, 9/26/12, Complete

40857 views
189 replies
1 rating 2 rating 3 rating 4 rating 5 rating
  • Member since
    July 2006
  • From: New Jersey
Posted by redleg12 on Monday, July 23, 2012 6:27 PM

Clay - Thanks for stopping in. PE does add some nice detail, just frustrating working with the tiny bit of metal....I know, it's worth it!!

Rounds Complete!!

"The Moral High Ground....A Great Place to Emplace Artillery."

  • Member since
    April 2005
  • From: Piscataway, NJ!
Posted by wing_nut on Wednesday, July 25, 2012 6:40 AM

Are you planning on leaving this unpainted for the "Naked Models" theme?

Marc  

  • Member since
    July 2006
  • From: New Jersey
Posted by redleg12 on Wednesday, July 25, 2012 6:28 PM

Marc - At my age naked is not a good thing!!  Surprise

Nope, this one requires paint as you go.Things like the engine area would be almost impossible to paint once assembled. Same for many of the internal areas.

Rounds Complete!!

"The Moral High Ground....A Great Place to Emplace Artillery."

  • Member since
    July 2006
  • From: San Francisco Bay Area
Posted by bufflehead on Wednesday, July 25, 2012 11:20 PM

redleg12

Very short update this week. Working with tiny PE is a PITA and time consuming. Well, I cut off the 16 tie down blobs on the ammo box and used the PE tie downs. As usual about 15% went into the “outer limits” before I was able to complete the set. The painted green is the headlight inserts. The seams on this were also a PITA as the overall shell did not fit well.

Off to the paint box for prime and finish coat. Also getting all the tools primed and beginning to work on PE tool boxes.

As always all comments are welcome.

Rounds Complete!!

I feel your pain Mike!!  I just prepped a few teeny tiny tie downs myself for a GAZ67B and I can barely see them on my mat!  And you did 16!!!  Confused  My eyese are spinning just thinking about that!

Ernest

Last Armor Build - 1/35 Dragon M-26A1, 1/35 Emhar Mk.IV Female


Last Aircraft Builds - Hobby Boss 1/72 F4F Wildcat & FW-190A8


  • Member since
    November 2009
  • From: SW Virginia
Posted by Gamera on Thursday, July 26, 2012 10:15 AM

Coming along nicely! Great work, though I think you've convinced me that I'm going to build my kit mostly straight outta-the-box! Still all the extra detail you're adding looks fantastic!

"I dream in fire but work in clay." -Arthur Machen


  • Member since
    July 2006
  • From: New Jersey
Posted by redleg12 on Thursday, July 26, 2012 6:29 PM

Gamera - You have to do what you feel will give you the most fun!!! Sometimes even I get bog down in all the details. Thanks for the peek and the comments

Rounds Complete!!

"The Moral High Ground....A Great Place to Emplace Artillery."

  • Member since
    July 2006
  • From: New Jersey
Posted by redleg12 on Sunday, August 5, 2012 7:32 PM

Well it seems like I can never get enough bench time. Finally had some time this weekend. The ammo box was primed with Vallejo OD Primer and the painted with Poly Scale OD.

With paint on all the exterior major components I used some Tamiya OD mixed with about 10% Tamiya Dark Yellow for darker shadow lines. Here is the ammo box.

Here is the forward crew cabin

Next, using PE stencil set I created masks for 20-inch stars and a 12-inch star for the rear. The masks are created using 1-inch wide painters tape. After the masks are applied and the area is generally masked to prevent overspray, the stars were applied using Tamiya Flat White. Here is the ammo box and the roof of the engine compartment. The small star on the rear door of the ammo box is the 12-inch. All the rest are 20-inch stars.

Here is the forward crew cabin

In between all this painting I have begun working on the tools, toolboxes and the rear crane.

The rear crane is Primed with Vallejo OD primer then painted with Poly Scale OD. The metal contact surfaces are painted with Alclad Steel. The hoist roller, hoist chain, hoist hook are all also painted with Alclad Steel. Here is the finished rear ammunition crane

I will be working on the tools and toolboxes and the M2 50 cal. while I pin wash the hull and major exterior parts. Also will be adding decals.

As always all comments are welcome.

Rounds Complete!!


"The Moral High Ground....A Great Place to Emplace Artillery."

  • Member since
    September 2005
  • From: beacon falls , Ct.
Posted by treadwell on Sunday, August 5, 2012 10:32 PM

Hiya Mike

Nice progress my friend YesYes..... Cab, crane and ammo box are  looking topnotch.Stick out tongue...and nice work using the stencil...I know they are a pain in the butt ! I know the completion date you are shooting for...Big Smile

yer pal,

treadCool


  • Member since
    March 2006
  • From: Right Side of a Left State
Posted by Shellback on Sunday, August 5, 2012 11:34 PM

Nice work with the stenciled stars Mike . Gives it the "real effect " .Yes Dang , i ate all of my pop corn waiting for this update .Bang Head

  • Member since
    July 2006
  • From: New Jersey
Posted by redleg12 on Monday, August 6, 2012 6:24 AM

Tread - Thanks for the peek. Yep, trying to get it done for the end of Sept...I'm hoping!

Shell - Pop another bag in the microwave!!! Sorry to keep you waiting....i am peddling as fast as I can  Wink

Rounds Complete!!

"The Moral High Ground....A Great Place to Emplace Artillery."

  • Member since
    July 2004
  • From: Texas
Posted by wbill76 on Monday, August 6, 2012 12:51 PM

Great progress Mike, she's getting closer to the finish line! Nice job with the stars, nothing creates the "painted on look" like, well, paint! Wink

  • Member since
    December 2004
  • From: ohio
Posted by vonryan on Monday, August 6, 2012 10:19 PM

WOW Mike this is just a SWEET BUILD really liking eyeing this build my friend.

Clay

  • Member since
    July 2006
  • From: New Jersey
Posted by redleg12 on Monday, August 6, 2012 11:02 PM

Bill - The best part of paint is it looks like paint!!! You can get the bit of overspray and it always fits well over details!! Thanks

Clay - Glad you are enjoying it. Thanks for the peek.

Rounds Complete!!

"The Moral High Ground....A Great Place to Emplace Artillery."

  • Member since
    March 2006
  • From: Right Side of a Left State
Posted by Shellback on Monday, August 6, 2012 11:34 PM

Ok Mike , supplies replenished  !


  • Member since
    July 2006
  • From: New Jersey
Posted by redleg12 on Sunday, August 12, 2012 6:51 PM

After installing the PE front window hinges it was time to fit up the cab and engine compartment. The ammunition compartment is just dry fit for a check.

Getting the doors ready will require some time to allow drying. The Eduard PE doors require paper for the canvas. Instead of paper, I used my favorite for canvas, aircraft (jap) tissue. Here you can see the tissue attached using landscape cement. After attaching it each side is coated to seal up the tissue and give it strength.

Back to working on all the tools and the M2.

As always all comments are welcome.

Rounds Complete!!

"The Moral High Ground....A Great Place to Emplace Artillery."

  • Member since
    September 2005
  • From: beacon falls , Ct.
Posted by treadwell on Sunday, August 12, 2012 7:21 PM

Hiya Mike Big Smile

Wow I am really digging how cool the doors are going to look with the tissue for canvas/ brass frame deal.

I am sure this will look VERY realistic with this touch and can't wait to see an update on this aspect!

Very cool Yes

treadCool


  • Member since
    March 2006
  • From: Right Side of a Left State
Posted by Shellback on Sunday, August 12, 2012 11:43 PM

Mike , this step with the doors should be interesting .

  • Member since
    July 2006
  • From: New Jersey
Posted by redleg12 on Monday, August 13, 2012 5:26 AM

Tread - Thanks for the peek. The hard part is to come.....using the PE hinges, folding the doors so the cab is open.....patience!!

Shell - get some butter....doors will be fun!

Rounds Complete!!

"The Moral High Ground....A Great Place to Emplace Artillery."

  • Member since
    July 2004
  • From: Texas
Posted by wbill76 on Monday, August 13, 2012 10:50 AM

Sounds like a great plan to add some detail to those doors Mike! Looking forward to the end result, if anyone can pull off the patience for posed hinges, it's you! Beer

  • Member since
    July 2006
  • From: New Jersey
Posted by redleg12 on Tuesday, August 14, 2012 5:43 AM

Bill - thanks for the confidence. Patience and time are always in short supply, especially time. I'll just have to keep on chugging. Thanks for the peek.

Rounds Complete!!

"The Moral High Ground....A Great Place to Emplace Artillery."

  • Member since
    December 2004
  • From: ohio
Posted by vonryan on Tuesday, August 14, 2012 6:59 AM

OK i really DON'T know how that PE could enhance this build it's such an AWESOME build with out it. but OMG it's looking OUTSTANDING Mike.Yes really like watching,


Clay  

  • Member since
    July 2006
  • From: New Jersey
Posted by redleg12 on Tuesday, August 14, 2012 9:09 PM

Clay - You are tooooooo kind. I will post a step by step with the doors as I go forward. Seems to be of interest to our group.

Thanks again

Rounds Complete!!

"The Moral High Ground....A Great Place to Emplace Artillery."

  • Member since
    March 2006
  • From: Right Side of a Left State
Posted by Shellback on Thursday, August 16, 2012 10:00 AM

Got it !Yes

  • Member since
    April 2005
  • From: Piscataway, NJ!
Posted by wing_nut on Friday, August 17, 2012 6:17 AM

PE?  Nooooooooooooo... not more PE?  Must be strong... OK... I'll watch.

Marc  

  • Member since
    July 2006
  • From: New Jersey
Posted by redleg12 on Saturday, August 18, 2012 7:59 AM

Carl - Good to see you are prepared

Marc - We are both praying to the great PE god....the god of brass, solder and glue. Hopefully we do not have to offer him a sacrifice!!

Rounds Complete!!

"The Moral High Ground....A Great Place to Emplace Artillery."

  • Member since
    July 2006
  • From: New Jersey
Posted by redleg12 on Sunday, August 19, 2012 7:21 PM

This has been a long week getting my daughter back to college so the little bits of progress I kept to the doors

After coating the doors with airplane tissue, the doors were painted on one side with Vallejo OD Green. After the paint was given overnight to dry, I then using a new sharp #11 blade cut out the window areas and removed the tissue.

After the windows were cleared the other side of the doors was painted. I also painted one side of the window frames. On the unpainted side I applied contact cement. In my particular case, 3M photo mounting cement. This was done by spraying a small amount of the cement into a disposable cup and then applying the cement to the frame with a small detail cotton swab.

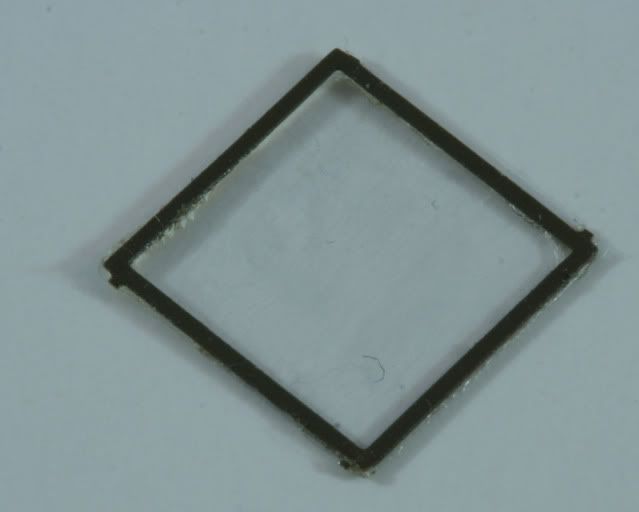
Once a set of frames was ready with I cut, with a new sharp #11 blade, a strip of clear stretch wrap plastic. Then I applied the stretch wrap to the frames starting on one side and working to the other while keeping the stretch wrap taught and straight. After pressing to the frames, again using the sharp #11 blade I cut around each frame and removed it from the PE sheet. Here is one of the small windows when removed.


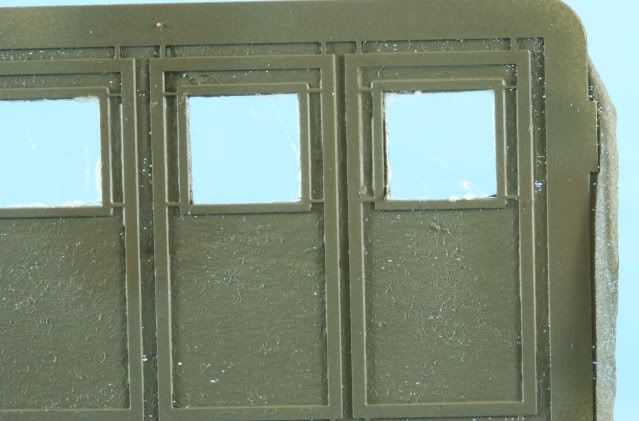
Again, using the contact cement, I place a small bead on the tissue side of the window opening on the door and then applied the frame with the clear window to the door. Here is a view of the small doors with the windows applied.

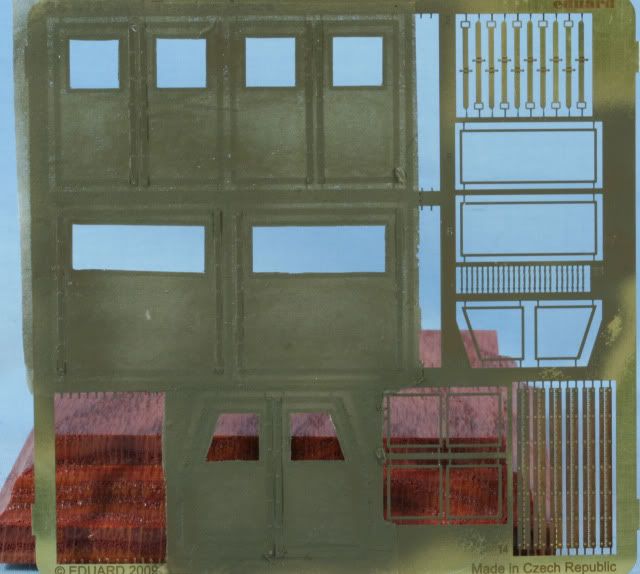
Once all the windows are applied it is time to remove the doors from the PE Sheet. Here is how the sheet looks with everything installed

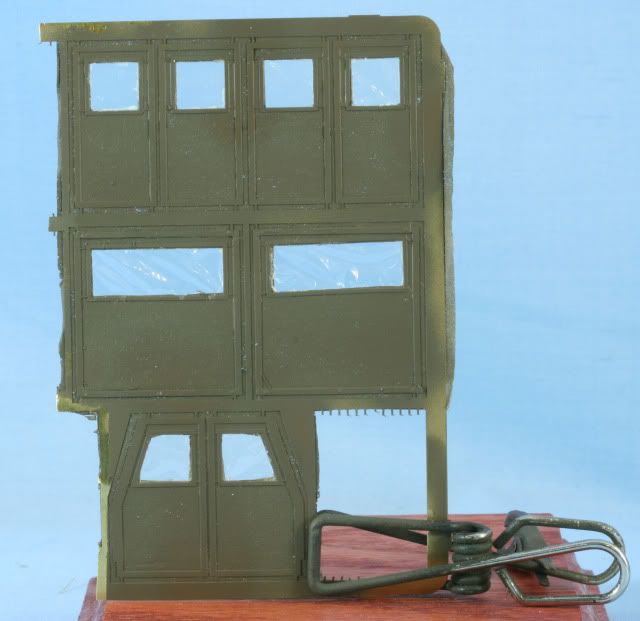
Once again using a sharp #11 blade I removed all the doors and the hinges. Since I intend to display with the crew compartment open, I folded the hinges and assembled the doors in the folded position using Gator Glue. Here is the finished set of doors, minus their tie down straps, but ready to mount.

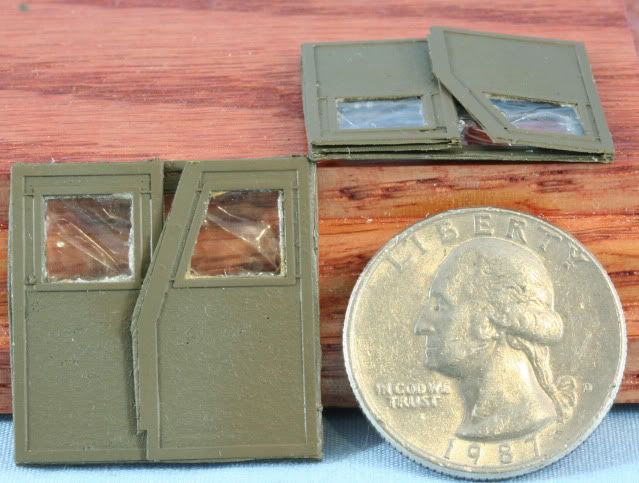
As you can see in the photo, how thin the folded set is which is much closer to scale than piling all the plastic doors together, which would have been more than .080 thick, which would be way out of scale. The Eduard doors are time consuming but much closer to scale

As always all comments are welcome.

Rounds Complete!!


"The Moral High Ground....A Great Place to Emplace Artillery."

  • Member since
    August 2007
  • From: back country of SO-CAL, at the birth place of Naval Aviation
Posted by DUSTER on Sunday, August 19, 2012 7:44 PM

 this looks terrific; another clever technique to add to the, "Now That's What I should Do" file.


p.s. the model of the quarter looks especially realistic and in scale to

Steve

Building the perfect model---just not quite yet  Confused

  • Member since
    July 2004
  • From: Texas
Posted by wbill76 on Sunday, August 19, 2012 7:44 PM

Very impressive Mike...you've held on to that quarter since 1987! Big Smile Seriously, very nice job on the doors, they definitely are an improvement over the kit styrene parts and look well worth the effort you've put into them. Beer

  • Member since
    September 2005
  • From: beacon falls , Ct.
Posted by treadwell on Sunday, August 19, 2012 7:45 PM

Hiya Mike Smile , Man that look terrific ! YesYes.. an investment in time , but so worth the finished, folded look!

Do they give you the stretchy window material or are you using saran wrap  or like a clear mono-Kote like they use on airplanes ?

Very cool buddy !Wink

treadCool


  • Member since
    July 2006
  • From: New Jersey
Posted by redleg12 on Sunday, August 19, 2012 9:40 PM

Steve - Glad to add to your list....glad you liked my scale quarter!! Thanks for stopping in

Bill - That quarter started out as a penny in 1987 Wink   Hoping Washington goes from silver to paper soon!!

 As for the look of the doors, if you are going to put the doors on the M4.....the PE doors are a billion times better than the plastic ones. Or for you , the improvement is the ratio of the combined thickness of the plastic doors vs the PE doors  Stick out tongue    Thanks for the peek

Tread - Thanks for stopping in. The PE set comes with clear film. Though it is thin it is stiff. Whenever I have a soft clear window I like to use plain old "saran wrap". The real deal is usually somewhere around 30 to 40 mils thick. So using saran wrap that is about 1 to 2 mils thick is excellent for scale and because it is soft, has the correct look. If it is too loose, careful work with a hair dryer will tighten it up. Wink

Thanks for the peek

Rounds Complete!!

"The Moral High Ground....A Great Place to Emplace Artillery."

JOIN OUR COMMUNITY!

Our community is FREE to join. To participate you must either login or register for an account.

SEARCH FORUMS
FREE NEWSLETTER
By signing up you may also receive reader surveys and occasional special offers. We do not sell, rent or trade our email lists. View our Privacy Policy.