SEARCH FINESCALE.COM

Enter keywords or a search phrase below:

1/35 Hobby Boss M4 18 Ton HST, WIP, 9/26/12, Complete

40855 views
189 replies
1 rating 2 rating 3 rating 4 rating 5 rating
  • Member since
    December 2004
  • From: ohio
Posted by vonryan on Sunday, August 19, 2012 10:35 PM

DANG Mike really great build.Yes


Clay

  • Member since
    July 2006
  • From: New Jersey
Posted by redleg12 on Monday, August 20, 2012 5:36 AM

Clay - Thanks for the visit. Your comment is appreciated.

Rounds Complete!!

"The Moral High Ground....A Great Place to Emplace Artillery."

  • Member since
    April 2005
  • From: Piscataway, NJ!
Posted by wing_nut on Monday, August 20, 2012 6:39 AM

Mike, you the the some total of my knowledge of the subjects you builds is this... they're OD.  So when I read the bit about airplane tissue I couldn't figure out what the heck you were doing.  The soft window pushed me over the edge and into the light.  Canvas doors!  Very cool technique.

Marc  

  • Member since
    March 2006
  • From: Right Side of a Left State
Posted by Shellback on Monday, August 20, 2012 8:38 AM

Mike , looks like it was fun . Time consuming i'm sure and the results are worth it .Yes This is going to look impressive on the M4 . Toast

p.s. Marc , Wingnut , has more pennies ..............i dont think his turn into quarters though ...........probably made from brass.........Whistling

  • Member since
    April 2005
  • From: Piscataway, NJ!
Posted by wing_nut on Monday, August 20, 2012 11:23 AM

Shellback

...i dont think his turn into quarters though ...

Dunno what kind of money Mike has but seems like my quarters are turning into pennies not the other way 'roundCrying

Marc  

  • Member since
    April 2009
  • From: Carmel, IN
Posted by deafpanzer on Monday, August 20, 2012 2:40 PM

Very impressive work on the doors especially its windows!  Just exactly like I have seen on those vehicles or convertible cars that they were not 'clean' flat.

Andy

  • Member since
    March 2006
  • From: Right Side of a Left State
Posted by Shellback on Monday, August 20, 2012 4:00 PM

wing_nut

Shellback

...i dont think his turn into quarters though ...

Dunno what kind of money Mike has but seems like my quarters are turning into pennies not the other way 'roundCrying

LOL and too true ..................

  • Member since
    July 2006
  • From: New Jersey
Posted by redleg12 on Tuesday, August 21, 2012 8:41 AM

Marc - Yep....sorry I did not explain the detail for the Germaholics Tongue Tied  but yes it is a canvas door set with with a clear plastic windows. Glad you liked it and thanks for the peek.

Carl - Thanks for the peek and for your comments.  What you don't see is Wasington is crying on that quarter as he is being squeezed soooo hard!! Crying

Andy - Thanks for stopping in. I like using the "saran wrap" for the soft clear plastic windows. You get a much more realistic look than rigid sheet clear.

Thanks again for the look to all

Rounds Complete!!

"The Moral High Ground....A Great Place to Emplace Artillery."

  • Member since
    March 2011
  • From: Ottawa,Ontario,Canada
Posted by modeler#1 on Tuesday, August 21, 2012 4:09 PM

Very captivating build will definitely be following this one.

On the Bench: Nothing atm

  • Member since
    July 2006
  • From: New Jersey
Posted by redleg12 on Tuesday, August 21, 2012 7:28 PM

Modeler#1 - Thanks for stopping in and I am glad you are enjoying it. Always feel free with the questions or comments around me!!

Rounds Complete!!

"The Moral High Ground....A Great Place to Emplace Artillery."

  • Member since
    March 2006
  • From: Right Side of a Left State
Posted by Shellback on Wednesday, August 22, 2012 11:54 AM

Mike , i hear you about having pinch ............sqeeze ..........ring out every cent !

  • Member since
    July 2006
  • From: New Jersey
Posted by redleg12 on Sunday, September 2, 2012 8:41 PM

It is Labor Day weekend and it was time to hit the bench.

First I needed to get the bumper markings for the vehicle. These are the markings of the 17th Field Artillery, one of 3 eights inch towed units in Korea. Using Archer Transfers, I created the bumper markings on clear decal sheet. After the letters and numbers are placed on the decal paper, the bumper decals were sprayed with Gloss Future. After drying overnight the decals are ready to be applied. After application, the decals are allowed to snug down overnight. After the decals are set, the bumper is over-sprayed with Dull Future.

To try to complete the ammunition container, I assembled 8 inch ammunition from the AFV 155mm/8inch ammunition kit. The projectiles and powder cans were painted with Tamiya OD. Once dry, the projectiles were masked and the rotating band was painted with Tamiya Flat Copper. After the paint was dry, the 8 inch projectile decals were applied and then the ammunition was loaded into the ammunition box

With the ammunition loaded, I created a tarp with aircraft tissue. After measuring and allowing an additional 1/8 inch on each edge, the edges are folded and sealed using landscape cement to create the tarp edge cuff. After the cement dries then the tarp was applied to the ammunition box with landscape cement. Then, the entire tarp is coated with landscape cement to seal the tissue. I applied the tarp with one side folded back where the crane will be attached.

After allowing the landscape cement to dry overnight, the tarp was painted with Vallejo OD and high edges shaded with Poly Scale OD

With the ammunition in the box and the tarp on the roof, the box was attached to the main frame.

Now I moved on to some pre weathering in the track area. To create some depth, I colored some Liquatex Ceramic Stucco with Tamiya NATO Brown. This was applied in the track area where mud would cake up. This was allowed to dry overnight.

Once dry I applied AK Earth Effects to the underside

Next up are some filters and then it is time to start applying tools and other details

As always all comments are welcome.

Rounds Complete!!

"The Moral High Ground....A Great Place to Emplace Artillery."

  • Member since
    September 2005
  • From: beacon falls , Ct.
Posted by treadwell on Sunday, September 2, 2012 9:43 PM

Big Smile Hi Mike

Jeez man..your build is really shaping up sweetly..a lot of cool things going on with canvas for the ammo box and doors and the shells look beautiful !

I kind of don't get the part with the dry transfers and the clear decal carrier. I have used dry transfers before, but Just transferred directly to the model.  Are you using the decal paper to line up the individual numbers you have chosen ? or is there something I am mis-understanding ?

Thanks Mike, looking forwrd to the next installment.

treadCool


  • Member since
    March 2006
  • From: Right Side of a Left State
Posted by Shellback on Sunday, September 2, 2012 10:01 PM

I'm liking all of the details your adding Mike . The aircraft paper works real well as scale canvas . Looking good !Yes

I will be here waiting for more !

  • Member since
    July 2004
  • From: Texas
Posted by wbill76 on Sunday, September 2, 2012 10:17 PM

That tarp is practically perfect in every way! Ditto on the rounds Mike, always love seeing you add those types of touches to your builds. Yes

  • Member since
    July 2006
  • From: New Jersey
Posted by redleg12 on Monday, September 3, 2012 6:08 AM

Tread - It just makes it simpler to put the whole bumper code on the decal paper then apply the decal. Thanks for the peek.

Carl - Glad to see I am still keeping you riveted!! Thanks for stopping in

Bill - I love to add the little items.....it adds reality. Thanks for the peek.

Rounds Complete!!

"The Moral High Ground....A Great Place to Emplace Artillery."

  • Member since
    April 2005
  • From: Piscataway, NJ!
Posted by wing_nut on Monday, September 3, 2012 6:31 AM

The ammo looks like it would go off if Bug Bunny were to hit it with a hammer. Of course if you've never seen that cartoon that woun't make much sense.Wink

What is landscape cement?

Marc  

  • Member since
    July 2006
  • From: New Jersey
Posted by redleg12 on Monday, September 3, 2012 7:31 AM

Marc - Landscape cement is basically watered down white glue. It is available from Woodland Scenics

As for Bugs

Rounds Complete!!.

"The Moral High Ground....A Great Place to Emplace Artillery."

  • Member since
    August 2007
  • From: back country of SO-CAL, at the birth place of Naval Aviation
Posted by DUSTER on Friday, September 7, 2012 4:37 PM

Well done  to date. Am enjoying the build and your ability to advance the quality of the model.

Enjoyed your web site- well executed and your skill certainly shows in your builds

.

Steve

Building the perfect model---just not quite yet  Confused

  • Member since
    July 2006
  • From: New Jersey
Posted by redleg12 on Saturday, September 8, 2012 6:09 AM

Steve - Thanks for the comments on the build and thanks for the web site peek.

Rounds Complete!!

"The Moral High Ground....A Great Place to Emplace Artillery."

  • Member since
    November 2009
  • From: SW Virginia
Posted by Gamera on Saturday, September 8, 2012 8:18 AM

Again, what else can I say but great job! I too love the tarp, looks very realistic in looks and the way you've positioned it with the edge just pulled aside.  

"I dream in fire but work in clay." -Arthur Machen


  • Member since
    July 2006
  • From: New Jersey
Posted by redleg12 on Saturday, September 8, 2012 7:53 PM

Gamera - Thanks, that was exactly the look I was trying to create. Again thanks for the comment.

Rounds Complete!!

"The Moral High Ground....A Great Place to Emplace Artillery."

  • Member since
    December 2004
  • From: ohio
Posted by vonryan on Monday, September 10, 2012 5:29 AM

hey Mike just an awesome buildYes now a question. is this the animal that would bring ammo to my M12? and also i want to do a dio with a M12. now this kit would look very nice with it. was in all fronts and when did it start in service? thanks for any help.

Clay   

  • Member since
    July 2006
  • From: New Jersey
Posted by redleg12 on Monday, September 10, 2012 5:40 AM

Clay - thanks fo the peek. As for the ammunition carrier for the M12, NOPE....the M12 was usaully followed be the M30 ammunition carrier. Here is some info on the M30. The good thing is you can make an M30 from an M12 kit.

www.network54.com/.../M30+Ammo+carrier

HTH

Rounds Complete!!

"The Moral High Ground....A Great Place to Emplace Artillery."

  • Member since
    July 2006
  • From: New Jersey
Posted by redleg12 on Sunday, September 16, 2012 9:21 PM

Well, getting close to the end, and made good progress this weekend.

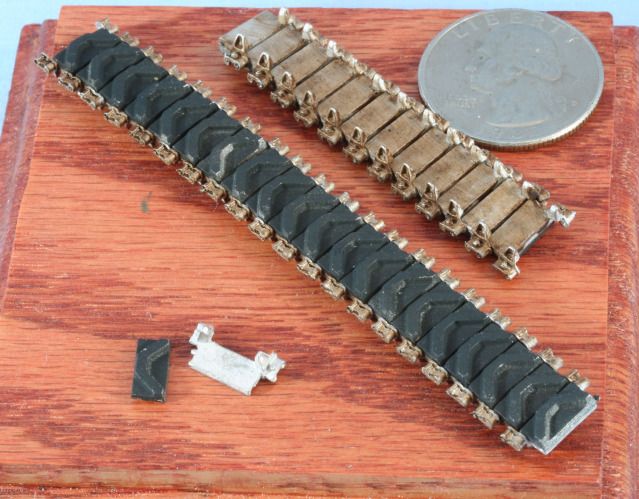
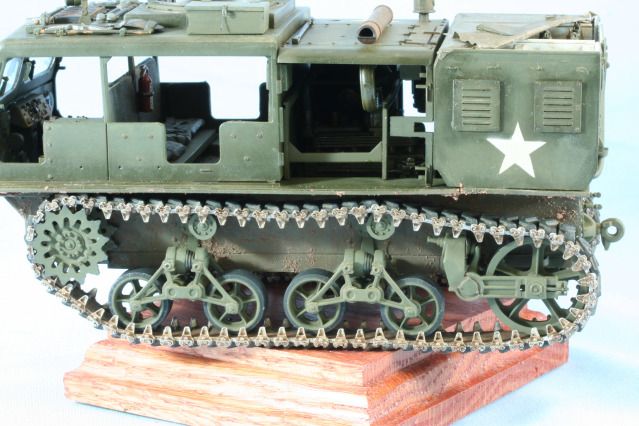
Worked on the tracks. I used Fruile T-48 tracks. The M4 HST requires 68 links per side. The Fruile links are two parts, the pad and the metal link with end caps. First I painted the pads with my rubber mix, 50/50 NATO & Flat Black. Then I assembled the pads to the links followed by assembling groups of links. The exposed metal was coated with AK Track Wash

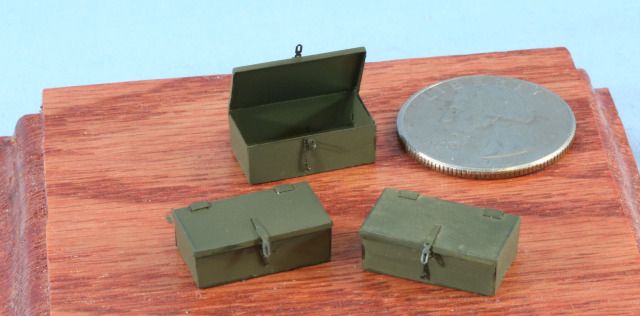
The 3 PE tool boxes make the PE set worth the purchase. After assembling the box, hinges, hasp, and lock chain. The boxes are painted the same as the vehicle with Poly Scale OD. The hasp, chain and edge wear is done with Alclad Steel.

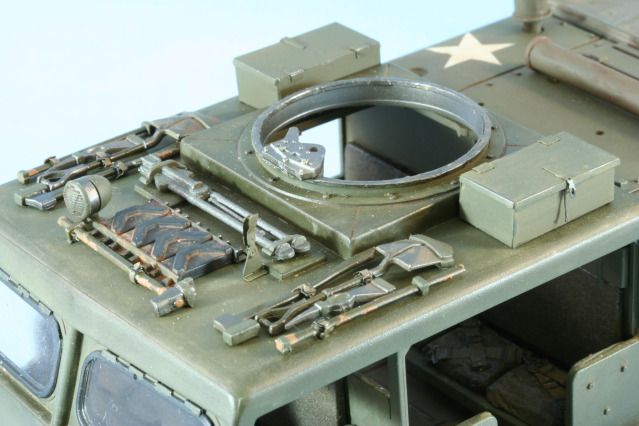
Time for tools. The wood handles were painted with Tamiya OD. The wear areas on the handles are painted with Poly Scale Rust to simulate the bare wood. All the tool brackets are painted with Poly Scale OD. The metal parts are painted with Alclad Steel.  The PE straps are Vallejo OD with Flat Black buckles. This includes the sledge, 2 axes, 2 shovels, 2 pick heads, 2 pick handles and a breaker bar.

The spare tracks were painted with the tire mix on the pads, Poly Scale OD for the brackets and Alclad Steel for the pins. The PE set includes a barrel bracket for the M2 which was painted with Poly Scale OD. Lastly, the M2 tripod is painted with a parkerized color mix.

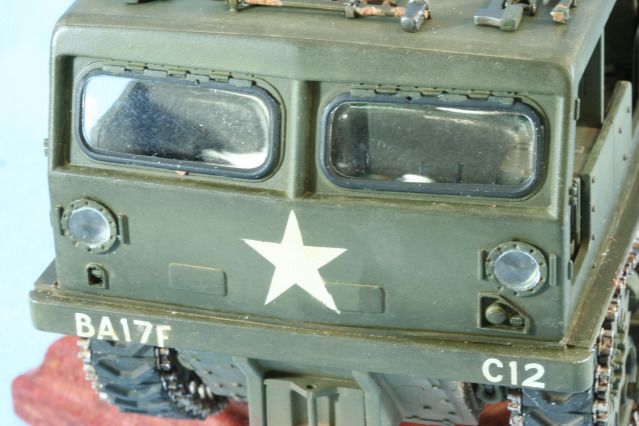
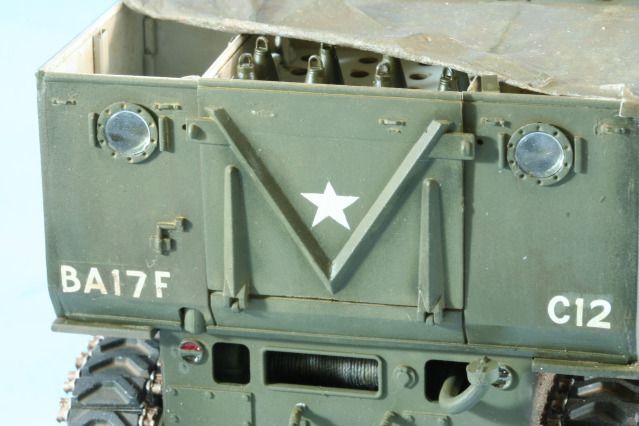
The front headlight bay was painted with Alclad Bright Aluminum and the clear lens applied. The windshields have the rubber edge gasket painted with the tire mix and their attaching pins to match the M4 OD

The rear headlights were done the same as the front headlights. The rear taillights were coated with Alclad Bright Aluminum and then Clear Red and Smoke (Clear Black).

The muffler and breather were painted with PolyScale OD. On the muffler to create a heat effect on the paint, I washed it with AK Track wash and mixed in some MIG Light Rust Pigment. The exhaust end is rings of MIG Dark Rust, Light Rust and then Smoke at the end and inside. The breather is coated with the AK Track Wash mixed with some MIG Light Rust Pigment. I still have to mount the open tool box but here is a look at the other items.

Lastly I mounted the road wheels, assembled and mounted the track. I still have to weather the track and road wheels, but here is the look with the “shoes on”.

Also started in the wood shop and started on the base. Next it is a matter of finishing the details and getting it mounted on the base. Need to finish up next week.

As always all comments are welcome.

Rounds Complete!!

"The Moral High Ground....A Great Place to Emplace Artillery."

  • Member since
    December 2002
  • From: Valrico, FL
Posted by HeavyArty on Sunday, September 16, 2012 9:26 PM

Ahhh, another great Sunday update from Mike.  It is really coming together ow and is looking great.  The little details on it really pop.  Great job.

Gino P. Quintiliani - Field Artillery - The KING of BATTLE!!!

Check out my Gallery: https://app.photobucket.com/u/HeavyArty

"People sleep peaceably in their beds at night only because rough men stand ready to do violence on their behalf." -- George Orwell

  • Member since
    September 2005
  • From: beacon falls , Ct.
Posted by treadwell on Sunday, September 16, 2012 10:05 PM

WOO-HOO ! MIKE Smile

Nice update and does she ever look sweet !.... the tracks are really great looking I really like your  'mix ' for the rubber parts.  All the detail is a real eye grabber, and you are right , the tool boxes look terrific !

I am glad I stayed up and waited for your anticipated update... I was getting worried ! LOL Wink

11 days to go !

treadCool


  • Member since
    March 2006
  • From: Right Side of a Left State
Posted by Shellback on Sunday, September 16, 2012 10:32 PM

Mike , it sure is looking great . Those details like the Fruil tracks , pe tool boxs and the rubber gaskets you painted on the windshields has really made a interesting model !Yes

  • Member since
    July 2006
  • From: New Jersey
Posted by redleg12 on Monday, September 17, 2012 6:15 AM

Gino - Thanks for the peek. Details are the key and the fun part.

Tread - Thanks for the late night look. As I said the PE tool boxes beat the hell out of the plastic kit boxes. Will try to mount one open with some tools.....hopefully. Track are usually a PITA....but these since the rubber was separated was a bit nicer.

Carl - I know it was late and so it was snack time and not popcorn time but thanks for stopping by. You know I love the details. I will try to keep you interest with more details

Thanks everyone

Rounds Complete!!

"The Moral High Ground....A Great Place to Emplace Artillery."

  • Member since
    April 2005
  • From: Piscataway, NJ!
Posted by wing_nut on Monday, September 17, 2012 8:20 AM

Let me address each of your progress photos.


Nice!

Sweet!

Sweet!

Great!

Awesome!

DUDE!

Burger King (I'm lovin' it)

Marc  

JOIN OUR COMMUNITY!

Our community is FREE to join. To participate you must either login or register for an account.

SEARCH FORUMS
FREE NEWSLETTER
By signing up you may also receive reader surveys and occasional special offers. We do not sell, rent or trade our email lists. View our Privacy Policy.