SEARCH FINESCALE.COM

Enter keywords or a search phrase below:

Zil 157 truck from Trumpeter kit 204 . Its 9-26 and Its finished ! Cutting edge pictures posted !

68674 views
327 replies
1 rating 2 rating 3 rating 4 rating 5 rating
  • Member since
    March 2006
  • From: Right Side of a Left State
Zil 157 truck from Trumpeter kit 204 . Its 9-26 and Its finished ! Cutting edge pictures posted !
Posted by Shellback on Monday, July 2, 2012 9:15 PM

Here's the box picture for kit 204 .

  • Member since
    December 2006
  • From: t.r.f. mn.
Posted by detailfreak on Monday, July 2, 2012 9:19 PM

show us more!!

[View:http://s172.photobucket.com/albums/w1/g-earl828/]  http://i158.photobucket.com/albums/t104/cycledupes/1000Roadwheels4BuildBadge.jpg

  • Member since
    March 2006
  • From: Right Side of a Left State
Posted by Shellback on Monday, July 2, 2012 9:22 PM

I'd like to Detailfreak but i cant edit the first post ..............

  • Member since
    March 2006
  • From: Right Side of a Left State
Posted by Shellback on Monday, July 2, 2012 9:24 PM

Anyway here's the Zil 157k tractor that i'll be building .

Trumpeter kit 204 includes parts for the Zil-157K and the SA-2 missile with its transport trailer .For this wip i'm building the tractor only and will build the trailer and missile later . The tractor must have 200 + parts on its own . The detail is very good . Close attention must be paid to the instructions and multiple dry fitting is a must .

Zil-157 specs .

Zil-157 is a general purpose 2.5 ton 6x6 truck . Production was 1958 -1961 USSR . The improved Zil-157K (with winch) was produced 1961 -1978. The engine is a gas 6 cylinder inline producing 109 hp with a manual transmission .

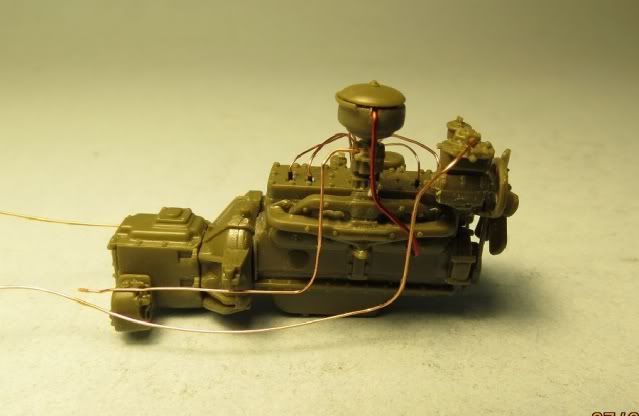
Here's the engine . It consist of 36 parts .

This is the front bumper /winch . I'll put a cable on it later .

Front axle . The wheels are positionable .

This build will take a while as this is a busy time of year . I may not complete the tractor  untill this winter . So far the kit has been interesting to build . I've had to pull some parts back off and re-position them because i didnt pay attention to the instructions . Its a good looking beast when done . Yes


  • Member since
    December 2004
  • From: ohio
Posted by vonryan on Monday, July 2, 2012 9:42 PM

awesome start Shellback love the wiring

Clay

  • Member since
    April 2009
  • From: Carmel, IN
Posted by deafpanzer on Monday, July 2, 2012 11:23 PM

Back from week long vacation.   Really like the engine!!!  

Andy

  • Member since
    May 2009
  • From: Poland
Posted by Pawel on Tuesday, July 3, 2012 1:39 AM

Oh yeah, this is a nice kit. I built it in 2006. One dude who was rebuilding the engines of those babies told me they were supposed to paint all the rotating parts, like the fan and the pulleys red. That's how I did it in my model for extra interest. What paint scheme do you want to use on it? Good luck with your project and have a nice day

Paweł

All comments and critique welcomed. Thanks for your honest opinions!

www.vietnam.net.pl

  • Member since
    July 2004
  • From: Texas
Posted by wbill76 on Tuesday, July 3, 2012 9:05 AM

No worries about the time Carl, just enjoy the ride! Looks good so far, nice job wiring up that engine.

  • Member since
    November 2009
  • From: SW Virginia
Posted by Gamera on Tuesday, July 3, 2012 10:11 AM

Wow neat subject and the engine looks great, looking forward to seeing how she comes out!

"I dream in fire but work in clay." -Arthur Machen


  • Member since
    March 2006
  • From: Right Side of a Left State
Posted by Shellback on Tuesday, July 3, 2012 10:27 AM

Hey guys i'm glad to have your comments . Thanks for looking in .Toast

Pawel , it does seem that the Russians like red engine parts . I found these pictures .


Later guys .Yes

  • Member since
    May 2005
  • From: Dublin Rep Of Ireland
Posted by terry35 on Tuesday, July 3, 2012 4:51 PM

Fantastic work Carl, it really is a super kit, I have one and it is stunning, I love your wiring etc so far.

I have the Voyager set for this kit and I must say its a waste the kit parts are probably better than what Voyager decided to provide as etch.

Just a quick note, while researching this truck I found one on YouTube and there is a blocky looking thing on the passenger side, its actually a stove, check YouTube for it, its cool.

Terry.

  • Member since
    March 2006
  • From: Right Side of a Left State
Posted by Shellback on Tuesday, July 3, 2012 5:50 PM

Terry thanks ! I'll look for that you tube video . I was thinking about some p.e. for this build but so far havent looked into it . This picture of the chasis lets me know that this thing could use a lot of plumbing .dont know if i'm up to it .Yes

  • Member since
    September 2005
  • From: beacon falls , Ct.
Posted by treadwell on Tuesday, July 3, 2012 7:32 PM

Hiya Shell ;-)   the work on the engine looks spectacular !  If the rest of the build goes this way, you have got another home-run on your hands for sure

great start buddyBeerYes

treadCool


  • Member since
    March 2006
  • From: Right Side of a Left State
Posted by Shellback on Tuesday, July 3, 2012 10:04 PM

Thanks for the comments Tread man Yes


  • Member since
    March 2006
  • From: Right Side of a Left State
Posted by Shellback on Sunday, July 15, 2012 2:54 PM

Almost 2 weeks later ...................Whistling

For sure this is not a kit for the inexperienced model builder . In fact a lot of patience is needed also Bang Head. The details are great . There are very few knock out pin marks and hardly any flash . But ...............the plastic is of a soft type which makes for mushy glue seams . I used Testors (pink label) lightly and 2 days after glueing the joins they were still soft . Another point of contention is the assembly sequence . I'm not sure that whoever made up the instructions actually put the entire kit together .Maybe they only built the sub assemblys ? An example is the rear axles assembly . After putting that sub assembly together as per instructions i ended up pulling it apart and assembling it ON the frame so that i could get the rear axles to set flat on all four wheels . I had to replace some of the smaller pieces with white styrene because the kit pieces are just too fragile ......at least for my handling fumbleing ?)

Here's where the assembly sets now . Next i'll do some detailing with hoses and wireing . I might have more pics in .......Camera......2 weeks ?

Take care .

  • Member since
    July 2004
  • From: Texas
Posted by wbill76 on Sunday, July 15, 2012 7:46 PM

Keep at it Carl, you'll get it to submit eventually! Nice work on the wiring and other details. Yes

  • Member since
    March 2006
  • From: Right Side of a Left State
Posted by Shellback on Sunday, July 15, 2012 8:19 PM

Bill , i guess there's no hurry .............good thing . Thanks .

  • Member since
    April 2009
  • From: Carmel, IN
Posted by deafpanzer on Monday, July 16, 2012 11:04 AM

Looking real good... nice touch adding a lot of wirings!  Keep it coming buddy...

Andy

  • Member since
    September 2005
  • From: beacon falls , Ct.
Posted by treadwell on Monday, July 16, 2012 4:12 PM

2 weeks ain't that long,buddy.... I'll be waitin' ;-)


  • Member since
    January 2003
  • From: Washington, DC
Posted by TomZ2 on Monday, July 16, 2012 5:51 PM

Reminder: white headliner:

Occasional factual, grammatical, or spelling variations are inherent to this thesis and should not be considered as defects, as they enhance the individuality and character of this document.

  • Member since
    March 2006
  • From: Right Side of a Left State
Posted by Shellback on Monday, July 16, 2012 5:59 PM

TomZ2

Andy , thanks for looking in again !

Tread , it seemed like it was a while for what i got accomplished . Thanks again !

TomZ2 , white headliner ? Hmm Who'd of thunk it ! I see where Eduard makes a p.e. set for this truck . Those pics will really help . Thanks .Their from Sprue Bros ? Off of their new site ?

  • Member since
    October 2009
Posted by PANZERWAFFE on Monday, July 16, 2012 7:32 PM

Hey man, intresting project you have going on, dont see a lot of these here.  The frame is quit impressive and your plumbing is comeing along very nice.  From those pictures it looks as if there is plenty you could still add.  Will be waiting to see what you do.  With that high part count, misleading instructions and soft plastic sounds as if you have a little challenge on your hands.  I know your handy work will breeze right through as always.  Are you planning the hood open or some way to see the details?  Look forward to the next update.

Rob

  • Member since
    March 2006
  • From: Right Side of a Left State
Posted by Shellback on Monday, July 16, 2012 8:40 PM

Rob goood to hear from you ! I'm planning on having the hood open to show the engine detail . I dont know yet if the kit plastic hood can be posed open . Its a bi-fold arrangement on the realski. Eduard makes a p.e. hood for this kit that can be bi-folded ..............i may have to get it .

Thanks for taking a look ! Yes

  • Member since
    July 2006
  • From: New Jersey
Posted by redleg12 on Monday, July 16, 2012 9:14 PM

With all that engine work, you definitely have to show it....I think you need the PE hood!!

Rounds Complete!!

"The Moral High Ground....A Great Place to Emplace Artillery."

  • Member since
    March 2006
  • From: Right Side of a Left State
Posted by Shellback on Monday, July 16, 2012 10:07 PM

Mike , that settles it ! I'm going to get that Eduard p.e. set by golley !

Thanks Yes

  • Member since
    March 2006
  • From: Right Side of a Left State
Posted by Shellback on Thursday, July 19, 2012 9:51 PM

This time i have done some plumbing . I ran the lines for the air brakes and the fuel lines . I'm not saying that the lines are exactly correct in their positioning . I did do research on the web and this is the i came up with .It looks like 99 % of this will be covered up on the completed model but the effort was enjoyable . The pe set from Eduard i cant find at Sprue bros or Squadron . According to the kit instruction the plastic hood parts can be bi-folded so i will go with that idea . Probably scratch build a lot of the under hood detail that kit leaft out .

Take care

  • Member since
    April 2009
  • From: Carmel, IN
Posted by deafpanzer on Friday, July 20, 2012 7:47 AM

Beautiful job so far and it is only 25 percent complete?!?!  Agree with y'all... keep the hood open!  Really hoping you will add a cup holder or two... LOL

Andy

  • Member since
    May 2009
  • From: Poland
Posted by Pawel on Friday, July 20, 2012 7:52 AM

Howdy!

Nice work on the plumbing! This is turning into something special. Good luck with your build and have a nice day

Paweł

All comments and critique welcomed. Thanks for your honest opinions!

www.vietnam.net.pl

  • Member since
    September 2006
  • From: Dripping Springs, TX, USA
Posted by RBaer on Friday, July 20, 2012 11:58 AM

Sweet work. I have a question: The prop shaft off the front of the transfer case, looks like it could be the PTO (power take-off) for a front winch, that's dangling so realistically.....did Trump mold it that way or do the U-joints actually flex like the realski (good word, btw)  and the shaft is actually dangling?

Apprentice rivet counter.

  • Member since
    March 2006
  • From: Right Side of a Left State
Posted by Shellback on Friday, July 20, 2012 2:16 PM

Andy , less than 15% complete me thinks . A cup holder.......Hmm.......good idea , maybe up on the dash ?

Pawel , thanks for looking .Yes

RBaer , the u-joints snap together but its not a tight fit so i glued mine , except for that shaft that is dangling . I will hook it up to the tranny when i install the engine later . Here's a pic to explain the shafts up front . I put a coat of dark gray primer on it last night .

JOIN OUR COMMUNITY!

Our community is FREE to join. To participate you must either login or register for an account.

SEARCH FORUMS
FREE NEWSLETTER
By signing up you may also receive reader surveys and occasional special offers. We do not sell, rent or trade our email lists. View our Privacy Policy.