SEARCH FINESCALE.COM

Enter keywords or a search phrase below:

Br 52 WIP

60636 views
192 replies
1 rating 2 rating 3 rating 4 rating 5 rating
  • Member since
    October 2009
Br 52 WIP
Posted by PANZERWAFFE on Monday, July 23, 2012 7:21 PM

OK guys, this is the first build in the new house.  It will take more time for me then usual to finish this due to a new work schedule and the lack of a spray booth, the old booth did not make the move.  Will be skipping around building this in several assemblies allowing me time to set up a new booth. So here we go........

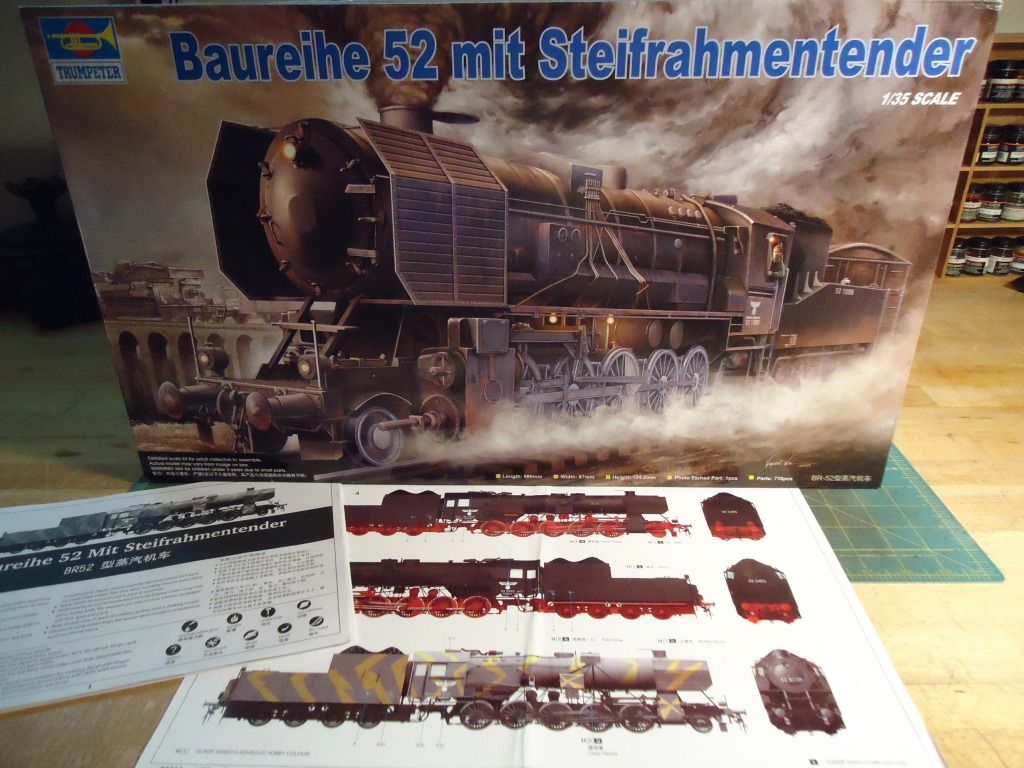
Baureihe 52 mit Steifrahmentender, BR 52

Due to available man hours and a needed adaptation to war-time shortages, new war locomotives (Kriegslokomotives) were developed.  Both the BR44 and BR50 class locomotives were simplified. The lightweight BR52, locomotive  No. 52001 left the workshops of Borsig in Berlin on September 12, 1942.

The BR52 was a radically simplified version of the pre-war Reichsbahn BR50 locomotive (produced 1938-1942). The BR50 consisted of around 6,000 parts, the BR52 only 5,000 parts, of which about 3,000 were simplified. The manufacturing time for each machine was reduced by 6,000 hours. Building the economic BR52 made a saving of around 12 tons of steel and 30% of work time in relation to the BR50.  These machines became, with an axle load of 15 tonnes and a maximum speed of 80 km/h (44 mph) forwards or backwards, as good as the Class BR 50.

Quick Notes:

**Between 1942 and the end of the war in May 1945 over 6300 BR52 locomotives were built.

**Locomotives of the 52 class are commonly referred to as "Kriegslok" meaning "Wartime".

**BR - German Class type - the technical group of similar structures that are available in different sizes.

**DR - East Germany Class type.

**Baureihe 52 mit Steifrahmentender - Series 52 with rigid frame border.


Builders: Berliner Maschinenfabrik and Henschel

Year Built: 1942

Works Number: 12226

Weight in Working Order: 149.7 tonnes

Length Over Body: 22975 mm (75 feet, 4 inches)

Maximum Speed: 80 km/h (44 mph)

Boiler Pressure: 16 bar (240 psi)

Power: 1620 CV

Driving Wheel Diameter: 1400 mm

Fuel Capacity: Coal - 10 tonnes

                      Water - 26 m3 (5,715 gallons)

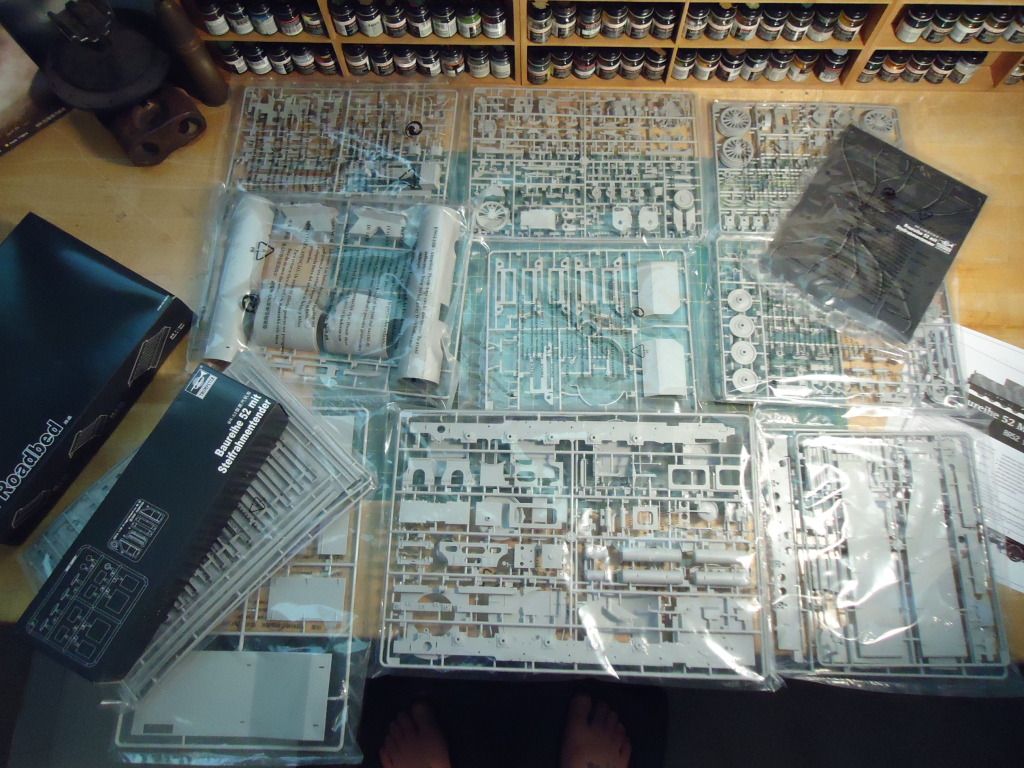
Some of the parts.  Have found that the majority of the parts, even though well detailed, have an off set mold seam and will require much clean-up to correct further increasing the build time.

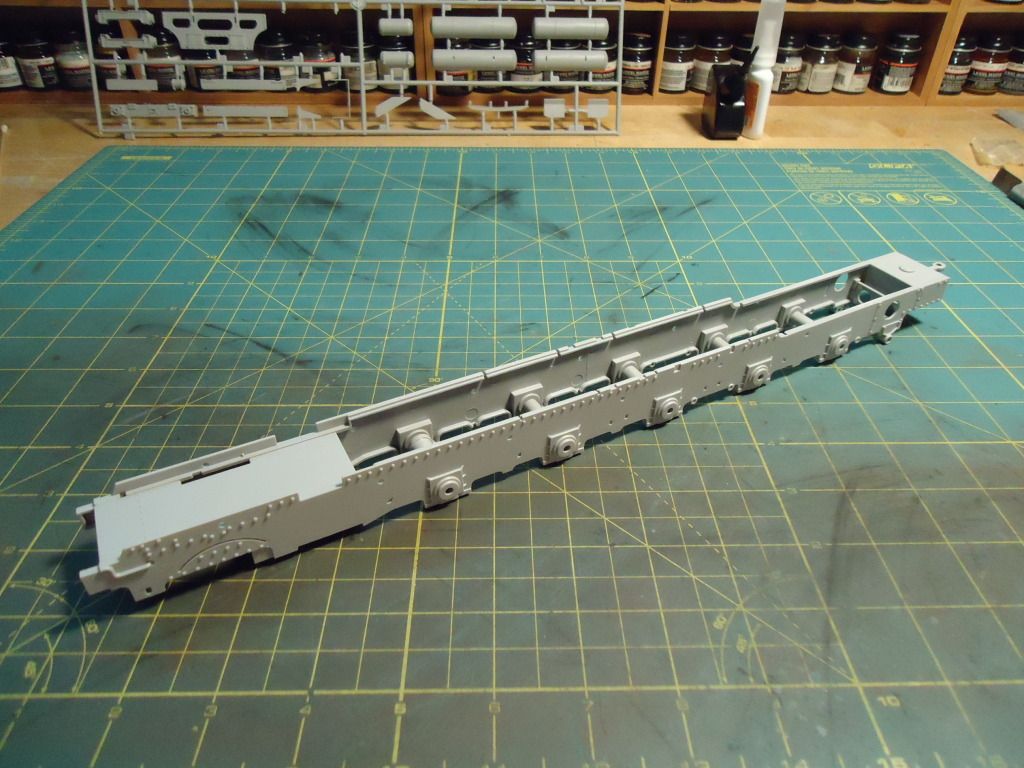
Step 1 was straight forward and went together well making the basis of the frame.

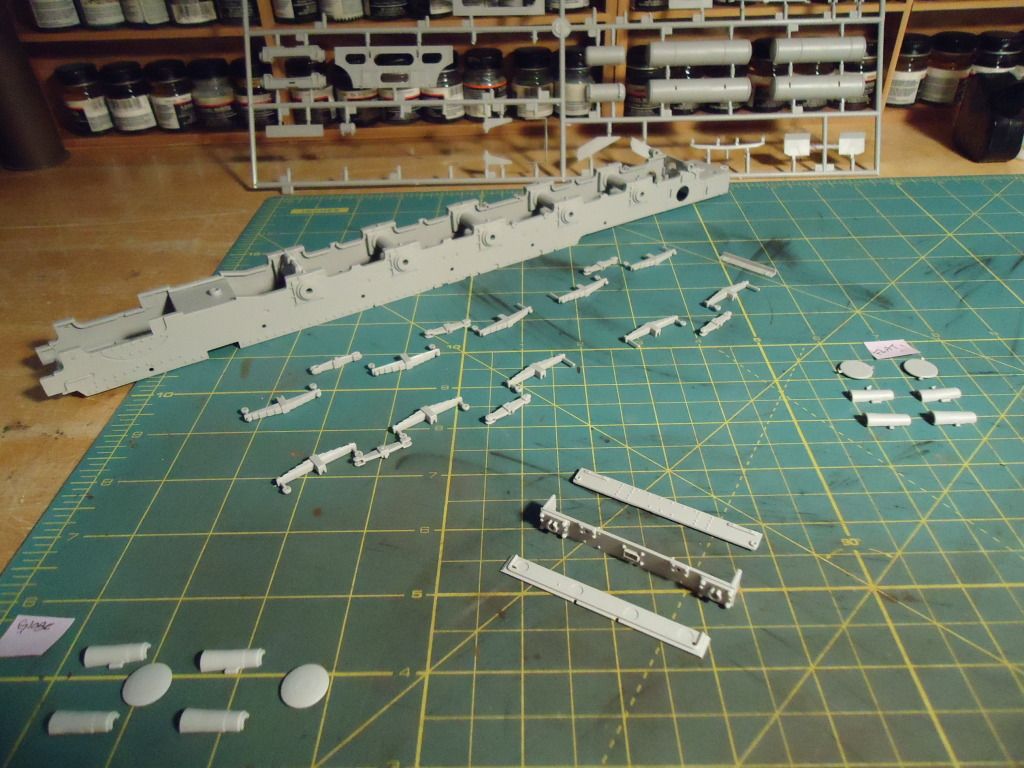
Step 2 will be adding the suspension.  Clean-up of pats is almost complete and assembly is soon to follow.

That's it for now.  Thanks for stoping in.

Rob

  • Member since
    April 2009
  • From: Carmel, IN
Posted by deafpanzer on Monday, July 23, 2012 8:41 PM

Am so glad to see you settled at your new place so you are back modeling!  This is going to be fun to watch for sure...

Andy

  • Member since
    February 2003
  • From: Thailand
Posted by Model Maniac on Tuesday, July 24, 2012 9:47 AM

Rob, you have a long way to go. I don't think you'll finish it any time soon.

Impressive Songs:

All 10 Playlists that I created on Youtube:

http://www.youtube.com/user/ModelManiacThailand/playlists

Pan Flute Music (300 songs) (Most Popular, over 100K views):

https://www.youtube.com/playlist?list=PLUNb2zPxGTZO7alagEPsEMzgBkWt4-vKV

El Condor Pasa (Top 50) (World's most famous and my most favorite song):

http://www.youtube.com/playlist?list=PLUNb2zPxGTZOLKHbju350mLle4HkMhsb8

  • Member since
    April 2005
  • From: Piscataway, NJ!
Posted by wing_nut on Wednesday, July 25, 2012 6:25 AM

All of a sudden some train stuff goin' inhere.  COOL!.  Will be watching.

Marc  

  • Member since
    July 2004
  • From: Texas
Posted by wbill76 on Wednesday, July 25, 2012 1:39 PM

Off and running Rob! Will be fun to watch this beast come together. Yes

  • Member since
    October 2009
Posted by PANZERWAFFE on Sunday, July 29, 2012 6:36 PM

Andy - Thanks and glad to have you aboard.

Model Maniac - No, will not finish anytime soon that's for sure.  The kit itself looks to be pretty straight forward and probably would not take too long but I have definitely been short of time lately.  Will keep plugging away when I have the chance though and there's no hurry.  Thanks for stopping in.

Wing Nut - There has been a lot of train items lately.  Funny how everything happens at the same time.  I had thought I would have been the oddball on here with this build.  Glad you stopped in.

Bill - Should say "off and crawling"  but things are at least moving.

More work on the frame has been done.  There was still much clean up to do on parts, seams and pin marks took some time.  This is an example:

The frame as of now.

Little closer look of how the kit looks with it's detail.

Added some details to the air tanks also.  Here have started some plumbing work.

On the right side of the tanks added some valve handles.  They were made from parts in the spares box and were made from the brackets to hold the wire rope down onto a King Tiger.  They were cut in half and slightly re-shaped with a sanding stick.  The PE tank caps were also from the spare parts box.

Left side of the tanks added the drain plugs by shaving them off some spare parts.

That's it for now guys and as always thanks for looking.

Rob

  • Member since
    March 2006
  • From: Right Side of a Left State
Posted by Shellback on Monday, July 30, 2012 8:32 AM

"Crawl" ??? I dont think so . Looks like your off to good start Rob . I like the plumbing on the air tanks . What did you use ..............solder ?

  • Member since
    September 2005
  • From: beacon falls , Ct.
Posted by treadwell on Monday, July 30, 2012 10:35 AM

Looking great ,Rob... I have seen a couple of these bad boys built up and man are they impressive. 

I am sure yours will be the topper !

I am ' all aboard ' for this one...lol

treadCool


  • Member since
    April 2009
  • From: Carmel, IN
Posted by deafpanzer on Monday, July 30, 2012 10:36 AM

It is really looking good especially with scratch built plumbing!

Andy

  • Member since
    July 2004
  • From: Texas
Posted by wbill76 on Monday, July 30, 2012 11:03 AM

Looking good Rob, I remember all those dreaded ejector marks everywhere! As a word of caution, you'll probably want to completely replace the vinyl sand lines that the kit supplies when you get to that point...they are extremely difficult to install and defy most attempts with conventional glues. Big Smile

  • Member since
    July 2012
Posted by DeafStuG on Monday, July 30, 2012 8:26 PM

Looking Good with Photo-Etch Super add on.. i have got Br 52 plus P.E. extra & Resin. My eyes keeping on your Br-52 1/35 processing. Good luck !

  • Member since
    March 2003
  • From: Rain USA, Vancouver WA
Posted by tigerman on Tuesday, July 31, 2012 1:01 AM

I wish I could watch more of this, but i am so busy. I'll check in as much as I can. Great start.

   http://i7.photobucket.com/albums/y269/wing_nut_5o/PANZERJAGERGB.jpg

 Eric 

  • Member since
    November 2005
Posted by Anonymous on Tuesday, July 31, 2012 11:32 AM

Hey Rob, I am doing the same kit, just about to wrap up the construction on mine and move along to the paint. Not sure how you'll display yours, but mine will be abandoned. I opened up the front of mine and will be displaying it as abandoned. The seam marks are a royal PIA, and so ar the ejector marks, I probably filled and sanded a cpl hundred !! Also, Bill is right, the vinyl pipes SUCK. I am redoing them with piano wire, going to start molding those tonight.. Just a thought, but if I could redo mine, I might leave the leaf springs off until later in the build. With the amount of handling, they have a tendency to come off.

Was yours missing parts. I seemed to have some smaller bits here and there missing off the sprues....

What paint scheme are you doing ?? And how much effort are you gonna put into the cabin ?? I put the upgrade set in the cabin, and probably 25+ hours into just the cabin, which really isn't gonna be seen, I know, kinda silly, but I thought it was worth the effort.. Watch the cabin walls, I had an issue with getting them to line up . I am going to leave the roof unglued, so it can show the cabin if I want someone to see it. Also watch when you mount the body to the frame, had some fit issues there as well.Take a look at my post, maybe the pics will help. Wild Bill has a nice one, I love the amount of reference material available. Sorry, didn't mean to hijack your thread. I will be watching yours come together.

***On a side note, I wonder how many people we could get together to do a rail themed group build ???***

  • Member since
    October 2009
Posted by PANZERWAFFE on Sunday, August 5, 2012 8:44 PM

Sorry for the long delay to respond to all of you.  Looks like I will only be coming on here on the weekends for a while.  I do appreciate all of your comments.

CARL - Yes that's solder for the plumbing and on the ends for the

"fittings" I slid small hex nuts on.  You will be seeing more plumbing on this build and it will be with various types of wire.  I use solder for the larger items and various sizes of floral wire for the smaller stuff.  I like the florist wire because it's abundant, cheap, easy to get at any arts/crafts store, comes in many sizes and is very easy to work with.  For tiny stuff I use windings off of small motors.  Now I just have to get some more sizes of nuts.  The ones I have now and used are left overs from my RC aircraft days.  They too come in many sizes and work great for added details.

TREAD - Always great to have you aboard.  We will see what I can make of this locomotive so just kick back and enjoy the ride.

ANDY - Thanks buddy.

BILL - Thanks for the heads up with the sand lines.  Will be referring to your build as a guide.  What did you use to replace yours with?  I assume some type of wire.

DEAFSTUG - Thanks man.  You should break out your BR 52 and post some pics of it.  Would love to see a WIP of it.  Good luck with yours also.

ERIC - Always good to have you stop in.  Don't worry about how often but just pop in when you can.  I understand about being busy, I'm in the same predicament.

BRUTUS1175 - Very glad you stopped in and good to see you put your WIP on the forum.  Nice to see another one of these being built and being built so wonderfully at that!

Display of my BR will eventually (not any time soon) be in a very large dio consisting of 2 Ommr flat cars, 3 Ommr Gondola cars, and 3 SSy flatcars with Pz III's on them.  The flat cars will have flak guns and crew on them and one of the gondolas will be converted to a hard top command/kitchen car.  For now they will be built as individual cars and put into the display case until I can figure out where and how to put such a large dio.

I'm glad you and Bill pointed out the problem with the sand lines and I will now be looking at coming up with an alternative.  Agree, I too would have left off the leaf springs if I would have known better.  Have not broken one yet but believe I have come close.  Have not found any missing parts but will be going back and rechecking to make sure.  Did you contact Trump to see if they would replace the missing parts?

As far as painting, I'm back and forth.  From my knowledge they should be painted solid in Field Gray.  That would be the safe way to go and not be incorrect but I am really liken both the ZIG-ZAG scheme like in the instructions

and the 3-tone camouflage scheme.  Problem is I can not find evidence of the ZIG-ZAG pattern and the 3-tone, I know it was officially ordered but have not found any real photo's of it done this way.  I do think I am leaning towards some type of camoflage scheme but just have to do some more research.

Your interior looks fantastic!  I will be looking for the issues you spoke of with the interior and proceed with caution.  Plan on going all out and scratch building additions for the interior.  Had thought about leaving the overhead removable myself but I am now making plans of installing a light which will mean it will be attached down somehow.  Also planing on installing the cat-walk and front headlight.

It would be cool to see a rail themed GB YesYes

And now for my small update.

Piston housing as the kit would have it.

As you can see there was much putty and sanding.  The kit was a little plan for me and decided to add just a few things.

Added the pressure sensores wiring and pressure release.  Used small floral wire and brass tubing.

Next up is more added details to the front section of the frame.  Until next time, happy building Cool

Rob

  • Member since
    November 2005
Posted by Anonymous on Sunday, August 5, 2012 8:52 PM

nice job. I HATED all the seam marks in this kit. Seems like every piece had to be scraped and/or filled. Have fun, thx for the comment !!

  • Member since
    November 2005
Posted by Anonymous on Sunday, August 5, 2012 8:53 PM

and I TOTALLY vote for a rail GB !!!!

  • Member since
    March 2003
  • From: Rain USA, Vancouver WA
Posted by tigerman on Sunday, August 5, 2012 9:22 PM

I love the zig-zag pattern.

   http://i7.photobucket.com/albums/y269/wing_nut_5o/PANZERJAGERGB.jpg

 Eric 

  • Member since
    March 2006
  • From: Right Side of a Left State
Posted by Shellback on Sunday, August 5, 2012 11:22 PM

Rob , thank for explanation on the solder . Like the details . My Dad would really enjoy this . He was a Model RR (HO gauge) and steam locomotive enthusiast .

  • Member since
    September 2005
  • From: beacon falls , Ct.
Posted by treadwell on Monday, August 6, 2012 9:30 AM

Looking like a locomotive, Rob ! Stick out tongue  Man I love the awe inspiring sheer horse power and elegance of these massive,mechanical marvels !This is a little off topic, but last year I had the pleasure to be around and ride on a medium size,almost 200 year old steam engine . It was a 2-8-2 as opposed to the BRs 2-10-0 wheel set up, but still thrilling. The odd thing is they are in reality very,very, quiet.
I put some pictures up that have nothing to do with the BR, but the mechanical inter play becomes almost art when it starts moving.
You are doing a great job, man and I'll be along for the whole ride. Did you know the German war effort was able to make almost 7000 BR 52s and 42s (which were a little larger) during the war years ? Amazing.
It's gonna be one awesome choo choo set when you are finished !


treadCool


  • Member since
    April 2009
  • From: Carmel, IN
Posted by deafpanzer on Monday, August 6, 2012 10:24 AM

Looking real good!   Really like that zig zag camo pattern so it has my vote!

Andy

  • Member since
    July 2004
  • From: Texas
Posted by wbill76 on Monday, August 6, 2012 12:40 PM

Some nice progress, love the added little details! As to your question about the sandlines on mine, I managed to make the vinyl ones work at the time but it was an exercise in patience and a lot of cursing along the way.The planned dio you have for this one ought to be a treat to see when you get it all built. Yes

  • Member since
    August 2009
  • From: Milwaukee, Wisconsin
Posted by StreetFightingMan on Thursday, August 9, 2012 10:16 AM

Great build so far! I was going to ask for this kit for my birthday a few years back, but decided I didn't have the patience to build it well.

It looks like the detail on the kit parts is pretty good. The wiring you added is going to definitely add to it.

-Mike

On the Bench: 1/48 Eduard Avia B-534 Series IV, Cyber Hobby Messerschmidt Bf-109 E-4

  • Member since
    October 2009
Posted by PANZERWAFFE on Wednesday, September 12, 2012 4:44 PM

TREAD - Thanks for those pics they should be useful when painting to help show some wear.  Even though not the same some of the wear should be the same and I just enjoy looking at them.  Agree, the power of steam is amazing and elegant.

Well guys, remember me?  It has been a while.  Time around here has been a rare thing but have been doing little things a little at a time.  Not having the time to sit at the bench, I went ahead and cut parts from the sprue tree, wrote the part number down and threw them into small zip lock bags.  Anytime I had a few minutes would just grab a few bags and clean / prep the parts.  Eventually had quit a few bags done.

Had worked on and wired all lights.....

unfortunately the lights were to hot and had fear of damaging the plastic (melting / warping) so they were left in but not hooked to power any longer.

Front area added styrene under the boiler mount to cover a large gap.

Before further assembly, had to fix the steam pipe too the cylinder / piston.  The kit part was short at the connection point on both sides so the pipe was extended on both sides.  This pic is one side corrected and the the other side is how it originaly came before correcting.

Not a good pic but this is a close up of the installed pipe were it enters into the cylinder.

Having this correction on the steam pipe also holds it in place snugly and is a great help for aligning things up when putting on the boiler.

Next added airlines made from wire and added the wireing for the lights.  The air connections in the front were modified kit parts.  Had cut the plastic air hose off and replaced with wire by drilling into the remaining valve and pushing in the wire.  This way can later push rubber tubbing over the wire for a more realistic effect.  Will also make it flexable for hooking it up to the futer cars.  This is the same procedure had done on my Gondola  car for those that remember.  Here are the pics of all of that and how she looks in the front now.

Have a few more update pics ready and will post them up shortly.

Thanks all for stopping in Beer

Rob

  • Member since
    October 2009
Posted by PANZERWAFFE on Wednesday, September 12, 2012 5:09 PM

Continued updates.....

Work was started on the boiler.

Before gluing the stack on, had drilled it out so not to see the solid shallow bottom.

installed the light and wiring on the front of the boiler also.

Brought the added light wire to the molded on wireing and tied together with CA glue then sanded it smooth.  Should look like a continues wire when painted.

The burner portion of the boiler has also been roughly constructed.

This is the dry fit of the frame and boiler.

Thats it for now.  Hope it will not be another month before my next post, will post again as time permits.

Thanks for looking

Rob

  • Member since
    March 2007
  • From: Northeast WA State
Posted by armornut on Wednesday, September 12, 2012 5:46 PM

love it, i think i may buy another one someday and start over,if my vote counts Zig Zag would be cool(that would be my choice  right or wrong).with so moch work involved in the prep and sub assy. my sidelined kit would be more work than i want to fix, fantastic build so far looking forward to more.

we're modelers it's what we do

  • Member since
    April 2009
  • From: Carmel, IN
Posted by deafpanzer on Wednesday, September 12, 2012 7:35 PM

OMG!  Somebody is back... good to hearing from you again!  Now it is starting to look like a train... looking real good!

Andy

  • Member since
    July 2004
  • From: Texas
Posted by wbill76 on Wednesday, September 12, 2012 7:47 PM

Nice to see you're making progress on this one Rob! Sharp work on the wiring...too bad about the lights/heat situation...maybe try LEDs?

  • Member since
    October 2009
Posted by PANZERWAFFE on Sunday, September 16, 2012 9:33 AM

ARMORNUT - Is your kit really that far gone Sad  I had thoughts of getting another kit so that I could de-rail it and give it some battle damage and show off its under carriage.  A thought maybe for yours?

ANDY - Hey buddy...I'll unfortuantly still be in and out but hopefully more IN.  Some good news, I finally ordered my new spray booth and it should be here sometime this coming week Big Smile  (for those that do not know, my old booth did not make my last recent move Sad)

BILL - It feels good to finally get some work done on this!  Had looked for LED's but was unable to find some small enough.  Since putting everything in permanent had found a Fiber Optic set that would have worked perfectly.  May get the set for some future project?

No lights is alright anyway, with the black-out order these trains rarely ever used their lights.

Thanks for the comments guys and I think I will be going with the ZIG-ZAG paint job.  Thanks for the input about it Yes

Today's update, decided to get away from some of the smaller details for a while and built the rough construction of the tender.  Even all of these pieces needed much sanding and filling the pin marks.  No part so far has gone untouched without filling and sanding Tongue Tied

There still maybe some putty touch up areas on here, will get to them.  Now back to the frame to add some more scratch work.

Rob

  • Member since
    April 2009
  • From: Carmel, IN
Posted by deafpanzer on Sunday, September 16, 2012 10:23 AM

Sorry to hear your old paint booth... was it the one you built from scratch?  What booth did you buy?  Big Smile

Still looking great... will follow this til the end! 

Andy

  • Member since
    July 2004
  • From: Texas
Posted by wbill76 on Sunday, September 16, 2012 11:10 AM

Keep up the good work! When you get around to filling the coal bin, I would suggest getting some charcoal bits from aquarium filters and use that instead of the kit-supplied part. Keeps it in scale but also allows you to control the level of "fill" in the bin. The kit part is ok...but a little too uniform IMHO.  

JOIN OUR COMMUNITY!

Our community is FREE to join. To participate you must either login or register for an account.

SEARCH FORUMS
FREE NEWSLETTER
By signing up you may also receive reader surveys and occasional special offers. We do not sell, rent or trade our email lists. View our Privacy Policy.