SEARCH FINESCALE.COM

Enter keywords or a search phrase below:

1/35 M1009 CUCV, WIP, 02/17/13, Completed

27455 views
101 replies
1 rating 2 rating 3 rating 4 rating 5 rating
  • Member since
    July 2006
  • From: New Jersey
Posted by redleg12 on Sunday, January 13, 2013 6:27 PM

Gino - Always a pleasure tho have you stop by the firing point!!

Rounds Complete!!

"The Moral High Ground....A Great Place to Emplace Artillery."

  • Member since
    December 2002
  • From: Valrico, FL
Posted by HeavyArty on Sunday, January 13, 2013 6:13 PM

The camo looks really nice.  Great job as always.

Gino P. Quintiliani - Field Artillery - The KING of BATTLE!!!

Check out my Gallery: https://app.photobucket.com/u/HeavyArty

"People sleep peaceably in their beds at night only because rough men stand ready to do violence on their behalf." -- George Orwell

  • Member since
    July 2006
  • From: New Jersey
Posted by redleg12 on Sunday, January 13, 2013 3:07 PM

Well, into the paint shop, the entire body is given a primer coat Poly Scale NATO Green and a finish coat of Tamiya NATO Green.

After letting the green dry overnight the window openings are masked to keep overspray getting on the inside. Next is the Tamiya NATO Black. The camo pattern is done with my Grex airbush on a low airflow setting, using the vented tip and painted by eye, looking at photos

Lastly, the Tamiya NATO Brown to finish the 3 color camo.

Once the paint was allowed to dry, the body was coated with Future Clear in preparation for decals and weathering.

That’s it for now, more coming.

As always feel free to leave a comment either positive or negative

Rounds Complete!!


"The Moral High Ground....A Great Place to Emplace Artillery."

  • Member since
    July 2006
  • From: New Jersey
Posted by redleg12 on Tuesday, January 8, 2013 6:28 PM

Tread - Ahhh.... the old AMT kits, all the old kits bring back some good memories. Thanks for the peek.

Wood - Thanks for stopping by and for the comments.

Rounds Complete!!

"The Moral High Ground....A Great Place to Emplace Artillery."

  • Member since
    January 2013
Posted by Wood on Monday, January 7, 2013 9:54 PM

I can't see anything to be negative about. This looks like a very good project to be working on.

  • Member since
    January 2013
Posted by Wood on Monday, January 7, 2013 9:49 PM

Very interesting project. I would like to see this one when it's finished.

  • Member since
    September 2005
  • From: beacon falls , Ct.
Posted by treadwell on Monday, January 7, 2013 9:27 PM

Heya Mike Smile

Looking nice with the small details being added....reminds me of way back to about 6th grade building the AMT cars with the one piece bodies ! .. Ah ...memories  Wink

They are expensive on e bay now !  LOL

treadCool


  • Member since
    July 2006
  • From: New Jersey
Posted by redleg12 on Sunday, January 6, 2013 8:55 PM

Bill - Yep....headed to see Earl....at least for the base NATO Green... then I will going for the 3 color camo.... charging up the air brush.

Sprue - They have to be be removed slowly and carefully using a fine saw and #11 blade

Ernest - Thanks, it is what I enjoy in modeling, bringing back memories in 1/35.

Thanks guys.

Rounds Complete!!

"The Moral High Ground....A Great Place to Emplace Artillery."

  • Member since
    July 2006
  • From: San Francisco Bay Area
Posted by bufflehead on Sunday, January 6, 2013 8:28 PM

Wow!  This is an interesting build Mike!  Not your typical plastic kit, but a full multimedia one! I love all the detail you're putting into it, based on your real life experiences!  I'm keeping an eye on this one!

Ernest

Last Armor Build - 1/35 Dragon M-26A1, 1/35 Emhar Mk.IV Female


Last Aircraft Builds - Hobby Boss 1/72 F4F Wildcat & FW-190A8


  • Member since
    January 2006
  • From: California
Posted by SprueOne on Sunday, January 6, 2013 8:24 PM

Thanks for the heads up with the door handles and rear bumper.

Still watching the build

Anyone with a good car don't need to be justified - Hazel Motes


Iron Rails 2015 by Wayne Cassell Weekend Madness sprueone

  • Member since
    July 2004
  • From: Texas
Posted by wbill76 on Sunday, January 6, 2013 7:35 PM

Some nice progress Mike, give it the Earl Scheib special treatment and you'll be set! Smile

  • Member since
    July 2006
  • From: New Jersey
Posted by redleg12 on Sunday, January 6, 2013 7:28 PM

Moving on to the body. Before any assembly on the body, which is a one piece cast, has to be cleaned up including cutting out the excess resin from all the window areas.  The first assembly to the body is to glue in the front grille in place.

Next is to complete the front adding the bumper, tow hook holders the PE Chevy logo and the PE bridge marker plate. On each side the base for the rear view mirrors and the door handles. Let me just say the door handles are a PITA to remove from the pour block without breaking

In the rear, the bumper and tow hook holders. Also the PE rear window handle and license plate cover. With the PE cover added, the PE bolt plate and resin tow hook can be added.

The rear bumper on the M1009 has 4 bolt heads, which are not on the kit bumper. I used some PE rivet heads to add these to the bumper.

The kit includes an antenna mounting bracket in PE. This bracket is for a full size antenna for the RT-524, which I mounted in the rear. I went into my PE spare parts to find the PE to fabricate the smaller bracket for the short antenna used on the R-442.  With the antenna brackets in place, the kit includes PE antenna wire grommets. One is mounted above each antenna mount on the body.


That’s it for now. The body is off to the paint shop.

As always feel free to leave a comment either positive or negative

Rounds Complete!!


"The Moral High Ground....A Great Place to Emplace Artillery."

  • Member since
    July 2006
  • From: New Jersey
Posted by redleg12 on Sunday, January 6, 2013 7:27 PM

.

"The Moral High Ground....A Great Place to Emplace Artillery."

  • Member since
    September 2005
  • From: beacon falls , Ct.
Posted by treadwell on Tuesday, January 1, 2013 7:09 PM

Mike, thanks also for the explanation...still trying to figure out how I got Chrysler/ Chevrolet  mixed up..

You and Rob posted about 3 minutes apart and originally I missed yours .... dam....I need some sleep...made it all the way to midnight just like the big kids last night ! ...LOL

you are off to a great start for 2013 Yes

tread Cool


  • Member since
    September 2005
  • From: beacon falls , Ct.
Posted by treadwell on Tuesday, January 1, 2013 7:01 PM

Hi Rob Smile

Happy New Year to you !

Sorry about the Chevy /Chrysler confusion.. I'm easily confused during the holidays LOL .

Very interesting about all the keys and ignitions being the same Surprise .  I can easily understand the need of the chain, padlock and responsibility of the padlock key bearer now !  

Have a great New Year !

tread Cool   


  • Member since
    December 2002
  • From: Fort Knox
Posted by Rob Gronovius on Tuesday, January 1, 2013 5:52 PM

treadwell

Happy New Year Mike Smile

The interior is really shaping up nicely. A chain to lock the steering wheel ?  Doesn't the Army trust the Chrysler locking wheel column ?  You don't have to answer that one LOL Wink 

tread Cool

Chevrolet, not Chrysler, provided door locks & steering wheels all keyed exactly alike. Therefore, the only way to ensure unauthorized use of the 1008/1009 series was to have a lock & chain on the steering wheel.

Every CUCV key would open every door and every ignition key would start every truck.

That way, a lost vehicle key did not require re-keying of the vehicle. A lost padlock normally had a second key in the motor pool, or if in the field, a pair of bolt cutters and another padlock and you were on your way.

  • Member since
    July 2006
  • From: New Jersey
Posted by redleg12 on Tuesday, January 1, 2013 5:49 PM

Tread - Happy New Year to you and your wife. Now to answer the question....when the Army ordered the CUCV series, they ordered them ALL keyed alike. Anyone who had access to a CUCV key could make a copy and start any CUCV in the inventory. Soooooo....thus the chains to lock the steering column.

Rounds Complete!!

"The Moral High Ground....A Great Place to Emplace Artillery."

  • Member since
    September 2005
  • From: beacon falls , Ct.
Posted by treadwell on Tuesday, January 1, 2013 5:39 PM

Happy New Year Mike Smile

The interior is really shaping up nicely. A chain to lock the steering wheel ?  Doesn't the Army trust the Chrysler locking wheel column ?  You don't have to answer that one LOL Wink 

tread Cool


  • Member since
    July 2006
  • From: New Jersey
Posted by redleg12 on Tuesday, January 1, 2013 4:13 PM

Rob - Thanks for the comments. My time with the CUCV was that interim time between the 1/4 ton and the HMMWV. That time when we turned in all the 1/4 ton & doghouses and then waited for particular models of the HMMWV to be delivered...Even after delivery the CUCV hung around as a go for vehicle until the supply system caught up.

Happy New Year to you Rob!

Rounds Complete!!

"The Moral High Ground....A Great Place to Emplace Artillery."

  • Member since
    December 2002
  • From: Fort Knox
Posted by Rob Gronovius on Tuesday, January 1, 2013 3:27 PM

You're catching that purplish-brown color of the vinyl interior very well.

CUCVs still scream REMF wagon to me. Real men drove in 1/4 tons pulling doghouses.

  • Member since
    July 2006
  • From: New Jersey
Posted by redleg12 on Tuesday, January 1, 2013 3:12 PM

Ok, I was able to get some details done over the holiday. First, you cannot go anywhere with a military vehicle without your vehicle logbook. The logbook is on the floor next to the driver seat. The logbook is .020 styrene covered with Sungumini BDU camouflage decal.

Next is the chain welded to the floor to lock the steering wheel. I used chain from Michaels painted with Alclad Steel.

On the passenger seat is the “pork chop” or radio microphone. This is from the Pro Art radio set. The microphone wire is 26 gauge SS wire, coiled and painted flat black. Now as the Assistant S-3 of an artillery battalion, I was the Fire Direction Officer, responsible for coordination all of the battalion firing. The manual that covers all artillery fire direction is FM-6-40. A copy of the early 1980s version is on the front seat.  Photo of the real manual shrunk down to 1/35, printed and glued to .020 styrene. Next to the manual is a Graphical Firing Table, which is like a slide ruler to calculate firing data. Produced the same way as the manual except I used .010 styrene (yes….I do have the real items to photo). Lastly, the sign of the times, the empty pack of Marlboro on the floor….long day.

I had a buddy make me a copy of the rear tire, as the kit does not come with a spare, (thanks S.R.) which on the M1009 has a spare stored in the rear. The tire is painted with tire mix of 50/50 Flat and NATO black, the rim is NATO Green. The mount is made from .030 styrene angle painted flat black.

The back seat has the radio mounted. The mount is supported by .030 angle painted with Alclad Steel. The radio connecting jacks are .020 styrene rod painted with Alclad Aluminum. The speaker and microphone wires are 26 gauge SS painted flat black. Then on the seat, there is my army cot (hopefully at some point I got to use it if only for an hour). The cot frame is Alclad Aluminum and the canvas is Tamiya Drab Green.  

In the back are two water cans from Real Models painted flat black. Also two cases of MREs made from Verlinden set. The box is a resin box, which would be a FDC plotting kit. The box is painted with Tamiya Olive Green and edges worn with a #2 pencil. Lastly is my pack painted NATO Green and faded with AK dust effects.

Well that is it for the interior, now it is time to start working on the body.

As always feel free to leave a comment either positive or negative

Rounds Complete!!

"The Moral High Ground....A Great Place to Emplace Artillery."

  • Member since
    April 2011
Posted by jezones on Sunday, December 30, 2012 7:53 PM
No that I think about it I think our Chief had one of those bucket seats in our M998. Don't ask me how or where he got it from. It always did look funny compared to the other seats

Mark
  • Member since
    July 2006
  • From: New Jersey
Posted by redleg12 on Sunday, December 30, 2012 7:25 PM

Mark - Glad you are enjoying and learning. Part of doing a blog is teaching. Enjoy and always feel free to ask questions

Bill - Thanks, I will admit it was the most comfortable vehicle in the field. With all the gear on you did not fit real well in a "bucket" seat. It was an oddity.

Rounds Complete!!

"The Moral High Ground....A Great Place to Emplace Artillery."

  • Member since
    July 2004
  • From: Texas
Posted by wbill76 on Sunday, December 30, 2012 6:49 PM

Nice work as always on the details Mike! I bet those leather bucket seats bring back some memories. Smile

  • Member since
    April 2011
Posted by jezones on Sunday, December 30, 2012 4:59 PM
The build looks great so far. I always learn so much from watching your builds. I'm looking forward to the next update.

Mark
  • Member since
    July 2006
  • From: New Jersey
Posted by redleg12 on Sunday, December 30, 2012 4:00 PM

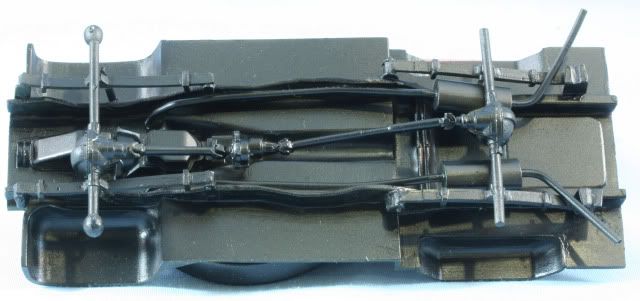
Having some time with the holiday allows me to keep moving on this build. First the undercarriage assembly was primed and then the bottom painted flat black.

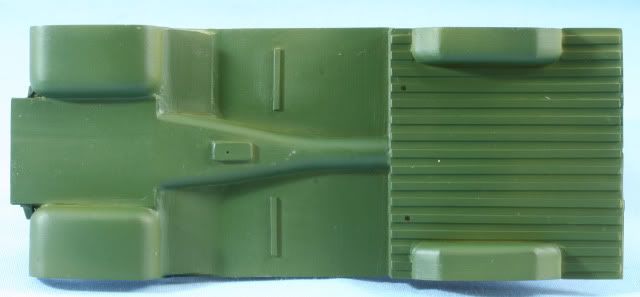
Once dry, the flip side which is the interior was painted NATO Green

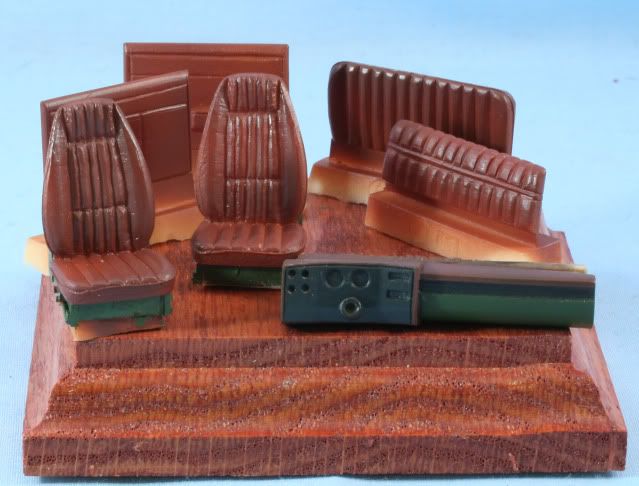
Next were the interior components including the seats door panels and the dashboard. The vinyl in the M1009 was a reddish brown to close to NATO Brown. The dash had vinyl in NATO Brown, plastic in Black and the metal underside in NATO Green. After painting the respective parts, I then used MM Acryl Semi Gloss Clear on the vinyl and plastic areas to give the proper sheen to the components.

With all the paint dry on the undercarriage, I did some basic underside weathering using AK Filter for NATO. Dabbing in spots to create the dirty stained effect.

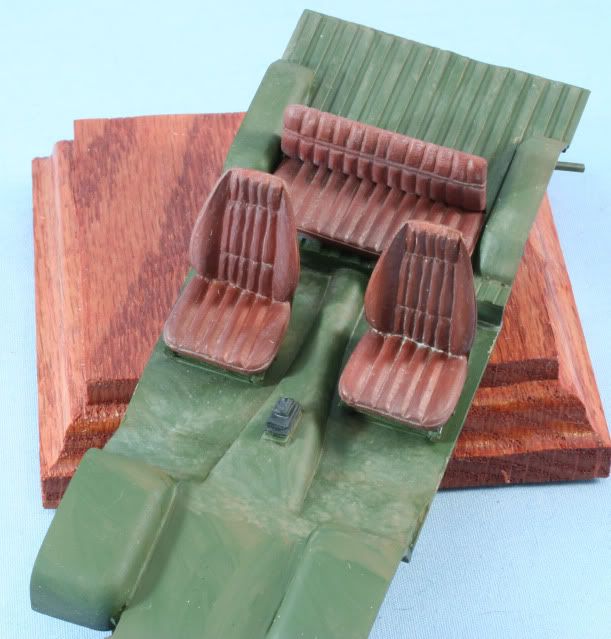
Next I assembled the interior installing the front and rear seats and the floor transfer case shifter.

With that complete the interior was weathered with a light coat of AK Filter for NATO followed by AK Dust Effects.

With the kit interior parts now assembled it is time to add a bunch of details. First I completed the dashboard. I used Archer transfer gauges and the put a drop of future over each gauge. When the future dries it simulates the gauge glass. The data plate is from Archer Data Plate set. I attached the PE dash bracket and then attached a Verlinden speaker. The speaker is painted with Tamiya Olive Green and the speaker wire, which goes from the speaker under the dash, is 26 gauge SS wire painted Flat Black. I then assembled the steering column and steering wheel to finish the dashboard assembly

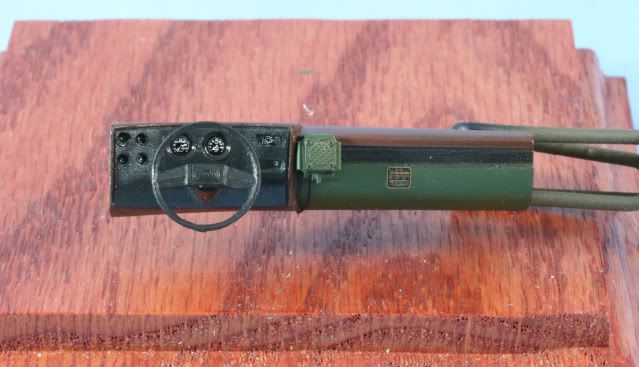
Lastly I worked on the radio assembly. I started with a Verlinden RT-524 and R-442 radios with their mounts and painted them with Tamiya Olive Green. The details on the radio include the white area for grease pencils to write frequency, the black area for the frequency, the orange for the incoming call light, and dry brush on some of the knobs with white for indicator. I also dry bushed using Alclad Aluminum for the jacks and the paint wear on the edges of the radio.

Next I made the brackets to hold the radio assembly using .060 C channels styrene. After assembly, the channels were painted with Alclad Steel. Once everything was dried I assembled everything for installation into the M1009.

That is it for now. Lots more interior details coming.

As always feel free to leave a comment either positive or negative

Happy New Year!

Rounds Complete!!

"The Moral High Ground....A Great Place to Emplace Artillery."

  • Member since
    July 2006
  • From: New Jersey
Posted by redleg12 on Saturday, December 29, 2012 4:51 PM

Bill - I am raising it up through the roof hoping for a thunderstorm!!

RBaer - Glad you are along...I always enjoy modeling something from my past. I get those "scale" memories!!

Rich - I hear you...The Dodge was a total DOG...the Chevy was transportation...much better than the Dodge 880 series but not close to a HMMVE. Many guys have had an experience with the 1009. Glad to see you come along through memory lane

Rounds Complete!!

"The Moral High Ground....A Great Place to Emplace Artillery."

  • Member since
    September 2005
  • From: North Pole, Alaska
Posted by richs26 on Saturday, December 29, 2012 2:55 PM

I have driven both the Dodge and the Chevy's and they both sucked, especially with the Chevy's 6.2L diesel which was also used in the original Humvee.  Had 3 GM's at Gitmo in 95 with my AF CE group that were totally thrashed by the time we deployed there.  They probably ended up in the dump.  Had a Dodge and several GM's at the AF's largest used car lot, "Al's Garage", Al Kharj, Saudi. The GM's are highly prized for offroading vehicles with the heavier frames and axles.

WIP:  Monogram 1/72 B-26 (Snaptite) as 73rd BS B-26, 40-1408, torpedo bomber attempt on Ryujo

Monogram 1/72 B-26 (Snaptite) as 22nd BG B-26, 7-Mile Drome, New Guinea

Minicraft 1/72 B-24D as LB-30, AL-613, "Tough Boy", 28th Composite Group

  • Member since
    September 2006
  • From: Dripping Springs, TX, USA
Posted by RBaer on Saturday, December 29, 2012 2:44 PM

I'm going to follow this one as well, both for the build and for the amusement value of seeing a model of something I spent a large part of my life working on (among other things). Should be neat.

Apprentice rivet counter.

  • Member since
    July 2004
  • From: Texas
Posted by wbill76 on Saturday, December 29, 2012 12:58 PM

Nice to see this one get its turn on the bench Mike! Look forward to seeing it come alive. Beer

JOIN OUR COMMUNITY!

Our community is FREE to join. To participate you must either login or register for an account.

SEARCH FORUMS
FREE NEWSLETTER
By signing up you may also receive reader surveys and occasional special offers. We do not sell, rent or trade our email lists. View our Privacy Policy.