SEARCH FINESCALE.COM

Enter keywords or a search phrase below:

T54-E1 FINISHED PICS!

12923 views
222 replies
1 rating 2 rating 3 rating 4 rating 5 rating
  • Member since
    September 2006
  • From: Dripping Springs, TX, USA
Posted by RBaer on Wednesday, March 22, 2017 10:24 AM

I smell an article......

Yes

Apprentice rivet counter.

  • Member since
    July 2003
  • From: On my kitchen counter top somewhere in North Carolina.
Posted by disastermaster on Wednesday, March 22, 2017 10:30 AM

http://s4.picofile.com/file/7905903438/fav3.gif....... Smells good to me.

Good to have you back Karl!

Sherman-Jumbo-1945

"I was so much older then, I'm younger than that now"


  • Member since
    December 2007
  • From: Eagle River, WI
Posted by PANZERJAGER on Wednesday, March 22, 2017 10:31 AM

Neet subject Karl.

BTW the smaller wheels ar called return rollers.

 PANZERJAGER


  • Member since
    December 2002
  • From: Valrico, FL
Posted by HeavyArty on Wednesday, March 22, 2017 10:40 AM

I don't understand the rationale behind using seperate wheel/rubber pieces...


They are designed like that to allow for the proper undercut on the inside of the roadwheel.  One-piece molded roadwheels are all incorrect since they do not show this undercut.  You can see it in the below pic, where the water and leaves are trapped at the bottom.

Also, beware, the turret ring on the kit is way off.  The cut-out section around the bottom turret edge is not present in the kit parts.  It is not clear if the turret will even rotate without this cut-out section. 

Check out more about it at a recent post at Armorama about the kit.  Disregard all the whining and compalining.  There is good info on how to fix it there.

http://www.armorama.com/modules.php?op=modload&name=SquawkBox&file=index&req=viewtopic&topic_id=256183&page=1

Gino P. Quintiliani - Field Artillery - The KING of BATTLE!!!

Check out my Gallery: https://app.photobucket.com/u/HeavyArty

"People sleep peaceably in their beds at night only because rough men stand ready to do violence on their behalf." -- George Orwell

  • Member since
    December 2002
  • From: Fort Knox
Posted by Rob Gronovius on Wednesday, March 22, 2017 10:48 AM

the doog

 this baby is REAL, not just a "World of Tanks" fantasy creation (a sad trend, in my opinion Sad)


I don't know, I see it as a positive trend. World of Tanks has gotten gamers to try building model tanks. They are more concerned with replicating their in game tank than accuracy in the model kit. Therefore models that were once panned by modelers have found a second life with gamers unconcerned with accuracy buying the kits to get in game goodies or just wanting to build "their tank".

It's also opened up a fresh vein of casual modelers flowing into the hobby.

Another benefit is that companies will start creating new kits of tanks that appear in game that haven't been done to death like the Tigers and Shermans. We're getting new kits of tanks that existed in prototypes only. This gives more fuel to the modelers who like to do "what if" kits or Luft '46 type builds.

More modelers and more models; I fail to see the downside.

  • Member since
    December 2002
  • From: Bury St Edmunds, Suffolk, England
Posted by Bish on Wednesday, March 22, 2017 11:03 AM

Interesting subject Karl, will be watching.

Surely you must have done an armour kit with top rollers before.

I am a Norfolk man and i glory in being so


On the bench: Airfix 1/72nd Harrier GR.3/Fujimi 1/72nd Ju 87D-3

  • Member since
    December 2007
  • From: Eagle River, WI
Posted by PANZERJAGER on Wednesday, March 22, 2017 11:14 AM

Rob Gronovius


the doog

 this baby is REAL, not just a "World of Tanks" fantasy creation (a sad trend, in my opinion Sad)


I don't know, I see it as a positive trend. World of Tanks has gotten gamers to try building model tanks. They are more concerned with replicating their in game tank than accuracy in the model kit. Therefore models that were once panned by modelers have found a second life with gamers unconcerned with accuracy buying the kits to get in game goodies or just wanting to build "their tank".

It's also opened up a fresh vein of casual modelers flowing into the hobby.

Another benefit is that companies will start creating new kits of tanks that appear in game that haven't been done to death like the Tigers and Shermans. We're getting new kits of tanks that existed in prototypes only. This gives more fuel to the modelers who like to do "what if" kits or Luft '46 type builds.

More modelers and more models; I fail to see the downside.


I agree with Rob here.

As en example of a WOT build I did;

http://cs.finescale.com/fsm/modeling_subjects/f/3/t/161366.aspx

Just my2 cents

 PANZERJAGER


  • Member since
    November 2009
  • From: SW Virginia
Posted by Gamera on Wednesday, March 22, 2017 11:34 AM

Awesome!!! 

I looked at this when it first came out but was put off by the bad reviews and that same thread on Armorama. Looking forward to how you solve the issues here. 

I can see the points here about WoT but I'm just happy to see new experimental and rare AFVs that aren't German for a change. I picked up Takom's new T30/34 and T29 and they're beautiful kits, pretty darn good reviews too. 

"I dream in fire but work in clay." -Arthur Machen


  • Member since
    July 2004
  • From: Sonora Desert
Posted by stikpusher on Wednesday, March 22, 2017 1:18 PM

I am in league with Rob and Gamera. Why not do all the "what ifs?" and prototypes that are non third Reich that are inspired by WOT. Especially if it creates new kits and brings in new blood. I am happy to see all these long neglected AFVs from the West coming out. 

This project looks like a real sweet one! Looks like an M48 hull with one high speed wazoo new dangled turret.


F is for FIRE, That burns down the whole town!

U is for URANIUM... BOMBS!

N is for NO SURVIVORS...

       - Plankton

LSM


  • Member since
    January 2007
Posted by the doog on Wednesday, March 22, 2017 2:24 PM

RBaer

I smell an article......

Yes


Is that what that smell is? I thought I burned the lasagna.... Big Smile

You may be right....

  • Member since
    January 2007
Posted by the doog on Wednesday, March 22, 2017 2:24 PM

disastermaster

http://s4.picofile.com/file/7905903438/fav3.gif....... Smells good to me.

Good to have you back Karl!


Thanks, Steve! Good to BE back home. Smile

  • Member since
    January 2007
Posted by the doog on Wednesday, March 22, 2017 2:27 PM

Bish

Interesting subject Karl, will be watching.

Surely you must have done an armour kit with top rollers before.


PANZERJAGER

Neet subject Karl.

BTW the smaller wheels ar called return rollers.


lol, do you guys know that I actually had a verified brain fart? I knew what they were called but I've been building those darned Indy cars so long I plum forgot what the parts are called! Big Smile Thanks for the reminders! :)

  • Member since
    January 2007
Posted by the doog on Wednesday, March 22, 2017 2:38 PM

HeavyArty


They are designed like that to allow for the proper undercut on the inside of the roadwheel.  One-piece molded roadwheels are all incorrect since they do not show this undercut.


Ahhh, that's why. Thanks for straightening me out on this, Gino. I thought it was just some marketing nonsense because some guys hate to paint roadwheels. Sad It makes sense now.


HeavyArty
Also, beware, the turret ring on the kit is way off.  The cut-out section around the bottom turret edge is not present in the kit parts.  It is not clear if the turret will even rotate without this cut-out section. 

Check out more about it at a recent post at Armorama about the kit.  Disregard all the whining and compalining.  There is good info on how to fix it there.

http://www.armorama.com/modules.php?op=modload&name=SquawkBox&file=index&req=viewtopic&topic_id=256183&page=1

OMG, boy, you're not kidding about the "whining"

"Styrene abortion"--someone actually used that phrase, haha. Sheesh! Get over it!

Thanks for the heads-up and the link. I hadn't noticed that discrepancy but I do remember reading a discussion on it before when it was announced. I hadn't seen the renewed moan-fest though.

I have studied the problem and think I have a very good solution to it. Different than from what the buider on Armorama has conceived. I'll make sure to document it in detail. Thanks again! YesBeer

  • Member since
    December 2002
  • From: Bury St Edmunds, Suffolk, England
Posted by Bish on Wednesday, March 22, 2017 2:43 PM

the doog
 
Bish

Interesting subject Karl, will be watching.

Surely you must have done an armour kit with top rollers before.


Bish

Interesting subject Karl, will be watching.

Surely you must have done an armour kit with top rollers before.


lol, do you guys know that I actually had a verified brain fart? I knew what they were called but I've been building those darned Indy cars so long I plum forgot what the parts are called! Big Smile Thanks for the reminders! :)


 O dear, you have been corrupted. Just play safe and before you get carried away, store all those bright metalic colours well out the way. Would not want any nasty accidents Wink

I am a Norfolk man and i glory in being so


On the bench: Airfix 1/72nd Harrier GR.3/Fujimi 1/72nd Ju 87D-3

  • Member since
    January 2007
Posted by the doog on Wednesday, March 22, 2017 2:45 PM

Rob Gronovius


the doog

 this baby is REAL, not just a "World of Tanks" fantasy creation (a sad trend, in my opinion Sad)


I don't know, I see it as a positive trend. World of Tanks has gotten gamers to try building model tanks. They are more concerned with replicating their in game tank than accuracy in the model kit. Therefore models that were once panned by modelers have found a second life with gamers unconcerned with accuracy buying the kits to get in game goodies or just wanting to build "their tank".

It's also opened up a fresh vein of casual modelers flowing into the hobby.

Another benefit is that companies will start creating new kits of tanks that appear in game that haven't been done to death like the Tigers and Shermans. We're getting new kits of tanks that existed in prototypes only. This gives more fuel to the modelers who like to do "what if" kits or Luft '46 type builds.

More modelers and more models; I fail to see the downside.


An excellent rebuttal, Rob; well thought-out and well stated. Bow Down

I guess what annoys me is that they're releasing these ridiculously upgunned Panthers et al with gun barrels that are 30 feet long, instead of giving us some more cool offerings like this and my long-hoped-for M55 and the various cool Cold War US stuff that we're sorely lacking. But, really, I must admit that they seem to be noticing this stuff too. Maybe we'll finally get a good M55 and some of those cool little SPGs and APCs and whatnot from that era.

More modelers is definitely a good thing. I guess that I may underestimate the appeal of these WoT models; most people I talk to aren't interested in them, but it just may be the crowd that I'm in. :)

  • Member since
    January 2007
Posted by the doog on Wednesday, March 22, 2017 2:46 PM

PANZERJAGER


As en example of a WOT build I did;

http://cs.finescale.com/fsm/modeling_subjects/f/3/t/161366.aspx

Just my2 cents


That's a nice model, PZjg! Nice camo on her. :)

  • Member since
    January 2007
Posted by the doog on Wednesday, March 22, 2017 2:49 PM

Gamera

Awesome!!! 

I looked at this when it first came out but was put off by the bad reviews and that same thread on Armorama. Looking forward to how you solve the issues here. 

I can see the points here about WoT but I'm just happy to see new experimental and rare AFVs that aren't German for a change. I picked up Takom's new T30/34 and T29 and they're beautiful kits, pretty darn good reviews too. 


Yeah, I'm not put off by some of the chronic whiners. Jeez, some of these guys forget what it means to "model". They so spoiled these days----try building three of the old stone-aged AMT McLaren kits like I just labored through and you'd see what I mean!
I'm glad to see some of these cool vehicles being produced too. I picked up that T30 as well-a killer kit! I may build that next. :)


  • Member since
    January 2007
Posted by the doog on Wednesday, March 22, 2017 2:50 PM

stikpusher

I am in league with Rob and Gamera. Why not do all the "what ifs?" and prototypes that are non third Reich that are inspired by WOT. Especially if it creates new kits and brings in new blood. I am happy to see all these long neglected AFVs from the West coming out. 

This project looks like a real sweet one! Looks like an M48 hull with one high speed wazoo new dangled turret.


Yup, it's based on the M48! I agree with you about the long-neglected kits finally being made! (Dragon, if you're reasing this, how about an M55, please?!?!)

  • Member since
    December 2002
  • From: Valrico, FL
Posted by HeavyArty on Wednesday, March 22, 2017 2:52 PM

Another area you may want to address is the missing mud release holes on the rear sprockets.

Gino P. Quintiliani - Field Artillery - The KING of BATTLE!!!

Check out my Gallery: https://app.photobucket.com/u/HeavyArty

"People sleep peaceably in their beds at night only because rough men stand ready to do violence on their behalf." -- George Orwell

  • Member since
    January 2007
Posted by the doog on Wednesday, March 22, 2017 2:55 PM

"Another area you may want to address is the missing mud release holes on the rear sprockets." -- HEAVYARTY

Oh dear, THOSE again! lol, I had to do that on my old M48 that I did here too. Yup; consider it done. Thanks again, Gino. I appreciate that call out as well. :)

  • Member since
    October 2004
  • From: Northern Virginia
Posted by ygmodeler4 on Wednesday, March 22, 2017 3:12 PM

Looking forward to seeing what you do with this one....return rollers on the top hull, interesting. Hmm

-Josiah

  • Member since
    May 2009
  • From: Poland
Posted by Pawel on Wednesday, March 22, 2017 3:32 PM

Hello Karl!

I'll be watching, too - good luck with your build and have a nice day

Paweł

All comments and critique welcomed. Thanks for your honest opinions!

www.vietnam.net.pl

  • Member since
    December 2002
  • From: Fort Knox
Posted by Rob Gronovius on Wednesday, March 22, 2017 11:27 PM

I can understand some of the whining. Dragon is an established model manufacturing company that has done some of the best model kits of some subjects. Then they drop the ball and kick it into a pile of manure with some kits. This is one of several that have been ripped.

It is almost like they have two development teams. An A-Team that puts out kits like their Tiger, Abrams, M48A3 and many of their German armor kits.

Then there's a B-Team that can't quite get it right. They put out the M60A2, M103, Saladin, and others like it.

I am thankful for their non-panzer kits regardless of quality. I really like the MBT70 even though it has been dismissed as middling.

  • Member since
    January 2007
Posted by the doog on Thursday, March 23, 2017 7:18 AM

Thanks, Josiah and Pawel! Nice to see you guys here again!

  • Member since
    December 2002
  • From: Valrico, FL
Posted by HeavyArty on Thursday, March 23, 2017 7:37 AM

ygmodeler4
....return rollers on the top hull, interesting. 

Thay are not really on the top hull.  They are on the upper portion of the lower hull. Because of the design of the M48 hull, which has a prominent bulged "waistline" to deflect rounds, Dragon divided the lower hull into a top and bottom section.  The return rollers are on this top section of the lower hull.

Dragon's top and bottom section of lower hull.  The triangles on the sides of the top section are where the return rollers attach, just under the fenders, like all other tanks.

Gino P. Quintiliani - Field Artillery - The KING of BATTLE!!!

Check out my Gallery: https://app.photobucket.com/u/HeavyArty

"People sleep peaceably in their beds at night only because rough men stand ready to do violence on their behalf." -- George Orwell

  • Member since
    January 2007
Posted by the doog on Thursday, March 23, 2017 7:53 AM

Rob Gronovius

I can understand some of the whining. Dragon is an established model manufacturing company that has done some of the best model kits of some subjects. Then they drop the ball and kick it into a pile of manure with some kits. This is one of several that have been ripped.

It is almost like they have two development teams. An A-Team that puts out kits like their Tiger, Abrams, M48A3 and many of their German armor kits.

Then there's a B-Team that can't quite get it right. They put out the M60A2, M103, Saladin, and others like it.

I am thankful for their non-panzer kits regardless of quality. I really like the MBT70 even though it has been dismissed as middling.


I think you're really probably right about the "A/B Team". It makes sense. But I still can't honestly countenance the incessant whining. I want to ask these people "Have you ever built an old Monogram kit? An old Tamiya? What did you cut your teeth on?" Have the lost their memory? Jeez, today's kits practically fall together--I am ever grateful for the choices and quality that we have today. Complaining about these few mostly inconsequential screw-ups that don't--if we're really going to be honest about things--don't make the models look like "an amorphous blob of styrene" (as one commentator put it) is like being stuck on an desert island with a squad of cheerleaders and complaining about the preponderance of blonds.Big Smile

The things that really irritate me are the steps-back, like the return to rubber band style tracks---especially ones that consistently don't fit; gimmicky things like "workable suspension" and the inscrutable decision by companies to make "workable tracks" but not just plain indy-link sets. I would LOVE to be able to throw a set of regular indy link tracks on this, and other, tanks without having to go through the fiddly process of assembling "workable" tracks that aren't EVER going to "work" at all. I think that if you did a quick survey, there's maybe one out of 1,000 modelers out there who actually articulate their suspension in a diorama. I just don't understand the trend.

  • Member since
    December 2002
  • From: Valrico, FL
Posted by HeavyArty on Thursday, March 23, 2017 8:14 AM

I agree w/you Doog.  These whiners have been spoiled by the latest kits and are only assemblers.  Most of them couldn't fix the simplest problems and are not really modelers. Like you say, most of these "huge issues" are really minor and can be fixed w/some old school modeling skill.  I am happy that these new kits are coming out, even if they are not perfect.  I can fix them if I choose to.

Gino P. Quintiliani - Field Artillery - The KING of BATTLE!!!

Check out my Gallery: https://app.photobucket.com/u/HeavyArty

"People sleep peaceably in their beds at night only because rough men stand ready to do violence on their behalf." -- George Orwell

  • Member since
    November 2009
  • From: SW Virginia
Posted by Gamera on Thursday, March 23, 2017 8:45 AM

Lol, could be worse though- if you'll excuse me for going a little off subject here Karl. 

Sitting here looking at Italeri's Chinese Type 59 in the WoT box on HobbyLink Japan- they've got it priced at 5,800 Yen or $52.25 US. I had assumed this was Trumpeter's old Type 59 that I got off Ebay for $12.00 US. Which is frankly highway robbery for Italeri. The brand new Takom Type 59/69 (contains hull and turret parts to build either tank) is only 4,800 Yen or $43.24 US. 

So a twenty year old Trumpeter kit is priced higher than a brand new Takom kit just because it says WoT on the box!?!!? 

And then I look for a review on the Italeri 'Type 59'..... And I was wrong- it's not the Trumpeter Type 59 kit. It's actually the late '80s ESCI T-55A Indifferent

Which the Chinese copied the Type 59 from, but still the details aren't right. I suppose some will sell to people unwilling to look the blasted thing up and get a review though...

So basically I can buy the brand spanking new Takom Type 59 or pay ten bucks more for a thirty year old ECSI kit of a different tank in a Type 59 box!?!?! 

PS: The Italeri kit does come with a bottle of cement, poster, and tank guide, and decals that match those in the game. Probably worth maybe five bucks??? And a coupon for 30 days premium time in the game which is worth a fair bit but would be probably cheaper to buy separtly. 

Again sorry for going off subject but gee whiz, Dragon ain't got nuttin' on Italeri here... 

"I dream in fire but work in clay." -Arthur Machen


  • Member since
    December 2002
  • From: Fort Knox
Posted by Rob Gronovius on Thursday, March 23, 2017 12:29 PM

I also agree, but I also see why they complain; yes the kits are better than the Renwal armor and Aurora armor I grew up with, some of the old Monogram are superior. The few 1/32 scale Airfix kits from 1976 are better. But it is 2017, not 1960, and the company has produced awesome models in the past.

They could do better; the guys who do their superb kits could probably knock these out the ball park.

  • Member since
    January 2007
Posted by the doog on Thursday, March 23, 2017 8:02 PM

HeavyArty

I agree w/you Doog.  These whiners have been spoiled by the latest kits and are only assemblers.  Most of them couldn't fix the simplest problems and are not really modelers. Like you say, most of these "huge issues" are really minor and can be fixed w/some old school modeling skill.  I am happy that these new kits are coming out, even if they are not perfect.  I can fix them if I choose to.


I agree with you, mostly. In defense, some of these guys are really excellent modelers, however---one guy posts here, and his work is stellar--but personally, I actually feel as if I've done something worthwhile when I correct or add something that the kit doesn't have. It doesn't bother me: that's what modeling is all about!

I also wonder if some of these guys who are complainers are driven by deadlines, and resent having it out more time into a model when they're paid by output? Anyway, as long as there are guys like you and me and many other "old school modelers" here who accept a small challenge, I say just take their observations and turn 'em into better models! Big Smile

I got some more "old school" modeling coming up in the next post. :)

  • Member since
    January 2007
Posted by the doog on Thursday, March 23, 2017 8:06 PM

Gamera

Lol, could be worse though- if you'll excuse me for going a little off subject here Karl. 

Sitting here looking at Italeri's Chinese Type........etc

Cliff, I think we're talking about two different things entirely. I think what you're talking about is when modeling companies buy the licenses and molds to previously marketed models and then just repackage them without telling you what's in them. Yeah, that's kinda crappy. Do your research before buying something that you're not familiar with in terms of its provenance. Smile

  • Member since
    January 2007
Posted by the doog on Thursday, March 23, 2017 8:09 PM
Rob Gronovious---"Renwall and Aurora".....yuck! And how about "Glencoe"? Their "Frog" Soviet APC was it? Now THERE was an "amorphous blob of styrene" if there ever was one! :)
  • Member since
    January 2007
Posted by the doog on Thursday, March 23, 2017 9:24 PM

OK, 2nd post. Things are getting ... interesting.. Hmm

By the way, if you can't see some of these photos in their entirety, some of them are shaped longer than others due to my editing; you should be able to see them if you click on them.

First up: the sprockets. Be careful when positioning the holes at 12, 4, and 8 o'clock. If you simply visually locate them, you could wind up thinking that the 4 and 8 go over the sprocket teeth, but they don't---you must go in between the teeth for 4 and 8. See the photo below.

I used a series of drill bits to first locate the holes and then to bore them out with larger bits. Use a good ol' #11 to finish cleaning and shaping the holes.

Make sure you only do the outsides!

So, things were going so uncharacteristically well that I decided to make some extra work for myself...Bang Head here, on the bottom hull, these are NOT old manufacturer's marks, like "Revell 1985". lol. These are casting numbers and they're supposed to be there! As a measure of how much I've forgotten about how "plush" today's models can be at times, I saw these and, not paying attention, removed them because I thought they were like license numbers put on there to copyright their molds, liike in the old days. I would up having to replace them with some Archer raised decals! Sad Bang Head

Replaced...

I took the opportunity to tackle the gun barrel, as it will need some time to harden. FOr those of you who can't stand using glued barrels and use metal ones instead, here's how to save yourself some money. Stick out tongue

I soften up the plastic using Testor's liquid cement. I like this glue for its low "bite" and working time. I use the lid-brush to put a coat of glue around the mating surfaces of BOTH sides of the gun barrel, twice around.

This nicely softens the plastic...

Now join the barrel halves at the bottom, and add glue as you progressively join it upward...

Next, squeeze that sucker like yo' mama.... Heart See how the bead pops up? That's what you want...

Put a little putty on the muzzle end to hide any seam end...

Now just set that aside for 12 hours overnight and in the morning you'll be able to sand it pretty flush. Smile I'll show you what I do with that later.

OK, there are some holes to be filled on the rear panel; I just use little shape cut from styrene strip to fill them. Much easier than using putty in a case like this.

Here's something that is going to require some Olde School Modeling; I can already hear the doogs barking about this one...the rear engine deck has a bit of a problem...you have to glue on this exhaust cover with the deflectors, but not where it actually fits!

In the photo below, notice the handles on the rear deck. In the illustration, the "blue" handles are not actually there at all! I initially thought that the cover rested in that area, but no---it's supposed to go OVER the handles that are molded on near the rear. Oh...bother...

Sure enough--in a later step it shows the correct position of the exhaust cover..so you have to remove four clamps molded onto a spaced louver panel and place them where the missing ones are. WHAT FUN!! Stick out tongue

Using a straight razor blade, I carefully cleaved the clamps off. I used a scrap of index card to protect against nicks to other parts.

Now you have to clean up the louvers. This MicroMark mini-chisel is your huckleberry.. most of this will be hidden, but it pays to go the extra mile, lest IMPS judges with dental mirrors and mini-Maglights dismiss your model out-of-hand....Whistling

The finished deck showing the position of the cover to be glued next...

And.....voila'! The exhaust cover finally in place! All grab handles scavenged! Also, notice the two different directions of the gas caps (?). I checked this as well as I could; the directions definitely intend this mismatched directions. Weird, thinks I....

Oh yeah, the wheels are assembled too...

So that's it for tonight.. Still got some suspension component and arms to add, and then we'll be getting to that darned turret... Sad

Thanks for looking in, guys!

  • Member since
    December 2002
  • From: Fort Knox
Posted by Rob Gronovius on Friday, March 24, 2017 12:31 AM

the doog
Rob Gronovious---"Renwall and Aurora".....yuck! And how about "Glencoe"? Their "Frog" Soviet APC was it? Now THERE was an "amorphous blob of styrene" if there ever was one! :)
 

Glencoe was a company started around 1995. Like Round2, they just took these old molds, cleaned them up and reissued these kits that were getting collector's prices.

The Glencoe FROG (free rocket over ground), PT-76 and BTR-50 were based on the same old motorized chassis originally issued by ITC (Ideal Toy Company) in the 1950s and again by Ringo in the 1960s.

Before Glencoe issued these kits, old glue bombed kits were going for a pretty penny. Much like the old Renwal Ontos and 1980s Revell reissue used to get $40-50 for, but now the recent reissue doesn't go for $20.

  • Member since
    July 2004
  • From: Sonora Desert
Posted by stikpusher on Friday, March 24, 2017 1:12 AM

Some of those Aurora WWI biplane kits were not bad at all. The final issues of them before Monogram took over the molds were pretty decent for their time. And some of their 1/48 AFVs were also half decent. Just think,  the 1975 dream USAREUR of MBT-70s and AH-56 Cheyennes in 1/48...


F is for FIRE, That burns down the whole town!

U is for URANIUM... BOMBS!

N is for NO SURVIVORS...

       - Plankton

LSM


  • Member since
    December 2002
  • From: Bury St Edmunds, Suffolk, England
Posted by Bish on Friday, March 24, 2017 2:58 AM

Nice update there karl, very informative as always.

I like the look of those Archer decals. Are they as prominant as the origianl you unfortunatly removed.

I am a Norfolk man and i glory in being so


On the bench: Airfix 1/72nd Harrier GR.3/Fujimi 1/72nd Ju 87D-3

  • Member since
    November 2009
  • From: SW Virginia
Posted by Gamera on Friday, March 24, 2017 7:58 AM

Looks good Karl, I'd think a lot of your advice on the hull would be applicable on an M48 as well. Thanks to you and Gino on how to drill out the mud release slots on the drive spockets, I've a couple of M48s but haven't had the guts to take drill to plastic yet. 

And interesting solution to the gun barrel, I normally just slowly glue it inch by inch to make sure it's as straight as possible, going to look into doing this way now. 

Really looking forward to how you deal with the two-part turret and the rubber-type plastic representation of the cover. I wonder how it stacks up to the two-part turret design's of Tamiya and Takom's AMX-13 kits. 

"I dream in fire but work in clay." -Arthur Machen


  • Member since
    January 2007
Posted by the doog on Friday, March 24, 2017 10:13 AM

Rob Gronovius


the doog
Rob Gronovious---"Renwall and Aurora".....yuck! And how about "Glencoe"? Their "Frog" Soviet APC was it? Now THERE was an "amorphous blob of styrene" if there ever was one! :)


Glencoe was a company started around 1995. Like Round2, they just took these old molds, cleaned them up and reissued these kits that were getting collector's prices.


The Glencoe FROG (free rocket over grounSmiled), PT-76 and BTR-50 were based on the same old motorized chassis originally issued by ITC (Ideal Toy Company) in the 1950s and again by Ringo in the 1960s.

Before Glencoe issued these kits, old glue bombed kits were going for a pretty penny. Much like the old Renwal Ontos and 1980s Revell reissue used to get $40-50 for, but now the recent reissue doesn't go for $20.


Rob, you're like a walking encyclopedia on old kit info. I always enjoy reading your posts when you get all historical like this. Smile I had no idea Glencoe were so significant in that way. I tried building that old Frog and just couldn't get enthused about it when I saw the low quality of the molds.

Hey, maybe they'll reissue the old AMT 1974 AMC Javelin AMX in 1/25 that goes for over $100 or more on eBay, now that would be sweeet! I won't hold my breath though...Big Smile

  • Member since
    January 2007
Posted by the doog on Friday, March 24, 2017 10:17 AM

Bish

Nice update there karl, very informative as always.

I like the look of those Archer decals. Are they as prominant as the origianl you unfortunatly removed????


lol, Bish, I had to quote you here so I could add the question marks to your question. Smile

Yes, they're raised, and really, perfectly in scale. They work just like decals; cut 'em out and just stick 'em on with water. I used them on my old M48 Patton build here before, on the turret, and they're a nice little detail to add. Looks like now we're not going to be needing them on some kits. There are also numbers on the hull top on this model. :)

  • Member since
    January 2007
Posted by the doog on Friday, March 24, 2017 10:24 AM

Gamera

Looks good Karl, I'd think a lot of your advice on the hull would be applicable on an M48 as well. Thanks to you and Gino on how to drill out the mud release slots on the drive spockets, I've a couple of M48s but haven't had the guts to take drill to plastic yet. 

And interesting solution to the gun barrel, I normally just slowly glue it inch by inch to make sure it's as straight as possible, going to look into doing this way now. 

Really looking forward to how you deal with the two-part turret and the rubber-type plastic representation of the cover. I wonder how it stacks up to the two-part turret design's of Tamiya and Takom's AMX-13 kits???


I think I have the turret problem licked. I should get to that maybe later today or this weekend if I don't get too bogged down in yard work. The cover is just going on as molded, or I might quite possible just scratch my own. The cover doesn't look so "puffy" on the real tank; it's just a question of whether or not I can figger out how to best replicate it and make it look real.

  • Member since
    December 2002
  • From: Bury St Edmunds, Suffolk, England
Posted by Bish on Friday, March 24, 2017 10:26 AM

Big Smile

Ye, quite a few kits do have raised detail on, but still handy to have. I have an Academy Warrior in the stash and am trying to think if there should be any raised lettering, i am sure there is on the turret, and also sure the kit doesn't include it. Will have to get some of those.

I am a Norfolk man and i glory in being so


On the bench: Airfix 1/72nd Harrier GR.3/Fujimi 1/72nd Ju 87D-3

  • Member since
    December 2002
  • From: Fort Knox
Posted by Rob Gronovius on Friday, March 24, 2017 12:35 PM

the doog
 

Rob, you're like a walking encyclopedia on old kit info. I always enjoy reading your posts when you get all historical like this. Smile I had no idea Glencoe were so significant in that way. I tried building that old Frog and just couldn't get enthused about it when I saw the low quality of the molds.


Hey, maybe they'll reissue the old AMT 1974 AMC Javelin AMX in 1/25 that goes for over $100 or more on eBay, now that would be sweeet! I won't hold my breath though...Big Smile


The man who started Glencoe had been a member of the IPMS chapter I joined when I was stationed outside of Boston. He went the extra mile and really produced some awesome decal sheets that were literally worth more than the plastic kits they were designed to be used on.

  • Member since
    October 2010
  • From: Rockford, IL
Posted by AlanF on Sunday, March 26, 2017 4:33 PM

This one is on my list. I hope to pick up some nice notes and build hints along the way.

  • Member since
    January 2006
  • From: California
Posted by SprueOne on Sunday, March 26, 2017 10:10 PM

Excellent Blogging highlighting all the corrections. Yes Idea

Thank you.


Anyone with a good car don't need to be justified - Hazel Motes


Iron Rails 2015 by Wayne Cassell Weekend Madness sprueone

  • Member since
    January 2007
Posted by the doog on Tuesday, March 28, 2017 2:09 PM

Hey guys, thanks for following along! Glad to have ya and glad to help! Big Smile

THIRD update:

Still working on the hull and its fittings. There are some PE parts, some of which add to the model, some of which are honestly just redundant and annoying. Before you work with any of it, use some fine sandpaper to put some micro-scratches into the surface to help hold glue and paint.

The first parts are some fittings on the rear panel; on the lowermost part is a semi-circle and two open blocks...

Watch the shape of this little clamp...

The rear panels so far. Be careful with parts F9 and F10. The travel lock attaches to them, and if not placed correctly, the travel lock will be slanted. I recommend gluing them lightly first and seating the lock; when it looks acceptable, seal their fate. Also watch the placement of the rear light blocks---their lower parts attach properly to the lower part of the hull, so before you glue these on, glue the whole panel (L1) to the rear. If you work on completing the panel off-the-model, you could wind up with these parts standing proud of the hull.

The hull so far, from the side. I added some stippled putty to the side to cover the hill joins. (No, that's not wbill's plinth! Wink)

These parts (C26, C27) are, annoyingly, wrongly shown in the directions. They are shown as being "below the surface" of the side of the hull where they're supposed to go...

When I glued them on properly as shown...

...they really interfere with placement of the fenders.....aargh!

After cutting them off, you can see the change;

They should be proud of the fenders---above them. Install the fenders FIRST!

Part MA4 has to be bent to make a fender end. I used the Exacto knife to curve the PE.

It has to follow a reasonable curve from the fender mold.

Those PE parts on the edges of the fenders---the long strips--are entirely redundant, as they only sit on the edges of the already-molded parts, not adding anything. The real fenders have a small lip on them, but these do nothing to represent that. I almost left them off but I think I'm going to putty-seal the topward egdes of them to make them appear a little better.

OK,  one of the inexlicably-weird piece of engineering in this model is the way that a piece of the turrent ring is molded onto the fenders, necessitating the filling of the joint.

More work to be done there..

The toolbox diagram is printed from two different directions, and I found that confusing...

Heck with that; I cut the diagram out and re-taped it to make the PE placement easier...

The parts in place; look carefully at how they are bent, as it's prety hard to tell from the diagram.

Make sure you use the hovel to properly locate the placement of part MA6---it traps the shovel end, and the handle part of the shovel will be trapped in a clamp. not yet shown.

That's where I am now....more work to be done when I get back from a short trip to New York tomorrow. I'm going to be back Friday, but probably won't get too much done over the weekend, as it's supposed to be nice.

Thanks for looking in, all. Toast

  • Member since
    December 2002
  • From: Bury St Edmunds, Suffolk, England
Posted by Bish on Wednesday, March 29, 2017 1:54 AM

Some more nice work there karl, and good to see Dragon haven't gone completly soft with their instructions and are still getting things wrong. Would not want to make it to easy Big Smile

I am a Norfolk man and i glory in being so


On the bench: Airfix 1/72nd Harrier GR.3/Fujimi 1/72nd Ju 87D-3

  • Member since
    November 2009
  • From: SW Virginia
Posted by Gamera on Wednesday, March 29, 2017 7:33 AM

Looking good! 

And yeah, not surprising Dragon still prints confusing instruction sheets. 

Is the gap in the turret ring an issue though? I've seen more than a few kits designed that way. I used to fill and sand the seam but in everything I've built the turret covers it all up. Now I just putty and sand the front and rear edges where it shows. 

"I dream in fire but work in clay." -Arthur Machen


  • Member since
    December 2002
  • From: Valrico, FL
Posted by HeavyArty on Wednesday, March 29, 2017 7:50 AM

Gamera
Is the gap in the turret ring an issue though? ...in everything I've built the turret covers it all up. 


I have built Dragon's M48A1, M48A3 Mod B, and M60, which all have the same turret ring design.  I have found that there is no need to fill/sand the area where the seam is as it gets covered by the turret.  It cannot be seen once the kit is assembled.

Gino P. Quintiliani - Field Artillery - The KING of BATTLE!!!

Check out my Gallery: https://app.photobucket.com/u/HeavyArty

"People sleep peaceably in their beds at night only because rough men stand ready to do violence on their behalf." -- George Orwell

  • Member since
    February 2014
Posted by USMC6094 on Wednesday, March 29, 2017 11:31 AM

HeavyArty

Another area you may want to address is the missing mud release holes on the rear sprockets.


How far back in the "T" series of experimantal armor do these holes go( if at all)? Or is it just a later addition like M47 and up?

  • Member since
    December 2002
  • From: Valrico, FL
Posted by HeavyArty on Wednesday, March 29, 2017 1:13 PM

I believe it is just the M47/M48 based vehicles and up that uses the modern-style sprockets like the ones pictured.

Gino P. Quintiliani - Field Artillery - The KING of BATTLE!!!

Check out my Gallery: https://app.photobucket.com/u/HeavyArty

"People sleep peaceably in their beds at night only because rough men stand ready to do violence on their behalf." -- George Orwell

  • Member since
    January 2007
Posted by the doog on Saturday, April 1, 2017 8:37 PM

HeavyArty

I believe it is just the M47/M48 based vehicles and up that uses the modern-style sprockets like the ones pictured.


Thanks for that info, Gino, and for the input on the turret ring. Good to know that that's not a necessary step. (I know that NOW, lol).

  • Member since
    January 2007
Posted by the doog on Saturday, April 1, 2017 10:25 PM

Hey guys, thanks to evrryone commenting and following along; I've been in New York for a few days so I didn't get a chance to respond, but it seems like all questions have been answered so far. Smile

So....here's what that tool box loooks like when you're done with it. I soldered the two pieces that make the frame, but didn't bother soldering the clamps, as they can be just squeezed around the handles where indicated and glued.

Hoooo....kay...   ...now for that turret issue...

I'd like to credit "jcneel" from Armorama's site for this photo; I found it on a build he was doing on this model. This is an excellent photo of the turret problem area. Specifically, the undercut---or lack of it on the Dragon model...

Side by side, you can see what a flabby pancake is the Dragon version. Like...."Whaaa??"

This is honestly pretty shocking, how bungled it is, if you ask me. (No need to post a litany of complaints; I've read them all elsewhere!) But it's not even close.

Here's the turret parts, including the "DS styrene" mantlet which I will not be using.

This is the turret bottom---the part that fits in the ring. As you can see, it most definitely impacts the boxes on the fender. Ugh...

It also barely clears the rear deck. So here's how I tackled a correction for this. Hold onto your Exacto's; this ain't gonna be pretty. Time for some old-school modeling.

First of all, I curse myself for not remembering to take a photo of this before I glued the hull halves together, so I made a crude diagram. BEFORE you glue the top hull on, put a pencil through the driver's hatch and trace a circle around the bottom-turret part "B4". Take off the top pieces and spin it like you're rotating the turret to get a perfect circle on the bottom of the part.

Next, trace or scribe the interior of where part B3 (misidentified in several step as "B4") rests on actual part B4. You'll need this to locate this part later..

When you put the pencil line on B4, you'll get this---this circle matches the molded turret ring on the bottom hull.

Now, I cut the excess plastic off outside of this pencil ring.

This solves part 1 of the problem..the huge turret ring. I'l refine this a bit in a few minutes to match the ring better.

The Dremel is your best friend here...Here's how it sits, so far...I'm going to use the Dremel now to take off all of that flab beneath the red line here...this is "part 2" of the correction...

Using the Dremel with a sanding tip, I shaved it down, also contouring the front area to blend in the lines. This front looks pretty rough now--I blew right through the front wall--but this will all be hidden under the expansive mantlet cover.

Looking better as far as the overall contour and undercut....


Now I need some Milliput, Fine grade..

After mixing the two parts, part B3 is semi-hollow, so I had to fill the gap in

The Dremel-damage will leave gaps in front and in the back. I filled the back in from inside the turret.

I shaped the underside to look like the real turret, and healed the front somewhat..

The front of the part with the putty...Milliput can be shaped very nicely with water, so I smoothed under the "undercut" and shaped it with some water. This will also be sandable when dried. It may need some touch up, or re-puttying in small some small measure.

Rear contour.....this too will be obscured by the mantlet cover, whcih circles the entire turret.

I'm pretty happy with what it looks like at this point. Is it perfect? Dimensionally correct? I dunno---but it looks a hell of a lot better than that flabby pancake that comes in the kit. Remember, the gap under the gun will be completely hidden by the mantlet cover.

A comparison with jcneel's turret photo.

I'm pretty confident that this is going to work just fine. It's a bit of a PITA correction, and the mantlet cover is going to take a bit of artistry, but I think it's going to make this a viable representation of this cool, unique tank. The mantlet cover will be made of Milliput as well, when I get there...

Thanks for looking in guys! Questions and comments always welcomed! Smile


  • Member since
    July 2004
  • From: Sonora Desert
Posted by stikpusher on Saturday, April 1, 2017 11:27 PM

Nice work in the correction mods. That looks far better than before. But e after your fixes, the contours still look a bit off overall on the turret compared to the reference photos. Not thru any of your doing, as you sure improved the look.

Now I gotta ask, do Dragon Black Label kits like this one mean that the folks who create these kits partake in a little JW Black Label during the development and Quality Control process? I am thrilled to see the subjects they make in this series, but some of the goofs that Dragon makes on them....

Anyways, I do enjoy watching your overcoming of these gaffes Karl.


F is for FIRE, That burns down the whole town!

U is for URANIUM... BOMBS!

N is for NO SURVIVORS...

       - Plankton

LSM


  • Member since
    December 2002
  • From: Valrico, FL
Posted by HeavyArty on Sunday, April 2, 2017 5:57 AM

Looking good.  The turret correction came out great.  The turret looks 100% better.

Gino P. Quintiliani - Field Artillery - The KING of BATTLE!!!

Check out my Gallery: https://app.photobucket.com/u/HeavyArty

"People sleep peaceably in their beds at night only because rough men stand ready to do violence on their behalf." -- George Orwell

  • Member since
    January 2015
Posted by Moff on Sunday, April 2, 2017 9:11 AM

Oooh, I always loved this tank. The build is looking good! Definitely following this. 

"Gaiety is the most outstanding feature of the Soviet Union." - Josef Stalin 

  • Member since
    December 2002
  • From: Fort Knox
Posted by Rob Gronovius on Sunday, April 2, 2017 9:41 AM

That is a lot of work, something that shouldn't be necessary to assemble a kit out of box. Many casual modelers do not have the level of skill required to make the corrections. You've done a great job accurizing the turret. Is the turret designed to articulate like the actual tank or does it just glue into place?

  • Member since
    January 2007
Posted by the doog on Sunday, April 2, 2017 10:28 AM

stikpusher

Nice work in the correction mods. That looks far better than before. But e after your fixes, the contours still look a bit off overall on the turret compared to the reference photos. Not thru any of your doing, as you sure improved the look.....


Thanks, Carlos; I understand that there may indeed be more "dimensional" anomalies in this model--I mean, the development team basically punted on the turret shape!--but I've never been a numbers-and-calipers guy; if it looks like the real thing, that's good enough for me. Geeked Don'f forget though--the turret isn't even built up--there's no additional parts added yet, and I suspect that it will look better when all the odd parts are added and that mantlet engineered.

Thanks for tuning in and taking time to leave a comment. Yes

  • Member since
    January 2007
Posted by the doog on Sunday, April 2, 2017 10:35 AM

HeavyArty

Looking good.  The turret correction came out great.  The turret looks 100% better.


Thank you, sir! Much obliged!! YesBeerBeer

  • Member since
    January 2007
Posted by the doog on Sunday, April 2, 2017 10:35 AM

Moff

Oooh, I always loved this tank. The build is looking good! Definitely following this. 


Thanks for following along! Welcome aboard! :)


  • Member since
    January 2007
Posted by the doog on Sunday, April 2, 2017 11:01 AM

Rob Gronovius

That is a lot of work, something that shouldn't be necessary to assemble a kit out of box. Many casual modelers do not have the level of skill required to make the corrections. You've done a great job accurizing the turret. Is the turret designed to articulate like the actual tank or does it just glue into place?


Thank you, Rob! Smile I wholeheartedly agree--the developers really blew this turret, and it's honestly just baffling why--I think that "Pavel" here on FSM allegedly was in contact with them beforehand when this model had been announced and was very critical and helpful in pointing out these significant errors. I would bet some financial aspect of the reality of the perceived market for this oddball tank figured into it, but still, it's a shame. Modelers on many forums have already put the kibosh on this model, and I think that it seriously hurt the Black Label brand.

The model is engineered to articulate the turret via pins which go through the side of the "collar" part that I ground down and into the turret part itself. I didn't put those in because I wanted to be able to take that part in and out because of the necessary modifications. I'm going to make it immobile anyway with a Milliput mantlet cover. The DS one included is a neat option for casual builders, but it won't fit now with the mods I made.

  • Member since
    December 2002
  • From: Fort Knox
Posted by Rob Gronovius on Sunday, April 2, 2017 11:49 AM

Nearly their entire Black Label series has taken a hit. I've got their MBT70/Kpz.70 kit. It is a nice model kit, but folks have noted that they took features from one prototype tank and other features from the other to combine into one inaccurate model. It's the only one from that line that hasn't been ripped to shreds.

While I see their point, why not just copy one of the two prototypes so you have one accurate model?

Having said that, I am happy they made a model of the tank and that I can make my own modifications to produce a what if the tank was fielded version.

This T54 looks like a kit I will pass on. Not that I don't have the necessary skils required to fix. It's just that I do not wish to mess with a kit that isn't a "must have" to me. I guess if I played WoTs, I would feel differently. I am interested in how yours turns out.

  • Member since
    September 2005
  • From: Groton, CT
Posted by warshipguy on Sunday, April 2, 2017 12:18 PM

I looked at the thread you posted on Armorama and was overwhelmed by the crying and whining.  As primarily a ship modeler, I have seen more than a fair share of poor kits that have only recently begun to be addressed.  As a sailing ship modeler, I would kill for a new kit. My God, the major manufacturers of that genre (except for Airfix) are notorious for releasing kits of ships that do not represent the real ship at all.  Just don't purchase the bad ones and be grateful for the good ones.  Vote with your wallet and let the manufacturers know.

I, for one, am most interested to see what you can do with this kit!

BIll Morrison

  • Member since
    January 2007
Posted by the doog on Sunday, April 2, 2017 4:00 PM

Rob Gronovius

Nearly their entire Black Label series has taken a hit. I've got their MBT70/Kpz.70 kit. It is a nice model kit, but folks have noted that they took features from one prototype tank and other features from the other to combine into one inaccurate model. It's the only one from that line that hasn't been ripped to shreds.

While I see their point, why not just copy one of the two prototypes so you have one accurate model?

Having said that, I am happy they made a model of the tank and that I can make my own modifications to produce a what if the tank was fielded version.

This T54 looks like a kit I will pass on. Not that I don't have the necessary skils required to fix. It's just that I do not wish to mess with a kit that isn't a "must have" to me. I guess if I played WoTs, I would feel differently. I am interested in how yours turns out.


I've got that MBT70 too---I'd been waiting for it ever since I got a tour of the Aberdeen "sheds" by Bill Atwater in the mid-80s...I saw one of the protoypes in the sheds, dusty and sitting there like an armorific "Holy Grail" at the time; it was like, mythical back then. I've got photos of it somewhere...I remember that it was a lot different than the model..but I'll take a bash-up of one, just the same... Stick out tongue

  • Member since
    January 2007
Posted by the doog on Sunday, April 2, 2017 4:03 PM

warshipguy

I looked at the thread you posted on Armorama and was overwhelmed by the crying and whining.  As primarily a ship modeler, I have seen more than a fair share of poor kits that have only recently begun to be addressed.  As a sailing ship modeler, I would kill for a new kit. My God, the major manufacturers of that genre (except for Airfix) are notorious for releasing kits of ships that do not represent the real ship at all.  Just don't purchase the bad ones and be grateful for the good ones.  Vote with your wallet and let the manufacturers know.

I, for one, am most interested to see what you can do with this kit!

BIll Morrison


Thanks, Bill; I appreciate you looking in and leaving your thoughts here. :)

It's kinda the same way with car models---the output rate seems super slow as well, although it's been picking up lately with some nice new molds. Many of the old kits though are just abysmal---I recently spent 6 months revamping and improving three Indy car kits. The armor models that come out now are almost shake-n-bake, just add glue...but the criticisms of this one are somewhat "on", though I don't believe they warrant some of the histrionic language that have accompanied them, lol.

  • Member since
    May 2009
  • From: Poland
Posted by Pawel on Sunday, April 2, 2017 5:05 PM

the doog
I think that "Pavel" here on FSM allegedly was in contact with them beforehand when this model had been announced and was very critical and helpful in pointing out these significant errors.

I sure hope you don't mean me... The Polish modeller in question here is "Vodnik". His first name is also Pawel (also with a "W"), so some people flatter me confusing me with my distiguished colleague.

One tip for the turret - for other people wanting to try the correction - maybe it would be better to fill the turret with Milliput and THEN dremel it - this would give the turret more stability while working on it.

Then again - I can understand people complaining about those kits. First you pay 50$, then you put still more very special work to just get the turret to rotate and in the end you might end up with a model that just isn't accurate or doesn't look right. It seems natural to me to complain about a situation like that, especially since we know that it doesn't have to be that way.

Anyhow, I'm glad to see your progress here, good luck with your build and have a nice day

Paweł

All comments and critique welcomed. Thanks for your honest opinions!

www.vietnam.net.pl

  • Member since
    January 2007
Posted by the doog on Sunday, April 2, 2017 7:31 PM

Pawel


the doog
I think that "Pavel" here on FSM allegedly was in contact with them beforehand when this model had been announced and was very critical and helpful in pointing out these significant errors.


I sure hope you don't mean me... The Polish modeller in question here is "Vodnik". His first name is also Pawel (also with a "W"), so some people flatter me confusing me with my distiguished colleague.


Paweł


Oh my god, Pawel, forgive me! I genuinely thought that that WAS you! Embarrassed haha, well GOOD that it's NOT! I was wondering why you hadn't made some comments about how you tried to get Dragon to change these blueprints and CADs. :)

Thanks for your suggestion about the Milliput---that may indeed be helpful, but then again, it would also be a lot more mess when grinding the plastic. I thought about just sawing the undercut, but gringing it just seemed easier. Having said that, the turret piece is pretty stable and doesn't really deform when working it.

  • Member since
    November 2009
  • From: SW Virginia
Posted by Gamera on Sunday, April 2, 2017 7:37 PM

Great job there Karl, I'll be sure to refer back to your solution if I ever pick up this kit. Which I might if I can get it on sale, sorry not paying fifty bucks for something with this many issues. Plus hopefully someone will release a resin turret that actually looks like the real thing, which I frankly consider a joke to have to buy aftermarket to fix Dragon's screw-up. Still if I can get it cheap enough it might be a go.  And I want the aftermarket option in case I should screw-up modifing the turret.

I bought the Black Label M103* when it first came out and well it does look like an M113 in basic shape but I've been a bit gun-shy since hearing about all the other problems. I did pick up the M6 on sale and I'm not sure how accurate it is but it is together and mostly painted and the fit was pretty darn good. Only real issue is the double rows of four bogies on each side, that's sixteen bogies in total for thirty-two road wheels to clean up. As opposed of course to a M4 or M3's single set of three bogies per side for only twelve road wheels...

I don't even get why Dragon can't do better here. I'm almost finished assembling Takom's T30/34 and the fit is perfect, it's a friggin' shake the box and it assembles itself kit. Not sure how accurate but it looks the part and Takom did post photos of their Facebook page showing how they climbed around on the real thing to get the details right. I'm sad to say I haven't bought hardly anything Dragon in years while loading up on Takom and Meng kits.....

*Edit: I meant to say M103 heavy tank, not the M113 APC... Embarrassed

"I dream in fire but work in clay." -Arthur Machen


  • Member since
    September 2005
  • From: Groton, CT
Posted by warshipguy on Monday, April 3, 2017 7:57 AM

I don't mind thoughtful comments concerning a given kit's flaws; Lord knows I did my fair share of complaining with the Hasegawa 1/350 IJN Nagato after the manufacturer forgot to erase the CAD lines, but I did not resort to profanity, nor did I complain about the good fortunes of other modelers.  The contributors to the Armorama thread did both. I love the German tanks of WWII, and I have started my sojourn into tank modeling by starting with them.

I would much rather see specific complaints that might help a new tank builder such as myself, as well as helpful advice for the more advanced builder.

Bill

  • Member since
    January 2007
Posted by the doog on Monday, April 3, 2017 9:23 AM

Gamera

 I'm almost finished assembling Takom's T30/34 and the fit is perfect, it's a friggin' shake the box and it assembles itself kit. .


Good to know; I just picked that baby up too. and it's a cool looking kit!

What is the "Black Label M113"? That a misprint?? :)

Thanks for stopping in, Cliff, and speaking out! :)

  • Member since
    November 2009
  • From: SW Virginia
Posted by Gamera on Monday, April 3, 2017 9:28 AM

the doog


Gamera

 I'm almost finished assembling Takom's T30/34 and the fit is perfect, it's a friggin' shake the box and it assembles itself kit. .


Good to know; I just picked that baby up too. and it's a cool looking kit!


What is the "Black Label M113"? That a misprint?? :)

Thanks for stopping in, Cliff, and speaking out! :)


Whoops yeah, I meant the M103 heavy, not the M113 APC... Embarrassed

"I dream in fire but work in clay." -Arthur Machen


  • Member since
    January 2007
Posted by the doog on Monday, April 3, 2017 9:30 AM

Gamera


Whoops yeah, I meant the M103 heavy, not the M113 APC... Embarrassed


Haha, good to know; I thought they somehow slipped that release by me.. Big Smile

  • Member since
    December 2002
  • From: Fort Knox
Posted by Rob Gronovius on Wednesday, April 5, 2017 11:45 AM

HeavyArty

Another area you may want to address is the missing mud release holes on the rear sprockets.


My old photograph of my new (at the time) M88A1 sprocket sure has made the rounds. Somewhere I have a close up photo of the holes. They are not tear drop shaped on this M88 sprocket carrier; they are oval, but with straight sides, more like a medicine capsule or a Good and Plenty candy piece.

  • Member since
    December 2002
  • From: Fort Knox
Posted by Rob Gronovius on Wednesday, April 5, 2017 11:49 AM

the doog


Gamera


Whoops yeah, I meant the M103 heavy, not the M113 APC... Embarrassed


Haha, good to know; I thought they somehow slipped that release by me.. Big Smile


My first time on an M103 was a hard target at Fort Drum in 1985. We had fired at it the night before and the next day, were checking out our handiwork. It is one of the Black Label kits I would have liked to get, but in order to just build the kit as it should be (not correcting accuracy errors) seemed like just too much work and you wouldn't end up with a good model in the end. Now, I have see some modelers make outstanding models, but it was probably a labor of love.

  • Member since
    January 2007
Posted by the doog on Wednesday, April 5, 2017 11:58 AM

Rob Gronovius


....in order to just build the kit as it should be (not correcting accuracy errors) seemed like just too much work and you wouldn't end up with a good model in the end.


Rob, really? Seriously, I'm floored that you would say that "...you wouldn't end up with a good model in the end." What's so godawful about it that would preclude even a decent representation of the tank? Geez, I thought it looked pretty ballpark, enough so at least to throw it together and put it in the 1/35 arsenal. What's so unforgiveably "off" about it that makes you say something so stringent? Smile

  • Member since
    March 2013
Posted by MikeyBugs95 on Wednesday, April 5, 2017 12:14 PM

I can't tell if you're being sarcastic or not (doesn't really translate well over the internet) but this is why the Black Label M103 is such a bad kit:

http://www.armorama.com/modules.php?op=modload&name=SquawkBox&file=index&req=viewtopic&topic_id=219229&page=1

Build is by Pawel "Vodnik" Krupo...(forgive me but I can't spell his last name). He corrects nearly 85% (if not, more) of the kit. The turret won't even rotate completely... The Dragon engineers placed an exhaust (that they designed too high way) in the path of a bulge under the turret... 

 In progress:

CAD:

1/35 SINCGARS ICOM/ASIP; 1/35 Flat screen TVs; 1/35 tactical light that I shall reveal later Devil

Models:

1/35 DML M4A1 DV; AFV Club M18 Hellcat; DML StuG IV; DML Armored Jeep w/ .50 cal; Panda Cougar 4x4 MRAP; Academy M3A1 Stuart; 1/700 Midship Models USS Miami; 1/700 Skywave Rudderow Destroyer Escort

  • Member since
    January 2007
Posted by the doog on Wednesday, April 5, 2017 1:11 PM

MikeyBugs95

I can't tell if you're being sarcastic or not (doesn't really translate well over the internet) but this is why the Black Label M103 is such a bad kit:

http://www.armorama.com/modules.php?op=modload&name=SquawkBox&file=index&req=viewtopic&topic_id=219229&page=1

Build is by Pawel "Vodnik" Krupo...(forgive me but I can't spell his last name). He corrects nearly 85% (if not, more) of the kit. The turret won't even rotate completely... The Dragon engineers placed an exhaust (that they designed too high way) in the path of a bulge under the turret...


No, not being saracastic at all. I've seen Pavel's months thread earlier, (didn't realize that he was going to correct the whole kit!) but honestly felt that it was a little over-the-top in its condemnations. I honestly am happy that there are guys like Pavel out there to be so rigorous in his estimation of new kits, but I find it all to be a bit much. In his own words: "...we have a kit that will look impressive and certainly look like M103 once built, but in fact is seriously inaccurate.". Again: "...we have a kit that will...certainly look like M103 once built..." -- that's good enough for me, seriously.

Don't get me wrong--it's not that I just "accept" the ridiculous corner-cutting obvious on that and even this kit that I"m building; it's obvious that the engineers of these kits are using shortcuts to save money by using existing parts, molds, CAD programs, etc, to cobble together reasonable facsimiles of these tanks. ANd if a reasonable correction can be made here and there to improve them, great! I agree that the turret problem of not being able to turn is just ridiculous--kind like this model's clearance problems on the turret. But, if not, they STILL "will certainly look like" the models they are intended to represent. For most guys, I genuinely believe that that's reason enough to buy them.

I know guys too who date swimsuit models and break up with them, complaining about the size of their....yeah...or the shape of their toes or something insignificant like that...some guys just can't see the pretty forest for the trees.

In the end, I would wish that ANY model company would strive to give us the best models possible, but I look at the word "Model" as BOTH a noun AND a verb. :)

Thanks for your response though, and the info.Yes

  • Member since
    September 2005
  • From: Groton, CT
Posted by warshipguy on Wednesday, April 5, 2017 1:26 PM

Karl,

I couldn't agree with you more!  I have read reviews that have stopped modelers cold, only to find build logs on that same kit raving about the fun the builder is having.  Isn't that what the hobby exists for?

Bill

  • Member since
    March 2013
Posted by MikeyBugs95 on Wednesday, April 5, 2017 4:09 PM

I do agree with you, doog (at least the part I could see, the mobile site cuts off a bit of some posts occasionally). I'm of the mind that as long as it looks like the subject and is generally accurate (especially if it's such a well documented and photo'd subject like the M103...) it's fine but I prefer that the kit be mostly accurate shape-wise. In cases like the M103, if i want it enough I'll buy it cheaper through third parties. I was able to get the kit for around $30. 

 In progress:

CAD:

1/35 SINCGARS ICOM/ASIP; 1/35 Flat screen TVs; 1/35 tactical light that I shall reveal later Devil

Models:

1/35 DML M4A1 DV; AFV Club M18 Hellcat; DML StuG IV; DML Armored Jeep w/ .50 cal; Panda Cougar 4x4 MRAP; Academy M3A1 Stuart; 1/700 Midship Models USS Miami; 1/700 Skywave Rudderow Destroyer Escort

  • Member since
    December 2002
  • From: Valrico, FL
Posted by HeavyArty on Wednesday, April 5, 2017 4:24 PM

I agree with you guys above.   It seems some modelers are just spoiled and looking for a perfect kit out of the box.  I built the M103A1 for a customer pretty much straight from the box with only a few corrections.  I think it looks like an M103 and a pretty nice one at that.  It may not be 100% accurate, but it was close enough for me and the customer.  It would definitely look good in anyone's collection.

M103A1:  http://armorama.com/modules.php?op=modload&name=SquawkBox&file=index&req=viewtopic&topic_id=232867&page=1

Gino P. Quintiliani - Field Artillery - The KING of BATTLE!!!

Check out my Gallery: https://app.photobucket.com/u/HeavyArty

"People sleep peaceably in their beds at night only because rough men stand ready to do violence on their behalf." -- George Orwell

  • Member since
    December 2002
  • From: Fort Knox
Posted by Rob Gronovius on Wednesday, April 5, 2017 6:47 PM

the doog


Rob Gronovius

....in order to just build the kit as it should be (not correcting accuracy errors) seemed like just too much work and you wouldn't end up with a good model in the end.


Rob, really? Seriously, I'm floored that you would say that "...you wouldn't end up with a good model in the end." What's so godawful about it that would preclude even a decent representation of the tank? Geez, I thought it looked pretty ballpark, enough so at least to throw it together and put it in the 1/35 arsenal. What's so unforgiveably "off" about it that makes you say something so stringent? Smile


Yes, it would look like an M103. Yes, I could make the necessary modifications to either build it out of box or attempt major and minor surgery to accurize the kit. Results might vary depending on if I think the detail is worth the effort to correct. But if I have to pay $50-60 for the kit, why should it require surgery to assemble out of box?

To me, in my opinion, it would be too much work for me to build this kit that does not interest me and costs more money for what I'd end up with. I could buy one of the best Abrams kits with the same amount of money. Your opinion, abilities and wallet may not agree with me, and that's okay. That's why we aren't all required to like and buy the same subjects. Fortunately, I don't have to buy a kit just because someone else thinks it's good enough for them.

Likewise, Gino perfers the Meng Bradley. To me, I got the Orochi kit in a trade, and it is good enough for me. Am I fully satisfied with it? Nah, but I can live with it. A third person may prefer the Academy or Tamiya kit because they are cheaper and can live with those older kits.

  • Member since
    July 2014
  • From: Rifle, CO. USA
Posted by M1GarandFan on Wednesday, April 5, 2017 7:25 PM

Once again, just my two cents, but, I agree with Rob here. If I'm paying 50-60 bucks for a kit, I expect it to competently represent the actual object. Minor details and pieces not included are one thing, but when the gross scale of hull, turret and tracks are incorrect, I don't feel it's worth my time to bother with major surgery. I "fixed" my hatch problem on my M4 (105), but it ain't great. I probably won't spend much on a Dragon kit again. Not worth the effort. BTW, none of these builds are for anyone's eyes but me. No posted photos or shows.

  • Member since
    July 2004
  • From: Sonora Desert
Posted by stikpusher on Wednesday, April 5, 2017 10:43 PM

Rob Gronovius
 

  A third person may prefer the Academy or Tamiya kit because they are cheaper and can live with those older kits.


That would be me... I am reluctant to spend big bucks (pretty much anything over $40) on a kit that needs serious work like the subject of this thread. Let alone most any tank that never made it into service. The M103, is a maybe, if I can find it for a good price, due to less corrective work being required, and I like it as a subject more. I build primarily for myself and filling gaps in my collection. My friends who see my builds won't know about corrections or not, nor will most of the guys at IPMS, and probably less than half at AMPS. 

But it is nice to tag along vicariously and watch as Karl/Doog tackles this kit's problems. 


F is for FIRE, That burns down the whole town!

U is for URANIUM... BOMBS!

N is for NO SURVIVORS...

       - Plankton

LSM


  • Member since
    November 2009
  • From: SW Virginia
Posted by Gamera on Thursday, April 6, 2017 7:55 AM

stikpusher


But it is nice to tag along vicariously and watch as Karl/Doog tackles this kit's problems. 


Oh yeah! At this point I'm happy to just follow along and watch Karl work his magical voodoo on making it awesome! Wink

"I dream in fire but work in clay." -Arthur Machen


  • Member since
    January 2007
Posted by the doog on Saturday, April 8, 2017 7:42 PM

warshipguy

Karl,

I couldn't agree with you more!  I have read reviews that have stopped modelers cold, only to find build logs on that same kit raving about the fun the builder is having.  Isn't that what the hobby exists for?

Bill


I'm with you there, Bill. Having fun with this one, even though it's a bit of a turkey..where's the cranberry sauce? Eats

  • Member since
    January 2007
Posted by the doog on Saturday, April 8, 2017 7:44 PM

HeavyArty

I agree with you guys above.   It seems some modelers are just spoiled and looking for a perfect kit out of the box.  I built the M103A1 for a customer pretty much straight from the box with only a few corrections.  I think it looks like an M103 and a pretty nice one at that.  It may not be 100% accurate, but it was close enough for me and the customer.  It would definitely look good in anyone's collection.

M103A1:  http://armorama.com/modules.php?op=modload&name=SquawkBox&file=index&req=viewtopic&topic_id=232867&page=1


A fine job on that big boy, Gino. Well done, and we're on the same page here. Build it, improve it if you can. revel in the glory of it up on the shelf. Big Smile

  • Member since
    January 2007
Posted by the doog on Saturday, April 8, 2017 7:49 PM

Rob Gronovius


Your opinion, abilities and wallet may not agree with me, and that's okay. That's why we aren't all required to like and buy the same subjects. Fortunately, I don't have to buy a kit just because someone else thinks it's good enough for them.


Seriously, Rob; no umbrage taken, and none intended; I was only genuinely curious why you were so dead-set against it. That's ok: we've all got our preferences and quirks as modelers. I appreciate your input here on this thread. I love reading your knowledgeable posts and historical references. Wink

  • Member since
    January 2007
Posted by the doog on Saturday, April 8, 2017 7:51 PM

M1GarandFan

Once again, just my two cents, but, I agree with Rob here. If I'm paying 50-60 bucks for a kit, I expect it to competently represent the actual object. Minor details and pieces not included are one thing, but when the gross scale of hull, turret and tracks are incorrect, I don't feel it's worth my time to bother with major surgery. I "fixed" my hatch problem on my M4 (105), but it ain't great. I probably won't spend much on a Dragon kit again. Not worth the effort. BTW, none of these builds are for anyone's eyes but me. No posted photos or shows.


"Scale" imperfections just never bothered me unless they're like, something that my wife could point out, lol.

I think we can all say that anything using the DS tracks is going to look too loose unless you monkey with them. I HATE these tracks; I hope like hell that they go back to indylinks or link-and-length.

  • Member since
    January 2007
Posted by the doog on Saturday, April 8, 2017 7:53 PM

stikpusher


Rob Gronovius
 

  A third person may prefer the Academy or Tamiya kit because they are cheaper and can live with those older kits.


That would be me... I am reluctant to spend big bucks (pretty much anything over $40) on a kit that needs serious work like the subject of this thread. Let alone most any tank that never made it into service. The M103, is a maybe, if I can find it for a good price, due to less corrective work being required, and I like it as a subject more. I build primarily for myself and filling gaps in my collection. My friends who see my builds won't know about corrections or not, nor will most of the guys at IPMS, and probably less than half at AMPS. 

But it is nice to tag along vicariously and watch as Karl/Doog tackles this kit's problems. 


Glad to have you along, Carlos; I agree with you when you say "My friends who see my builds won't know about corrections or not, nor will most of the guys at IPMS, and probably less than half at AMPS. ". True, that! And that's why I don't really worry about it much. Smile

  • Member since
    January 2007
Posted by the doog on Saturday, April 8, 2017 8:24 PM

Gamera


stikpusher


But it is nice to tag along vicariously and watch as Karl/Doog tackles this kit's problems. 


Oh yeah! At this point I'm happy to just follow along and watch Karl work his magical voodoo on making it awesome! Wink


Here we go again, Cliff! This one's for you! :)

So the next "episode"....

I decided the rough-up the hull and turret since that Milliput application was so smooth. I used a Dremel grinding bit to bounce around the hull and turret to get the effect...

The effect...

When you assemble the machine gun, be aware that there are actually two different "J" sprues...

The lights are a fiddly assembly, but they look great when done. They're missing the horn (?) on the right side, center of the light tree. I couldn't find one in the box or sprues. I may look for one in the spares box.

If you can assemble the PE part that's supposed to wrap around the muffler pipe ends, you're a better modeler than me! Its bend-indentations are very weirdly proportioned, and I just substituted a piece of PE cut from the frame to contain them.

The machine gun has one PE part---I knew I would one day love that bender tool that I got three years ago..be careful bending this part. If you muck up the bends, the two ends will not be equidistant and will not allow the gun to sit properly in the cradle. The PE cradle actually pins onto two plastic pins on the mount, and if the parts are lined up, it skews the whole cradle and makes a mess..

When properly assembled, it's a nice little MG...

You got two problems with the MG mounting piece; 1. you have to fill this weird depression on top of it, and 2. it blocks the placement of the hatch if you try to close it. You can see it here before I corrected it by cutting it out with a sharp #11...

The rear hatch is a poor fit; you can see daylight behind it. I filled in the gap and that solved the problem.

The gun mount can use some help. I drilled some holes in the collar and used a minifile to better define the "stepped" forward-collar that surrounds the gun in front.

 You also have to drill out that tube on the side, and fill in the space around it to make it look welded in.

I stilll have some cleaning-up to do on the side sighting "bubbles" that don't fit in very well to the side of the turret. I also didn't put in the bottom hand rail yet because I still have to fashion the Milliput mantlet cover.

Almost there, almost there....construction almost finished..by the way that's not a deep crease on the turret bottom-side--it's just the way the light is hitting it.

I can't believe how long the gun is on this sucker. It's going to be a challenge to fit it in my display case!

Well, by the next post I should have the mantlet cover done, so please stay tuned. And I have to work on those "workable" tracks---NOT looking forward to THAT, as the last time I used these on my M48 build they proved to be as delicate as lace....going to try to reinforce the assembly with some CA glue and see what happens. Stay tuned, guys! Thanks for being a part of this build! Big Smile


  • Member since
    September 2005
  • From: Groton, CT
Posted by warshipguy on Monday, April 10, 2017 3:17 PM

Karl,

I'm impressed, and I am learning a lot from following this build.  By the way, my wife just gave me the Conqueror Mark II kit as a surprise, and I need to look up the recommended corrections to the kit.  Otherwise, I plan on emulating what you are doing here, such as with the texturing.

Bill

  • Member since
    February 2015
  • From: Charlotte, NC
Posted by panzer948 on Tuesday, April 11, 2017 6:39 PM
Hi Karl, I haven't been on here in a while myself. Will be following along on your build of this US monster. I know a guy in the Wildcats group down in Columbia that bought this kit too. I will let you know if I hear of something that may help! Anyway, good luck on the build and glad to see you back in some armor.... I knew you couldn't be gone from armor to long.

On the bench: Revell 1/32nd Junkers JU-88 A1

  • Member since
    January 2007
Posted by the doog on Tuesday, April 11, 2017 8:21 PM

warshipguy

Karl,

I'm impressed, and I am learning a lot from following this build.  By the way, my wife just gave me the Conqueror Mark II kit as a surprise, and I need to look up the recommended corrections to the kit.  Otherwise, I plan on emulating what you are doing here, such as with the texturing.

Bill


Bill, good luck with that one! Hope it turns out to be a killer build! Thanks for following along here!

  • Member since
    January 2007
Posted by the doog on Tuesday, April 11, 2017 8:24 PM

panzer948
Hi Karl, I haven't been on here in a while myself. Will be following along on your build of this US monster. I know a guy in the Wildcats group down in Columbia that bought this kit too. I will let you know if I hear of something that may help! Anyway, good luck on the build and glad to see you back in some armor.... I knew you couldn't be gone from armor to long.
 

Good to be back, and to see you back, Brian. :) Getting ready to paint soon. Sure wish I had a chance to go see this again and take detail shots before I started, but I think it's coming out pretty nicely. See what you think---here comes the next installment! :)

  • Member since
    January 2007
Posted by the doog on Tuesday, April 11, 2017 9:24 PM

OK, so this post deals wirth the construction of the mantlet cover using Milliput (hereafter referred to as MP) I chose this because I didn't think I could get the necessary bulk using tissue paper, as is the standard method.

I mixed up the two parts of MP into a big ball.

Roll it out with your fingers...

Use both hands; make a long snake of it.

Now flatten it. I used a Tamiya paint can to do this----wet the can to prevent the MP from sticking. Water can be used to shape MP and prevent it from sticking to things.

Now I started shaping it around the turret. I made a decision to leave off the lower rear hand rails, but this caused me problems later because I had to modify the MP when I couldn't fit the rails where they needed to go. Put the rails on before you do this.

I used the back end of a scribing tool to put in folds and layers. You'll notice some tiny holes in the edges---I mistakenly thought that this cover was laced like regular mantelt covers, but it is actually bolted hard onto the turret. I had to fill this in later with white putty.

The other side. It's a pain to get the cover around all the projections and contours of the turret, no doubt..

...'round back....

Since the mentlet is bolted on, I cut out a hundred or more little "bolt heads" from a piece of Plastruct 1.5 styrene hex rod using a razor blade.

I used thinned Squadron White Putty to "paint" a line around the edges of the MP cover, filling in those previous holes but also laying an adhesive "bed" for the "bolts". Tediously, I laid in each bolt into the putty after dipping it into some Testor's liquid glue.

Note the "pockets" on the side of the cover? I made these AFTER the MP had dried, of MP as well. I flattened a ball of putty on the desktop, and then used a razor blade to cut out the square, which I then fastened into a reasonable resemblance of the feature. It's hard to tell what exactly this was, or what it really looked like from photos, but I gave it my best guess. It also seems to have been bolted at the four corners. I'm guessing that it could have somehow enclosed the two stereoscopic sighting "bubbles" on the side of the turret near it?

The other side...

And here's the model, ready for primer. Man, this sucker has a LOOOOOOOONG barrel!

Some more pics of the mantlet and model showing profile and turret corrections.

All in all, I'm pretty happy with how it turned out. Now I'll prime it and clean up whatever shows as a flaw, or smooth out the mantlet cover a bit more if necessary. I think that once the primer is on, I'll be able to get more of a sense of what the cover will actually look like---it's kinda hard to see with all the putty residue around. I make no claim to this being 100% accurate, and I can't tell you that it has the correct number of bolts securing the cover to the turret--all I know is that it looks the part much more so than the kit's original design and DS-plastic mantlet cover. I hope you agree. Smile

As always, comments, critique, and conversation welcomed! Big Smile

  • Member since
    December 2002
  • From: Valrico, FL
Posted by HeavyArty on Tuesday, April 11, 2017 9:29 PM

Very nice.  Great job on the mantlet cover using the MP and hex rod.  The corrected undercut looks great too.  It should look awesome once painted.

Gino P. Quintiliani - Field Artillery - The KING of BATTLE!!!

Check out my Gallery: https://app.photobucket.com/u/HeavyArty

"People sleep peaceably in their beds at night only because rough men stand ready to do violence on their behalf." -- George Orwell

  • Member since
    July 2004
  • From: Sonora Desert
Posted by stikpusher on Tuesday, April 11, 2017 9:39 PM

Karl, that is looking too sweet! Super work! And like Gino said, your work on the undercut correction looks great as well...


and your milliput prep work  gave me a bit of a chuckle and a flashback to this Far Side cartoon...


F is for FIRE, That burns down the whole town!

U is for URANIUM... BOMBS!

N is for NO SURVIVORS...

       - Plankton

LSM


  • Member since
    April 2016
  • From: N. Burbs of ChiKawgo
Posted by GlennH on Wednesday, April 12, 2017 9:11 AM

stikpusher

Karl, that is looking too sweet! Super work! And like Gino said, your work on the undercut correction looks great as well...


and your milliput prep work  gave me a bit of a chuckle and a flashback to this Far Side cartoon...


Thanks for the cartoon. I remember this and the smiles. Great modeling work.

A number Army Viet Nam scans from hundreds yet to be done:

https://www.flickr.com/photos/southwestdreams/albums/72157621855914355

Have had the great fortune to be on every side of the howitzers.

  • Member since
    January 2007
Posted by the doog on Wednesday, April 12, 2017 9:23 AM

HeavyArty

Very nice.  Great job on the mantlet cover using the MP and hex rod.  The corrected undercut looks great too.  It should look awesome once painted.


Thanks, Gino! I know you would tell me if it wasn't! Much appreciated! YesBeer

I can't wait to slap some paint on it!

  • Member since
    January 2007
Posted by the doog on Wednesday, April 12, 2017 9:24 AM

Stik, that cartoon is hilarious, haha!! I don't remember seeing that one..

Thanks too, for the props...Smile

  • Member since
    January 2007
Posted by the doog on Wednesday, April 12, 2017 9:25 AM

Glenn, thank you for looking in and commenting! Big Smile

  • Member since
    December 2002
  • From: Fort Knox
Posted by Rob Gronovius on Wednesday, April 12, 2017 9:44 AM

Some resin manufacturer should try to get you to cast your turret and sell it as as an aftermarket replacement for the kit turret. You've done a superb job on the turret, and it would be a "shame" not to pass it on for others to enjoy!

  • Member since
    September 2005
  • From: Groton, CT
Posted by warshipguy on Wednesday, April 12, 2017 10:41 AM

Karl,

Great work!

Bill

  • Member since
    February 2015
  • From: Charlotte, NC
Posted by panzer948 on Wednesday, April 12, 2017 11:33 AM
Wow good stuff Karl! Yes that is a long barrel. You probably need an extra jar of paint to finish that sucker. Great example of how to properly mask for painting. This one is coming along nicely.

On the bench: Revell 1/32nd Junkers JU-88 A1

  • Member since
    January 2007
Posted by the doog on Wednesday, April 12, 2017 12:33 PM

Rob Gronovius

Some resin manufacturer should try to get you to cast your turret and sell it as as an aftermarket replacement for the kit turret. You've done a superb job on the turret, and it would be a "shame" not to pass it on for others to enjoy!


Wow, Rob; I am humbled. That is the nicest thing anyone's said to me this year. :) Seriously, thank you for that endorsement.

Taking all offers! lol

  • Member since
    January 2007
Posted by the doog on Wednesday, April 12, 2017 12:34 PM

Thanks, Bill!
Thanks, Bryan!!!

Big SmileBig SmileBig SmileBig SmileBig SmileBig SmileBig SmileBig Smile

  • Member since
    May 2009
  • From: Poland
Posted by Pawel on Wednesday, April 12, 2017 4:49 PM

Hello Karl!

That turret looks good! As for Rob said - IF a corrected turred showed up, wouldn't it make the kit a bit useless? From what I see you could get quite a nice T54 by combining a correct turret with a Patton hull, that's also what the "whiners" at Armorama said.

Good luck with your build and have a nice day

Paweł

All comments and critique welcomed. Thanks for your honest opinions!

www.vietnam.net.pl

  • Member since
    January 2015
  • From: Tumwater, WA.
Posted by M. Brindos on Wednesday, April 12, 2017 5:59 PM

Wow, Karl. Just wow! I think I need to practice with the miliput more. That is crazy!

...and I thought the M-103 had a huge gun! 

I am eagerly awaiting the paint on this monster!  :D

- Mike Brindos "Lost Boy"

  • Member since
    January 2007
Posted by the doog on Wednesday, April 12, 2017 9:18 PM

Pawel

Hello Karl!

That turret looks good! As for Rob said - IF a corrected turred showed up, wouldn't it make the kit a bit useless? From what I see you could get quite a nice T54 by combining a correct turret with a Patton hull, that's also what the "whiners" at Armorama said.

Good luck with your build and have a nice day

Paweł


Thank you, Pawel!

Well, it MIGHT make the kit useless for some people, but personally, I'd rather buy the kit and work it over a bit than have to buy two different kits to make one model. That gets expensive in the long run. Those Armorama "whiners" must have deep pockets, lol.

  • Member since
    January 2007
Posted by the doog on Wednesday, April 12, 2017 9:19 PM

M. Brindos

Wow, Karl. Just wow! I think I need to practice with the miliput more. That is crazy!

...and I thought the M-103 had a huge gun! 

I am eagerly awaiting the paint on this monster!  :D


Thanks, Mike! MP isn't hard to work with, just a little messy, But it's the go-to tool to get stuff like this done. :)


  • Member since
    January 2007
Posted by the doog on Wednesday, April 12, 2017 9:24 PM

Hello all,

Well, I got it primered. First, I put some Wilder putty on the wheel mounts so that I can attach the wheeels afterward. I'm going to paint the hull/wheels first before I even attempt the tracks because these damn wheels don't have much to hold on to in the way the mount is designed, and frankly, it's just a huge PITA to try to stick them on the model hull without gluing them in order to form the tracks. Gonna try something a lil different...

And here's a series of photos showing the primered turret. Yup, I think I can live with it. It looks loads better than what the kit gives you, and the Dremel work really helped liven it up. I'm pleased, for the most part, with how the cover came out. :) Enjoy...

Well, I should have some paint on this pig by tomorrow, later.....keep an eye out. :) Thanks, all!!!

  • Member since
    December 2002
  • From: Bury St Edmunds, Suffolk, England
Posted by Bish on Thursday, April 13, 2017 2:17 AM

Cracking job on the mantlet cover and a real nice little tut on useing MP as well. Its looking really nice Karl.

I am a Norfolk man and i glory in being so


On the bench: Airfix 1/72nd Harrier GR.3/Fujimi 1/72nd Ju 87D-3

  • Member since
    January 2007
Posted by the doog on Thursday, April 13, 2017 2:10 PM

Bish

Cracking job on the mantlet cover and a real nice little tut on useing MP as well. Its looking really nice Karl.


Thanks, Bish, it's much appreciated! Toast

  • Member since
    January 2015
  • From: Tumwater, WA.
Posted by M. Brindos on Thursday, April 13, 2017 2:33 PM

I love what you've done with the turret, Karl!

With the primer bringing it altogether like that, it's really looking excellent. Can't wait to see paint!  :D

- Mike Brindos "Lost Boy"

  • Member since
    November 2009
  • From: SW Virginia
Posted by Gamera on Thursday, April 13, 2017 9:53 PM

I'm on vacation right now and the motel has lousy wi-fi so I been haven't been on the forum much this week. But so far she looks awesome!!! I love Rob's idea, if you did a resin version I'd consider buying in case I cut up the turret and made a mess of it.


"I dream in fire but work in clay." -Arthur Machen


  • Member since
    December 2002
  • From: Fort Knox
Posted by Rob Gronovius on Friday, April 14, 2017 10:47 AM

the doog


Rob Gronovius

Some resin manufacturer should try to get you to cast your turret and sell it as as an aftermarket replacement for the kit turret. You've done a superb job on the turret, and it would be a "shame" not to pass it on for others to enjoy!


Wow, Rob; I am humbled. That is the nicest thing anyone's said to me this year. :) Seriously, thank you for that endorsement.

Taking all offers! lol


I think you should photograph your work (already done) and submit the photos to one of the resin manufacturers that often cover this type of conversion. Then offer to make another one to be a master (may have to make some parts separate) and find out what they pay for masters. You could even negoiate them sending you another kit to make the turret.

  • Member since
    May 2009
  • From: Poland
Posted by Pawel on Friday, April 14, 2017 6:15 PM

Awright, but in case of making a master, wouldn't it be good to check if/where Dragon bothed the shape of the turret in other places than the turret ring?

Good luck with your builds and have a nice day

Paweł

All comments and critique welcomed. Thanks for your honest opinions!

www.vietnam.net.pl

  • Member since
    September 2005
  • From: Groton, CT
Posted by warshipguy on Saturday, April 15, 2017 7:43 AM

I concur with everyone.  Submitting your turret would be an awesome boon to our hobby!  I hope that you consider it.

Bill

  • Member since
    March 2015
  • From: Streetsboro, Ohio
Posted by Toshi on Saturday, April 15, 2017 1:45 PM

Amazing technique and I also concur with the statement in that your turret should be submitted.  What a great job, and the primer looks fantastic!

Toshi

On The Bench: Revell 1/48 B-25 Mitchell


Married to the most caring, loving, understanding, and beautiful wife in the world.  Mrs. Toshi


  • Member since
    January 2007
Posted by the doog on Sunday, April 16, 2017 11:22 AM

Rob Gronovius

Some resin manufacturer should try to get you to cast your turret and sell it as as an aftermarket replacement for the kit turret. You've done a superb job on the turret, and it would be a "shame" not to pass it on for others to enjoy!


Man, again, that's very generous praise. I appreciate the thought and suggestion, honestly. It's a tempting thought, and I wish I could believe that it would be a great seller. But...

In the back of my mind though, all I can see is a bunch of guys over on a "rival forum" birching about how the turret front is "off by 3 scale inches" and how the contour of the rounded undercut doesn't match up with the superimposed photo, etc, etc, etc...Since I never really considered the actual measurements and did any research from an engineering aspect, all I really have is a turret that "looks better than the kit part"--and I doubt that it would survive critical scrutiny for very long. Not being modest, just realistic.

But it's really nice to read the endorsements of those here who endorse the idea. It's very much appreciated, all! YesBeerBeerBeer

  • Member since
    January 2007
Posted by the doog on Sunday, April 16, 2017 11:26 AM

Pawel

Awright, but in case of making a master, wouldn't it be good to check if/where Dragon bothed the shape of the turret in other places than the turret ring?

Good luck with your builds and have a nice day

Paweł


lol, exactly what I was saying....honestly, not talking about you personally, Pawel, but I fear that I would get this in spades from those whose days are enriched and brightened by pointing out the tiniest dimensional errors and declaring in jiery superlatives what an uter disgrace and failure is the part/kit. I just think that I'll satisfy myself with having made a better-looking-then-kit form of the model, regardless of what the rivet counters (and contour measurers!) say.

  • Member since
    January 2007
Posted by the doog on Sunday, April 16, 2017 11:29 AM

Everyone, thanks for the favorable endorsements, but I think I'll probably not submit this, as it's probably nowhere even near the ballpark of being factually, dimensionally "correct"--and there are too many out there who would just delight in pointing that out, making any investor in this product really have to consider the formidable risks in producing something that would be undoubtedly savaged by the critics. I appreciate the support though, honestly.


I'll be back early next week with a painting update. Smile

  • Member since
    January 2007
Posted by the doog on Monday, April 17, 2017 5:10 PM

Hello everyone!

Well, after a long weekend of planting and yardwork, I've put some paint on her....but first, I added a few more details here...the first being this recess on the turret side---there's a tube coming out of the turret here on the T-42 which also had a very similar turret to this tank--perhaps the same one? Anyway, you can see that tube there--there's a similar one on the other side of the T54. This open recess bothered me just being bare, so I put the vestiges of a tube there. Whatever it is....homing pigeon turret access? Big Smile

You can tell that it definitely doesn't protrude like the T42's, but I think it looks better than nothing being there? Interestingly, the kit's DS plastic mantlet cover covers this part up, but it's definitely a component of the turret, if you look at reference photos.

I also screwed up in assmbling the return rollers---I should have only glued the inside ones to the hull, as per my indy track linik strategy....so I cut them in half and glued the inner ones in there. This willl help me align the tracks when I build them.

Finally, I put a hatch pad and a periscope in the TC's hatch. It just looks better if I decide to leave it open, and I may....I have a cool idea for this tanks' ultimate finish...

Painting started with a Tamiya mix of almost Black-green.

 Next, a coat of Tamiya XF-62, old school OD. Shaded in my usual way.

I then added about 20% white--I wanted a cold highlight, so I didn't use a tan or yellow which would have made a warmer highlight--and used a mask cut from an index card to do some "modulation" on the front hull.

Then I highlighted the whole model, concentrating on the high points and shading the highlight color down the sides to make a more 3-D rendering of a a paint coat.

Put together, it looks pretty good already.

Next up, decals....and then, a twist...I think it's going to be cool. Think "Korea, 1954; the Armistice fails.." Surprise...Smile

Stay tuned!


  • Member since
    July 2004
  • From: Sonora Desert
Posted by stikpusher on Monday, April 17, 2017 7:02 PM

OD, my favorite color! Yes Looking good so far. As far as that tube you added goes, it is likely one of two things: a co ax machine gun, or a telescopic gunners site. 


F is for FIRE, That burns down the whole town!

U is for URANIUM... BOMBS!

N is for NO SURVIVORS...

       - Plankton

LSM


  • Member since
    May 2016
Posted by Xena on Monday, April 17, 2017 7:38 PM

Wow Karl, another fascinating model with a detailed log Bow Down .. Thank you! ... She looks great!

  • Member since
    November 2009
  • From: SW Virginia
Posted by Gamera on Monday, April 17, 2017 7:55 PM

Ohhh.. looks awesome. I love the colour modulation there!


For some reason I think of a platypus looking at your photos. Not sure if it's the bill like mantlet or that it's made of all kinds of tank parts like the platypus looks to be made up of all of Mother Nature's critters.


And Korea '54... now I'm thinking how cool that thing would look with a big grinning tiger face painted on the front of that weird turret... Wink

"I dream in fire but work in clay." -Arthur Machen


  • Member since
    July 2014
  • From: Rifle, CO. USA
Posted by M1GarandFan on Monday, April 17, 2017 9:14 PM

Lookin' good and love the paint. It may not be 1954 anymore, but the armistice may still fail!

  • Member since
    March 2003
  • From: Western North Carolina
Posted by Tojo72 on Tuesday, April 18, 2017 6:18 AM
That's an awesome vehicle,looking forward to seeing it thru.

  • Member since
    December 2002
  • From: Bury St Edmunds, Suffolk, England
Posted by Bish on Tuesday, April 18, 2017 6:25 AM

Nice job there karl, looking good. As for that tube, first thing i thought was a co-ax MG.

I am a Norfolk man and i glory in being so


On the bench: Airfix 1/72nd Harrier GR.3/Fujimi 1/72nd Ju 87D-3

  • Member since
    January 2007
Posted by the doog on Tuesday, April 18, 2017 6:48 AM

stikpusher

OD, my favorite color! Yes Looking good so far. As far as that tube you added goes, it is likely one of two things: a co ax machine gun, or a telescopic gunners site. 


Ah yes, probably correct on that. I wish I could have gotten back down to Aberdeen to photograph it before I built it. :)

OD is a virtual rarity in my display case! I hope I can finish this well enough to make it pop! :)

  • Member since
    January 2007
Posted by the doog on Tuesday, April 18, 2017 7:27 AM

Gamera

Ohhh.. looks awesome. I love the colour modulation there!


For some reason I think of a platypus looking at your photos. Not sure if it's the bill like mantlet or that it's made of all kinds of tank parts like the platypus looks to be made up of all of Mother Nature's critters.


And Korea '54... now I'm thinking how cool that thing would look with a big grinning tiger face painted on the front of that weird turret... Wink


Thanks, Cliff! It IS a funny-looking tank, that's for sure...

And yep, you kinda guessed where I'm going with this....should be fun.. Stick out tongue

  • Member since
    January 2007
Posted by the doog on Tuesday, April 18, 2017 7:29 AM

Thanks for the comments, guys!

M1GarandFan, that's what I was thinking...this model is rather prescient in that regard. Should make a relevant story in FSM. :)

  • Member since
    December 2002
  • From: Fort Knox
Posted by Rob Gronovius on Tuesday, April 18, 2017 12:25 PM

As for the tubes, the one on the gunner's side of the tank (right hand as sitting in the turret) is the gunner's auxillary sight (a backup sight slaved to the gun tube). The opposite side tube is the coaxial machine gun. On the Abrams, the GAS and coax are on the same side, but on opposite sides on most US tanks.

  • Member since
    January 2007
Posted by the doog on Tuesday, April 18, 2017 2:37 PM

Rob Gronovius

As for the tubes, the one on the gunner's side of the tank (right hand as sitting in the turret) is the gunner's auxillary sight (a backup sight slaved to the gun tube). The opposite side tube is the coaxial machine gun. On the Abrams, the GAS and coax are on the same side, but on opposite sides on most US tanks.


Great info, thanks, Rob!

OK, now I need some help. I want to ask about plausible markings in the Korean era. It seems to me that there was a huge deal of variation and very little standardization of markings in that conflict. Marines seemed to use yellow lettering and numbers, and stars could be found in place or not at all.  Does anyone here have any US tanks marking guidelines for that era?


Specifically, I want to know if stars were out on top of tanks? ANd were they stars-in-a-circle? Or just plain stars? I have the two on the side of this tank (see below) but want to put one on top. Plausible, or no?

ALso, markings---number codes and all that. What's a plausible designation? Would they go on the front and identically on the back?


If you can help, I'd really appreciate it!


Now, the update...

Cliff (Gamera) correctly deduced that I'm going for a "Tiger" motif on this tank--I decided to try to do this with masking, rather than a tedious brush painting which might leave big, garish brush strokes... I used silly putty to define my "mouth".

I painted that White with the AB...

Now, I cut "teeth" out of a flattened piece of silly putty...some I just rolled up and flattened...

Spray paint that black now..

and....voila'!

Now, I paint in the red gums and lips..did this with a brush...

I added a star on the turret sides, as they were still using these back in the 50s...

I'm going to do the fender "claws" the same, and then give 'er some stripes by brush painting!

I also have a crew guy to show the scale of this beast...


If anyone can help me with the numbering codes and "star" question which I posted in the beginning of this post, please do!! Thanks eveyone!


  • Member since
    January 2015
  • From: Tumwater, WA.
Posted by M. Brindos on Tuesday, April 18, 2017 4:20 PM

No stars on the top and no circles around them either.

Not sure about The reg numbers, but I think you can use a fictional number starting with "B00*****". When making fictional armor I usually pick a significant date as the reg no. Birth dates, aniversaries and such. Just a personal touch lol.

Really nice work on the paint! That's wicked!

- Mike Brindos "Lost Boy"

  • Member since
    December 2002
  • From: Bury St Edmunds, Suffolk, England
Posted by Bish on Tuesday, April 18, 2017 4:28 PM

Can't help you with the markings, but that paint job is really nice. Love how thats come out.

I am a Norfolk man and i glory in being so


On the bench: Airfix 1/72nd Harrier GR.3/Fujimi 1/72nd Ju 87D-3

  • Member since
    July 2004
  • From: Sonora Desert
Posted by stikpusher on Tuesday, April 18, 2017 5:41 PM

Like already said, no circle stars  in Korea. That was a WWII Western Allies air recognition ID marking in ETO/MTO only from 1943 to 1945. The cat faces seen on US tanks in Korea was only in the Spring of 1951 period during the counter offensives to drive back the Chinese. They were authorized by General Ridgeway after he took over to foster and reflect an aggressive attitude. And also to take advantage of a supposed Chinese superstition against cats.

As far as number codes go, they would follow the standard format seen from WWII thru today on US Army vehicles. No armored division served in Korea. Only Tank Battaions and Companies attached to Infantry units. When viewed looking at the vehicle, the higher unit, Division and Battalion is seen to the left. The right would be the Company letter and Platoon & Vehicle number. Depending upon the unit, numbers may be seen on the turret sides and rear as well. In 1952 and later, some US Army tank units camouflage painted their tanks with two or three color patterns.


F is for FIRE, That burns down the whole town!

U is for URANIUM... BOMBS!

N is for NO SURVIVORS...

       - Plankton

LSM


  • Member since
    February 2015
  • From: Charlotte, NC
Posted by panzer948 on Tuesday, April 18, 2017 5:59 PM

Karl,

This is really coming along nicely.  Great shading effect. Can't wait to see your final finish on this beast!

On the bench: Revell 1/32nd Junkers JU-88 A1

  • Member since
    January 2007
Posted by the doog on Tuesday, April 18, 2017 7:30 PM

stikpusher

Like already said, no circle stars  in Korea. That was a WWII Western Allies air recognition ID marking in ETO/MTO only from 1943 to 1945. The cat faces seen on US tanks in Korea was only in the Spring of 1951 period during the counter offensives to drive back the Chinese. They were authorized by General Ridgeway after he took over to foster and reflect an aggressive attitude. And also to take advantage of a supposed Chinese superstition against cats.

As far as number codes go, they would follow the standard format seen from WWII thru today on US Army vehicles. No armored division served in Korea. Only Tank Battaions and Companies attached to Infantry units. When viewed looking at the vehicle, the higher unit, Division and Battalion is seen to the left. The right would be the Company letter and Platoon & Vehicle number. Depending upon the unit, numbers may be seen on the turret sides and rear as well. In 1952 and later, some US Army tank units camouflage painted their tanks with two or three color patterns.


Thanks for all that info, Carlos. I appreciate that. I am going to go with the Tiger paint just because this is really more of a hypothetical build and tank anyway--gotta love the protoype models, they're so open to interpretation.

As far as the difference between a Division, Company and a Battalion, how would that manifest itself in the markings? That triangle symbol--is that "Divisional" or "Battalion"? WHat would a typical "correct" marking look like for Korea? Would that triangle symbol be used?

And markings on the front only?

  • Member since
    January 2007
Posted by the doog on Tuesday, April 18, 2017 7:31 PM

Thanks too, Mike, Bish and Bryan. I appreciate the comments. :) Nice to see you guys following along. Toast

  • Member since
    July 2004
  • From: Sonora Desert
Posted by stikpusher on Tuesday, April 18, 2017 8:24 PM

Unit codes are placed on the front and rear of the tank. Typically on the fenders or on the front and rear plates. The triangle symbol after the first number denotes an Armored Division, while an I after the number denotes and Infantry Division. The second number would be the Tank Battalion with the triangle afterwards.

example: 2I 23^    2nd Infantry Division, 23rd Tank Battalion (a made up battalion)

then on the opposite side is the Company/Platoon/Tank combination,

example: A21    A Company 2nd Platoon Vehicle 1

so the codes would read

2I 23^       A21


F is for FIRE, That burns down the whole town!

U is for URANIUM... BOMBS!

N is for NO SURVIVORS...

       - Plankton

LSM


  • Member since
    November 2009
  • From: SW Virginia
Posted by Gamera on Tuesday, April 18, 2017 8:41 PM

Love the tiger mouth!

I flipped though Jim Mesko's 'Armor in Korea' and the biggest thing to jump out at me were large two-digit numbers painted on the turrets of many of the M26 and M46s.

"I dream in fire but work in clay." -Arthur Machen


  • Member since
    September 2012
Posted by GMorrison on Tuesday, April 18, 2017 11:17 PM

It's pretty spectacular. Oscillating turrets are cool, funny the Germans seemed to prefer an open fighting compartment.

Any chance that tanker can exchange his Thpson for a M3A1?

 Modeling is an excuse to buy books.


  • Member since
    July 2004
  • From: Sonora Desert
Posted by stikpusher on Wednesday, April 19, 2017 12:10 AM

GMorrison

It's pretty spectacular. Oscillating turrets are cool, funny the Germans seemed to prefer an open fighting compartment.

Any chance that tanker can exchange his Thpson for a M3A1?


For Korea, the Grease Gun would be correct... Thompsons were long gone by 1950...


F is for FIRE, That burns down the whole town!

U is for URANIUM... BOMBS!

N is for NO SURVIVORS...

       - Plankton

LSM


  • Member since
    May 2009
  • From: Poland
Posted by Pawel on Wednesday, April 19, 2017 1:41 AM

Hello!

I've got this document here:

http://www.vietnam.net.pl/TB746_en.htm

It's from 1964, so it's a little new, but it should give you some ideas as to the markings.

It also lists older documents, so you might want to check those out.

Hope it helps, good luck with the painting and have a nice day

Paweł


All comments and critique welcomed. Thanks for your honest opinions!

www.vietnam.net.pl

  • Member since
    January 2007
Posted by the doog on Wednesday, April 19, 2017 9:08 AM

stikpusher

Unit codes are placed on the front and rear of the tank. Typically on the fenders or on the front and rear plates. The triangle symbol after the first number denotes an Armored Division, while an I after the number denotes and Infantry Division. The second number would be the Tank Battalion with the triangle afterwards.

example: 2I 23^    2nd Infantry Division, 23rd Tank Battalion (a made up battalion)

then on the opposite side is the Company/Platoon/Tank combination,

example: A21    A Company 2nd Platoon Vehicle 1

so the codes would read

2I 23^       A21


THAT was what I needed! THANK YOU for clearing that up so...clearly. :) Now I can at least "fake" a proper marking on the tank. I'll mention you in the article for that, Carlos!!!

  • Member since
    January 2007
Posted by the doog on Wednesday, April 19, 2017 9:09 AM

Gamera

Love the tiger mouth!

I flipped though Jim Mesko's 'Armor in Korea' and the biggest thing to jump out at me were large two-digit numbers painted on the turrets of many of the M26 and M46s.


I agree--that seems to be a big factor on a lot of the tanks. I have to see if I can fit that somewhere... That cover hides a lot of the tank...maybe between the handrails?


  • Member since
    January 2007
Posted by the doog on Wednesday, April 19, 2017 9:10 AM

GMorrison


Any chance that tanker can exchange his Thpson for a M3A1?


Thanks for pointing this out too. I honestly wouldn't have even thought that to be an issue. I'm going to have to try to carve that out and find a correct-era gun somewhere here; I'm sure I've got some in my spares.

  • Member since
    January 2007
Posted by the doog on Wednesday, April 19, 2017 9:13 AM

Pawel

Hello!

I've got this document here:

http://www.vietnam.net.pl/TB746_en.htm

It's from 1964, so it's a little new, but it should give you some ideas as to the markings.

It also lists older documents, so you might want to check those out.

Hope it helps, good luck with the painting and have a nice day

Paweł


Thank you for that document link, Pawel! It's very informative! I'll have to take some time to familiarize myself with it! :)

  • Member since
    December 2002
  • From: Fort Knox
Posted by Rob Gronovius on Wednesday, April 19, 2017 9:21 AM

the doog


As far as the difference between a Division, Company and a Battalion, how would that manifest itself in the markings? That triangle symbol--is that "Divisional" or "Battalion"? WHat would a typical "correct" marking look like for Korea? Would that triangle symbol be used?

And markings on the front only?


Markings would be mirrored front and rear. The triangle (Δ) is used to denote armor units and can be used after the division number as well as before the regimental number. Although for the most part, regiments are non-entities in the US Army with a few exceptions.

For example there were the 1Δ, 2Δ, 3Δ for 1st, 2nd and 3rd Armor Divisions in the US Army and the 49Δ and 50Δ for the 49th and 50th Armor Divisions in the Army National Guard.

But when used for battalions within a regiment, the triangle comes between the battalion number and regiment number.

For instance, I served with the 5th Battalion, 77th Armor Regiment. While there were other numbered battalions (1st thru 6th), the 77th Armor Regiment did not exist as a stand alone entity with a regimental headquarters. Back in WW2, when regiments did exist, there would be a regimental headquarters and three battalions. Company A, B, C would be 1st Bn, D, E, F was 2nd Bn, G, H, I was 3rd Bn, etc.

Battalion bumper numbers would be 1Δ77, 2Δ77, 3Δ77, etc. or sometimes could be seen as 4-77Δ, 5-77Δ, 6-77Δ depending on how that particular unit decided to paint them on.

  • Member since
    January 2007
Posted by the doog on Wednesday, April 19, 2017 11:25 AM

Rob Gronovius


Markings would be mirrored front and rear. The triangle (Δ) is used to denote armor units and can be used after the division number as well as before the regimental number. Although for the most part, regiments are non-entities in the US Army with a few exceptions.

For example there were the 1Δ, 2Δ, 3Δ for 1st, 2nd and 3rd Armor Divisions in the US Army and the 49Δ and 50Δ for the 49th and 50th Armor Divisions in the Army National Guard.

But when used for battalions within a regiment, the triangle comes between the battalion number and regiment number.

For instance, I served with the 5th Battalion, 77th Armor Regiment. While there were other numbered battalions (1st thru 6th), the 77th Armor Regiment did not exist as a stand alone entity with a regimental headquarters. Back in WW2, when regiments did exist, there would be a regimental headquarters and three battalions. Company A, B, C would be 1st Bn, D, E, F was 2nd Bn, G, H, I was 3rd Bn, etc.

Battalion bumper numbers would be 1Δ77, 2Δ77, 3Δ77, etc. or sometimes could be seen as 4-77Δ, 5-77Δ, 6-77Δ depending on how that particular unit decided to paint them on.


Thanks too, Rob! That clarifies things a bit more too. I'm going to have to see what I can come up with with all the spares I have. The decals in the kit ae sparse, to say the least. Smile

  • Member since
    July 2004
  • From: Sonora Desert
Posted by stikpusher on Wednesday, April 19, 2017 11:34 AM

To add to Rob's post above, no US Army Tank Regiments or their sub battalions served in Korea during the war. Just tank companies and battalions attached to 8th Army, X Corps, or the various Infantry Divisions and Regiments. Army TO&E at that time had a tank company assigned to Infantry regiments. 

If you look at the unit codes in this photo, the tank is assigned to the 5th Infantry Regiments Tank Company


F is for FIRE, That burns down the whole town!

U is for URANIUM... BOMBS!

N is for NO SURVIVORS...

       - Plankton

LSM


  • Member since
    July 2004
  • From: Sonora Desert
Posted by stikpusher on Wednesday, April 19, 2017 11:43 AM

This M46 is assigned to an unknown Tank Battalion attached to 8th Army, B Company, 1st Platoon, vehicle 5


F is for FIRE, That burns down the whole town!

U is for URANIUM... BOMBS!

N is for NO SURVIVORS...

       - Plankton

LSM


  • Member since
    July 2004
  • From: Sonora Desert
Posted by stikpusher on Wednesday, April 19, 2017 11:46 AM

8th Army, 6th Tank Battalion... hard to tell the Company due to mud or dirt on that side's markings


F is for FIRE, That burns down the whole town!

U is for URANIUM... BOMBS!

N is for NO SURVIVORS...

       - Plankton

LSM


  • Member since
    January 2007
Posted by the doog on Wednesday, April 19, 2017 11:49 AM

stikpusher

To add to Rob's post above, no US Army Tank Regiments or their sub battalions served in Korea during the war. Just tank companies and battalions attached to 8th Army, X Corps, or the various Infantry Divisions and Regiments. Army TO&E at that time had a tank company assigned to Infantry regiments. 

If you look at the unit codes in this photo, the tank is assigned to the 5th Infantry Regiments Tank Company


Ah, ok....interesting. So what is "TK" on the right then? Surely, that's not a abbreviation for "tank"??

So here is a list I found of tank battalions and companies in the Korean War. I hate to ask you this, but could you give me some plausible markings from these groups? I would be looking for a heavy tank company of course. I THINK I understand the whole marking system somewhat, but honestly, I'm prone to screwing these kinds of things up, and you guys lived this and know it like the backs of your hands. I would definitely appreciate your expertise!

Rob, looks like you company was "Medium", or I would use that just to say thanks. Smile

Tank Battalion

Tank Company

  • Member since
    July 2004
  • From: Sonora Desert
Posted by stikpusher on Wednesday, April 19, 2017 1:03 PM

Yes, the "TK" stands for Tank as in Tank Company. 


F is for FIRE, That burns down the whole town!

U is for URANIUM... BOMBS!

N is for NO SURVIVORS...

       - Plankton

LSM


  • Member since
    January 2007
Posted by the doog on Wednesday, April 19, 2017 7:28 PM

stikpusher

Yes, the "TK" stands for Tank as in Tank Company. 


Carlos and Rob, thanks sincerely, for all the help you both have been!!! I'm really very grateful! I'm mentioning you both in the article! Smile


So here's some more work: I used the same process of masking with silly putty to get "claws" on the front.

I also settled on some markings "8A 1>   A28" (128 was my racing number!) I also put some of those numbers on the side, too.

I actually got on my computer and "Painted" a few photos with different Tiger-graphics schemes. I came up with the following....I am pretty happy with it so far.

Of course, I used silly putty to get the mask correct. I cut pieces out and then pasted them where I wanted them. I mixed up two different shades of Tamiya off-yellow, tinted with both Orange+Brown and then adding White.

I actually added literally a spot of black to make a "shadow" color, and sprayed that where appropriate...

Basically this is a three-tone yellow.

I will add black stripes to it tomorrow.

I also did the fenders to make "legs" in front. Thank god for sillly putty!

And here's some shots as it now looks....pretty cool. I'm going to add black stripes tomorrow..

Thanks for looking in guys!!! Opinions and suggestion welcomed! Smile

  • Member since
    July 2004
  • From: Sonora Desert
Posted by stikpusher on Wednesday, April 19, 2017 7:36 PM

That is looking very cool! Very creative to go with one of the Korean War tiger designs. And since it is a "what if", nobody can fang you on the bumper codes Wink 

Glad to help out, even if only a little, on this project of yours Karl.


F is for FIRE, That burns down the whole town!

U is for URANIUM... BOMBS!

N is for NO SURVIVORS...

       - Plankton

LSM


  • Member since
    January 2007
Posted by the doog on Wednesday, April 19, 2017 7:41 PM

stikpusher

That is looking very cool! Very creative to go with one of the Korean War tiger designs. And since it is a "what if", nobody can fang you on the bumper codes Wink 

Glad to help out, even if only a little, on this project of yours Karl.


My first thought is "uh oh, did I really screw them up that badly?" Surprise

Let me guess--no number 8 tank in a platoon, right? I didn't even think of that until now...is that correct?

Glad you're liking the scheme! :)

  • Member since
    July 2004
  • From: Sonora Desert
Posted by stikpusher on Wednesday, April 19, 2017 7:57 PM

Lol, probably not an 8. Tank platoon organization strengths have varied over the years, but I don't believe that there were ever 8 in any. 

And yes, Korean War era cat schemes are probably some of my favorite US Army tank paint schemes. 


F is for FIRE, That burns down the whole town!

U is for URANIUM... BOMBS!

N is for NO SURVIVORS...

       - Plankton

LSM


  • Member since
    January 2007
Posted by the doog on Wednesday, April 19, 2017 8:09 PM

Lol, I'll definitely change that to a "3" then with a little paint. Don't want anyone to think that you and Rob steered me wrong! 


  • Member since
    January 2015
Posted by PFJN on Wednesday, April 19, 2017 8:21 PM

Hi,

I really like your paint job.  Can't wait to see the finished model.

Pat

1st Group BuildSP

  • Member since
    July 2008
  • From: Vancouver, the "wet coast"
Posted by castelnuovo on Wednesday, April 19, 2017 9:11 PM

That looks pretty darn cool Smile

  • Member since
    December 2002
  • From: Fort Knox
Posted by Rob Gronovius on Thursday, April 20, 2017 7:51 AM

the doog


Rob, looks like you company was "Medium", or I would use that just to say thanks. Smile


By the 1980s, the US Army went to what was called the J-series MTOE as part of the Division '86 reorganization. Tank platoons went from the five tank formation (ex. A21 thru A25) to a four tank formation. With the exception of the 82nd Airborne's 3/73rd Sheridan battalion, there were no longer differentiations between between light, heavy and medium tank battalions.

The J-series MTOE also added a fourth tank company, D Co. with the three tanks swiped from each tank company (9 tanks) and an additional 5 tanks added to each battalion. Tank battalions went from 53 to 58 tanks.

The HQs and CSC (combat support companies) were combined into the HHC (Headquarters and Headquarters Company) we have today.

The US Army Combat Arms Regimental System had not taken place by the time of the Korean War. Separate numbered tank battalions were still being used.

  • Member since
    December 2002
  • From: Bury St Edmunds, Suffolk, England
Posted by Bish on Thursday, April 20, 2017 8:19 AM

Now thats different. So from what carlos is saying, is this based on real designs worn in Korea.

I am a Norfolk man and i glory in being so


On the bench: Airfix 1/72nd Harrier GR.3/Fujimi 1/72nd Ju 87D-3

  • Member since
    July 2004
  • From: Sonora Desert
Posted by stikpusher on Thursday, April 20, 2017 11:27 AM

Bish

Now thats different. So from what carlos is saying, is this based on real designs worn in Korea.


Yes, the examples that I gave are based off of Korean War era information and photos.


F is for FIRE, That burns down the whole town!

U is for URANIUM... BOMBS!

N is for NO SURVIVORS...

       - Plankton

LSM


  • Member since
    November 2009
  • From: SW Virginia
Posted by Gamera on Thursday, April 20, 2017 11:53 AM

Looking very cool Karl!!! 

Bish, do a websearch on 'tiger face sherman (or m26 etc) korean war' and you'll get piles of photos. 

"I dream in fire but work in clay." -Arthur Machen


  • Member since
    December 2002
  • From: Bury St Edmunds, Suffolk, England
Posted by Bish on Thursday, April 20, 2017 2:32 PM

Gamera

Looking very cool Karl!!! 

Bish, do a websearch on 'tiger face sherman (or m26 etc) korean war' and you'll get piles of photos. 


Blimey, your not kidding. Cheers.

I am a Norfolk man and i glory in being so


On the bench: Airfix 1/72nd Harrier GR.3/Fujimi 1/72nd Ju 87D-3

  • Member since
    January 2007
Posted by the doog on Thursday, April 20, 2017 7:50 PM

Rob Gronovius


the doog


Rob, looks like you company was "Medium", or I would use that just to say thanks. Smile


By the 1980s, the US Army went to what was called the J-series MTOE as part of the Division '86 reorganization. Tank platoons went from the five tank formation (ex. A21 thru A25) to a four tank formation. With the exception of the 82nd Airborne's 3/73rd Sheridan battalion, there were no longer differentiations between between light, heavy and medium tank battalions.

The J-series MTOE also added a fourth tank company, D Co. with the three tanks swiped from each tank company (9 tanks) and an additional 5 tanks added to each battalion. Tank battalions went from 53 to 58 tanks.

The HQs and CSC (combat support companies) were combined into the HHC (Headquarters and Headquarters Company) we have today.

The US Army Combat Arms Regimental System had not taken place by the time of the Korean War. Separate numbered tank battalions were still being used.


Wow, again, great info. I swear, I love doing these blog builds because of all the cool, arcane knowledge that you guys post; the guys who really know these things that would take you ages to find through google. Thanks for posting it, Rob. Great info for anyone who's interested in the whole numbering process and particulars of the various decades. BeerBeerBeer

I DID change my number from 8 to 3... :) :)

  • Member since
    January 2007
Posted by the doog on Thursday, April 20, 2017 7:56 PM

Hey, thanks to everyone who's following along and looking in. I have a small update; the tiger stripes are finished. I also changed my tank number to three after incorrectly decaling in an "8". Whistling


  • Member since
    July 2004
  • From: Sonora Desert
Posted by stikpusher on Thursday, April 20, 2017 9:18 PM

Now that looks pretty awesome! It may not be tactical for camouflage... but those cat faced tanks sure look just plain mean! 


F is for FIRE, That burns down the whole town!

U is for URANIUM... BOMBS!

N is for NO SURVIVORS...

       - Plankton

LSM


  • Member since
    January 2015
Posted by PFJN on Thursday, April 20, 2017 10:03 PM

stikpusher

Now that looks pretty awesome! It may not be tactical for camouflage... but those cat faced tanks sure look just plain mean! 


Hi,

I guess if maybe you're operating in an area known to have large tigers, it could maybe be considered tactical camoflage Stick out tongue

Pat

1st Group BuildSP

  • Member since
    September 2012
Posted by GMorrison on Friday, April 21, 2017 12:38 AM

My that's a big one.

needs little " mouse" kill marks.

 Modeling is an excuse to buy books.


  • Member since
    January 2015
  • From: Tumwater, WA.
Posted by M. Brindos on Friday, April 21, 2017 12:38 AM

That needs to be in a movie, bursting out from some jungle! That's wicked!!

- Mike Brindos "Lost Boy"

  • Member since
    November 2009
  • From: SW Virginia
Posted by Gamera on Friday, April 21, 2017 7:45 AM

Fantastic! 

"I dream in fire but work in clay." -Arthur Machen


  • Member since
    December 2002
  • From: Fort Knox
Posted by Rob Gronovius on Friday, April 21, 2017 9:39 AM

stikpusher

Now that looks pretty awesome! It may not be tactical for camouflage... but those cat faced tanks sure look just plain mean! 


That was the reasoning; it was thought that the Chinese feared the tiger so painting tiger faces on the tanks would be a bad omen to them.

  • Member since
    January 2015
Posted by Moff on Saturday, April 22, 2017 8:02 AM

Wow, that's turning out amazing! 

"Gaiety is the most outstanding feature of the Soviet Union." - Josef Stalin 

  • Member since
    December 2002
  • From: Fort Knox
Posted by Rob Gronovius on Saturday, April 22, 2017 10:01 AM

the doog
 

Wow, again, great info. I swear, I love doing these blog builds because of all the cool, arcane knowledge that you guys post; the guys who really know these things that would take you ages to find through google. Thanks for posting it, Rob. Great info for anyone who's interested in the whole numbering process and particulars of the various decades. BeerBeerBeer


Yeah, I'm full of useless information. Back in the day, armor units were tought of as support and were not regimentalized. Cavalry units that eventually evolved into armor battalions did carry on some pre-WW2 lineage as did some previous infantry regiments that became armor regiments (68th Armor Regiment jumps to mind as one of the infantry regiments that became an armor regiment). https://en.wikipedia.org/wiki/68th_Armor_Regiment

My first battalion, 5/77 Armor had been 3/68 Armor until a couple of years before I got there. The Army does stupid stuff like that without thinking. Men who had been a part of one named unit for years get the unit name changed.

  • Member since
    July 2004
  • From: Sonora Desert
Posted by stikpusher on Saturday, April 22, 2017 4:21 PM

Rob Gronovius
 

Yeah, I'm full of useless information. Back in the day, armor units were tought of as support and were not regimentalized. Cavalry units that eventually evolved into armor battalions did carry on some pre-WW2 lineage as did some previous infantry regiments that became armor regiments (68th Armor Regiment jumps to mind as one of the infantry regiments that became an armor regiment). https://en.wikipedia.org/wiki/68th_Armor_Regiment

My first battalion, 5/77 Armor had been 3/68 Armor until a couple of years before I got there. The Army does stupid stuff like that without thinking. Men who had been a part of one named unit for years get the unit name changed.


The United States Army- 242 years of tradition unhampered by progress Wink. I arrived at my first line unit out of OSUT and the division replacement detachment and was assigned to the TOW Platoon of a CSC, Combat Support Company, of a Mech Infantry Battalion, 3/10. That morning the battalion was re organized under the Divison 86 TO&E and CSC was no more. The TOW platoon was enlarged to a full company, E Company, my new home. CSC was disbanded with Scouts and Mortars going to HHC, and the Redeye and GSR sections returning to ADA and MI Battalions respectively. Later that year, under COHORT plans, we changed colors from 3/10 Infantry, which had a long history with the Division, into 4/6 Infantry, which had no prior association with it. But was associated with our opposite COHORT unit, 1st Armored Division in Germany. 6 months in three different units, by name only. I had not gone anywhere but on paper.


F is for FIRE, That burns down the whole town!

U is for URANIUM... BOMBS!

N is for NO SURVIVORS...

       - Plankton

LSM


  • Member since
    September 2005
  • From: Groton, CT
Posted by warshipguy on Sunday, April 23, 2017 7:34 AM

Karl,

That is a beautiful job!  It looks Grrrrreeeeeaaaaattt!

Rob and Stik,

I remember throughout my Navy career as a Hospital Corpsman, the entire Medical Department went from being under the Bureau of Medicine and Surgery to Navy Medical Command to the Navy Department of Medicine and Surgery and finally back to the Bureau of Medicine and Surgery.  Individual medical facilities would change from Naval Hospitals to Health Care Facilities to Primary Care Clinics to Regional Branch Clinics, all while giving the same services as always.  I always figured that some Admiral or Captain in Washington needed another Navy Commendation Medal.

At least the Navy doesn't change the names of its ships!

Bill

  • Member since
    November 2009
  • From: SW Virginia
Posted by Gamera on Thursday, May 4, 2017 12:09 PM

Just wanted to point out that if anyone wants the kit it's on sale today (May 4th, 2017) at Dragon USA for $34.89 which is the cheapest I've seen it. 

Personally I think I'm going to pass, I still have way too much stuff before I even look at another AFV. 

http://www.dragonusaonline.com/item_detail.aspx?ItemCode=DRA3560

"I dream in fire but work in clay." -Arthur Machen


  • Member since
    July 2003
  • From: On my kitchen counter top somewhere in North Carolina.
Posted by disastermaster on Thursday, May 4, 2017 6:56 PM


Hey Karl,
 Been away from the keyboard a couple weeks or so
but yikes, look at what you've done now!
Another rabbit outta the hat!
http://www.netanimations.net/rabbithat.gif
                                    
 This is just a spectacular showing of your many talents.

                              http://i20.photobucket.com/albums/b232/gluetank/Animated/th_1-Animated-Disastermaster.gif?t=1296616998

Sherman-Jumbo-1945

"I was so much older then, I'm younger than that now"


  • Member since
    January 2007
Posted by the doog on Saturday, May 6, 2017 10:02 AM

Screwed up update, will have to report at some point. Bang HeadBang HeadBang HeadBang HeadBang HeadBang HeadBang HeadBang HeadBang HeadBang HeadBang HeadBang HeadBang HeadBang HeadBang HeadBang HeadBang HeadBang HeadBang HeadBang HeadBang HeadBang HeadBang HeadBang HeadBang HeadBang HeadBang HeadBang HeadBang HeadBang HeadBang HeadBang HeadBang HeadBang HeadBang HeadBang HeadBang HeadBang HeadBang HeadBang HeadBang HeadBang HeadBang HeadBang HeadBang HeadBang HeadBang HeadBang HeadBang HeadBang HeadBang HeadBang HeadBang HeadBang HeadBang HeadBang HeadBang HeadBang HeadBang HeadBang HeadBang HeadBang HeadBang Head

  • Member since
    November 2009
  • From: SW Virginia
Posted by Gamera on Saturday, May 6, 2017 12:30 PM

Funny, showed up fine on my phone this morning. I waited to fire up the laptop so I'd have a real keyboard to type on. I love the way you did the mud and dirt.

"I dream in fire but work in clay." -Arthur Machen


  • Member since
    January 2006
  • From: California
Posted by SprueOne on Saturday, May 6, 2017 7:42 PM

the doog

Screwed up update, will have to report at some point. Bang HeadBang HeadBang HeadBang HeadBang HeadBang HeadBang HeadBang HeadBang HeadBang HeadBang HeadBang HeadBang HeadBang HeadBang HeadBang HeadBang HeadBang HeadBang HeadBang HeadBang HeadBang HeadBang HeadBang HeadBang HeadBang HeadBang HeadBang HeadBang HeadBang HeadBang HeadBang HeadBang HeadBang HeadBang HeadBang HeadBang HeadBang HeadBang HeadBang HeadBang HeadBang HeadBang HeadBang HeadBang HeadBang HeadBang HeadBang HeadBang HeadBang HeadBang HeadBang HeadBang HeadBang HeadBang HeadBang HeadBang HeadBang HeadBang HeadBang HeadBang HeadBang HeadBang Head


What?

What happened?

Anyone with a good car don't need to be justified - Hazel Motes


Iron Rails 2015 by Wayne Cassell Weekend Madness sprueone

  • Member since
    January 2007
Posted by the doog on Saturday, May 6, 2017 11:06 PM

Hey thanks, Steve, and Cliff, and everyone---I somehow muffed the whole post I made last time; only half of it showed up. Jeez, I hope they don't have a limit to how long posts can be?!?

Anyhoo....let's try this again...

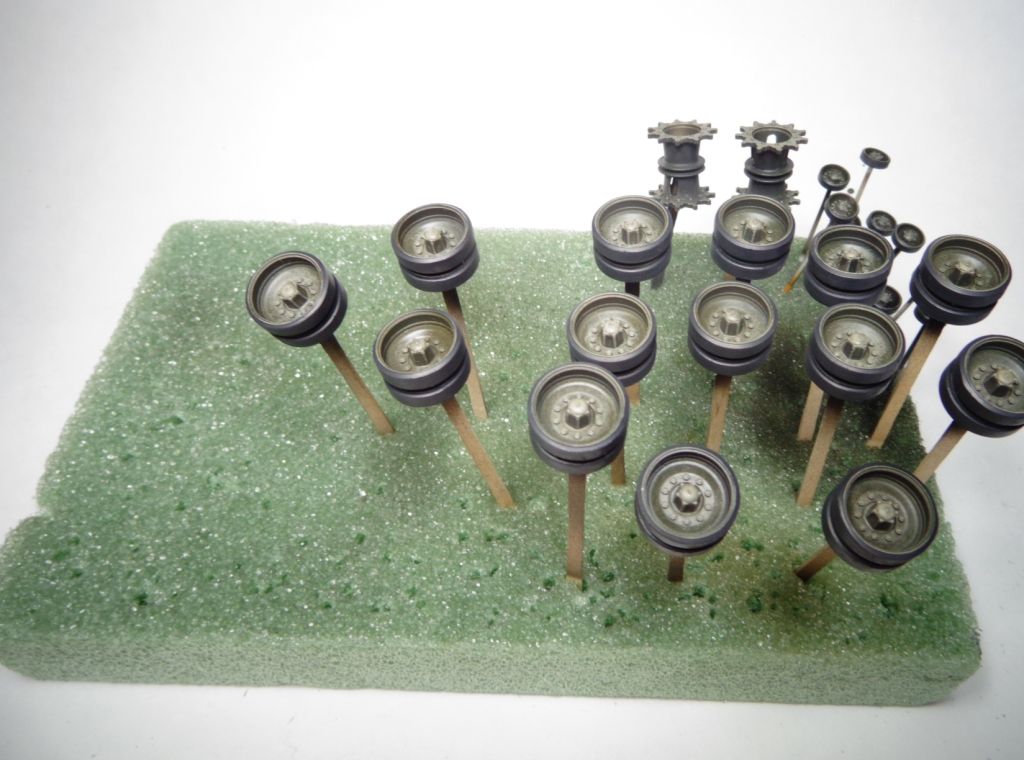
I drybrushed the wheels--it's still a great way to get the bolt detail to come out..tires were painted with Panzer Gray.

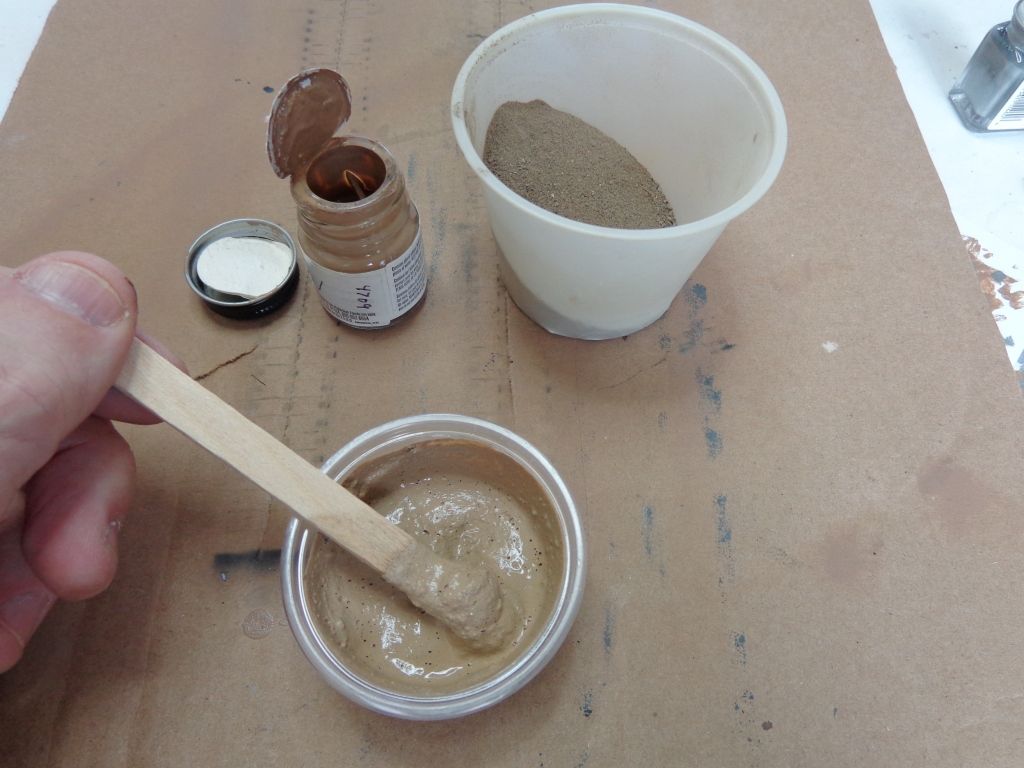
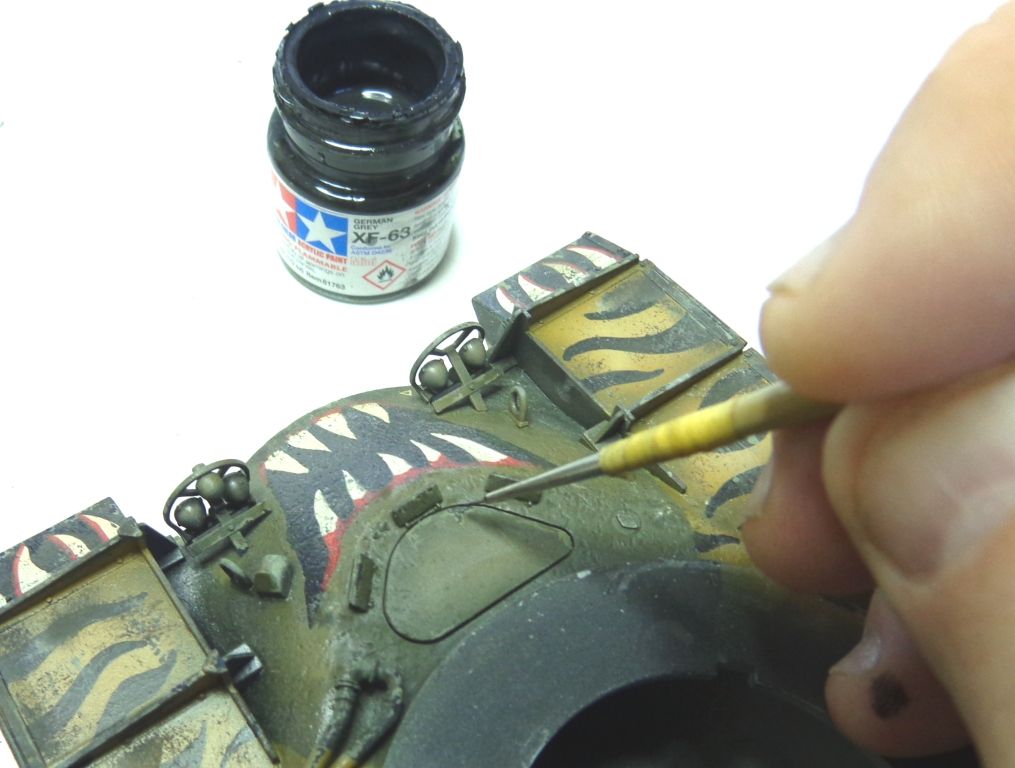
This is the melange of colors that I used; honestly, a lot of times I just reach for whatever's close and mix up what I need.

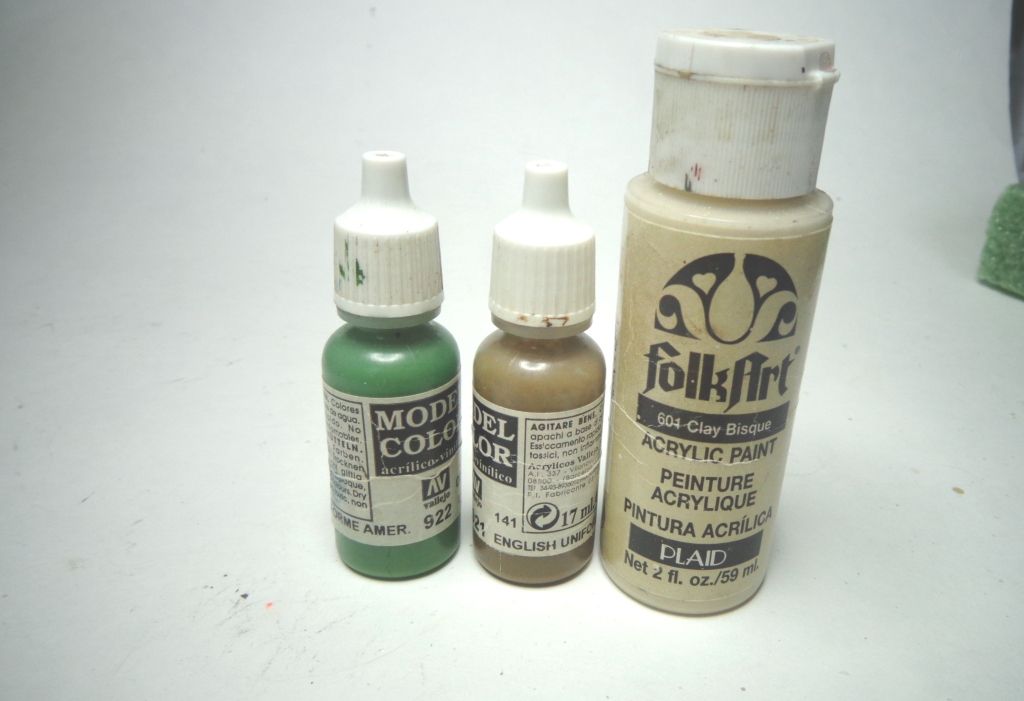
I also used this combination to paint the mantlet cover. I then used a bit of oil paints--Olive Green + Raw Umber--to wash the creases to impart some depth to it.

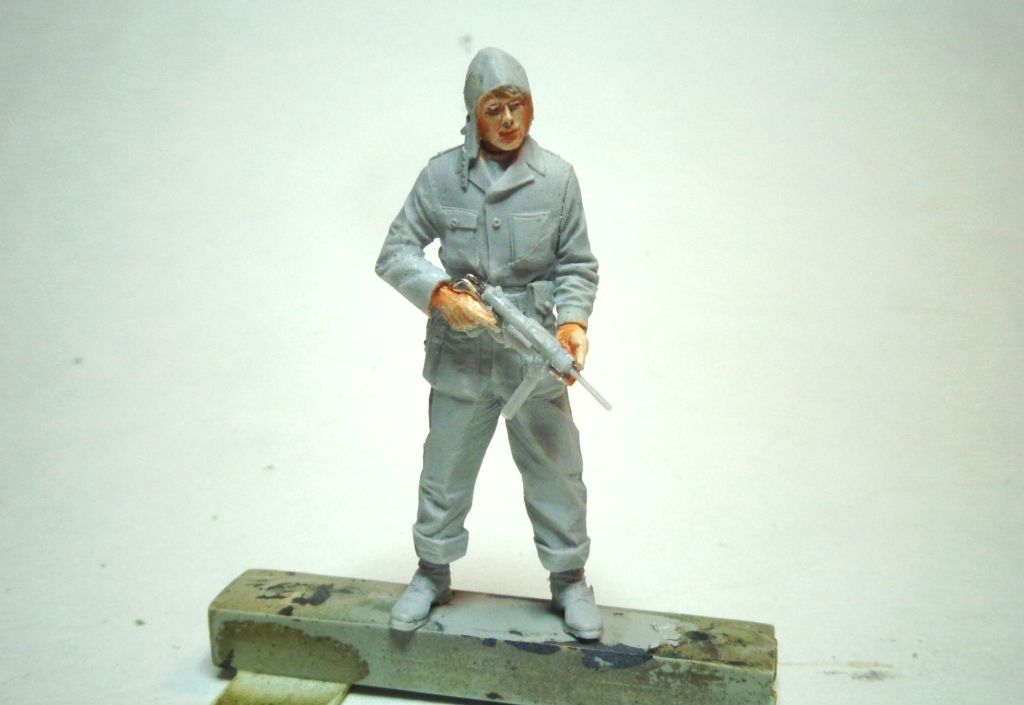
I painted up the tools with craft store light tan and a grayish metallic mix. Streaking them with Raw Umber gives them nice grain.

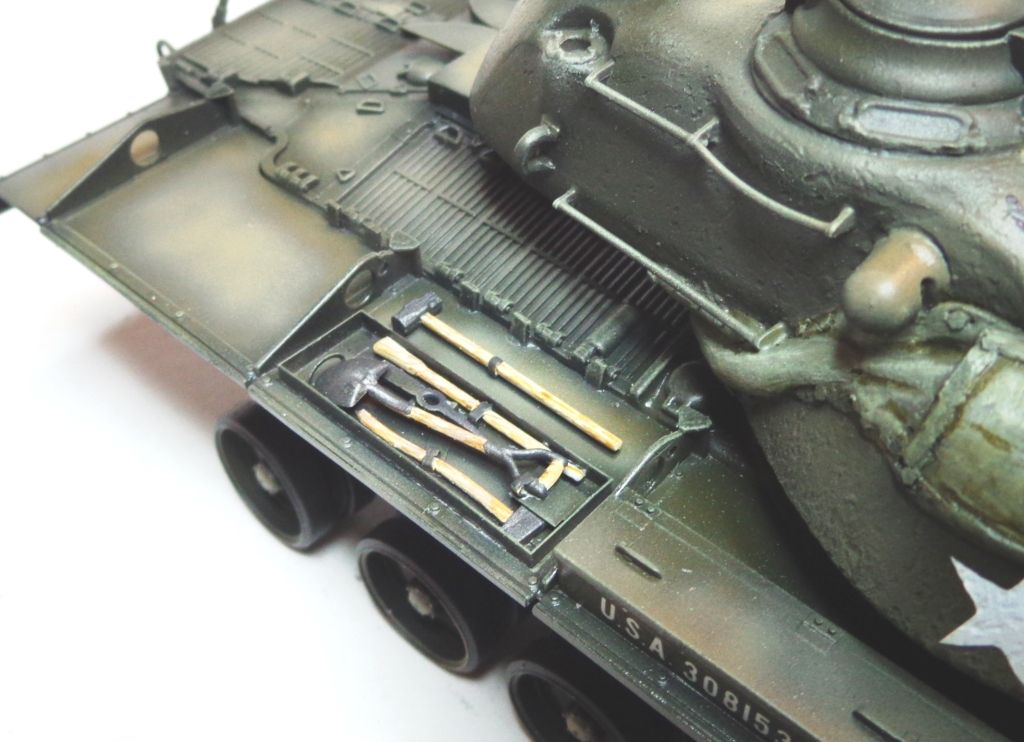
By the way, I also put a "grease gun" into my crewman's hands. Thanks to everyone who set me straight on this proper weapon for the era.

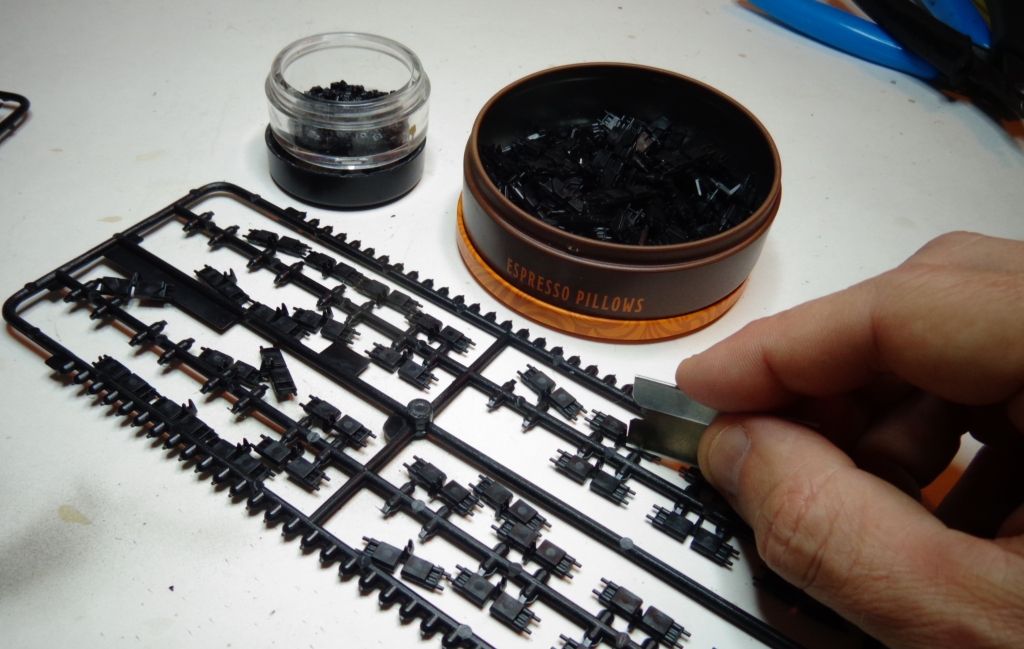
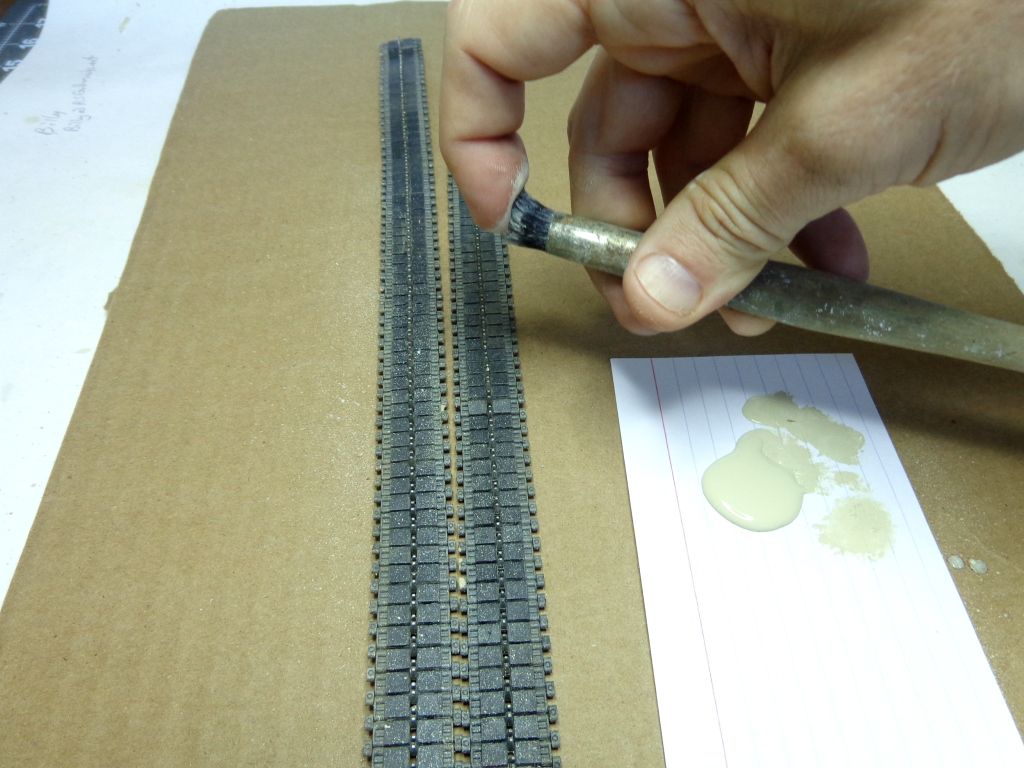
And then it was on to the *shudder* tracks... These AFV Club "workable" tracks have to be cut from the sprue, but they are such a soft plastic that cutting them with a flush cutter leaves a nasty nub on each one--well, TWO, actually.. it sucks. So I tried cutting them with a single-edge razor blade, which seemed to actually work well.

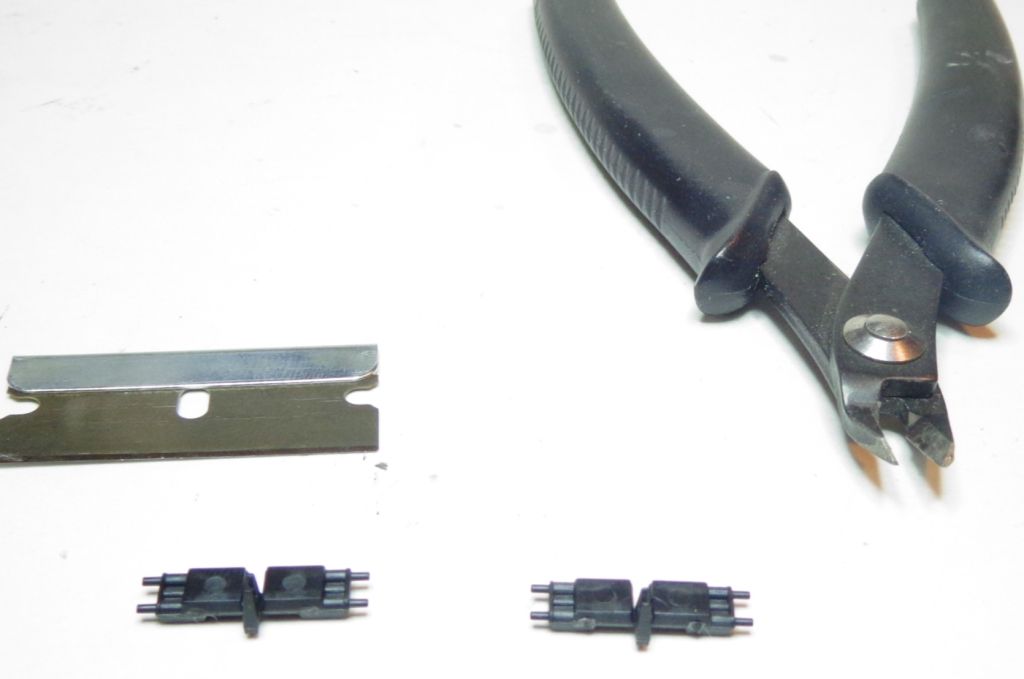
It takes a while to assemble them alll with those tedious connectors, but I didn't do it on the sprue the way they recommend because these tracks are so notoriously fragile (last time I used them I almost had to completely scrap them becasue they broke into so many pieces, but that maye have been because of the wash solvent, which seems to really attack the track pins). I removes them all first, every piece, and then just assembled them by hand so I didn't have to cut them off as assembled pieces and stress the track pins and their connectors.

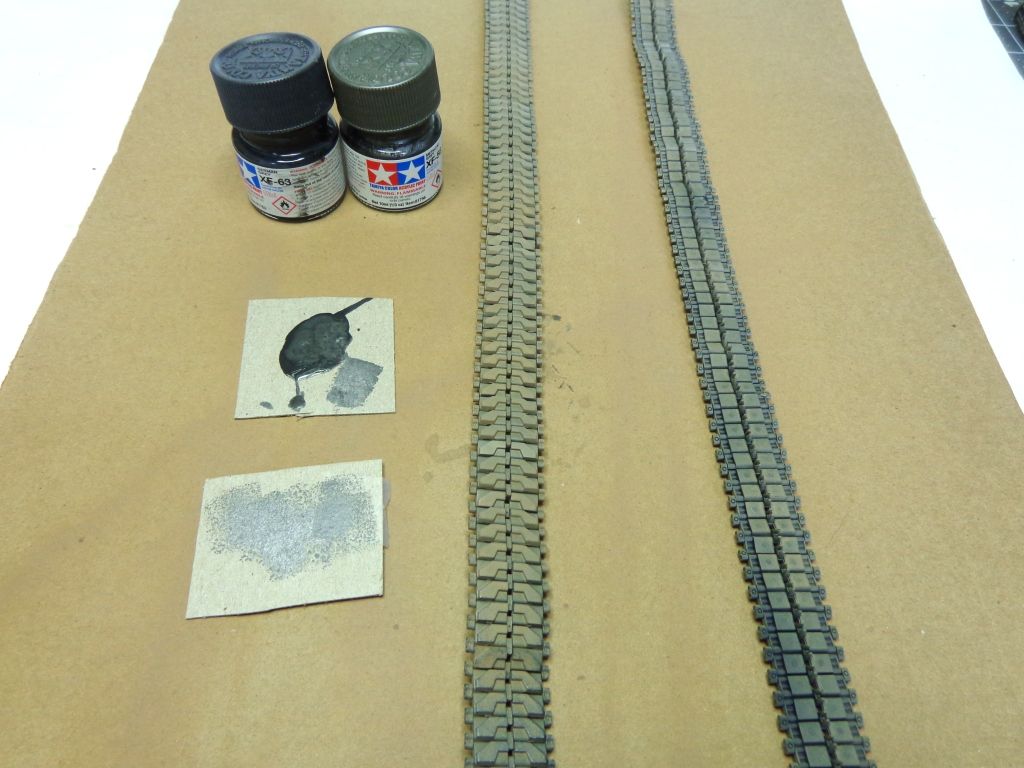
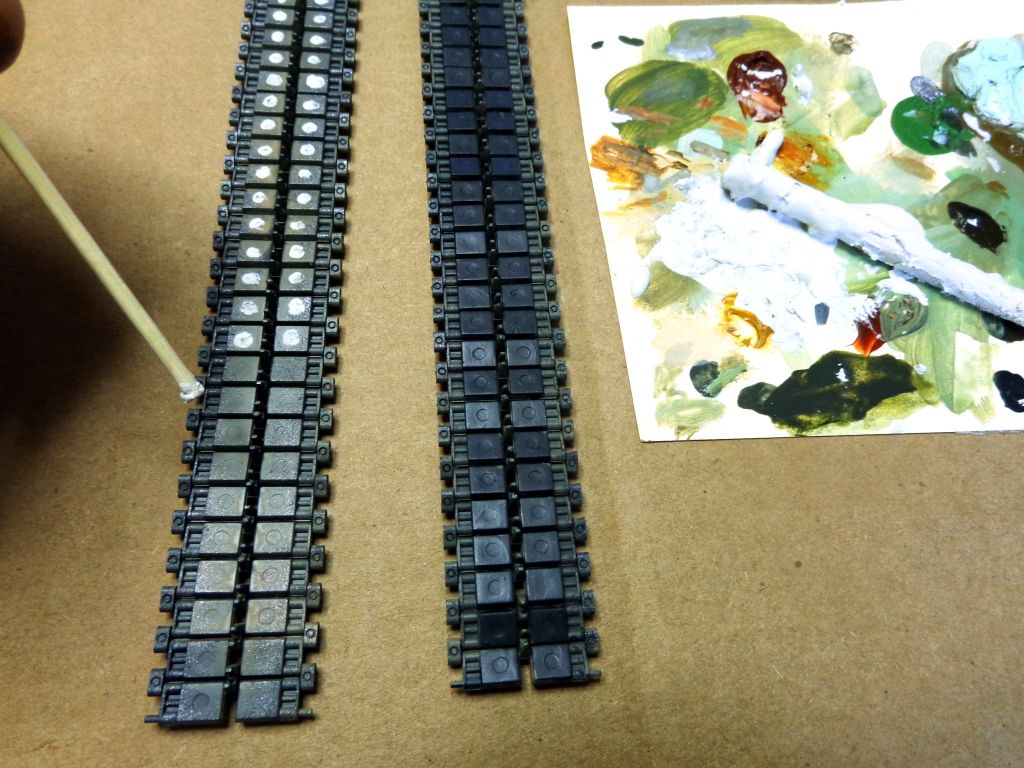
When they were done, I spray painted them Testor's Dark Tan and then drybrushed them with a blackish Metallic Grey before painting the track blocks with Panzer Grey.

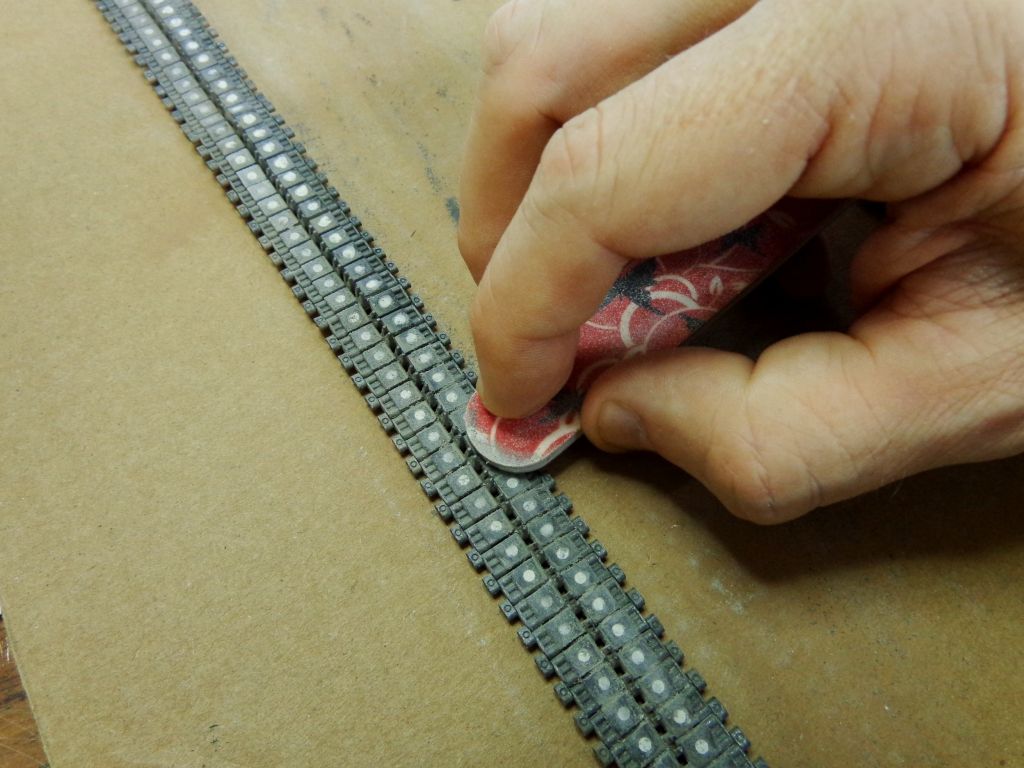
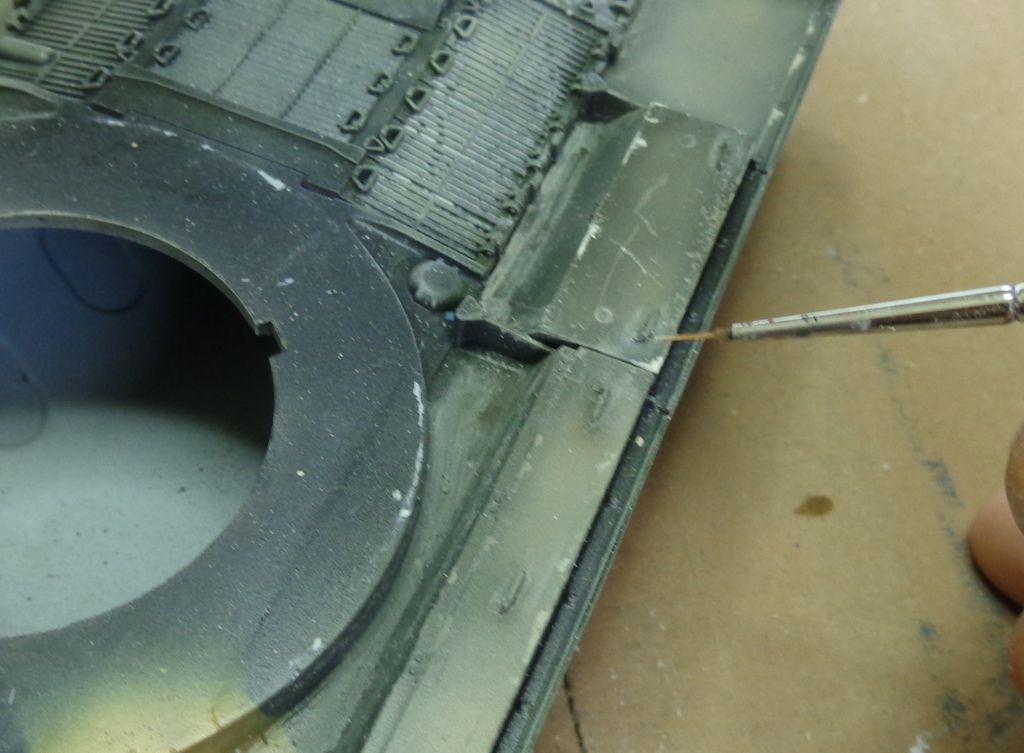
After painting the blocks, I realized that there was no way that I could reasonably leave the knockout marks so visible, so it was back to the putty, to apply small dots with a toothpick and then to carefully sand them out....another delay in the tracks..

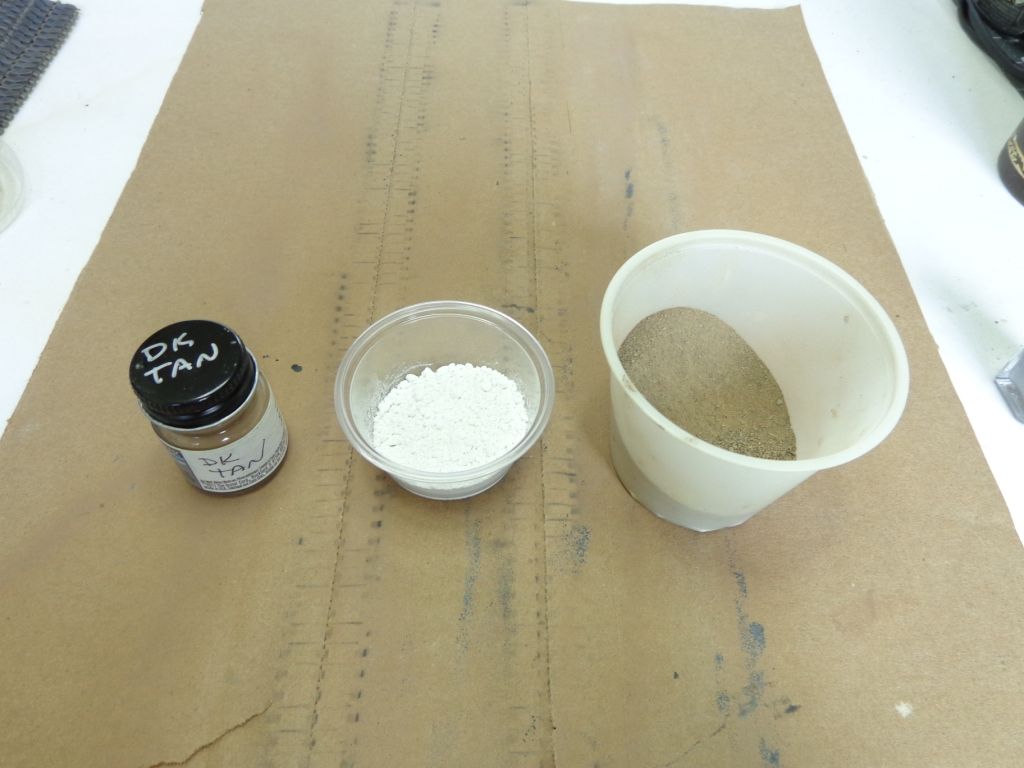
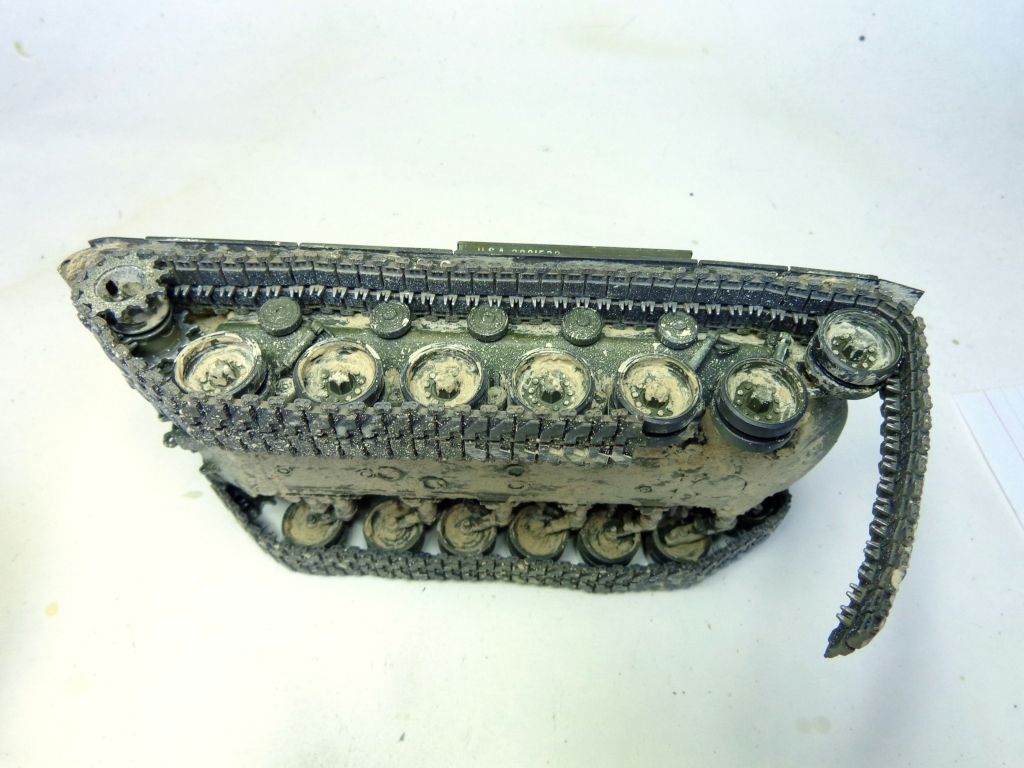
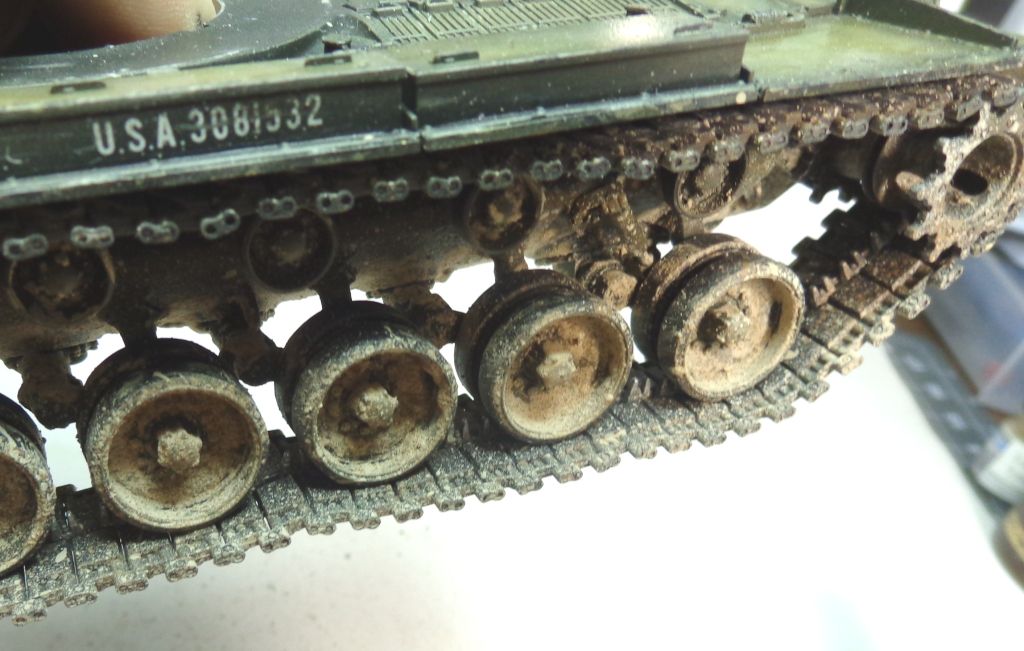
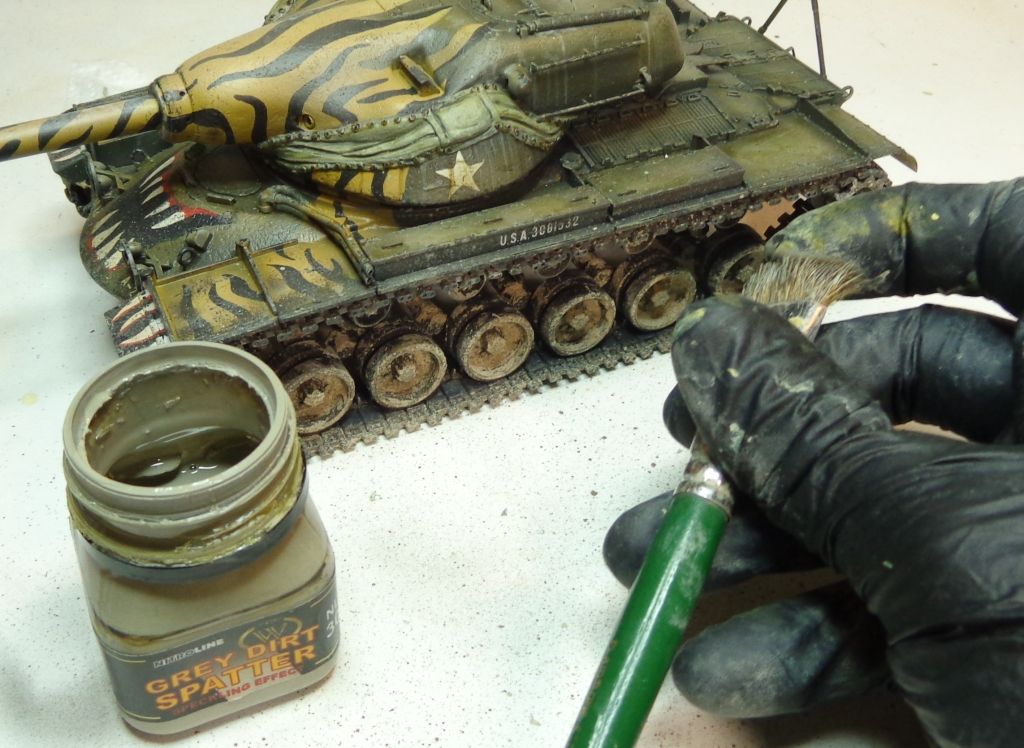
Next, time to add some gunk and dirt. I mixed up some mud with some paint, plaster, and real sifted dirt. I then used a paint brush to just slop it on the wheels and undercarriage.

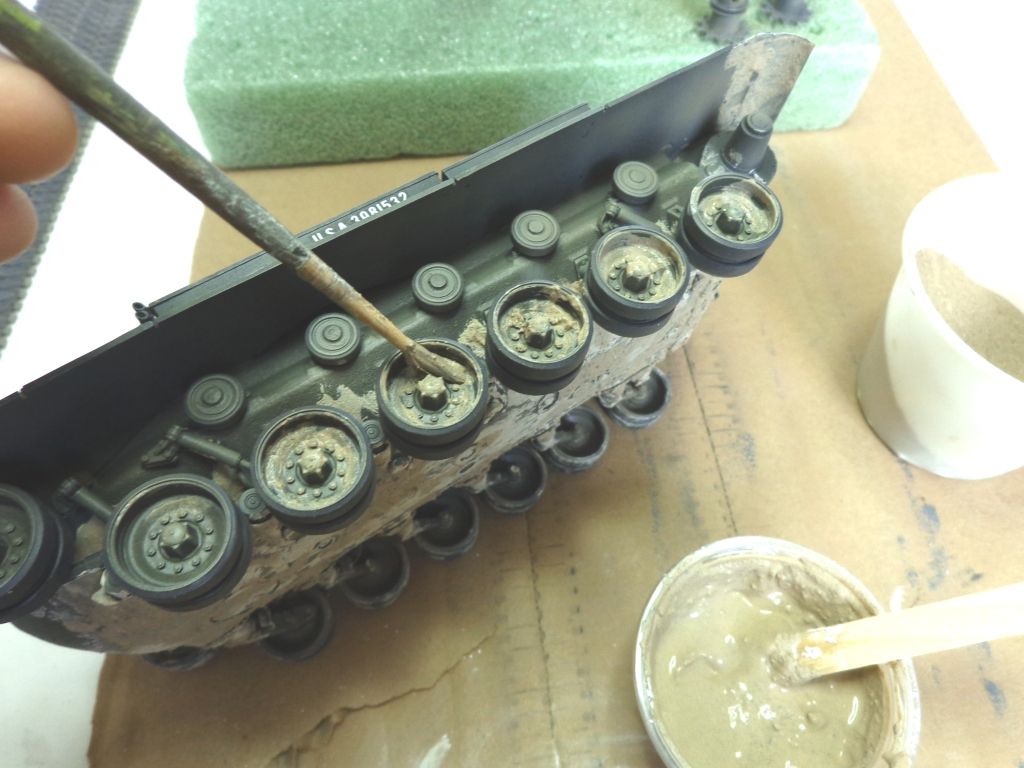
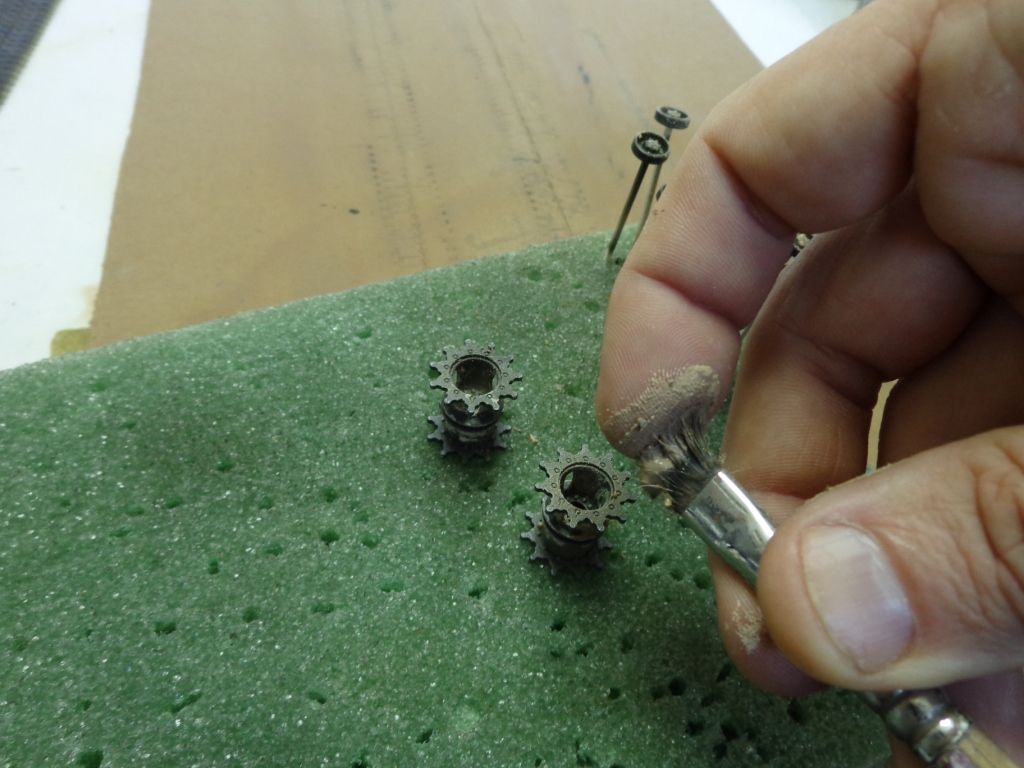
I also used the same mixture to speckle the wheels and sporckets. Use a stiff-bristle brush to do this, and practice before you try it. You have to learn the dispersion pattern of the brush you are using, or you risk it going everywhere.

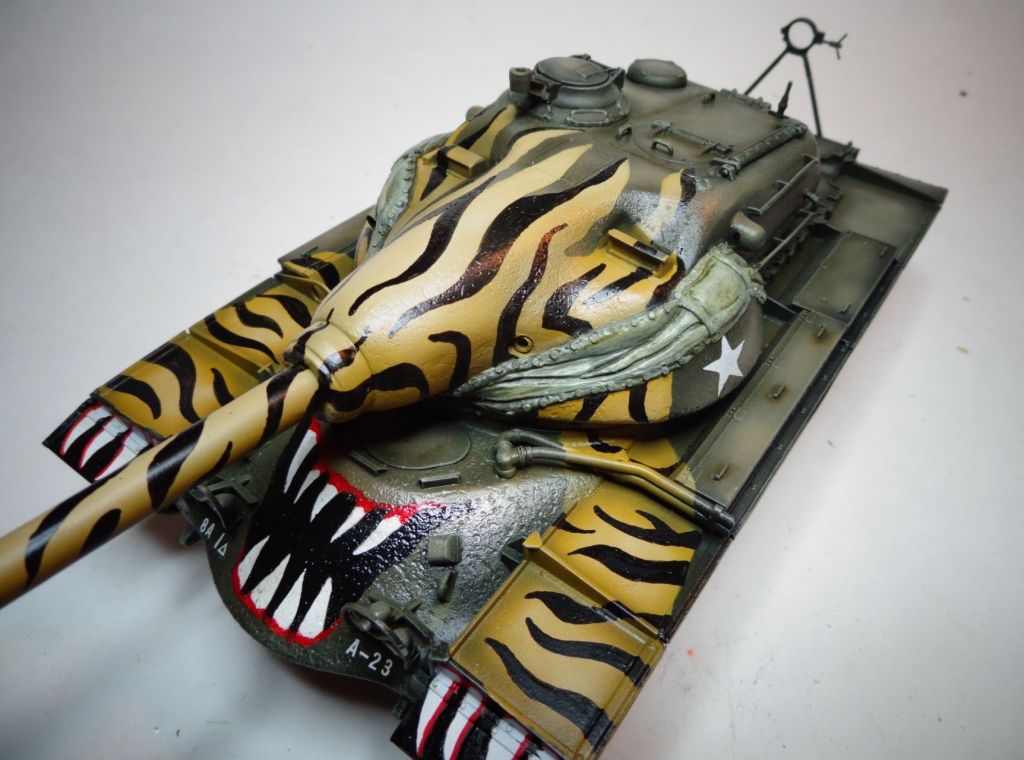
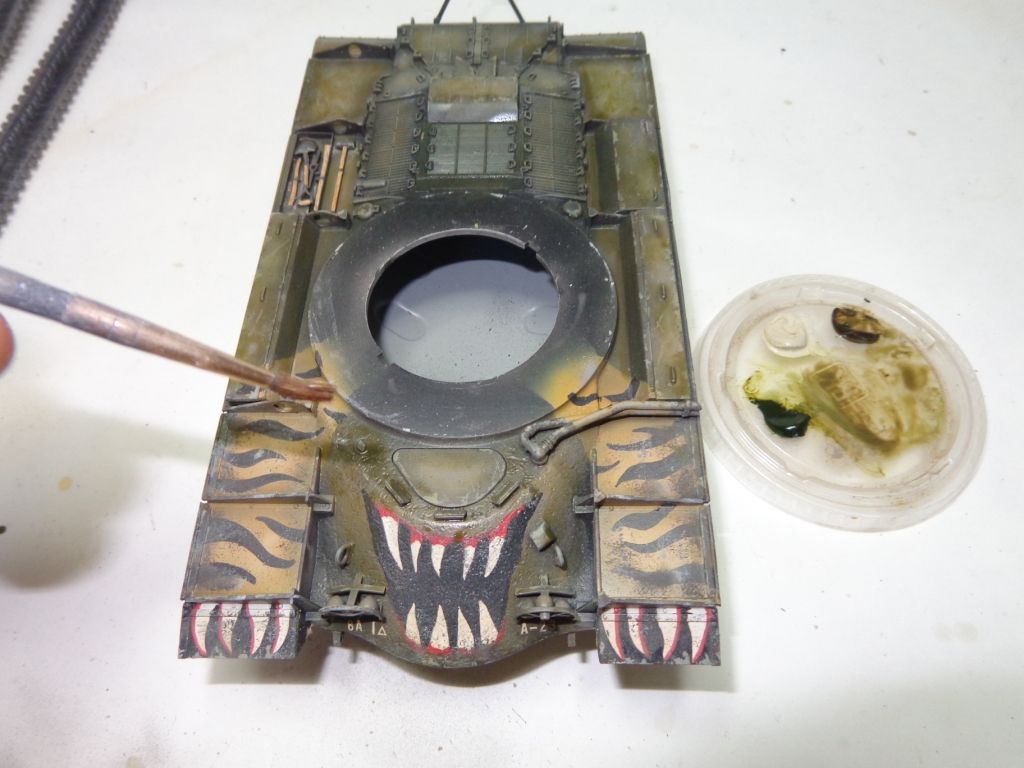
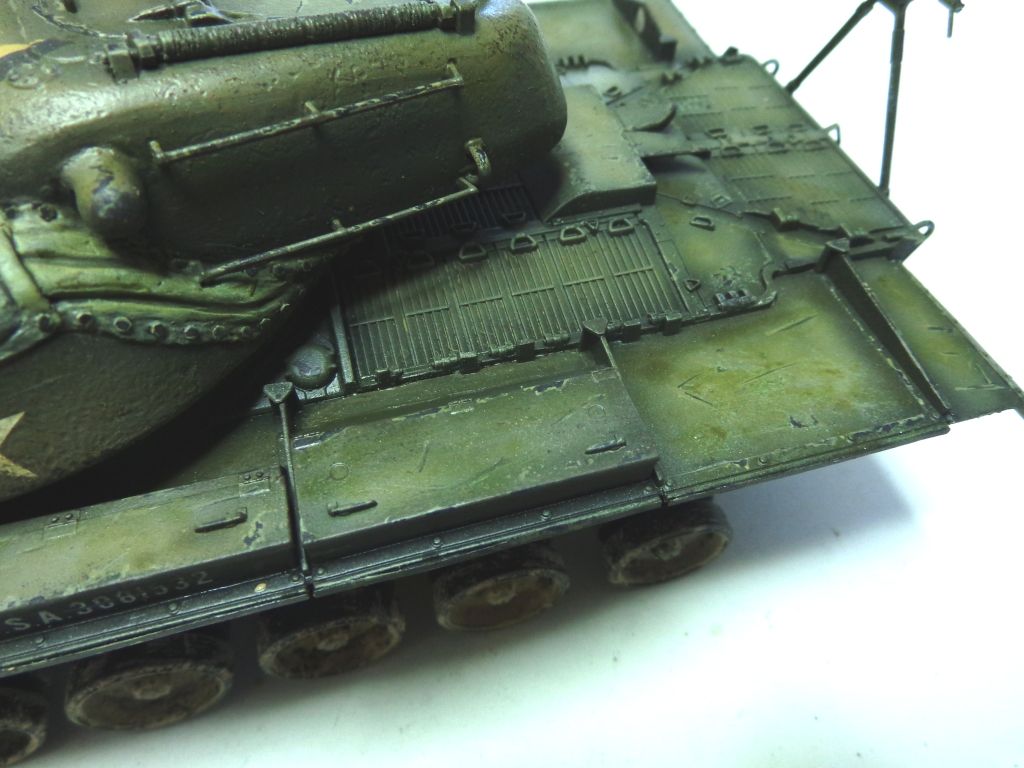
While this was solidifying, I started putting down some light chipping and scratching. I first used a sponge to add light green chips to all the OD parts of the tank. Then I used Metallic Gray to put chips on the edges of the fenders and hatches. FInally, I used some tan, and then also some brown "earth" tone on the yellow parts of the fenders to show wear and degradation on those parts.

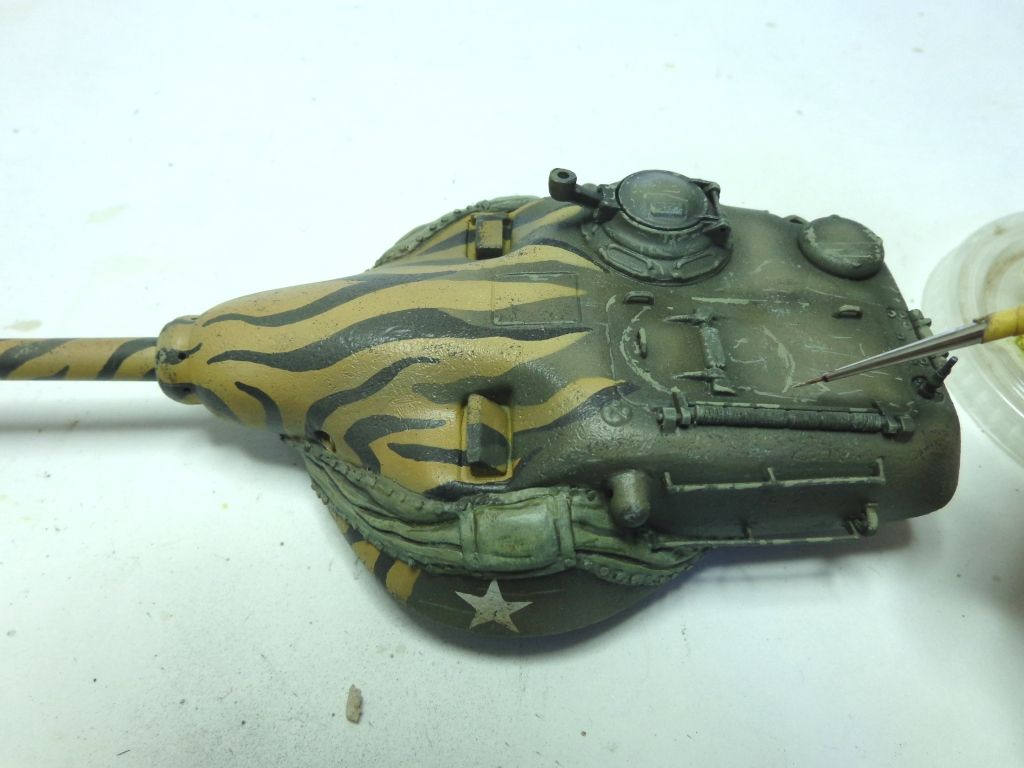
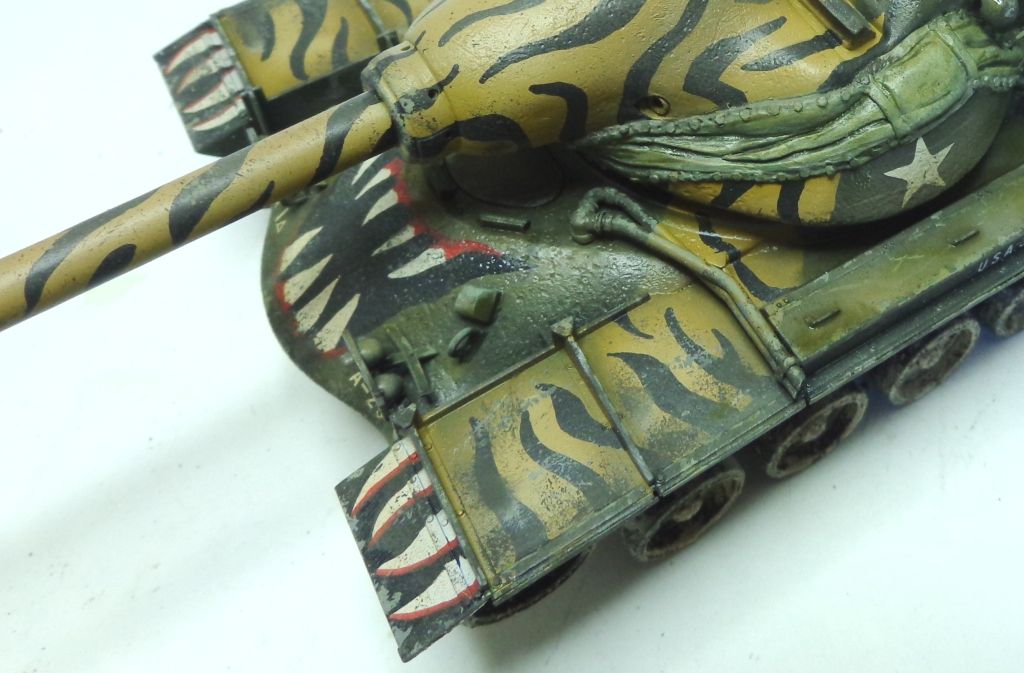
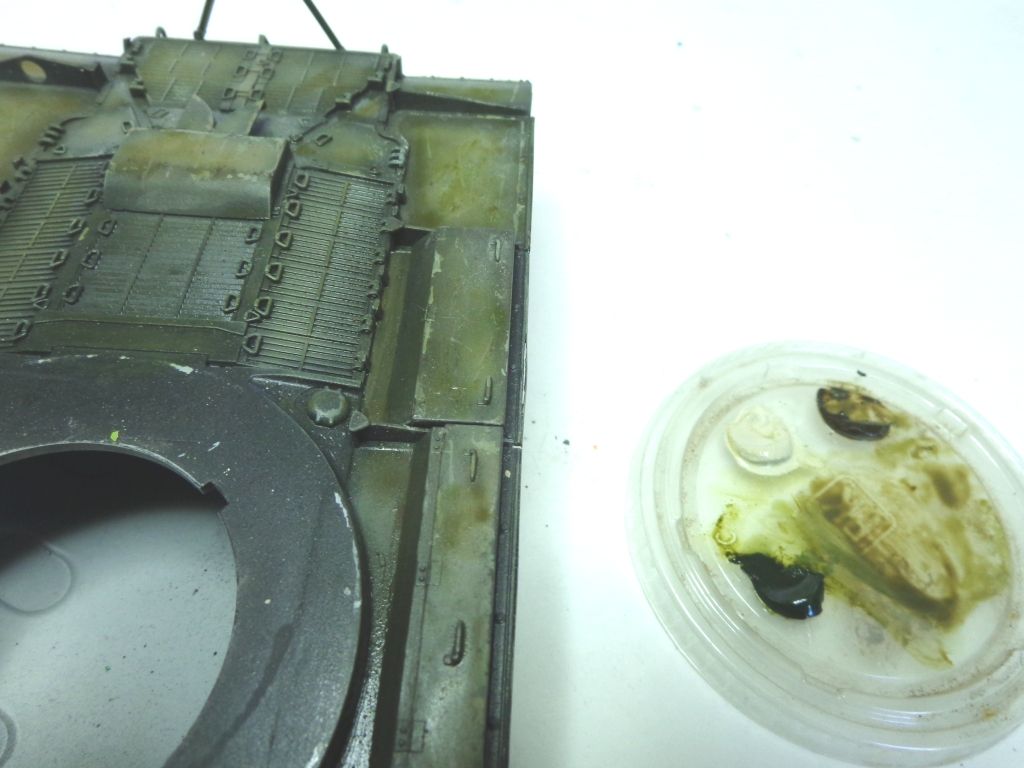
I then used a light wash of Olive Green dulled with Raw Umber to tone down the contrast a bit. You can see the darker wear on the fender area..

The oil wash also gave the base coat a slightly warmer tone.

I then painted in some metallic grey chips inside the light green ones to give a 3-D impression.

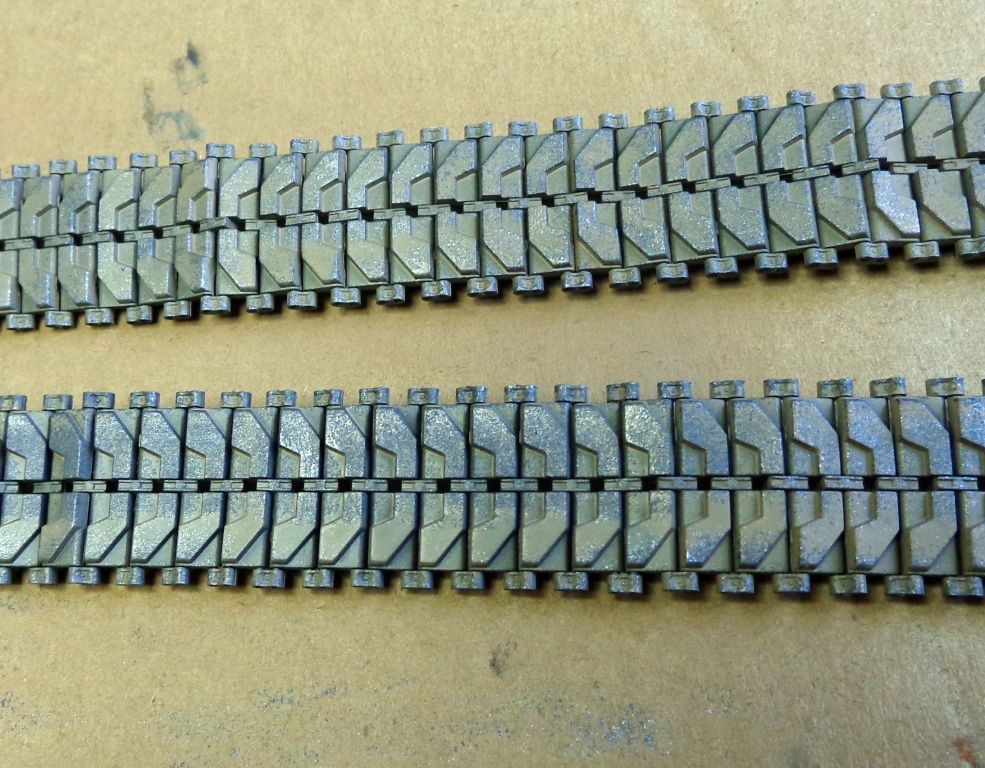
With the tracks now dry, I spattered some craft store light sand onto the track faces, both sides...

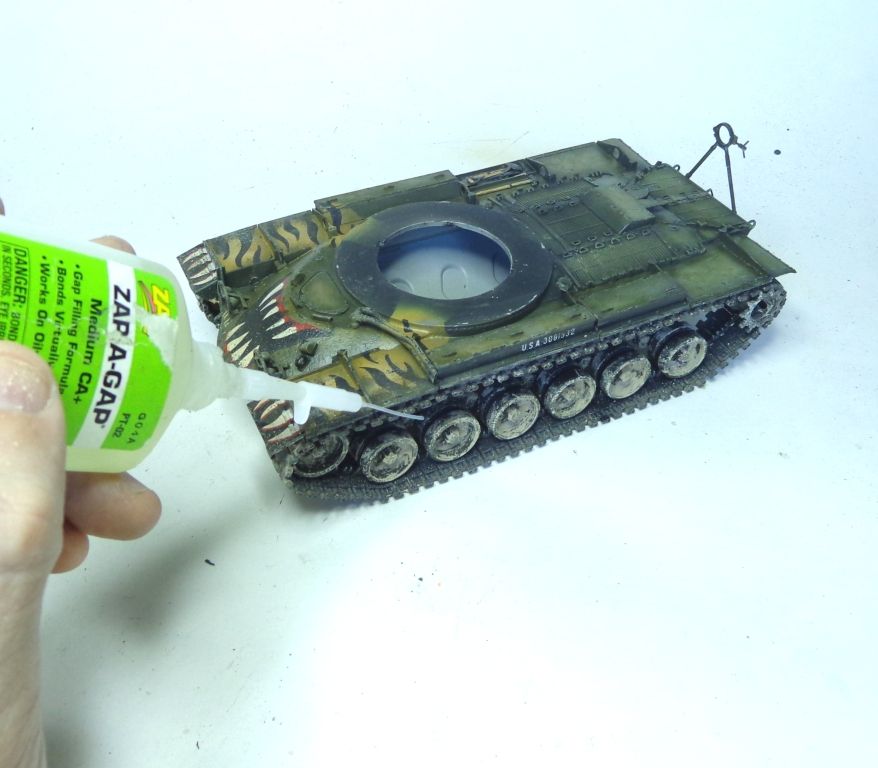
And now the scary part---I was waiting for the tracks to just disintegrate when I tried to put them on, but since I didn't use any washes or solvent-based paint on these, it seems to have really made a difference. I threaded the track through the glued-on wheels--about the only advantage to "workable" tracks that I can think of unless you aticulate the suspension--and placed the sprocket into the ends, and then carefully joined the ends with some connectors. I then used some superglue to strengthen these joints to add strength and reliability to the tracks.

I spattered the rear, and entire hull below the fenders.

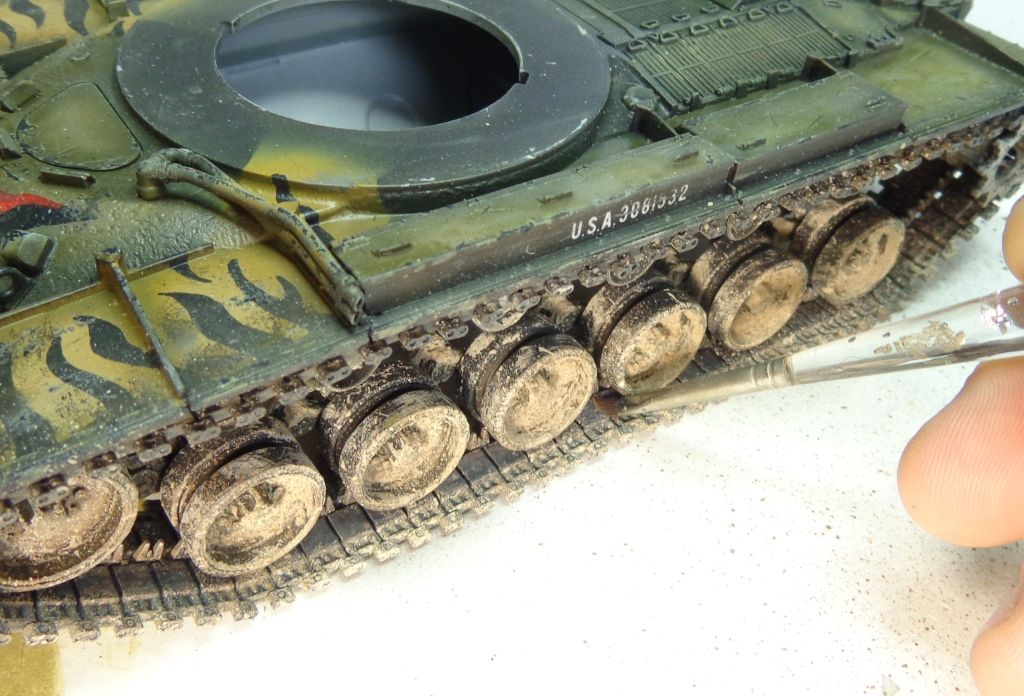
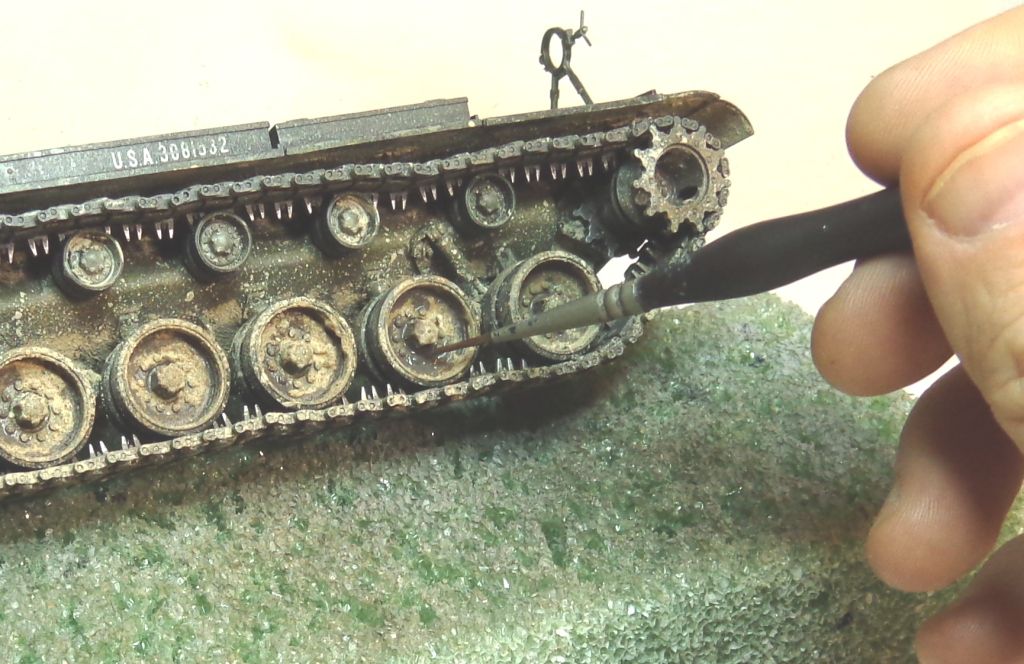
One thing I DIDN'T like was the spattering being on the wheel travel inside the tracks.

I wondered if I could remove this using some kind of solvent? I wet a brush with lacquer thinner, dabbed most of it off on a tissue, and ran it over the inside of the tracks. It worked like a charm.

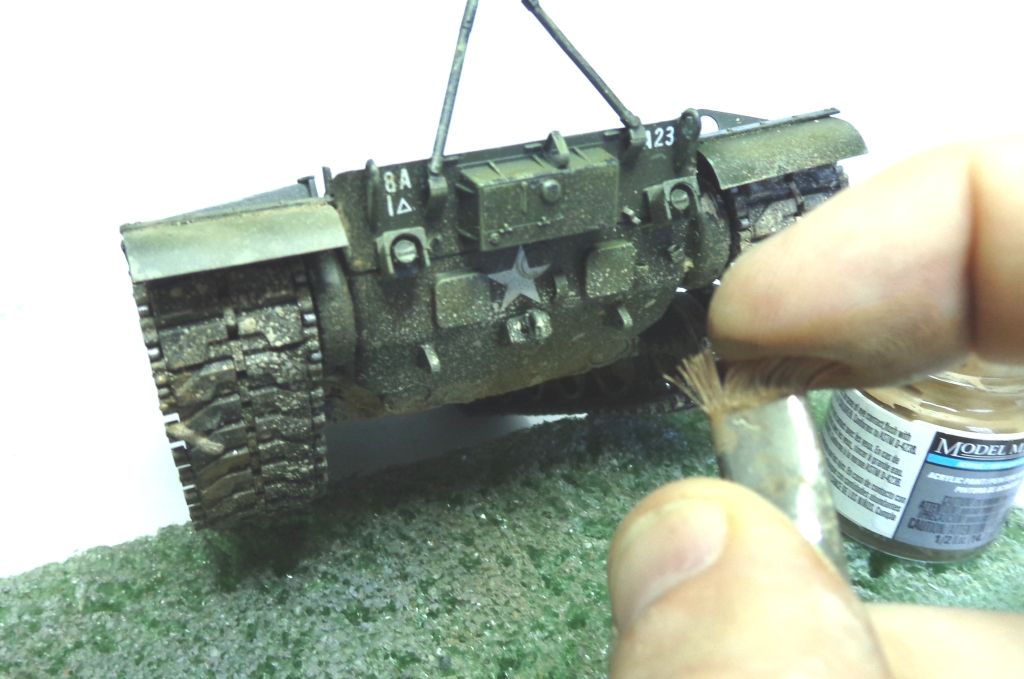
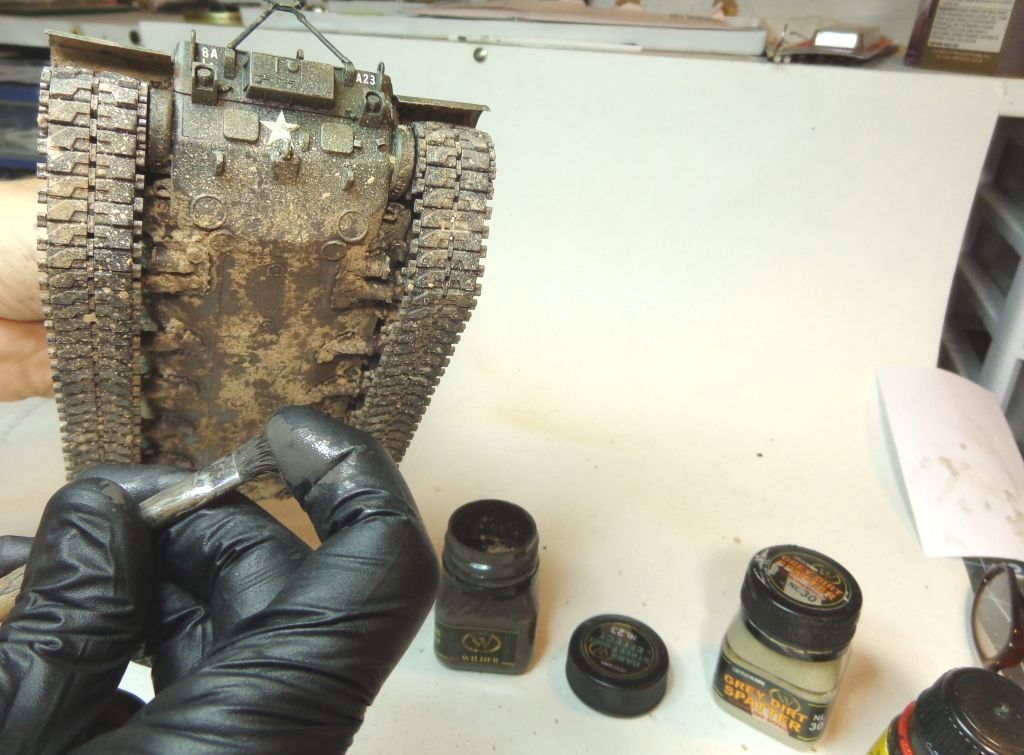
Next, I used some "Gray Dirt Spatter" from Adam Wilder's line to do rain marks and streaks. Thes dry a semi-gloss, so are great for simulating this kind of effect.

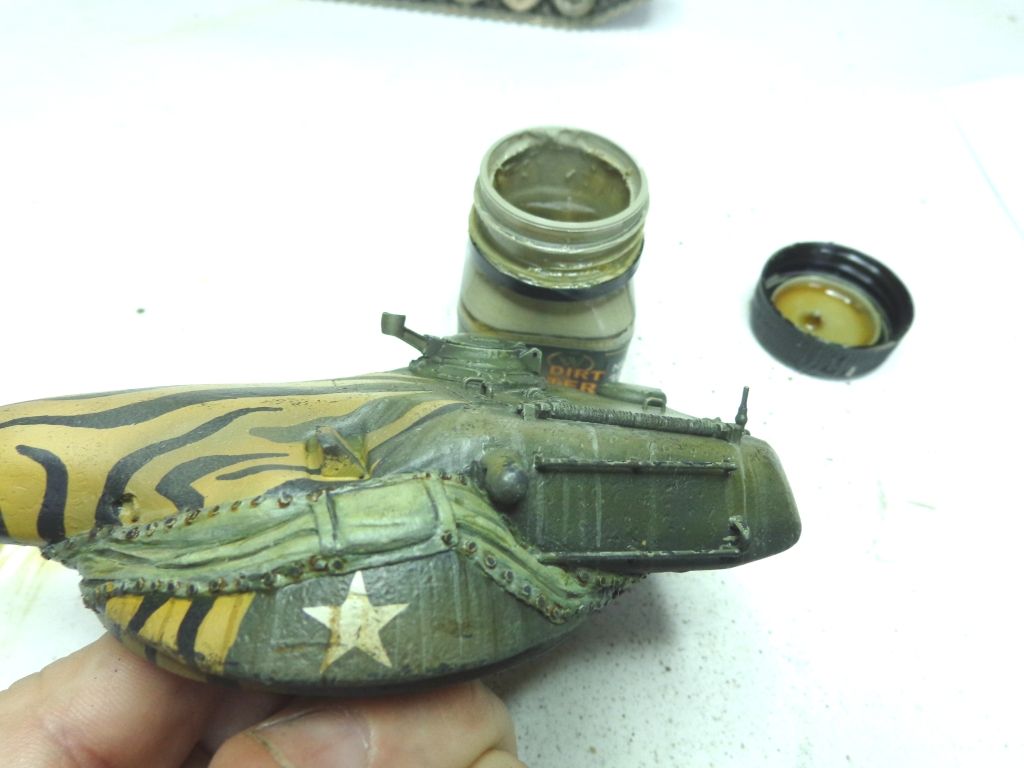
I also did light spattering on the fender tops and sides to tie the effect in to the hull. Wear gloves when you spatter with enamel-based products.

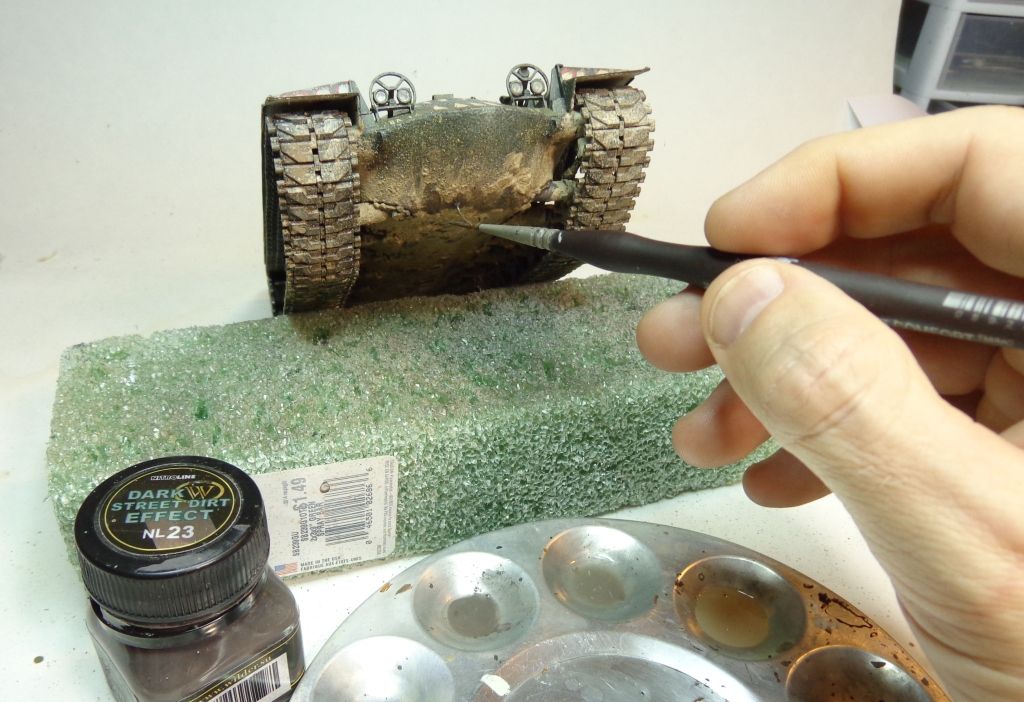
In order to add some depth to the plaster "mud" mix, I then used some WILDER "Dark Street Dirt Effect" and painted this on to the hull and inner wheels. I also spattered it onto the bottom hull.

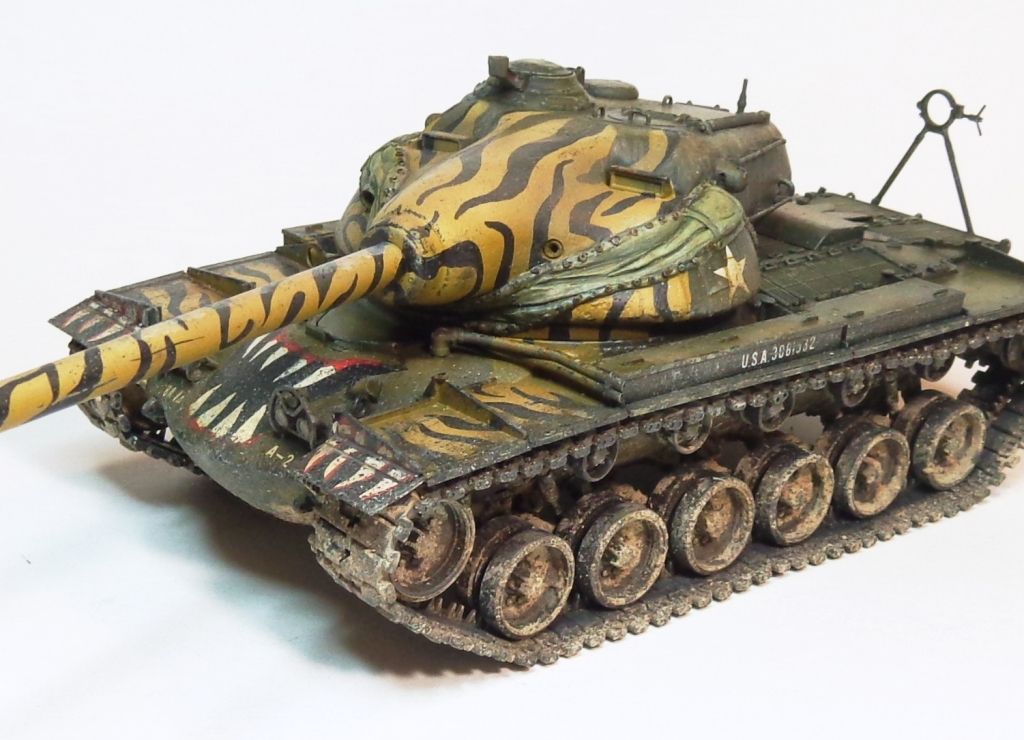
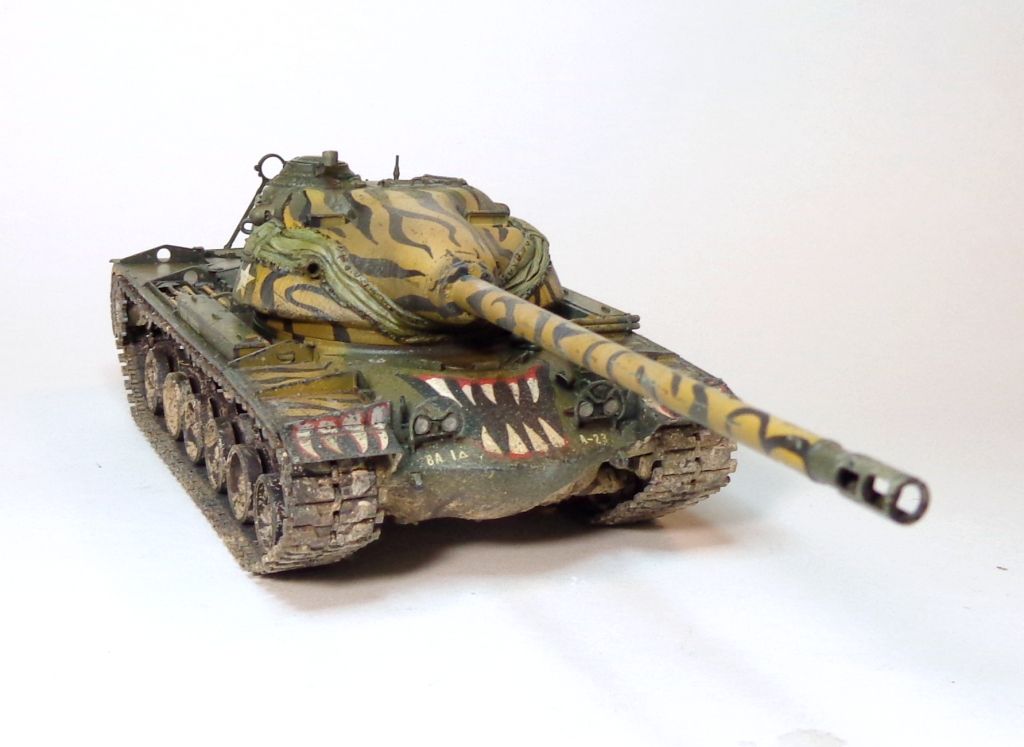
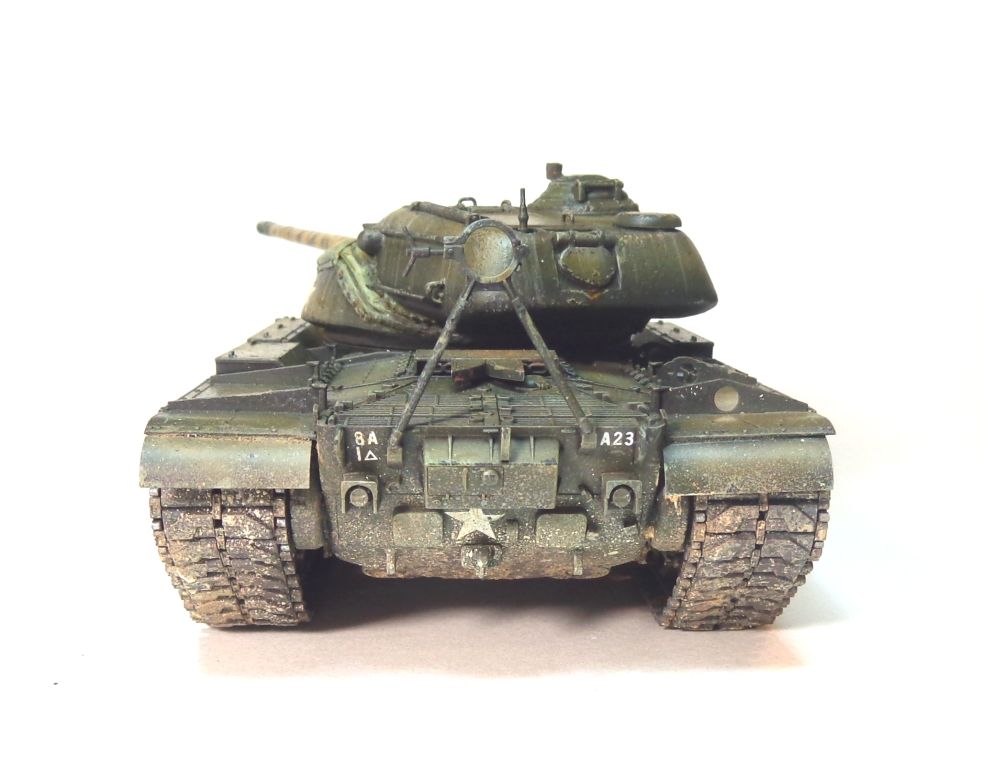
Here's where I am so far----vry close to being done!

Well, that's it for now, guys! Thanks for looking in. Be watching for the completed build some time next week! :) As always, comments and questions are always welcomed! Beer


  • Member since
    July 2004
  • From: Sonora Desert
Posted by stikpusher on Sunday, May 7, 2017 12:11 AM

Getting nice and muddy... as a tank should be... Yes


F is for FIRE, That burns down the whole town!

U is for URANIUM... BOMBS!

N is for NO SURVIVORS...

       - Plankton

LSM


  • Member since
    September 2005
  • From: Groton, CT
Posted by warshipguy on Sunday, May 7, 2017 6:57 AM

Karl,

It's stunning!  However, I do have a question about the rain streaking on the turret.  Was this airbrushed in a mist from a distance so that it would run and streak, or is it painted with a fine brush?  It looks terrific!

Bill

  • Member since
    December 2015
  • From: providence ,r.i.
Posted by templar1099 on Sunday, May 7, 2017 8:31 AM

I gotta say Doog that I've picked up more info from your approach to builds than most of the reading and videos I've done.

"le plaisir delicieux et toujours nouveau d'une occupation inutile"

  • Member since
    March 2003
  • From: Western North Carolina
Posted by Tojo72 on Sunday, May 7, 2017 8:36 AM
That's an awesome camo job,also love the wrathering.

  • Member since
    January 2007
Posted by the doog on Sunday, May 7, 2017 9:47 AM

warshipguy

Karl,

It's stunning!  However, I do have a question about the rain streaking on the turret.  Was this airbrushed in a mist from a distance so that it would run and streak, or is it painted with a fine brush?  It looks terrific!

Bill


Thanks so much, Bill!

That rain streak effect is always brushed on with a brush. You couldn't really put it on in any quantity to let it "run"--you'd have to glop it on to do that.

The skinnier the brush, the better. It's enamel based, so thinner is used to draw it down. You can also put dots of oil on the model and then use a wide brush soaked with thinner and then dabbed on a paper towel (to absorb the excess thinner) to draw them down in a nice, random fashion. A slightly more advance way would be to "spatter" the oil paint or WILDER product on and then do the wide-brush tango to draw it down. Try it on a scrap piece of painted plastic or an old model first.

  • Member since
    January 2007
Posted by the doog on Sunday, May 7, 2017 9:48 AM

templar1099

I gotta say Doog that I've picked up more info from your approach to builds than most of the reading and videos I've done.


Well, that thrills me. Big Smile That's what I'm here for! Glad to hear it!


  • Member since
    January 2007
Posted by the doog on Sunday, May 7, 2017 9:50 AM

Tojo72
That's an awesome camo job,also love the wrathering.
 

Thanks so much, Tojo! :)

  • Member since
    December 2002
  • From: Fort Knox
Posted by Rob Gronovius on Sunday, May 7, 2017 10:12 AM

I like it, but I think the crew would have painted the canvas covering with the stripes and not stopped at the edges.

  • Member since
    November 2009
  • From: SW Virginia
Posted by Gamera on Sunday, May 7, 2017 5:06 PM

Looks awesome Karl, I love how she's coming!


Rob has a point on how neat and clean the canvas covering is but I guess you are entitled to a little artistic license. Wink

"I dream in fire but work in clay." -Arthur Machen


  • Member since
    November 2009
  • From: SW Virginia
Posted by Gamera on Sunday, May 7, 2017 5:44 PM

BTW Karl, hope you'll forgive me for butting in here but I didn't want to start an entirely new tread on this:


SP and Rob: Takom didn't include any unit numbers on their T30/34 either and I'm trying to whip something up for a fictional Second World War tank. From what I've been able to find only the 3rd and 9th Armored Divisions were issued M26 Pershings so with the T34/M34 being the big brother to the M26 I was going to stick it in one of these two divisions:

3^32      A13

Would this be right for 3rd Armored Division 32nd Armored Regiment- First Company First Platoon Third Vehicle?

According to the website I'm looking at 9th put the M26s in a temporary 4th platoon in two tank companies- so maybe something like this for the experimental heavies?

9^2    A42 maybe?


I'm got Dragon's M6 too which again has only the real aka experimental never left the States markings- not sure what I'll mark it with... Dunce


This is the website I've been consulting:

http://www.militaryhistoryonline.com/wwii/usarmy/armor.aspx

"I dream in fire but work in clay." -Arthur Machen


  • Member since
    July 2004
  • From: Sonora Desert
Posted by stikpusher on Sunday, May 7, 2017 6:03 PM

Yes, you have the workings of the system down. There should be another triangle after the tank battalion/regiment number. And IIRC, 9th AD had their Pershings in the 14th Tank Battalion.


F is for FIRE, That burns down the whole town!

U is for URANIUM... BOMBS!

N is for NO SURVIVORS...

       - Plankton

LSM


  • Member since
    November 2009
  • From: SW Virginia
Posted by Gamera on Sunday, May 7, 2017 6:23 PM

Oh thanks so much SP!

So this would make more sense?

9^14^    A12

or 9^14^    A42 if I went with the temporary fourth platoon?

"I dream in fire but work in clay." -Arthur Machen


  • Member since
    July 2004
  • From: Sonora Desert
Posted by stikpusher on Sunday, May 7, 2017 6:28 PM

Gamera

Oh thanks so much SP!

So this would make more sense?

9^14^    A12

or 9^14^    A42 if I went with the temporary fourth platoon?


yes, just like that...


F is for FIRE, That burns down the whole town!

U is for URANIUM... BOMBS!

N is for NO SURVIVORS...

       - Plankton

LSM


  • Member since
    January 2007
Posted by the doog on Sunday, May 7, 2017 7:46 PM

Rob Gronovius

I like it, but I think the crew would have painted the canvas covering with the stripes and not stopped at the edges.


Yes, you may be right---and I did consider that---but I definitely made the call on an artistic consideration rather than strictly "correct". I know, for instance, that a lot of times you'll see tools painted the same color as the base coat, but I hate that look--the tools just disappear into the finish; same here--I want the mantelt cover to stand out, and it IS possible the cover was simply unsnapped and rolled back when they painted it so as not to discolor it. Smile

  • Member since
    November 2009
  • From: SW Virginia
Posted by Gamera on Sunday, May 7, 2017 9:28 PM

stikpusher


Gamera

Oh thanks so much SP!

So this would make more sense?

9^14^    A12

or 9^14^    A42 if I went with the temporary fourth platoon?


yes, just like that...


Thanks a bunch!!!


PS: Karl I'll stop posing my silly questions on your thread now. Embarrassed

"I dream in fire but work in clay." -Arthur Machen


  • Member since
    January 2015
Posted by Moff on Thursday, May 11, 2017 9:25 AM

Oooh, that weathering looks beautiful...Stick out tongue  

Muddying up a model is always the best part. 

"Gaiety is the most outstanding feature of the Soviet Union." - Josef Stalin 

  • Member since
    January 2007
Posted by the doog on Thursday, May 11, 2017 10:11 PM

Hey guys; forgive me; I'm in a time crunch and can't detail the last bit of weathering here yet, but here's the finished photos. Hope you all enjoyed this build, and thanks sincerely for all comments and help. I have to get to bed---traveling tomorrow, but I wanted to share these with you all. I'll get to the final weathering in a few days. ENjoy!


Thanks again guys!!! I'll be back in a few days! :)

  • Member since
    July 2004
  • From: Sonora Desert
Posted by stikpusher on Thursday, May 11, 2017 11:10 PM

Great work! The stowage, weathering, and figure all wrap it into one great finished project.


F is for FIRE, That burns down the whole town!

U is for URANIUM... BOMBS!

N is for NO SURVIVORS...

       - Plankton

LSM


  • Member since
    May 2016
Posted by Xena on Friday, May 12, 2017 12:33 AM

Bow Down Amazing! The paint work is fantastic! Bow Down

  • Member since
    December 2002
  • From: Bury St Edmunds, Suffolk, England
Posted by Bish on Friday, May 12, 2017 3:43 AM

Another great build Karl. Got to love those tiger markings, been a pleasure to follow.

I am a Norfolk man and i glory in being so


On the bench: Airfix 1/72nd Harrier GR.3/Fujimi 1/72nd Ju 87D-3

  • Member since
    November 2009
  • From: SW Virginia
Posted by Gamera on Friday, May 12, 2017 7:51 AM

As usual looks awesome!!! 

"I dream in fire but work in clay." -Arthur Machen


  • Member since
    October 2004
  • From: Northern Virginia
Posted by ygmodeler4 on Friday, May 12, 2017 9:28 PM
I really like how this one came together Karl, interesting interpretation and a great finished model as always

-Josiah

  • Member since
    January 2007
Posted by the doog on Sunday, May 14, 2017 2:10 PM

Guys, thanks to everyone for the kind comments and for following along with this fun build. I appreciate the support and guidance with aspects about this build in which I was ignorant. Special thanks to Carlos (stikpusher) and Rob Gronovious for help with those pesky bumper codes. :)

I'll be writing this up for an article. Hopefully you'll see it in a future issue. Big Smile

  • Member since
    January 2006
  • From: California
Posted by SprueOne on Sunday, May 14, 2017 5:51 PM

That tiger stripe and teeth masking/paint job is YesYesYes

Anyone with a good car don't need to be justified - Hazel Motes


Iron Rails 2015 by Wayne Cassell Weekend Madness sprueone

  • Member since
    February 2006
  • From: Boston
Posted by Wilbur Wright on Tuesday, May 16, 2017 12:58 PM

Love the tiger stripes Karl, nice job all around.  I love unique paint jobs.

  • Member since
    February 2015
  • From: Charlotte, NC
Posted by panzer948 on Sunday, May 21, 2017 8:17 AM
Karl, Just got a chance to come on here and read your final details on weathering, tracks etc. Good stuff. I enjoyed your detailed descriptions on the proper way to make these models look great. Great job on the figure too. Did you use mostly oils for your figure or do you use acrylics? I really want to try Adam Wilder's products and that book you recommended (Adams Armour 2) was a great help for my Kugelblitz build. I need to purchase some of his stuff but it is hard to find! You need to bring this beauty to the Model show in Columbia on Saturday, June 10th! I will be there. Let me know if you want more details.

On the bench: Revell 1/32nd Junkers JU-88 A1

  • Member since
    June 2014
  • From: New Braunfels , Texas
Posted by Tanker - Builder on Sunday, May 21, 2017 9:35 AM

Hi Doog ;

 It's been a while .Listen , you know that's beautiful as tanks go . You have spurred me to finish my " Dicker Max " . Even with my first attempt with Fruilmodel tracks , Yikes ! They were some work .

 I have been told that only two actually saw service . Both , on the Russian front , does that mean I gotta really get dirty ? One was destroyed and one retreated is the info I have .

 I hope to make it look as bad A*& as you did this one .  T.B.

  • Member since
    January 2007
Posted by the doog on Monday, May 22, 2017 8:19 PM

Tanker - Builder

Hi Doog ;

 It's been a while .Listen , you know that's beautiful as tanks go . You have spurred me to finish my " Dicker Max " . Even with my first attempt with Fruilmodel tracks , Yikes ! They were some work .

 I have been told that only two actually saw service . Both , on the Russian front , does that mean I gotta really get dirty ? One was destroyed and one retreated is the info I have .

 I hope to make it look as bad A*& as you did this one .  T.B.


Thanks, Tankerbuilder! I hope you knock that Dicker Max outta the park; that's a mean looking beast! You can finish it any way you like--try something out of your comfort zone, that's what I would say. Thanks for the nice compliments here on this model. :)

  • Member since
    January 2007
Posted by the doog on Monday, May 22, 2017 8:20 PM

Thanks too, SPrue and WIlbur! :)

  • Member since
    January 2007
Posted by the doog on Monday, May 22, 2017 8:24 PM

panzer948
Karl, Just got a chance to come on here and read your final details on weathering, tracks etc. Good stuff. I enjoyed your detailed descriptions on the proper way to make these models look great. Great job on the figure too. Did you use mostly oils for your figure or do you use acrylics? I really want to try Adam Wilder's products and that book you recommended (Adams Armour 2) was a great help for my Kugelblitz build. I need to purchase some of his stuff but it is hard to find! You need to bring this beauty to the Model show in Columbia on Saturday, June 10th! I will be there. Let me know if you want more details.
 

Hey that sounds intriguing, Bryan; sure, let me know that details. I may be able to make that!

Thanks for the comps...I use acrylic on my figures. I learned years ago that oils will absorb into the acrylic or primer base and in about 6 months to a year, the highlights on the flesh tones will disappear, making the figures look sunburned. I switched to acrylics well over a decade ago, and have never had that problem since.

Adam finally got a distributor here, but with the internet, you should be able to find some somewhere. Maybe someone at the show will have them? Is it an IPMS? Or local show?

  • Member since
    February 2015
  • From: Charlotte, NC
Posted by panzer948 on Saturday, May 27, 2017 9:30 AM

Hi Karl, wow I no idea about the oils absorbing six months later. That is defiantly something to be concerned about and will look into further. Would adding a clear coat help? About the show, it is really neither and a little bit different from the norm. As you know, last year I joined the AMPS Centeral South Carolina - Wildcats. They are very organized/active and actually hosted the International AMPS conf last year in Sumter, which is a big deal for such a small community. Anyway, they wanted to host more of a regional show this year and team with the "other" model community in the area. However, since that organization was already having another regional convention within a 200 mile radius (could be off a bit there on the mileage), it was not approved. Thus, our local AMPS group teamed with some "independents" to help support and put on our show. Therefore the show will have both AMPS style entry/judging as well as other categories outside of armor (i.e., aircraft, ships, cars, etc.) that will be judged separately. Basically two shows in one! So come on down. I will post a link to the flyer below.

On the bench: Revell 1/32nd Junkers JU-88 A1

  • Member since
    February 2015
  • From: Charlotte, NC
Posted by panzer948 on Saturday, May 27, 2017 9:31 AM

Here is the link to the show with more links at that site for forms etc. The independent group is called Flight Deck, which will host the non armor categories.

http://www.ampscentralsouthcarolina.org/june-2015-contest.html

On the bench: Revell 1/32nd Junkers JU-88 A1

  • Member since
    January 2015
Posted by Moff on Sunday, May 28, 2017 4:53 PM

@panzer948:

I agree regarding your interest in Wilder products. They always catch my eye, especially since I'm a huge fan of Adam's. Once I have time and money I'm not devoting to educational purposes, I mean to splurge on some nice weathering supplies.


@Karl:

Have you tried any of Vallejo's new water/acrylic based weathering products? I'm curious to hear what people say about them.

"Gaiety is the most outstanding feature of the Soviet Union." - Josef Stalin 

  • Member since
    January 2007
Posted by the doog on Sunday, May 28, 2017 9:25 PM

panzer948

Hi Karl, wow I no idea about the oils absorbing six months later. That is defiantly something to be concerned about and will look into further. Would adding a clear coat help? About the show, it is really neither and a little bit different from the norm. As you know, last year I joined the AMPS Centeral South Carolina - Wildcats. They are very organized/active and actually hosted the International AMPS conf last year in Sumter, which is a big deal for such a small community. Anyway, they wanted to host more of a regional show this year and team with the "other" model community in the area. However, since that organization was already having another regional convention within a 200 mile radius (could be off a bit there on the mileage), it was not approved. Thus, our local AMPS group teamed with some "independents" to help support and put on our show. Therefore the show will have both AMPS style entry/judging as well as other categories outside of armor (i.e., aircraft, ships, cars, etc.) that will be judged separately. Basically two shows in one! So come on down. I will post a link to the flyer below.


Thanks for the info, Bryan! Yeah, I may go to that. Thanks for the links. Let's talk about it sometime in the next week!

  • Member since
    January 2007
Posted by the doog on Sunday, May 28, 2017 9:32 PM

Moff

@panzer948:

I agree regarding your interest in Wilder products. They always catch my eye, especially since I'm a huge fan of Adam's. Once I have time and money I'm not devoting to educational purposes, I mean to splurge on some nice weathering supplies.


@Karl:

Have you tried any of Vallejo's new water/acrylic based weathering products? I'm curious to hear what people say about them.


I have not tried them. I generally don't deviate from my old standards and what I have on hand; Tamiya and Testors stuff. (I have so much free product, some of it's drying out from want of use)

By the way, Adam's stuff is available from Michigan Toy Soldier. :)

  • Member since
    March 2013
  • From: Puebla, Mexico
Posted by garzonh on Wednesday, June 7, 2017 9:36 AM

Hey man.

That painting scheme looks awesome!! and as usual, weathering looks spot on.

Yes

  • Member since
    January 2015
Posted by Moff on Monday, July 17, 2017 5:33 PM

the doog


I have so much free product, some of it's drying out from want of use)


You make me so jealous Indifferent 

By the way, sorry for the ultra-late reply...over-the-summer education opportunities and over-the-summer procrastination opportunities have combined Big Smile

"Gaiety is the most outstanding feature of the Soviet Union." - Josef Stalin 

JOIN OUR COMMUNITY!

Our community is FREE to join. To participate you must either login or register for an account.

SEARCH FORUMS
FREE NEWSLETTER
By signing up you may also receive reader surveys and occasional special offers. We do not sell, rent or trade our email lists. View our Privacy Policy.